
6. Landscape Photography
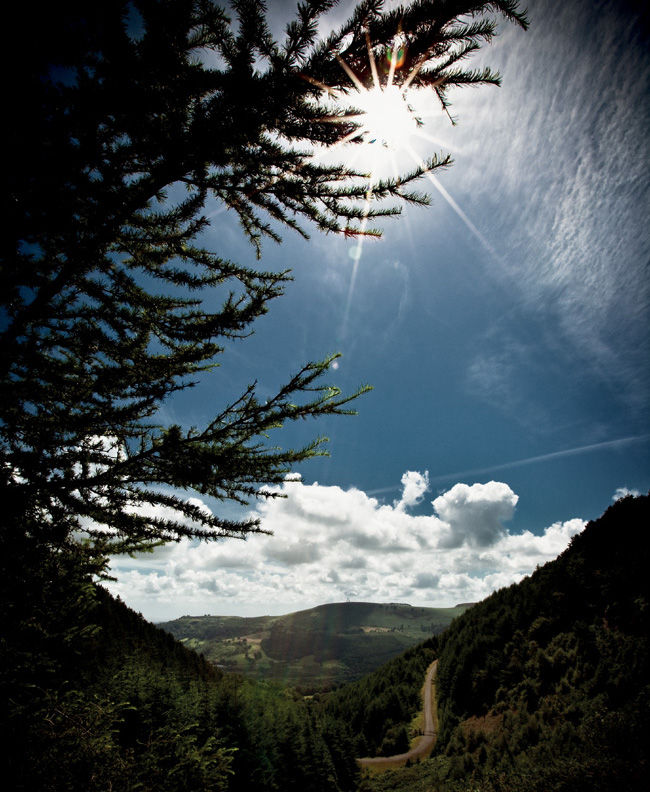
ISO 200 • 1/4000 sec. • f/8 • 23mm lens
Getting the most out of your landscape photographs
The countryside where I live is beautiful, and it’s a great place to capture stunning landscape photographs. Landscapes offer a great training ground for photographers, particularly in the areas of light and composition—and if you enjoy spending time outdoors, what better way to do so?
But landscape photography isn’t just about capturing fields and skies—it includes cities, beaches, and seascapes, too. In this chapter, I will outline some of the features of the Fuji X100S that will improve your landscape, cityscape, and seascape photography.
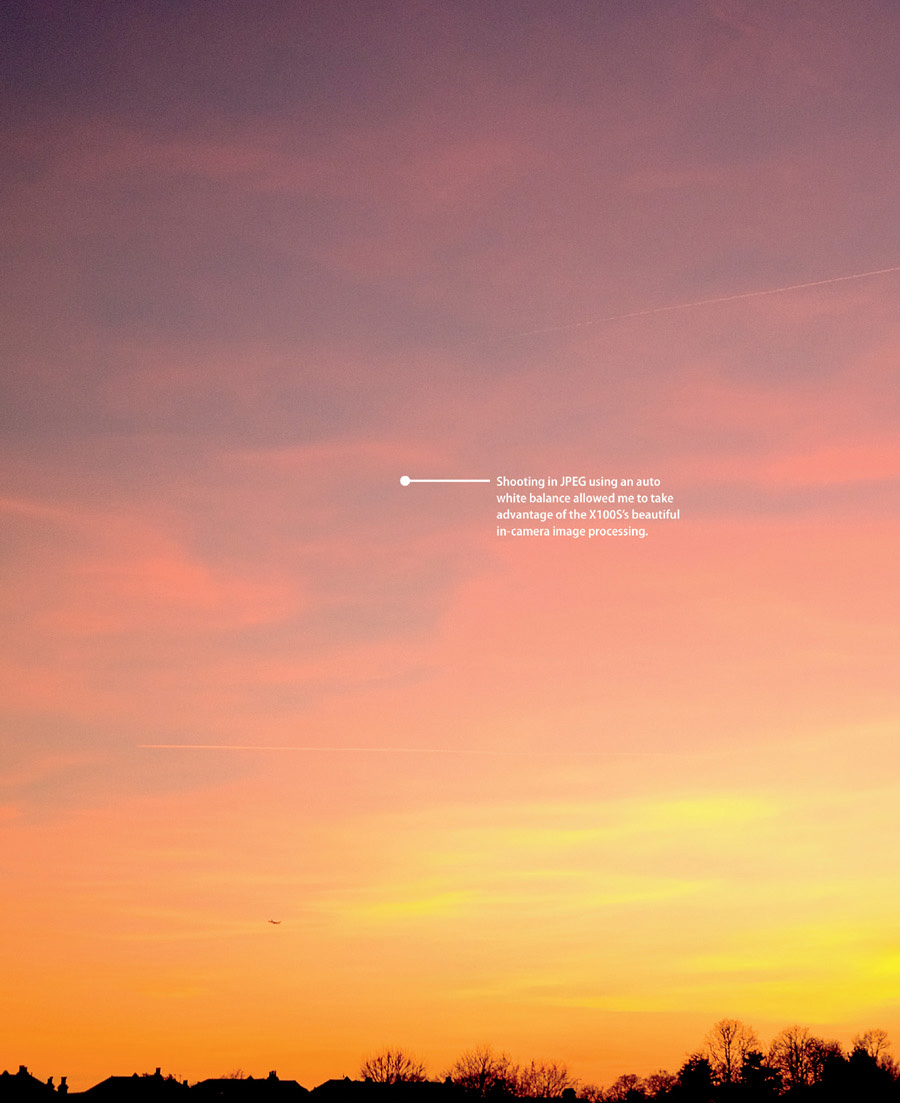
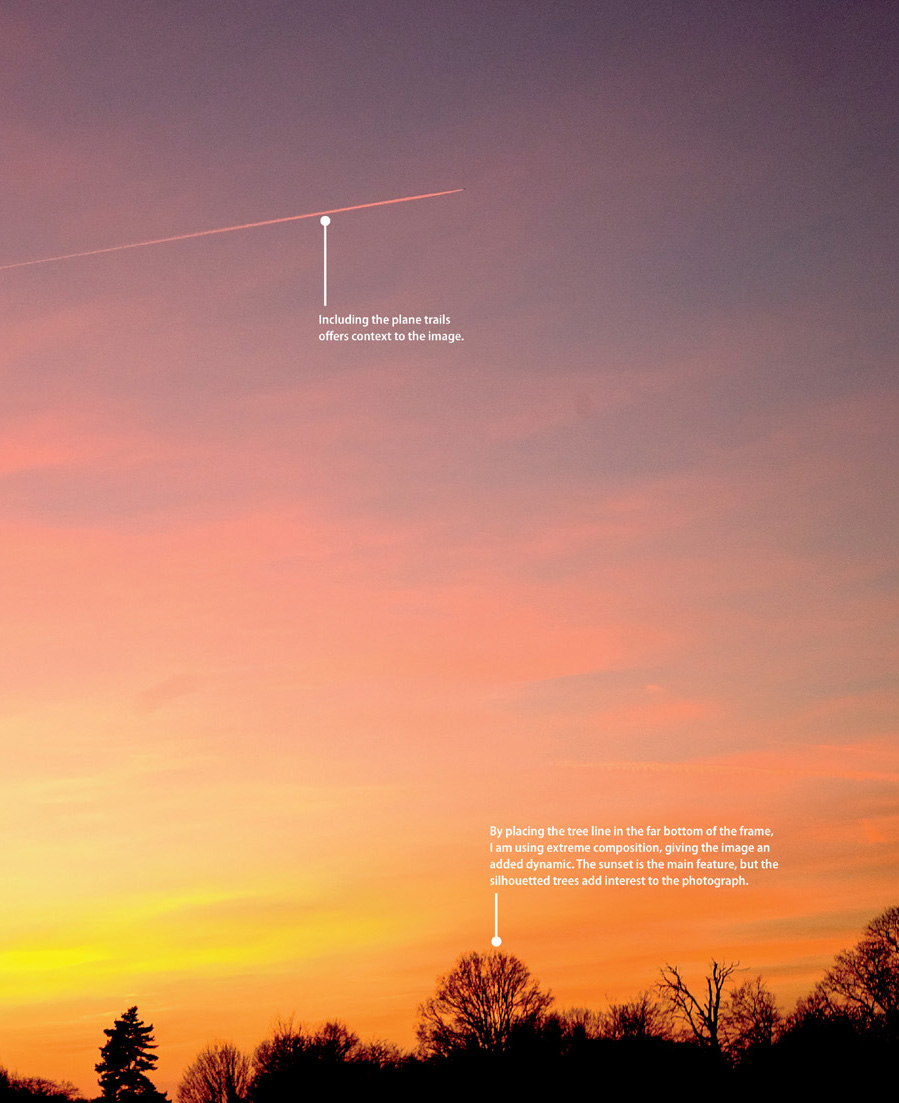
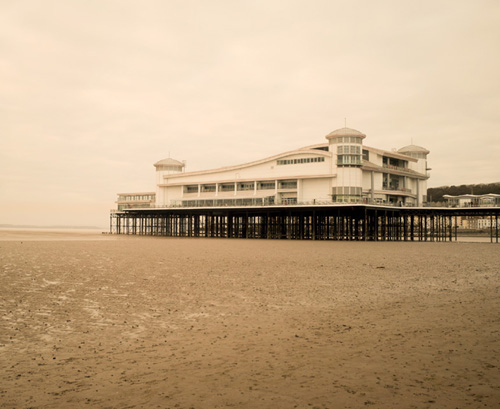
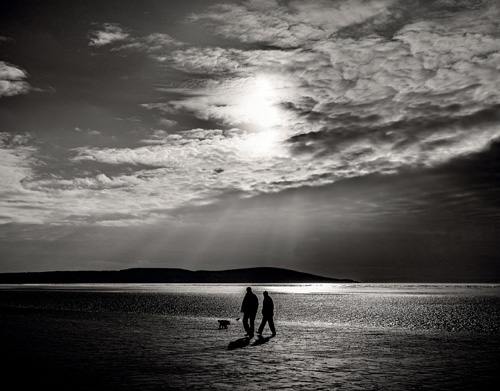
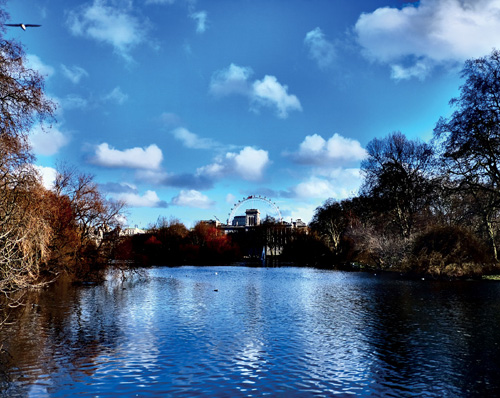
Poring Over the Picture
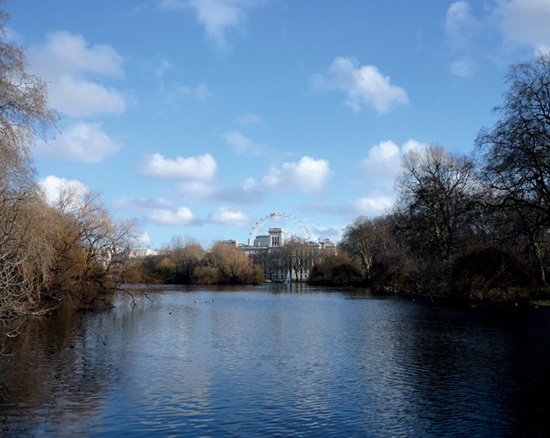
Once I spotted this gorgeous early evening sunset over a London park, I knew I had to work fast to capture it before the light disappeared. I used a sturdy tripod and a remote release cable to ensure sharpness of the photograph.
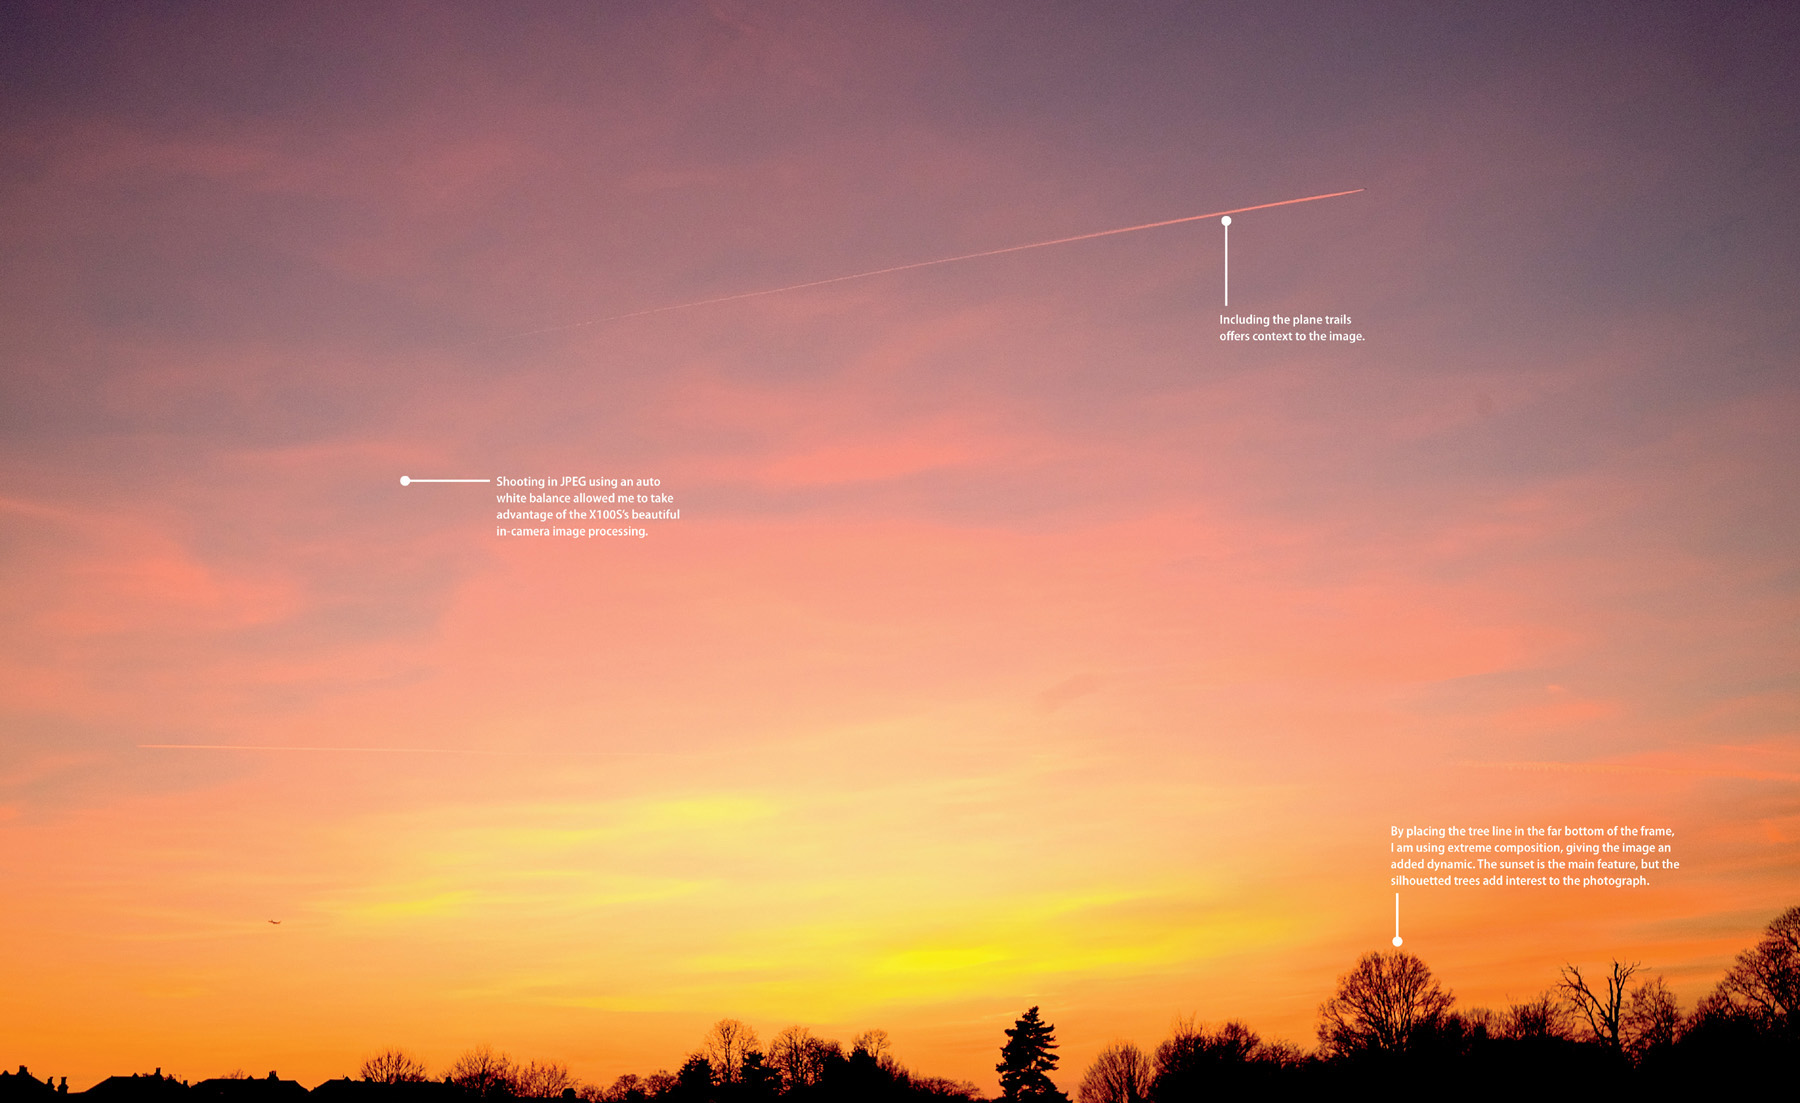
ISO 400 • 1/50 sec. • f/2 • 19mm lens (WCL)
Poring Over the Picture
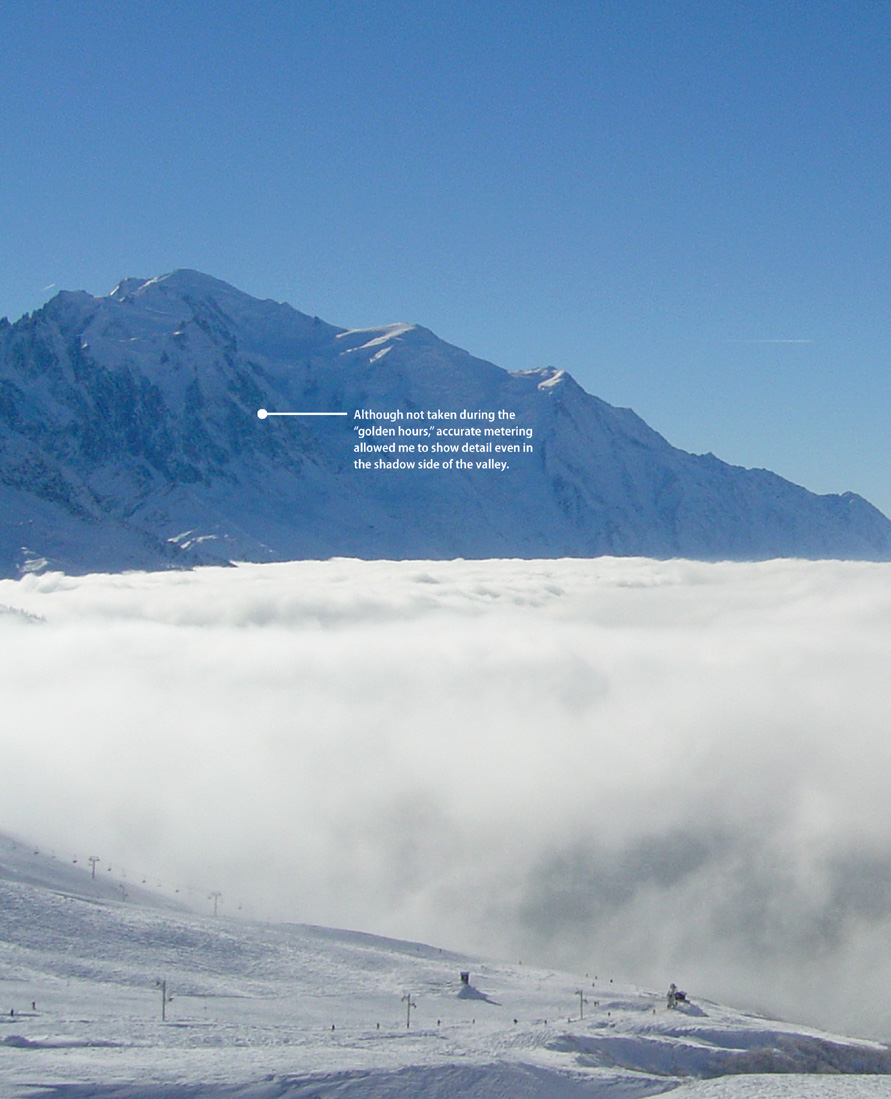
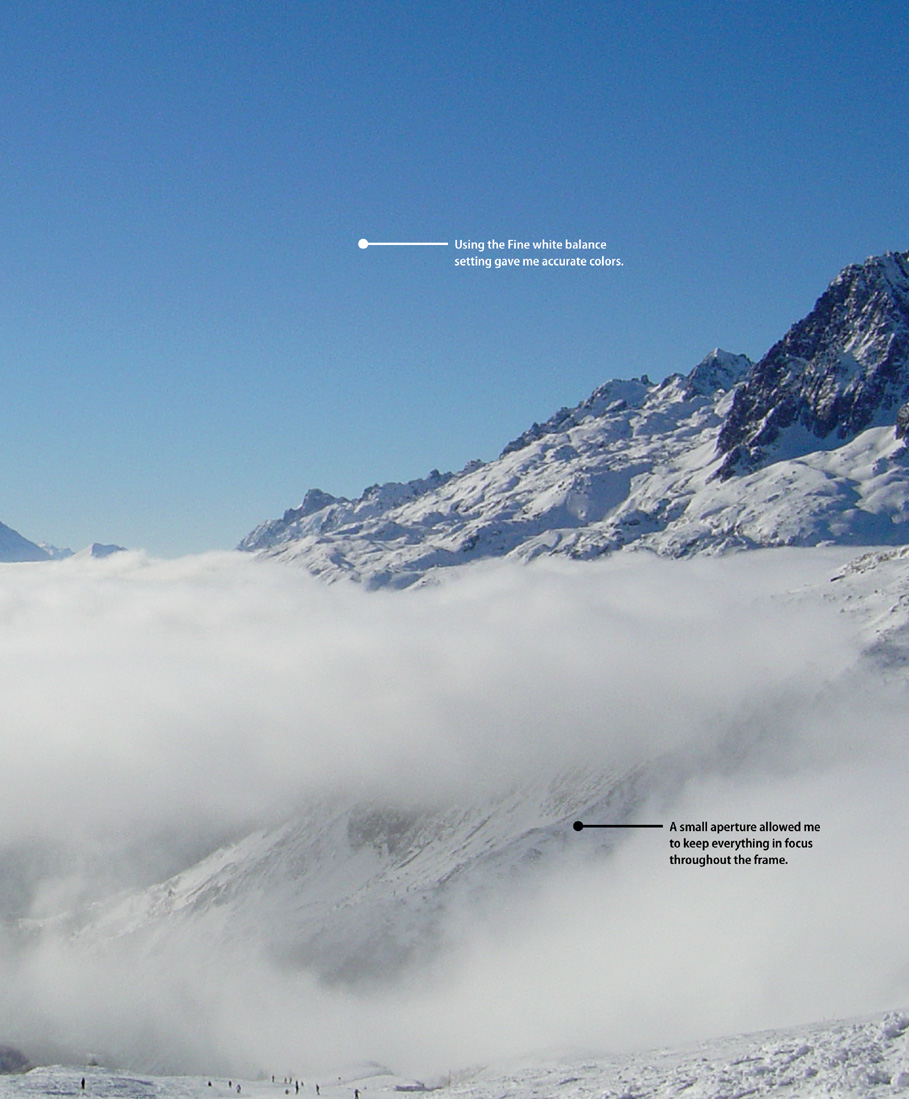
Shooting landscapes doesn’t have to be a preplanned exercise. This image presented itself to me while I was skiing. As the clouds rolled into the valley, I realized this was a shot I needed to get. Always be aware of the environment around you.
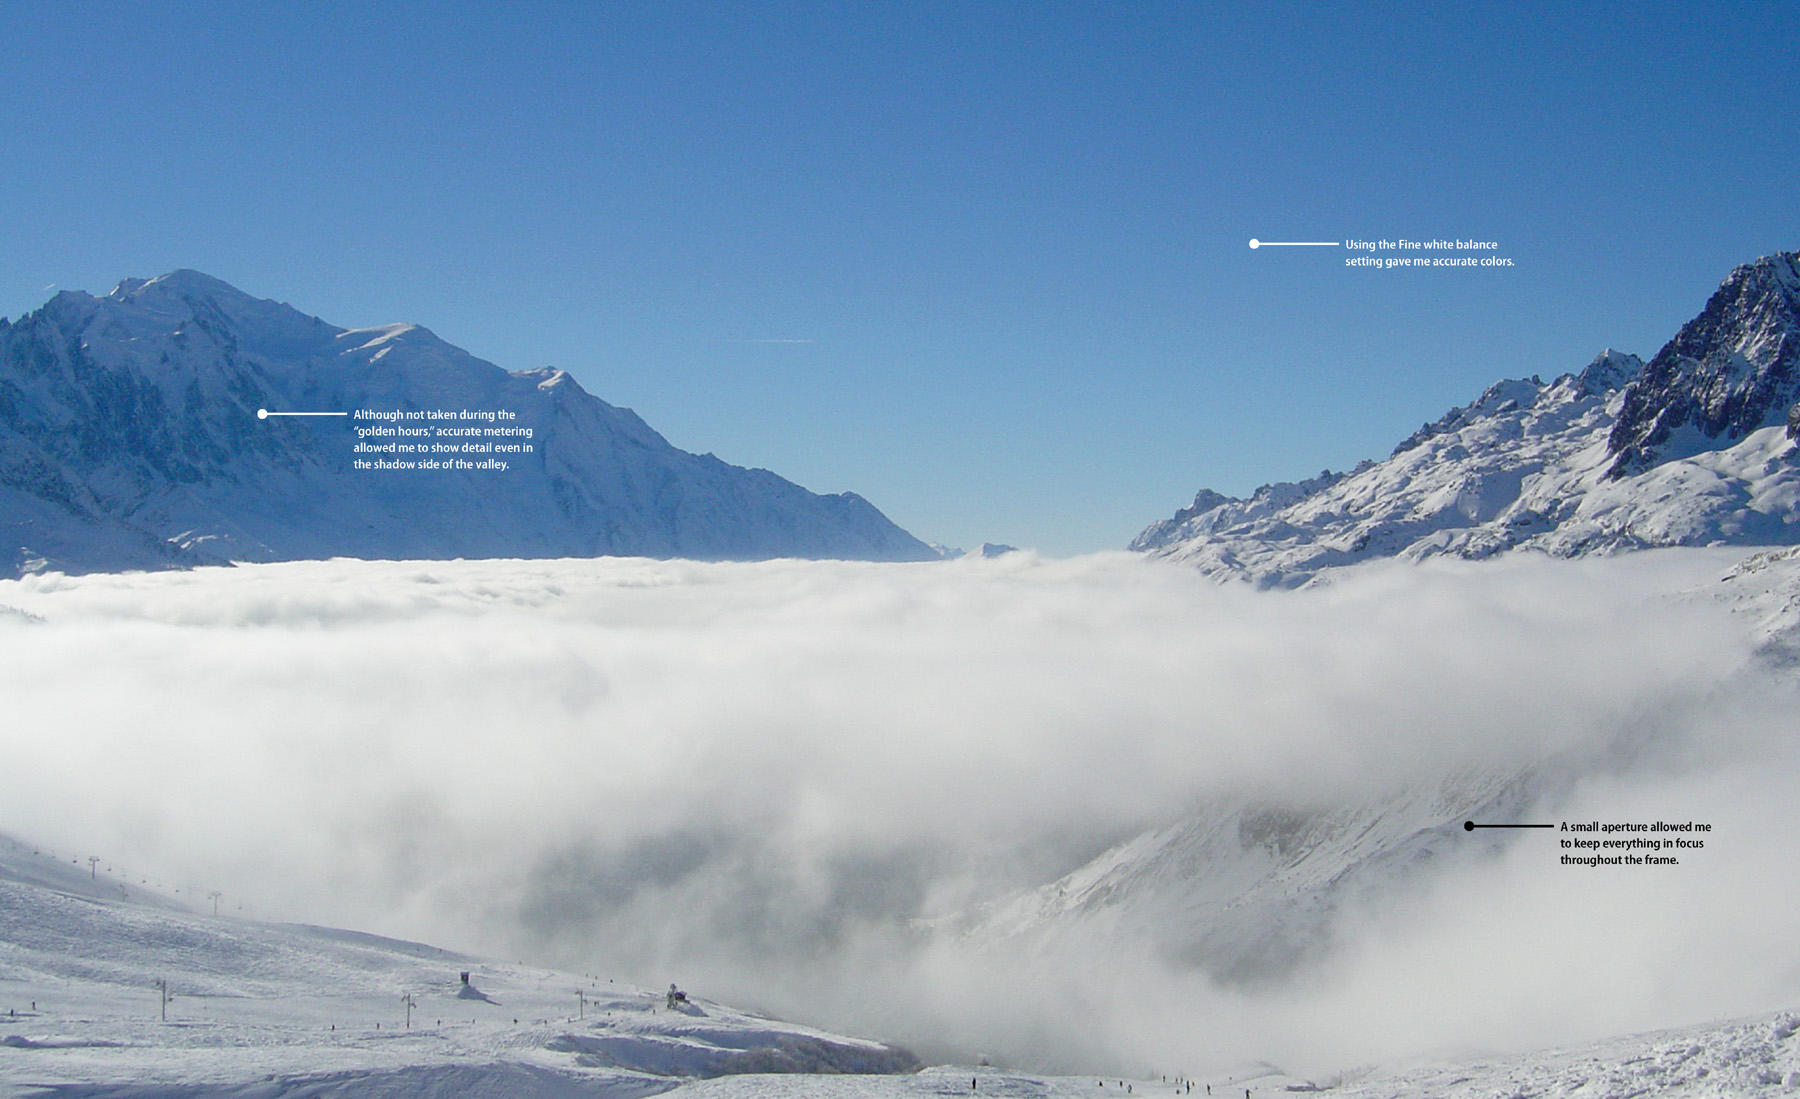
ISO 200 • 1/125 sec. • f/8 • 23mm lens
Sharp and In Focus
We talked about stabilization techniques in Chapter 7, “Low Lighting,” but it’s worth going over some detail again here, as it’s imperative that you have your images sharp and in focus when shooting landscapes.
Apart from your camera, the most essential part of your kit for serious landscape imagery will be a tripod. You may be able to shoot some images without a tripod, of course (for example, the second Poring over the Picture in this chapter was shot handheld), but for serious shooting you are likely to need a sturdy tripod.
Many of the best landscape photographs are made at sunrise or sunset, when the light levels are quite low. When shooting at these times of the day, you need to increase exposure time, which will result in a slower shutter speed and, thus, may be too slow to handhold. If you take such photos with your camera handheld, you’ll likely get some camera shake. Using a tripod is the best way of alleviating this problem.
Also, with landscape photography you often want as much of the image in focus as possible. To achieve this, you are going to need to use very small apertures (f/11 or f/16, perhaps), which will require you to compensate with a longer, slower shutter speed.
Additionally, if you are bracketing your images with the intention of creating an HDR (High Dynamic Range) composite, then you will absolutely need to use a tripod to keep your scene stable and correctly aligned throughout the three exposures. Many people also shoot long exposures of the night sky or try and capture water in motion; for both of these you will need a very good tripod to keep the camera steady during the exposures.
Let’s quickly review why using a tripod is so important when you have a slow shutter speed. As you know by now, the physical shutter in your camera opens and closes to capture the light coming through your lens. The longer the shutter stays open, the more camera shake and blur you could potentially add to your image if the subject moves. With landscapes your subject shouldn’t be moving, so by keeping your camera still, you prevent adding blur to your image. Keeping your image sharp and in focus is probably the most important element of shooting a beautiful landscape photograph.
Minimum Sustainable Shutter Speed
The “rule of thumb” for when to place the camera on a tripod is when your shutter speed is approximately the same as your focal length (or slower). For example, if you are using the standard 23mm lens and your metered exposure indicates a shutter speed of 1/25 or slower, you should consider using a tripod to make the picture.
Choosing a Tripod
Tripods are seemingly as numerous as camera models, and because a tripod can potentially last you for years, it makes sense to research and get a suitable one for you. The heavier the tripod, the sturdier it will be. If you are shooting landscapes, you are likely to be in exposed conditions where even a slight gust of wind will have an impact on the exposure. You may sometimes find yourself needing to plant the legs in water, too, so it’s really worth investigating the best option for the photographs you want to create with your X100S.
It’s also worth considering a tripod that can extend to and beyond your eye level. This will save you from having to bend down to compose your images, and it enables you to shoot from higher up with added stability.
A tripod itself is useless without a head that you can use to affix the camera to the tripod. Personally, I prefer ball heads with quick release plates. The quick release plate attaches to the tripod fix on the bottom of your X100S, which, in turn, sits in the head on the tripod itself. The quick release plate allows you to remove the camera easily from the tripod should you need to do so quickly.
Selecting the Correct ISO
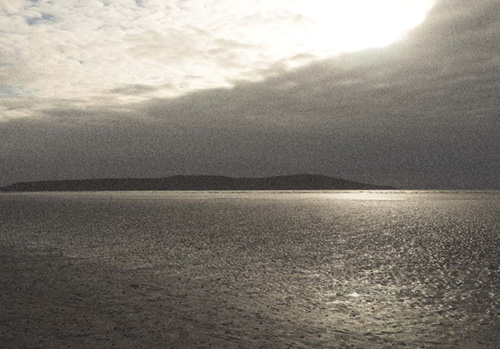
One of the most important things you’ll learn about landscape photography is to shoot with the lowest ISO possible. The lower the ISO, the better the image quality (Figure 6.1). The higher the ISO, the more noise will appear in your image (Figure 6.2).
ISO 200 • 1/210 sec. • f/16 • 23mm lens
Figure 6.1 By using a very low ISO, I was able to avoid noise and keep this image very clean.
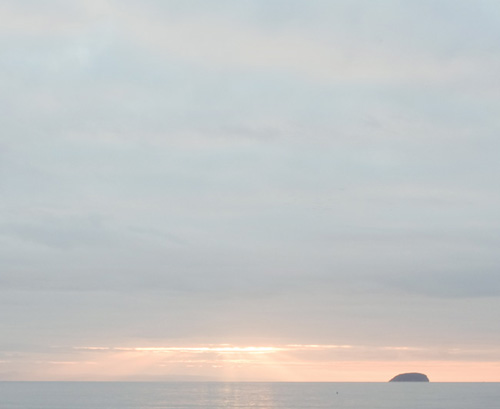
ISO 5000 • 1/500 sec. • f/16 • 23mm lens
Figure 6.2 Using a high ISO setting created a lot of digital noise in this image, resulting in a loss of detail.
Noise can detract from the color and quality of a photograph’s fine details. When shooting landscape images, you will want to preserve as much detail as possible. Shooting with a lower ISO forces you to shoot at a slower shutter speed, which is even more relevant when stopping down to apertures such as f/16 to maximize depth of field.
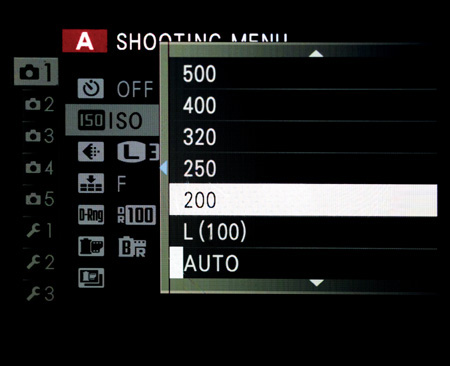
Setting the ISO:
1. Press the Menu/OK button.
2. Using the command dial, select ISO.
3. Using the command dial, select the lowest ISO you can achieve in the exposure.
4. Press Menu/OK to confirm the ISO setting.
Remember that, as you’ll often be shooting under low light conditions, a tripod will allow you the freedom to shoot at lower ISO settings than if you were handholding the camera. Because of the stability that the tripod offers, you can shoot at a low ISO and still produce sharp images.
Using Filters
Sometimes, if you are not shooting in low light, you may find the X100S doesn’t have a fast enough shutter speed to enable you to create an image without overexposing it. The quickest possible shutter speed for the X100S is 1/4000 of a second, which may not be enough to avoid overexposing the image, especially if you are shooting at large apertures such as f/2.
You may also want to use a very slow shutter speed to add creative effects to your image, such as blurring moving water or shooting a scene with a very bright sky but a darker foreground area. Cameras cannot deal with the dynamic range that we humans see, so you may need to resort to filters to manage these types of situations.
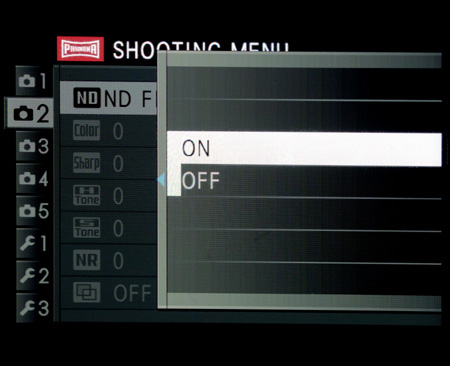
The Built-in ND Filter
The X100S has a very handy built-in feature called an electronic Neutral Density (ND) filter, which essentially cuts down the amount of light that can reach the sensor. ND filters are common in landscape photography and often are physical pieces of glass that are screwed, or somehow fixed, in front of the lens element to achieve the same result of reducing the amount of light that can reach the sensor.
The built-in ND filter is useful, as discussed, if you need to shoot at wide apertures but the lighting conditions are too bright for, say, a 1/4000 shutter speed to have any reasonable effect on the image exposure. It’s also very useful if you need to use a slow shutter speed—for example, if you are trying to shoot moving traffic and want to represent motion using a shutter speed of perhaps 1/4 of a second. Even if you use the lowest possible ISO, you still may not be able to get that image if the ambient light is too much (Figure 6.3). In these situations, you can activate the built-in ND filter, reducing the light hitting the sensor by three stops. This great feature gives you the latitude to get images that perhaps you wouldn’t be able to without a physical filter (Figure 6.4).
ISO 320 • 1/125 sec. • f/2
Figure 6.4 With the ND filter in place, the image is exposed correctly.
1. Press the Menu/OK button.
2. Using the command dial, navigate to Shooting Menu 2.
3. Using the command dial, select ND Filter.
4. Press Menu/OK to confirm the setting.
Using Physical Filters
Although the X100S’s built-in ND filter is a very useful feature, sometimes it doesn’t offer as much light blocking as a professional set of third-party filters would. Perhaps you really want to slow down an exposure or shoot a scene where light is very bright. In these cases, I use third-party filters that screw onto the front of the X100S and offer varying degrees of creative control as well as light blocking.
In the case of trying to represent motion within a water scene, for example, it’s important to have a shutter speed slow enough to blur the water, so it doesn’t just look like a choppy waterfall (Figure 6.5). In order to achieve this image, I used a Big Stopper filter from Lee Filters. This filter simply attaches to the front of the lens and offers an additional seven stops beyond the built-in ND filter, providing a ten-stop reduction in light hitting the sensor.
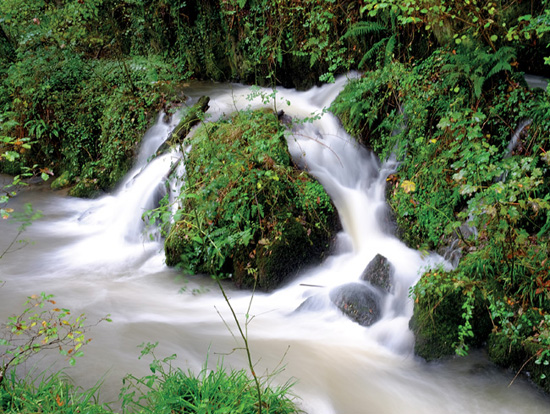
ISO 200 • 2.1 sec. • f/16 • 23mm lens
Figure 6.5 Using a physical ND filter allowed me to restrict the amount of light that hit the sensor.
In Figure 6.5, initially the camera had set an exposure of 1/500 of a second to expose the waterfall correctly. Clearly, that would not have illustrated the motion in the water or allowed for the blurred effect. Using the Big Stopper allowed me to shoot at just over 2 seconds without affecting the ISO or aperture. Shooting the image at this shutter speed without the filter in place would have resulted in an extremely overexposed image.
Another type of filter is an ND graduated or grad, filter, which landscape photographers commonly use to keep detail in a highlight area of an image, such as a sky (Figure 6.6). Grad filters also offer different stops of light blocking, but the filter has a gradient to allow more light to hit the sensor at different parts of the image. Different types of grad filters offer varying degrees of “hardness.” As a rule of thumb, the hard filters should be used for images with a distinct visual separation between elements, such as a horizon line in an image. Softer grad filters could be used for less defined elements, such as when shooting in mist or woodland.
ISO 400 • 1/320 sec. • f/16 • 19mm lens (WCL)
Figure 6.6 Using an ND grad filter allowed me to keep a well-exposed sky and retain the moodiness without compromising the foreground exposure.
White Balance
Getting an accurate white balance is important when shooting any photograph, perhaps especially so with landscape images. There are likely to be many tones and colors in the image, and you will want to ensure that these accurately reflect what you saw before your eyes when you took the picture. Just like a camera can’t see the same dynamic range that we humans can, it can’t identify colors like we do. Cameras “see” images and the hues within as “temperatures” of light, and it is the temperature of light that is the underlying control point of white balance. This temperature is measured in Kelvin (K). Cool, or bluer, temperatures have a lower K value, whereas warmer images have a higher K value.
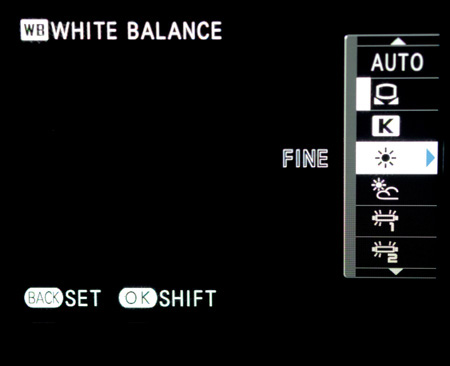
Like most modern digital cameras, the X100S offers a set of white balance presets along with the ability to use an auto white balance. The choices for white balance with the X100S are: Auto, Custom, Color Temperature, Fine, Shade, Fluorescent Light 1, Fluorescent Light 2, Fluorescent Light 3, Incandescent, and Underwater.
Selecting the white balance:
1. Press the down (WB) button on the back of the camera.
A popup menu will appear with the white balance choices.
2. Using the command dial (or pressing the up and down button), select the white balance you want to use.
3. Press Menu/OK to confirm your setting.
Auto white balance is fairly self-explanatory: It allows the camera to make a best guess at the white balance. Although this is useful in some shooting conditions—for example, if shooting street photography where you need the camera to react very quickly—it is generally not the best choice for landscape work where you have more time to get the white balance correct in camera.
The Fine white balance option is essentially direct sunlight, and Shade is used when shooting in shade or subdued natural lighting. There are, somewhat confusingly, three Fluorescent Light settings. One is for daylight lamps, two is warm white lamps, and three is cool white. I often find I have to do a little bit of test shooting before getting the correct fluorescent light white balance setting. Incandescent and Underwater presets can also be used under those particular lighting conditions.
On occasion, you may need to set the white balance manually, for example, when faced with difficult or mixed lighting scenarios, by choosing Custom. However, remember that light can change very quickly. If you select Custom and the light changes (even slightly), you may need to redo the custom white balance.
Setting custom white balance:
1. Press the down (WB) button on the back of the camera.
A popup menu will appear with the white balance choices.
2. Using the command dial (or pressing the up and down button), select Custom.
3. Press Menu/OK.
The Custom WB screen will appear (A).
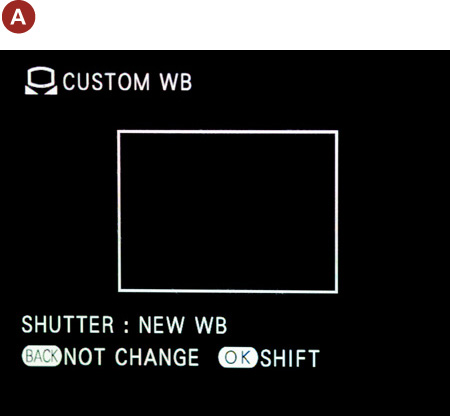
4. Press OK.
5. Point the lens at a white or neutral gray surface that fills the square on the screen.
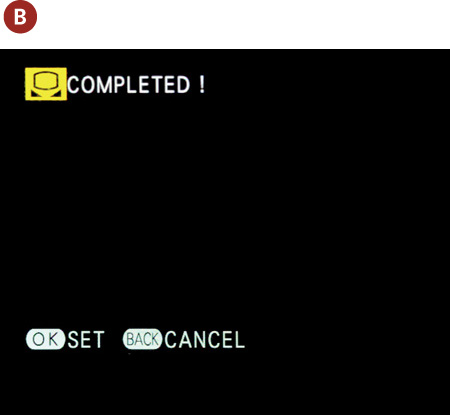
6. Press the shutter button.
The camera will display “Completed!” if the white balance has been set correctly (B). If the camera displays “Under!” or “Over!” instead of “Completed!,” then the light was either too bright (over) or too low (under) to register the custom white balance, and you should retry the procedure.
Each of the white balance settings, including Custom, allows you to “shift” the white balance slightly. This can be quite useful if you want to adjust a setting by a small amount, or if you want to create a white balance setting with a custom warm or cool tint effect.
1. Press the down (WB) Button on the back of the camera.
A popup menu will appear with the white balance choices.
2. Using the command dial (or pressing the up and down button), select the white balance you want to use.
3. Press the right button to take you to the Shift screen.
4. Use the four direction buttons to adjust the color according to your requirements.
5. Press the Menu/OK button to lock the white balance shift adjustments.
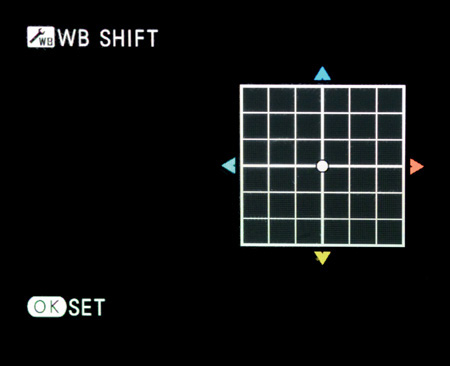
These shifts will affect any image where that particular white balance setting is in place, so remember to reset the dot to the central position if you no longer wish to use the white balance shift function.
The final white balance setting is Color Temperature. You can set a specific Kelvin (K) value if you know it.
Setting the Color Temperature white balance:
1. Press the down (WB) button on the back of the camera.
A popup menu will appear with the white balance choices.
2. Using the command dial (or pressing the up and down button), select Color Temperature.
3. Press the right button to select the Kelvin (K) value that you want to use.

The X100S Owner’s Manual that came with your camera has a table that lists the Kelvin number for certain light temperatures. For example, it states that sunlight is 5000K. You can use this table as a guide to which Kelvin temperatures to set the camera’s white balance.
White balance is a powerful and creative tool, and you should take time to understand and master it. Using white balance correctly will result in images that accurately reflect the colors of the scene you shot (Figure 6.7). An incorrect white balance can result in a lot of unnecessary post-production work or even the total loss of otherwise fine images (Figure 6.8).
ISO 400 • 1/500 sec. • f/16 • 23mm lens
Figure 6.7 Using the Fine white balance setting, I created an image with an accurate color and hue balance that’s the same as the scene at the time I shot the picture.
ISO 400 • 1/500 sec. • f/16 • 23mm lens
Figure 6.8 Using Fluorescent 1 white balance resulted in an image that appears much warmer than the actual color of the scene at the time the image was taken.
Beautiful Black-and-White Landscapes
Black-and-white imagery can be timeless and is a great option for capturing gorgeous landscape images. The X100S has a set of film simulation modes (discussed in Chapter 5, “Say Cheese!”), and when I’m shooting black-and-white landscapes I like to choose the Monochrome+R filter. According to the Fuji description, this “enhances contrast and darkens skies considerably.”
Selecting the Monochrome+R film simulation:
1. Press the Menu/OK button.
2. Using the command dial, navigate to Film Simulation on Shooting Menu 1 (A).
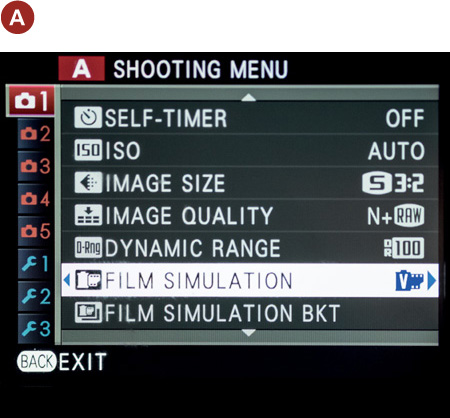
3. Press the right button.
4. Use the command dial or down button to select Monochrome+R (B).
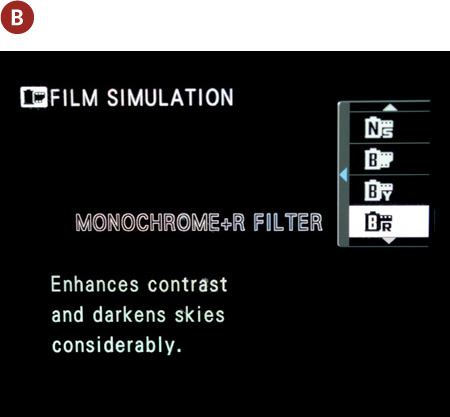
5. Press Menu/OK to confirm your selection.
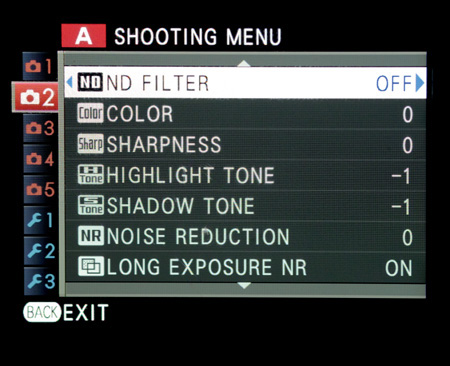
I also make a minor adjustment to the image settings. I detail my preferred settings in Chapter 4, “The Professional Modes,” but it’s worth going over the settings I adjust when shooting for landscapes in black-and-white mode: I set both the Highlight Tone and Shadow Tone to -1. This keeps an extra level of detail in the contrast of both the shadows and highlights. This is especially important with a monochrome image, since it is essentially composed of highlights and shadows. Having a setting of +1 here will make the shadows much darker and the highlights lighter. If I need to do any post-processing of the shadows or highlights, I give myself a little more latitude by selecting -1 for these settings.
Setting the highlight and shadow tones:
1. Press the Menu/OK button.
2. Using the command dial, navigate to Shooting Menu 2.
3. Press the right button.
4. Use the command dial or down button to select Highlight Tone.
5. Press the right button and select -1 (Medium Soft).
6. Press Menu/OK to confirm your selection.
7. Repeat for Shadow Tone.
Of course, you should experiment to create your preferred configuration for shooting landscapes in black and white. There are various other monochrome and sepia film simulations to choose from, and you can adjust the Highlight Tone and Shadow Tone settings according to taste. Personally, I love shooting in black and white with the X100S, which produces wonderful black-and-white landscape images (Figure 6.9).
ISO 200 • 1/500 sec. • f/2 • 23mm lens
Figure 6.9 Using the X100S’s built-in film simulations allows you to create beautiful black-and-white landscape images.
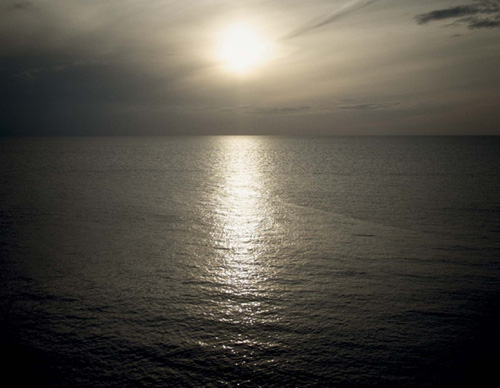
The Golden Light
The best times to shoot landscapes are early in the morning, around sunrise, and later in the evening, around sunset (Figure 6.10). Also referred to as “the Golden Hour” or “the Magic Hour,” technically these are the times immediately before sunset or sunrise. The light from sunrise to about an hour afterward, as well as from an hour before sunset until the sun slips below the horizon, is the most commonly used light in landscape photography. At these times, the sun is at an extreme angle to the earth, casting long shadows, and because of all the atmospheric debris it must pass through at these angles, the light is warm and enhances existing color (Figure 6.11).
ISO 400 • 1/50 sec. • f/2 • 19mm lens (WCL)
Figure 6.10 This sunset’s gorgeous colors were available for only a short period of time.
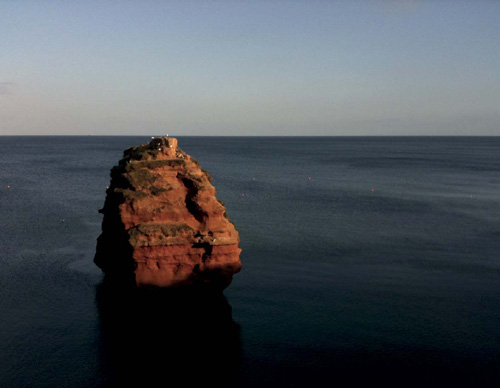
ISO 200 • 1/50 sec. • f/13 • 23mm lens
Figure 6.11 The sun at dusk, hitting the rock, makes a beautiful golden light that is perfect for capturing this landscape.
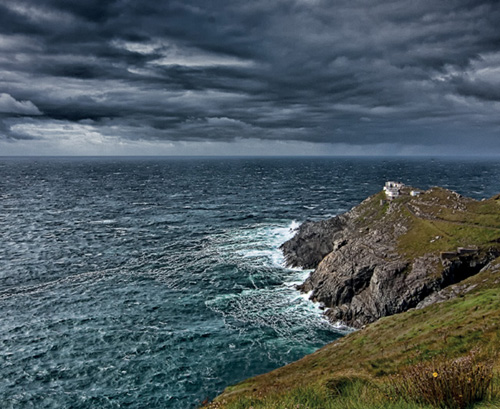
Clear, or bald, skies are nice when shooting with golden light—shooting toward the north, the sky will become an even deeper blue. But unique cloud formations can also enhance landscapes at these times of the day, adding structure to skies that may otherwise lack interest (Figure 6.12).
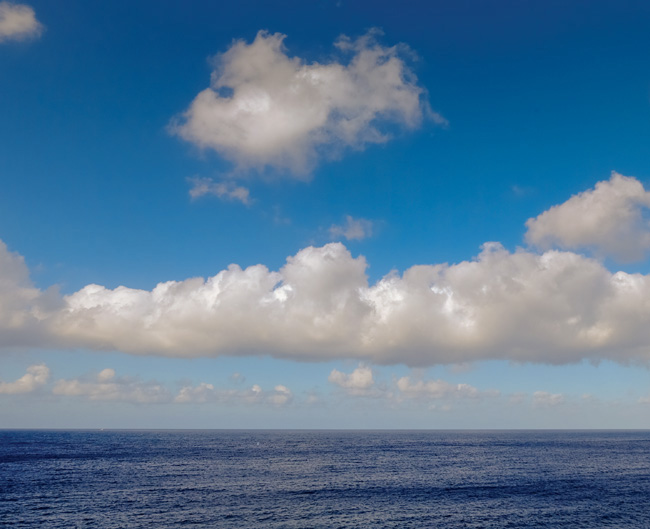
ISO 200 • 1/50 sec. • f/11 • 19mm lens (WCL)
Figure 6.12 Cloud structure can often add interest to an otherwise seemingly dull photograph.
Focusing
Pretty much every time you shoot a landscape image you are going to want as much of the image in focus, from front to back, as possible. From the foreground to far-off points in the distance, you will want all the details pin sharp. This means you need to think carefully about your focusing when shooting landscape images. If you focus on an image too far in the distance, it may result in an image whose foreground details are soft and out of focus, even if you are using a smaller aperture to maximize depth of field.
In order to get it right, you may want to use the smallest aperture of the camera (f/16 on the X100S). As we know, shooting at a small aperture such as f/16 is likely to lead to a slower shutter speed and require that you use a tripod to take the image. Using a tripod will allow you to concentrate on where to focus to achieve maximum depth of field. This is where something called hyperfocal distance (HFD) comes into play. HFD is the closest point of focus to the lens where the remaining distance, all the way to infinity, will be sharp. If you combine practicing HFD with a small aperture, you will get images that are tack sharp every time.
A simple way to achieve this is to focus on an object that is about one-third of the way into your frame (Figure 6.13). This is probably the easiest way to remember HFD and is the way that most professional landscape photographers operate.
ISO 200 • 1/60 sec. • f/14 • 23mm lens
Figure 6.13 By focusing on an object around one-third of the way into the frame and using a small aperture of f/14, I have enough depth of field to ensure the image is sharp from front to back.
Composition and the Rule of Thirds
We talk extensively about composition in Chapter 8, “Creative Compositions,” but it’s worth taking some time here to discuss the relevant elements for landscape photography. As the photographer, it is your job to lead the viewer through the picture. You accomplish this by utilizing the principles of composition, which essentially is the arrangement of elements in the scene that draws the viewer’s eye through your image and holds their attention.
There is a general order in which we look at elements in a photograph. The first is brightness. The eye wants to travel to the brightest object within a scene. So, if you have a very bright sky, it’s more than likely the first place the viewer’s eye will travel. The second order of attention is sharpness. Sharp, detailed elements will get more attention than soft, blurry areas. And finally, the eye will move toward vivid colors while leaving the dull, flat colors until last. If you can keep these features of image reading in mind, you will be in a good position to create well-composed and visually appealing landscape images (Figure 6.14).
ISO 200 • 1/60 sec. • f/16 • 23mm lens
Figure 6.14 The compositional elements in the frame pull the viewer’s eye around the image leading from the sky to the vivid area of blue water in the center.
The simplest of all compositional “rules” is the rule of thirds. The premise of this rule is simply to divide an image into thirds by two horizontal and two vertical lines that divide the frame equally. The key to this method of composition is to locate your main subject near, or on, one of the intersecting points of the lines. As a general rule, try to avoid placing your subject right in the middle of the frame. Occasionally this can work, but it requires the right subject matter and overall scene to work well. Otherwise, the image will likely be less visually appealing and may not hold the viewers’ attention, because it doesn’t convey to the viewer which element carries visual importance. Similarly, when you shoot landscapes, you should position the horizon one-third of the way up or down in the frame (Figure 6.15). Splitting the frame in half is usually not as effective as dividing the image based on the rule of thirds.
ISO 800 • 1/125 sec. • f/14 • 23mm lens
Figure 6.15 Placing the horizon line at the top third of the frame allowed me to create an interesting, but simple, composition focusing on the reflection of the setting sun in the sea.
Advanced Techniques to Explore
Although the X100S with its fixed lens may not be everyone’s ideal landscape photography camera, it is certainly able to produce beautiful images. With careful consideration of composition, structure, and light, you will be able to migrate from snapshots to great shots in no time. Moreover, the X100S does have a couple of very neat features up its sleeve that many other cameras don’t. Let’s explore motion panoramas and advanced filters.
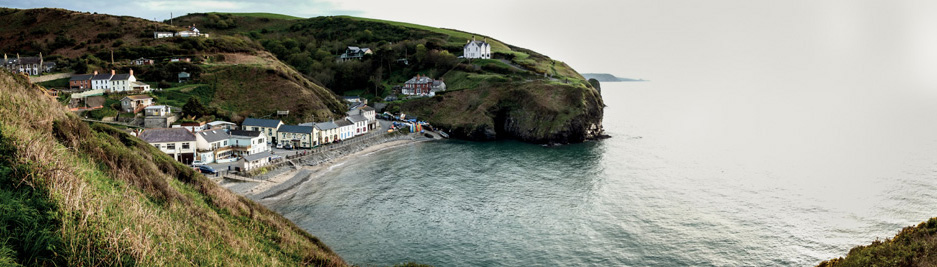
Shooting Panoramas
The X100S has an incredible built-in panorama system that essentially takes multiple images and stitches them together, in camera, to produce one panoramic image (Figures 6.16 and 6.17). Using a tripod with a panning head will yield the best results, but it’s certainly possible to shoot panoramas without a tripod.
ISO 400 • 1/125 sec. • f/8 • 23mm lens
Figure 6.16 Using the X100S’s motion panorama feature, I was able to capture a sweeping scene from the bay right out into the ocean.

ISO 400 • 1/500 sec. • f/16 • 23mm lens
Figure 6.17 Using the motion panorama feature, I was able to capture the whole bay, from one side to the other, in a 180-degree coverage.
Shooting motion panoramas:
1. Press the Drive button on the back of the camera.
2. Using the command dial, navigate to the last option, Motion Panorama (A).

3. Per the prompt on the next screen, press the command dial to the left to choose the angle and right to choose the direction (B).

4. Press the command dial left and select 120 or 180 Degrees (C).
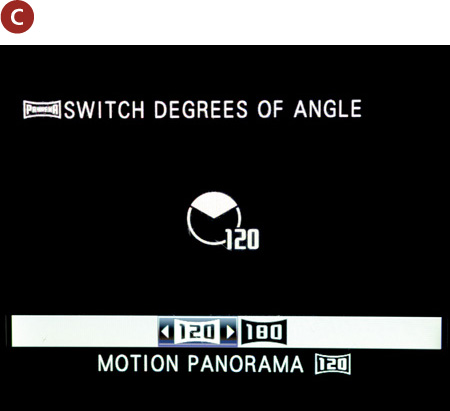
The degree selection screen will disappear automatically.
5. Press the command dial right to go to the direction selection screen (D).
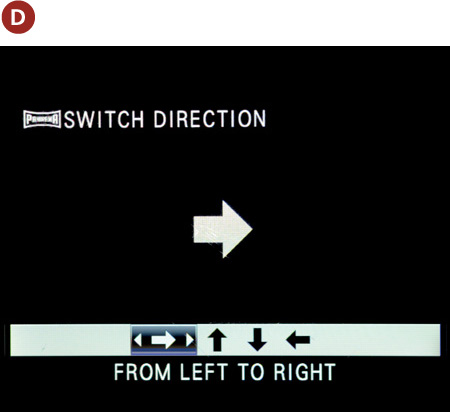
6. Use the command dial to select the direction.
The screen will disappear and it will be time to shoot the image.
7. Aim at the start of your panoramic image and, keeping the camera as steady as possible, follow the line through the arc of the panorama.
When you have completed the arc through the panoramic scene, the camera will stop shooting and make the image by stitching together all the exposures it created during the shot.
It’s important to note that the exposure of the whole panorama is set with the first frame. Also, the camera may stop while shooting the panorama if it senses you have moved wildly off the central line or if you press the shutter button during recording.
You are fairly restricted in terms of how the panorama image is created. Although the option to shoot a motion panorama will be available in the Drive menu, if you are in RAW shooting mode the image created will be a JPEG. Additionally, you can’t use flash, expanded ISO, self-timer, or advanced filters when shooting in this mode.
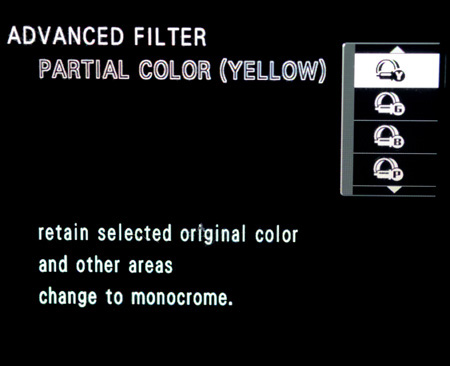
Advanced Filters
Advanced filters are built-in special effects that give you a creative outlet for making images with considerable flexibility. The advanced filters are available only for JPEG files and are accessed via the Shooting Menu 4’s Advanced Filters option. Once set, if you wish to switch off Advanced Filter shooting, return to this menu and select Off.
1. Press the Menu/OK button.
2. Using the command dial, navigate to Shooting Menu 4.
3. Select Advanced Filter by pressing the command dial to the right.
4. Select the filter you wish to use.
5. Press Menu/OK to confirm the selection.
When you shoot using the advanced filters, along with shooting only in JPEG, you will not be able to adjust many of the camera settings such as dynamic range, film simulation, ISO, sharpness, color, etc. This makes sense, as the advanced filters themselves will adjust these settings internally to create the image in the designated filter.
There are 13 advanced filters to choose from:
• Toy Camera
• Miniature
• Pop Color
• High-Key
• Low-Key
• Dynamic Tone
• Soft Focus
• Partial Color (Red, Orange, Yellow, Green, Blue, and Purple)
Each filter has a different effect. For example, shooting with and without the Dynamic Tone filter, you can see the dramatic effect that some of the filters have (Figures 6.18 and 6.19). Some filters are likely to be more appealing than others, and choosing which to use depends, to a certain extent, on your artistic taste. So let your creative juices flow and enjoy experimenting with the filters to add a very different and dynamic flair to your landscape images.
ISO 400 • 1/500 sec. • f/8 • 23mm lens
Figure 6.18 Before the Dynamic Tone advanced filter is applied.
ISO 400 • 1/500 sec. • f/8 • 23mm lens
Figure 6.19 After the Dynamic Tone advanced filter is applied.
Chapter 6 Assignments
We’ve covered a lot in this chapter, including getting your landscape images sharp, using the lowest ISO, using filters, taking panoramas, and even playing with advanced filters. Landscape photography is all about conveying your artistic vision for an image to the viewer. Let’s see what you’ve learned and put some of that new knowledge into practice.
Keep it sharp and in focus
To create landscape images that are filled with detail and in focus, we know that we need to use a small aperture (f/11 or f/16, for example) and the lowest ISO possible. Try shooting these images handheld, and then shoot the same scene using a tripod without changing the exposure settings. You should see that the images are extremely difficult to shoot handheld without upsetting the image quality.
Use a filter
If you intend to take landscape photography seriously, you could invest in professional ND and ND grad filters. I use ones that Lee Filters builds for the X100S; however, the X100S does have a three-stop ND filter built in.
Find a scene with fast-moving water and create an image illustrating the motion of the water. First shoot without the ND filter (or screw-on filter if you have one) and then with the filter. You should be able to shoot longer exposure times, allowing you to create a lovely, smoky water movement.
White balance your scene
Using the camera’s white balance features, take several images of the same scene using different white balances and even a custom white balance. Note the difference in the hue and temperature of the image. Try and “shift” the white balance to create a warmer image, then a cooler one.
Shoot at different times
Try shooting a landscape image at various times of the day, ensuring that you shoot at the Golden Hours (dusk and dawn). How do those images differ to, say, an image shot at midday?
Create a panorama
Using the camera’s Motion Panorama mode, create two sweeping images of the same scene. Shoot one at 120 degrees and the other at 180 degrees. If you are shooting handheld, hold the camera firm, plant your feet, and swivel at the hips. You should see quite a difference between the image shot at 120 degrees and the one shot at 180 degrees.
Experiment with advanced filters
There are 13 advanced filters to experiment with. My favorite ones are Dynamic Tone and Miniature. See if you can shoot the same scene with each of the 13 filters to get a great overview of what each one looks like.
Share your results with the book’s Flickr group!
Join the group here: flickr.com/groups/fujiX100S_fromsnapshotstogreatshots