9. Hitting the Streets

ISO 800 • 1/60 sec. • f/2 • 23mm lens
The art of candid photography
One of the things that attracts so many photographers to the Fujifilm X100S is its amazing form factor. Its retro look, tactile buttons and functions, and ability to shoot quickly in difficult situations make it a perfect tool for street photography.
Candid photography, in its rawest form, is a way of shooting a subject who is unaware that a photograph is even being taken. Of course, candid photography does not have to take place on the street, much like street photography does not have to be candid. Many excellent street photographers tell their stories through portraits, and some wedding photojournalists—myself included—shoot candidly when photographing weddings.
This chapter will cover the mechanisms of candid photography and also help you get the most out of some of the advanced features of the X100S that will aid you in any form of shooting. So let’s get going!
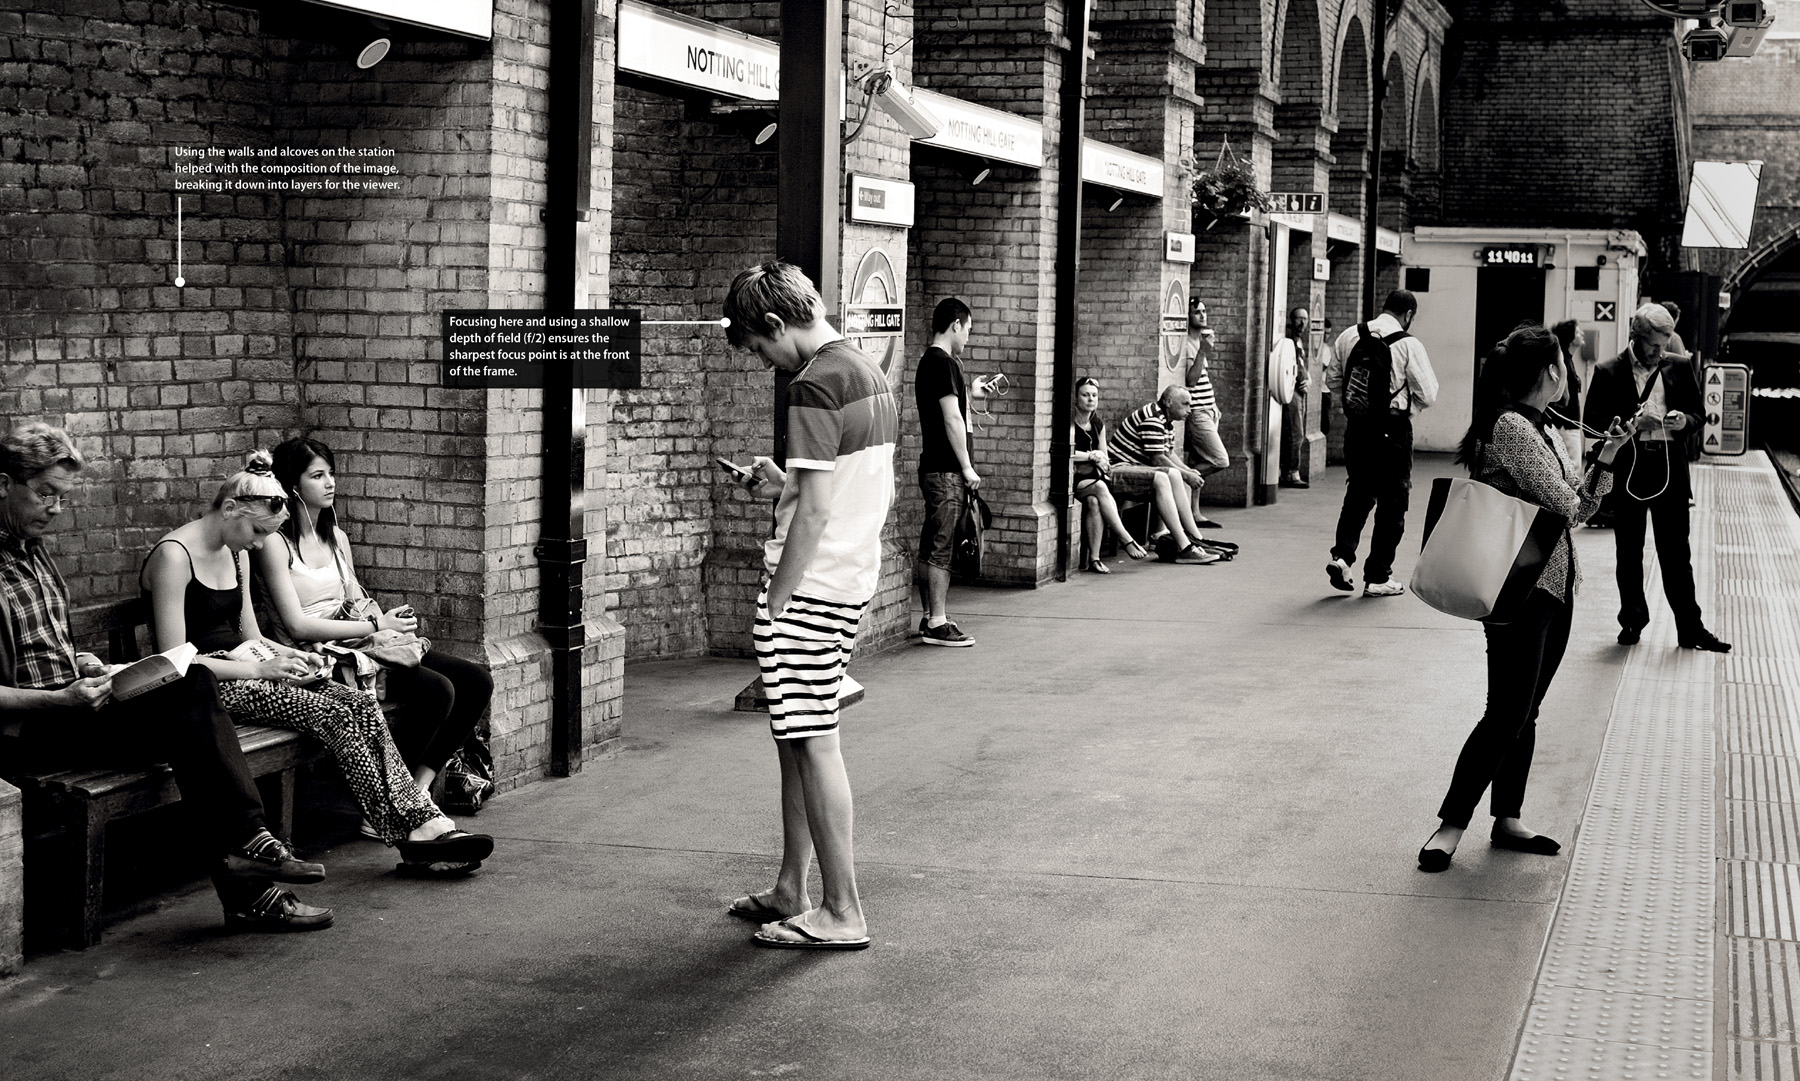
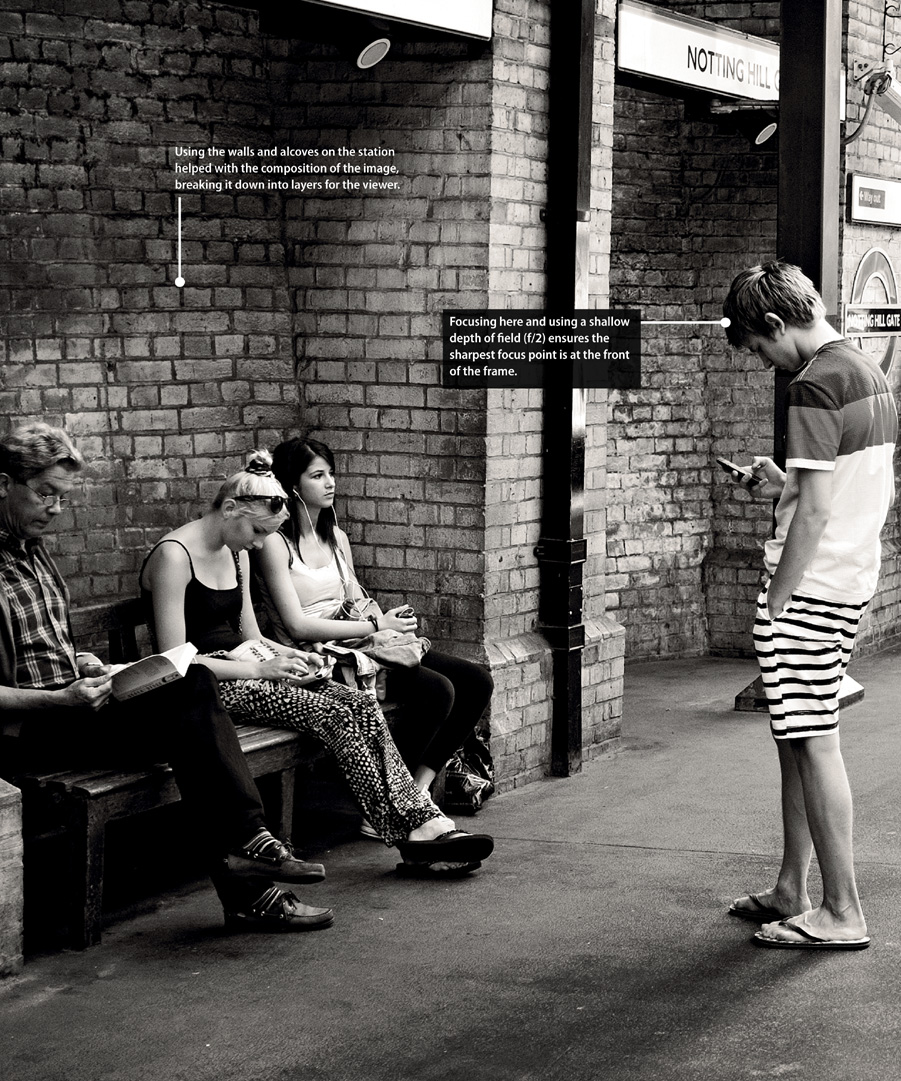
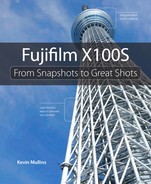
The X100S is a perfect companion for street photographers, enabling you to shoot quietly and discreetly. As with all images, it’s best if the photograph tells a story. In this shot, I wanted to capture a study of “modern life,” showing how almost everybody on the platform is interacting with an electronic device.
What Is Street Photography?
You can define most types of photography quite easily. Sports photography, wedding photography, landscape, and portraits are all specific genres, and the range of how the photographer shoots is relatively fixed. Street photography, however, is much more difficult to define because it can—and often does—encompass many types of photography along the way. The rapid reactions of a sports photographer, the compositional elegance of a landscape photographer, and the subject-appreciation skills of a portrait photographer are in the arsenal of a good street photographer.
Often, people assume that street photography is just “candid shooting” on the streets. For the most part, actually, this is true. But if you ask professional, working street photographers of today, almost always they will each give you a different definition. To me, “street photography” is just a term for a photographer’s style, and it certainly doesn’t have to be restricted to shooting on the streets. Storytelling should be the foundation, and the building blocks of telling the story are the moment, the composition, and the light. Including all three of those attributes is almost always going to result in a great image.
Constructing a Great Street Image
For me, street photography, while not restricted to the cities we live in, should revolve around people. People—and their behaviors and mannerisms—are what interest me when I’m looking at street photography. Of course, that doesn’t mean people have to be in every street photograph, but it’s important to focus on the human world, and capture and tell people’s stories—their creations and the world they live in. As mentioned above, at the core of street photography are these elements: moment, composition, and light.
The Moment
This is what storytelling photography is all about. The “decisive moment” is a concept termed by Henri Cartier-Bresson as a way to describe his style of street photography, which recognized that every event has a clear, defining moment. Photographs should involve composition and light, but without a “moment” to pull those two attributes together, you won’t truly be able to call it a great street photograph. For me, the moment is more important than the composition and the light when it comes to street photography. The story, or the moment, should form the fabric of why the image exists and, ideally, the image should need no words to give it context.
Composition
One of the “rules” of photography is composition. A seemingly good image can be deemed unusable if the composition isn’t quite right. In street photography, composition is almost as important as the moment itself. Mess up the compositional structure of the image and you could ruin a potentially brilliant photograph.
The composition of any image is made up of constituent parts. These could include the focal subject, leading lines, or the negative space that is part of the overall composition (see Chapter 8, “Creative Composition”). What makes good composition is often subjective, but you can’t get away from the fact that a well-composed photograph, coupled with an interesting moment, is going to make a rewarding image.
Light
Photography literally means “playing with light.” Light can fall in all directions, can be soft or hard, can be angled or baffled away... but the one constant is that light is essential to creating photographs. Of course, images can be made without great light, but ask any landscape photographer about the “golden hour” and what it means to them. If you ask a street photographer, you are likely to hear a similar story. Light is good most of the time, but it’s only great some of the time.
If you can capture an image that has wonderful light, brilliant composition, and a decisive moment, you have a winning formula for a strong photograph (Figure 9.1).
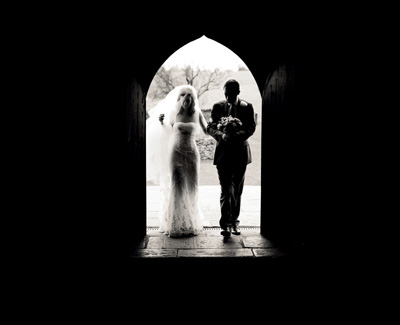
ISO 3200 • 1/60 sec. • f/2 • 23mm lens
Figure 9.1 The skills needed for street photography can be used anywhere. At this wedding I waited for the right moment, composed the image, and had excellent light to work with.
Beating the Fear
Getting out and about on the streets is all well and good, but you need to be able to conquer street photographers’ greatest problem of all: the fear of shooting in public, namely of being caught taking photographs of people, and the consequences should that happen. As a wedding photojournalist, it’s my job to blend in with my surroundings and shoot the wedding story unfolding in front of my eyes. As a street photographer, your goal is the same—but the stage for the story is different. It may be difficult to simply pick up your camera and start photographing the public straight away; you will need patience, stealth, and a lot of discretion. But with a little practice, you’ll get the hang of it.
Essentially, things may get problematic only if you are spotted taking a photograph. In that case, many people will just ignore you, but in all other cases the best weapon on you at that point is your smile (Figure 9.2). In this scenario, I had photographed the gentleman as I walked toward him. After I took the shot, he looked at me and I simply smiled and nodded slightly. I find smiling at people disarms a potentially tricky situation and, if it’s a candid portrait you have shot, you may even offer to show the image to the subject.

ISO 400 • 1/280 sec. • f/2 • 23mm lens
Figure 9.2 It’s better to wait for an image than to chase it, and reciprocate with a smile if necessary.
Different countries have different rules on what you may or may not use in terms of images photographed on the street. It’s wise to understand your local laws, as you may need a model release to use the images online or elsewhere. A model release is simply a signature from the subject that grants you use of their image. Generally speaking, images taken in public places, of the public, are considered fine to use—but be safe and sure of local jurisdiction rules.
It’s Not Always About People
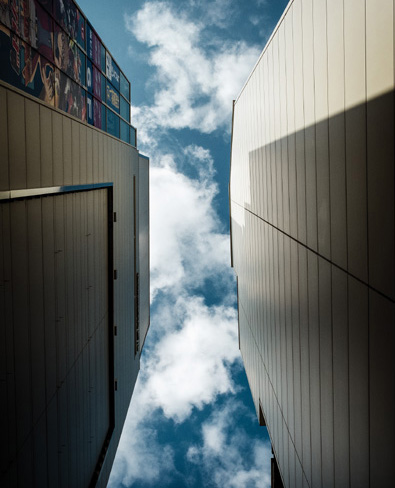
While street photography involves studying humans and their behaviors, it should also reach beyond them to the wider environment, which means that not all good street photographs have people in them (Figure 9.3). The environment that we live in and create should also be part of the canvas available to street photographers.
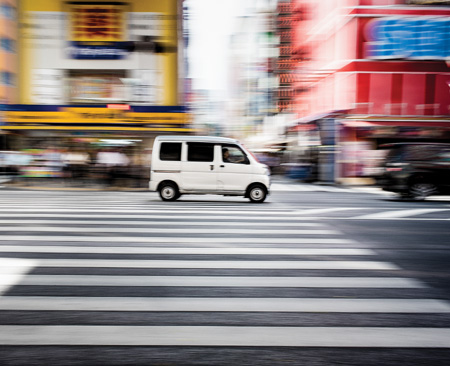
ISO 20 • 1/15 sec. • f/16 • 23mm lens
Figure 9.3 Street photography doesn’t always have to be about people. Selecting a topic for the day often works; in this case, my theme was transportation.
A good tip is to give yourself a topic for your day’s street shooting. This could be the color yellow, cars, or something more elaborate like the study of human communication. Whatever you choose, by giving yourself a focused topic, you are more likely to home in on the shots you want to capture. Without this plan, you may find yourself overshooting and searching for images that just aren’t there.
Also, when I’m out shooting, I try not to repeat subject matter ideas too often. The largest city near to me is London, which is a huge canvas with multitudes of ideas and subject areas to investigate.
It’s also worth remembering that you are not going to get award-winning photographs with every click of the shutter button. Sometimes you will come back with no images worth keeping, and other times only a few. The great photographer Ansel Adams once said, “Twelve significant photographs in one year is a good crop.” It’s worth bearing that in mind if you return from a fruitless street photography day (Figure 9.4).

ISO 200 • 1/250 sec. • f/2.8 • 23mm lens
Figure 9.4 The real purpose of street photography is to capture interesting moments. Using the X100S allows you to get very close to people without them even noticing, or to get a quirky shot like this one.
Using Focus Modes
The X100S is armed with three focus modes, each of which can be used for different types of photography, but all of which can be especially useful when shooting candidly or rapidly in any environment. These include:
• MF (manual focus)
• AF-S (single autofocus)
• AF-C (continuous autofocus)
Use the focus mode selector to choose the mode you wish to use (Figure 9.5).
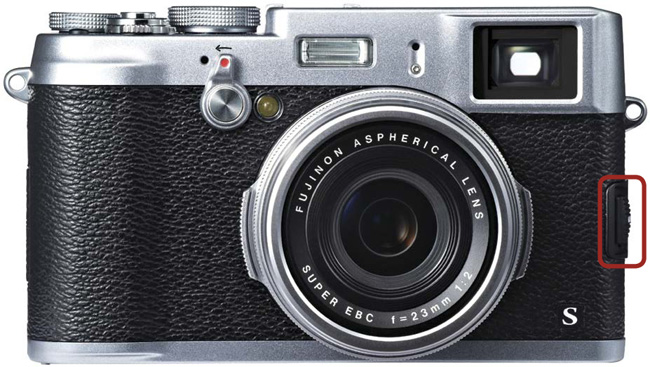
Understanding all of the focus modes will help you get great shots when you are out shooting. Do you need to use continuous mode all the time? Is there any place for manual focus in a fast-moving shooting scenario? Is single AF mode going to slow you down? Let’s investigate the focus mode options.
AF Mode
Before we review the focus modes fully, it’s worth taking a moment to consider the AF Mode menu option (Figure 9.6). This option allows you to select how the camera chooses a focus location in the scene when you are using AF-S focus mode.
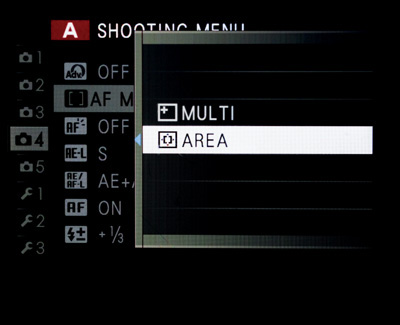
The X100S has 49 possible focus points if you are using the electronic viewfinder or LCD panel, and 25 focus points if you are using the optical viewfinder. Essentially, the choice between the two is one of control over automation.
To move the focus point around, press the AF button on the command dial (up button) and move the focus frame selectors by using the selector buttons. Confirm your focus frame selection by pressing the OK/Menu button. When you focus now, you will hear a beep and the focus frame will turn green to indicate focus lock. Occasionally, if the camera can’t achieve focus, the frame will turn red. In this case, you may be too close to the subject (the minimum focus distance on the X100S is 80cm, unless you are in macro mode).
In area mode (see next section), you can also adjust the size of the focus frame, which helps if you are shooting subjects where focus is critical. For example, if you are shooting a portrait you may want to ensure the focus is on the eye, so you might consider making the focus point smaller. To adjust the focus point size, press the AF button on the command dial (up button), then use the command control to make the frame smaller or larger as required.
Single Autofocus
AF-S is probably the widest-used focus mode on the X100S. In this mode, the camera will not attempt to achieve focus until you press the shutter button halfway. At this point, the camera will lock focus and exposure if it is able. The focus area frame will turn green, and the indicator lamp will also appear green when good focus is achieved. If the indicator lamp flashes green, this indicates that there may be an issue with exposure, such as blur caused by a very slow shutter speed. In this case, unless that is exactly what you are trying to achieve, check your exposure before reattempting the shot.
At this point, focus is locked for the duration you keep the shutter button pressed halfway. Of course, if the subject you are shooting moves, focus is likely to be lost. Pressing the shutter button fully shoots the photograph.
Single AF mode is often the quickest mode to use when taking street or candid photographs. Changing the focus point using the command dial each time is fine when shooting in a controlled environment, but when shooting on the streets or candidly at a wedding, for example, you simply will not have the time to change the focus point for each image.
Multi and Area AF Modes
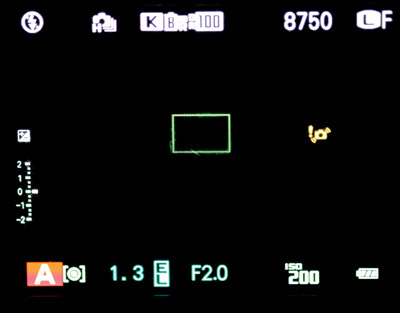
In AF-S mode, you have a choice of Multi or Area for the AF mode. If you choose Multi, when you press the shutter button halfway, the camera will not give you a focus point option; instead, it will guess based on the frame it sees and what it decides is the main subject, and focus on that. When the camera has established focus on a subject, it will display a green focus frame at that location and lock the focus (Figure 9.7).
The area AF mode allows you greater latitude in selecting the focus point. Further, you can choose any of the 49 focus points in the electronic viewfinder or LCD panel view, or the 29 focus points in the optical viewfinder. Once chosen, the camera will focus only using the selected focus frame. Personally, I prefer area mode, as it gives me much more control over focus point selection.
With the camera configured with area AF mode and the focus frame set to the center, I usually shoot using the “focus and recompose” method (Figure 9.8). Although the focus point is set at the center of the camera, not every subject I want to shoot is going to be in the center of the frame. So I focus using the center frame, then recompose the image in the viewfinder or on the LCD panel.
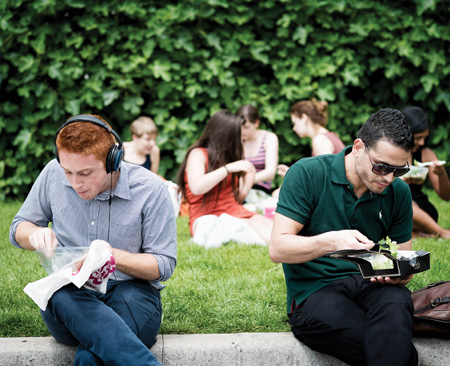
ISO 200 • 1/1000 sec. • f/2 • 23mm lens
Figure 9.8 Using AF-S and the “focus and recompose” method is a very quick way of getting in close, taking a shot, and moving away without interference.
Continuous Autofocus
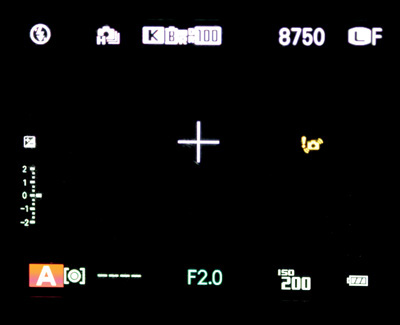
The AF-C mode essentially instructs the camera to track a subject continually, even if the subject moves away from or toward the camera until the point of focus lock. This mode of focusing is best used when you are sure your subjects are going to move, for example, when photographing sports or children. When shooting using AF-C, you will notice that the focus box becomes a white crosshair (Figure 9.9), and you may also notice a whirring noise from the lens mechanism. This is perfectly normal and is a result of the focus mechanism readjusting depending on the movement of the subject.
While the X100S’s continuous AF mode is not as responsive as the equivalent on professional DSLRs (such as AI Servo mode on Canon cameras), it certainly presents you with an opportunity to get shots in focus that you may not have managed with single AF mode (Figure 9.10).
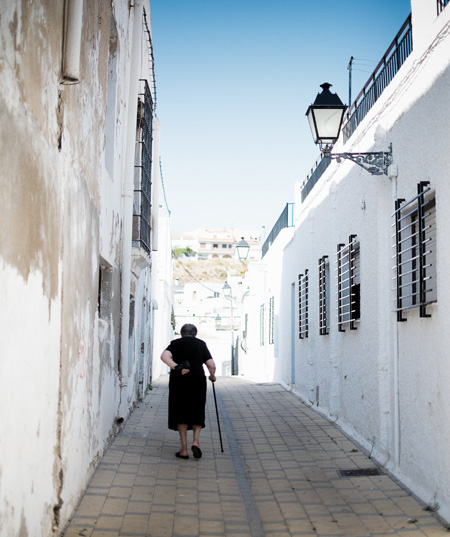
ISO 200 • 1/2000 sec. • f/5.6 • 23mm lens
Figure 9.10 Using AF-C, I could focus on the lady who was moving away from me, and the camera tracked her position reliably until I was ready to shoot the image.
The focusing in AF-C mode is instant, meaning you don’t need to press the shutter button halfway before it starts to hunt for the focus point. When you do press the shutter button halfway, focus is locked, much like in single AF mode, and the crosshair will turn green to confirm the focus. It’s important to note that after this point, the camera no longer performs focus tracking.
The AF Mode menu option (Area or Multi) is not enabled when shooting in AF-C, because there is no focus frame that can be selected when using continuous focus.
Manual Focus
Manual focus (MF), or the thought of it, often fills photographers with dread. We have become accustomed to cameras with rocket-fast autofocus that essentially takes the pain of focusing away from us. However, many seasoned street photographers insist on using manual focus, and I use it all the time when shooting weddings as well as street photography.
This is because with manual focus, you have complete control over the focusing and can fine-tune it very precisely. In low-light situations where you can’t rely on flash light, it’s often the only way to obtain focus, as there may not be enough contrast for the AF mechanism to work with. Also, when shooting close-up macro photography, for example, you may be able to achieve focus on the area of the subject you want only by manually focusing.
When you activate MF using the focus mode selector, it’s important to take note of the focus distance scale in the viewfinder. You adjust the focus by turning the focus ring to the left or right. The focus distance scale will give you an indication of the focus distance from you in a range of feet or meters. Note that this is an approximate focus distance, but I always find it to be very reliable.
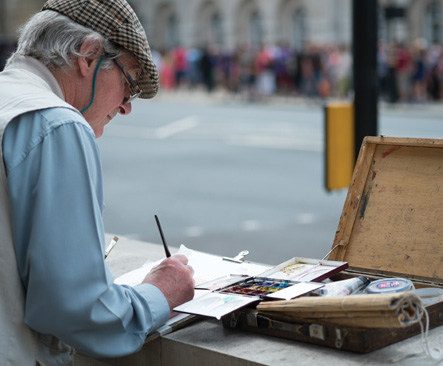
In Chapter 2, “First Things First,” we discussed exposure, how the aperture chosen affects the depth of field, and how much of an image will be in focus given that aperture. Using that knowledge, many street photographers preset their manual focus to a given distance, say 8 feet, and set their aperture moderately wide, say f/8. This means that everything around 8 feet away, give or take a few feet in front and behind, is likely to be in focus. If the aperture was set to f/2, then there would be much less of a focus range to work with, and moderately less of the distance in front and behind the 8-feet marker would be in focus (Figure 9.11).

ISO 1000 • 1/80 sec. • f/2 • 23mm lens
Figure 9.11 Using manual focus, I was able to prefocus on the area of paving stone that I wanted to shoot. Then I just had to wait for the subject to come into the frame and shoot.
Setting up your camera like this means that you can simply press the shutter button immediately and the camera will not try to autofocus; instead, it will very quickly take the frame (Figure 9.12). You can even “shoot from the hip” using this shooting philosophy, keeping the camera down by your side, holding it at waist level in front of you and firing shots.
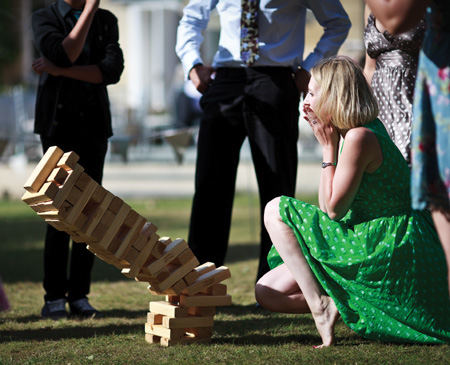
ISO 400 • 1/1000 sec. • f/2 • 23mm lens
Figure 9.12 Waiting for the right moment is all part of candid and street photography. I knew at some point the block tower would collapse, so I waited for it to occur before shooting.
In some cases, when using manual focus, you may want to determine if you can achieve accurate focus by pressing the command control. The display area will enlarge, enabling you to fine-tune the focus very precisely. Press the command control once again to return to normal view.
You may also use Digital Split Image and Focus Peak Highlight as focus aids (see Chapter 7, “Low Lighting”). A really neat way of having the best of both worlds in terms of focusing on the X100S is to use the AFL/AEL (focus lock/exposure) button on the back of the camera to “snap” focus, while in manual focus mode. This essentially allows the camera to autofocus for you, but you can also use the focus ring to fine-tune the focus further if required.
Shooting Through the Moment
The moment is key in any image, whether you’re shooting on the street, at a wedding, or just candidly around the home. An image that doesn’t stir any emotion, comment, or thought is not likely to have a strong moment occurring within it.
If you consider that a moment in time occurs instantaneously, sometimes it’s a good idea to try and shoot “through” the moment. By that, I mean shoot some frames before and after the perceived “moment” based on the understanding that you will have a greater chance of capturing the perfect moment among the mix of frames shot.
The X100S’s burst shooting mode is perfect for this and enables you to shoot several frames rapidly as you hold down the shutter button. The X100S has two burst speeds: 6 frames per second (fps) and 3 fps.
Setting up burst mode:
1. Press the Drive button on the back of the camera.
2. Using the command dial, select the Burst Shooting icon.
3. Choose either 6 or 3 frames per second.
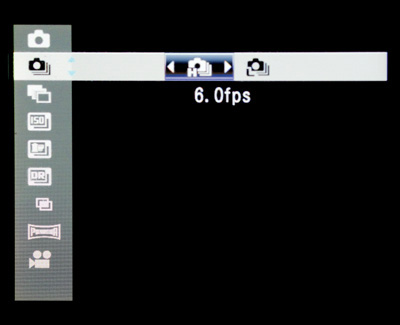
In order to shoot at 6 fps, the camera must be shooting at greater than 1/100 of a second; for 3 fps that drops down to 1/10 of a second.
Exposure is locked based on the first frame the camera shoots in this mode, so shooting in burst mode in an environment where the light is changing rapidly will not yield consistent results.
While burst mode is a very good feature to use when the time is right, I wouldn’t suggest using it all the time. You will notice that it can take quite some time to buffer the images to the card when the shooting is complete and, also, shooting in this mode can drain the battery quickly.
Tips for Shooting Quickly
When you are out shooting for prolonged periods of time, you need to be able to rely on the camera at all times to get the shots you want. The X100S has some great features that allow you to use it quickly and effectively.
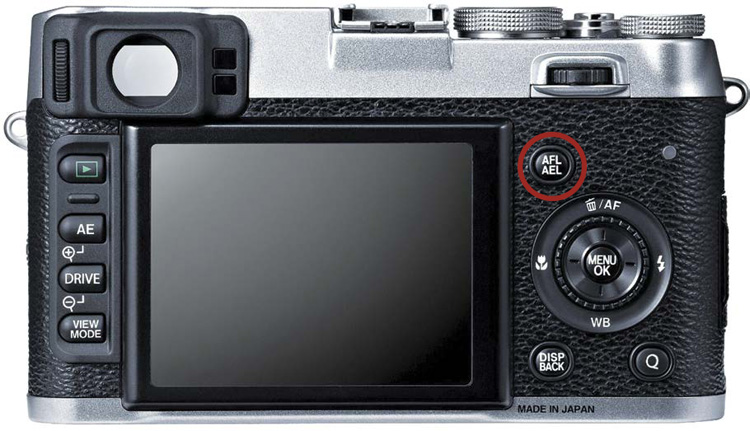
AFL/AEL Button
You can configure the AFL/AEL button on the back of the camera to function essentially as an autofocus override (Figure 9.13). It decouples the autofocus mechanism from the shutter release button, so shooting becomes more rapid as the focus is locked once (when pressing the AFL/AEL button) and the shutter button becomes responsible just for firing the shutter. Often referred to as “back button focusing,” this is used by many photojournalists and sports photographers to speed up shooting.
To get the camera completely set up for this type of shooting, however, there are a couple of menu changes that need considering. First, and most important, this method of shooting works only when the camera is in manual focus mode.
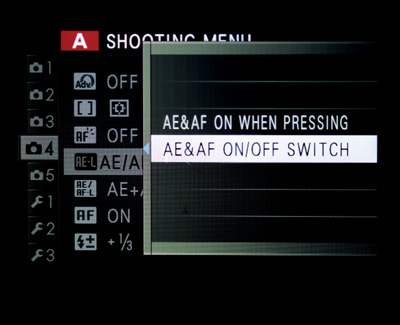
Configuring the camera for back button focusing:
1. Using the command dial, navigate to Shooting Menu 4.
2. Scroll down to the AE/AF-Lock Mode and set it to AE&AF On/Off Switch.
3. Press the Disp/Back button to go back to the shooting menu.
4. Scroll down to AE-AF-Lock Button and set it to AE/AF Lock.
5. Press the Menu/OK button to save and exit.
Now when you shoot, it is imperative to remember to use the AFL/AEL button as your focus button. Shooting this way is much more responsive as you lock the focus using the AFL/AEL button, and you can shoot more rapidly by pressing the shutter release button quickly.
The Q Button
The Q button (A) is an amazingly handy tool that lets you configure much of your shooting options all within the same place. Pressing the Q menu in shooting mode will present you with the shooting configuration options (B).
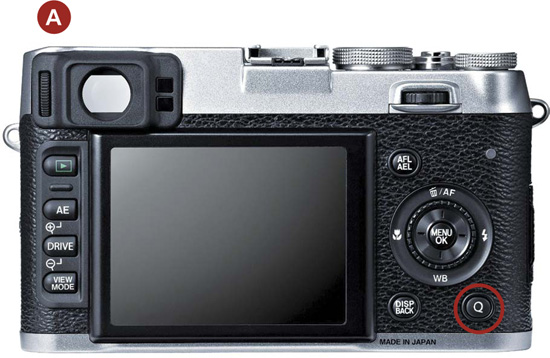
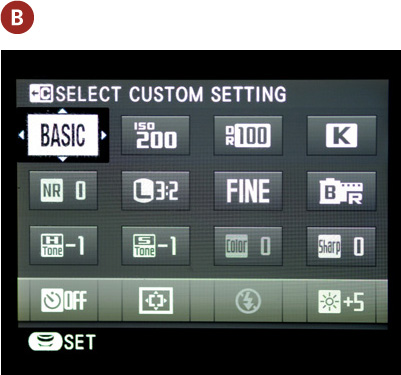
This button provides quick and easy access to many of the shooting options available, including ISO, white balance, image quality, etc. Use the direction buttons to select the option you want to change; to change the setting, turn the command dial.
Holding down the Q Button without releasing it for about 2 seconds will turn on Outdoor mode, which essentially brightens the LCD monitor, useful for bright sunny days. To return the LCD monitor to its normal brightness, hold down the Q button for another 2 seconds.
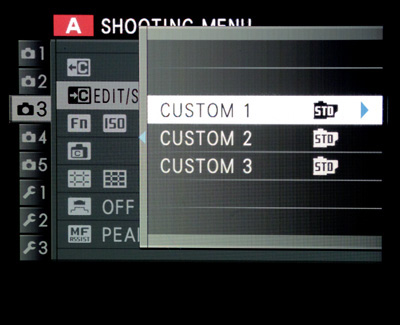
Custom Settings
Custom settings include a range of options that you can store for any given shooting scenario, and recall at any time without having to set up the camera completely from scratch. You can store three custom settings: Custom 1, Custom 2, and Custom 3.
Creating custom settings:
1. Using the command dial, navigate to Shooting Menu 3.
2. Scroll down to Edit/Save Custom Setting.
3. Press the command dial right to choose one of the custom settings.
4. Configure each option in this menu with your desired settings.
5. Once you are satisfied with your configuration, press Disp/Back.
You will be presented with an option to save the custom setting.
6. Highlight OK and press the Menu/OK button to confirm.
Most of the settings you configure here affect JPEG files only; however, it’s a really great way of setting up a working environment for multiple shooting scenarios. For example, you may set up one custom setting for shooting in really low light with a high ISO, or you may set up one to shoot in black and white.
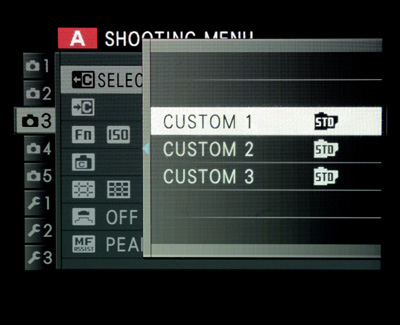
When you are ready to call upon a custom setting you have saved in the past, you use the other menu in this group, Select Custom Setting.
1. Using the command dial, navigate to Shooting Menu 3.
2. Scroll down to Select Custom Setting.
3. Choose the custom setting you want to use and press Menu/OK to confirm.
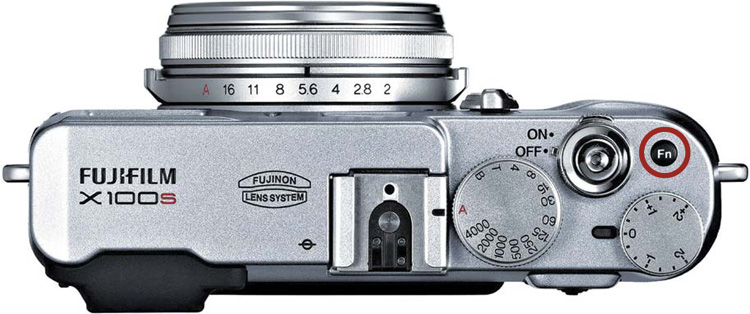
The Function Button
The Function (Fn) button is a very useful, programmable button that allows you to call up a single option that you have configured and to adjust that setting without digging through the menu options first (Figure 9.14).
Setting up the Fn button:
1. Using the command dial, navigate to Shooting Menu 3.
2. Scroll down to Fn Button and press the command dial right to select it.
You will be presented with a list of options to which you can set the Fn button.
3. Scroll to find the option you want.
4. Press Menu/OK to save and exit.
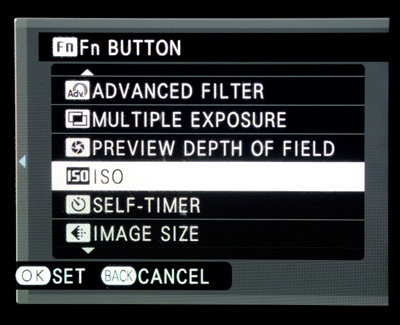
Typically, I set my Fn button to ISO, as that is the setting I change the most. You can select a multitude of options, of course, and next time you press the Fn button you will be taken immediately to the configuration screen for that setting.
A Few Final Thoughts on Street Photography
Street photography or any kind of candid photography can be very rewarding, but spending prolonged time out on the streets can put physical constraints on your body. It’s also a challenge to be both creative and fearless as you get started. Here are a few tips to help you succeed:
• Always wear comfortable, waterproof shoes.
• Carry a bottle of water with you at all times.
• Don’t be afraid to take the shots you want to take, within reason of course. Always respect any laws or privacy issues, and if a subject appears to be uncomfortable when you are shooting, simply move on.
• Remember that the city is a canvas and the painting unfolding on that canvas is there for you to capture in camera.
• Look for anything that is unique and attention-grabbing—interesting angles, humorous images, or social commentary (Figures 9.15–9.17).

ISO 400 • 1/1000 sec. • f/2 • 23mm lens
Figure 9.15 Keeping an eye out for humorous images can be very rewarding.
ISO 400 • 1/1000 sec. • f/2 • 23mm lens
Figure 9.16 Just watching the environment around you will yield interesting pictures of the people who make up the fabric of your community.
ISO 400 • 1/200 sec. • f/8 • 23mm lens
Figure 9.17 Look all around you—you may find some lovely geometric shapes, lines, or patterns simply by glancing up.
The X100S has quickly become a favorite of amateur and professional street photographers alike due to its unobtrusive looks, light weight, and amazing image quality. If you ever find yourself wondering what to shoot next, just pick up the camera and wander the streets. You may be amazed by what you find (Figure 9.18).

ISO 2000 • 1/80 sec. • f/2.8 • 23mm lens
Figure 9.18 Shopping centers or malls can be a great place to photograph candid images of the world in motion. Look for pleasing images that make you smile.
Chapter 9 Assignments
Now that you know how to use the X100S as the perfect candid camera, it’s time to put your newfound knowledge into practice. These assignments will help you break down the fear factor with street photography and produce some images to be proud of.
Overcome your fears
If you are not comfortable shooting on the streets, you will never become an accomplished street photographer. Remember, the X100S is a perfect camera for street photography, so try and put it through its paces.
Find a very busy part of your city, perhaps a fair or music festival. Consider stopping three or four complete strangers and taking their portrait. Ask politely and offer to send them an image afterward. You will be amazed at how reciprocal most people are.
Shoot from the hip
Set up the camera to manual focus at around 8 feet. Set the aperture to f/8 and, depending on the light, consider increasing the ISO. You want to be able to shoot at least 1/80 of a second.
Now, with the camera at hip level, go for a walk and shoot images that you think will make good stories. You can shoot freely, as very few people will realize you are actually shooting with the camera at your hip level. Now adjust your aperture to f/2 and try again. Comparing the two sets of images, how many more of the images shot at f/8 are “keepers” compared to those shot at f/2?
Take the test
Professional street photographers test their strongest images very simply: by captioning the image. Take an image, look at it briefly, and then write down a short caption for the photograph to convey the emotion or story within the frame. If you struggle to write a caption, then likely the image isn’t a strong one.
Back button shooting
Configure the camera to use the AFL/AEL button as the autofocus button. Remember to keep the camera in manual focus mode. Hit the streets and shoot for a period of time. Notice how you can shoot more rapidly using this method. Now switch the camera to AF-S and shoot again. Do you notice it slowing you down when shooting?
Find the canvas
Find an area with great light, perhaps where there are strong shadows, or at dusk in the city. Then wait until something happens within the scene that is engaging enough for you to take the shot you have been waiting for. Note that the shot may never happen; the art of street photography is often in the patience involved in capturing the shots you want.
Share your results with the book’s Flickr group!
Join the group here: flickr.com/groups/fujiX100S_fromsnapshotstogreatshots