11. Making Movies

ISO 200 • 1/2000 sec. • f/8 • 23mm lens
It’s Hollywood time
Almost all modern digital cameras, whether they are high-end DSLR (digital single-lens reflex) cameras or simple point-and-shoots, have the ability to record high-definition (HD) video. While the video-recording functionality of the X100S is not as capable as that of a high-end DSLR or camcorder, it does offer a great system for capturing movies on the go or for short movie projects.
Shooting movies involves many of the techniques and topics that we have already discussed in the book, such as understanding light, creative composition, and being able to achieve the correct exposures. However, as you will find out in this chapter, shooting movies often requires a subtle mentality change and other considerations.
Poring Over the LCD Monitor
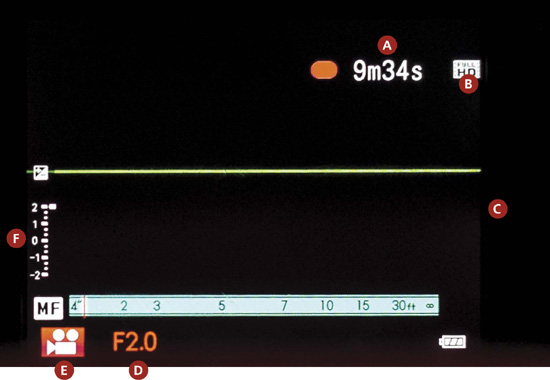
A Recording Time Remaining
B Full HD Indicator
C Virtual Horizon
D Aperture
E Movie Mode Indicator
F Exposure Compensation/Indicator
Movie Settings
Before you can start recording your first blockbuster, you need to understand the intricacies of the X100S’s movie-recording features as well as some movie-making jargon and techniques.
Getting Started
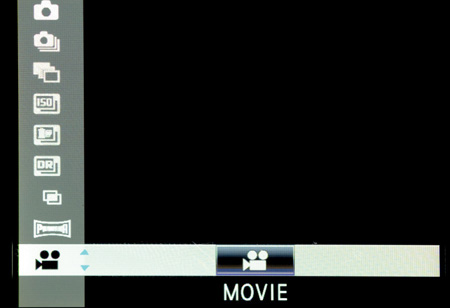
Unlike a lot of other cameras with video functionality, the X100S doesn’t have a simple “record” button. Instead, to activate the Movie mode, you must press the Drive button and select Movie from the menu. Alternatively, if you are likely to be shooting a lot of movie footage throughout the day, you can configure the Fn (Function) button to Movie, which means that you can switch between Movie mode and stills mode at the touch of the button.
Once you have selected Movie mode, many of the same principles of shooting stills with the X100S apply: adjusting exposure, starting and stopping the recording, and various other settings that control the video recording.
To get shooting straight away:
1. Using the focus mode selector on the side of the camera, select AF-C. This will force the camera to autofocus continually throughout the recording.
2. Using the aperture ring, set the desired aperture. I suggest setting it to A (Auto) to allow the camera to work out the best aperture during the recording.
3. To begin recording, press the shutter button fully down. You will see the time remaining of the recording on the LCD. The indicator lamp will be constantly orange during the recording.
4. To stop shooting, press the shutter button again.
Movie Mode
Although the X100S’s video-recording capability is fairly rudimentary, there are some video-specific settings that are worth discussing so you can make the most of the available shooting features.
Your camera has two video-recording modes that essentially allow you to choose the frames per second (fps, or frame rate) at which the camera will record. As a rule of thumb, 60 fps is preferable to 30 fps, but in order to decide which is right for your shooting scenario, you need to understand the differences between the two recording rates.
If you have good light, or are intending to shoot for slow motion, then 60 fps is the best choice. If you consider the number of frames shot per second, it makes sense that the faster speed will result in less jittery footage, especially if you are shooting fast-moving subjects like an athlete or a passing train.
Of course, unless it’s for a creative reason, you will want your movies to be as smooth as possible; 60 fps is likely to offer that quality. However, remembering back to our discussions about low-light shooting (Chapter 7, “Low Lighting”), you will recall that the faster the shutter speed, the less light reaches the sensor. For example, at 60 fps (1/60 second), less light is reaching the shutter than at 30 fps (1/30 second). So, if the ambient or available light in which you are shooting is not bright enough, you may need to use the 30 fps option.
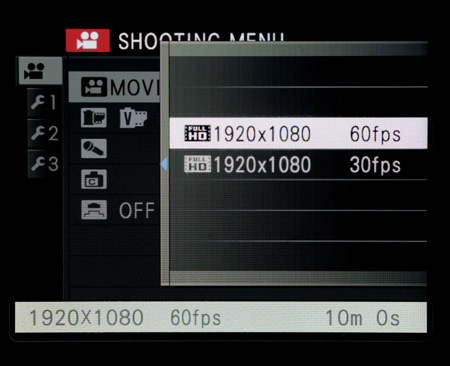
Selecting Movie mode:
1. Select Movie from the Drive menu and press the Menu/OK button.
2. Using the command dial, navigate to Shooting Menu.
3. Using the command dial, select Movie Mode.
4. Select the Movie mode of your choice (60fps or 30fps).
5. Press Menu/OK to confirm the setting.
Audio
Have you ever considered what the movie Jaws would be like without the epic soundtrack? Or Star Wars? What about the movie Psycho? Most iconic movies owe their success, at least partly, to their soundtracks. If you think of any of those movies, you will automatically recall the unique-sounding music.
Some professional filmmakers will tell you that, when it comes to making a great movie, audio is actually more important than visuals. From the soundtrack to the dubbing (making sure the words are in sync with the speech), the audio needs to be at the forefront of any movie being produced.
With the X100S, you can record audio either directly to the SD (Secure Digital) card via the built-in microphone or an external microphone tethered to the camera (such as the Fujifilm MIC ST1 shown in Figure 11.1), or to a separate sound device and then sync the audio in postproduction. My preferred method is to record directly to the SD card in the camera, as it avoids any syncing difficulties you may have later on in production.
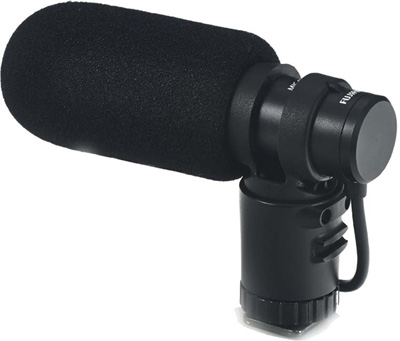
Figure 11.1 Using an external microphone, like the Fujifilm MIC ST1, is a much better audio-recording solution than recording to a separate device and syncing in production.
The built-in microphone on the X100S is adequate for most small videos that you may shoot, especially indoors. However, if you are looking to record high-quality sound, I recommend checking out Fuji’s MIC ST1. Its audio quality is of a much higher level compared to the built-in mic. Additionally, this microphone has a windscreen that comes in handy when recording outside, as it eliminates most noise that wind makes when whistling past the microphone. Further, unlike when recording audio with the X100S’s built-in microphone, you will not hear all of the operational or focusing noises that the camera makes on the recording.
In terms of controlling the audio within the camera itself, the Mic Level Adjustment feature lets you set the level of the sound between a low level of 1 and high level of 4. When you open up the Mic Level Adjustment, you will see the two volume meters. These meters will react to any noise the camera is picking up (whether it’s from the internal microphones or an external microphone).
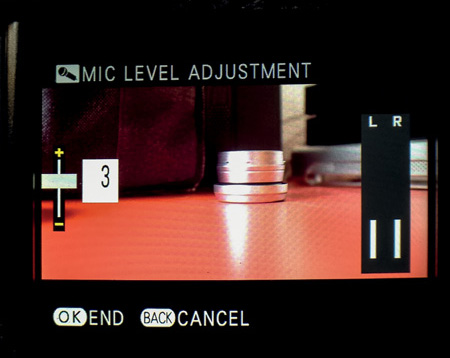
You need to set this microphone level such that the indicators are not turning red at the top. If the indicators are turning red (Figure 11.2), the audio will likely be clipped and possibly not useable at all. Orange, the level below red, is also a warning indicator for me, and I like to adjust the levels until the indicators are not showing any red or orange at all (Figure 11.3).
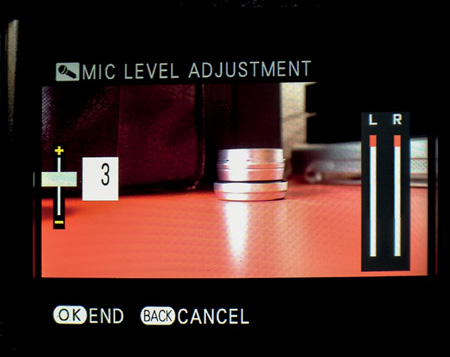
Figure 11.2 Gauge the audio level being received by the camera using the Microphone Level Adjustment.
Setting the microphone level:
1. Select Movie from the Drive menu and press the Menu/OK button.
2. Using the command dial, navigate to Mic Level Adjustment.
3. Using the command dial, select the level you are comfortable with.
4. Press Menu/OK to confirm the setting.
Exposure and Focus
It’s crucial to understand the differences between shooting stills and shooting movies. Not only is the mindset different, but you also need to address certain elements of exposure and focus so you can make creative and awe-inspiring movies with your X100S.
Controlling Exposure
When shooting movies with the X100S, it’s important to understand what level of control you have over exposure. You have some, but not as much as when you are shooting stills. Understanding these limitations when recording movies will mitigate frustration when shooting.
First, selecting the shutter speed is redundant when shooting movies. You will have already decided on 60 fps or 30 fps in the Movie mode menu, and you cannot override this at all using the shutter speed dial. For peace of mind, I tend to set the shutter speed dial on A, just to avoid confusion if I happen to glance at the dial.
In many circumstances, when you are not looking to shoot creative depth of field effects, you may want to set the aperture ring to A. This effectively puts the camera into Program mode, which means that when shooting the movie, the camera will control exposure to the best of its ability in order to create a well-exposed movie clip. Personally, I love to utilize aperture to create dramatic depth of field in both my stills and also in movies that I shoot with the X100S. You can use the aperture ring just like when shooting stills to create a narrow or wide depth of field (Figure 11.4).

As we know from Chapter 7, a lower f-stop will allow us to shoot in lower light. So shooting at f/2 or f/2.8 not only produces a blurred background or foreground, but also may be the difference between shooting at 60 fps or 30 fps if the light is fading. Note that when the movie is rolling, you can’t adjust the aperture. This means you can shoot each clip at only one particular aperture; adjusting the aperture ring when the movie is rolling will have no effect.
The rules of exposure still apply when shooting movies, so keep in mind that the aperture you are using and the light in which you are shooting may not be conducive to achieving a good exposure. To check this, keep an eye on the aperture reading on the LCD monitor while you are recording. If the aperture reading appears red, that means the camera is having difficulty exposing the movie at that aperture (Figure 11.5). If this is the case, you will have to do one of the following:

• Adjust your aperture.
• Increase the ambient light.
• Adjust the exposure using compensation (again, this must be set before you start shooting).
• Consider shooting at 30 fps instead of 60 fps.
Selecting a Focus Mode
You can use all three of the X100S’s focus modes when shooting video; however, there are some limitations. If you choose to use AF-C, as mentioned earlier in the chapter, the camera will attempt to autofocus throughout the video recording. The camera will always use the central focusing point when using AF-C, and you cannot adjust this manually. This focus mechanism might be useful if your focus points are likely to change within the movie, or if the subject itself moves within the frame (for example, if you are shooting a person walking toward you).
You can use the AF-S mode to prefocus on a spot before the recording commences. For example, if you’re filming a faucet of running water, you would likely focus on the faucet using AF-S to lock the focus in place before pressing the shutter button to start recording. Assuming the camera doesn’t move (as we know the faucet won’t), then you can be sure the focus will be correct throughout the video clip.
For ultimate creative control, however, focusing manually will yield the best results. Focusing manually means you can adjust your focus point while the camera is recording, which can have a very powerful effect on the final movie. In professional film making this is known as “rack focus.” You may notice only subtle focus shifts at smaller apertures like f/16, but using a bigger aperture such as f/2 can often yield dramatic effects (Figures 11.6, 11.7, and 11.8).
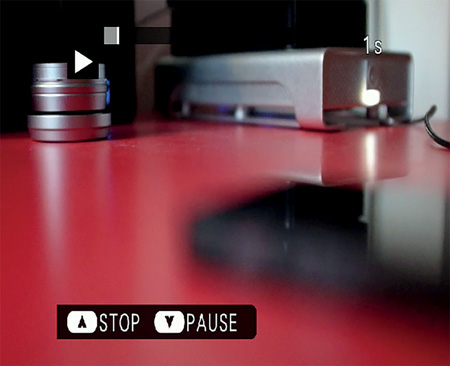
Figure 11.6 Using manual focus, I can start recording while focusing on a subject at the back of the scene.
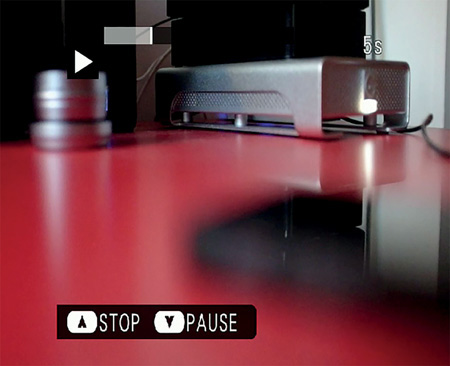
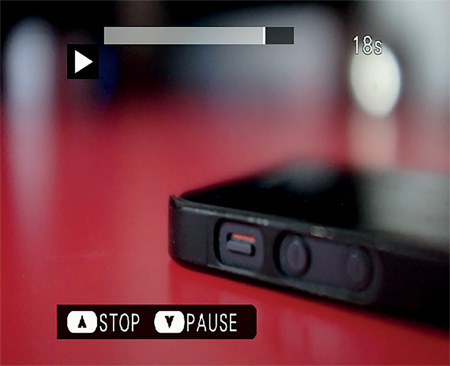
Figure 11.8 And finally, as I’m using a large f/2 aperture, the closest item in the frame becomes the focal point.
White Balance
You should also be aware of your white balance settings when shooting video. It’s really more crucial than when shooting stills, because correcting white balance in movies in postproduction is a far more complicated job than correcting it in stills.
You cannot use a custom white balance when shooting video, and generally I keep the white balance set to Auto when shooting video. Unless you are confident that your lighting is not going to change, and one of the presets (such as Shade) is the correct white balance for the shoot, then auto white balance will do a good job.
Getting Creative with Film Simulation
One of the great joys of the Fuji X100S is its built-in Fujifilm film simulations, which are authentic in-camera replications of famous traditional “film” looks. Fujifilm is world renowned for its film stock and color and black-and-white renderings—and, just as with shooting stills, you can shoot movies using these film simulations.
Professional filmmakers may spend hours color grading their movies to get the look and feel that they want in postproduction. However, you have a great opportunity with the X100S to add a bit of creative magic right in the camera using its film simulations. If, like me, you are a sucker for black-and-white movies, now you can produce beautifully rendered black-and-white footage straight out of your camera.
You can choose to film in Provia, Velvia, Astia, Pro Neg. Hi, Pro Neg. Std, B&W (with or without filters), or Sepia. I have found that it’s very difficult to get anything resembling the Provia or Velvia filmic finishes in postproduction using any other recording device. Using cameras that don’t have the film simulations built in means you will need to edit the movie substantially to try to emulate those film stocks.
Technicalities
Shooting movies on the X100S is rewarding, and given patience and your newly acquired skill, you will be making beautiful movies that you can enjoy. There are a couple of technical elements of shooting movies that you should be aware of, however, to get the most out of the camera and its features.
Recording Time
It’s worth noting that the maximum recording time for any one sequence on the X100S is 10 minutes. You will find that all “still cameras” that shoot video have a limit of just under 30 minutes, because equipment that can shoot more than 30-minute bursts must legally be referred to as a “video camera.” The X100S falls somewhat short of the 30-minute maximum offered by most other still cameras that shoot movies. However, if you look at any professionally produced movie or TV show, you’ll notice that it is extremely rare to see a scene that is more than a few minutes in length.
You can, of course, shoot multiple sequences, up to the capacity of your memory card (an 8 GB card will give you approximately 25 minutes of shooting time). Whenever I shoot video, I tend to use a 32 GB card to give me more recording time. It’s wise to use a card with a rating of 10 or more, which will give you enough speed to buffer the movie to the card adequately. A slower card speed is likely to cause problems, as the camera needs to buffer the footage to the memory card as fast as possible. It’s worth investing in faster cards even for still photography, but it’s essential for video recording.
Resolution and Aspect Ratio
All movies recorded on the X100S are in full HD at a resolution of 1920×180 pixels and a 16:9 aspect ratio (this looks wonderful in wide-screen format). You have no control over the pixel resolution or aspect ratio.
File Formats
All X100S movies are generated using the .MOV file format (Apple QuickTime), which can be read on all modern computers and imported into all postproduction software suites such as Adobe Premiere and Apple Final Cut Pro.
Watching Your Movies
To watch your videos, simply press the Playback button and select the movie. If your card contains a combination of still shots and movies, you can tell the ones that are movies by the gray sprockets down the left- and right-hand sides of the preview (Figure 11.9).
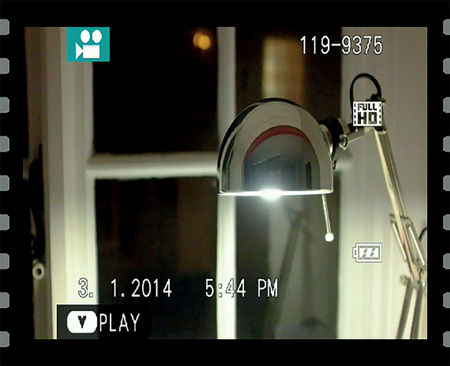
Figure 11.9 Movies are easy to identify in playback due to the film-like sprockets on the left and right.
Once you can see the preview of the movie you wish to watch, press the Down button on the command dial to commence playback. You will see the movie on the LCD monitor, and the gray progress indicator bar will tell you how much of the movie has expired and how much is remaining.
Similarly, to pause playback, press the command dial down; to stop the movie completely, press it up. You can adjust the playback volume by rotating the command dial. You can also skip through frames when paused by pressing the dial left and right.
Of course, the best way to experience your movies is on a computer screen after the movies have been copied from your card. You move the video files from your camera to your computer in much the same way as you do still photographs. You can even use asset management software such as Adobe Photoshop Lightroom to import the movies for you. Remember, however, that movie files are likely to be much larger than the still files you may be used to, so you may need more storage space or an external drive to hold the files. Once the movies are offloaded, you can watch them in exactly the format produced by the camera, or you can choose to edit them (see the next section) to add even more cinematic wow.
Editing and Workflow
If you wish to enhance your movies further, you can use post-processing tools that are readily available. On the Apple platform, iMovie offers basic but useful editing opportunities, as does Microsoft’s Movie Maker on the Windows platform (Figure 11.10).
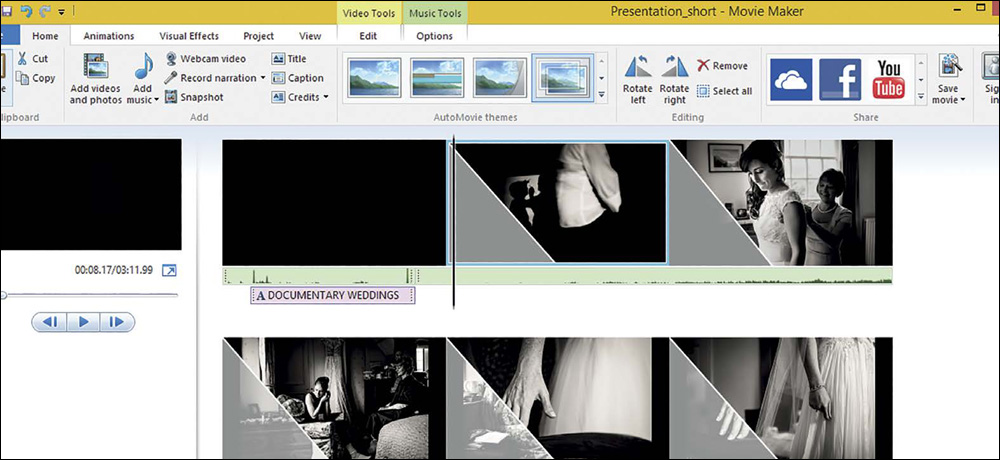
Figure 11.10 Using tools such as Windows Movie Maker (shown here) or iMovie, you can make enhancements to your movies very quickly.
Using these tools, you can perform basic enhancements such as clipping and splicing (chopping up your movie and putting scenes into an order), add fades and transitions, and even do some basic color grading. Color grading refers to using software to alter the look of the movie in terms of its overall color and tone. For example, in postproduction you can change a movie from color to black and white. You can also use these tools to add sound files and text clips to use as credits.
If you fancy yourself the next Steven Spielberg, you can consider some more advanced editing tools such as Adobe Premiere Elements, which will give you far more flexibility in your editing and final output. Using a more complex tool like Premiere Elements allows you to get creative with slow-motion editing, animated titling, and specialized film effects.
For asset management of stills as well as video files, I tend to use Adobe Photoshop Lightroom. Lightroom is a great tool for cataloging and grouping your digital assets, and you can even make some basic adjustments to video files from within the software itself.
If you wish to provide a viewing platform for the wider world, you can even use most of these tools to upload your video in Internet streaming formats (such as .MP4) to video-hosting sites such as Vimeo or YouTube. The benefits of using these hosting solutions are many and varied. For example, for the most part, hosting is free unless you are planning on storing a lot of movie content online. You can also embed and share movies seamlessly into social media streams such as Facebook and Twitter, giving you a great platform to show off your newfound filmmaking skills.
Chapter 11 Assignments
Now that you understand the creative opportunities available to you as a moviemaker using your Fuji X100S, it’s time to put those newfound director talents to the test! These assignments will take you through the essentials of movie making while encouraging you to explore your creativity and sense of adventure.
Shoot your first movie
Find a well-lit environment, perhaps the backyard or a local park. Using the Drive menu, switch the camera to Movie mode. Set the focus switch to AF-C, set the aperture ring to A, and press the shutter button fully to start recording your first movie. Walk around and move the camera as you walk. Preview the video and watch how the camera automatically adjusts its focus point for you.
Shoot in low light
Take your camera to a low-light environment, perhaps a bar or a theater. Set the aperture to f/2 and adjust the exposure using the exposure compensation option if necessary. As the light fades further, put the camera into the 30 fps mode. Review your movies. Do you see any difference between 60 fps and 30 fps? Is the 30 fps a little more jittery during playback?
Focus creatively
Using manual focus, create a movie at a large aperture, such as f/2 or f/2.8, and concentrate on moving focus between subjects during the recording. Keep steady with the focus ring!
Make a black-and-white documentary
Using all of the techniques you have acquired in this chapter, shoot a short documentary or interview with a friend. Use one of the black-and-white film simulation modes for added creative flair. Shoot several scenes and copy them all to your computer. Using a video-editing tool, splice and cut your first movie. Sit back, grab the popcorn, and enjoy!
Share your results with the book’s Flickr group!
Join the group here: flickr.com/groups/fujiX100S_fromsnapshotstogreatshots