6. Using Timeline Scripting with Mouse Events
Everything you have done so far has used ActionScript and for the most part, ignored the timeline. I want to reassure you that you don’t need to choose one over the other, the timeline and ActionScript can peacefully coexist. In fact, they work very well together, and you’ll be able to create some amazing projects using both.
There are certain ActionScript commands that can alter the playback of the timeline. In this chapter, you’ll learn about all of these timeline controls. Some of these might be familiar to you already, but in this chapter you’ll use these controls in combination with mouse events to create an interactive project.
Explaining the Project
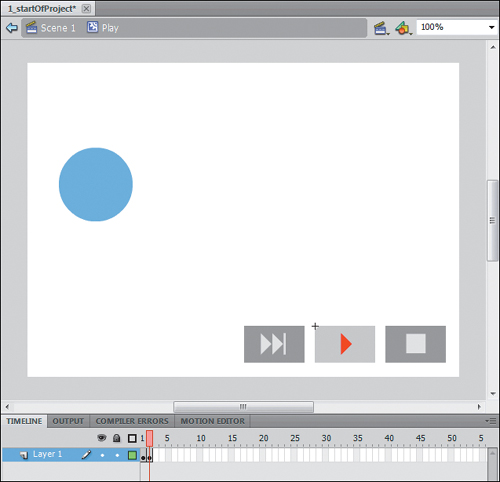
The project in this chapter has a ball that moves across the screen. Let’s check out the project and see how you can add mouse events to the existing timeline scripts (Figure 6.1).
Figure 6.1. Example project before starting to create code
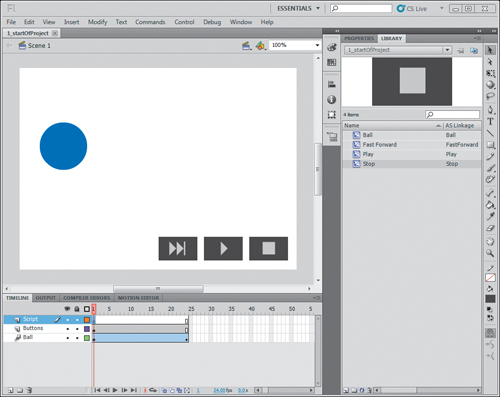
This starting project is available on the book’s website (www.peachpit.com/actionscript3dd) as the 1_startOfProject.fla file. Download the file to your computer and open the FLA file in Flash Professional CS5.5.
The ball on the stage is an instance of the Ball Library object with the instance name of myBall. This instance is tweened on the Ball timeline layer from frame 1 to 24. The tween animates the ball from the left side of the stage to the right.
The Stage also has single instances of the Fast Forward, Stop, and Play Library objects on the stage. These have the instance names of forwardButton, stopButton, and playButton respectively and are on the Buttons layer.
If you run the project now, the ball will move across the screen the project will repeat, because Flash automatically repeats the main timeline unless you specifically tell it to stop at a certain point.
Now you are ready to start adding some ActionScript to control the button actions.
Controlling Timeline Playback
Let’s start looking at ways you can let the user modify the playback of the project. Controlling playback will require that you combine playback commands with the mouse events that you learned in the last chapter. You’ll start with adding a playback control to stop the movie when you click the stop button.
Stopping Playback
On the Script timeline layer, you can stop playback of the overall project and link that action to a mouse event broadcasted from the stopButton instance.
1. Add the following code to the Script layer:
/*
Demonstrate how to combine frame controls with ActionScript code
*/
// Add event listener and callback function for the STOP button
stopButton.addEventListener(MouseEvent.CLICK, stopBall);
function stopBall(e:MouseEvent):void
{
trace("Stop playback");
stop();
}
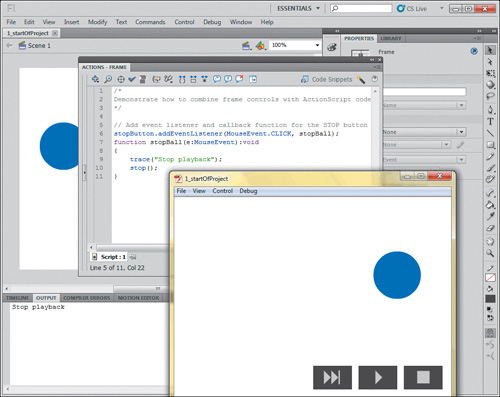
2. Save and run the project. When you click the stop button, you’ll stop the playback of the project.
What you are doing here is adding an event listener to the stopButton object. This listener will listen for the CLICK mouse event. When it hears this event, it will execute the stopBall function. The stopBall function accepts the event from the listener, sends a message to the Output panel, and executes the stop() function that halts the playback of the main timeline. Figure 6.2 shows an example of how this looks.
Figure 6.2. Stopping playback using an event listener
I should point out that while the script is on frame 1, it still works when the project is playing a different frame. When the project starts, the code that is in frame 1 is processed and remains resident in the application. It is one reason why when working with tweens and timelines that your ActionScript should be on frame 1, unless you are doing something very specific at a particular frame.
Seeking to a Specific Frame
In addition to stopping playback, you can also seek (go to) a specific numbered frame in the project and stop playback at that point. You can do that by adding a new event listener to the forwardButton instance, and create a new callback function.
1. Add the following code to the bottom of your existing project:
// Add event listener and callback function for the FAST
// FORWARD button
forwardButton.addEventListener(MouseEvent.CLICK, jumpBall);
function jumpBall(e:MouseEvent):void
{
trace("Seek and stop to frame 24");
gotoAndStop(24);
}
3. Click the fast forward button to activate the new event handler.
In this code, you are adding an event listener to the jump button. The callback function in this case is executing the gotoAndStop() function, which moves the playback to a specific frame and then stops the playback at that point. An example is shown in Figure 6.3.
Figure 6.3. Seeking to a specific frame and stopping playback
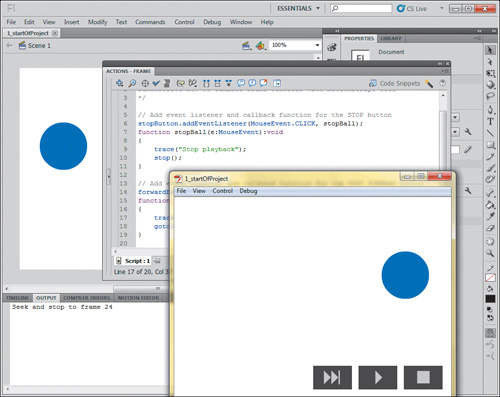
If you didn’t want to stop playback after seeking to the specified frame, but instead continue playback, you could replace the gotoAndStop() function with the gotoAndPlay() command.
Working with MovieClip Timelines
All these examples have been working with the main timeline. However, each of the MovieClips in the Library have their own timeline that you can work with and build motion and animations with and then control from the main timeline.
The buttons in this project are pretty flat. They don’t highlight when you mouse over them, or show any other visual effects. You can use their internal timelines to create special effects to make them more interesting.
To edit these timelines, you can either double-click the object in the Library, or double-click the instance on the Stage. Double-clicking the instance on the Stage will show you the edits in context of the instance, which is often helpful. This technique is called editing-in-place.
1. Double-click the playButton instance on the Stage to edit-in-place.
You’ll see that you now have access to the internal timeline of the object and you can make modifications inside. When you make changes in this way, you’ll apply the changes to all instances of the object since you are editing an instance of an object in the Library. In this case, you have only one instance, but this is important to remember.
Also note the breadcrumb trail at the top of the window; it shows that you are within the Play object in the Library.
2. Add a new frame by selecting frame 2, right-clicking, and selecting Insert Keyframe.
This will create a duplicate of the previous keyframe in the project, in which you can modify the design of the object to be unique from the object in the keyframe before it.
3. Change the color of the background and play icon using the Paint Bucket tool, or through the color picker.
You should have something that looks like Figure 6.4.
Figure 6.4. Editing a MovieClip’s internal timeline
4. Run the project.
You’ll instantly see there is a problem. The playButton instance is flipping between the two frames you created. As you learned earlier, Flash automatically repeats timelines unless you specifically stop them. So to avoid this, you need to stop playback on the first frame.
5. While inside the stop button, create a new timeline layer and name it Script. If you are on the main timeline, double-click the stop button to enter it.
6. Select frame 1 of the new Script timeline layer, right-click, and select Actions.
7. Enter stop(); in the Actions panel.
8. Run the project again.
Now the button won’t oscillate when you run the project.
Repeat this process for the other two buttons in the project.
Using the Event Callback Object and Handling Scope
Since you started learning about events, you’ve accepted an event object named e in the callback function. While you haven’t used the object yet, it contains valuable information about the event that you can use in your code. Let’s put this valuable information to work. But first, you need to see how the scope of this information affects your project.
The Event Callback Object
Often when you hover over a button, there will be some sort of action that takes place. For instance, the button might change color, or it might move slightly. You created these effects in the last section, but now you need to hook them up to the mouse events of the button for them to work.
There are a couple of ways you can link this effect with events. You have not been doing much with the event callback object. Let’s introduce how that can be used, and why.
Let’s first start with a basic event listener for the play button.
1. Add the following code to the bottom of the code that is already in the project:
// Create rollovers for the playback control buttons
playButton.addEventListener(MouseEvent.MOUSE_OVER, hoverButton);
function hoverButton(e:MouseEvent):void
{
gotoAndStop(2);
}
2. Run the project. You won’t get something you expect.
3. Hover over the play button.
The entire movie stops playing back and goes to frame 2. That is because when you hover, you execute the hoverButton callback function and the scope of the code is taking place on the main timeline. You need some way to tell the hoverButton function that you are focusing on the playButton instance. You can do that by defining the instance before the gotoAndStop() statement using dot notation.
4. Prepend playButton. to the gotoAndStop(2) statement inside the hoverButton() function:
// Create rollovers for the playback control buttons
playButton.addEventListener(MouseEvent.MOUSE_OVER, hoverButton);
function hoverButton(e:MouseEvent):void
{
playButton.gotoAndStop(2);
}
5. Run the project. You’ll see that you have the desired roll on effect for the MOUSE_OVER event.
Let’s finish the button by adding an effect to the MOUSE_OUT event.
6. Update the code like this:
// Create rollovers for the playback control buttons
playButton.addEventListener(MouseEvent.MOUSE_OVER, hoverButton);
playButton.addEventListener(MouseEvent.MOUSE_OUT, hoverOffButton);
function hoverButton(e:MouseEvent):void
{
playButton.gotoAndStop(2);
}
function hoverOffButton(e:MouseEvent):void
{
playButton.gotoAndStop(1);
}
7. Run the project. You now have everything working for the play button.
But you have two more buttons to do. Does that mean you have to repeat all of this to get the buttons working?
No. You don’t—and this is when you use the event callback object.
Using the Event Callback Object
You have been accepting an event callback object, named e. Now you’ll start using its valuable information.
The e object contains a number of properties that you can use in your projects. One of these is a property called target, which is the name of the object that triggered the event. Let’s take the previous example and add a trace statement to see how this works.
1. Modify the hoverButton() function to add this trace statement:
function hoverButton(e:MouseEvent):void
{
trace(e.target);
playButton.gotoAndStop(2);
}
2. Run the project.
3. Move your mouse over the play button. You’ll see the phrase [object Play] appear in the Output panel, indicating that it is taking an object of the Play class and is sending it to the Output panel. This indicates that e.target is a reference to the object that sent the event, in this case the Play object.
You can now use e.target as a substitution for explicitly calling playButton() in the callback function.
4. Change the code to swap e.target for the playButton instance:
// Create rollovers for the playback control buttons
playButton.addEventListener(MouseEvent.MOUSE_OVER, hoverButton);
playButton.addEventListener(MouseEvent.MOUSE_OUT, hoverOffButton);
function hoverButton(e:MouseEvent):void
{
e.target.gotoAndStop(2);
}
function hoverOffButton(e:MouseEvent):void
{
e.target.gotoAndStop(1);
}
5. Run the project. You’ll see that the program works just as it did before.
Now, here is where you will really maximize the benefits of all that information available in that little e. All the examples you have worked on so far using events have had a matching callback function; but you can also use the same callback function multiple times for different event listeners. You don’t need to have a one-to-one matching of them in your project.
In this case, you need to create new event listeners for the other objects that will use the same callback functions. Since the callback functions now know to look for the e.target object as its reference, you can use this callback function for different event listeners.
The next step to get this all working, is to finish creating the event listeners for the other objects.
6. Add the following MOUSE_OVER and MOUSE_OUT event code for the forwardButton and stopButton instances:
// Create rollovers for the playback control buttons
playButton.addEventListener(MouseEvent.MOUSE_OVER, hoverButton);
playButton.addEventListener(MouseEvent.MOUSE_OUT, hoverOffButton);
forwardButton.addEventListener(MouseEvent.MOUSE_OVER, hoverButton);
forwardButton.addEventListener(MouseEvent.MOUSE_OUT, hoverOffButton);
stopButton.addEventListener(MouseEvent.MOUSE_OVER, hoverButton);
stopButton.addEventListener(MouseEvent.MOUSE_OUT, hoverOffButton);
function hoverButton(e:MouseEvent):void
{
e.target.gotoAndStop(2);
}
function hoverOffButton(e:MouseEvent):void
{
e.target.gotoAndStop(1);
}
7. Run the project. The buttons behave the same as they did before the changes.
Shortcuts for gotoAndStop()
In this example, when you hover or move off the buttons, you are moving the playhead of the button movie clips up or back one frame. There are two commands that make this more explicit and don’t force you to remember and specify frame numbers: nextFrame() and prevFrame().
1. Substitute the gotoAndStop statements with the nextFrame() and prevFrame() functions:
function hoverButton(e:MouseEvent):void
{
e.target.nextFrame();
}
function hoverOffButton(e:MouseEvent):void
{
e.target.prevFrame();
}
2. Run the project. The buttons behave the same as they did before the changes.
The Finished Example
Now your code is dynamic and more flexible. Your project should look like the following code. The completed project is named 2_internalTimelines.fla and is available on the book website (www.peachpit.com/actionscript3dd).
import flash.events.MouseEvent;
/*
Demonstrate how to combine frame controls with ActionScript code
*/
// Add event listener and callback function for the STOP button
stopButton.addEventListener(MouseEvent.CLICK, stopBall);
function stopBall(e:MouseEvent):void
{
trace("Stop playback");
stop();
}
// Add event listener and callback function for the FAST FORWARD button
forwardButton.addEventListener(MouseEvent.CLICK, jumpBall);
function jumpBall(e:MouseEvent):void
{
trace("Seek and stop to frame 24");
gotoAndStop(24);
}
// Add event listener and callback function for the PLAY button
playButton.addEventListener(MouseEvent.CLICK, playBall);
function playBall(e:MouseEvent):void
{
trace("Play");
play();
}
// Create rollovers for the playback control buttons
playButton.addEventListener(MouseEvent.MOUSE_OVER, hoverButton);
playButton.addEventListener(MouseEvent.MOUSE_OUT, hoverOffButton);
forwardButton.addEventListener(MouseEvent.MOUSE_OVER, hoverButton);
forwardButton.addEventListener(MouseEvent.MOUSE_OUT, hoverOffButton);
stopButton.addEventListener(MouseEvent.MOUSE_OVER, hoverButton);
stopButton.addEventListener(MouseEvent.MOUSE_OUT, hoverOffButton);
function hoverButton(e:MouseEvent):void
{
e.target.nextFrame();
}
function hoverOffButton(e:MouseEvent):void
{
e.target.prevFrame();
}
Another e Example
Using the event target data is one way to make your event handlers dynamic. Let’s look at another example that will illustrate this. The project is available on the book website (www.peachpit.com/actionscript3dd) as the file named 3_soManyBalls.fla and is shown in Figure 6.5.
Figure 6.5. Another event callback object example
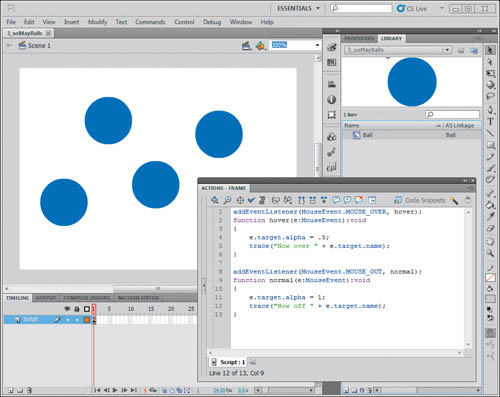
In this example, you have the same Ball object in the library with multiple instances on the stage called ball1, ball2, ball3, ball4, and ball5. On the Scripts layer of the main timeline is the following code.
addEventListener(MouseEvent.MOUSE_OVER, hover);
function hover(e:MouseEvent):void
{
e.target.alpha = .5;
trace("Now over " + e.target.name);
}
addEventListener(MouseEvent.MOUSE_OUT, normal);
function normal(e:MouseEvent):void
{
e.target.alpha = 1;
trace("Now off " + e.target.name);
}
Instead of placing the event listener on a specific object, it has been placed at the current scope of the main timeline. The event handlers capture the event object and manipulate the alpha level of the event target. To help illustrate the event target, a trace statement is used to output the name of the event object target. The name attribute is used to display the instance name that has been applied to the object in Flash once the file is running.
When you run this, if the mouse moves over any of the balls, its transparency value is affected, and the Output panel displays a message.
Even though this code uses only a single event handler, it is still dynamic because it uses the event object’s data values. When you learn about conditionals, you can apply greater amounts of control over what happens in the callback function based on the type of event broadcasted or the event target.
Working with Simple Callback Functions
The last callback function is pretty simple. It contains only a single line of ActionScript code. You could understandably wonder why you would need to create four lines of code just to do a single action.
Luckily, you can put all of this on a single line by using a generic unnamed function in the event listener itself. This function cannot be called in any other area of the code because it is fully encapsulated within the event listener; but if your callback is doing only one thing, it can make your code more concise:
// Add event listener and callback function for roll out of the
// PAUSE button
myBall.addEventListener(MouseEvent.MOUSE_OUT, function (e:MouseEvent) {myBall.gotoAndStop('normal'), });
This code replaced the callback function name in the event handler with a specific function definition. This function doesn’t have a name, but does contain the other basic parts, the function statement, the parameter definition, and the code block.
Notice that this example introduces a new item: single quotes. You have used double quotes to denote strings, but it is just as legal to use matching single quotes for strings as well, and can be helpful and even preferable for some situations.
While completely optional, this approach can make your simple callback functions more concise. The limitations are that you can’t execute this function outside the callback function, and adding multiple commands can make this approach cumbersome.
Some code blocks in this book contain a single line of ActionScript code; however, it cannot fit on the printed page. Therefore, the line indention is an indication of a continued line and not a new line.
Wrapping Up
In this chapter, you learned how you can combine timelines with mouse events. There are lots of ways to combine main and encapsulated timelines with your projects using mouse events. When working with events and timelines, try to keep in mind the following to avoid issues or errors:
• Use basic playback commands like stop(), play(), gotoAndStop(), gotoAndPlay(), nextFrame(), and prevFrame() to control playback of your main timeline.
• To control items in encapsulated timelines from the main timeline, prefix your playback commands with the instance name containing the timeline.
• Remember that timelines automatically loop unless you say to do otherwise using stop() in your timeline.
• Use the callback event object e to access the name of the object using the target property that triggered the event for use in your callback function.