
“The most important thing is for us to find Osama bin Laden. It is our number one priority and we will not rest until we find him.” | ||
| --George W. Bush, Washington, DC, September 13, 2001 | ||
“I don’t know where bin Laden is. I have no idea and really don’t care. It’s not that important. It’s not our priority.” | ||
| --George W. Bush, Washington, DC, March 13, 2002 | ||
Now that we’ve discussed how Web applications could be fuzzed, it’s time to put our theories to the test. In this chapter, we take what we learned in the background chapter and apply it by developing WebFuzz, a graphical Web application fuzzer. We start by planning the design of the application and identifying any unique challenges that we’ll face. We can then move onto the selection of an appropriate development platform and begin building the fuzzer. Once development is complete, our work won’t yet be done. When building a vulnerability discovery tool you should never consider development complete until you’ve used it to find vulnerabilities. You wouldn’t build a car without test driving it would you? We’ll therefore walk through a number of different classes of known Web application vulnerabilities to determine if WebFuzz would be able to uncover them.
The concept of Web application fuzzing is not new. Various fuzzers exist and the list is continuing to grow. Here is a listing of some popular freeware and commercial Web application fuzzers:
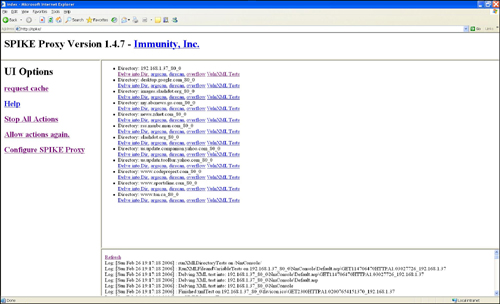
SPIKE Proxy. [1]Developed by Dave Aitel, SPIKE Proxy is a browser-based Web fuzzer written in Python. It acts as a proxy, capturing Web browser requests, and then allows you to run a series of predefined audits against a target Web site in an effort to identify various vulnerabilities such as SQL injection, buffer overflows, and XSS. Being built on an open source framework, SPIKE Proxy can be further extended to fuzz various targets. SPIKE Proxy isn’t exclusively a fuzzer; rather it is a combination of a vulnerability scanner and a fuzzer. Figure 10.1 displays a screenshot of SPIKE Proxy.
WebScarab. [2]The Open Web Application Security Project (OWASP) makes available various tools for testing the security of Web applications including WebScarab. Although more of an overall Web application security-testing tool, WebScarab does contain a basic fuzzer for injecting fuzzed values into application parameters.
SPI Fuzzer. [3]SPI Fuzzer is a component of the SPI Toolkit, which is itself part of the WebInspect application. WebInspect is a commercial tool developed by SPI Dynamics, designed to provide a comprehensive set of tools for testing Web applications.
Codenomicon HTTP Test Tools. [4]Codenomicon produces commercial fuzzing test suites for just about every protocol imaginable, including HTTP.
beSTORM. [5]Like Codenomicon, Beyond Security has built a business around the development of commercial fuzzers. beSTORM is a fuzzer that can handle various Internet protocols, including HTTP.
WebFuzz was inspired by the commercial tool SPI Fuzzer. SPI Fuzzer is a simple but well-designed graphical Web application fuzzer that provides a user with complete control over the raw HTTP requests that are used for fuzzing. It requires a basic knowledge of the HTTP protocol to develop tests that are likely to yield results. Such knowledge is also required to interpret the responses to identify those that require further investigation. Figure 10.2 shows SPI Fuzzer.

The primary downside to SPI Fuzzer is that fact that it is only available as a component of a rather expensive commercial application. We have built on the lessons learned from SPI Fuzzer to create a limited but open source alternative to meet our specific needs in WebFuzz. As with most fuzzers, WebFuzz is not a point-and-click, walk away and all the work is done for you security tool. It is simply a tool to automate what would otherwise need to be done manually. It is up to you as the end user to leverage it to develop meaningful tests and interpret the results. It should also be seen as a starting point, not a final solution.
As with all of the tools developed for this book, WebFuzz is an open source application. It therefore provides a framework that can and should be built on. We encourage you to add functionality and fix bugs, but most important, we hope that you will share your improvements with the rest of the world. The remainder of this chapter details the development of WebFuzz and walks through various case studies to demonstrate its capabilities and limitations. WebFuzz can be downloaded from this book’s Web site at www.fuzzing.org.
Before we dive into building our own fuzzer, let’s first consider what we learned in the last chapter about how the HTTP protocol functions and use that knowledge to determine the features that our fuzzer will require.
Let’s start at the beginning. You can’t fuzz a Web application unless you have a way to send it requests. In general, we use a Web browser when communicating with a Web server. After all, it knows how to speak the lingo (HTTP) and takes care of all the messy details in putting together an HTTP request. When fuzzing, however, we want the messy details. We want to be able to roll up our sleeves and alter every aspect of the request. For this reason, we have chosen to expose the raw request to the end user and allow for any portion of it to be fuzzed.
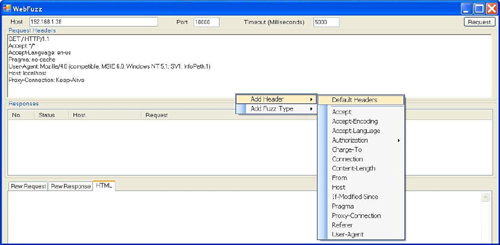
Figure 10.3 displays a basic WebFuzz request. The request consists of the following fields:
Host. The name or IP address of the target machine is a required field. We can’t fuzz a Web application without letting WebFuzz know where to send the request. This is not a fuzzable field.
Port. While Web applications run on TCP port 80 by default, they can just as easily run on any TCP port. It is actually common for Web applications designed to provide Web-based administration consoles to run on an alternate port to not interfere with the main Web server. As with the hostname, the port field exists to tell WebFuzz where to send the request and is not a fuzzable field.
Timeout. Because we’re purposely sending nonstandard Web requests, it won’t be uncommon for the target application not to respond in a timely fashion, if at all. We have therefore included a user-definable timeout value measured in milliseconds. When recording the resulting response for a request that timed out, it will be important that we record that fact as it could indicate that our request has knocked the target offline, resulting in a potential DoS vulnerability.
Request Headers. This is where the rubber hits the road. When using a Web browser, the end user has control over the target host, port, and request URI, but not all of the various headers. We have intentionally kept all components of the request in a single writable text field because we want the end user to be able to control every aspect of the request. The request can be built manually by simply typing the desired request into the Request Headers field. Alternately, if you prefer a point-and-click solution, headers can also be pieced together using the list of standard headers provided in the context menu as shown in Figure 10.3. One last option allows for the Default Headers to be selected from the context menu if a basic request of the default Web page is desired.
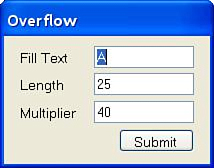
We refer to fuzz variables as the areas within the request that will be replaced by fuzz data. As discussed, the user has full control over the raw request sent to the Web server. Therefore, fuzz variables are added directly to the raw request and are identified by variable names enclosed in square brackets (e.g., [Overflow]). When designing the functions to create fuzz variables we have chosen to divide them into two basic types: static lists or generated variables. Static lists are fuzz variables pulled from a predefined list of data. An example of a static list would be fuzz data used to identify XSS vulnerabilities. A predefined list of various inputs that could lead to XSS vulnerabilities (e.g., <script>alert(‘XSS’)</script>) is compiled and the data is injected one line at a time into the request. The static lists are intentionally maintained as external ASCII text files so that users can modify the variables without needing to recompile the application. Generated fuzz variables, on the other hand, are built from predefined algorithms that might allow for input from the user. The Overflow variable is an example of a generated fuzz variable. An overflow allows the user to define the text used for the overflow, its length, and the number of times that it is repeated. Figure 10.4 illustrates the default pop-up window that allows the inputs for the overflow variable to be altered.
To be efficient, we might wish to define multiple fuzz variables within a single request. Although there are times when you might want to dynamically change two or more variables at the same time (e.g., a length value along with the content that it describes), for the sake of simplicity we have chosen to handle only one variable at a time, but it is possible to include multiple fuzz variables in a single request. WebFuzz will handle the first encountered fuzz variable and ignore the rest. Once the first variable has been completely fuzzed, it will be removed from the raw request so that WebFuzz can move on to subsequent variables. The following WebFuzz request demonstrates a request designed to identify a number of common vulnerabilities in one shot.
[Methods] /file.php?var1=[XSS][SQL]&var2=[Format] HTTP/1.1
Accept: */*
Accept-Language: en-us
User-Agent: Mozilla/4.0
Host: [Overflow]
Proxy-Connection: Keep-Alive
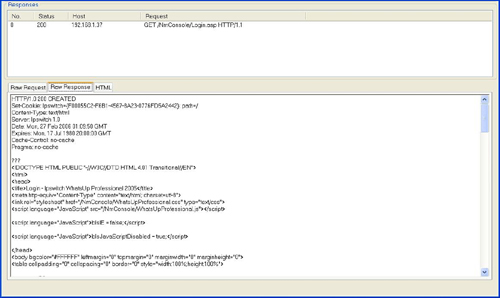
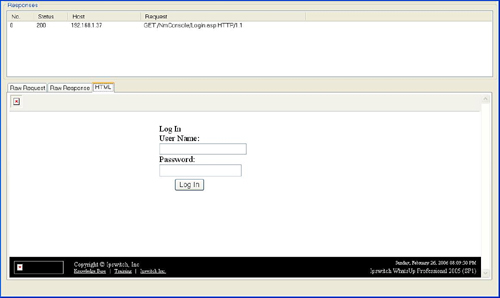
WebFuzz captures and archives all resulting responses in a raw format. By capturing the full raw response, we have the flexibility to display the responses in various formats. Specifically, we enable the user to display raw results or view the HTML within a Web browser control. Figure 10.5 shows a raw response and Figure 10.6 shows the same data within a Web browser. This is important, as clues to existing vulnerabilities can arrive in various forms. For example, the headers might include a status code (e.g., 500 – Internal Error) suggesting that a DoS has occurred. Alternately, the Web page itself might display a customer error message suggesting that SQL injection is possible. In this case, the error will be easier to see when a browser interprets the HTML.
HTTP provides some unique challenges both in terms of determining how best to monitor traffic and more important, in determining how to identify exceptions when they occur. Next, we’ll pull back the curtains to determine what is going on behind the Web browser.
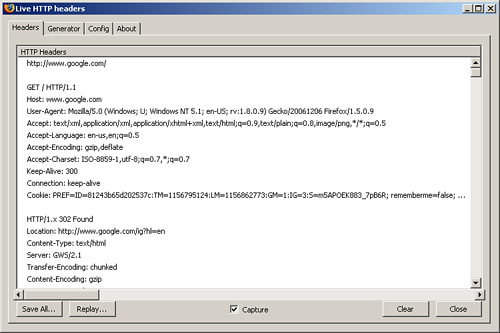
WebFuzz requires the user to build a raw HTTP request, but how do you identify appropriate requests for a given Web application? What Web pages exist? What variables can those pages receive and how should the variables be passed? In the last chapter, we discussed how inputs could be identified manually or through the use of sniffers, spiders, and proxies. Before we continue, we’d like to introduce a Web browser plug-in that can come in handy when working with WebFuzz and needing to identify the raw request for a single Web page. The LiveHTTPHeaders project[6] provides a handy tool for identifying raw HTTP requests within Mozilla-based Web browsers. Figure 10.7 shows LiveHTTPHeaders being used to display all requests and their associated responses in the Firefox sidebar. A nice advantage of using this approach is that a request can be captured and then cut and pasted directly into WebFuzz to streamline the creation of a fuzzed request. Various other browser plug-ins exist, such as Tamper Data[7] or Firebug,[8] which are also Firefox extensions, or Fiddler,[9] a browser add-on for Internet Explorer, but LiveHTTPHeaders is a favorite due to its simplicity.
As discussed previously, the response sent back from the targeted application can provide various clues about the impact of the initial fuzzed request. WebFuzz is designed to provide the user with detection data, but it is up to the user to interpret the responses. Although it’s not realistic to manually review in detail all responses from the Web server, the hope is that certain portions of a response will highlight the fact that an anomalous condition has occurred. The user can then identify the associated request. This is possible because all responses, in both a raw and HTML format, can be viewed in conjunction with the associated request simply by selecting the appropriate tab from the Responses window.
When running WebFuzz, the following pieces of information might indicate the existence of a vulnerable condition:
HTML status codes
Error messages embedded in the response
User input embedded in the response
Performance degradation
Request timeouts
WebFuzz error messages
Handled or unhandled exceptions
Let’s look at each of these pieces of information individually to better understand why they might be helpful in identifying vulnerabilities.
We already mentioned that HTML status codes are a vital piece of information, as they provide a quick visual indication of the success or failure of the initial request. Therefore, WebFuzz parses the raw response to identify the status code, which is then separately displayed in a table detailing all responses. With this information, the user can quickly identify responses that should be reviewed in greater detail.
Web servers by design can include error messages in dynamically generated Web pages. This is especially true if a Web server is incorrectly launched in a production environment with debugging functionality enabled. A classic example of an error message that says too much is an authentication error that states something like “password incorrect” as opposed to “username or password incorrect.” When brute forcing the login screen for a Web application, the first message will let you know that the username exists but the password is incorrect. This reduces the unknown variables from two (username and password) to one (password) and greatly increases the odds of being able to gain access. Application error messages can also be particularly useful when identifying SQL injection attacks.
When dynamically generated Web pages contain user-supplied data, it is possible that XSS vulnerabilities exist. Web application designers need to filter user input to ensure that such attacks aren’t possible, but improper filtering is a very common problem. Therefore, identifying data in the HTML response that was provided by WebFuzz is an indication the application should be tested for XSS vulnerabilities.
Although a flat-out application crash makes a DoS attack easy to spot, such vulnerabilities are typically more subtle. Often, performance degradation will indicate that the application might be vulnerable to DoS attacks. A request timeout is one way to identify performance degradation, but performance monitors should also be used during fuzzing to identify issues such as excessive CPU or memory usage.
As mentioned, request timeouts should not be ignored, as they might indicate a temporary or permanent DoS condition.
WebFuzz has its own error handling and will pop up error messages when certain functions fail to execute. For example, if the target server goes offline due to a previous fuzz request, WebFuzz might issue an error message indicating that it cannot connect to the target. This could mean that a DoS attack has occurred.
When fuzzing Web applications, it is possible to uncover vulnerabilities in both the application itself and the Web server on which it is running. It is therefore also important to be monitoring the status of the server. Although responses returned by the Web server provide insight into potential vulnerabilities, they do not tell the full story. It is quite likely that fuzzed requests will cause handled and unhandled exceptions that could lead to exploitable conditions if the inputs were altered slightly. It is therefore recommended that the targeted Web server have a separate debugger attached during fuzzing to identify such exceptions. Other tools discussed in this book such as FileFuzz and COMRaider include built-in debugging functionality. However, this is not required for Web fuzzing, as WebFuzz does not need to repeatedly launch and kill an application. This time we are sending a series of fuzzed requests to a single Web application that continues to run and respond to all requests barring input that causes a DoS condition.
Okay, enough theory; now it’s time for the fun stuff. Let’s roll up our sleeves and build a Web application fuzzer.
In designing WebFuzz, our goal was to create a user-friendly tool for fuzzing Web applications. As our target audience is expected to have a reasonable understanding of HTTP, it was not necessary to create a point-and-click solution. Instead, we wanted to design a tool that provided end users with maximum flexibility over request structure. We also wanted to deliver response data in a means that simplified the detection of potential vulnerabilities.
To make WebFuzz user friendly, it made sense to build a GUI application. C# was selected as the development language for two primary reasons. First, C# allowed us to design a reasonably professional-looking GUI with minimal effort. Second, C# provides a number of classes to assist with sending/receiving network traffic. A downside to using C# is that we’re primarily tied to the Windows platform. However, when fuzzing Web applications, we’re not necessarily fuzzing targets running on the same machine as the fuzzer. Therefore, designing a Windows tool does not limit us to fuzzing only Windows-based targets.
It’s not possible to dissect every piece of code without putting the reader to sleep. However, the main functionality for our fuzzer is contained within a few basic classes and we’ll now highlight key functionality in each of those classes. Remember that full source code for all of the applications presented in this book is available on the book’s website.
C# provides a WebClient class that includes functions for handling HTTP requests and responses. It encapsulates much of the code needed to generate and handle the necessary network traffic and can greatly streamline application development. It even comes with functions to handle much of the functionality required by WebFuzz, such as accessing the headers in the HTTP response. At a slightly lower level, C# provides the HttpWebRequest and HttpWebResponse classes. These classes require a little more coding effort but also expose more advanced functionality such as the ability to use proxies. Which of these slick classes did we use with WebFuzz? The answer is none. Instead we chose to use the TcpClient class, which is designed for any type of TCP traffic, not just HTTP. As such, it lacks the canned functionality of the other Web classes. Why would we do such a thing? Are we sadistic and enjoy writing unnecessary lines of code? No, it was just a necessary evil.
A major challenge when writing fuzzers is that you’re trying to do things in a way that they’re not supposed to be done. Therefore, standard classes and functions might not suit your needs. For our purposes we want complete control over the raw HTTP request and unfortunately, the various Web classes do not provide us with that level of granularity. Consider, for example, the following code:
WebClient wclFuzz = new WebClient();
wclFuzz.Headers.Add("blah", "blah");

Stream data = wclFuzz.OpenRead("http:// www.fuzzing.org");
StreamReader reader = new StreamReader(data);

data.Close();
reader.Close();
This simple code sample is all that is required to send a custom Web request using the WebClient class. We have created a basic GET request and have added only one custom header (blah: blah). However, when sniffing the actual traffic generated we find that the following request was sent:
GET / HTTP/1.1
blah: blah
Host: www.fuzzing.org
Connection: Keep-Alive
You will note that in the actual request, two additional headers were added, Host and Connection. It is for this reason that we’re unable to use the classes that are generally desirable. We need to sacrifice ease of use to go to a lower level and gain complete control over the process. In our case, we’ll use the TcpClient class for the networking component of WebFuzz.
Networking can be done using asynchronous or synchronous sockets. Although asynchronous sockets require a bit of extra work, their use within WebFuzz was a deliberate decision as the choice better handles the anticipated network problems that are likely when using a fuzzer.
Synchronous sockets are blocking. This means that when a request or response is encountered, the main thread will stop and wait for that communication to complete before proceeding. With a fuzzer we are deliberately trying to cause anomalous conditions, some of which might cause performance degradation or take the target application offline completely. We wouldn’t want WebFuzz to become nonresponsive while waiting for communication that might never occur. Asynchronous sockets allow us to avoid this problem as they are nonblocking. Asynchronous sockets launch a separate thread to handle the communication that will invoke a callback function to signal when the communication is complete. This allows other events to continue uninterrupted.
Let’s walk through the networking code in WebFuzz to better understand the concept of asynchronous sockets:
TcpClient client;
NetworkStream stream;
ClientState cs;

try
{
   client = new TcpClient();
   client.Connect(reqHost, Convert.ToInt32(tbxPort.Text));
   stream = client.GetStream();
   cs = new ClientState(stream, reqBytes);
}
catch (SocketException ex)
{
   MessageBox.Show(ex.Message, "Error", MessageBoxButtons.OK,
     MessageBoxIcon.Error);
   return;
}
catch (System.IO.IOException ex)
{
   MessageBox.Show(ex.Message, "Error", MessageBoxButtons.OK,
     MessageBoxIcon.Error);
   return;
}
IAsyncResult result = stream.BeginWrite(cs.ByteBuffer, 0,
   cs.ByteBuffer.Length, new AsyncCallback(OnWriteComplete), cs);

result.AsyncWaitHandle.WaitOne();
After creating a typical TCPClient and NetworkStream we invoke the BeginWrite() method of the stream. The BeginWrite() method takes the following five arguments:[10]
byte[] array. A buffer that contains the data to write to the network stream.int offset. The location in the buffer to begin sending data.int numBytes. The maximum number of bytes to write.AsyncCallback userCallback. The callback method that will be invoked when communication is complete.object stateObject. An object to distinguish this asynchronous write request from other such requests.
AsyncWaitHandle.WaitOne() causes the listening thread to be blocked until the request has been successfully sent. At that point, the callback function will be invoked as follows:
public static void OnWriteComplete(IAsyncResult ar)
{
   try
   {
      ClientState cs = (ClientState)ar.AsyncState;
      cs.NetStream.EndWrite(ar);
   }
   catch (System.ObjectDisposedException ex)
   {
      MessageBox.Show(ex.Message, "Error", MessageBoxButtons.OK,
        MessageBoxIcon.Error);
   }
}
When we have finished writing our request to the network stream, we are then able to receive the result back from the server:
try
{
   result = stream.BeginRead(cs.ByteBuffer, cs.TotalBytes,
   cs.ByteBuffer.Length - cs.TotalBytes,
   new AsyncCallback(OnReadComplete), cs);
}
catch (System.IO.IOException ex)
{
   MessageBox.Show(ex.Message, "Error", MessageBoxButtons.OK,
     MessageBoxIcon.Error);
   ReadDone.Close();
   return;
}
At this point, we once again use an asynchronous socket, but this time it is used to receive the response back from the target application. We now invoke the BeginRead() method, which takes the same arguments as the BeginWrite() method, but this time around, we are using OnReadComplete() as our callback method:
public void OnReadComplete(IAsyncResult ar)
{
   readTimeout.Elapsed += new ElapsedEventHandler(OnTimedEvent);
   readTimeout.Interval = Convert.ToInt32(tbxTimeout.Text);
   readTimeout.Enabled = true;

   ClientState cs = (ClientState)ar.AsyncState;
   int bytesRcvd;

   try
   {
      bytesRcvd = cs.NetStream.EndRead(ar);
   }
   catch (System.IO.IOException ex)
   {
      MessageBox.Show(ex.Message, "Error", MessageBoxButtons.OK,
        MessageBoxIcon.Error);
      return;
   }
   catch (System.ObjectDisposedException ex)
   {
      return;
   }

   cs.AppendResponse(Encoding.ASCII.GetString(cs.ByteBuffer,
     cs.TotalBytes, bytesRcvd));
   cs.AddToTotalBytes(bytesRcvd);

   if (bytesRcvd != 0)
   {
      cs.NetStream.BeginRead(cs.ByteBuffer, cs.TotalBytes,
      cs.ByteBuffer.Length - cs.TotalBytes,
                new AsyncCallback(OnReadComplete), cs);
      }
   else
   {
      readTimeout.Enabled = false;
      if (ReadDone.Set() == false)
         ReadDone.Set();
   }
}
We begin OnReadComplete() by creating a timer (readTimeout) that will call ReadDone.Set() if the user-defined timeout is reached. This allows us to ensure that the thread does not live indefinitely if the read fails to complete and provides the end user with a means of controlling the timeout length. We then append the response received to our buffer. At that point, we need to decide if we should continue waiting for further data. We do this by determining if more than zero bytes were received. If that’s the case, we do it all over again by once again invoking BeginRead(). If not, we kill the thread and move on.
Before we ever send a request, we must first determine what to send. This is obviously taken from the Request Headers window where the user creates the request, but each fuzz variable [XXX] must be replaced by the actual fuzz data. This process kicks off once the user clicks the Request button within the btnRequest_Click() method:
if (rawRequest.Contains("[") != true || rawRequest.Contains("]") != true)
        rawRequest = "[None]" + rawRequest;
while (rawRequest.Contains("[") && rawRequest.Contains("]")
{
    fuzz = rawRequest.Substring(rawRequest.IndexOf('[' ) + 1, (rawRequest.IndexOf(']')
- rawRequest.IndexOf('[')) - 1);
When we generate requests, we begin a loop that will continue to parse the user-supplied data so long as fuzz variables are encountered in the request. We then move onto a case statement that will determine what is to be done with each fuzz variable.
int arrayCount = 0;
int arrayEnd = 0;
Read fuzzText = null;
WebFuzz.Generate fuzzGenerate = null;
ArrayList fuzzArray = null;
string replaceString = "";
string[] fuzzVariables = { "SQL", "XSS", "Methods", "Overflow", "Traversal", "Format"
};

switch (fuzz)
{
   case "SQL":
      fuzzText = new Read("sqlinjection.txt");
      fuzzArray = fuzzText.readFile();
      arrayEnd = fuzzArray.Count;
      replaceString = "[SQL]";
      break;
   case "XSS":
      fuzzText = new Read("xssinjection.txt");
      fuzzArray = fuzzText.readFile();
      arrayEnd = fuzzArray.Count;
      replaceString = "[XSS]";
      break;
   case "Methods":
      fuzzText = new Read("methods.txt");
      fuzzArray = fuzzText.readFile();
      arrayEnd = fuzzArray.Count;
      replaceString = "[Methods]";
      break;
   case "Overflow":
      fuzzGenerate= new WebFuzz.Overflow(overflowFill, overflowLength,
      overflowMultiplier);
      fuzzArray = fuzzGenerate.buildArray();
      arrayEnd = fuzzArray.Count;
      replaceString = "[Overflow]";
      break;
   case "Traversal":
      fuzzGenerate= new WebFuzz.Overflow("../", 1, 10);
      fuzzArray = fuzzGenerate.buildArray();
      arrayEnd = fuzzArray.Count;
      replaceString = "[Traversal]";
      break;
   case "Format":
      fuzzGenerate= new WebFuzz.Overflow("%n", 1, 10);
      fuzzArray = fuzzGenerate.buildArray();
      arrayEnd = fuzzArray.Count;
      replaceString = "[Format]";
      break;
   case "None":
      ArrayList nullValueArrayList = new ArrayList();
      nullValueArrayList.Add("");
      fuzzArray = nullValueArrayList;
      arrayEnd = fuzzArray.Count;
      replaceString = "[None]";
      break;
   default:
      arrayEnd = 1;
      break;
Those fuzz variables, which come from a static list (SQL, XSS, and Methods), create a new Read() class and pass the constructor the name of the ASCII text file that contains the fuzz variables. Generated variables (Overflow, Traversal, and Format) on the other hand, instantiate a new Generate() class and pass in the string to be repeated, the total size of the string, and the number of times that the string is to be repeated.
As responses are received, WebFuzz archives the request, raw response, HTML response, hostname, and path by adding them to individual string arrays. Additionally, identifying information including the status code, hostname, and request are added to a ListView control. This way, when the fuzzing is complete you can simply click on the appropriate response in the ListView control and full details will be displayed in a series of tabbed RichTextBox and WebBrowser controls.
rtbRequestRaw.Text = reqString;
rtbResponseRaw.Text = dataReceived;
wbrResponse.DocumentText = html;

string path = getPath(reqString);

lvwResponses.Items.Add(lvwResponses.Items.Count.ToString());
lvwResponses.Items[lvwResponses.Items.Count - 1].SubItems.Add(status);
lvwResponses.Items[lvwResponses.Items.Count - 1].SubItems.Add(reqHost);
lvwResponses.Items[lvwResponses.Items.Count - 1].SubItems.Add
  (requestString.Substring(0, requestString.IndexOf("
")));

lvwResponses.Refresh();

requestsRaw[lvwResponses.Items.Count - 1] = reqString;
responsesRaw[lvwResponses.Items.Count - 1] = dataReceived;
responsesHtml[lvwResponses.Items.Count - 1] = html;
responsesHost[lvwResponses.Items.Count - 1] = reqHost;
responsesPath[lvwResponses.Items.Count - 1] = path;
As mentioned, WebFuzz is not a point-and-click vulnerability scanner. Rather, it is a tool designed to allow a knowledgeable individual to fuzz targeted portions of an HTTP request. Full source code and binaries for the tool are available at www.fuzzing.org.
Now that we have a basic understanding of how and why WebFuzz was built, it’s time to move on to more important things. It’s time to see if it actually works.
A directory traversal exists when a user is able to break out of the Web root directory and access files and folders that are not meant to be delivered via the Web application. This type of vulnerability poses a confidentiality risk but can also be escalated to result in a complete system compromise depending on the files that can the accessed. Consider, for example, a situation whereby a directory traversal would allow an attacker to obtain a password file. Even if the file were encrypted, it might present the opportunity to crack the passwords offline after it has been retrieved so that the attacker can return at a later time and connect to the server using valid authentication credentials.
Traversals generally involve sending a series of ../ characters to traverse to a higher level directory. The traversal characters are also often URL encoded to bypass basic detection filters. If directories are browsable this might be all that is required but it is generally also necessary to append the name of an existing file. When testing for a directory traversal attack, it is advisable to append the name of a file that will by default exist on the target server. For example, on a Windows system, boot.ini or win.ini are good choices as they are ASCII files that are easily recognizable when encountered and exist on all modern Windows operating systems.
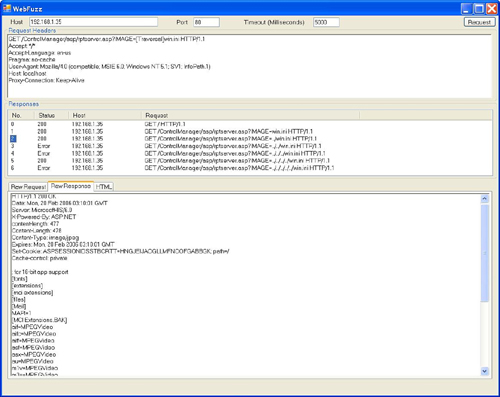
Let’s start by looking at a simple directory traversal attack in Trend Micro Control Manager[11] that is caused by improper input validation in the IMAGE parameter in the rptserver.asp page. We’ll use WebFuzz to send a get request to the rptserver.asp page but we’ll replace the legitimate IMAGE parameter with the [Traversal] fuzz variable followed by a known file, in this case, win.ini. We can see from the results shown in Figure 10.8 that the directory traversal is indeed exposed after a single traversal.
Let’s try another example, but this time, we’ll throw in a little twist. A vulnerability in Ipswitch Imail Web Calendaring[12] showed us that to find a directory traversal, sometimes you must also ask for something that isn’t there. In this case, it was discovered that a directory traversal vulnerability existed when the traversal was passed to a nonexistent JSP page. Once again, let’s put WebFuzz to the test (see Figure 10.9).
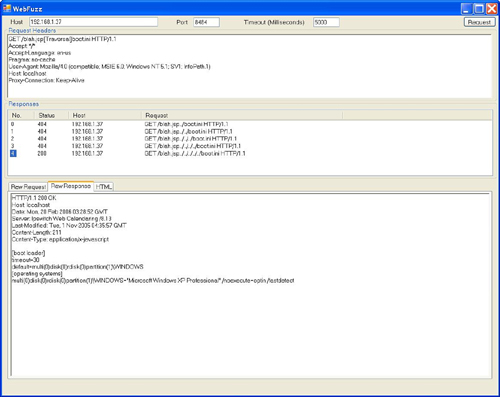
To test this particular vulnerability, we’ll pass a GET method to the server that requests the nonexistent blah.jsp Web page, followed by the traversal and ultimately the common boot.ini file. Figure 10.9 shows us that it takes a few requests but after five traversal sequences...you guessed it, the vulnerability is revealed.
Although relatively rare in the Web application world, buffer overflows can exist in Web applications or servers just as they do in console or GUI applications and they exist for the same reason: User-supplied input is not appropriately filtered, allowing data of an unexpected length to overflow a fixed size buffer. Overflows are particularly dangerous as they might lead to arbitrary code execution. However, when fuzzing, the most likely indicator that an overflow has occurred will be the fact that the application has crashed following a request containing an overly long string. By attaching a debugger to the target during fuzzing, it will be possible to determine if the overflow is limited to a DoS attack or could be extended to allow for remote code execution.
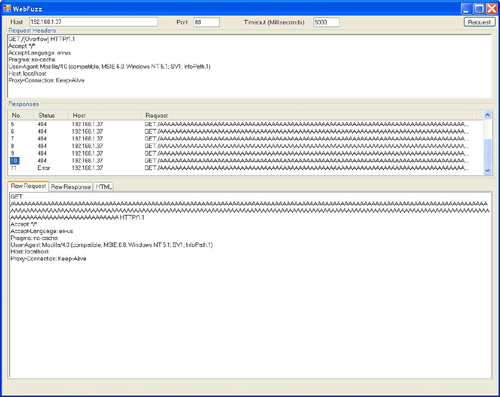
To illustrate the use of WebFuzz in detecting overflow vulnerabilities, we’ll use a simple example. What could be simpler that an overflow in PMSoftware’s Simple Web Server?[13] In this case, all we need to do is send a long GET request to the server. We’ll therefore send the following request, which includes an overflow fuzz variable:
GET /[Overflow] HTTP/1.1
At first, nothing happens other than a 404 – Page Not Found error but as can be seen in Figure 10.10, following request number 10, WebFuzz no longer receives a response of any kind. Why?
The answer is soon revealed when we look at the server where Simple Web Server was running, as the pop-up message shown in Figure 10.11 is displayed.
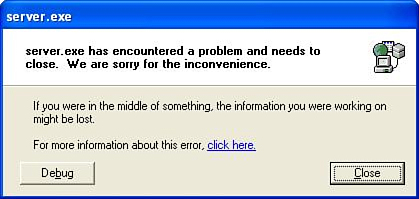
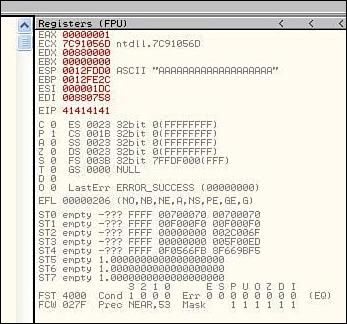
This is not a good sign (at least not for Simple Web Server). When the error message is closed, so too is the application. Yes indeed, at the very least, we have a DoS attack. Do we have the potential for code execution as well? The answer lies in Figure 10.12, where the attached debugger shows that EIP is controlled and therefore code execution will be possible. If you’re new to buffer overflows, don’t get too excited. This is a best case scenario. It’s not often that the fruit is hanging quite this low.
SQL injection attacks occur when user-supplied data can influence SQL requests reaching the back-end relational database. Once again, improperly filtered user data is the culprit. When fuzzing, application error messages provide a strong clue that SQL injection could be possible.
A SQL injection attack in the username field at the login screen for Ipswitch Whatsup Professional (SP1)[14] allowed attackers to bypass security altogether by changing the Administrator password. But how do we find it? Using LiveHTTPHeaders, we’re able to easily see that the username and password parameters are passed to the Login.asp page via a POST request as shown here:
POST /NmConsole/Login.asp HTTP/1.1
Host: localhost
User-Agent: Mozilla/5.0 (Windows; U; Windows NT 5.1; en-US; rv:1.8.0.1) Gecko/20060111
Firefox/1.5.0.1
Accept:
text/xml,application/xml,application/xhtml+xml,text/html;q=0.9,text/plain;q=0.8,image/
png,*/*;q=0.5
Accept-Language: en-us,en;q=0.5
Accept-Encoding: gzip,deflate
Accept-Charset: ISO-8859-1,utf-8;q=0.7,*;q=0.7
Keep-Alive: 300
Connection: keep-alive
Referer: http://localhost/NmConsole/Login.asp
Cookie: Ipswitch={A481461B-2EC6-40AE-B362-46B31959F6D1}
Content-Type: application/x-www-form-urlencoded
Content-Length: 81

bIsJavaScriptDisabled=false&sUserName=xxx&sPassword=yyy&btnLogIn=Log+In
Now that we know the proper format of the request, we can put together a fuzz request such as the following:
POST /NmConsole/Login.asp HTTP/1.1
Host: localhost

bIsJavaScriptDisabled=false&sUserName=[SQL]&sPassword=&btnLogIn=Log+In
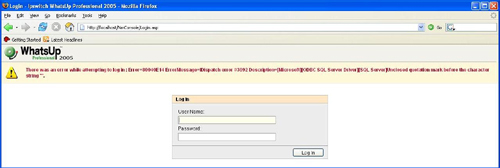
The standard error message for a failed login attempt is the following: There was an error while attempting to login: Invalid user name. However, when we run WebFuzz, we find that alternate error messages such as the one shown in Figure 10.13 are displayed in certain responses. You can clearly see from the content of the error message that user-supplied data appears to be getting submitted to the database.
However, this is not a straightforward SQL injection attack. Common authentication bypass techniques such as ‘ or 1=1[15] do not work here so we’ll have to actually craft a legitimate UPDATE query to change the administrator password. At this point we need details of the database schema to issue tailored SQL injection attacks that are specific to the target, but where can we obtain such information? A quick Google search reveals the answer. First, Ipswitch provides the schema itself for download.[16]
That’s great, but it still requires some effort to come up with a meaningful query and we’re busy building fuzzers. Not to worry: Ipswitch is kind enough to provide us with the query that we’re looking for. The Ipswitch knowledge base[17] actually provides us with the following command that will reset the password for the Admin user to its default value:
osql -E -D WhatsUp -Q "UPDATE WebUser SET sPassword=DEFAULT WHERE sUserName='Admin'"
Ipswitch provided this query to be used from a command-line tool to help out administrators who had accidentally locked themselves out of the application after forgetting their password. What they didn’t realize is that the same query works equally well with our SQL injection attack. Looks like the knowledge base Q and A section should have read as follows:
Question/Problem: I forgot the password for the default admin user in the Web interface. How can I reset it?
Answer/Solution: Find a SQL injection vulnerability and issue the following command...
XSS is everywhere. According to Mitre, in 2006, 21.5 percent of all new vulnerabilities involved XSS[18] and you don’t need to look hard to find them. In fact sla.ckers.org maintains an ever-growing XSS wall of shame[19] in their forums and it’s disappointing to see the number of large corporations that make an appearance on the list.
As with most Web application vulnerabilities, XSS is made possible because of improper input validation. The vulnerable application accepts user input and embeds it within dynamic page content without any filtering. As such, an attacker can inject client-side script such as JavaScript into the requested page. This in turn can allow the attacker to control the contents of the displayed Web page or perform actions on behalf of the victim.
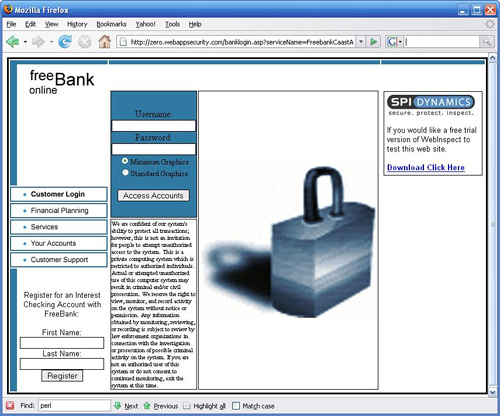
To walk through an XSS fuzzing example, we’ll start with a known vulnerable Web page. SPI Dynamics hosts a vulnerable Web application at http://zero.webappsecurity.com, shown in Figure 10.14, for the purpose of testing WebInspect, their Web application scanner. The default login page contains two Web forms. One is a login form that posts to the login1.asp page, and the other posts data to the rootlogin.asp page. It is this second form that contains an XSS vulnerability. Of the input fields in this form, the contents of the txtName field, which is labeled as Last Name, will be echoed back in the requested rootlogin.asp page. As the user input is displayed without any validation, the application is vulnerable to an XSS attack.
A common way to test for the existence of XSS is to input a simple JavaScript code snippet with an alert function that will result in a popup window. This is a quick and dirty test that results in a simple visual queue that leaves no doubt that client-side JavaScript can be injected into the target page. Therefore, we’ll submit the following request to test for XSS on the page:
POST /rootlogin.asp HTTP/1.1
Host: zero.webappsecurity.com
User-Agent: Mozilla/5.0 (Windows; U; Windows NT 5.1; en-US; rv:1.8.1.1) Gecko/20061204
Firefox/2.0.0.1
Accept:
text/xml,application/xml,application/xhtml+xml,text/html;q=0.9,text/plain;q=0.8,image/
png,*/*;q=0.5
Accept-Language: en-us,en;q=0.5
Accept-Encoding: gzip,deflate
Accept-Charset: ISO-8859-1,utf-8;q=0.7,*;q=0.7
Keep-Alive: 300
Connection: keep-alive
Referer: http://zero.webappsecurity.com
Content-Type: application/x-www-form-urlencoded
Content-Length: 72
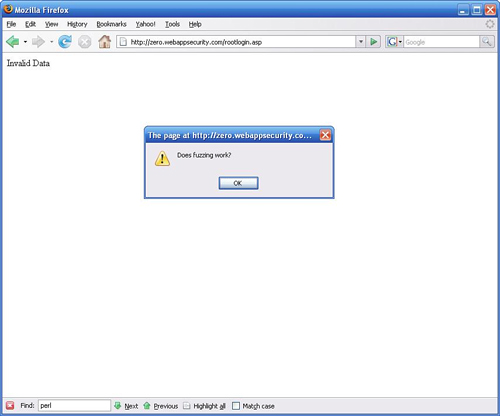
txtPassPhrase=first&txtName=<script>alert('Does fuzzing
work?')</script>&txtHidden=This+was+hidden+from+the+userAs can be seen in Figure 10.15, this results in a pop-up window being displayed on the page. However, when it comes to fuzzing, this isn’t a practical detection mechanism as it would require that we sit and watch for results. The greatest advantage of fuzzing is that it can be automated so that we can walk away and have results when we return.
Fortunately, given that we can inject code into the page, we have numerous options. What about injecting JavaScript that would ‘phone home’ when successful? That would work, but we can take an even more simplistic approach. Client side script doesn’t have to be JavaScript, it can be any scripting language that the browser is capable of interpreting. How about HTML? It’s a client side scripting language and it’s less likely to be filtered via blacklists than JavaScript so in one way it provides a stronger XSS test. An HTML IMG tag gives us a very simple ‘phone home’ capability. All that we need to do is use our fuzzer to inject an HTML IMG tag which requests a fake page from a local web server. When the fuzzing is complete, we check the server logs and if we see the request, voila! We know that the target is vulnerable to XSS. Let’s give it a try. First off, we need to add an appropriate fuzz variable to WebFuzz. This is why WebFuzz was designed to pull fuzz variables from plain text files. Adding new variables is simple and doesn’t require recompiling the application. In order to conduct the test, we’ll add the following line to the xssinjection.txt file.
%3Cimg+src%3D%27http%3A%2F%2Flocalhost%2Fblah%27%3E
This is simply a URL encoded version of the following image request, which attempts to retrieve a fake page from our local web server.
<img src='http://localhost/blah'>
When we check our Web server log files, what do we see?
#Software: Microsoft Internet Information Services 5.1
#Version: 1.0
#Date: 2007-01-31 00:57:34
#Fields: time c-ip cs-method cs-uri-stem sc-status
00:57:34 127.0.0.1 GET /xss 404
Busted! The 404 – Page Not Found log entry was made when WebFuzz injected the image request into the rootlogin.asp page, proof positive that the page has an XSS vulnerability.
The benefits provided by WebFuzz stem from the level of control provided to the end user. Namely, the user can completely control every aspect of the request. However, this comes at the price of needing to have a reasonable understanding of HTTP to put together a meaningful request that is likely to bear fruit. One area where the request portion of the tool could be improved is in allowing for more complex combinations of fuzz variables. For example, dependent variables could be added so that more than one variable is added at a time with the value of one being driven by the value of the other.
There is also plenty of room to further automate WebFuzz to allow for complete coverage of the entire application. This could be greatly enhanced by adding spidering functionality, which would be run initially to identify all possible requests and their structure. Porting the functionality in WebFuzz to a Web browser extension would also be valuable as it would allow for specific requests to be fuzzed as they’re encountered while surfing the Web. Finally, we foresee an opportunity to further automate the detection of responses that identify potential vulnerabilities. For example, a parsing engine could run over the raw responses and look for identifiers such as user-supplied data in the response that could indicate the existence of XSS vulnerabilities.
Well, we got the ball rolling but it’s in your court now. Make the application better and share your improvements with the world by resubmitting them to us so that we can roll them into future versions.
Web applications present some unique challenges but they are definitely appropriate targets for fuzzing. Hopefully, we’ve demonstrated the value of using fuzzing to uncover vulnerabilities in your Web applications before releasing them to production. WebFuzz is only a proof of concept but even in its raw state it is capable of uncovering vulnerabilities. We encourage you to take the source code for WebFuzz and build it into an even more effective tool.