
We’ve gotten everything in place. Our site is running and we have products available for sale, so is there anything missing? At this stage, I am sure there will be: before we can test our site, now is an excellent opportunity to consider finessing the user experience.
I can think of at least four topics to get us started; how about considering SEO, providing language support, and considering any plugins that might enhance the experience? Throughout this chapter, we will explore a handful of mini-projects to fine-tune the experience for customers and work toward adding a little more polish to our site. We’ve already mentioned three – let’s start with arguably the most important, enabling support for SEO on our website.
Before starting on any project, I would recommend taking a backup copy of the site for safekeeping – you can safely exclude .cache, .git, and the node_modules folders. We can reinstate these very quickly using different methods, so backups are not required.
Implementing SEO
If three letters could incite fear in oneself, they could well be S, E, and O. Anyone who spends any time developing sites will, of course, recognize these as referring to SEO, or Search Engine Optimization .
SEO is critical to the success of any site – it can be the difference between search engines (and therefore customers) finding your website and you making money and being lost in a sea of websites. Not only is it something of an ongoing battle but we also have to think of that behemoth of a search engine, aka Google! Adding in advanced SEO capabilities falls outside of the scope of this book, but thankfully Gatsby makes it very easy for us to add in a basic level of support.
To do so requires us to create a new component; you may find that if you use an existing starter theme (as we have done), this task isn’t necessary. If so, we just need to add a reference to call that component in on every page we create – to see how, let’s take a look at the next demo.
- 1.
First, stop the Gatsby development server if it is active – for this, press Ctrl+C (for Windows/Linux) or Cmd+C (for Mac).
- 2.
Go ahead and check your project folder – if you do not have a copy of a file called seo.js in srccomponents, then extract a copy of the file from the code download that accompanies this book. If you have one, then you can skip this step.
- 3.Next, we need to update gatsby-config.js – for this, crack open the file, and modify it as highlighted:module.exports = {siteMetadata: {title: 'Have Cake, Eat Cake',description: 'A demo cake store, built using Gatsby, DatoCMS, Netlify and Shopify',author: 'Alex Libby',url: `https://www.havecakeeatcake.com`,twitterUsername: `@havecakeeatcake`},
- 4.
This next bit gets a little more complicated – we need to update each of the pages to reflect the addition of the SEO component. We’ll start with terms.js – go ahead and open it in your text editor.
- 5.
Next, add in this line at the top of the file, before any code:
- 6.Scroll down until you get to the opening bracket at the end of the const declaration – add in the highlighted lines as indicated:const TermsPage = () => (<SEO title="Terms and Conditions" keywords={['gatsby', 'application', 'react']} />
- 7.
We also need to add a closing React fragment, so do this just before the closing }.
- 8.
We need to repeat this for the remaining pages – use the same steps, but this time swap out the existing text for those shown in the following:
Name of Page | Code Line to Use to Replace Existing Code |
|---|---|
products.js | <SEO title="Products" keywords={['gatsby', 'application', 'react']} /> |
help.js | <SEO title="Help" keywords={['gatsby', 'application', 'react']} /> |
gifts.js | <SEO title="Gifts" keywords={['gatsby', 'application', 'react']} /> |
delivery.js | <SEO title="Delivery" keywords={['gatsby', 'application', 'react']} /> |
about.js | <SEO title="About Us" keywords={['gatsby', 'application', 'react']} /> |
blog.js | <SEO title="Blog" keywords={['gatsby', 'application', 'react']} /> |
cart.js | <SEO title="Cart" keywords={['gatsby', 'application', 'react']} /> |
404.js | Replace the existing line with this: <SEO title="404: Not Found" keywords={['gatsby', 'application', 'react']} /> |
- 9.
We’ve completed the changes, so it’s time to restart the Gatsby server. Switch to the Node.js terminal session from earlier or crack open a new one, and make sure the working folder is our project area.
- 10.
At the prompt, enter gatsby develop and press Enter – wait for it to prompt that we can view the site, via http://localhost:8000.
- 11.
At this stage, we’re going to run a Lighthouse audit to confirm that SEO has now been enabled (albeit needing a tweak). Browse to any page of your choice – I will assume the use of about.js, but you can choose another if you prefer.
- 12.
Bring up the Developer Console by pressing Ctrl/Cmd+Shift+I, and then switch to the Lighthouse tab. Make sure that Desktop is selected, and then click the Generate report button.
- 13.
When completed, you will see a report appear – we’re interested in the SEO part, which will look similar to the screenshot shown in Figure 8-1.
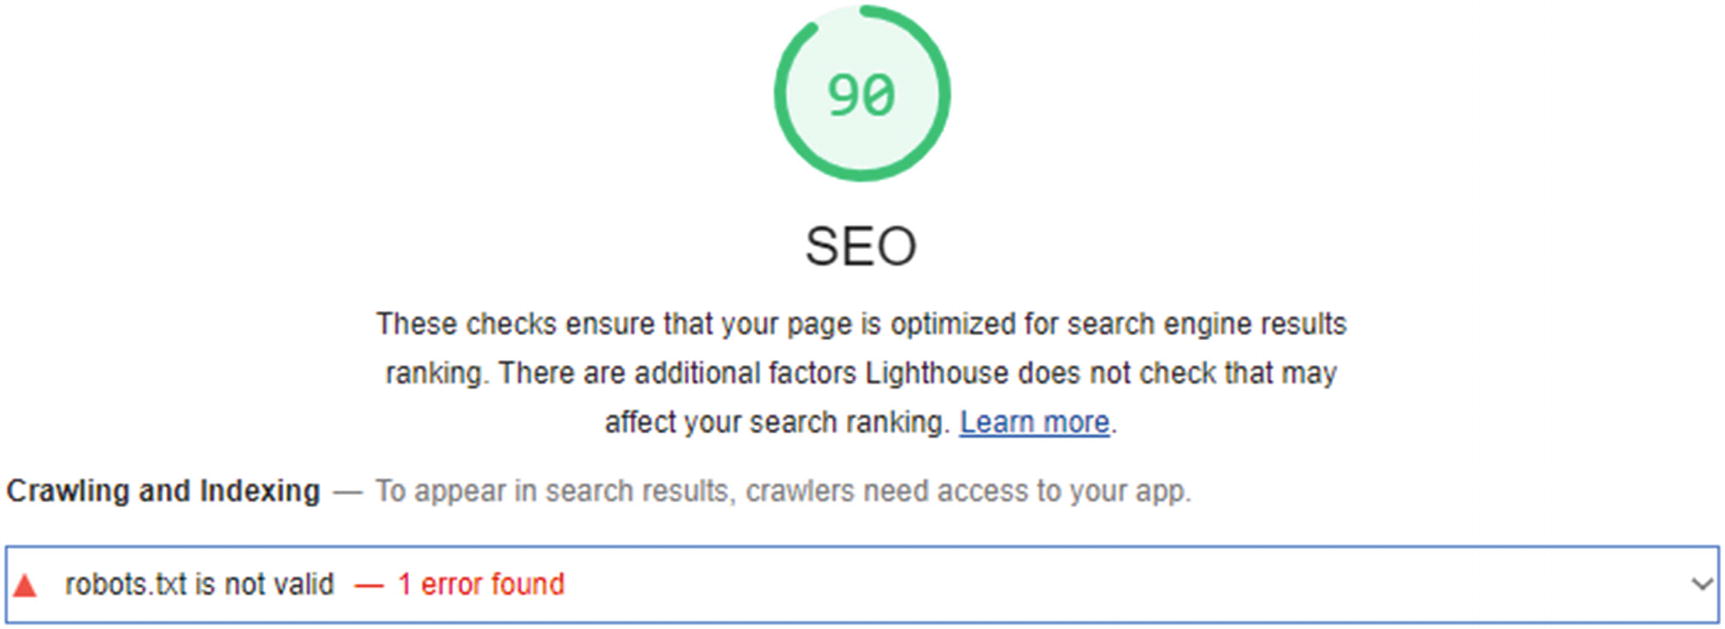
SEO enabled on our site, ready for customization
That might have seemed like a longer than normal exercise, but in reality, the change we’ve implemented is very straightforward – adding in references to a new SEO component. The trouble is it is only scratching the surface of what we can do – to take it further would require the services of someone well-versed in the intricacies of SEO! That said, it does raise some important points, so let’s take a look at the changes we’ve made in closer detail.
Exploring the Code in More Detail
Adding in SEO capabilities to any site is crucial to help with ranking and performance in search engines; adding a basic component or plugin takes minutes, but fine-tuning it is a much longer process! We’ve focused on the former in this last exercise, on the basis that fine-tuning it would be something we would do post–go live.
We started by adding a copy of the SEO plugin code from the code download that accompanies this book (seo.js); this is Gatsby’s starter SEO plugin and provides a good base for us to fine-tune the configuration at a later date. Next up, we then updated the gatsby-config.js file to add some new metadata properties that our plugin would use before importing it into various pages on the site.
To round out the exercise, we restarted the Gatsby development server (essential when editing gatsby-config.js) before running the Lighthouse audit from within Chrome to get a feel for how our page SEO stands with the addition of this component.
We will cover the use of Lighthouse more extensively in Chapter 9 when we start to optimize our site ready for production use.
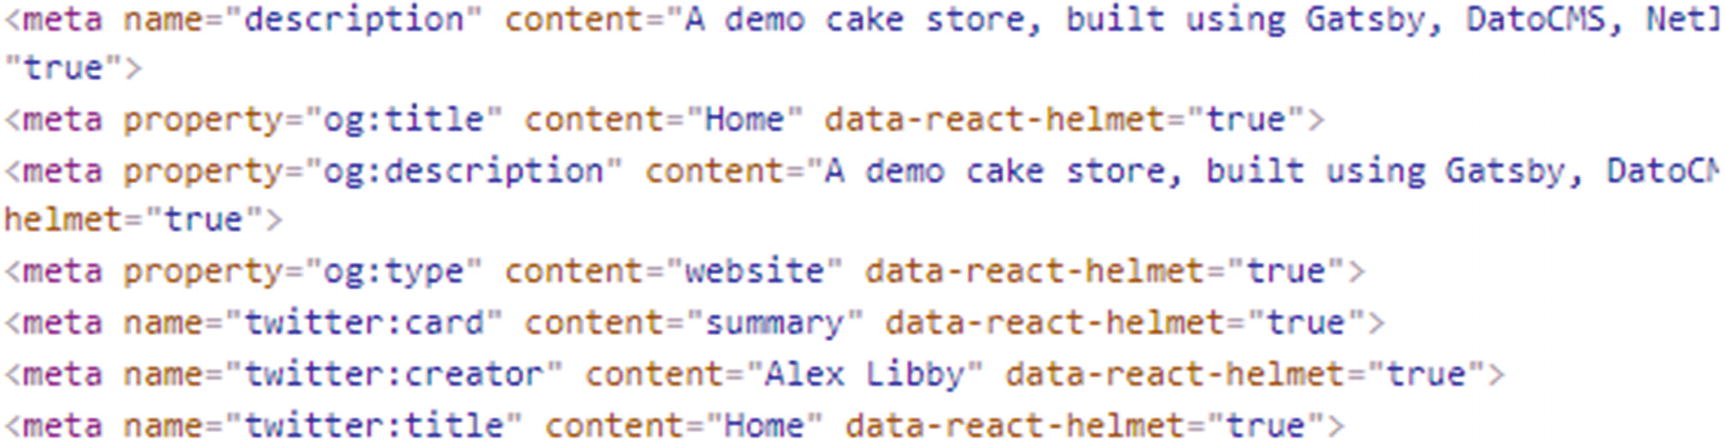
Verifying that SEO metadata is now displayed
Looking further afield, this isn’t the end of the story though. To take things further, I would recommend checking out the blog posts on the Gatsby website for SEO – you can find them at www.gatsbyjs.com/blog/tags/seo/. The posts provide a wealth of information around how to configure Gatsby for SEO; it shouldn’t act as a replacement for standard SEO practice, but complement the basics that any SEO expert would recommend.
Gatsby also provides an intriguing section on SEO for their framework – the documentation at www.gatsbyjs.com/docs/seo/ is worth a read too!
Although we will explore using Lighthouse more in Chapter 9, there is one topic I want to cover: adding in metadata tags, using the JSON-LD (JavaScript Object Notation for Linked Data) format.
This format is a useful way to add in data such as contact details to the DOM so that Google can better understand the structure of the page when it comes to crawling its content. Let’s take a quick look at how this would work in more detail.
Adding in Metadata
In this instance, we’re adding it in using the React Helmet plugin; as Gatsby is a server-side rendered framework, the plugin will insert the data into the correct place on the page for us.
This type of change would be ideal for inclusion into a Contact Us–type page, such as the one we have on our site. It will help search engines better understand your content and ultimately improve the page’s ranking in search results. Just something to consider, particularly if you have to battle Google and the intricacies of SEO!
Okay, let’s crack on: we have plenty more to cover! For our next project, there is one topic we absolutely should cover in this age of global e-commerce: adding comments.
If I had a dollar for every time someone said content (and feedback) is king, I would be a rich man by now! In all seriousness, though, feedback is essential to the survival of any site. It’s an opportunity for our customers to give their thoughts on various topics, such as service, their experience of ordering, and the like. Whether they give feedback constructively or negatively, that is a different matter…
Adding Comments
But I digress. For our next project, we will add the Disqus commenting system to our site. Gatsby won’t allow for comments to be added manually on a server-side rendered site, so we need to use a third-party system such as Disqus. Disqus is hosted externally, so won’t cause a problem in this respect – it only requires a handful of changes, so let’s dive in and take a look at how to set up Disqus in more detail.
- 1.
The first task is to sign up for an account at www.disqus.com. As part of this process, you will need to choose a site name – keep this name safe, as you will need it later in this exercise.
- 2.
Click Sign Up, and then enter your name, email address, and password – go ahead and tick checkboxes as directed/preferred (the last one is not compulsory!)
- 3.
On the next page, click I want to install Disqus on my site.
- 4.
When prompted, enter your name in the Site owner field.
- 5.
Next, enter your website name, and then select business as the Category.
- 6.
We will use the free Basic plan for now – click Basic and then click Subscribe now.
- 7.
When prompted, click Create Site.
The account is now created; we don’t need to get the code for the comment form from the site, as this we will handle in the next part of this exercise, by use of a Gatsby plugin. There are a fair few steps involved in this next part, so have a breather and get a drink, and when you’re ready, let’s continue with the next part of this demo.
- 1.
First, crack open a Node.js terminal session, and change the working folder to our project area – at the prompt, enter npm install disqus-react and press Enter.
- 2.
NPM will go away and install the Disqus package for React; once done, open your text editor.
- 3.
Next, go ahead and open your .production.env file and add this statement to the end of the file, where XXXXX is the name you gave your Disqus site/account back in part 1:
- 4.
Repeat step 3, but this time, add the same line to your .development.env file as well – this makes sure Disqus is available to operate in both your development and production environments.
- 5.
Next, open the blog-template file from the src emplates folder, and add in this line immediately after the last import statement at the top of the file:
- 6.Scroll down a bit, and add in this block of code immediately before the let featuredImage... statement – leave a line after this block of code and that let statement:const post = data.markdownRemark;const disqusConfig = {shortname: process.env.GATSBY_DISQUS_NAME,config: { identifier: post.id },}
- 7.A little further down, go ahead and add in this line before the closing React fragment, as indicated:<DiscussionEmbed {...disqusConfig} />
- 8.
Go ahead and save all open files and then close them – we’ve completed the changes needed for this exercise.
- 9.
At this point, we should be able to view the comment block. For this, switch to your Node.js terminal session, and then at the prompt, enter gatsby develop and press Enter.
- 10.
Browse to http://localhost:8000 in your browser – if all is well, we should see something akin to the screenshot in Figure 8-3.
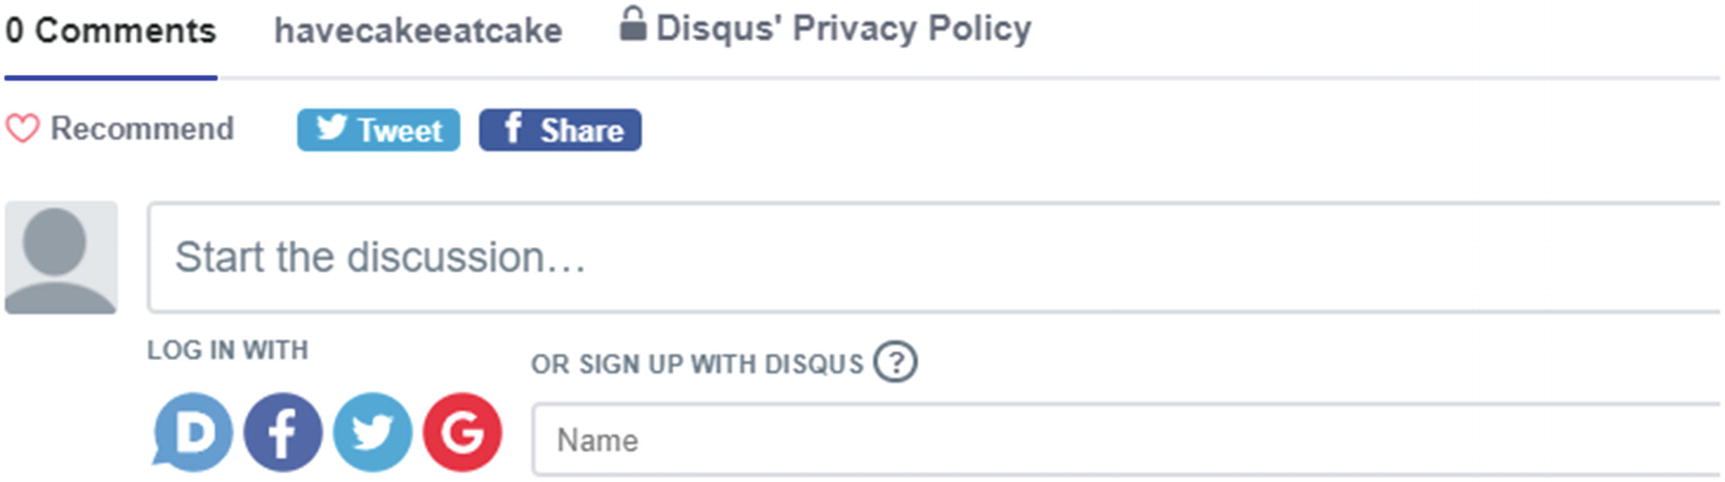
The addition of a Disqus comment block to a post on our site
Adding comments is an essential step to engaging with our customer base – it allows them to communicate with us, and leaving a comment can be far more powerful than just sending another email! We’ve worked through several steps to enable this facility, so let’s take a moment to explore the changes in more detail.
Understanding the Changes Made
So we’ve explored the importance of adding comments, but how did we manage it technically? Well, as we saw, it required a few steps – let’s work through them.
We started by signing up for an account on the Disqus website – as part of this, we took note of the site/account name that we used when creating the account. Next up, we then ran through the plugin’s installation – for the most part, this uses the same process as any other NPM plugin.
The real change comes from configuring our site to use the Disqus plugin; the first change required us to add a value to two .env files before updating the blog-template.js file to insert a call to the Disqus comment system. We then rounded out the demo by rebuilding the content as a production-optimized version; we confirmed it worked by browsing to the site so that we could view it in all its glory.
With our comment system set up, let’s move on to our next project: as a change, this one will be simpler, as a break from the last two monster changes we’ve made! Every site should have a sitemap to help Google find and index our content – let’s take a look in more detail at how to configure it for use in our site.
Setting Up a Sitemap
Adding a sitemap in Gatsby is easy to do, as we can use the Gatsby sitemap plugin that takes care of everything; it’s hosted at www.gatsbyjs.com/plugins/gatsby-plugin-sitemap/. We need to install it and add a reference to it in our gatsby-config.js file. Let’s take a look at how, as part of the next exercise.
- 1.
First, crack open a Node.js terminal session, and then change the working folder to our project area.
- 2.
At the prompt, enter npm install gatsby-plugin-sitemap and press Enter.
- 3.
Next, switch to your text editor, and open your gatsby-config.js file.
- 4.Go ahead and add in the following highlighted lines – your package.json should look similar to this:url: 'https://www.havecakeeatcake.com',twitterUsername: '@havecakeeatcake',siteUrl: 'http://havecakeeatcake.com'},plugins: ['gatsby-plugin-sitemap','gatsby-plugin-react-helmet',
- 5.
Go ahead and save and then close the file – the change is complete.
- 6.
Switch to your Node.js terminal session, and then at the prompt, enter gatsby build and press Enter.
- 7.
If all is well, we should see a sitemap generated – you can see proof of this in Figure 8-4.
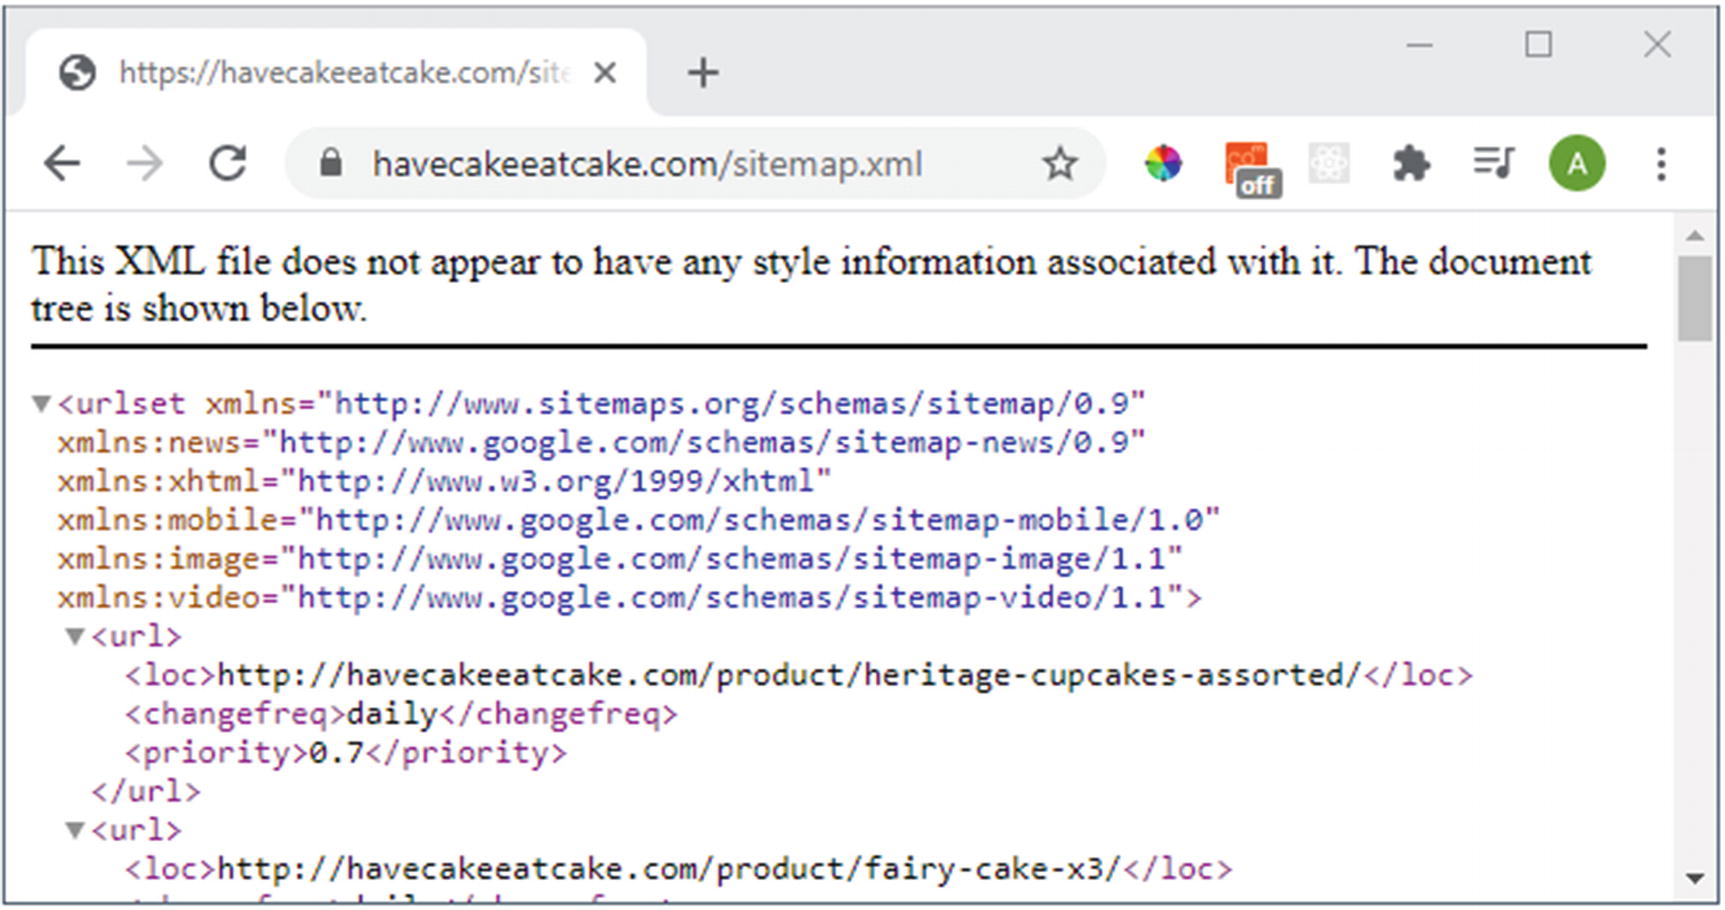
The addition of a sitemap to our site
A nice simple change, I’m sure you will agree! It may be a simple change, but an important one; it will help Google rank our site better in its search listings. We started by running through the installation, which is standard for any NPM package; we then added a reference to it from the gatsby-config.js file to tell Gatsby to use it during the build process.
An important point is that the sitemap plugin works when running in production mode only – you won’t see it if you are in development mode.
Okay, let’s crack on: the next project is all about communication, specifically from our customers. Yes, it’s time to add in that ubiquitous contact form; given we render content server-side, how would we go about adding in such a form? I wonder.
Adding a Contact Form
Before we delve into the intricacies of how we will architect our form, I want to ask a question: hands up anyone who has come across a site that does not have some way for customers to contact them?
Providing a contact mechanism is essential for all sites, as customers will want to get hold of you at some point. It doesn’t matter why; every question or request should be treated with the same importance, no matter how stupid it might be! I know companies do provide such a contact form but make it so hard to get to it that it’s almost as bad as not providing one….but I digress!
Getform – https://getform.io/
Netlify Forms – www.netlify.com/docs/form-handling/
Formspree – https://formspree.io/
For this book, I’ve elected to use Formspree, as it is free and can run independently of any architecture we use. If we needed to move the code, it would be easier, as it is architecturally platform-agnostic. With this in mind, let’s look at how we can add a simple form as a starting point for our website.
To set up a form using Formspree, follow these steps:
- 1.
The first step is to register a new account at https://formspree.io/ – you will need to verify your email address as part of the registration.
- 2.
Once registered, click New Form.
- 3.
In the Name field, enter Contact Us, and then click Create.
- 4.
For the Send emails to field, add your email address.
- 5.
Copy the value in the Your form’s endpoint is… field – this is your form on Formspree, and we will use the value in our site.
- 6.
Next, go ahead and extract a copy of ContactForm.js from the code download and save it to the srccomponents folder.
- 7.
Crack that file open in your editor, and then look for this line: action=https://formspree.io/XXXXX. Replace the XXXXX with the value from step 5.
- 8.
Next, we need to create a contact us page – there is a copy on the code download that accompanies this book. Extract contactus.js, and save it to the srcpages folder.
- 9.We need to add a link to our navigation. For this, crack open sitenavigation.js in your editor and add this link in immediately before the closing </div>, thus:<Link to="/contactus/">Contact Us</Link></div>
It doesn’t follow the same format, but this is just a temporary measure to prove it works – we will update this shortly.
- 10.
Save and close the file.
- 11.The contact form by itself won’t look great, so to fix that, let’s add in some basic formatting – add in these styles to the bottom of styles.scss:/***** CONTACT FORM ******/.contactform { display: flex; flex-direction: column; width: 50%; }.contactform label:nth-child(2) {margin-bottom: 10px; }.contactform input:nth-child(4) { height: 150px; margin-bottom: 10px; }.contactform p { background-color: #00ff00; color: #ffffff; padding: 10px; }
- 12.
Go ahead and save this file. Revert to a Node.js terminal session (or open a new one), and change the working folder to our project area.
- 13.
At the prompt, enter gatsby develop and press Enter; if all is well, we should see our new form appear once we’ve restarted the server and content rebuilt (Figure 8-5).

The newly created form
- 14.
Make sure all files still open are closed – this completes the exercise.
Phew, that exercise might have seemed a little on the long side, but at least we now have the option available for our customers to get hold of us! Adding the form is a straightforward affair when using a service such as Formspree.
It takes care of most of the hard work for us, leaving us to create a suitable page to host it (contactus.js) and add a preconfigured form (contactform.js) as a component to our site. Let’s pause to review the code in more detail before we crack on with the next part of this mini-project.
Reviewing the Code in Detail
This last demo was a simple exercise, for which Formspree had done a lot of the work for us already; we simply had to drop in the prepared code, update the form action, and link it into our site. So what did we do?
We began by registering a new account with Formspree; we used the default settings for now, but we could expand this at a later date. We then added a copy of the preprepared contactform.js component from the code download before updating the form action with the URL generated from the Formspree account.
Next up, we then added a copy of the contactus.js page from the code download; this follows a similar format to the other pages on our site. For the last task, we tweaked the styling of the form to make it look more presentable, before rebuilding the content and viewing the results on-screen.
Before we move to our next mini-project, there is one update we should do – remember how we hard-coded the Contact Us URL in the navigation? It was purely to test it works; it would look better if we were pulling data from our data source in DatoCMS. Let’s fix that now, as part of the next exercise.
Updating the Link
Everything should look okay at this point, right? After all, we have a form in place; it submits to our chosen email address and looks presentable on the page… There is one thing left to do, though.
“What’s that?” I hear you ask. Well, if you remember, we took a shortcut to add in the Contact Us link in the navigation; part of the reason for this was that it required quite a few steps to update our data source, which would have made for a lengthy exercise! It wasn’t essential in the short term to prove if our page was accessible; now that it is in place, let’s rectify this omission by adding in the correctly formatted link.
- 1.
First, log into our DatoCMS project at https://XXXXX.admin.datocms.com/sign_in.
- 2.
Next, click the Navigation entry on the left and then Home.
- 3.
In the top-left corner, you will see Edit Navigation navigation; click the lowercase instance of navigation to begin editing the data structure.
- 4.
Click Add new field, then Text, and then Single-line string.
- 5.
In the field displayed, enter Contact Us as the title.
- 6.
Change Field ID to contact_us_text, and then click Save field.
- 7.
Repeat steps 4–6, but use Contact Us Link as the ID. Click Save field when done.
- 8.
Click Go to content editing and then click Home.
- 9.
Scroll down to the Contact Us field, and then enter Contact Us as the text.
- 10.
In the Contact Us Link field, add /contactus/.
- 11.
Click Save, and then revert to your text editor.
- 12.Open sitenavigation.js, and then replace the hard-coded link we added in the previous exercise with this:<Link to={'${data.datoCmsNavigation.ContactUsLink}'}>{data.datoCmsNavigation.ContactUsText}</Link>
- 13.At the same time, update GraphQL query as highlighted:productsLinkhelpTexthelpLinkcontactUsTextcontactUsLink}}')
- 14.
Save the file; then restart the Gatsby develop server by entering gatsby develop in the Node.js terminal session and pressing Enter.
- 15.
Ensure you’ve saved all of the open files and closed them if they are still open – the changes are complete for this demo.
Although we’ve had to work through a fair few steps, most of these are ones we’ve been through before; remember when we built the original data structure in DatoCMS back at the start of this book?
This time around, we added data fields for the Contact Us text and link; we then filled out the relevant text that should be displayed, once we reference the fields in code. Next up, we then amended the sitenavigation.js file to replace the hard-coded link with one that pulls in the information from DatoCMS and updated the GraphQL query. We then rebuilt the content using the by-now-familiar gatsby develop command; although we wouldn’t see any change in what appears on the page, we can at least be sure that all of the links now use the same format.
Taking It to the Next Level
Taking things to the next level…I wonder where we could go?
Animation – I’m wary of adding animation, as it can be overdone and spoil the effects we are trying to achieve. However, we could potentially look at adding in something to give a visual identity to the customer when a product has been added to the basket, for example. This is a perfect way to add in a subtle effect that really adds value to the site.
I think a change of background color could be required – we’ve not run it yet, but I happen to know that Lighthouse will report that our header and footer do not show sufficient contrast, so will flag it as an accessibility issue.
Talking of accessibility, what about adding in ARIA labels to our site? This is essential for a good Lighthouse score – we will touch more on this in the next chapter.
We added in a basic stock level availability, but this wasn’t real-time; there is potential to improve on it and also the wording (we may not want to show exactly how many items we have!).
I think a magnifying glass effect, or potentially a gallery, could prove useful here – cakes are very visual items, so anything to help show off how they look will help the customer.
How about adding in support for different currencies? We might decide that English is the only language we can support (as we may not have the resources to add in more). However, we should also consider adding in support for other currencies; in this global age, there is nothing to stop us exporting goods, as long as they are packaged correctly!
These are just a few ideas that come to mind – I’m sure that, given time, you will come up with other ideas worthy of consideration. Ultimately we can’t do them all at once, so prioritization is key; this is something we will need to agree with our site owner, according to their business requirements and strategy, before launching into providing the world before they are ready!
Summary
We are almost at the point where we can move our site into production. There’s always time to tweak and improve the experience; it’s just a case of knowing what to include and when to stop! Throughout the last few pages, we’ve worked on four mini-projects, to give you a flavor of where we could improve the experience – let’s review what we have learned in this chapter.
We began by exploring some of the basics around adding in SEO support for our site; we used a plugin from the Gatsby site and learned that although it significantly improved the rating given by Lighthouse, there was still more we could do to improve on the score.
Next up, we then covered the initial process of setting up localization, using French as our example language. We saw how easy it was to add in the support, but learned that we would have to be careful about how we structure the site. Otherwise, we might risk being penalized by Google – not a good move!
We then moved onto adding in both a contact form and comments mechanisms, using third-party services. We understood that as Gatsby is rendered server-side, it means that traditional methods wouldn’t work; using external services allows us to tie in something to our site and for customers to get in touch with us.
Phew, we’re making significant progress, but here comes the critical part: before we can release our site into the wild, it’s time to make sure it is fully optimized and tested! There are dozens of ways to do this, but I will show you in the next chapter how, with some simple tools, we can already make some tangible improvements to our code, ready for release later in this book.