
Getting Started with Bazel
Introducing Bazel
The landscape for build tools these days can be confusing, especially if there’s no clear “winner.” All too often, you hear users rave about their favorite tool and how it is most definitely more feature-rich, expressive, or performant than its competitors. A lot of build tool users have a biased, sometimes even religious, opinion. Without hands-on experience, it is very hard to distinguish between bias and hard facts.
It’s easy to decide on a build tool for a pet project based on personal preference; however, as soon as you plan to standardize on a tool on an enterprise-wide level, you’ll definitely have to consider more aspects. A wrong choice may cause a ripple effect across the organization, potentially resulting in unmaintainable builds, long-running build times, or a poor user experience.
Bazel, an open source build tool implemented and maintained by Google, is one of the newer players in the field. You might have heard of Blaze (Google’s internal build tool) at conferences in the past and are wondering whether the open source variant, Bazel, is for you. In this report, we’ll explore use cases, features, and usability concerns of Bazel. We’ll take a hard look at its benefits and shortcomings and work through concrete, Java-based examples to give you a first taste of its syntax and functionality. We’ll also see Bazel’s advanced features, like remote caching and execution.
After reading this report, you should be able to evaluate whether Bazel is a good fit for your organization. Moreover, you’ll be equipped with the knowledge and the resources to get a head start on using Bazel for your project.
What Is It?
Before jumping right into Bazel code examples, let’s talk about its history. As mentioned, Google implements and uses a build tool named Blaze for internal use only. Blaze is optimized to carry out Google-internal use cases and processes. Most prominently, Blaze focuses on building large monorepos, delivering fast execution and feedback times, as well as ensuring reproducibility and correctness. As you can imagine, those requirements make Blaze a highly opinionated though powerful tool.
Despite its strong stance on internal build practices and standards, Google decided to open-source a Blaze derivate in 2015. That’s the build tool we refer to as Bazel. Bazel comes with the same DNA as its internal cousin, but it is far less Google-specific. After growing the community and feature set for over four years, Google released its first official, production-ready offering—Bazel version 1.0—in October 2019.
Why Should I Use It?
You might be asking: What’s in it for me? Aren’t the tool’s conventions too specific for my project? Does my project even meet the requirements of being buildable by Bazel? Here’s what Bazel can bring to the table in a nutshell:
- Declarative language
-
As a developer of build logic, you use a higher-level language called Starlark, a Python derivative. Starlark introduces an abstraction to the concepts of a build and hides its implementation complexities as much as possible. As a result, you do not have to concern yourself with low-level implementation details like compilers or linkers. Instead, you just point your build to the source code and declare dependencies. Bazel will figure out the rest. Needless to say, you can still fine-tune the compiler or linker settings if needed.
- Reproducibility
-
When executing builds over and over again, you do not want any surprises. Nondeterministic behavior erodes trust in the correctness of build results. Bazel ensures a sandboxed build execution by enforcing the definition of all of its dependencies explicitly.
- Scalability
-
Bazel’s main focus is on projects with large codebases, predominantly for organizations that have decided to put all of their projects into a monorepo. It’s not a dealbreaker if you break down your projects into individual source code repositories. That’s common practice, especially if you are working on software with a microservices architecture. Bazel can handle both code organizational structures quite well.
- Parallel and distributed execution
-
Improvements to build performance become more apparent in larger codebases, as Bazel can execute its work in parallel and in a distributed fashion. Build execution can be performed on a single machine or distributed across multiple remote machines (e.g., located in a datacenter).
- Building polyglot projects
-
Many build tools support building only a single language or ecosystem. That’s not the case with Bazel. Bazel can handle polyglot projects. For example, it supports the JVM (Java Virtual Machine) ecosystem, native languages, and JavaScript. Furthermore, Bazel embraces modern software development methodologies like containerization of applications with Docker and deployment to orchestration engines like Kubernetes.
- Extensibility
-
It’s not uncommon for projects to have custom requirements. While Bazel’s built-in support for languages and ecosystems is broad and expansive, it cannot cover every possible use case. With the help of Bazel’s extension mechanism, called rules, developers can enhance the tool’s base functionality and share it across the organization or wider community.
- Long-term support
-
One of the biggest advantages to using Bazel is that Google is driving it, which means that the project benefits from years of in-house use and evolution at Google. Moreover, with Bazel’s move to go open source, it’s also backed by a dedicated team of Google developers. As a result, you can expect bug fixes, new features, and long-term support. The latter was confirmed explicitly in the 1.0 release announcement.
I won’t compare Bazel with other build tools in detail to see how they stack up—doing so would require a whole other report. Hopefully, however, the next couple of sections will give you a sense of its capabilities. You can find all the source code in a dedicated repository on GitHub if you’d like to follow along.
Let’s get started by installing Bazel on your machine.
Installing Bazel
This section will give you relevant information on platform requirements, supported operating systems, and how to specify the compatible Bazel version for a project in a configuration-as-code way.
Installation Options
The Bazel runtime can be executed on all major operating systems. At the time of writing, those operating systems include Linux, macOS, and Windows. Given different operating system distributions and versions, it’s hard to determine 100% compatibility without trying it out. See the installation instructions for a detailed breakdown of distributions and versions. Upon further inspection, you will find that Bazel requires the installation of additional tools as a prerequisite. For example, on Windows you’ll have to install the Visual C++ Redistributable for Visual Studio 2015, and on macOS you’ll need to install XCode.
Alternatively, you can execute Bazel inside of a Docker container. A Docker execution environment might be helpful if you just want to get familiar with Bazel without having to install a specific version of the runtime yourself. Docker containers are easy to stand up and can be disposed of after you’ve finished experimenting with them. The project provides a Docker container based on Ubuntu Linux with a preinstalled version of Bazel available on the Google Cloud Marketspace. For detailed usage information, refer to the relevant section in the Bazel user manual.
Using the Bazel Binary Installer
To give you an idea of the steps involved in the installation process, we’ll walk through one of the installation routines applicable to a multitude of operating systems—Linux, macOS, and Windows. The following steps assume you’ve already installed the prerequisites.
The binary installer can be directly downloaded from Bazel’s GitHub releases web page. Pick the appropriate distribution for your operating system and the architecture from one of the released versions. If you want to run Bazel version 1.1.0 on a Linux 64-bit system, for example, you’d pick the binary file named bazel-1.1.0-linux-x86_64.sh.
Before executing the binary, make sure to provide execution permissions to the file. Install the file in your user home bin directory by providing the command-line option --user. The following two commands perform those operations on Ubuntu Linux:
$ chmod +x bazel-1.1.0-installer-linux-x86_64.sh
$ ./bazel-1.1.0-installer-linux-x86_64.sh --user
All that’s left is to add the executable’s path to the PATH environment variable. While this step isn’t really mandatory, it will help a lot with running Bazel from all project directories on your machine:
$ export PATH="$PATH:$HOME/bin"
You can verify the Bazel installation by running the help command. The command should be able to run the Bazel executable and render valuable usage information on the console:
$ bazel help
WARNING: --batch mode is deprecated. Please instead explicitly
shut down your Bazel server using the command "bazel shutdown".

[bazel release 1.1.0]
Usage: bazel <command> <options> ...
Available commands:
  analyze-profile     Analyzes build profile data.
  aquery              Analyzes the given targets and queries
                      the action graph.
  build               Builds the specified targets.
  canonicalize-flags  Canonicalizes a list of bazel options.
...
Especially if you’re a beginner to the tool, you’ll find the help command invaluable for exploring as a short reference instead of having to jump back and forth between the console and the documentation. An even more convenient solution is the optional command-line interface (CLI) completion feature.
Command-Line Completion
You might be well familiar with the CLI completion functionality for other tools. Some shells propose commands when you press the Tab key, and CLI flags when you type certain letters. Bazel supports command-line completion functionality for the shells bash and zsh. You can install this feature as needed. Installation instructions can be found on the Bazel web page.
User-Friendly Launcher for Bazel
How many times have you asked your coworkers about the version of a tool you need to install to ensure optimal compatibility with the code? Bazel makes this question a nonissue. In Bazel, you can define the compatible version of the runtime together with the project source code—think “configuration as code.” How does this look in practice?
Install the binary Bazelisk on the machine that you want to use for build execution. From now on, simply use the executable bazelisk instead of bazel.
Create a .bazelversion file and check it into version control alongside your project source code. The file contains the version compatible with your project. Upon execution, Bazelisk will automatically download and install the Bazel runtime and use it for this particular build. It goes without saying that the Bazel runtime for a specific version needs to be downloaded only once.
Why is this functionality such a big deal? First of all, your whole team knows exactly which version of Bazel is required to build the project. Should the build fail for whatever reason, it won’t be the result of an incompatible runtime version but of the build logic itself. Moreover, in a Continuous Integration (CI) environment, you only need to ensure that the Bazelisk runtime is installed. There’s no more need to maintain multiple Bazel versions in parallel independent of the CI execution environment (e.g., different CI agents, or running the CI build in a Docker container).
With the basic setup out of the way, let’s jump right into a very simple example that teaches you how to define and run a Bazel build from the user’s perspective, what happens under the hood, and what terminology applies.
Bazel Quick Start
What’s the best way to learn a new programming language or tool? By trying out a “Hello World” example, of course. In this section, we’ll set up a Java-based project with the goal of compiling the source code and running the application. You don’t need to be a Java expert; the concepts apply to the Bazel’s support for other languages as well. For a quick reference, refer to the Bazel documentation page.
Basic Building Blocks
Every project in Bazel starts with a workspace file named (appropriately) WORKSPACE. The WORKSPACE file resides in the root directory of your project. Its purpose is to designate the directories containing your source code. Optionally, the WORKSPACE file can also define the external dependencies of your project and their respective repositories. We will discuss how to declare dependencies later in “Dependency Management”. It’s totally valid to start with an empty WORKSPACE file and add to it when the need arises.
Every piece of software project that grows in complexity over time is usually split up into modules. In a perfect world, modules group source code based on a dedicated function or domain responsibility. For example, you could organize a travel application by functionality for account management, reservations, and payment processing. It’s very common that one module may need the functionality of another module and therefore has to define a dependency on it at compile time and/or runtime.
In Bazel, a software module is called a package. The BUILD file (alternatively, BUILD.bazel) indicates that we are dealing with a package. Any workspace can contain one or many packages and therefore BUILD files. Figure 1 demonstrates an exemplary setup of a project and the respective Bazel files.
Note
Now, you may say that the Bazel term package overlaps with what Java calls a package. You are absolutely right. It definitely makes discussing a Java project built with Bazel much harder than it needs to be. In this report, I will explicitly refer to either a Bazel package or a Java package, as they are two different concepts.
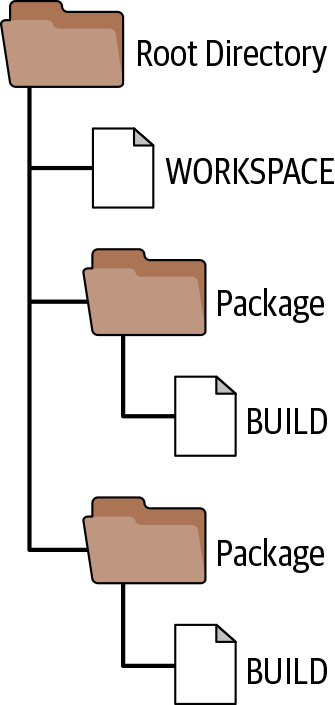
Figure 1. A sample project built with Bazel with two packages
For the purpose of building a simplistic Java project, let’s assume that we are just dealing with a single Bazel package. Later, we’ll extend the setup of the build by breaking up the logic into a more fine-grained structure. Alongside this, we’ll also talk about the pros and cons for each approach.
Setting Up a “Hello World” Java Project
Let’s start small and simple. The Java application we are about to build contains two Java source files in the directory src/main/java. You might already know this particular source directory from other build tools like Maven or Gradle. It’s important to mention that Bazel doesn’t enforce the naming of the source code directory, nor does it propose any conventions. A project is free to organize source code in any directory structure that suits its needs or enterprise-wide conventions. I chose src/main/java to make the project structure look as familiar as possible.
Note
Some build tools (like Maven’s archetype or Gradle’s init task) offer bootstrapping functionality for generating a canonical skeleton project. At the time of writing, Bazel does not offer equivalent functionality.
The file HelloWorld.java defines the main method, the entry point to the application. The file Messenger.java exposes a method that simply renders the “Hello World” message. The following directory structure shows the project setup after the necessary Bazel files are added:
.
├── BUILD
├── WORKSPACE
└── src
    └── main
        └── java
            └── com
                └── bmuschko
                    ├── HelloWorld.java
                    └── messenger
                        └── Messenger.java
As you can see, the root directory of the project contains the WORKSPACE file and the BUILD file. For now, we can keep the WORKSPACE file empty because our code doesn’t require any external dependencies.
The BUILD file shown in Example 1-1 looks more interesting. We start defining our Bazel package by declaring a so-called build rule. A build rule knows how to build one or many outputs from a set of inputs. In this example, we are using the built-in java_binary build rule. The inputs are represented by the source files and a pointer to the main class for execution. Once executed, the build rule will produce a JAR (Java Archive) file and an OS-specific script for executing the application.
Example 1-1. Modeling a Java binary by pointing to the source code and main class
java_binary(name="hello-world",srcs=glob(["src/main/java/com/bmuschko/**/*.java"]),main_class="com.bmuschko.HelloWorld",)

Usage of the build rule for generating a Java binary file

The name of the target

A pointer to the source code using wildcard notation referenced for compilation and packaging

The main class name of the application
We have the proper code in place, but how do we actually execute the logical steps required to compile the code, package the JAR file, and generate the shell script? That’s the purpose of a target. In the preceding build logic, we defined a target with the name "hello-world". Next up, we’ll invoke the target from the console with the help of the Bazel runtime.
Running the Build from the Command Line
Earlier, we ran the help command to verify the successful installation of Bazel. If you looked at the console output more closely, you might have noticed the build command. It is the primary command for executing a target. You can find the command in action in this condensed console output:
$ bazel build //:hello-world ... INFO: Found 1 target... Target //:hello-world up-to-date: bazel-bin/hello-world.jar
The path to the generated JAR file
The script for executing the application
Note
Compiling Java source code and packaging JAR files requires you to install the JDK on the machine that runs the build. If needed for a specific target, Bazel will try to download the JDK with a specific hardcoded version. At the time of writing, the default JDK version is 11.
The definition of the target as part of the bazel command might not look as you expected. Instead of just spelling out the name, we also have to provide the path relative to the project structure. Therefore, every target belongs to exactly one package. Bazel calls the combination of package name plus the target name a label. Figure 2 shows a more elaborate example. In “Modeling Fine-Grained Package Granularity and Dependencies” we’ll get back to using this particular label.

Figure 2. Composition of a label
Remember that you can have one or many targets per package in a project. To prevent any naming overlaps, the command requires you to specify which package you’re dealing with. The // refers to the root directory that holds your WORKSPACE file. The prefix // doesn’t need to be spelled out if you are executing the command directly from the package directory. Later, we will explore build invocations for more deeply nested project definitions.
Using the Generated Artifacts
Let’s briefly verify that the build outputs of the target look as expected. First, we’ll have a look at the contents of the JAR file. No surprise there: all expected class files are included with the correct Java package. Additionally, we can also find the manifest file:
$ jar tf bazel-bin/hello-world.jar
META-INF/
META-INF/MANIFEST.MF
com/
com/bmuschko/
com/bmuschko/HelloWorld.class
com/bmuschko/messenger/
com/bmuschko/messenger/Messenger.class
We also want to give the shell script a go. Executing the script sets up the classpath for the JAR file and runs the main method of the class HelloWorld:
$ bazel-bin/hello-world
Hello World!
The produced artifacts are great for use in a production environment. During development, you can also execute the main method of your Java binary with the help of the run command. The run command automatically ensures that the source files are compiled and packaged and that the main class is executed.
$ bazel run //:hello-world
...
Hello World!
We’ve seen what happens from the end user’s perspective when we run a build. But how does Bazel go about translating the build logic into executable instructions? In the next section, we’ll take a deeper look at what happens under the hood.
The Lifecycle of a Bazel Build
Every Bazel build executes as part of a three-part, phased process. While this process is mostly abstracted from the end user, you’ll need a deeper understanding when implementing your own extensions to Bazel. We’ll get back to Bazel’s extensibility features in “Extending Bazel’s Capabilities”. For now, we’re just laying the groundwork of Bazel’s build lifecycle, as shown in Figure 3.
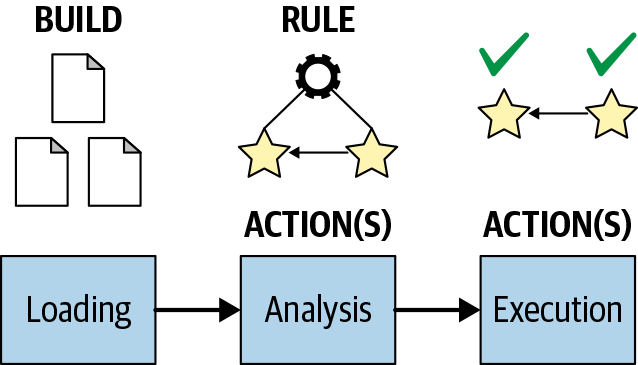
Figure 3. Phases executed for every Bazel build
The initial phase is called the loading phase. Its main purpose is to parse, evaluate, and cache the contents of all BUILD files defined for a project, including all targets and their dependencies. Any issue during this process will fail the build—for example, if a BUILD file doesn’t contain the correct notation of a rule or tries to call a function that doesn’t exist.
The next phase, the analysis phase, is responsible for constructing the build execution graph, implemented as a directed acyclic graph. The build execution graph consists of actions created by targets and formalizes their order of execution. Actions are responsible for generating the outputs we talked about before. The build can fail in this phase as well (e.g., if rule types don’t match).
Lastly, the execution phase takes care of executing the actions. The build fails if any one of the actions cannot perform its work.
That’s it from the perspective of a higher-level view. There’s definitely more to be said about the intricate details of each lifecycle phases; however, we won’t drill in any deeper here. You can read up on additional aspects in the Bazel user documentation.
For many developers, their IDE of choice is the primary interaction with the source code and the compiler. The build usually already has all of the information to perform more advanced automation processes, which can be derived from the IDE. The next section will give a short overview on Bazel’s integration with popular IDEs.
Driving Bazel from the IDE
The Bazel team maintains two IDE integrations as open source projects, one for IntelliJ IDEA and another one for VSCode. Both plug-ins provide a feature-rich experience. For the purpose of demonstrating the functionality, we’ll walk through opening the “Hello World” project in IntelliJ and touch on some of the features.
First things first: you’ll have to install the plug-in in IntelliJ. The plug-in does not require the commercial version of IntelliJ; you can simply go with the Community Edition. Open the menu option IntelliJ IDEA > Preferences... > Plugins and type in the search term Bazel. Figure 4 shows the installed plug-in after you restart the IDE.
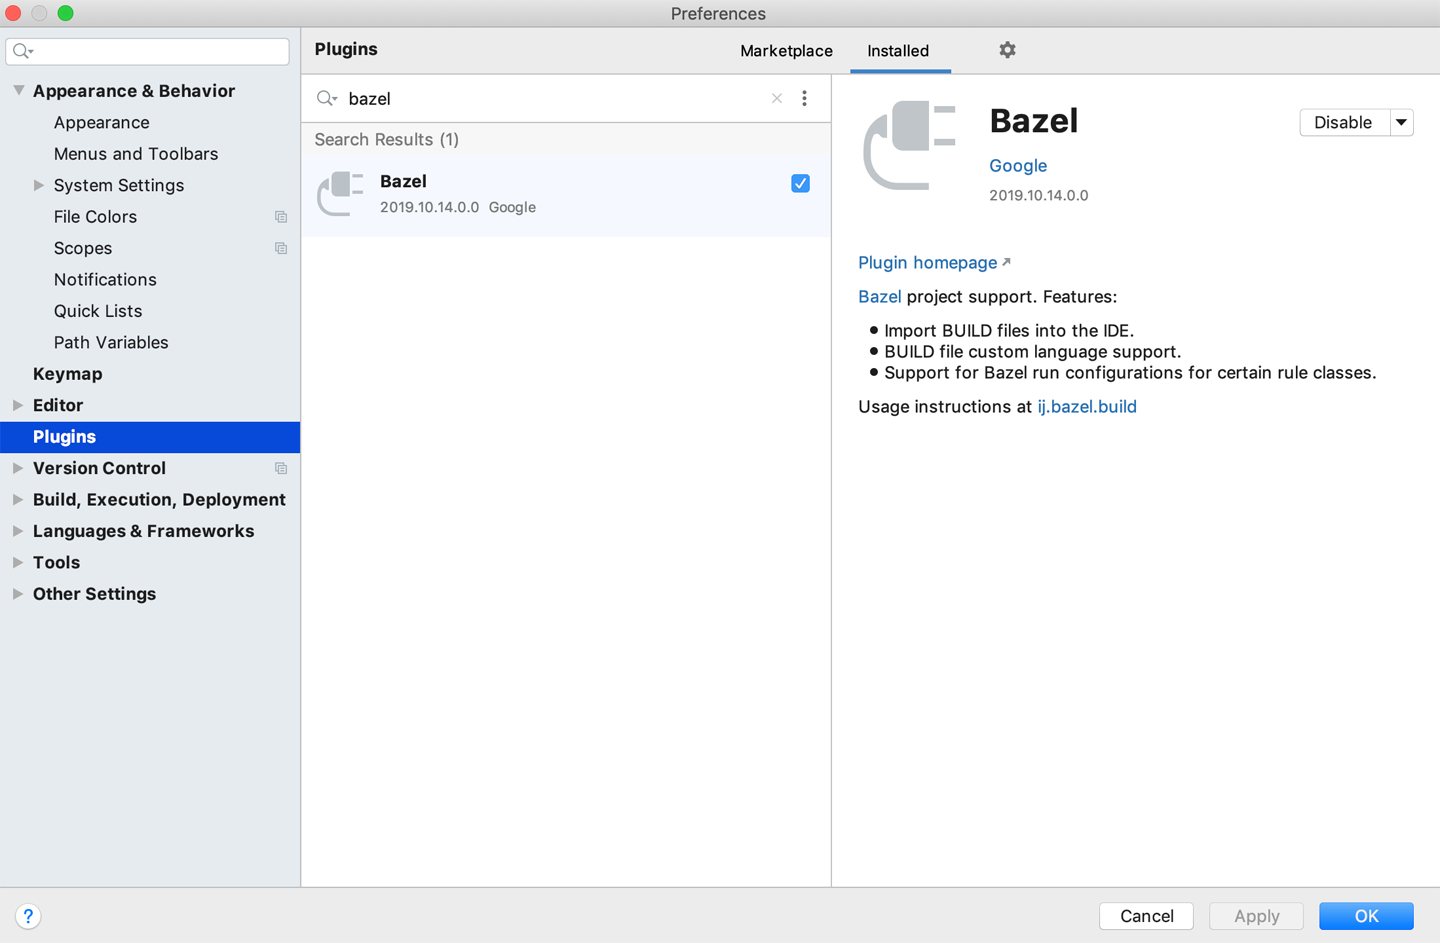
Figure 4. Installation of the Bazel plug-in for IntelliJ
After installing the plug-in, you should see the option “Import Bazel project” when trying to open a new project. Select the option and point it to the root directory of your project. IntelliJ will analyze the project structure and derive all important information from the build (e.g., source directories and dependencies). The imported project for our “Hello World” example is shown in Figure 5.

Figure 5. Imported Bazel project in IntelliJ
Figure 5 reveals the main integration points with Bazel. The Bazel Problems panel automatically renders semantic issues discovered in a BUILD or WORKSPACE file. The Bazel Console panel shows the output of a build execution, which you can trigger by clicking the little Bazel icon in the top-right corner of the window. One of the most compelling reasons for using an IDE is the autocompletion feature. Figure 6 shows an example of the autocompletion pop up in the context of a java_binary rule.
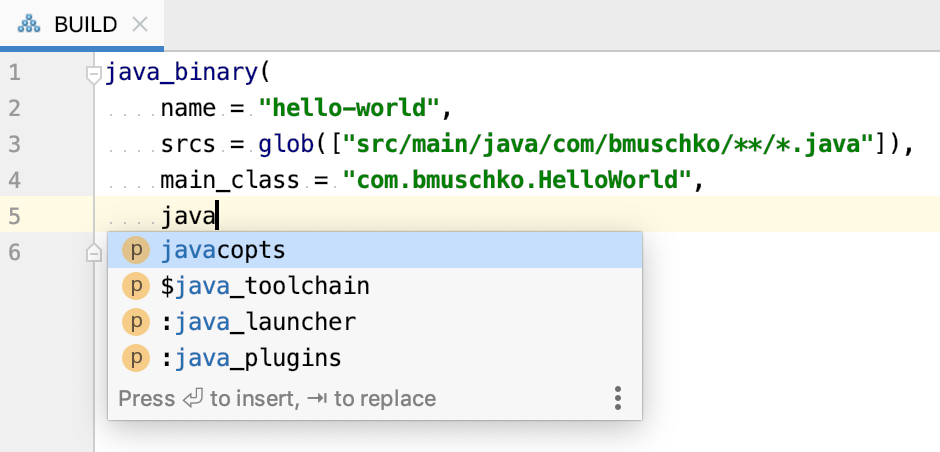
Figure 6. Autocompletion for Bazel build functionality in IntelliJ
This concludes our condensed introduction to Bazel. You should have learned everything you need to know to get started with using Bazel in your own projects. It’s very possible that you are not writing Java code—maybe you need to build C++ code, Go projects, or mobile applications. The Bazel web page offers a wide range of hands-on tutorials to guide you.
Granted, enterprise projects have far more complex requirements. In the next couple of sections, we’ll dive deeper into the Bazel toolbox. We’ll talk about dependency management, executing tests, modeling builds on CI, and all the scalability features that make Bazel stand out.
Dependency Management
Dependency management is a crucial feature of every build tool. Without it, you wouldn’t be able to define compile-time dependencies on other packages, on libraries hosted in an external repository, or on projects in a different workspace. The next sections will touch on two of those dependency types in more detail. Take a look at the Bazel user documentation for a more detailed discussion of what’s possible in Bazel in the realm of dependency management.
Modeling Fine-Grained Package Granularity and Dependencies
I mentioned earlier that you can break down your project source by modules, or packages in Bazel-speak. So far we’ve modeled only a single package, which simply pointed to all of the source code found in a specific subdirectory.
One of Bazel’s benefits is that you can define packages in a very fine-grained way, even to the level of a single source file per package. What’s the big deal? Well, if they’re structured properly, you’ll be able to execute many of those packages in parallel or farm out the work as part of the distributed build. We’ll talk about those features in “Extending Bazel’s Capabilities”. For now, we’ll just lay the groundwork by breaking down our existing project into multiple packages.
Let’s say we wanted to create a Bazel package for the Java package com.bmuschko, which contains our main class, and another Bazel package for the Java package com.bmuschko.messenger. For each of the packages, we need to create a BUILD file. We can delete the BUILD file in the root directory of the workspace. If you are following along by making these changes on your machine, you should end up with the following project structure:
.
├── WORKSPACE
└── src
    └── main
        └── java
            └── com
                └── bmuschko
                    ├── BUILD
                    ├── HelloWorld.java
                    └── messenger
                        ├── BUILD
                        └── Messenger.java
Next up, we’ll edit the BUILD files of the packages. Example 1-2 shows the contents of the BUILD file in the messenger package.
Example 1-2. Defining a fine-grained package
java_library(name="messenger-lib",srcs=["Messenger.java"])
Definition of a nonexecutable Java library
As you might have guessed, the BUILD file defines a rule; however, it is a different one than we used before. Because we are building a simple library that doesn’t need to be executable, we’ll just go with the rule java_library. At runtime, the Java library rule compiles the source code and packages the class files into a JAR file.
Now that we’ve split the source code into two distinct compilation units, we’ll have to establish a dependency between the packages. We are assuming that the main method defined in HelloWorld creates an instance of the class Messenger and uses its functionality. Every rule can define compile-time and/or runtime dependencies. Example 1-3 demonstrates how to establish a compile-time dependency on the messenger-lib target that produces the JAR file with the help of the deps attribute.
Example 1-3. Declaring a dependency on the messenger package
java_binary(name="hello-world",srcs=["HelloWorld.java"],main_class="com.bmuschko.HelloWorld",deps=["//src/main/java/com/bmuschko/messenger"+":messenger-lib"])
The full path to the
messenger-libtarget in themessengerpackage
The notation for running the hello-world target looks different now that we have moved the package definition into a subdirectory. To invoke the target, provide the full path to the Bazel package:
$ bazel build //src/main/java/com/bmuschko:hello-world
ERROR: /Users/bmuschko/dev/projects/polyglot-projects-bazel/
multi-package/src/main/java/com/bmuschko/BUILD:1:1: in
java_binary rule //src/main/java/com/bmuschko:hello-world:
target '//src/main/java/com/bmuschko/messenger
:messenger-lib' is not visible from target
'//src/main/java/com/bmuschko:hello-world'. Check the
visibility declaration of the former target if you think
the dependency is legitimate
ERROR: Analysis of target '//src/main/java/com/bmuschko
:hello-world' failed; build aborted: Analysis of target
'//src/main/java/com/bmuschko:hello-world' failed; build
aborted
FAILED: Build did NOT complete successfully (1 packages
loaded, 2 targets configured)
What a surprise! The build failed. Is there something we missed? Bazel requires a build author to be explicit about the visibility of targets across multiple packages. By default, a target can “see” only other targets of the same BUILD file. Now that we are dealing with two different packages, we have to declare the visibility for the Java library, as shown in Example 1-4. The target __pkg__ is a reserved keyword, meaning “all rules in the package.” We can specify an even broader visibility attribute via //visibility:public, which effectively allows any other package to use the rule. Refer to the user documentation for a deep dive into the different visibility notations and their use cases.
Example 1-4. Declaring a dependency on the messenger package
java_library(name="messenger",srcs=["Messenger.java"],visibility=["//src/main/java/com/bmuschko:__pkg__"])
Make the target visible to all rules in specified package.
Executing the build with the same command we used before will resolve the package dependency properly, compile the code with the intended classpath, and create an executable JAR file that runs the “Hello World” application:
$ bazel build //src/main/java/com/bmuschko:hello-world
...
INFO: Found 1 target...
Target //src/main/java/com/bmuschko:hello-world up-to-date:
  bazel-bin/src/main/java/com/bmuschko/hello-world.jar
  bazel-bin/src/main/java/com/bmuschko/hello-world
INFO: Elapsed time: 0.154s, Critical Path: 0.01s
INFO: 0 processes.
INFO: Build completed successfully, 1 total action
Modeling package dependencies may look tedious in the beginning but will feel natural after a while. There’s a comfort in knowing the exact relationship between your packages, which will ultimately lead to better structured code with high cohesion and low coupling.
You do not want to write every aspect of your application yourself. For example, it’s unlikely that you’ll want to write code for parsing JSON (JavaScript Object Notation) or the low-level details of HTTP communication. Oftentimes, we rely on the code other people wrote and distributed as external dependencies. External dependencies usually reside in repositories, such as a Git repository containing the source code or a binary repository hosting the artifacts produced by a build (e.g., a JAR file). In the next section, we’ll talk about declaring and consuming external dependencies in your build.
Declaring and Using External Dependencies
Bazel supports different types of dependencies. As we’re dealing with a JVM project, we’ll just focus on one of those types: binary artifacts in a Maven repository. To learn how to declare external dependencies for other use cases, refer to the user documentation.
At the time of writing, dependency management for JVM projects isn’t a built-in feature that comes with the standard Bazel installation. It is implemented through Bazel’s extension mechanism—a rule. We must explicitly declare the rule for defining and resolving external dependencies, rules_jvm_external, in the WORKSPACE file, as shown in Example 1-5. The majority of this example is boilerplate, but the code for declaring the dependencies and repositories as part of maven_install is custom.
Example 1-5. Declaring the rule for resolving dependencies from a list of Maven repositories
load("@bazel_tools//tools/build_defs/repo:http.bzl","http_archive")RULES_JVM_EXTERNAL_TAG="2.10"RULES_JVM_EXTERNAL_SHA="1bbf2e48d07686707dd85357e9a94da775"+"e1dbd7c464272b3664283c9c716d26"http_archive(name="rules_jvm_external",strip_prefix="rules_jvm_external-%s"%RULES_JVM_EXTERNAL_TAG,sha256=RULES_JVM_EXTERNAL_SHA,url="https://github.com/bazelbuild/rules_jvm_external/"+"archive/%s.zip"%RULES_JVM_EXTERNAL_TAG,)load("@rules_jvm_external//:defs.bzl","maven_install")maven_install(artifacts=["org.apache.commons:commons-lang3:3.9"],repositories=["https://jcenter.bintray.com","https://repo1.maven.org/maven2"])
Downloads a Bazel repository as a compressed archive file, decompresses it, and makes its targets available for binding
Configures the URL, version, and SHA256 of the archive file to be downloaded
Loads the rules for later consumption
Defines the GAV of the Maven dependencies

Specifies a list of Maven repositories for downloading the artifacts
As you can see in the listing, our code requires the dependency Apache Commons Lang version 3.9. For Bazel to resolve the dependency, you need to provide its group, artifact ID, and version (GAV). If you are a JVM developer, you’ve probably used this notation before. Each portion of the dependency declaration org.apache.commons:commons-lang3:3.9 is separated by a colon.
At runtime, Bazel reads the dependency information from the WORKSPACE file, tries to find the artifacts in the list of declared repositories, downloads the artifacts, and then uses them in the build for specific tasks (e.g., compilation or test execution). Note that Bazel resolves the transitive closure of your dependencies as defined by the metadata in the repository. For example, if dependency A needs dependency B to work properly, then B will be downloaded automatically as well when used within the build. Figure 7 illustrates the workflow on a high level.
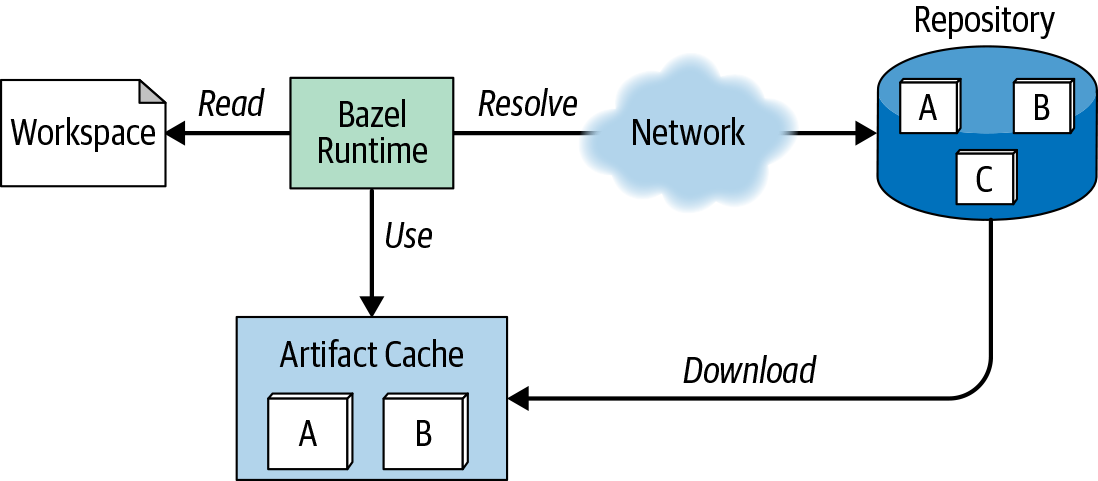
Figure 7. Resolution and usage of external binary dependencies with Bazel
We declared the dependency and where it should come from, but how do we tell Bazel which package should consume it? If you’ve read through the whole report so far, you might remember that Bazel requires you to explicitly specify it. Let’s assume that the messenger package needs the dependency on the compilation classpath, as shown in Example 1-6.
Example 1-6. Using an import from the Apache Commons Lang library in Messenger.java
packagecom.bmuschko.messenger;importorg.apache.commons.lang3.StringUtils;publicclassMessenger{publicStringgetMessage(){returnStringUtils.upperCase("Hello World!");}}
Import the class
StringUtilsprovided by the Commons Lang library.Call a method of the class.
To declare a dependency on the external library in a package, you must add it to the deps attribute. If you look at Example 1-7 closely, you’ll find that Bazel requires a special notation to reference the dependency from the WORKSPACE file. You use the same group and artifact ID; however, you need to leave off the version and convert every nonalphanumeric character to an underscore character.
Example 1-7. Using the dependency declaration for a package
java_library(name="messenger-lib",srcs=["Messenger.java"],visibility=["//src/main/java/com/bmuschko:__pkg__"],deps=["@maven//:org_apache_commons_commons_lang3"],)
References the dependency from the WORKSPACE file.
That’s it. Now you just have to run the build target. Bazel will automatically resolve and download external dependencies. Of course, if the dependency has been downloaded before, it will simply be reused from the local cache.
I hope you are writing tests alongside your application code and running them to verify its correct behavior. Bazel can execute tests from the build. You’ll find that we are building upon the knowledge from the previous sections to make that happen.
Executing Automated Tests
The Java rule set also includes a rule for compiling and executing test source code named java_test. The way you model the package is very similar to what we’ve done before. First, we’ll create the Java test code in the source directory src/test/java. The test class MessengerTest.java uses the API of the test framework JUnit 4. Next, we’ll create a BUILD file for that package. Your project structure should end up as follows:
.
├── WORKSPACE
└── src
    ├── main
    │   └── java
    │       └── ...
    └── test
        └── java
            └── com
                └── bmuschko
                    └── messenger
                        ├── BUILD
                        └── MessengerTest.java
Let’s also populate the contents of the new BUILD file. Example 1-8 creates the test rule with the name messenger-test.
Example 1-8. Declaring a test target for the messenger production source code
java_test(name="messenger-test",srcs=["MessengerTest.java"],test_class="com.bmuschko.messenger.MessengerTest",deps=["//src/main/java/com/bmuschko/messenger:messenger-lib","@maven//:junit_junit",],)
The test class or suite to execute
Dependencies needed for test compilation and execution
The rule points to the source files used for compilation. For now, we’ll just stick with a single test file, but you can easily extend this list by adding more files or using a glob expression. The java_test rule expects you to assign a single test class as an entry point; this can either be a single test class or a test suite definition. The rule needs to point to two dependencies: the package under test and the external dependency on the library JUnit 4. Without those dependencies, compilation would fail because the compiler doesn’t have a reference to the used classes.
For test compilation and execution, simply run the test command. You should see that we’re executing a single test, indicated by the console output:
$ bazel test //src/test/java/com/bmuschko/messenger
:messenger-test
INFO: Found 1 test target...
Target //src/test/java/com/bmuschko/messenger:messenger-test
up-to-date:
  bazel-bin/src/test/java/com/bmuschko/messenger/
  messenger-test.jar
  bazel-bin/src/test/java/com/bmuschko/messenger/
  messenger-test
//src/test/java/com/bmuschko/messenger:messenger-test
                    PASSED in 0.4s
Executed 1 out of 1 test: 1 test passes.
The directory bazel-testlogs contains the log output produced by test execution as well as the XML-based test results for further inspection and postprocessing (e.g., to visualize a historical trend graph in a CI product). Currently, Bazel doesn’t generate an HTML-based test report for further inspection.
bazel-testlogs
└── src
    └── test
        └── java
            └── com
                └── bmuschko
                    └── messenger
                        └── messenger-test
                            ├── ...
                            ├── test.log
                            └── test.xml
Contains the log output from test execution
Contains the test results in XML format
In our coverage on compilation, packaging, dependency management, and testing, we talked about the most basic use cases you’d encounter as a software developer of a Java-based project. All of these aspects apply to other language projects as well; however, the support in Bazel might look slightly different. Because in-depth coverage of this topic is beyond the scope of this report, I’d encourage you to explore on your own.
While Bazel’s support is adequate for a broad spectrum of projects and use cases, there’s a high likelihood that you’ll need to implement some custom build logic that is not covered by Bazel’s functionality. Bazel offers an extension mechanism that gave rise to some of the functionality we covered already—rules_jvm_external, for example. The next section focuses on the core extensibility concepts and how to use them to organize your build logic and write reusable capabilities.
Extending Bazel’s Capabilities
Extensibility is one of Bazel’s core capabilities. In this part of the report, I’ll give you a first taste of the functionality, its possibilities, and some code examples to demonstrate the concepts in action. We’ll start by talking about two concepts in theory, macros and rules.
Extension Concepts
To extend Bazel’s capabilities, we start by creating a new file with the extension .bzl. This file can live anywhere in your project directory or can be hosted on a HTTP server for wider exposure. In fact, we’ve already seen one of the concepts in action—the rule for retrieving binary artifacts, http.bzl, as shown in Example 1-5.
A rule represents the most powerful extension point in Bazel. It has full control over Bazel’s internals, can configure other rules, and introduces elaborate features that are complex in nature. You will want to write a rule for nontrivial functionality. Think of it as a plug-in for the Bazel ecosystem. As an example, the fully fledged Go language support in Bazel has been written as a rule.
The other extension option is a macro. A macro is a good fit for externalizing common functionality into a new, reusable function. It’s a means to better organize your build or to call a rule with parameters you want to set by default. You will want to write a macro if your build logic becomes too complex to maintain or to avoid the copy-paste anti-pattern.
When are macros and rules evaluated and executed during the lifecycle phases of a Bazel build? To revisit the three phases you’ve already learned about, macros are evaluated during the loading phase, and rules are executed during the analysis phase. Consequently, you cannot modify a macro anymore once the build has left the loading phase. Figure 8 shows how both concepts fit into the lifecycle.
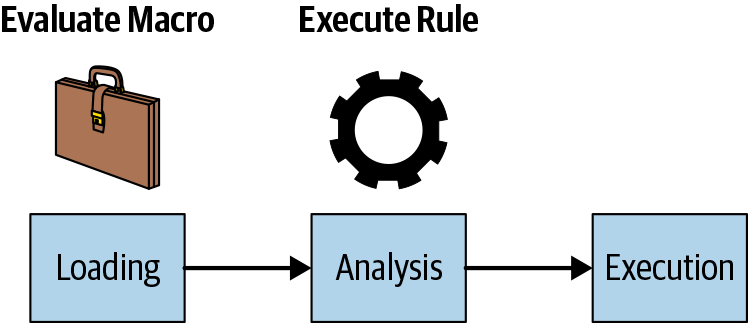
Figure 8. Evaluation of macros and rules in the lifecycle of a Bazel build
Now you have a basic understanding of the extension concepts in Bazel, but what language or syntax do you actually use to implement them? To express build script logic as well as extension implementations, Bazel uses the language Starlark. Let’s take a closer look at it.
The Starlark Build Language
Technically, the Starlark language is based on Python 3. If you are familiar with the Python language, you should be able to read and write Bazel build scripts and any of its extensions on a syntax level.
There are differences between Starlark and the pure Python language, though. Starlark is more of a custom runtime and dialect of Python because it introduces specific restrictions. For example, you cannot access the filesystem, network, or system clock. Moreover, mutability and access to the standard Python library is limited.
The main reason for locking down the available functionality is to achieve optimal build execution performance by supporting parallel and remote execution and to allow multithreaded processing of build logic. In practice, you will interact with a custom API when implementing macros or rules. We’ll learn how to use Starlark in the following sections by writing a custom macro and rule.
Writing a Macro by Example
Earlier, we implemented and executed the Java test code with the help of JUnit 4. If you’re saying, “Wait—JUnit 4? Isn’t that outdated?” you’re right. The JUnit team released JUnit 5 awhile back, and it’s definitely the more feature-rich and future-proof API for writing test code in Java. So why don’t we just switch over to JUnit 5? Well, it’s not that easy. At the time of writing, Bazel’s Java rules do not support JUnit 5 out of the box. Nevertheless, we can write a macro to integrate the latest JUnit version into the build.
We’ll start by switching over the test implementation to the JUnit 5 API, as shown in Example 1-9. You might have noticed that the imported Java packages all start with org.junit.jupiter.api.
Example 1-9. Test class using the JUnit 5 API
packagecom.bmuschko.messenger;importorg.junit.jupiter.api.DisplayName;importorg.junit.jupiter.api.Test;importstaticorg.junit.jupiter.api.Assertions.assertEquals;publicclassMessengerTest{@Test@DisplayName("Can retrieve message")publicvoidtestGetMessage(){Messengermessenger=newMessenger();assertEquals("HELLO WORLD!",messenger.getMessage());}}
Imports from the JUnit Jupiter API, the JUnit 5 programming model
If you tried to compile the code right now, you’d end up with a compiler error, as Bazel wouldn’t be able to resolve the referenced JUnit 5 classes on the compile classpath. In preparation for this change, we’ll need to switch from the JUnit 4 to the JUnit 5 dependencies in the WORKSPACE file, as shown in Example 1-10.
Example 1-10. Declaration of the JUnit 5 dependencies
maven_install(artifacts=["org.apache.commons:commons-lang3:3.9","org.junit.jupiter:junit-jupiter-api:5.5.2","org.junit.jupiter:junit-jupiter-engine:5.5.2","org.junit.platform:junit-platform-console:1.5.2"],...)
Macros are best organized into their own package, somewhat separate from the actual application source code. For that purpose, we’ll create a new directory named macros. In there, we’ll place a BUILD file to model a package and the macro file, which we’ll name junit5.bzl. The result should look as follows:
.
├── WORKSPACE
├── macros
│   ├── BUILD
│   └── junit5.bzl
└── src
    └── ...
For macros, it’s not required to populate the BUILD file with instructions, so we’ll just leave it empty. It merely acts as an indicator that we’re modeling a package here. A macro is basically a function that can instantiate and configure rules. That’s exactly what we are planning to do here. Example 1-11 implements such a function, ingests a list of parameters, massages them, and then creates a java_test rule with the appropriate parameters. You can also see that it sets up the JUnit 5 dependencies without having to declare them repeatedly for every single test package.
Example 1-11. Implementation of a macro for executing JUnit 5–based tests
defjava_junit5_test(name,srcs,test_package,deps=[],runtime_deps=[],**kwargs):FILTER_KWARGS=["main_class","use_testrunner","args",]forarginFILTER_KWARGS:ifarginkwargs.keys():kwargs.pop(arg)junit_console_args=[]iftest_package:junit_console_args+=["--select-package",test_package]else:fail("must specify'test_package'")native.java_test(name=name,srcs=srcs,use_testrunner=False,main_class="org.junit.platform.console.ConsoleLauncher",args=junit_console_args,deps=deps+["@maven//:org_junit_jupiter_junit_jupiter_api","@maven//:org_junit_jupiter_junit_jupiter_engine"],runtime_deps=runtime_deps+["@maven//:org_junit_platform_junit_platform_console"],**kwargs)
The function that defines the macro including the expected parameters and default values
Calls the built-in, “native” rule named
java_testand configures it.
With the goal of reusability and encapsulation achieved, we can move on to loading and using the macro. The existing BUILD file of our test package can simply reference the macro and use it as if it were a built-in function provided by the Bazel runtime. Example 1-12 shows the revised BUILD file.
Example 1-12. Using the macro to execute JUnit 5–based tests
load("//macros:junit5.bzl","java_junit5_test")java_junit5_test(name="messenger-test",srcs=["MessengerTest.java"],test_package="com.bmuschko.messenger",deps=["//src/main/java/com/bmuschko/messenger:messenger-lib"],)
Loads the macro with the appropriate package
Calls the macro and configures it
While we didn’t inspect every single implementation detail, I think it’s clear that macros can help with code maintenance quite a bit. Next up, we’ll touch on the creation of a rule and how the concept is different from a macro.
Writing a Rule by Example
A rule is a Bazel concept reserved for implementing more complex logic. In essence, it performs a list of actions based on a set of inputs and produces outputs as a result of the actions. Built-in rules that ship with the Bazel runtime are also called native rules. The java_library is such a native rule. It ingests a list of Java source files as inputs, compiles the code as part of its actions, and produces class files as its outputs. Figure 9 illustrates the relationship between the inputs, actions, and outputs of a rule.

Figure 9. The moving pieces of a rule
At a high level, implementing a rule looks easy; however, there are a lot of intricacies when it comes to writing one yourself. In this report, I’ll only scratch the surface and explain just enough to get you going on your own journey.
Let’s assume you are a developer of a Java library. Whenever you ship a new version of that library to your consumer, you’d also like to publish the API documentation for it—the Javadocs. Bazel does not provide a rule for generating Javadocs as part of the native rule set, so we’ll have to come up with our own implementation. Our task is to write a rudimentary implementation of a Javadoc rule that touches on as many of the important aspects as possible.
Similar to a Bazel macro, a rule has to be written in a file with the extension .bzl. We’ll name the file javadoc.bzl and put it into the package named rules:
.
├── WORKSPACE
├── rules
│   ├── BUILD
│   └── javadoc.bzl
└── src
    └── ...
The implementation of a rule breaks down into two parts: the rule function users would call from a BUILD file and the rule implementation containing the actual build logic. Both components of a rule need to be implemented in the same file. To make the logic a little bit more digestible, we’ll discuss each part separately. First, we’ll have a look at the rule function.
The entry point of the function somewhat speaks for itself. You have to call the function named rule. Once it’s created, you’ll need to assign it to a global variable so it can be accessed within a build. The rule function is responsible for defining the inputs, outputs, and implementation of a rule, as shown in Example 1-13. It would be impossible to explain the implications of every implementation detail. In a nutshell, this rule accepts a list of source files containing the relevant Javadoc comments, referencing the current JDK. We’ll use the JDK to call the javadoc binary to generate the API documentation. The output of the rule is a ZIP file containing the API documentation in the form of HTML files.
Example 1-13. Defining a rule function to generate Javadoc API documentation
javadoc=rule(attrs={"srcs":attr.label_list(allow_files=True),"_jdk":attr.label(default=Label("@bazel_tools//tools/jdk"+":current_java_runtime"),providers=[java_common.JavaRuntimeInfo],),},implementation=_impl,outputs={"zip":"%{name}.zip"},)
Entry point of a rule definition, the call to the
rulefunctionThe configurable inputs of the rule, called attributes
A pointer to the implementation of the rule
The configurable outputs of the rule
In the implementation of the rule, shown in Example 1-14, we are consuming and processing the values provided by the inputs and outputs and then executing a series of shell commands. Among those commands, the rule creates a new directory, executes the javadoc tool, and packages the generated files into a ZIP file. You might have noticed that the implementation isn’t really cross-platform compatible. It’s possible that those commands might work on Windows (for example) as is, but I wouldn’t count on it. As the developer of the rule, you’ll have to come up with appropriate solutions for making the code cross-platform compatible.
Example 1-14. Implementation function for Javadoc functionality
def_impl(ctx):zip_input=ctx.label.namezip_output=ctx.outputs.zipjava_home=str(ctx.attr._jdk[java_common.JavaRuntimeInfo].java_home)src_list=[src.pathforsrcinctx.files.srcs]cmd=["mkdir%s"%zip_input,"%s/bin/javadoc -quiet -d%s%s"%(java_home,zip_input,"".join(src_list)),"zip -q -r%s%s/*"%(zip_output.path,zip_input)]ctx.actions.run_shell(inputs=ctx.files.srcs+ctx.files._jdk,outputs=[zip_output],command="".join(cmd))
The implementation function accepting the context parameter
The shell command executing the
javadocCLI tool during the execution phase
Consuming the newly minted rule is straightforward and looks very similar to the build scripts we have dealt with before. First, you load the rule. Second, you instantiate the rule and provide the relevant configuration. It makes sense to generate the API documentation for all Java source files of the project. Therefore, we’ll put the logic shown in Example 1-15 into a BUILD file at the root level of the workspace.
Example 1-15. Using the rule in a BUILD file at the root level of the workspace
load("//rules:javadoc.bzl","javadoc")javadoc(name="api-docs",srcs=glob(["src/main/java/com/bmuschko/**/*.java"]),)
Loads the rule by its global variable name
Configures the rule by assigning attribute values
To generate the Javadocs as a ZIP file, simply run the command bazel build //:api-docs. You should find the file api-docs.zip under the directory bazel-bin.
There’s far more to learn about rules than explained in this section, so I’d highly encourage you to explore more on your own by reading the Bazel user documentation and the code of other open source Bazel rules.
Build Performance and Scalability
In the spirit of Continuous Delivery, organizations need to ship software fast and frequently. There’s nothing worse than a slow build process that hinders the ability to get the latest features or bug fixes to the end user. In practice, that means building and testing the code multiple times a day, not only on developer machines but as part of a Continuous Integration environment as well.
Bazel offers two solutions that can help with achieving the goals of build avoidance and build scalability while at the same time keeping the promise of consistency and correctness (see Figure 10):
- Remote caching
-
Sharing and reusing build results across multiple, physically separated machines (e.g., developer machines and CI infrastructure)
- Remote execution
-
Offloading build execution to high-performance computing nodes in a datacenter and using those results on the originating build machine

Figure 10. Moving parts of remote caching and remote execution with Bazel
With those basic definitions out of the way, let’s dive into a high-level discussion of both concepts. While we cannot walk through all the intricate details, I’ll provide pointers for a path forward to incorporate remote caching and remote execution into your own Bazel projects.
Remote Caching
The idea of remote caching is to share build outputs across multiple machines that invoke a Bazel build. If a build output has already been produced for certain inputs of an action, then you can simply reuse that output without having to actually execute its actions.
Let’s illustrate this functionality with the help of a concrete example. Say you have two different teams working on the same project across geographically separated locations. One team resides in the US, the other in Asia. Considering the difference in time zones, the Asia team starts their day before the US team. In the course of the day, the Asia team executes the Bazel build and produces build outputs. Hours later, the US team comes online. As soon as they start executing their builds, the US team will likely be able to reuse some of the existing build outputs, which leads to faster builds in most situations.
The central piece of the architecture is a server that acts as an entry point and storage facility for build outputs. Bazel offers various options, some of which are one-stop solutions:
-
An nginx server that acts as a cache but requires manual configuration
-
The open source remote build cache built by Google,
bazel-remote -
A fully managed but commercial object store on Google Cloud Storage
It’s up to your organization to pick a solution that’s best suited to your needs. For the purpose of demonstrating the build cache functionality, we’ll set up bazel-remote as a Docker container. You can retrieve the Docker image for bazel-remote from Docker Hub. To ensure that the container can persist the cached data, we’ll mount a volume represented by a path on our local disk. For now, the volume mount path is /Users/bmuschko/dev/bazel-cache. Make sure to create the directory before starting the container. The following command starts the build cache server in a container, maps port 8080 to 9090, and mounts the volume:
$ docker run -v /Users/bmuschko/dev/bazel-cache:/data
-p 9090:8080 buchgr/bazel-remote-cache
2019/12/15 17:48:16 Loaded 0 existing disk cache items.
Initially, the cache directory will be empty. You will have to use the command-line option --remote-cache to tell Bazel about the existence of the remote cache. The following Bazel invocation executes the tests of our example project and populates the cache with build outputs:
$ bazel test --remote_cache=http://localhost:9090
//src/test/java/com/bmuschko/messenger:messenger-test
...
//src/test/java/com/bmuschko/messenger:messenger-test
                    PASSED in 0.4s
Executed 1 out of 1 test: 1 test passes.
Earlier we started the build cache container in foreground mode. This mode is convenient for inspecting the log message; however, if you are planning to set up the build cache in a production environment, you should run in detached mode instead. The log message now implies that we are looking for existing build outputs but can’t find them (indicated by the HTTP GET 404 status code). As a result, Bazel populates the cache with the result we just produced (indicated by the HTTP PUT 200 status code).
2019/12/15 17:48:55  GET 404      172.17.0.1 /ac/06f08c1047e4
a6c5ae5202724b7abe8cd3a633463de28d66544aaa77292cda70
2019/12/15 17:48:55  GET 404      172.17.0.1 /ac/0a317cb909b6
273627720a96fd954080ddfe6e0052ce525551e60fa4bd37b5a0
2019/12/15 17:48:55  GET 404      172.17.0.1 /ac/46af73a1541c
d9322acd2f8b6fd3a76634c0e67d448636a7540810542bfde1c4
2019/12/15 17:48:55  GET 404      172.17.0.1 /ac/efccd560dcca
7935b5f9e15aab4dabb536653324a741dee2a7f5364a942bdff6
2019/12/15 17:48:55  GET 404      172.17.0.1 /ac/66005e46cb37
ac52b6bac4f8654b4ef7b3c9aab38391ab9db9f96969df8d5d90
2019/12/15 17:48:55  PUT 200      172.17.0.1 /cas/e74e18475fa
864bf5aa5b60512c86bbb08619cf3ae8443394105c012ad523fd2
2019/12/15 17:48:55  PUT 200      172.17.0.1 /cas/e3b0c44298f
c1c149afbf4c8996fb92427ae41e4649b934ca495991b7852b855
2019/12/15 17:48:55  PUT 200      172.17.0.1 /cas/bd19f26dc7b
acb77e659b82e4582097d15fb27f20fbd0545fe11396490728c7a
2019/12/15 17:48:55  PUT 200      172.17.0.1 /cas/0a317cb909b
6273627720a96fd954080ddfe6e0052ce525551e60fa4bd37b5a0
2019/12/15 17:48:55  PUT 200      172.17.0.1 /cas/00afd170b3e
c8a4408292d894af328d212705a0180575a3fb61172091137d816
...
Now, let’s run the build with the same command again and observe the difference. In the output, you can see that the build outputs for the tests were reused from the cache. Bazel flags the target with the cached marker.
$ bazel test --remote_cache=http://localhost:9090
//src/test/java/com/bmuschko/messenger:messenger-test
...
//src/test/java/com/bmuschko/messenger:messenger-test
           (cached) PASSED in 0.4s
Executed 0 out of 1 test: 1 test passes.
To cross-check the expected behavior, you can also inspect the new log messages on the build cache container. The build cache indicates that existing build outputs could be reused with the HTTP GET 200 status code.
2019/12/15 17:52:24  GET 200      172.17.0.1 /ac/06f08c1047e4
a6c5ae5202724b7abe8cd3a633463de28d66544aaa77292cda70
2019/12/15 17:52:24  GET 200      172.17.0.1 /ac/66005e46cb37
ac52b6bac4f8654b4ef7b3c9aab38391ab9db9f96969df8d5d90
2019/12/15 17:52:24  GET 200      172.17.0.1 /ac/0a317cb909b6
273627720a96fd954080ddfe6e0052ce525551e60fa4bd37b5a0
2019/12/15 17:52:24  GET 200      172.17.0.1 /ac/46af73a1541c
d9322acd2f8b6fd3a76634c0e67d448636a7540810542bfde1c4
2019/12/15 17:52:24  GET 200      172.17.0.1 /ac/efccd560dcca
7935b5f9e15aab4dabb536653324a741dee2a7f5364a942bdff6
2019/12/15 17:52:24  GET 200      172.17.0.1 /cas/e74e18475fa
864bf5aa5b60512c86bbb08619cf3ae8443394105c012ad523fd2
2019/12/15 17:52:24  GET 200      172.17.0.1 /cas/9d20c5302dd
7b4a2166180fbda5e5656fb49ec7bc9d3da61759db0336c2c9feb
The build cache is tremendously helpful for implementing build avoidance. If you are planning to use the build cache for your own project, read the user documentation for more details. The build cache offers a variety of operational modes and command-line options to control the runtime behavior. At the time of writing, the build cache does not offer a user interface or visualization option to monitor performance trends over time.
Remote Execution
Builds can be very demanding when it comes to consuming hardware resources. It’s not uncommon to end up with a completely overloaded machine while compiling code or executing tests. What can we do in the meantime? Check Twitter on our phones. Wouldn’t it be great if you could instead offload the work to other machines? That’s where remote build execution comes into play.
Bazel can be configured to execute build or test actions in the cloud. Depending on the available hardware resources on the receiving end, you will end up with a much faster and potentially more reliable build as you don’t need to depend on the sandbox of your local machine.
Various remote execution services have evolved over time. Among them are open source, self-hosted solutions like Buildbarn, Buildfarm, BuildGrid, and Scoop, as well as Google’s commercial offering, Remote Build Execution (RBE).
This report won’t go into depth on creating and using a multinode build farm to avoid going into all the details specific to a particular solution.
Executing Bazel Projects on CI Servers
No discussion of a build tool is complete without considering its execution on a Continuous Integration product. There’s a plethora of commercial and open source services available, each with its own feature set, cost structure, and user interfaces. For this report, I’ll show a popular CI service, CircleCI, and explain how to use Bazel to execute builds.
Nowadays, every reputable CI product allows for executing a build inside of a Docker container. A Docker container can help with standardizing the runtime environment, including any tool required to execute the build. The Bazel project publishes a Docker image for every release, which makes it extremely easy to execute a build with the appropriate setup. The configuration for the CircleCI job will use the Bazel Docker image bazel:1.1.0 from Google’s image registry. This means that Bazel 1.1.0 is preinstalled and can be used to execute the build.
Every CircleCI job starts out with the configuration-as-code methodology in the form of a YAML file named config.yml that defines how the job should look like at runtime and should be checked into version control alongside your production source code. Example 1-16 shows a CircleCI configuration file that executes the Bazel build inside of a Docker container.
Example 1-16. A CircleCI job YAML file executing a Bazel build
version:2.1jobs:build:docker:-image:l.gcr.io/google/bazel:1.1.0steps:-checkout-run:bazel build //:hello-world
All that’s left to do is to point CircleCI to the GitHub repository that contains the YAML configuration file. CircleCI will automatically check out the source code, evaluate the job definition, and kick off a Bazel build. Figure 11 shows the build on CircleCI for the example project.
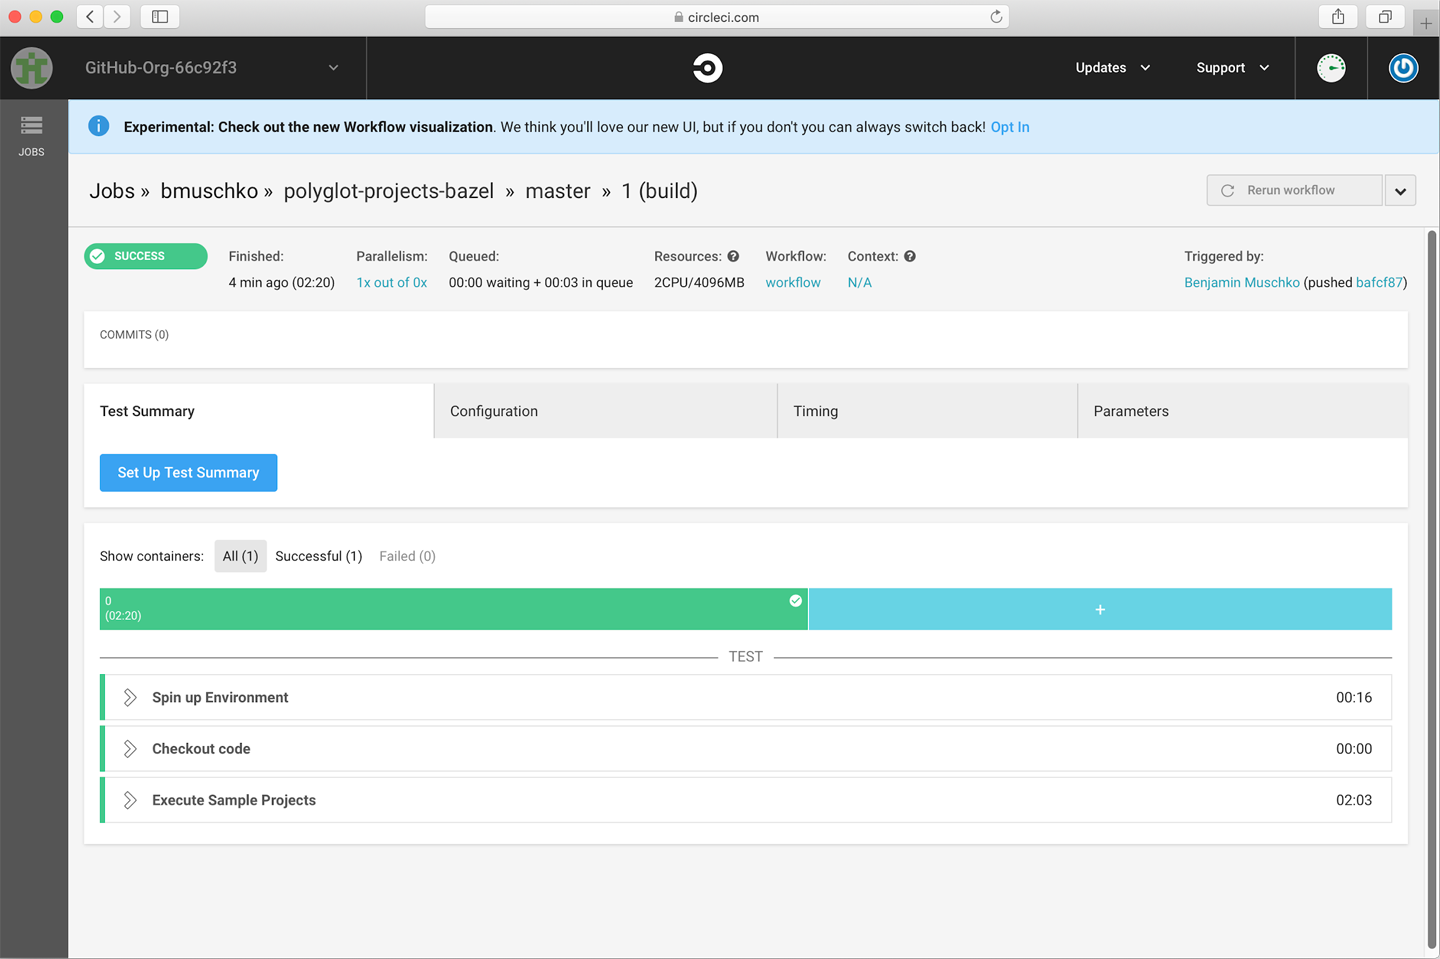
Figure 11. A Bazel build on CircleCI
This concludes our whirlwind tour of Bazel!
Conclusion
Bazel is a feature-rich and versatile polyglot build tool that we’ve explored with the help of typical use cases applicable to Java-based projects. We identified the building blocks in Bazel responsible for compiling, testing, and packaging code. You learned that Bazel takes a strong, opinionated view on how to model a project as a direct result of years of internal use at Google. While Bazel requires an explicit definition of fine-grained modules and dependencies, it rewards the user with fast, incremental, and parallel build execution. Bazel’s remote caching and execution capabilities form the foundation for scalable, performant enterprise projects, especially the ones that reside in a monorepo. If needed, build authors can enhance Bazel’s built-in functionality with the help of rules.
Bazel’s feature set is quite impressive. It covers most aspects required for building modern polyglot enterprise applications, small and large. A first look at Bazel reveals that it can handle typical requirements with ease. Upon closer inspection, you’ll find that the Bazel ecosystem still has to catch up with features that end users have come to love from other prominent build tools and now expect. Over the course of this report, we’ve touched on some of those aspects—for example, refined and powerful dependency management capabilities, built-in Javadoc support, and support for a standard way to publish process artifacts to binary repositories. While all of these capabilities can be implemented as a rule, the effort would be quite significant for a team trying to switch to Bazel, ultimately leading to a less refined and polished experience. As Bazel gains popularity, I have no doubt that the ecosystem will catch up with other build tools. In the user documentation you can find a list of available rules, some of which have been contributed by the community.
It’s hard to give a generalized personal recommendation on a build tool. It always depends on the needs of the organization, team, or project. For some teams, flexibility and build language syntax is important; for others, build execution performance and scalability is paramount. If you are evaluating Bazel to see whether it’s a good fit for your project, I’d recommend implementing a prototype that can live alongside your current automation logic. Very soon, you’ll determine whether Bazel can adapt to your needs. Measure and compare aspects that are important to you and then make your decision.