
We're now going to create the structure of our central application and add a basic query to make sure everything up to this point is running smoothly:
- Click on the File menu, then navigate to New | Dynamic Web Project.
- On the Dynamic Web Project screen:
- Enter
Storein the Project Name field. - The Target runtime should be Oracle WebLogic Server 12c (12.1.2) already. If not, select this entry.
- Select JavaServer Faces v2.1 Project from the Configuration drop-down menu.
- Click on Next.
- Enter
- Click on Next again—no need to change folder settings.
- Change Context root to
store. - Click on Next.
- In JSF Capabilities, select Disable Library Configuration from the JSF Implementation Library field, then remove the existing entry from URL Mapping Patterns and create a new one with the value
*.jsf. - Click on Finish.
As we already created the shared library within OEPE, we just need to add the necessary references to the project. First, we make the library visible to the OEPE's design-time compiler:
- Right-click on the Store project, select Properties, then Java Build Path entry at the tree, and click on the Libraries tab.
- Click on the Add Library… button, select the WebLogic Shared Library entry and click on Next.
- Click the Browse… button, select primefaces from the list and click on OK.
- The fields Name and Specification Version will be populated. Leave all the fields as they are and click on Finish to add the library.
- Click on OK to close the Properties window.
Then, we must tell WebLogic Server that our project depends on this library so that the proper linkage will be done when deploying and running the application. In order to do so:
- Open the
weblogic.xmlfile of the projectStore—you can find it in theWebContent/WEB-INFfolder. - Add the following lines inside the
weblogic-web-apptag:<wls:library-ref> <wls:library-name>primefaces</wls:library-name> <wls:specification-version>3.5</wls:specification-version> <wls:exact-match>true</wls:exact-match> </wls:library-ref>
- Save the file.
To reference an optional package, the procedure is a little bit different. To do so:
- Open the
MANIFEST.MFfile inside the folderWebContent/META-INFand paste the following lines making sure that you don't leave empty lines between the ones already there and the new ones:Extension-List: storeBO storeBO-Extension-Name: storeBO storeBO-Specification-Version: 1.0 storeBO-Implementation-Version: 1.0.0
Tip
If you leave blank lines between entries on this file, the deployer will not process the lines after the first blank one and
java.lang.IllegalStateExceptionis likely to be raised, associated with a somewhat misleading message, such asCould not find backup for factory javax.faces.context.FacesContextFactory. If you see it when deploying, check yourMANIFEST.MFfile. - Save the file.
With this setting, we are instructing WebLogic Server to link the optional package to our application upon deployment.
But Eclipse's compiler does not process this configuration, so we need to add another reference to be able to use the entities inside our code. The easiest way to accomplish this is to create a dependency between the Store and StoreBO projects:
- Right-click on the Store project, navigate to Properties | Java Build Path, and click on the Projects tab.
- Click on the Add… button.
- Check the StoreBO project and click on OK.
- Click on OK again to close the Properties screen.
And that's it. Now we can use the entities both during development and runtime.
As mentioned before, we need to have an explicit reference to the persistence.xml file inside our project to be able to use the declared persistence unit. Here's what must be done:
- Create for a
META-INFfolder inside the folder/Java Resources/srcand make sure you can see the new folder in Project Explorer. - Expand the
src/META-INFfolder of the project StoreBO. - Copy the
persistence.xmlfile from StoreBO and paste it inside theMETA-INFfolder of the project Store.
This way, we make sure the persistence configuration will be found and processed as it should.
Tip
You may want to create a link from one project to the other so that you have just one physical copy of the file. To do so, when doing a drag-and-drop action, hold the Ctrl and Shift keys down. Be aware that the actual reference is bound to your operating system, so the source project may not be 100% portable.
To enable data access and use these functionalities on a web page, we need to create a class to run the necessary queries against the persistence layer we just enabled. The next section shows how to accomplish this.
The concept of Context and Dependency Injection (CDI) is not new to the Java EE platform—the JSR that defines it, # 299, was bound to Java EE 5 and was called Web Beans. Here's a quote from the specification that clearly explains how we're going to use it:
"The use of these services significantly simplifies the task of creating Java EE applications by integrating the Java EE web tier with Java EE enterprise services. In particular, EJB components may be used as JSF managed beans, thus integrating the programming models of EJB and JSF (King, 2009)."
Previously, when programming with JSF, you had to create managed beans that were specific to this technology. With the introduction of CDI, we can integrate JSF and EJB, unlocking all the features exposed by the EJB container, such as transaction demarcation and concurrency.
To expose a bean to be used by our JSF pages, we need to:
- Annotate a class with
javax.inject.Named. - Inform the container that the application/package where the bean resides is a bean archive—this can be a library, EJB, or an application package, or even a classpath directory, as long as a
beans.xmlfile is present inside itsMETA-INFfolder or inside the folderWEB-INFof a WAR file. By doing this, we instruct the container to discover beans inside that package.
To accomplish the first item, perform the following steps:
- Click on the File menu, then navigate to New | Class.
- Type
com.packt.store.searchas Java package. - Enter
SearchManageras the Class name and click on Finish. - In the class editor, enter the following lines:
import java.io.Serializable; import javax.enterprise.context.SessionScoped; import javax.inject.Named; @Named("search") @SessionScoped public class SearchManager implements Serializable { } - Save the file.
By decorating the class with the Named annotation, we made it recognizable by the container as a CDI-enabled bean. The decoration argument, "search", tells the container by which name the bean will be referenced from JSF pages.
As we will hold static lists to populate the page—theaters and movies—we changed the scope of the bean to session by using the SessionScoped annotation so that we don't need to go to the database every time a new request is made.
Note
The default scope of a bean is Dependent, meaning that its instantiation is bounded to the scope of the object which carries a reference to it. For instance, when a JSF page refers a dependent bean, it can be instantiated several times when rendering the page, one for each JSF expression found.
There are other longer scopes, such as Request, Session, Application, and so on. To check the complete list and behavior of these scopes, refer to http://docs.oracle.com/javaee/6/api/index.html?javax/enterprise/context/SessionScoped.html.
The second and final step to enable CDI is to inform the container that the application/package where the bean resides is a
bean archive. For our web project, we just need to create an empty beans.xml file inside the WebContent/WEB-INF/ folder.
There are definitions we can enter in the beans.xml file, but none of them are relevant to our scenario; so we will let it empty by now—more on this in Chapter 6, Using Events, Interceptors, and Logging Services, when we discuss interceptors.
Here is the full code needed to execute a basic functionality test:
@Named("search")
@SessionScoped
public class SearchManager implements Serializable {
   @PersistenceContext(unitName="StoreBO")
   EntityManager em;

   private List<Theater> theaters;
   private List<Movie> movies;

   private int movie;
   private int theater;

   @SuppressWarnings("unchecked")
   public List<Theater> getTheaters() {
      if (theaters == null)
         theaters = em.createNamedQuery(Theater.findAll).
                    getResultList();

      return theaters;
   }

   @SuppressWarnings("unchecked")
   public List<Movie> getMovies() {
      if (movies == null)
         movies = em.createNamedQuery(Movie.findAll).
                  getResultList();

      return movies;
   }

   public int getTheater() {
      return theater;
   }

   public void setTheater(int theater) {
      this.theater = theater;
   }

   public int getMovie() {
      return movie;
   }

   public void setMovie(int movie) {
      this.movie = movie;
   }
}
The PersistenceContext annotation injects the persistence unit that goes by the provided name into an
Entity Manager, and with this instance we can query, create, and delete object instances, among other actions.
The getTheaters and getMovies methods return a list of objects that will populate the query screen using the named queries we created earlier, if the corresponding variables, theaters and movies, aren't loaded yet. The other variables, theater and movie, along with their getter and setter methods, must be created to hold the values selected from each drop-down menu.
There are a lot of options available to configure the behavior of an application that goes inside the web.xml file. As we're trying to do a basic sanity test right now, we need to tweak it just a little bit:
- Open the
web.xmlfile located in the folderWebContent/WEB-INF. - Remove the list of
welcome-filetags leaving just one entry, and change its value toindex.jsf. - Save the file.
We just instructed the container to process the index.jsf file when the user enters the project's root URL, http://localhost:7001/store/.
Here's the content of web.xml at this point:
<?xml version="1.0" encoding="UTF-8"?>
<web-app xmlns:xsi="http://www.w3.org/2001/XMLSchema-instance"xmlns="http://java.sun.com/xml/ns/javaee"xmlns:web="http://java.sun.com/xml/ns/javaee/web-app_2_5.xsd"xsi:schemaLocation="http://java.sun.com/xml/ns/javaee/web-app_3_0.xsd" version="3.0">
   <display-name>Store</display-name>
   <servlet>
      <servlet-name>Faces Servlet</servlet-name>
      <servlet-class>javax.faces.webapp.FacesServlet</servlet-class>
      <load-on-startup>1</load-on-startup>
   </servlet>
   <servlet-mapping>
      <servlet-name>Faces Servlet</servlet-name>
      <url-pattern>*.jsf</url-pattern>
   </servlet-mapping>
   <welcome-file-list>
      <welcome-file>index.jsf</welcome-file>
   </welcome-file-list>
</web-app>
Tip
You may also instruct PrimeFaces to use one of the themes you may have added to the shared library built in Chapter 2, Setting Up the Environment. To do so, add this block of code just after the welcome-list tag, referring to the theme that you packed into the shared library:
<context-param>
   <param-name>primefaces.THEME</param-name>
   <param-value>ui-lightness</param-value>
</context-param>
If you don't do so, PrimeFaces will use the
Aristo theme, which comes packed within its base library, primefaces-3.5.jar.
Finally, edit (or create) the index.xhtml file under the WebContent folder and enter the following code:
<!DOCTYPE html PUBLIC "-//W3C//DTD XHTML 1.0 Transitional//EN"
   "http://www.w3.org/TR/xhtml1/DTD/xhtml1-transitional.dtd">

<html lang="en" xmlns="http://www.w3.org/1999/xhtml"
                xmlns:f="http://java.sun.com/jsf/core"
                xmlns:h="http://java.sun.com/jsf/html"
                xmlns:ui="http://java.sun.com/jsf/facelets"
                xmlns:p="http://primefaces.org/ui">

<h:head />

<h:body>
   <p:fieldset legend="Basic Query">
      <p:panelGrid columns="2">
         <h:outputLabel for="theater" value="Theater:" />
         <p:selectOneMenu id="theater"
            style="width: 350px;"
            value="#{search.theater}">
            <f:selectItem itemLabel="Select one"
               itemValue="0" />
            <f:selectItems value="#{search.theaters}"
               var="n"
               itemLabel="#{n.name}"
               itemValue="#{n.id}" />
         </p:selectOneMenu>

         <h:outputLabel for="movie" value="Movie:" />
         <p:selectOneMenu id="movie"
            style="width: 350px;"
            value="#{search.movie}">
            <f:selectItem itemLabel="Select one"
               itemValue="0" />
            <f:selectItems value="#{search.movies}"
               var="n"
               itemLabel="#{n.name}"
               itemValue="#{n.id}" />
         </p:selectOneMenu>
      </p:panelGrid>
   </p:fieldset>
</h:body>
</html>
Tip
If you don't want to type the entire page's code, go ahead and get the accompanying source code from the Packt Publishing's website, www.packtpub.com.
The relevant pieces of code here are:
- The declarations at the top of the file, where we tell which tag libraries we're going to use on this page. This is the basic set defined by JavaServerFaces and PrimeFaces:
<html lang="en" xmlns="http://www.w3.org/1999/xhtml"
   xmlns:f="http://java.sun.com/jsf/core"
   xmlns:h="http://java.sun.com/jsf/html"
   xmlns:ui="http://java.sun.com/jsf/facelets"
   xmlns:p="http://primefaces.org/ui">
- The JSF's
<h:head>tag must be declared so that PrimeFaces can inject its dependencies into the page. - The <
p:fieldset>entry is a PrimeFaces tag used to group fields, with support for skinning and events. We use it here to give a more polished look to our query page. - PrimeFaces's
<p:panelGrid>tag allows us to easily create a table—we just need to define the number of columns (2, in your sample), and it will distribute the tags declared inside it, one inside each cell, creating a new line after processing each pair of tags. This component has support for header, footers, colspan, and rowspan (ways to group cells horizontally or vertically). - The two blocks that define the dropdown boxes for Theater and Movie—the
<p:selectOneMenu>tag. Each drop-down menu has a reference to our bean and uses a getter to retrieve the data—thesearch.theatersentry will be translated tosearchManager.getTheaters(), which is the method we implemented. The propertiesnameandidof each entry are also defined inside theTheaterclass. - Finally, each
selectOneMenucomponent is attached by itsidparameter to a variable of the bean that will have the key of the selected entry upon form submission (this will be done in a later chapter).
Tip
You may have noticed that the page extension is .xhtml, although we are calling it using the prefix .jsf. This is due to the JSF engine, which translates the request to an internal suffix, .xhtml being the default value.
You may change this behavior by adding the following lines of code into your web.xml file, declaring the extension that suits your needs better:
<context-param>
   <param-name>javax.faces.DEFAULT_SUFFIX</param-name>
   <param-value>.jsf</param-value>
</context-param>
<context-param>
   <param-name>javax.faces.FACELETS_VIEW_MAPPINGS
   </param-name>
   <param-value>*.jsf</param-value>
</context-param>
To run the application, we must tell Eclipse that the configured WebLogic Server is the target container to deploy and run it. To do so, perform the following steps:
- Open the Servers view and navigate to Window | Show View | Servers.
- Right-click on the server name and click on the Add and Remove… entry from the context menu.
- Select the Store project from the Available list and click on Add >.
- Click on the Finish button.
The window will close and the deployment will start automatically. You should see the status Publishing at the end of the line in the Servers view. If everything goes well, the status will change to Synchronized.
You can now navigate to http://localhost:7001/store/ using a browser, or right-click on the Store project, select Run As from the context menu, and then click on Run on Server. A browser page will open inside Eclipse showing the query page:
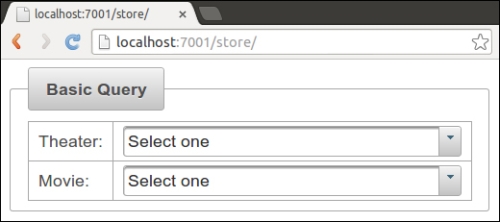
Take a look at the dropdown boxes; they should have a few entries each. This means that every component—shared library, optional package, persistence data, and configuration—is working as expected.