
At this point we already have the business case defined, a web application reading information from a database and every needed component running in WebLogic Server. Some other inner concepts are well developed and exemplified, such as modularization (web module, entities module) and dependency injection with CDI.
The objective of this chapter is to enhance the application created in the previous chapter, Store, by adding more information to the search page based on a remote call to a new application, Theater, which exposes a RESTful web service that provides movie exhibition dates.
Note
By definition, a web service is designed to support machine-to-machine communication in a platform-independent way. The decision to design such services using REST or SOAP standards are beyond the scope of this book, although readers will get an example of each type of service and can compare the benefits and drawbacks of each approach.
So, in this chapter we're going to:
- Create two new projects, TheaterBO and Theater, to hold the entities of this business domain and expose the interfaces consumed by the central module, respectively
- Develop a RESTful Web Service with JAX-RS while adjusting the entities to be able to produce XML or JSON output along the way using JAXB
- Extend the Store project to consume and display data from the new web service using JAX-RS Client API
In Chapter 3, Java EE Basics – Persistence, Query, and Presentation, we have already created a JPA project that has entities from the Store module. Now we need to create a similar project for the Theater module, mapping entities of the corresponding database schema. We're going to do it using a few other concepts of Java Persistence API (JPA). Let's get started.
Note
Before proceeding, make sure you have already loaded the tables into the databases and configured OEPE's (Eclipse) connection to MySQL. These procedures are explained in Chapter 2, Setting Up the Environment.
- In Eclipse, create a new JPA project and perform the following steps:
- Enter
TheaterBOas the Project name. - Remember to set the Target runtime to point to your WebLogic 12c Runtime configuration.
- At the JPA Facet configuration page, select the same JPA library and implementation you already used in Chapter 3, Java EE Basics – Persistence, Query, and Presentation—that would be EclipseLink 2.4.x/2.5.x for Platform.
- Select Disable Library Configuration in JPA Implementation Type.
- Set the connection to MySQL - Theater.
- Finish the wizard.
- Enter
- Add a reference to WebLogic's persistence library, so we can compile the generated classes:
- Right-click on the project name and click on the last entry, Properties.
- Click on Java Build Path in the tree.
- Click on the Libraries tab and then click on the Add Library… button.
- Select the entry WebLogic System Libraries and click on Next.
- Select the javax.persistence library and click on Finish.
- If the library is not available, click on the add icon (the plus sign) in the top-right portion of the screen, type
javax.persistencein the Module Id field, and click on Finish to close this window and get back to the Properties window: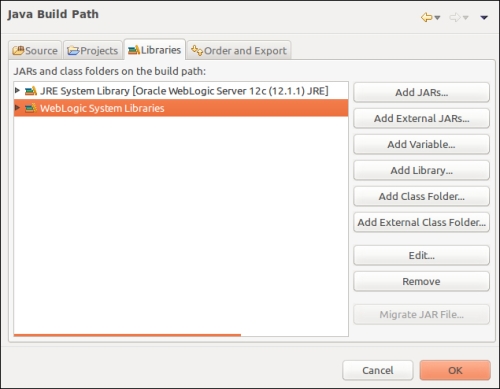
- Click on OK to close the window.
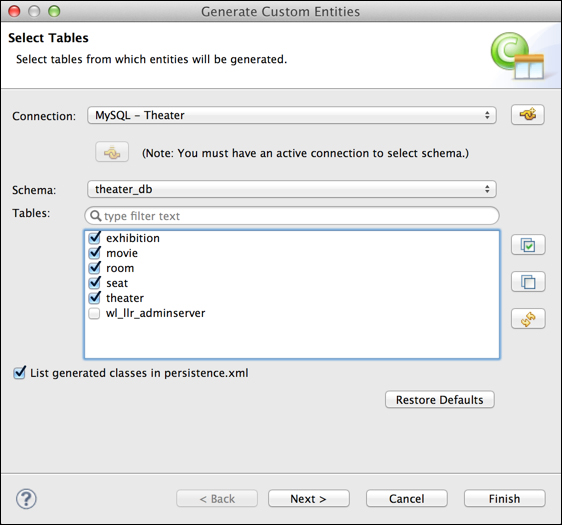
- Right-click on the project name and select JPA Tools, then select Generate Entities from Tables… from the submenu.
- Now select the MySQL - Theater connection. Make sure you have not selected the MySQL - Store connection. If the connection is not yet active, the button just below the connection drop-down menu will be enabled. If that's the case, click on it to activate the connection.
- Select the theater_db entry from the Schema drop-down menu, then select tables exhibition, movie, room, seat, and theater and click on Next:
- On the Table Associations screen, the associations are already in place because in this schema all the relationships are set at the database level with the declaration of foreign keys:

- Click on Next.
- Select auto for Key generator, java.util.List as Collection properties type and enter
com.packt.domain.theaterin the Package field:
Tip
We are using auto for key generator to let the JPA layer decide which strategy to use when dealing with keys. Because the theater database schema is using MySQL's
AUTO_INCREMENTfeature to declare primary keys, it will use the identity approach, which lets the database engine deal with key generation. - Click on Finish.
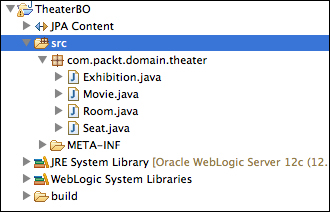
At this point, your project should look like the following screenshot:
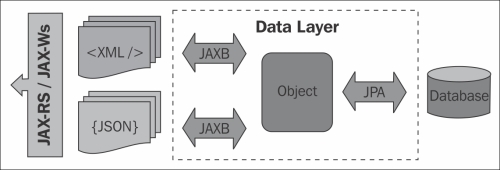
The entities are in place, but we need to customize some of them in order to use as a base for a web service call and to avoid marshaling issues. In fact, we are going to show the usage of JAXB and JPA integration as shown in the following diagram—the data layer (materialized by the entities) is responsible for the conversion between object instances and XML or JSON using the corresponding framework:
In order to query for instances of this business entity, we are going to add a few named queries. We also have to mark the entity as an XML element, so it can be processed by JAXB.
First, let's add the named queries that will support our use case. So, open the Exhibition class and add this block of code after the @Entity decoration:
@NamedQueries({
   @NamedQuery(name=Exhibition.findAll,query="SELECT r FROM Exhibition r"),
   @NamedQuery(name=Exhibition.findById,query="SELECT r FROM Exhibition r WHERE r.id = :id"),
   @NamedQuery(name=Exhibition.findByMovie,query="SELECT r FROM Exhibition r WHEREr.movie.id = :movieId")
   })
Also, add the names of the queries:
public final static String findAll = "Exhibition.findAll";
public final static String findById = "Exhibition.findById";
public final static String findByMovie = "Exhibition.findByMovie";
As we're going to expose this entity through a web service, we need to decorate the class with a JAXB annotation, java.xml.bind.annotation.XmlRootElement, so the engine can process the instance as a JAXB object when generating the web service's response. This must be done only to top-level entities of a request or response— for instance, even though the Movie entity will be a part of our response, we don't need to mark it. Just add the following line after @Table:
@XmlRootElement(name="Exhibition")
This annotation states that this class can be represented as an XML or JSON document through the use of JAXB and its binding providers, such as EclipseLink MOXy, the default JAXB provider of WebLogic Server 12c.
Tip
The same concepts applied to RESTful services using JAX-RS on this chapter can easily be reused for SOAP-based services through JAX-WS, Java API for XML Web Services. In other words, entities annotated with XmlRootElement will produce XML documents through JAXB and these documents can be used as input or output for both SOAP and RESTful services.
After adding these customizations to the class, your code should look like this:
@Entity
@NamedQueries({
   @NamedQuery(name=Exhibition.findAll,query="SELECT r FROM Exhibition r"),
   @NamedQuery(name=Exhibition.findById,query="SELECT r FROM Exhibition r WHERE r.id = :id"),
   @NamedQuery(name=Exhibition.findByMovie,query="SELECT r FROM Exhibition r WHEREr.movie.id = :movieId")
   })
@XmlRootElement(name="Exhibition")
public class Exhibition implements Serializable {
   public final static String findAll = "Exhibition.findAll";
   public final static String findById = "Exhibition.findById";
   public final static String findByMovie = " Exhibition.findByMovie";
...We have to do a simple modification to two entities, Movie and Room, in order to prevent a very common issue with JAXB and XML parsing: cyclic references or
bidirectional relationships. In standard JAXB this is not supported and one side of the relationship must be marked with @XmlTransient, but some JAXB implementations are also trying to solve this issue with extensions, such as EclipseLink MOXy.
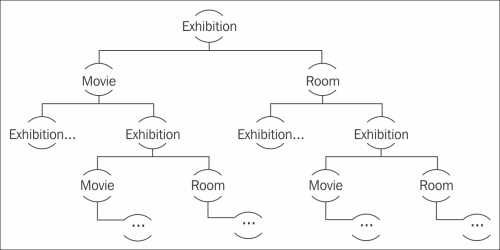
Following the database model, for each Exhibition instance we have references to both Movie and Room via @ManyToOne relationships. And Movie and Room both have a list of all exhibitions pointing back to the Exhibition entity, a @OneToMany relationship. The object graph generated by default for a given Exhibition object and its references would look like this:
The solution for this situation is to mark the field and method you don't want JAXB to parse with the XmlTransient annotation, found in the javax.xml.bind.annotation package. So, in this specific case, we need to modify the Movie and Room classes to instruct JAXB to not go over their list of exhibitions. Update your code by decorating both the variable declaration and their getter methods with @XmlTransient:
@Entity
public class Movie implements Serializable {
...
   @XmlTransient
   @OneToMany(mappedBy="movie")
   private List<Exhibition> exhibitions;
...
   @XmlTransient
   public List<Exhibition> getExhibitions() {
      return this.exhibitions;
   }
    ...
And:
@Entity
public class Room implements Serializable {
    ...
   @XmlTransient
   @OneToMany(mappedBy = "room")
   private List<Exhibition> exhibitions;
    ...
   @XmlTransient
   public List<Exhibition> getExhibitions() {
      return this.exhibitions;
   }
    ...
We also need to execute the same procedure to adjust the relationship between Seat and Room—when marshaling a Seat instance, JAXB must not include the referenced Room instance. To do so, open the Seat class and mark the Room reference with @XMLTransient, also add @XMLRootElement to the class declaration while you are at it:
@Entity
@Table("Seat")
@XmlRootElement(name="Seat")
public class Seat implements Serializable {
    ...
   @XmlTransient
   @ManyToOne
   @JoinColumn(name = "roomRef")
   private Room room;
    ...
   @XmlTransient
   public Room getRoom() {
      return this.room;
   }
...In order to show a user-friendly exhibition time on the query page, we are going to change the getDate method of the Exhibition class to join the date and time information (available as separate attributes, date and hour) and return the result. Also, the hour is saved in
military format, so we need to break it down to hours and minutes before joining it to the date.
Open the source code of Exhibition and change the contents of getDate() from the following code:
public Date getDate() {
   return this.date;
}
To this:
public Date getDate() {
   Calendar cal = Calendar.getInstance();
   cal.setTime(this.date);
   cal.set(Calendar.HOUR_OF_DAY, this.hour / 100);
   cal.set(Calendar.MINUTE, this.hour % 100);

   return cal.getTime();
}
After these changes, the entities are good to go, we just need to create the proper descriptors before packaging the project for deployment.
The persistence.xml file needs some tweaking but nothing different from what you already did in Chapter 3, Java EE Basics – Persistence, Query, and Presentation, so we're not going into all the details here. Just remember that you need to update the JTA data source accordingly. Here is how your file should look like:
<?xml version="1.0" encoding="UTF-8"?>
<persistence version="2.0"
   xmlns="http://java.sun.com/xml/ns/persistence"xmlns:xsi="http://www.w3.org/2001/XMLSchema-instance"
   xsi:schemaLocation="http://java.sun.com/xml/ns/persistencehttp://java.sun.com/xml/ns/persistence/persistence_2_0.xsd">
   <persistence-unit name="TheaterBO" transaction-type="JTA">
      <jta-data-source>jdbc/tickets/theater</jta-data-source>
      <class>com.packt.domain.theater.Exhibition</class>
      <class>com.packt.domain.theater.Movie</class>
      <class>com.packt.domain.theater.Room</class>
      <class>com.packt.domain.theater.Seat</class>
   </persistence-unit>
</persistence>
This project will be used as a library and shared between both web projects, Store and Theater. In order to avoid having duplicated JAR files, we're going to deploy the entity project as an optional package just like we have done with the StoreBO project in Chapter 3, Java EE Basics – Persistence, Query, and Presentation. To do that, create a MANIFEST.MF file inside the src/META-INF folder and add the following lines:
Manifest-Version: 1.0
Extension-Name: theaterBO
Specification-Version: 1.0
Implementation-Version: 1.0.0
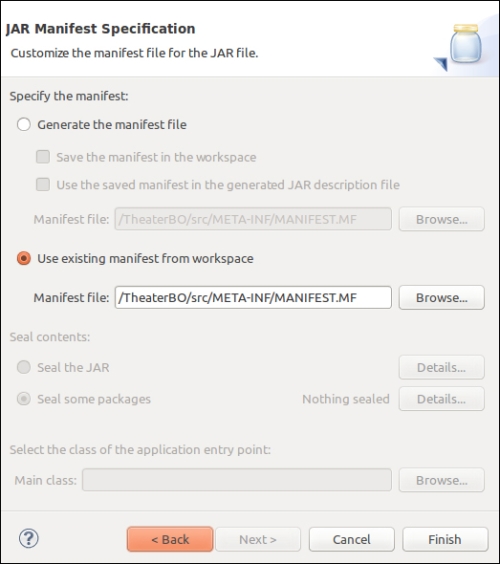
After creating the MANIFEST.MF file, you can export the project to a JAR file using Eclipse's Export wizard—it is a very simple procedure, but to avoid problems with the manifest file, remember to mark the Add Directory Entries option, especially, the Use existing manifest from workspace option pointing to the file you just created, as shown in the following screenshot:
Make sure the packaged MANIFEST.MF file has exactly the same content and sequence as we created inside the project. Without the specific tags we added, and in that particular order, the deployment will work, but the reference by other projects will not.
Tip
As an alternative to Eclipse's Export wizard we have created a build.xml Ant script that you can use to generate the JAR. You will find this script in the code bundle available at the Packt Publishing website, www.packtpub.com. A similar script was explained in Chapter 3, Java EE Basics – Persistence, Query, and Presentation
.
To complete the optional package creation procedure, we need to publish it into the WebLogic Server. To do so, access the WebLogic Administration Console and perform the following steps:
- Click on Deployments at Domain Structure.
- Click on the Install button at the top of the Deployments list.
- Click on the link upload your file(s) inside the Note phrase.
- Click on the first Choose File button next to Deployment Archive.
- Navigate to the folder where you saved the
TheaterBO.jarfile, select it, and click on Open and Next on the main page. - The Path field shows the complete path to our JAR file. Click on Next.
- This page shows options to change the deployment strategy, but as the default settings are just fine, we don't need to change any of them, so just click on Next.
- Click on Finish and conclude the deployment wizard.