
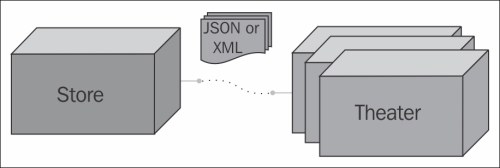
Now that there is a service that provides a list of movie exhibitions available on the Theater module, we need to update the Store module to consume this API and display the retrieved information on the query page. Here's a graphical representation of this functionality:
The JAX-RS RI defines a client API for RESTful Web Services clients and the base class for this is com.sun.jersey.api.client.Client. This is the main class we're going to use to develop our client in the next section.
Before starting the creation of the client, we need to add some Jersey libraries to the project classpath since they provide the client API and JSON classes that we're going to use:
- Open the Properties for Store window and go to the Java Build Path section.
- Click on the Libraries tab and click on Add External JARs….
- Browse to the WebLogic 12c installation directory and go to the
modulesfolder at$MW_HOME/oracle_common/modules. - Select files
jersey.core-1.17.1.jar,jersey.json-1.17.1.jar, andjersey.client-1.17.1.jarand click on OK:
- Click on OK to close the Properties for Store window.
Also, we need to add references to TheaterBO to properly manipulate the response of our REST Web Service. As we did with StoreBO in the previous chapter, we need to add a reference to the project for design-time compilation, and some tags to the project's MANIFEST.MF file to link them at runtime. Let's do so:
- To add a project reference, right-click on the Store project and select Properties, then Java Build Path and finally Projects. Click on Add… and select the TheaterBO project.
- Now, open the Store's project
MANIFEST.MFfile insideWebContent/META-INF, add a reference to theExtension-List, and then add the package details. Here's how your file should look after this step:Manifest-Version: 1.0 Class-Path: Extension-List: storeBO theaterBO storeBO-Extension-Name: storeBO storeBO-Specification-Version: 1.0 storeBO-Implementation-Version: 1.0.0 theaterBO-Extension-Name: theaterBO theaterBO-Specification-Version: 1.0 theaterBO-Implementation-Version: 1.0.0
- Save the file.
The Store project is now ready and you can start implementing the web service client.
Now that the Store project has the correct libraries, we can create the client that is going to consume the API exposed at http://localhost:7001/theater/api/exhibition/q. In order to achieve this, we must:
- Create a named bean that is going to act as a proxy between our
SearchManagerbean and the Theater API. - Instantiate the JAX Client handler and retrieve an actual handler to call the remote methods, represented by a
WebResourceobject. - Define and code the proxy method that is going to receive a movie ID from
SearchManager, build the query, and execute it.
So, in the Store project, create a new Java class named TheaterClient under the package com.packt.theater.client, decorate it with @Named and add a method to retrieve a JAX-RS handler:
private WebResource getClient() {
   final Client client = Client.create();
   return client.resource(ENDPOINT);
}
The endpoint referenced above is going to be retrieved from a deployment descriptor, web.xml, using CDI. Add these lines just after the class declaration:
@Resource(lookup="theaterServiceEndpoint")
private String ENDPOINT;
Now, open your web.xml file and add this block at the end of the web-app tag:
<env-entry>
   <env-entry-name>theaterServiceEndpoint</env-entry-name>
   <env-entry-type>java.lang.String</env-entry-type>
   <env-entry-value>http://localhost:7001/theater/api
   </env-entry-value>
</env-entry>
Note
As we will simulate just one Theater module when running the projects, there's no need to worry about finding out the right recipient for a request (which theater), so we won't have such a logic in our project, that is, we will use a fixed endpoint address. In a real-world scenario, we should have several entries here, each pointing to a different partner.
The last step is to create a method, getExhibitionByMovie, that receives a movie ID as parameter and returns a list of exhibitions, executing the call to the REST Web Service exposed by the Theater module. Here's how the final code of the TheaterClient class should look like:
@Named
public class TheaterClient {
   @Resource(lookup="theaterServiceEndpoint")
   private String ENDPOINT;

   private WebResource getClient() {
      final Client client = Client.create();
      return client.resource(ENDPOINT);
   }

   public List<Exhibition> getExhibitionByMovie(int movieId) {
      if (null == ENDPOINT) {
         return null;
      }

      final List<Exhibition> exhibition = (List<Exhibition>)getClient()
         .path("exhibition")
         .path("q")
         .queryParam("movie", String.valueOf(movieId))
         .accept(MediaType.APPLICATION_XML)
         .get(ClientResponse.class)
         .getEntity(new GenericType<List<Exhibition>>() {});

      return exhibition;
   }
}
Now, we must change the SearchManager bean to call the brand new client proxy and add variables to deal with this new data.
The SearchManager class already has methods that list theaters (getTheaters) and movies (getMovies), and now we need to update the bean to include a method that will call TheaterClient and receive a list of available exhibitions of the selected movie:
- Open class
SearchManagerand add two attributes, one to hold the list of exhibitions and another to hold the value of the selected entry from the exhibition drop-down menu (don't worry, it doesn't exist just yet, we're going to create it shortly), along with their respective getters and setters:private List<Exhibition> exhibitions; private int exhibition;
- Inject an instance of
TheaterClientinto it, marking it astransientto avoid problems later when serializing the instance ofSearchManager:@Inject private transient TheaterClient theaterClient;
- Create a method that will handle any changes in the Movie drop-down menu, so every time you select a different movie, this method will be called and the list of exhibitions will be populated or refreshed:
public void handleMovieChange() { if (movie != 0) exhibitions = newTheaterClient().getExhibitionByMovie(movie); else exhibitions = null; }
The complete class should look like this:
@Named("search")
@SessionScoped
public class SearchManager implements Serializable {
private static final long serialVersionUID = 1L;
@PersistenceContext(unitName="StoreBO")
EntityManager em;
@Inject
private transient TheaterClient theaterClient;
private List<Theater> theaters;
private List<Movie> movies;
private List<Exhibition> exhibitions;
private int movie;
private int theater;
private int exhibition;
// Change listener for Movie selectOneMenu
public void handleMovieChange() {
if (movie != 0) {
exhibitions = theaterClient.getExhibitionByMovie(movie);
} else {
exhibitions = null;
}
}
@SuppressWarnings("unchecked")
public List<Theater> getTheaters() {
if (theaters == null)
theaters = em.createNamedQuery(Theater.findAll).
getResultList();
return theaters;
}
@SuppressWarnings("unchecked")
public List<Movie> getMovies() {
if (movies == null)
movies = em.createNamedQuery(Movie.findAll).
getResultList();
return movies;
}
}
// Other getters and setters omittedThe web page that displays the search form needs to be updated with the exhibition dates retrieved from the Theater module. To accomplish this without refreshing the whole page, we will rely on some Ajax (Asynchronous JavaScript and XML) features provided by JavaServer Faces. This can be accomplished by firing an Ajax call when the user selects an entry from the Movies drop-down menu:
- Open the
index.xhtmlfile and add a form namedqueryFormbetween tagsp:fieldsetandp:panelGrid—this is needed so that the Ajax engine can capture events:<p:fieldset legend="Basic Query"> <h:form id="queryForm"> <p:panelGrid columns="2"> ... </p:panelGrid> </h:form> - Add a
p:ajaxcomponent inside thep:selectOneMenutag that shows the movie list. This component needs to inform which method should be called (that is, the event listener), and which component must be updated upon event execution. The component should look like this:<p:selectOneMenu id="movie" value="#{search.movie}"style="width: 350px;"> <f:selectItem itemLabel="Select one" itemValue="0" /> <f:selectItems value="#{search.movies}" var="n"itemLabel="#{n.name}" itemValue="#{n.id}" /> <p:ajax process="@this" update="exhibition"listener="#{search.handleMovieChange}" /> </p:selectOneMenu> - Add another
p:selectOneMenutag to list the exhibitions. It's very important to set the ID of this component toexhibitionsince it's the value configured in the Ajax event listener in the previous step:<h:outputLabel for="exhibition" value="Exhibition:" /> <p:selectOneMenu id="exhibition"value="#{search.exhibition}" style="width: 350px;"> <f:selectItem itemLabel="Select one" itemValue="0" /> <f:selectItems value="#{search.exhibitions}" var="n"itemLabel="#{n.date}" itemValue="#{n.id}"/> </p:selectOneMenu> - Save all files and redeploy (publish) the Store application.
The resulting page should look like this:
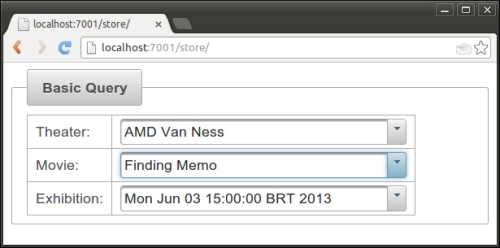
The Exhibition drop-down menu is being populated by the results returned by the exhibition RESTful web service, hosted by the Theater application. Every time the movie list changes, a new call is made and the exhibition list is refreshed. For a real-world scenario, many considerations would need to be taken into account, such as latency, caching, security, and other strategies. Some of these strategies will be explored in the following chapters.