
Now that we saw how to expose and consume web services using REST, let's see how to use another popular technology, SOAP, to achieve the same results.
Also, we already accessed the persistence layer provided by the server to connect and retrieve information from a database. In this chapter we will use this mechanism to insert data, detailing the transactional aspects involved, and will declare the bean validation rules to check the values being passed to the database.
Some of these functionalities will be encapsulated by a singleton bean, another new feature of Java EE 6 that makes the developer's life easier but brings a few details that must be considered to achieve the expected results.
The bean validation specification, defined by JSR 303, is a new addition to Java EE 6 and sets a single validation framework—instead of declaring a set of validations for input mechanisms and another set in the model layer, now we can use a consistent group of constraints and apply them at both view and model levels.
A validation is composed of one or more constraints and can be applied to virtually any element—examples being a class, a method, an attribute, or even another constraint (a structure called
constraint composition) depending on the scope of the constraint (its @Target decoration).
All validation constraints can be defined inside a validation.xml file or as annotations packaged with your application. We will focus on annotations as they are easier to read.
The rules defined in the validation.xml file have precedence over any constraint annotations a class may have.
The specification defines a fixed set of constraints as described in the following table:
All these built-in constraints—and custom constraints that we're about to create—can be combined to create complex validations; all we need to do is attach all the necessary constraints to a variable:
@NotNull
@Min(10)
@Digits(integer=5)
Long counter;
But you can't declare two annotations of the same type for the same object. When you need to do this, you must use the List format—actually, this is another annotation that extends all the built-in constraints—and pass an array of rules of the same type as its value:
@Pattern.List({ @Pattern(regexp="[a-z]*"),
                @Pattern(regexp="[A-Z]*")})
String name;
This is all good if you want to apply every single rule every time you check an object, and basically this is the expected behavior when applying validation to the user input via JSF.
But suppose you have a business entity that must be checked against specific rules depending on some entity's attribute. You can't create the validation set dynamically at runtime, which is when you have details about the object that must be checked. So, to solve this, you must use validation groups.
Every constraint exposes a groups attribute that can receive a list of Java interfaces, and this can be used to segregate rules. Notice that the definition of the interface is not used by the validation framework, only its name.
To illustrate the usage of groups, let's say we have a customer entity, and an individual can be a regular or a premium customer. This profile will define how many items can be set in the quantity attribute. To implement this scenario, we could use just three classes:
public class Customer {
  int quantity;

  public int getQuantity() {
         return quantity;
  }
  public void setQuantity(int quantity) {
         this.quantity = quantity;
  }
}

public class RegularCustomer extends Customer { }

public class PremiumCustomer extends Customer { }
As the group structure deals with interfaces, we need to attach the class definitions to the interfaces to be able to define the validation rules. So, let's create two empty interfaces and attach them to the classes we just created:
public interface Regular { }

public interface Premium { }

public class RegularCustomer implements Regular
                                extends Customer { }

public class PremiumCustomer implements Premium
                                extends Customer { }
We can now go back to the customer class and define the business constraints—a regular customer can add up to 10 items with no minimum value, and a premium customer can get up to 30 items but must get at least 10 items:
public class Customer {
  @Min.List({ @Min(value=10, groups={ Premium.class })})

  @Max.List({ @Max(value=10, groups={ Regular.class }),
              @Max(value=30, groups={ Premium.class })})
  int quantity;
To test the code, we're going to create a regular customer, instantiate a validator object—this object gives us a direct way to access the validation framework—and call the validate method to pass the customer and the interface whose rules must be checked:
import javax.validation.*;

Customer regular = new RegularCustomer();
regular.setQuantity(20);

ValidatorFactory vf = Validation.buildDefaultValidatorFactory();
Validator validator = vf.getValidator();

Set<ConstraintViolation<Customer>> violations =
                        validator.validate(regular, Regular.class);

for (ConstraintViolation<Customer> violation : violations) {
  System.out.println(violation.getMessage());
}If you need to declare validations that aren't covered by a specific built-in constraint or a combination of them, you can create your own constraints.
Here's an example of a custom constraint that just wraps two built-in constraints. Apart from the @NotNull and @Pattern decorations that specifies the validation rule, everything else just composes the minimum set of instructions needed to define a constraint:
import java.lang.annotation.*;
import javax.validation.*;
import javax.validation.constraints.NotNull;
import javax.validation.constraints.Pattern;

@Constraint(validatedBy={})
@Retention(RetentionPolicy.RUNTIME)
@Target(ElementType.FIELD)

@NotNull
@Pattern(regexp = "[0-9]{1,3}.[0-9]{1,3}.[0-9]{1,3}.[0-9]{1,3}")
public @interface IP {
    String message() default "";
    Class<?>[] groups() default {};
    Class<? extends Payload>[] payload() default {};
}The @Constraint decoration is the most important one because it defines this piece of code as a constraint to the container. As this custom constraint is just a composition of built-in constraints, an empty array is all we need to pass to validatedBy.
As constraints are checked at runtime, the @Retention decoration must be set to RUNTIME. The @Target decoration indicates which type of elements can be decorated with the custom constraint; for example, only fields (attributes) are allowed to have it, hence its FIELD value is decorated.
The message, groups, and payload methods are mandatory when defining a validation constraint. If you forget any of them, your code will compile and deploy, but when the WebLogic tries to check it at runtime, a javax.validation.ConstraintDefinitionException error will pop up.
You may have noticed that the message method has an empty string as its default value. This is because we don't have the actual code attached to this constraint—the built-in constraints will generate the output messages, so any text you enter here will not be used.
If your validation needs are more complex and some code is necessary, you can create one or more classes that implement the javax.validation.ConstraintValidator interface and list them in the validatedBy attribute in @Constraint.
In the class declaration, you must state which constraint this code will be bound to and to which type of data. Here's how the same IP validation would look like if we use Java code instead of the built-in constraints:
import javax.validation.ConstraintValidator;
import javax.validation.ConstraintValidatorContext;

public class IPValidator implements ConstraintValidator<IP, String>
{
    private IP constraint;

    // Lazy pattern, not designed for real situations
    private static String IP_PATTERN =
    "(?>[0-9]{1,3}.)(?>[0-9]{1,3}.)([0-9]{1,3}.)([0-9]{1,3}.)";

    @Override
    public void initialize(IP constraint) {
        this.constraint = constraint;
  }

  @Override
  public boolean isValid(String ipAddress,
    ConstraintValidatorContext cvc) {
        if (null == ipAddress)
             return false;

             return ipAddress.matches(IP_PATTERN);
  }
}
As our IP rule can only be applied to strings, the validator declaration reflects this decision as ConstraintValidator<IP, String>.
The initialize method receives the parameters set at the annotation, and this information can be stored to be used later by the isValid method; for example, to organize the sequence of checks based on the groups attribute.
When you attach constraints to bean attributes and these attributes are linked to a form, the validation phase is started upon the form's submission. If one or more of the constraints aren't met, the associated message(s) is returned to the view.
To exemplify this, let's attach a basic rule to the attributes of our SearchManager class in the project Store:
public class SearchManager {
   ...
  @Min(value = 1, message = "Please select a movie")
  private int movie;

  @Min(value = 1, message = "Please select a theater")
  private int theater;

  @Min(value = 1, message = "Please select an exhibition")
  private int exhibition;
This set of constraints will guarantee that when the search method executes, the user selected an entry of each available dropdown: theater, movie, and exhibition.
We have a couple options to show the messages returned by JSF:
Tip
Consider using some of these restrictions on POJOs at StoreBO and TheaterBO. That way, you can easily apply some common restrictions for business objects. You can also save a layer hop to validate some of these restrictions that are actual database constraints, and every project that consumes these beans will share these basic validations. For instance, you can add the following validations to the Ticket class::
…
@NotNull(message="Control numbers can't be null.")
private String control;

@NotNull(message="An exhibition must be assigned to the ticket.")
private int exhibitionRef;

@NotNull(message="Seat(s) must be assigned to the ticket.")
private int seatRef;
…
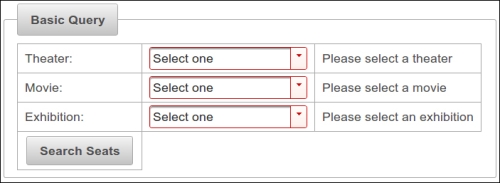
You can attach a message component to each field of a form, so each one will show the messages related to its linked field. Just add an h:message tag with the name of the target component to its for attribute:
<h:message for="movie" />
To be able to submit the form and run validations, we need to add a command button inside queryForm, along with an HTML break to keep the screen aligned:
<p:commandButton id="query" update="queryForm" value="Search Seats" action="#{search.query}"/>
<br />
Here's a snippet of the code from the index.xhtml file of the Store project showing how to use it:
<h:form id="queryForm">
   <p:panelGrid columns="3">
      <h:outputLabel for="movie" value="Movie:" />
   <p:selectOneMenu id="movie" value="#{search.movie}">
      ...
   </p:selectOneMenu>
   <h:message for="movie" />
   ...
   <p:commandButton id="query" update="queryForm" value="Search Seats" action="#{search.query}"/>
<br />The downside of this approach is that you have to code individual entries and obviously must consider them as screen components—to accommodate the message tags, we had to raise the number of columns of the panelGrid tag defined earlier. Conversely, when you have a screen with too many fields, using it brings better visual feedback to the user, despite the extra effort to format the page output.
The rendered screen with some validation messages would look similar to the following screenshot:
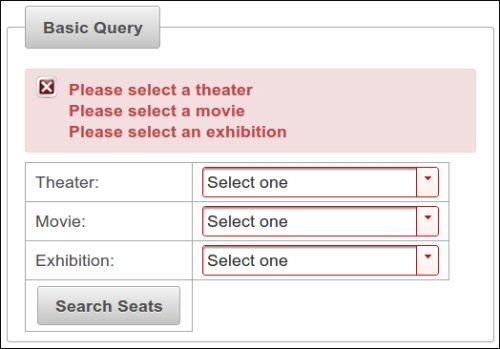
You can also set a message area, which is not attached to a specific field, like this:
<h:form id="queryForm">
      <p:messages />
      ...
This is how the same messages would be shown using this component:
You can customize a component's style by adding your own stylesheet and overriding PrimeFaces' definitions. The appropriate tags you should change are detailed in the framework's documentation.
Growl is name of the notification system adopted by Apple's Mac OS X, and also the name of a PrimeFaces's component based on it that shows messages in an overlay.
In order to use the component, just add a reference to it inside your command's target update component—the form, in our example:
<h:form id="queryForm">
<p:growl showDetail="false"/>
And here's how the messages would be shown:
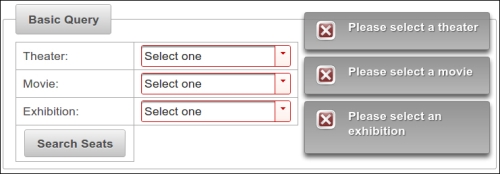
The showDetail attribute is set to false to avoid message repetition inside each box—each FaceMessage has a summary attribute and a detail attribute, and the bean validation framework sets both of them with the same value.
The book's example application will use PrimeFaces's Growl component.
If you plan to use bean validations along with JSF, there's something you must remember; when you attach a bean element to a JSF text component such as InputText, the element is initialized with an empty string. So, if you mark such an element with a @Null or @NotNull constraint, the resulting check would be inaccurate.
To avoid this scenario, you must add a parameter to the application's web.xml file:
<context-param>
 <param-name>
   javax.faces.INTERPRET_EMPTY_STRING_SUBMITTED_VALUES_AS_NULL
 </param-name>
 <param-value>true</param-value>
</context-param>
By doing this, you're instructing the JSF engine that it must handle empty strings as null.