
The Simple Object Access Protocol (SOAP) is present in probably 97.32 percent (an educated guess) of all the web service-related products available today, although it isn't mandatory to assemble a service. As it plays such an important role to integrate systems, let's take a look at how this is accomplished using WebLogic Server 12c.
To illustrate the usage of SOAP, we will expose a service from the Theater project that makes a seat reservation. This web service will be consumed by the Store project once the user has decided which and how many of each seat type he/she wants for a specific exhibition.
To create and expose a web service, we just need to annotate a POJO class with javax.jws.WebService. By default, all public methods of the class are automatically exposed as operations.
We're going to create a service in the Theater project that will receive a reservation request and pass it to the partner's system to register it. Then, we subtract the number of seats received from the available seats of the given exhibition.
The update of the Exhibition instance is going to be done inside a UserTransaction that we must manually acquire. Also, the find instruction to retrieve the instance using the persistence layer is going to be marked with the PESSIMISTIC_WRITE lock mode. So, only one instance of the web service is able to update the entity at a given moment (all others will wait for the release of the entry).
Let's implement the web service:
- Create a new class named
ReservationBeanin the packagecom.packt.theater.servicesof the project Theater, and add ajavax.jws.WebServiceannotation to the class definition:@WebService(serviceName="ReservationService", targetNamespace="http://com.packt.wls12c") public class ReservationBean { }Tip
The
serviceNameparameter defines the name by which the service will be known, not exactly a revealing statement. But what happens when you don't declare it? Your service's name will be a contraction of the class name plus the suffix,Service. For our class, this would beReservationBeanService.The default
targetnamespacevalue is the class' package converted to a URL -http://services.theater.packt.com/using the same example. - We need just one operation that will receive the exhibition ID along with a list of seat types and quantities:
public String execute(@WebParam(name="exhibitionId")
                         int exhibitionId,
                      @WebParam(name = "reservationCode")
                         String reservationCode,
                      @WebParam(name="seats")
                         Map<Integer, Integer> seats) throws ReservationException {
}
Tip
The
WebParamannotation is used here to give meaningful names to the parameters—when an explicitnameattribute isn't declared, the parameters are calledarg0,arg1, and so on. TheReservationExceptionclass is a simple POJO that extends theExceptionclass. We need a specific class like that in order to generateSoapFaultmessages when exceptions occur in the service. For more details, check the code bundle of this chapter. - As we're going to update an
Exhibitioninstance, we need to inject a persistence context:@PersistenceContext EntityManager em;
- At this operation, we should communicate with the partner's backend system to proceed with the seat reservation and update the related
Exhibitioninstance to subtract the number of seats passed onto the request - the first step can't be implemented as there is no system to connect to, so here is the logic for the remaining steps:// Find the total number of seats for this reservation int seatsTotal = 0; for (Iterator<Entry<Integer, Integer>> it = seats.entrySet().iterator(); it.hasNext();) { seatsTotal = seatsTotal + it.next().getValue(); } // and subtract then from the Exhibition instance UserTransaction ut = TransactionHelper. getTransactionHelper(). getUserTransaction(); // // The find method _must_ be inside the transaction! // try { ut.begin(); Exhibition exhibition = em.find(Exhibition.class, exhibitionId, LockModeType.PESSIMISTIC_WRITE); if (null == exhibition) { throw new ReservationException("Exhibition not found"); } exhibition.setAvailableSeats( exhibition.getAvailableSeats() – seatsTotal); ut.commit(); } catch (Exception e) { e.printStackTrace(); throw new ReservationException(); } return ReservationBean.OK; - Save the file and publish the Theater project. To check whether the service is ready for use, open your browser and go to
http://localhost:7001/theater/ReservationService?WSDL. If you get the XML definition of the service, we're good to go.Tip
Another possible strategy to deal with the locking of an instance of
Exhibitionis to decorate the entity with@Versioninstead of retrieving it with thePESSIMISTIC_WRITEflag. This approach uses a table column to deal with concurrency. It can be more effective because we're instructing the entity to behave in a certain way instead of leaving the decision to the consumers, as is the case shown here.
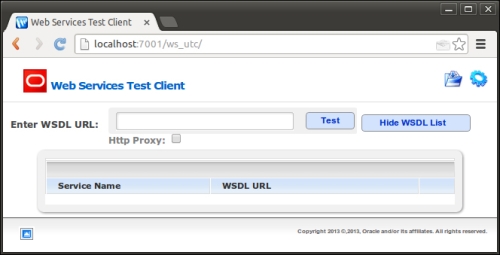
WebLogic Server gives us a pretty useful utility to call services, the WebLogic Universal Test Client (ws_utc). This is a web-based application that you can use to test services exposed by WebLogic as well as external endpoints.
To start it, type http://localhost:7001/ws_utc/ in your browser, and after a message stating that the package is being deployed, a screen like this will show up:
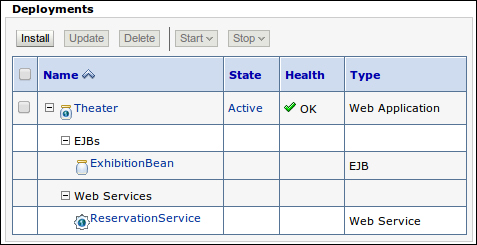
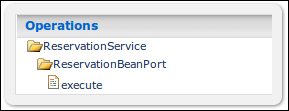
If you need to find the address of a web service exposed by WebLogic Server, you can open the administration console (http://localhost:7001/console), select Deployments in the navigation tree, and expand the desired package to see the list of available services under the Web Services group:
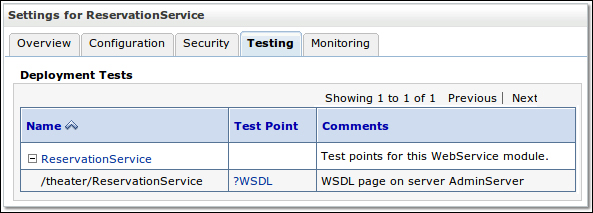
By clicking on a web service's name, you can access pages to check and configure several parameters such as security credentials and policies, and advanced features such as reliable messaging and buffering. Click on the Testing tab, and expand the box besides the service name to get the service's WSDL address:
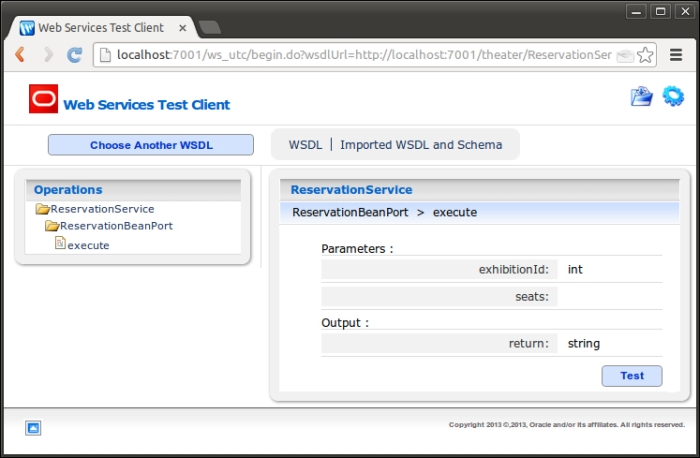
After you enter the service's WSDL address, the operations exposed by the service are listed. Click on the Test button of the operation you want to run:
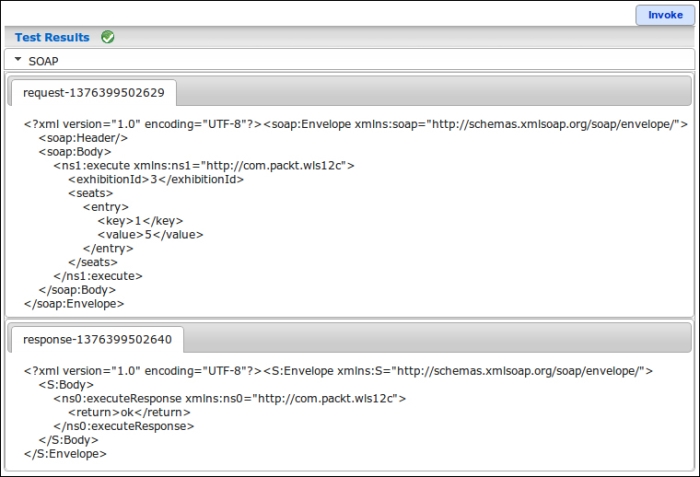
A new screen is loaded with a form mapping the entries from the request element. Click on the Raw Message button to switch to the textbox where we can edit an XML payload; here's a valid payload to use (change the values of the generated XML to match the following ones):
<soap:Envelope
            xmlns:soap="http://schemas.xmlsoap.org/soap/envelope/">
    <soap:Body>
        <ns1:execute xmlns:ns1="http://com.packt.wls12c">
            <exhibitionId>3</exhibitionId><reservationCode>1234-1234-1234</reservationCode>
            <seats>
                <entry>
                    <key>1</key>
                    <value>5</value>
                </entry>
            </seats>
        </ns1:execute>
    </soap:Body>
</soap:Envelope>
Click on the Invoke button at the bottom of the screen; the Test Results block will be loaded right below the Invoke button, showing both request and response XML files. Check whether the return node in the response block is set to ok:
To execute the same call again with the same payload, just click on the Invoke button one more time. To test other methods or to use another payload, click on the name of the desired operation in the Operations tree on the left-hand side of the screen:
We just checked that the service implementation is working as it should be, so now it's time to code the service call from our Store module. To do so, we must perform either of the following:
- Build a call by instantiating and loading the objects that represent the service and its payload. This is called a dynamic invocation.
- Create Java classes that act as a stub to the service provider. As this solution involves creating structures that must match the service's and having them pinned to our code—either by having the actual source added to the project or by packing the stub inside a JAR library—it is referred to as a static invocation method.
The most common way to consume a web service is to create a stub for it. This way we don't have to manually create all the boilerplate code needed to map the service's operations, its data structures, and the actual invocation to the provider.
To create the classes, we can use the wsimport command-line tool provided by the JDK. This tool gives us the option to create a JAR file with the generated classes or to keep the code and insert it into our project. Let's use the latter option so you can check how it works by browsing the Java source.
Open a command prompt or terminal, and enter the following command—as a single line—with the necessary replacements for your environment:
/opt/packt/install/jdk1.7.0_21/bin/wsimport -keep
        -Xnocompile
        -p com.packt.util.gen
        -d /opt/packt/workspace/Store/src/
        http://localhost:7001/theater/ReservationService?WSDL
The parameters in the preceding code tell the utility:
- To keep the sources instead of erasing them after compilation, use the
-keepargument. - That a specific package name must be used when creating the classes use the
–pargument. - The root directory where the files are to be written with the
–dargument. As we are adding the source to our Store project, the value is the root source of the project,/opt/packt/workspace/Store/src/. - That we don't need the compiled objects, hence the
-Xnocompileoption.
If you go to Eclipse and press F5 to refresh the project, a new package com.packt.util.gen will appear. The Execute and ExecuteResponse classes are wrappers to the request and response payloads respectively. The ReservationBean class is the wrapper to the actual service provider, and ReservationService is the client we're going to use to code our call.
So, open the SearchManager class and make the following changes:
- Start by adding a reference to the
ReservationServiceclass:private transient ReservationService reservationService;
- Then, we need to make the WSDL location of our web service configurable and dynamic, just like we already did for the RESTful service. Add an entry in the
web.xmlfile as follows:<env-entry> <env-entry-name>reservationServiceEndpoint</env-entry-name> <env-entry-type>java.lang.String</env-entry-type> <env-entry-value>http://localhost:7001/theater/ReservationService?WSDL</env-entry-value> </env-entry>
- Then we can add a lookup for this resource entry through
@Resource:@Resource(lookup = "reservationServiceEndpoint") private String RESERVATION_SVC_ENDPOINT;
- And finally let's create an
init()method marked with@PostContructso it will be executed after all the injected resources are ready. In this method, we are going to set the service endpoint to the resource:@PostConstruct public void init() { try { reservationService = new ReservationService(new URL(RESERVATION_SVC_ENDPOINT)); } catch (MalformedURLException e) { e.printStackTrace(); } } - Locate the
reservemethod in the same class and insert the code to load aSeatsinstance that we're going to pass as part of the request. The definition of this class is inside theExecuteclass file that maps the input structure of the operation:public void reserve() { Seats seats = new Seats(); List< com.packt.util.gen.Execute.Seats.Entry> entries = seats.getEntry(); for (int i = 0; i < quantities.length; i++) { String quantity = quantities[i]; if (0 < Integer.parseInt(quantity)) { Entry entry = new Entry(); entry.setKey(this.seats.get(i).getType()); entry.setValue(Integer.parseInt(quantity)); entries.add(entry); } } - A control code must be generated and the reservation must be added to the central database. This is done by a call to the
generatemethod of the classReservationCodeBean, which also must be injected here:@Inject private transient ReservationCodeBean controlBean; … public String reserve() { … String reservationCode = controlBean.generate(this.theater, this.exhibition); - As an instance of
ReservationServiceis created after the bean initialization, we just need to get the declared port—the concrete reference to the service's endpoint—and call the desired operation,execute. By doing this, we're actually consuming the service:String response = reservationService.getReservationBeanPort(). execute(this.getExhibition(), reservationCode, seats); - Now, check the response received from the service provider and whether the process returned an ok literal. We must show a confirmation message to the user and redirect them to the reservation page, so they can print a receipt that must be presented at the theater's booth to redeem the reservation. Simply add the following:
... if (response.equals("ok")) { FacesContext context = FacesContext.getCurrentInstance(); context.getExternalContext().getFlash().setKeepMessages(true); FacesContext.getCurrentInstance().addMessage( null, new FacesMessage( "New reservation of " + quantities.length + " seats completed. Number is " + reservationCode)); resetSearch(); return "reservation?faces-redirect=true"; } else {... // error treatment - The code in the last step adds a confirmation message, resets the search data, and redirects the user to the reservation page where the system keeps a history of all the reservations made by a customer. Note that at this point, we don't have an authenticated customer yet, so it's showing data from all of them. So let's create a
reservation.xhtmlpage:<ui:composition template="/WEB-INF/templates/template.xhtml"> <ui:define name="title">Reservations</ui:define> <ui:define name="content"> <h:form> <p:growl showDetail="false" /> <p:panel id="tpanel" header="Reservations"> <p:dataGrid columns="3" value="#{ticket.tickets}" emptyMessage="You have no reservations yet." var="item"> <p:panelGrid style="font-size:12px" columns="2" id="div-#{item.id}"> <h:outputLabel for="control" value="Code:" /> <h:outputText id="control" value="#{item.control}" /> <h:outputLabel for="tname" value="Theater:" /> <h:outputText id="tname" value="#{item.theater.name}" /> <h:outputLabel for="exhib" value="Exhibition:" /> <h:outputText id="exhib" value="#{exhibition.find(item.exhibitionRef).date}"> <f:convertDateTime pattern="MMM dd, yyyy hh:mm a" /> </h:outputText> </p:panelGrid> <p:commandButton icon="ui-icon-print" style="font-size:12px;" id="print" value="Print" type="button"> <p:printer target="div-#{item.id}" /> </p:commandButton> </p:dataGrid> </p:panel> </h:form> </ui:define> </ui:composition - The final step is to create the
resetSearchmethod referenced by thereservemethod:public void resetSearch() { this.theater = 0; this.movie = 0; this.exhibition = 0; this.seats = null; }
Now, save all the files, publish both Theater and Store projects to WebLogic Server, and execute the business scenario. Here's how the reservation page and the confirmation message would look like after a successful reservation:
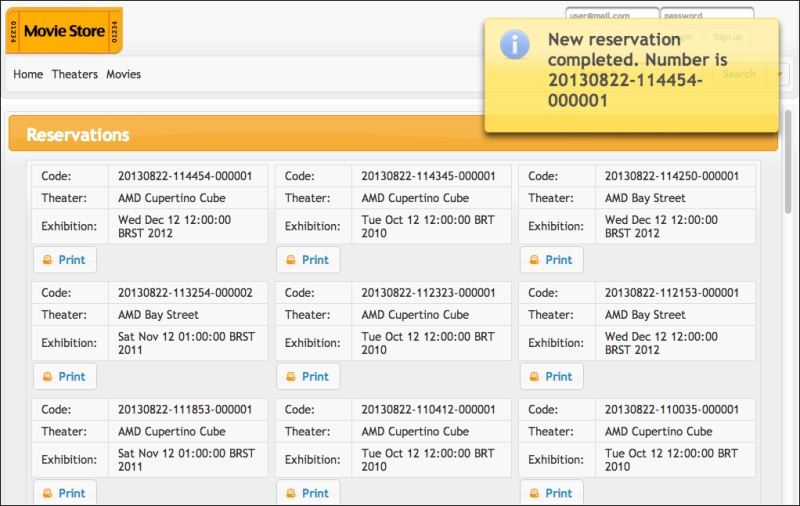
From this page, a customer can see the history of reservations. Also, by clicking on the Print button, the selected reservation will be printed; the entries are ordered, and the newest ones are showed first.
If you want to check whether the web service ran as expected, check the contents of the exhibition table of the theater_db database—the available_seats column should have its value updated by the subtraction of the number of seats sent by the page. Also, each successful submission should create a new entry in the table ticket of the database store_db.