
In order to have a fully functioning app and eventually publish it to the Windows Store, you will need to properly handle application state while also considering the user’s bandwidth, disk space, and other system resources. I’ve simplified this to what I would call being a developer good citizen of the platform. This means providing users with an optimal experience regardless of the device or the presence of network connectivity. Whether you value user experience or not, Microsoft has a set of guidelines that must be followed to pass certification for the Windows Store. These guidelines value user experience, and if you plan to release your app through the Windows Store, you should consider these guidelines from the beginning. For more information on what’s required by the Windows Store, see Chapter 5.
This chapter describes core components of a more complex application than the Bing Simple Search app we explored in the previous chapter. These concepts will be used throughout the book, and I will reference various aspects of the application through the use of these techniques. If you are familiar with previous XAML-based technologies, you will likely be familiar with these concepts. As a reminder, all the code for the book’s full application is available online at https://github.com/bendewey/GettingStartedWithMetroApps. I encourage you to download the code ahead of time so you can follow along.
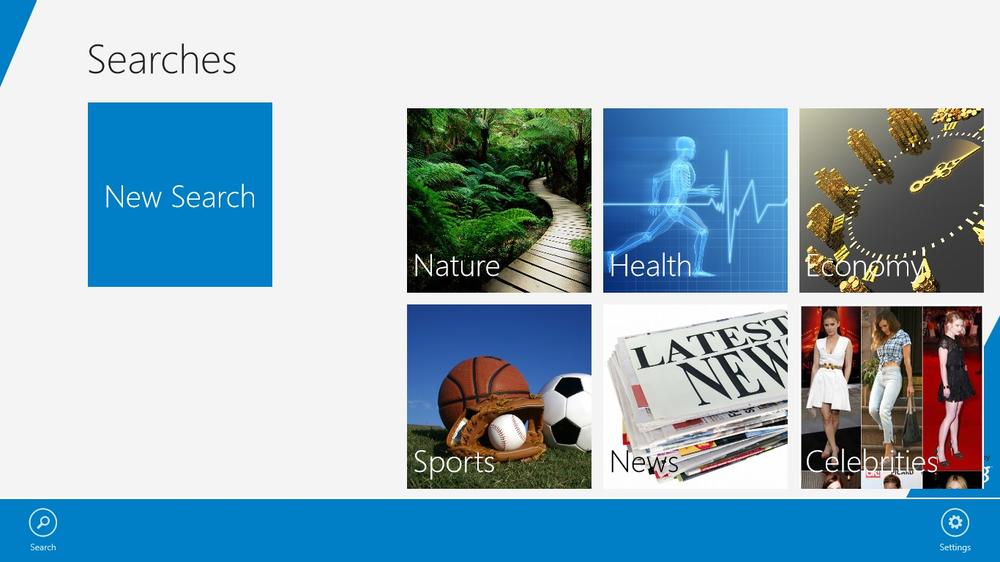
Before I get too deep into the code, let’s step back and review the goals of the Bing Image Search app (Figure 3-1).
Usability goals determine the way users interact with the app, from how quickly they can use it to how satisfied they are with the experience. In my case, usability, functionality, and interface design goals are all synonymous.
- Allow users to search, browse, save, and share images
The Bing Image Search app will use the Bing Search API to retrieve a list of search results and display them in a number of different user-friendly views.
- Make use of the charms where applicable (search, share, settings)
The Windows 8 charms provide a nice way to perform many tasks that are common to all applications. A goal of this app is to use charms where ever applicable. This does not mean that you should rely on the charms for all user interaction; in contrast, I encourage you to provide app bar buttons that trigger the charm panes and provide users with an alternative to opening the charms to discover critical pieces of your app like search.
- Expose the content to other apps via the file pickers
Windows 8 provides new and improved file pickers that can load images from numerous locations, not only the local filesystem. The Bing Image Search app should allow users from other apps to select images for use within their app.
- Should support multiple layouts
In addition to multiple screen resolutions, you will need to consider how your application will respond to changes in orientation (portrait and landscape) and how it will look in the new Snapped mode. Many of the Visual Studio application templates, use a
LayoutAwarePagebase class to provide pages with updates to their state. The Bing Image Search application will use the same technique to notify its pages of any changes.- Use gestures and sensors to provide users with unique ways to interact with the app
While a button to load more results is sufficient, it’s becoming common for tablets and slates to support a shake gesture for reloading content. In order to be on the cutting edge, the Bing Image Search app should support these gestures.
Non-functional goals describe what the app should be; this is in contrast to what the app should do, as discussed in the previous section. This also includes features that may not be encountered during typical application use, but would ultimately affect the user experience.
- Be a good citizen on the platform
To be a good citizen means to do all you can to ensure a good user experience. This means your app should be responsive and clean. A good experience in the app is not the only concern. Being a good citizen also includes sparing use of network bandwidth and isolated storage so that your app does not hog system resources.
- Should gracefully respond to the user when network access is disabled
Since it’s not practical to store all the possible image results from the Bing Search API, the app can’t offer the users a compelling offline experience. If your app has the ability to provide valid data to the user when offline, then I encourage you to consider this goal for yourself. Simply informing the users that the app is not available when the user is offline will suffice.
- Should support a loading progress bar and downloading indicators
Because all the data for the Bing Image Search app comes from online sources, the network traffic can be quite heavy. For this reason, it’s imperative to provide progress bars and status information to the user so they know when the app is busy. The main
Shellof the application exposes status update functionality through anIStatusServiceinterface.- Should gracefully handle exception messages
The Bing Image Search app should never return sensitive information regarding exceptions to users. To handle this, the
DialogServiceclass can be used throughout the app or as unhandled exceptions are encountered, it can provide users with friendly error messages.- Should perform all actions asynchronously
WinRT does not provide any way to perform actions that take longer than 50ms without using an asynchronous pattern. The Bing Image Search app maintains this requirement and performs all long-running tasks asynchronously so the user experience is never jeopardized.
While the previous two goals relate to the overall user experience, development process goals impact developers and the overall code maintainability throughout the lifetime of the application.
- Bing Image Search should have highly testable code.
The Bing Image Search uses the Model-View-ViewModel (MVVM) pattern to provide testable application logic. ViewModels are provided to their respective Views via the
ViewModelLocator. All of the ViewModels and services are instantiated via a central Inversion of Control (IoC) container and dependencies are provided to their objects via Dependency Injection (DI). This allows the unit tests to provide mock implementations when testing functionality.- Bing Image Search should adapt to the application for compatibility with new capabilities of future versions.
The Bing Image Search app has an
ApplicationSettingsclass that is a strongly typed wrapper over application storage. The underlying implementation remains flexible to change. In the event that you need to change whether settings are roaming, local, or serialized to a file, the object exposed to the consuming classes remains unchanged.- Bing Image Search wants to handle all events in a centralized location, be it Windows events or local app events.
The Bing Image Search app uses a
MessageHubto handle messages. Messages are used to signal the occurrence of an event in a loosely coupled fashion. Messages are made up of two parts: anIMessage, which is the payload, and anIHandler, which is responsible for handling the message when it is sent. There is also anIMessagePump, which is responsible for listening to events like a search action or a share data request for Windows, at which point its only job is toSenda message.
Warning
The WinRT platform is new, so expect it to change and design your application so that you can easily modify it to use new features.
These goals allow me to set a standard for quality and functionality that can be used when testing the app. The remainder of the chapter will focus on the actual application: designing the interface, structuring the pages, and core functionality.
In order to accomplish the goals laid out in this chapter, the Bing Image Search app needs to be small and easy to navigate. With that in mind, the app is broken up into three pages:
SearchHistoryPageSearchResultsPageDetailsPage
The primary page that the user sees is the SearchHistoryPage; this outlines the user’s
searching history and is the home screen for the application. Once a user
has performed a search, she is navigated to a SearchResultsPage. The SearchResultsPage provides multiple views of the
images. There are buttons on the bottom of the app bar that allow users to
switch between views. Once an image is selected, the user has the ability
to load a DetailsPage where she can
perform a number of Windows 8 tasks. Figure 3-2 shows a
detailed diagram of the navigation events in the Bing Image Search
app.
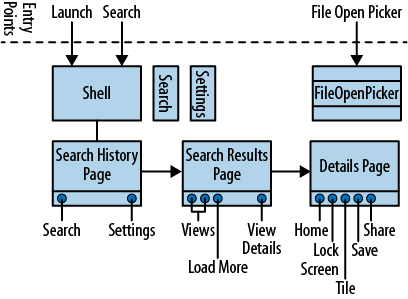
Table 3-1. Application Entry Points
| Entry Point Override in App.xaml | Description | Bing Image Search app behavior |
|---|---|---|
| Occurs when the user clicks on the tile from the Start Screen or Apps list | Loads the main |
| Occurs when the user clicks the app icon from within the Windows SearchPane when the app is not currently in the foreground. (i.e., from within another app or from the Start Screen) | Loads the main shell and immediately sends a |
| Occurs when the user launches the | Loads the custom |
In addition to the overall design of the application, Figure 3-2 also shows the different entry points into the app.
All of these entry points, described in Table 3-1, occur
in the App.xaml.cs file. This
App.xaml file contains the resource, or style,
definitions for use throughout the application. The associated
App.xaml.cs file contains the App class, which, like WPF and Silverlight,
hosts the application startup and shutdown event or overrides. This
App class, or application class,
creates a new Shell control, assigns it
to the current window, and activates that window, as seen in Example 3-1. This main application Shell is responsible for the navigation, title,
back button, and the PreferencesPage.
In the case of the OnFileOpenPickerActivated entry point, the full
application UI won’t suffice for a number of reasons, primarily because
the resolution is different and the app bar will not work. This is why it
loads a custom page, specifically the FileOpenPickerPage, to run the application. The
file picker will be described in more detail in Chapter 4.
The Bing Image Search app is made of Models, Views, ViewModels, application services, and Windows services. Figure 3-3 describes the structure of the Bing Image Search application. This diagram is simplified in a number of ways, but the core components in the application services layer remain. You will also notice that the ViewModels don’t talk to the Windows services directly. The application services act as a proxy to the Windows services, which maintains code testability.
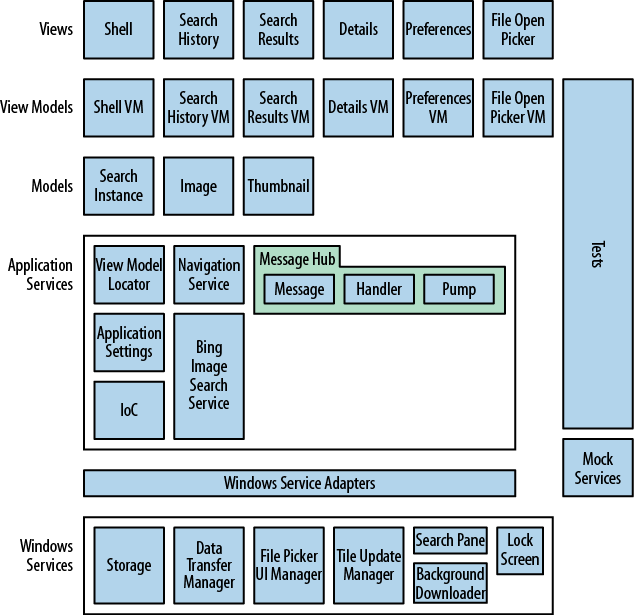
The application services are broken up into five categories and I’ll review them in the order in which they occur when the application activates:
MVVM & the ViewModelLocator
IoC
NavigationService
MessagingHub
ApplicationSettings
Model-View-ViewModel (MVVM) is a common practice in XAML and C# that was made popular by WPF and Silverlight. MVVM makes extensive use of the data binding capabilities in XAML. The ViewModel exposes properties on the Model objects to the View, which uses data binding to display that information to the user. In addition to binding data from the ViewModel to the View, events from the View are routed to the ViewModel via commands.
Note
MVVM as a design pattern is a broad topic that I will not be able to cover in this short guide. This section will focus on what’s relevant for this app. If you are new to MVVM, you may want to take a look at WPF Apps With The Model-View-ViewModel Design Pattern, an article by Josh Smith in MSDN Magazine (http://msdn.microsoft.com/en-us/magazine/dd419663.aspx).
There are many schools of thought regarding which object should be
created first, the View or the ViewModel. While there are merits in
both, I find that using a ViewModelLocator for small task-oriented
projects, like those typically found in apps for phones and tablets, is
easy to manage. This approach may not be appropriate for larger
applications because the statically typed nature of the properties may
become difficult to manage.
The ViewModelLocator is created
as an application resource (see Example 3-2) and is used,
in this case, with an Inversion of Control (IoC) container to provide
object activation for almost everything in the system. Within the
ViewModelLocator, you will find
properties for each of the views. Example 3-3 shows the
property for the SearchHistoryPageViewModel. This property
retrieves an instance of the ViewModel from the container, which in the
case of the Bing Image Search app, returns a new instance of the
ViewModel every time. This allows the ViewModel to load any information
required for the page at the time the page is created. Example 3-4 shows the final piece of the puzzle. When a new
page—the new View—loads, it sets its DataContext in XAML to the property on the
ViewModelLocator, which in turn
creates the ViewModel for that page.
The View-first style of MVVM works well with the page navigation model in XAML because it decreases the concerns prior to navigating to a page. All you need to do is store the current user state and tell the application to navigate to a new page. Conversely, you would have to create the ViewModel and populate it with information before navigating to a new page, which can negatively affect maintainability as calling pages need to know specific details about any related pages. In addition, by storing all of the navigation state change information in application storage, you get the added benefit of saving your user’s place in the application as he navigates around, which makes tombstoning easier.
Example 3-2. ViewModelLocator creation (App.xaml)
<Application.Resources><common:ViewModelLocatorx:Key="ViewModelLocator"/><!-- Other styles and resources ---></Application.Resources>
Example 3-3. SearchHistoryPageViewModel Property in the ViewModelLocator (ViewModelLocator.cs)
publicSearchHistoryPageViewModelSearchHistoryPageViewModel{get{returnContainer.Resolve<SearchHistoryPageViewModel>();}}
Example 3-4. SearchHistoryPage DataContext Binding to ViewModel (SearchHistoryPage.xaml)
<Pagex:Class="BingImageSearch.SearchHistoryPage"xmlns="http://schemas.microsoft.com/winfx/2006/xaml/presentation"xmlns:x="http://schemas.microsoft.com/winfx/2006/xaml"DataContext="{Binding SearchHistoryPageViewModel,Source={StaticResource ViewModelLocator}}"><!-- code removed for clarity --></Page>
Instead of handling events in the code-behind, which is difficult
to test, the MVVM pattern leverages commands to respond to user
interactivity. A command is nothing more than a generic interface in
WinRT. The way I’ve chosen to implement them uses a DelegateCommand, which can be found in
numerous places including the Prism Framework for WPF and Silverlight.
Once you’ve included the DelegateCommand, wiring them up to execute
methods is as simple as supplying a delegate to the constructor as seen
in Example 3-5. In general, I try to ensure that the
ViewModels have minimal responsibilities, except for coordinating with
the view. For this reason, many command handlers have a simple action
that sends the required message to the MessageHub for processing.
Note
Prism (http://compositewpf.codeplex.com/) is a set of guidelines produced by Microsoft’s Patterns and Practices team on building applications in WPF. While it’s a great example of building full-scale applications, I find the techniques described in the Windows Phone 7 Guide to be far more relevant to Windows 8 apps (http://wp7guide.codeplex.com/).
Numerous Inversion of Control (IoC) containers have been created by the .NET community and make the process of configuring types for your application quite easy. When leveraging the Dependency Inversion principle (or Dependency Injection) your services will likely have nested dependencies, which lead to quite a bit of setup. The IoC container solves this by handling the setup of your application type mappings in a centralized location. In addition, the IoC container is responsible for maintaining the lifetime of each object in your application. If you want more info about IoC containers, there is plenty of information online. My favorite resource is still the DNR TV video James Kovacs’ roll-your-own IoC container at http://www.dnrtv.com/default.aspx?showNum=126.
Warning
You should consider carefully which objects you should reuse and
which objects you should instantiate on demand, also known as SingletonLifetime and TransientLifetime respectively. Reusing
objects can improve the application’s performance at the expense of
memory utilization.
Since the .NET Windows 8 App Profile is new, the options for containers are limited. I’d imagine that many more containers will become available with time. For now, I am using a nice container that is available from codeplex called MetroIoC (http://metroioc.codeplex.com/).
The ViewModelLocator maintains a
reference to the application’s only IoC container and uses it to create
all the ViewModels. Example 3-6 shows how the container is
created in the ViewModelLocator. It
uses a Lazy<T> object that builds
the container the first time it’s requested. The constructor for the lazy
object takes a delegate to create an object of the requested type. In the
case of Example 3-6, the lazy construction is offloaded to
the IoC.BuildContainer method, which
can be seen in Example 3-7.
Example 3-6. Container declaration (ViewModelLocator.cs)
privateLazy<IContainer>_container;publicIContainerContainer{get{return_container.Value;}}publicViewModelLocator(){_container=newLazy<IContainer>(IoC.BuildContainer);}
Example 3-7. BuildContainer method (IoC.cs)
publicclassIoC{publicstaticIContainerBuildContainer(){varcontainer=newMetroContainer();container.RegisterInstance(container);container.RegisterInstance<IContainer>(container);container.Register<IHub,MessageHub>(lifetime:newSingletonLifetime());/* more type registrations */}}
Once the container is set up, the app is free to use the Dependency
Inversion principle throughout. When you look at the SearchHistoryPageViewModel class (Example 3-8), you see that the only way to create the object is by
supplying two required dependencies in the constructor. The container will
automatically determine the requirements and perform the necessary steps
to resolve them first and ensure that these requirements are satisfied so
that a newly created SearchHistoryPageViewModel can be
provided.
Example 3-8. SearchHistoryPageViewModel with dependencies (SearchHistoryPageViewModel.cs)
publicclassSearchHistoryPageViewModel:BindableBase{privatereadonlyINavigationService_navigationService;privatereadonlyIHub_hub;publicSearchHistoryPageViewModel(INavigationServicenavigationService,IHubhub){_navigationService=navigationService;_hub=hub;}}
Note
When you couple this design with a unit test, you’ll quickly see
how much easier this makes your test logic. In the case of the view
models, the NavigationService and
MessageHub can be mocked and
assertions can easily be made on these objects to ensure the proper
message is sent when the SearchCommand is executed.
There are numerous benefits to unit testing your code. I will not be covering testing in the book, but the Bing Image Search application has been built with unit tests. If you are interested in my approach to testing, you can find it online at https://github.com/bendewey/GettingStartedWithMetroApps.
The Bing Image Search app is small, but regardless of your app size,
you’ll probably need to handle local navigation. There are two main ways
to do this: first is to change the Window.Current property to a new UserControl and allow changes in navigation to
update that property. The second uses a Frame, which can be set to a Type reference, typically using the typeof keyword, for the XAML page you’d like to
display. Both of these approaches have a place, but for the Bing Image
Search app, I am going to use the Frame
control (Example 3-9). The Frame control works best because it has built-in
support for navigation, both forward and backward, and because it allows
me to treat the container page (the Shell) as a form of master page or master layout
where I can place common UI elements across all pages.
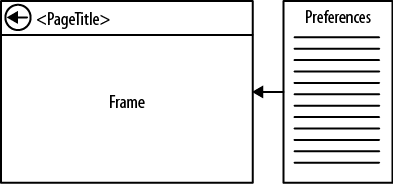
This Frame is located in the
Shell.xaml file. The purpose of the Shell, and the reason I am using a Frame, can be seen in Figure 3-4.
The Bing Image Search app will use a consistent title and back button
across all pages. The Shell will also
be used for the preferences page, which will be available from any
page.
In order to tell your app to use the Shell.xaml
file as its default page, you’ll need to specify this in the OnLaunching event of the
App.xaml.cs file. Example 3-10 shows
what’s required to initialize your Shell page. In addition to creating the new
control and assigning it to the Window,
the OnLaunching event registers the
frame with the ViewModelLocator’s
NavigationService. If you remember, the
ViewModelLocator holds the only
container, and the properties on it simply return whatever the container
provides, in this case, a SingletonLifetime instance of the NavigationService.
Example 3-10. Shell initialization (App.xaml.cs)
shell=newShell();ViewModelLocator.NavigationService.InitializeFrame(shell.Frame);Window.Current.Content=shell;Window.Current.Activate();
While this code works well for the OnLaunched event, the same logic will be needed
on the OnSearchActivated method. In
order to reuse the code between the different activation models, extract
this code into a new method and call this from either activation method as
in Example 3-11.
Example 3-11. App activation (App.xaml.cs)
publicoverridevoidOnLaunched(/* ... */){awaitEnsureShell(args.PreviousExecutionState);ViewModelLocator.NavigationService.Navigate(typeof(SearchHistoryPage));}publicoverridevoidOnSearchActivated(/* ... */){awaitEnsureShell(args.PreviousExecutionState);awaitViewModelLocator.Hub.Send(newSearchQuerySubmittedMessage(args.QueryText));}publicvoidEnsureShell(){// setup shell and activate window}
In Example 3-10, I registered the frame with the
NavigationService. This service is
used throughout the application to handle navigation requests. Example 3-12 shows the NavigationService class, which is essentially
a proxy to the Frame methods.
Example 3-12. Using the NavigationService requires a Frame to be initialized (NavigationService.cs)
publicclassNavigationService:INavigationService{privateFrame_frame;publicvoidInitializeFrame(Frameframe){if(_frame!=null){_frame.Navigating-=Frame_Navigating;}_frame=frame;_frame.Navigating+=Frame_Navigating;}publicvoidNavigate(Typesource,objectparameter=null){if(_frame==null){thrownewInvalidOperationException("Frame has not been initialized.");}_frame.Navigate(source,parameter);}/* more proxy methods, CanGoBack, GoBack */}
Once the NavigationService has
been initialized, any service can inject it to navigate the application
to a new page by calling its navigate method. Example 3-13
shows an example of how the SearchQuerySubmittedHandler handles
navigation.
Example 3-13. Using the NavigationService (SearchQuerySubmittedHandler.cs)
publicclassSearchQuerySubmittedHandler:IHandler<SearchQuerySubmittedMessage>{privatereadonlyINavigationService_navigationService;publicSearchQuerySubmittedHandler(INavigationServicenavigationService){_navigationService=navigationService;}publicvoidHandle(SearchQuerySubmittedMessagemessage){// execute the search against the Bing Search API_navigationService.Navigate(typeof(SearchResultsPage));}}
One of the goals for the Bing Image Search app is to handle
application and operate system-level events in a centralized location. To
accomplish this, I’ve implemented a MessageHub, which routes all messages to
dedicated handlers that are created by the container, and thus can have
their dependencies injected. The MessageHub is made up of four components
described in Table 3-2.
Table 3-2. MessageHub Components
| Name | Description |
|---|---|
MessageHub ( | The |
Message ( | A |
Handler ( | A handler requires a single method called |
MessagePump ( | Certain messages are not triggered by user
interaction, but by Windows 8. Rather than take dependencies on
events throughout the code, message pumps provide a mechanism to
listen to system events and pump them out to the MessageHub when
they occur. |
The MessageHub will be used
throughout Chapter 4, so in order to get familiar
with how it works, I’ll show you an end-to-end example. In the previous
section I used a SearchQuerySubmittedMessage to demonstrate
navigation and dependency injection. When the application launches with
a search command from Windows (OnSearchActivated), the application class
sends a new SearchQuerySubmittedMessage with the search
text to the MessageHub. The MessageHub (Example 3-15) locates
a handler for the new message and calls the Handle method. The final step is for the
handler to receive the message and process it Example 3-16.
Example 3-14. OnSearchActivated (App.xaml.cs)
protectedoverrideasyncvoidOnSearchActivated(SearchActivatedEventArgsargs){awaitEnsureShell(args.PreviousExecutionState);awaitViewModelLocator.Hub.Send(newSearchQuerySubmittedMessage(args.QueryText));}
Example 3-15. MessageHub class for routing all messages in the app (MessageHub.cs)
publicclassMessageHub:IHub{privatereadonlyIContainer_container;publicMessageHub(IContainercontainer){_container=container;}publicasyncTaskSend<TMessage>(TMessagemessage)whereTMessage:IMessage{varhandler=_container.TryResolve<IHandler<TMessage>>(null);if(handler!=null){handler.Handle(message);return;}varasyncHandler=_container.TryResolve<IAsyncHandler<TMessage>>(null);if(asyncHandler!=null){awaitasyncHandler.HandleAsync(message);return;}}}
Example 3-16. The message handler for the SearchQuerySubmittedMessage (SearchQuerySubmittedHandler.cs)
publicclassSearchQuerySubmittedHandler:IAsyncHandler<SearchQuerySubmittedMessage>{publicSearchQuerySubmittedHandler(/* dependencies */){}publicasyncTaskHandleAsync(SearchQuerySubmittedMessagemessage){// execute search using message.Query}}
Prism uses a similar pattern called the EventAggregator. This approach allows for multiple handlers, known as subscribers, to listen for notification when an event is sent or published. This approach allows for more flexibility in the handling of events, at the expense of extra setup on the side of the subscribing classes.
The new application model for Windows 8 apps will suspend your app
shortly after your app leaves the user’s foreground. It’s up to the app to
handle reloading to the correct location and retaining the state of the
application when the user was last active. This process is known as
tombstoning your application and is common practice
on phones and tablet devices. One approach to handling this is to save
your application state when the OnSuspending event occurs in the
App.xaml.cs file. An alternative approach—and the
approach that is used by the Bing Image Search app—is to constantly save
state while the user navigates through the application. The latter allows
us to use the same tracking mechanism to pass state between different
objects in the system.
To accomplish this, the Bing Image Search app uses an ApplicationSettings class. This class is a
strongly typed wrapper over the internal ISuspensionManager that maintains the settings
in a Dictionary of key-value pairs and
contains two methods: SaveAsync and
RestoreAsync.
Example 3-17 shows how the SearchResultsPageViewModel updates the ApplicationSettings with the currently selected
image and then navigates to the DetailsPage, which loads the selected image from
the same application settings location.
Example 3-17. Snippet for setting current image in application settings (SearchResultsPageViewModel.cs)
publicclassSearchResultsPageViewModel:BindableBase{privatereadonlyApplicationSettings_settings;privatereadonlyINavigationService_navigationService;publicSearchResultsPageViewModel(ApplicationSettingssettings,INavigationServicenavigationService){_settings=settings;_navigationService=navigationService;// Additional ViewModel setup codeViewDetailsCommand=newDelegateCommand(ViewDetails);}publicImageResultSelectedImage{get{return_settings.SelectedImage;}set{_settings.SelectedImage=value;OnPropertyChanged();}}publicvoidViewDetails(){_navigationService.Navigate(typeof(DetailsPage));}}
Now that all the settings and other relevant information about the
state within the application have been saved, the only remaining concern
is reloading the data for the user’s return to the app. Example 3-18 shows how, with a simple modification to the EnsureShell method, you can restore the
application state.
Note
Windows 8 apps are not required to save and restore state every
time the application relaunches. Depending on your application
requirements, you should reserve saving and restoring large objects and
files for when the app launches after being terminated. To determine
this, you can check the ApplicationExecutionState on the OnLaunching method for Terminated or ClosedByUser. More information about the
application lifecycle can be found online at http://msdn.microsoft.com/en-us/library/windows/apps/hh464925.aspx.
Example 3-18. Restoring application settings (App.xaml.cs)
publicasyncvoidEnsureShell(){if(previousState==ApplicationExecutionState.Terminated||previousState==ApplicationExecutionState.ClosedByUser){varsettings=ViewModelLocator.Container.Resolve<ApplicationSettings>();awaitsettings.RestoreAsync();}// Remaining EnsureShell logic from earlier}
One of the charms on the new Windows 8 Start Bar is the Settings
charm. This mechanism is consistent across all apps for providing settings
to the user. In the case of the Bing Image Search app, there is only one
settings page called Preferences. The preferences UI exists in a UserControl that
is located in the main Shell (see Example 3-19). By default, the PreferencesPage is hidden. In order to display
the PreferencesPage, you need to
register a setting as a SettingsCommand
and provide a callback to show the page. Example 3-20 shows
the registration command and the callback.
Example 3-19. Preference page in Shell (Shell.xaml)
<UserControlx:Class="BingImageSearch.Shell"xmlns="http://schemas.microsoft.com/winfx/2006/xaml/presentation"xmlns:x="http://schemas.microsoft.com/winfx/2006/xaml"xmlns:local="using:BingImageSearch"Loaded="UserControl_Loaded"><Gridx:Name="LayoutRoot"><!-- Some code removed for clarity --><local:PreferencesPagex:Name="PreferencesPage"Grid.RowSpan="2"/></Grid></UserControl>
Example 3-20. Settings command registration (Shell.xaml.cs)
privatevoidRegisterSettings(){SettingsPane.GetForCurrentView().CommandsRequested+=(s,e)=>{varsettingsCommand=newSettingsCommand("Preferences","Preferences",(h)=>{this.PreferencesPage.Show();});e.Request.ApplicationCommands.Add(settingsCommand);};}
While the ApplicationSettings
class stores settings for application state, it is also used to store the
user settings for the application. The PreferencesViewModel, Example 3-21
uses the same ApplicationSettings class
to instantly store any changes made by the user. You can see this by the
call to _settings.Rating = value after
calling the base class SetProperty
method. When the user closes the settings view, these changes are
immediately available for use within the app.
Example 3-21. Preferences are saved to settings after updating the property (PreferencesViewModel.cs)
publicclassPreferencesViewModel:BindableBase{privatereadonlyApplicationSettings_settings;publicPreferencesViewModel(ApplicationSettingssettings){_settings=settings;ImageResultSize=_settings.ImageResultSize;Rating=_settings.Rating;}privateResultSize_imageResultSize;publicResultSizeImageResultSize{get{return_imageResultSize;}set{if(value!=ResultSize.Empty){base.SetProperty(ref_imageResultSize,value);_settings.ImageResultSize=value;}}}privateRating_rating;publicRatingRating{get{return_rating;}set{if(value!=Rating.Empty){base.SetProperty(ref_rating,value);_settings.Rating=value;}}}}