
So far, our chat application has made use of the OAuth2 protocol to allow users to sign in to our application so that we know who is saying what. In this chapter, we are going to add profile pictures to make the chatting experience more engaging.
We will look at the following ways to add pictures or avatars alongside the messages in our application:
- Using the avatar picture provided by the authentication server
- Using the Gravatar.com web service to look up a picture by the user's e-mail address
- Allowing the user to upload their own picture and host it themselves
The first two options allow us to delegate the hosting of pictures to a third party—either an authentication service or Gravatar.com—which is great because it reduces the cost of hosting our application (in terms of storage costs and bandwidth, since the user's browsers will actually download the pictures from the servers of the authenticating service, not ours). The third option requires us to host pictures ourselves at a location that is web accessible.
These options aren't mutually exclusive; you will most likely use some combination of them in a real-world production application. Towards the end of the chapter, we will see how the flexible design that emerges allows us to try each implementation in turn, until we find an appropriate avatar.
We are going to be agile with our design throughout this chapter, doing the minimum work needed to accomplish each milestone. This means that at the end of each section, we will have working implementations that are demonstrable in the browser. This also means that we will refactor code as and when we need to and discuss the rationale behind the decisions we make as we go.
Specifically, in this chapter, you will learn the following:
- What are good practices to get additional information from authentication services, even when there are no standards in place
- When it is appropriate to build abstractions into our code
- How Go's zero-initialization pattern can save time and memory
- How reusing an interface allows us to work with collections and individual objects in the same way as the existing interface did
- How to use the Gravatar.com web service
- How to do MD5 hashing in Go
- How to upload files over HTTP and store them on a server
- How to serve static files through a Go web server
- How to use unit tests to guide the refactoring of code
- How and when to abstract functionality from
structtypes into interfaces
It turns out that most authentication servers already have images for their users, and they make them available through the protected user resource that we already know how to access in order to get our users' names. To use this avatar picture, we need to get the URL from the provider, store it in the cookie for our user, and send it through a web socket so that every client can render the picture alongside the corresponding message.
The schema for user or profile resources is not part of the OAuth2 spec, which means that each provider is responsible for deciding how to represent that data. Indeed, providers do things differently, for example, the avatar URL in a GitHub user resource is stored in a field called avatar_url, whereas in Google, the same field is called picture. Facebook goes even further by nesting the avatar URL value in a url field inside an object called picture. Luckily, Gomniauth abstracts this for us; its GetUser call on a provider standardizes the interface to get common fields.
In order to make use of the avatar URL field, we need to go back and store its information in our cookie. In auth.go, look inside the callback action switch case and update the code that creates the authCookieValue object as follows:
authCookieValue := objx.New(map[string]interface{}{
  "name":       user.Name(),
  "avatar_url": user.AvatarURL(),
}).MustBase64()
The AvatarURL method called in the preceding code will return the appropriate URL value which we then store in the avatar_url field which will be stored in the cookie.
Tip
Gomniauth defines a User type of interface and each provider implements their own version. The generic map[string]interface{} data returned from the authentication server is stored inside each object, and the method calls access the appropriate value using the right field name for that provider. This approach—describing the way information is accessed without being strict about implementation details—is a great use of interfaces in Go.
We need to update our message type so that it can also carry with it the avatar URL. In message.go, add the AvatarURL string field:
type message struct {
  Name      string
  Message   string
  When      time.Time
  AvatarURL string
}
So far, we have not actually assigned a value to AvatarURL like we do for the Name field, so we must update our read method in client.go:
func (c *client) read() {
  for {
    var msg *message
    if err := c.socket.ReadJSON(&msg); err == nil {
      msg.When = time.Now()
      msg.Name = c.userData["name"].(string)
      if avatarUrl, ok := c.userData["avatar_url"]; ok {
        msg.AvatarURL = avatarUrl.(string)
      }
      c.room.forward <- msg
    } else {
      break
    }
  }
  c.socket.Close()
}
All we have done here is we took the value from the userData field that represents what we put into the cookie and assigned it to the appropriate field in message if the value was present in the map. We will now take the additional step of checking whether the value is present because we cannot guarantee that the authentication service will provide a value for this field. And since it could be nil, it might cause a panic to assign it to a string type if it's actually missing.
Now that our JavaScript client gets an avatar URL value via the socket, we can use it to display the image alongside the messages. We do this by updating the socket.onmessage code in chat.html:
socket.onmessage = function(e) {
  var msg = eval("("+e.data+")");
  messages.append(
    $("<li>").append(
      $("<img>").css({
        width:50,
        verticalAlign:"middle"
      }).attr("src", msg.AvatarURL),
      $("<strong>").text(msg.Name + ": "),
      $("<span>").text(msg.Message)
    )
  );
}
When we receive a message, we will insert an img tag with the source set to the AvatarURL field from the message. We will use jQuery's css method to force a width of 50 pixels. This protects us from massive pictures spoiling our interface and allows us to align the image to the middle of the surrounding text.
If we build and run our application having logged in with a previous version, you will find that the auth cookie that doesn't contain the avatar URL is still there. We are not asked to sign in again (since we are already logged in), and the code that adds the avatar_url field never gets a chance to run. We could delete our cookie and refresh the page, but we would have to keep doing so whenever we make changes during development. Let's solve this problem properly by adding a logout feature.
The simplest way to log a user out is to get rid of the auth cookie and redirect the user to the chat page, which will in turn cause a redirect to the login page since we just removed the cookie. We do this by adding a new HandleFunc call to main.go:
http.HandleFunc("/logout", func(w http.ResponseWriter, r *http.Request) {
  http.SetCookie(w, &http.Cookie{
    Name:   "auth",
    Value:  "",
    Path:   "/",
    MaxAge: -1,
  })
  w.Header()["Location"] = []string{"/chat"}
  w.WriteHeader(http.StatusTemporaryRedirect)
})
The preceding handler function uses http.SetCookie to update the cookie setting MaxAge to -1, which indicates that it should be deleted immediately by the browser. Not all browsers are forced to delete the cookie, which is why we also provide a new Value setting of an empty string, thus removing the user data that would previously have been stored.
Tip
As an additional assignment, you can bulletproof your app a little by updating the first line in ServeHTTP for your authHandler in auth.go to make it cope with the empty-value case as well as the missing-cookie case:
if cookie, err := r.Cookie("auth"); err == http.ErrNoCookie || cookie.Value == ""Instead of ignoring the return of r.Cookie, we keep a reference to the returned cookie (if there was actually one) and also add an additional check to see whether the Value string of the cookie is empty or not.
Before we continue, let's add a Sign Out link to make it even easier to get rid of the cookie, and also to allow our users to log out. In chat.html, update the chatbox form to insert a simple HTML link to the new /logout handler:
<form id="chatbox">
{{.UserData.name}}:<br/>
<textarea></textarea>
<input type="submit" value="Send" />
or <a href="/logout">sign out</a>
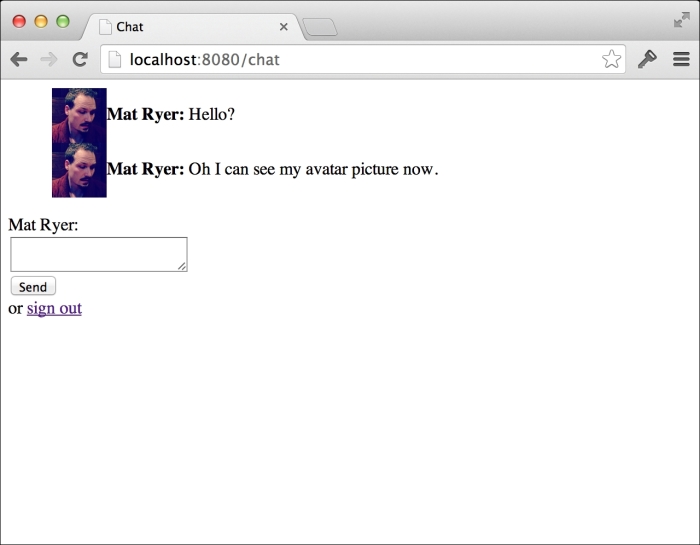
</form>Now build and run the application and open a browser to localhost:8080/chat:
go build –o chat
./chat –host=:8080
Log out if you need to and log back in. When you click on Send, you will see your avatar picture appear next to your messages.
Our application is starting to look a little ugly, and it's time to do something about it. In the previous chapter, we implemented the Bootstrap library into our login page, and we are now going to extend its use to our chat page. We will make three changes in chat.html: include Bootstrap and tweak the CSS styles for our page, change the markup for our form, and tweak how we render messages on the page.
First, let's update the style tag at the top of the page and insert a link tag above it to include Bootstrap:
<link rel="stylesheet" href="//netdna.bootstrapcdn.com/bootstrap/3.1.1/css/bootstrap.min.css">
<style>
  ul#messages        { list-style: none; }
  ul#messages li     { margin-bottom: 2px; }
  ul#messages li img { margin-right: 10px; }
</style>
Next, let's replace the markup at the top of the body tag (before the script tags) with the following code:
<div class="container">
  <div class="panel panel-default">
    <div class="panel-body">
      <ul id="messages"></ul>
    </div>
  </div>
  <form id="chatbox" role="form">
    <div class="form-group">
      <label for="message">Send a message as {{.UserData.name}}</label> or <a href="/logout">Sign out</a>
      <textarea id="message" class="form-control"></textarea>
    </div>
    <input type="submit" value="Send" class="btn btn-default" />
  </form>
</div>
This markup follows Bootstrap standards of applying appropriate classes to various items, for example, the form-control class neatly formats elements within form (you can check out the Bootstrap documentation for more information on what these classes do).
Finally, let's update our socket.onmessage JavaScript code to put the sender's name as the title attribute for our image. This makes our app display the image when you hover the mouse over it rather than displaying it next to every message:
socket.onmessage = function(e) {
  var msg = eval("("+e.data+")");
  messages.append(
    $("<li>").append(
      $("<img>").attr("title", msg.Name).css({
        width:50,
        verticalAlign:"middle"
      }).attr("src", msg.AvatarURL),
      $("<span>").text(msg.Message)
    )
  );
}
Build and run the application and refresh your browser to see whether a new design appears:
go build –o chat
./chat –host=:8080
The preceding command shows the following output:
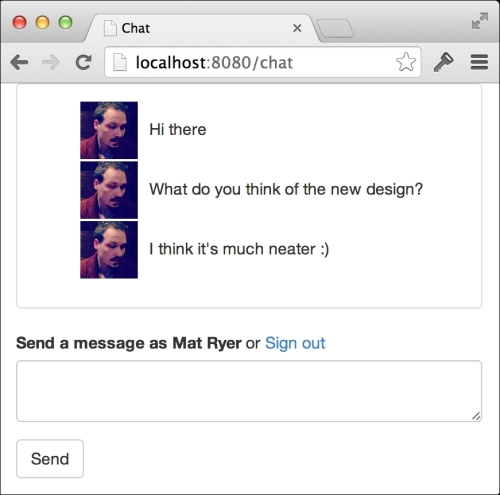
With relatively few changes to the code, we have dramatically improved the look and feel of our application.