
Chapter 3. Streams, Sharing, and Privacy
THE STREAM IS THE HEART OF GOOGLE+: It’s where you go to check out the stuff that connects you to the people you know. It’s where your friends, family, acquaintances, and all the other people you added to circles share their thoughts and lives—and you do, too. Photos, links to websites, funny one-liners, longer pieces of writing—they all go into the stream. But you control where your posts go: who can see them, and even who those people can share your items with. And you get to choose what items you see from which circles of friends.
This chapter explains how to navigate and enjoy your stream: viewing what other people are up to and interested in; writing about your own experiences; and responding to the posts of friends, acquaintances, and complete strangers, even if only to give them a quick “+1” high-five. Once you know how it works, you’ll find that it’s quite easy to learn a lot about people in Google+.
Viewing Your Stream
GETTING TO YOUR MAIN stream is easy—it’s where you land whenever you log into Google+. Simply head to www.plus.google.com. If you’re already logged into your Google account, you’ll see your main stream immediately. If not, click the red Sign In button, enter your email address and password, and then click “Sign in”—voilà, your main stream!
Tip
If you’re using another Google service like Gmail or Google Docs, you can jump to your main stream by clicking the “+[your first name]” link on the left side of the black bar at the top of any Google page.
If you’re already in Google+, click the Google+ logo or Home button near the top of any page to see your main stream, which includes posts from all the people in all your circles.

Your stream is the busiest part of Google+. Think of it like a lobby in a college dorm with a big bulletin board where people have posted all kinds of messages, pictures, and notes about what they’re doing, where they’ve been, and so on. Viewing the stream for just a particular circle (which you’ll learn how to do in a sec) is akin to moving from the lobby of the dorm into a hallway, where you’ll (likely) to run into only the people who live there—in other words, the people in that circle. Unlike in college, though, you have a lot of control over who has access to each hallway, and you have the power to mute or boot bad or boring stuff.
The Anatomy of a Stream
WHETHER YOU’RE LOOKING AT your main stream or the stream for a particular circle, the Stream page includes the same basic features.
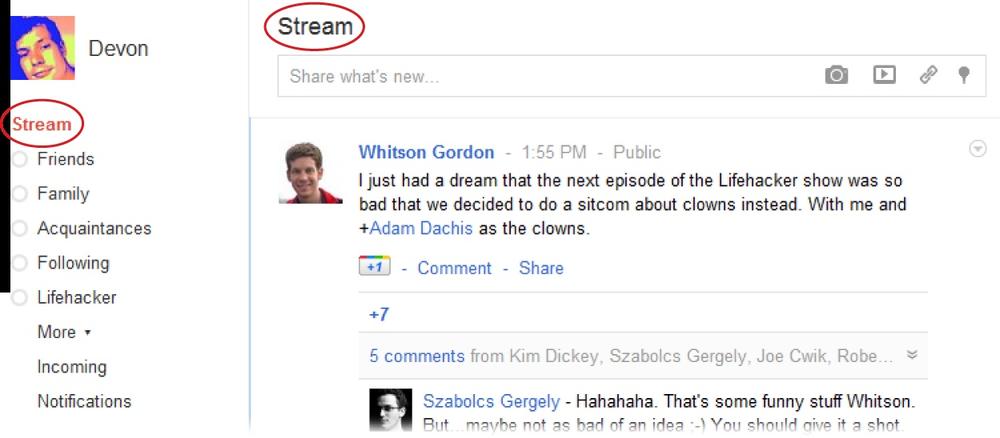
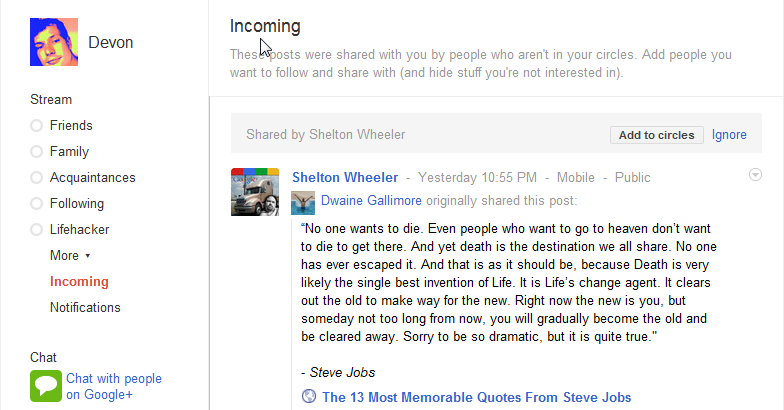
On the left is your profile image and first name (click either one to bring up your profile page.) Below that is a list that indicates what stream you’re looking at. This list includes all your circles, plus a couple of other items you’ll learn about momentarily: Incoming and Notifications. You can read about the Incoming stream in the box on The Incoming Stream, and Chapter 4 covers notifications. (If you have a lot of circles, you’ll also see a More link in this list, which you can click to view all your circles; when you do, the link changes to a Less link that you can click to collapse the list again.) If you’re looking at your main stream, the word “Stream” at the top of this list is in bold, red text. If you want to view a sub-stream that includes only posts by people in a specific circle, click that circle’s name in this list.
The center of the Stream page is where all the action happens. At the very top is a title that indicates which stream you’re looking at: It says “Stream” if you’re looking at your main stream, “Friends” if you’re looking at your Friends stream, and so on (this title is the same as the item selected in the list on the left side of the page). Just below that is a box prompting you to “Share what’s new.” You’ll learn all about this box starting on Writing a Google+ Post.
Note
If your circles aren’t very full or if your contacts aren’t all that active on Google+, you might see a “Not enough posts in your stream?” link section below the Share box. Ignore it if you’re just trying things out. Clicking the red “Find people” button takes you to the same page where you search out contacts and invite them to join Google+ (shown on Signing In and Joining Up).
Below the Share box is the top-most post in this stream. The items in the stream aren’t simply in chronological order (though newer posts are generally near the top of the list). Nope, Google+ deems some posts more important than others and bumps them up in the stream. Which ones? Google hasn’t given away the exact formula it uses, but posts that have a lot of comments (Commenting), have received quite a few +1 votes (Interacting with Posts), and have been shared for greater exposure (Sharing Others’ Posts) tend to move up the list. And any post that specifically mentions you jumps up to a high spot in your stream. But even posts that pick up continual clicks and attention slide down the stream after a while. Commenting explains posts in more detail.
Tip
You can scroll through the posts in a stream in several ways: by using your mouse to drag your browser’s scrollbar, pressing your keyboard’s up and down arrow keys or Page Up and Page Down keys, or even by hitting the J and K keys (see The Notifications Panel for more keyboard shortcuts).
Main Stream vs. Circle Streams
The main stream is the one you see immediately after you log into Google+, or when you click the Home button (Viewing Your Stream). In the center are posts from everybody in all your circles. You can tell you’re looking at your main stream because the word “Stream” appears in red on the left of the page, and in black at the top of the page (circled on The Anatomy of a Stream).
The big difference between your main stream and the streams for your various circles is which posts you see: Your main stream includes posts by all the people in your circles, while the stream for a specific circle only includes posts by the people in that circle. Another difference is what appears on the right side of the page. When viewing your main stream, here’s what appears in the right-hand column:
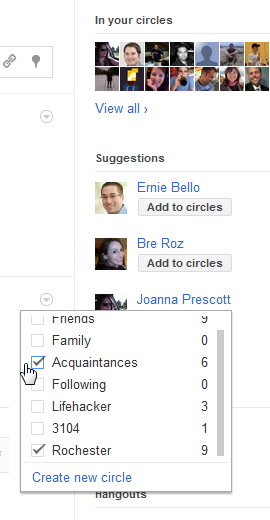
An In your circles section that includes thumbnails of your friends’ profile photos, with a “View all” link beneath them. Clicking a person’s image takes you to their profile, while clicking the “View all” link zips you to the Circles page (How Circles Work).
A Suggestions section that includes thumbnails of people Google+ thinks you might want to add to your circles. These folks can appear for a few different reasons: You’ve contacted them via Gmail, friends in your circles have added them to their own circles, or they live in the same area or have worked for the same company as you, for example. (They’re the same suggestions you see in the “Find people” section of the Circle page.) If you see someone you know and want to quickly add them, simply mouse over the “Add to circles” box under their name, and a small box listing all your circles appears. Scroll through and turn on the checkboxes for the circle(s) you want to add her to (or click Create new circle), and then simply mouse away when you’re done.
The Send invitations section includes a button for sending invitations to friends who aren’t on Google+ yet. The box on Inviting Friends has the details.
The Hangouts section is related to, well, hangouts, which you’ll learn about in Chapter 6.
The Games section (which may or may not show up) shows you several of the games that you can play on Google+. Chapter 9 has the skinny on Google+ games.
The Google+ Pages section links to a spot where you can create a Page for a business, brand, organization, or another public entity. You can find more info about Pages on this book’s Missing CD page at www.missingmanuals.com/cds.
Note
Google+ is constantly changing. This chapter describes how the streams pages looked while this book was being written, but it’s possible you’ll see different things on the right side of your stream pages.
Click the name of a circle on the left side of the Stream page, and the page will change in a few major ways. Most importantly, the center column now shows only posts by people in that circle.
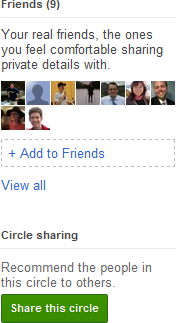
On the right side of the stream page, a few other things have changed, too. The top item is now specific to the circle you selected: It includes the name of the circle, how many people are in it, the circle’s description, and thumbnails of some of the people in it. Beneath the thumbnails is an “Add to [circle name]” box. Click this box and start typing a name, and matching Google+ members (and contacts from your Google account, if applicable) appear in a drop-down list. Click a name to add that person to the circle whose stream you’re viewing.
Below that you may see the same Suggestions section described previously. There’s also a “Circle sharing” section that includes a tempting green button. Clicking it lets you show the people in any of your circles to the people in any other circle, all your circles, or the public. (Circle sharing is covered in detail on Sharing Circles.) Below that is the Hangouts section described above, and in the bottom right of your screen is the “Send feedback” button described next.
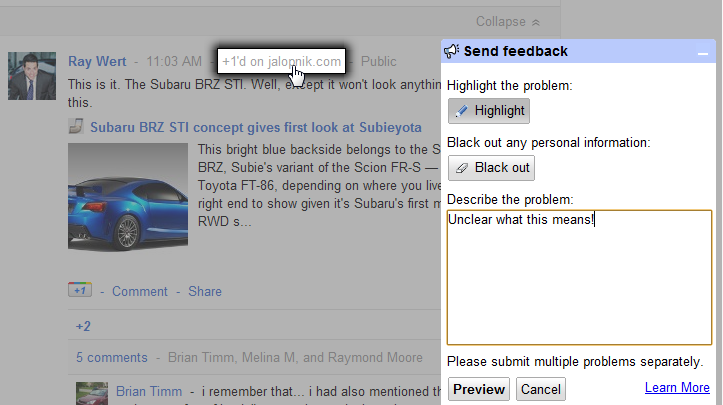
As of this writing, Google+ is still pretty new and technically in beta (available for people to use, but with no promises about everything working properly). In order to help improve the site, Google makes it easy for you to weigh in with suggestions, complaints, and other kinds of observations by including a gray “Send feedback” button in the bottom-right corner of every Google+ screen. Click it, and you’ll get a pretty cool tool for telling Google when something goes wrong on the site, or if there’s something that you just don’t like about Google+. A box pops up that includes two buttons: Highlight and “Black out.”
The Highlight button is automatically selected. With this button turned on, you can move your cursor over a section of your screen to point it out to Google (you can highlight several different parts of the screen if you want). If your screen includes something you don’t want the people at Google to see like a friend’s phone number, click the “Black out” button and then click the thing you want to hide.
In the “Describe the problem” box, explain the bug you’ve discovered as specifically as you can. When you’re done, click the Preview button to see the information that will be sent to Google. If you want to make changes, click Cancel to get back to your original screen and start again. If everything looks okay, click “Send feedback to Google.”
Go ahead and use this handy feedback tool whenever you feel irked or like something must be broken. The folks who created Google+ will honestly appreciate it.
What’s In a Post
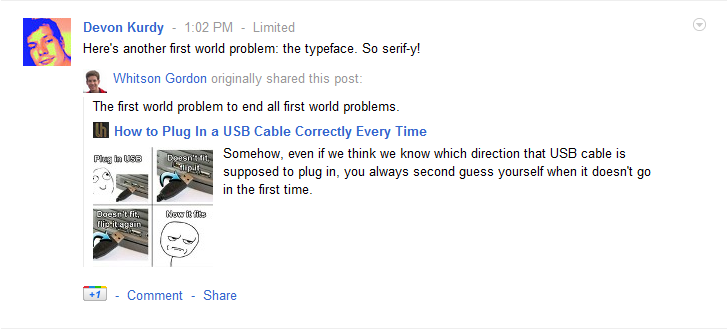
Every post includes the same basic features:
The poster’s profile photo and name. Click either one to hop to that person’s profile page.
The time and date the post was published. (If the post was created today, you see only the time.) Click this timestamp to see the post on a separate page.
Note
You may see the term “(edited)” after a post’s timestamp, which means that the person who wrote the post made changes to it after she originally posted it. Editing, Deleting, and Controlling Your Posts explains how to edit your own posts.
The word “Public” or “Limited.” This indicates whether this post is available for the whole world to see or restricted to just a worthy few. To see exactly who a limited post was shared with, click the word “Limited” to display a pop-out box with thumbnails of up to 22 of the other people who can see it.
A faint gray arrow inside a circle. Click this icon to see a menu that lets you link to the post (Blocking, Muting, and Reporting Posts), report abusive content in the post to Google, “mute” the post, or block the person who posted it, so you won’t see any further posts from him (all covered on Blocking, Muting, and Reporting Posts).
Note
You may see another item after a post’s timestamp: the word “Mobile,” or maybe “+1’d on [something.com].” This lets you know that the post was written by someone using Google+ on their cellphone or mobile device, or was typed by someone who clicked a +1 button on a website other than Google+. In either case, it’s just to let you know that the post was probably typed quickly or on a small screen so you’ll be more understanding of brevity and typos.
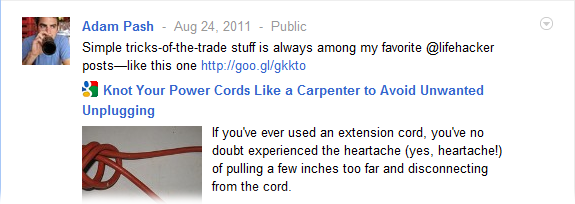
Below all that is the meat of the post: whatever the person typed when he created the post. If he included a link to something (like the knot-tying article mentioned in the post shown on What’s In a Post), a preview of the web page he linked to appears below what he wrote: a sample photo from his latest photo album, a still from the YouTube video he pointed to, or a small slice of a map showing where he “checked in,” for example. You’ll get a better sense of what to look for in a post when you write one of your own.
Now you know how to view different streams and decipher posts, and you’re probably eager to do something besides just look at stuff. You’ll learn how to interact with other people’s posts later in this chapter (Interacting with Posts). For now, it’s time to learn how to write your inaugural post.
Writing a Google+ Post
ONCE YOU’VE WRITTEN A POST, shared it, and seen how it shows up in a stream, you’ll have a better sense of how the whole stream thing works. Plus, writing a post is a great way to announce yourself to the Google+ universe, and then you can watch the comments and approving +1s (Interacting with Posts) roll in.
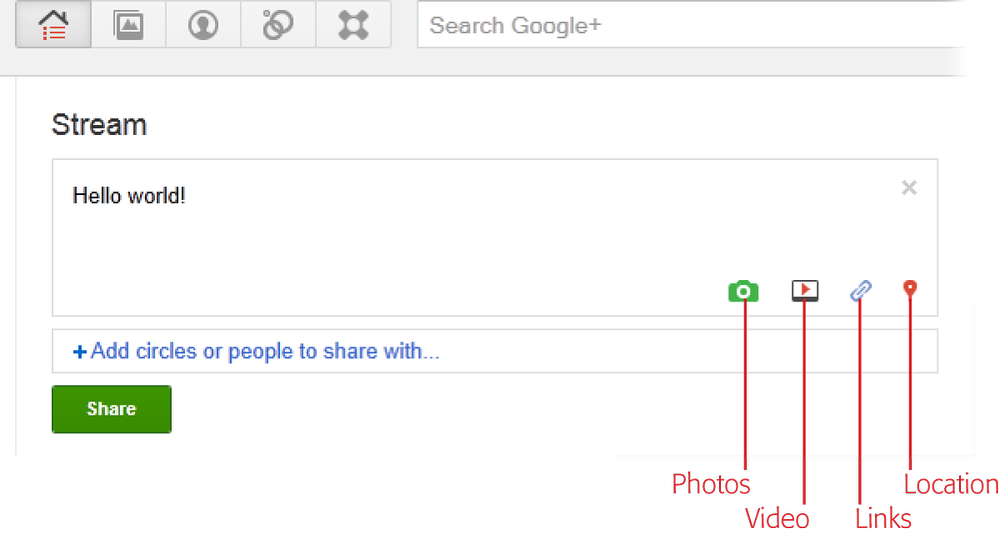
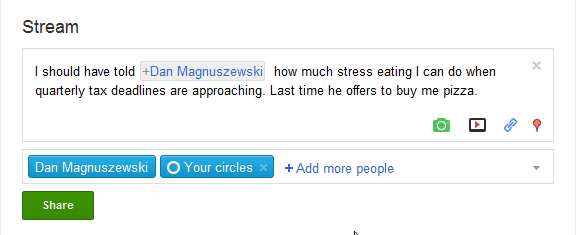
To get started, head to your main stream page (if you’re not already there) by clicking the Google+ logo or the Home button near the top of the screen, and then click the “Share what’s new” box. The box expands to give you plenty of room to type. Decide what you want to tell everybody, and then type it in (“Hello world!” is always a good start). You may automatically see a blue rectangle labeled “Your circles” appear below where you’re typing; if not, click the “Add people or circles to share with” box and select “Your circles.” When you’re done, click the Share button. Congratulations—you’ve just written your first post and shared it with everyone in your Google+ circles!
Tip
If you start writing a post and then get a case of cold feet, just click the X in the upper right of the “Share what’s new” box to bail out and shrink the box back down to its original size. Just know that what you wrote won’t be saved. If it was quite witty, you could copy and paste it somewhere else for posterity, like a Notepad (Windows) or TextEdit (Mac) file.
Adding Photos, Videos, Links, and Locations
The icons in the lower-right of the “Share what’s new” box let you add extras to a post: a photo (or photos), a video, a web link, and your location. However, you can add only one of these extra elements to each post—a set of photos, a video, or a link. The one exception to this rule is that you can add a location to any post.
These extras can be a subtle footnote to the text you write in the “Share what’s new” box, or the text can serve as a caption for—or description of—the extra. For example, you could write a long post that thanks everybody for coming out to your fundraising event, and then attach a crowd shot to demonstrate the success; or you could write a short note about the event, and then attach a series of photos showing highlights of the night. Most links needs some kind of explanation—at least a blurb about why you find a site interesting or relevant—but most videos don’t need lots of text, as they usually speak for themselves.
Here’s how to add each kind of goodie:
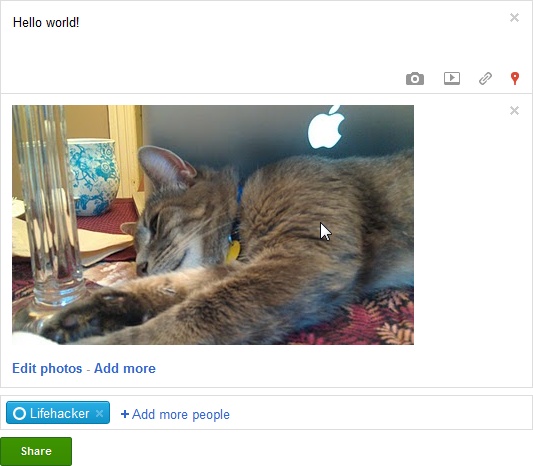
Photos. Click the camera icon and a menu with three options appears. Click “Add photos” to browse your computer and select the photo(s) you want to upload; click “Create an album” to upload photos in a more organized fashion by dragging and dropping the files into the order you want; or click “From your phone” to post images from your smartphone (you need the Google+ app to do this; see Uploading photos automatically from an Android phone or tablet for details). Photos need to be in JPG, PNG, or GIF format, and no larger than 2048 pixels on their longest side (about 2 MB). You’ll learn more about sharing photos in Chapter 5.
Video. Click this icon, which looks sort of like a play button, to display a menu of three options. Choosing “Upload video” lets you do just that—upload a clip directly from your computer. You can upload videos in nearly any format (though you’ll get the best results with MPEG-2, MPEG-4, and H.264 files), but they need to be smaller than 1 GB and less than 10 minutes long. Click the YouTube option to bring up the “Choose a YouTube video” dialog box, where you can type in a search term or the name of the video you’re looking for (type keyboard cat, for example, to add that catchy gem to your post). The third option is “From your phone,” which, as with photos, you need the Google+ app to use.
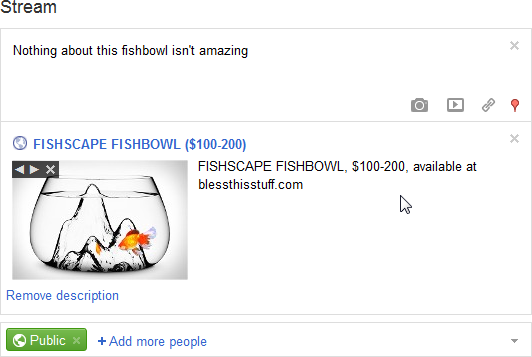
Link. This icon is supposed to resemble a couple links of chain (get it?). When you click it, a text box appears so you can type out or paste in a link to a website. You don’t have to type http://www at the beginning—oreilly.com or npr.org works just fine. Once you hit Enter or click “Add,” your link shows up at the bottom of your post, with the title of the web page, a short description of it (pulled from the text of the page), and a thumb-nail image. You can click the arrows at the top of the thumbnail to choose from other images on the page you linked, or click the X to not include an image. Similarly, you can click “Remove description” to axe the text under the link; it’s good to provide some context for the page, but not if it’s gobbledygook.
Location. You don’t have to type, paste, or select anything to add this extra—simply click the red icon that looks like the place markers used in Google Maps, and Google+ determines your current location automatically. The location may be very specific, with GPS-like coordinates, or more general, like “Omaha, NE.”
“Wait,” you might be asking, “my web browser knows where I am?” Yes, but not unless you give your browser, and whatever site is asking, permission to estimate your location, and not in any particularly scary way. Most modern web browsers—Chrome, Firefox, Safari, and newer versions of Internet Explorer—let websites politely ask for your location. So when you click the Location icon, you may see a message from your web browser asking if it’s okay for Google+ to figure out your whereabouts. If you agree, the site pulls in information about your IP address (the unique string of numbers assigned to your computer by your Internet service provider) and (if you’re using a wireless connection) the details of your WiFi router. With these numbers, Google+ can usually figure out what neighborhood you’re in. (If you’re using a mobile device that connects to cellular towers and has a GPS chip, the location is much more specific; Chapter 8 has more info.)
As noted above, you can add a location to a post even if you’ve already added photos, a video, or a link.
Tip
If you get partway through a post and then decide you don’t want to include that photo, video, or link anymore, click the X button in the upper-right corner of the extra’s box to wipe the slate clean and remove the extra you attached. To remove your location, click the X on the right side of the thin location box.
Posting on Google+, or any social networking site, is a good way to learn how to best convey your sentiments. As you experiment, you’ll learn what gets a reaction (positive or negative) from your friends and contacts. If you want to get a discussion going, for example, pose a semi-open question: “What do you listen to when you’ve got a whole lot of household chores to crank through?” That works a lot better usually than just posting “Ugh, chores!” The same goes for photos, videos, and links—the more informative and interesting they are, the more likely you’ll get responses and have your posts shared more widely (Sharing Others’ Posts).
Note
You can also post to Google+ from a text message sent to a special number. See Chapter 8 (Posting to Google+ via Text Message) for details on writing posts via text message.
Mentioning People in Posts
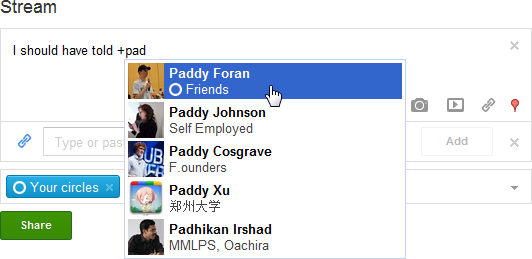
You can casually mention people in your posts as much as you like: “Mom just made the best peach pie!” or “Just got back from hanging out with my buddy Jim—good times!” But, confusingly, Google+ uses the term mention to mean something really specific: directly addressing another Google+ member, or even a friend who hasn’t joined the site yet, by including her name in a post with a + character before it. This comes in handy when you want to bring someone’s attention to a post, and perhaps give other people reading your post a link to the tagged person’s Google+ profile. You can do that by mentioning the person in context (“+Adam Pash and I are huge fans of AeroPress coffee,” for example), or by tossing someone’s name in at the end (“AeroPress coffee is always amazing! +Adam Pash”).
When you mention someone in a post, in addition to seeing your post in her stream, the person you mentioned also gets notified about the post (exactly what form the notification takes depends on her settings; see Chapter 4 for details). (If she’s not signed up for Google+, Google+ sends her an email notification.) Also, her Google+ name (which links to her Google+ profile) is visible—and clickable—to whomever else you share the post with, unless she’s blocked them (the next section covers sharing options in detail; Blocking, Muting, and Reporting Posts explains blocking). So, your friend who likes to keep a low profile online might not appreciate you mentioning her in your posts.
To tag someone in a post, type either @ or +, and then start typing the person’s name. In the list of suggestions that appears, click her name or, if the right name is highlighted in the list, just hit the space bar or Enter key (Return on a Mac).
Tip
If you aren’t trying to mention someone, but instead just want to type a term that includes the @ or + symbol, when the list of suggested names appears, press the Esc key or click somewhere besides the list to make the list disappear.
You can mention people who aren’t in your circles, and even people who haven’t added you to their own circles, and they’ll see the post in their main stream. Do that too often or in an invasive kind of way, however, and the person you mentioned might block you (Blocking, Muting, and Reporting Posts). Also note that, when you mention somebody in a post, Google+ adds their name to the list of people and circles the post is shared with, and that you can’t remove her. (Probably Google+’s way of making sure you don’t say mean things about people.)
If you want to get really advanced, you can include hashtags in your posts, just like on Twitter. To learn about hashtags and how to add them to your posts, flip to Throw Your Post into the Mix with Hashtags.
Note
As of this writing, Google+ is working with other companies on tools that will let you write posts and manage various aspects of Google+ without having to go to the Google+ website or install the Google+ mobile app (see Chapter 8). Some of these tools will make it easier to post things to Google+, Facebook, Twitter, and other services simultaneously. For more information about the status of these tools, head to this book’s Missing CD page at www.missingmanuals.com/cds.
Choosing Who Sees Your Posts
AFTER YOU’VE WRITTEN THE text of your post and added any extras you want to include, it’s time to decide exactly who you want to share it with. The box above the Share button (the one with the placeholder text that begins with “+Add”) is where you determine who’s lucky enough to have access to your brilliant witticism, piece of news, or whatever you’re sharing. Before you learn exactly how to use this box to control the visibility of your posts, it’s helpful to get an overview of what it means to share with different circles and groups of people.
You may have used other social networking sites to share things with friends (on Facebook) or followers (on Twitter). Google+ is different from those kinds of sites because of the sharing and privacy controls it gives you. On Facebook and Twitter, everything you share is visible to everyone you’re connected to on the site and/or everyone on the entire Internet. In Google+, on the other hand, you create circles, your friends and contacts create circles, and the things you see in your streams represent where those circles overlap. You can share with just a few people or with everyone online, but the circles and streams are where all the interesting ideas, links, photos, and sharing happens. The idea of restricting your posts to certain people or circles may sound confusing, but it’s the kind of thing you do every day in emails, in huddled conversations, and in addressing particular groups. Here’s a concrete example:
You, Bob, and Rachel are all Google+ members. You and your friend Bob share a love of restaurants and fancy food pictures. Rachel is a work acquaintance you don’t know quite as well, but you know she loves books about management, leadership, and motivation, with titles like “Getting There Innoventually.”
You add Bob to your Foodies circle, since you two share that interest. You add Rachel to your Forced Acquaintance circle (remember, no one but you sees the names you give to your circles).

After organizing your circles, you decide to post a cute picture of your cat, Butterscotch, curled up next to some liquor that’s still sitting out from last night’s little gathering. Now you have to choose who to share it with. You know it’s not a good idea to share photos that include booze with all your circles (since your parents might see it) or everyone on the Internet (since your boss might see it), so you want to choose a specific subset of your Google+ friends. Bob was at the shindig and will probably like the picture, but Rachel tends to spend her evenings crunching at the gym, cleaning out her work inbox, and planning her action items for the next day, so she probably won’t be amused by Butterscotch’s antics. So you share the photo with your Foodies circle.
Does Bob see it? Yes—if he’s added you to one of his circles and he looks at his main stream, since that stream includes all the posts from everyone in all of his circles. However, if Bob has created a circle that you’re not in called Feline-Free Friends, when he browses through that circle’s stream (which he does by clicking Feline-Free Friends on the left side of his Stream page), he won’t see Butterscotch there. But if he looks at the stream for the Gourmands circle he added you to, then he’ll see the snapshot. (This is a good example of how you can use your various streams to filter whose posts you see.)
Tip
So, what if you add Bob to a circle, but he hasn’t added you to any of his? Then Bob won’t see most of your posts. The only cases where he will see them are if a mutual friend of yours and Bob’s shares your post (Sharing Others’ Posts), if you mention Bob in the post (Mentioning People in Posts), or you specifically add him to the list of people and circles you’re sharing the post with. But otherwise, Bob’s streams will be mostly free of your posts, though he’ll continue to show up in your streams.
Rachel, on the other hand, doesn’t see the picture of Butterscotch and the bottle of crème de cacao because you intentionally didn’t send it her way. She won’t see your adorable orange furball even if she’s added you her “Professional Contacts to Synergize and Conquer” circle or she goes out of her way to click your profile to see what you’ve posted recently.
So remember, there are two sides to the whole circles thing: the circles you arrange your friends into, and the circles your friends create and put you in. You control your own circles, but there’s no way of knowing what kinds of circles other people have put you into. So all you need to worry about is deciding which circle(s) to share with, as explained in the next section.
Post Visibility Options
Now that you have a general overview of the ways you can share with certain groups of people, it’s time to learn how to actually pick those groups in Google+. These visibility options let you share items with only the people who will truly appreciate them.
As the following sections explain, Google+ tries to be smart by automatically choosing a group to share your post with based on which stream you’re viewing while you write it, but you can always choose a different group if you want.
Writing a post while viewing your main stream
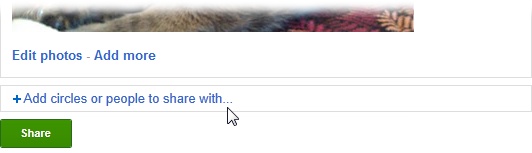
On your main stream page, below the text of your post and any extras you added, is a box that reads “+Add circles or people to share with.” If you shared your last post with “Your circles,” Google+ automatically puts “Your circles” in this box again. If you shared your last post with some other group of folks or you don’t want to share this post with everyone in all your circles, you have to select the people and circles you want to share with.
To be more selective about who you share with, click the “+Add circles or people to share with” box. A menu appears that includes several options. The text at the top of the menu explains that you can type a person’s name or email address to share just with that person, or type the name of the circle you want to share with. Here’s what the other options are for:
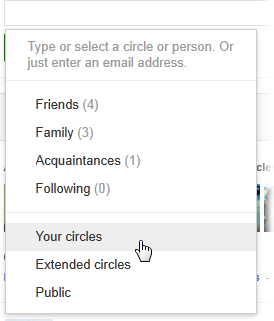
Specific circles. At the top of the menu are the names of your circles. If you have more than three or four circles, you’ll also see a “# more” link that indicate how many other circles you have that aren’t shown in the list; click this link to see the names of all your circles. To select the circle you want to share with, click its name in this list or type its name in the +Add box.
Tip
The first three circles you see listed in this menu are the ones in the upper left of the circles section of your Circles page (covered in Chapter 2). Changing the order they appear in this list is a simple matter of heading to your Circles page and then dragging your most important circles to the first three slots.
Your circles. This means that your post will be shared with everyone in all your circles. If you share that picture of Butterscotch with this group, both Bob and Rachel will likely see it in their main Google+ streams, which include everything posted by everybody in their circles. In addition, Bob will see it in his Gourmands stream, and Rachel will see it in her “Professional Contacts to Synergize and Conquer” stream.
Extended circles. This option is something of an odd duck. It includes all the people in all your circles and all the people in their circles. It’s the Google+ equivalent of “friends of friends,” except that your posts appear in the Incoming streams of the people in your friends’ circles. (The box on The Incoming Stream has more about this stream.)
Public. If you cropped that photo of Butterscotch so that it showed nothing but your fuzzy feline, then you’d have no reason not to post it for the whole world to see. In that case, you could post it using the Public setting. Doing that sends the post to all your Google+ contacts and makes it visible to everyone on Google+ and on the whole Internet. That means that a friend of yours could copy and paste the timestamp from your post (see Editing, Deleting, and Controlling Your Posts for details), send it out in an email, post it to their blog, or otherwise distribute it, and anybody could look at it.
Posting something publicly isn’t as scary as it may sound. It’s a great option for people working in the media, building their personal or small business brand, or trying to get attention for their chosen topics. Public sharing is what people do on Twitter, and it’s increasingly how Facebook wants its users to share their posts and photos. In Google+, it just means that you’re sharing to everyone in your circles and other people could potentially find it on the Web.
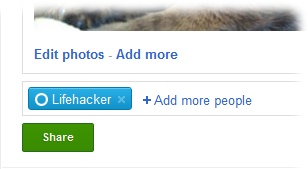
When you select an option in this list, a corresponding blue or green rectangle appears in the +Add box. For example, if you have a Lifehacker circle and select it in the list of visibility options, a blue rectangle labeled “Lifehacker” appears in the +Add box, as shown here.
Writing a post while viewing a circle’s stream
If you write your post while viewing a specific circle’s stream, Google+ automatically puts a blue rectangle representing that circle in the +Add box because it assumes you want to share the post with that circle. If that’s true, then you can just leave the +Add box alone. But if you want to share with more people than just the ones in that circle, click “+Add more people” to do just that. You can also click the X that appears when you mouse over a circle or person’s name to remove them from the sharing list.
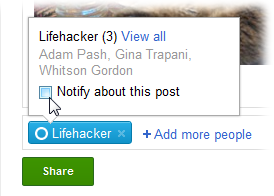
For a reminder of who’s in that circle, point your cursor at the blue rectangle. If there are a bunch of people in that circle, you’ll see the first few names, and you can see the rest by clicking the “View all” link at the top of the pop-up box. What about the “Notify about this post” checkbox? Normally, when you post to a specific circle, the people in that circle will see this post if they look at their main stream or the stream for whatever circle they put you in (like if Bob looks at the stream for his Gourmands circle, for example). If you turn on the “Notify about this post” checkbox, Google+ will also send the people you’re sharing with a special alert about your post. Depending on their Google+ settings, that could mean they see a notification in their Google toolbars, receive an email, or hear a little bloop from their phone—something like, “Take note: Devon Kurdy wants you to see this post.” (Chapter 4 has the details on notifications.)
Note
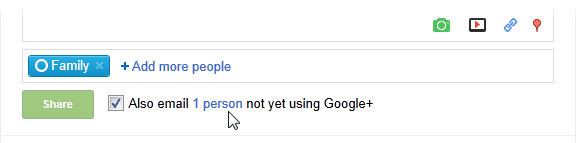
If you add someone who’s not on Google+ to one of your circles, when you go to share a post with that circle, you’ll see a checkbox next to the Share button labeled “Also email 1 person not yet using Google+.” This checkbox is turned on automatically, and it’s basically an attempt by Google+ to attract more users. Google is hoping that, when your friend gets an email letting him know about the post, he’ll sign up for Google+ to see the brilliant insight you’ve written.
Other posting tips
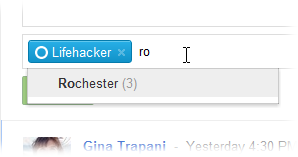
Clicking the +Add box and selecting circles by clicking works okay if you’ve got less than, say, a dozen circles. But if you have more than that, the list becomes quite long and a bit cumbersome. Fortunately, there’s an easier way to add circles: click the +Add box and then typing a few letters of the name of the circle you want. When the right one appears, hit Enter (Return on a Mac) or click its name in the list.
In addition to—or instead of—sharing with circles, you can share posts with individual people. For example, say you want to share news of your promotion with everyone in your Family circle and your buddy Bruce, or you just heard some gossip about your high school math teacher and want to share it with your three closest friends. To share with a specific person, click the +Add box and start typing her name, and Google+ will suggest matches.
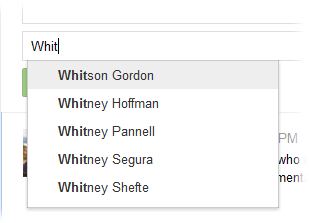
The names of people who are already contacts of yours should appear at the top of the list, but what about the other folks listed? Those names are Google+’s guesses as to other Google+ members you might know. If a name looks familiar but you’re not sure (or the name is something as common as John Smith), click the name to add that person. Then, click the person’s name in the +Add box to see her profile.
Tip
When you mention someone in a post, that person is automatically added to +Add box, and also, even if they’re not? That’s the point behind Google+ adding them automatically, right? You can’t remove them, either. Google+ is old-fashioned that way—it won’t let you go talking about somebody without their knowing it.
If it turns out you don’t know this particular John Smith, no problem. To delete a person or circle from the +Add box, click the X at the right end of the rectangle representing that person or circle.
When all the right people and circles are listed in the +Add box, click Share to send your post out to those people’s streams.
I don’t see an Incoming circle on my Circles page, so what’s the deal with the Incoming stream?
The Incoming stream is an anomaly in that it doesn’t match up with a specific circle. (The other exceptions are your main stream—which shows posts from people in all your circles—and the Notifications stream, which only includes notifications [see Chapter 4].) Here are the kinds of posts that appear in your Incoming stream:
Posts by friends of friends. As you learned on Writing a post while viewing your main stream, if someone who’s connected to one of the people in your Google+ circles shares something and sets the visibility of that post to “Extended circles,” it’ll show up in this stream.
Posts specifically shared with you. These are posts where people either selected your name in the +Add box or mentioned you in the post (see Mentioning People in Posts). You’ll see these posts in your main stream, too.
One-sided posts. As you’ve learned, the whole circles concept is a two-way street: You can add people to circles, and they can add you to circles. If you haven’t added Bruce to any of your circles but he’s put you in one of his, when he writes a post or shares someone else’s post (see Sharing Others’ Posts), it’ll show up in this stream.
Your Incoming stream will quickly get cluttered with posts by people you don’t know, people who post too much stuff to too many people, and folks you haven’t added to a circle. You might think that perusing this stream is a good way to find people and add them to your circles, but there’s a specific section of the Circles page (“People who have added you”) that serves this purpose far better; see Adding People to Circles for the details. So, overall, the Incoming stream isn’t terribly useful for anything besides killing time.
Interacting with Posts
NOW THAT YOU’VE SET up some circles and learned how to post to them, it’s time to find out what you can do when you see stuff you like in your stream.
Tip
If you see something you don’t like in your stream, Google+ gives you a few different ways to respond. See Blocking, Muting, and Reporting Posts for details.
Other people’s posts are just like yours: they include some text, perhaps some mentions, and maybe an extra like a link, video, photo, or location. Hopefully you find some of them interesting—perhaps interesting enough to +1, comment on, or share that material with your own circles. The following sections explain each option.
The +1 Button
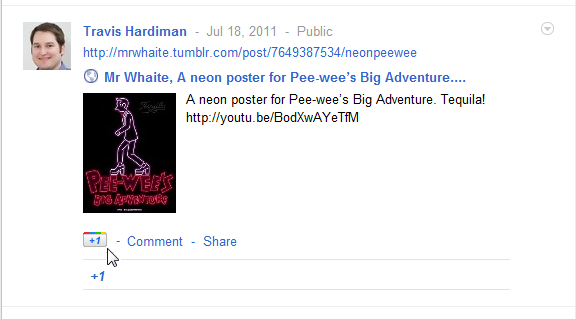
Giving someone’s post a +1 (pronounced “plus one”, just like it looks) is the equivalent of a thumbs-up, a laugh with a smile, or a knowing nod—just a quick acknowledgement that you think the post is good, funny, poignant, worthwhile, or right up your alley. (The box on The +1 explains where the term “+1” came from.)
To give a post a +1, click the +1 button below the body of the post. When you do, you see a little animation that “rolls over” the total number of +1s that post has received, and the +1 button turns blue. If you’re the first person to give the post a +1, the phrase “You +1’d this” appears below the +1 box. If others have already registered their +1 sentiments, you see a number below that box indicating the total number of +1s (“+24,” for example).
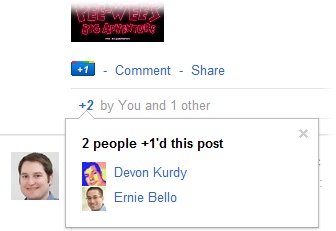
Other people who look at the post are able to see that you’ve given it a +1. To see who liked a post, click the blue +# link, and Google+ displays the little pop-up shown below.
Viewing other people’s +1s
You might remember from the signup process that you could +1 items on pages outside Google+, and how that would lead to customized advertising (Signing In and Joining Up). And, as you’ve just read, clicking +1 while on Google+ is a kind of stamp of approval. So where do all these +1 clicks end up? In a special section of your Profile page, and on everybody else’s Profile pages, if they’re made public.
If you want to show off your +1s, you have to edit your profile and make the +1 section of your profile visible: Head to your Profile page, click Edit Profile, click the +1’s tab, and then turn on the “Show this tab on your profile” checkbox. Once that’s done, folks who view your profile can view the things you’ve given a +1 to: web pages other than Google+ (by clicking a +1 button in a Google search result or on the page itself) and posts and photos on Google+.
Commenting
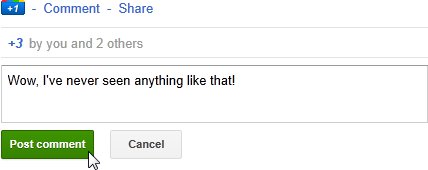
When you want to respond to a post with something more specific than a +1, click the Comment link next to the +1 button. (You can, of course, both comment on a post and give it a +1.) When you do, a text box appears so you can type your feedback.
You can do most of the same things in a comment that you can do in your own posts, like mention people or link to websites or videos—although you don’t get the same icons or images as when you’re writing your own post. You can’t attach image or files from your computer to a comment, so if you want to write a really robust response to a post, your best bet is to start a brand-new post that includes a link to the original post (Editing, Deleting, and Controlling Your Posts explains how), and then mentioning the original post’s writer (Mentioning People in Posts) in your post.
When you’re ready to add your comment, click the “Post comment” button (hitting Enter (Return on a Mac) instead doesn’t post your comment, it just adds a line break to what you’ve written).
Tip
If you really want to keep your hands on the keyboard, you can hit the Tab key to select the “Post comment” button and then tap Enter (Return on a Mac) to add your comment.
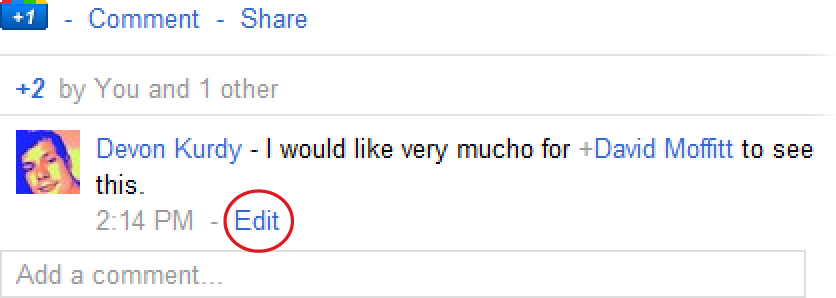
If you post a comment and then decide that what you wrote wasn’t quite right, click the Edit link below the comment. Doing so gives you full editing powers on your comment.
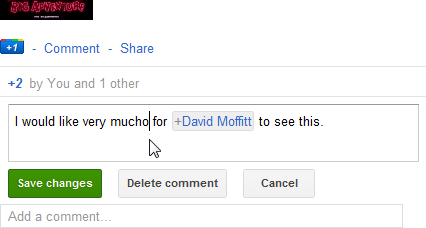
If things went really wrong and you’d like to back out entirely, click “Delete comment.” If you change your mind again and want to leave your comment as is, click Cancel. After you make changes and click “Save changes,” Google+ updates your comment, changes the timestamp next to it to reflect when you made your changes, and adds “(edited)” next to the timestamp so folks know that you changed the wording.
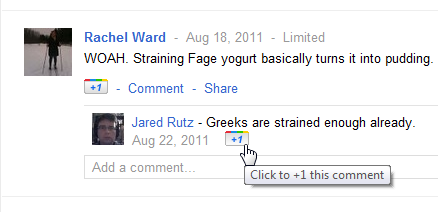
Posts aren’t the only things you can give a +1 to. Sometimes the best thing about a post isn’t the post itself, but another person’s take on it. When you’re looking at a post and point your cursor at a particular comment, you’ll see a +1 button appear. To let everyone know how much you like that comment, click that button.
Sharing Others’ Posts
If someone writes a post that’s good enough that you want to share with your friends, click the Share link below the post to send the text, link, or whatever else is in the post out to your circles. (Don’t worry—the original author will get credit.) The pop-up that appears includes some of the same controls you see when you write a post from scratch, plus a text box at the top where you can type in an explanation of why you’re re-posting this item.
Note
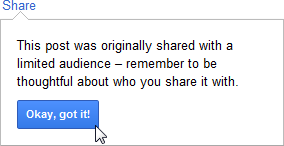
When you click the Share link, you may see a message box that says “This post was originally shared with a limited audience – remember to be thoughtful about who you share it with.” See Controlling Sharing for details about this warning.
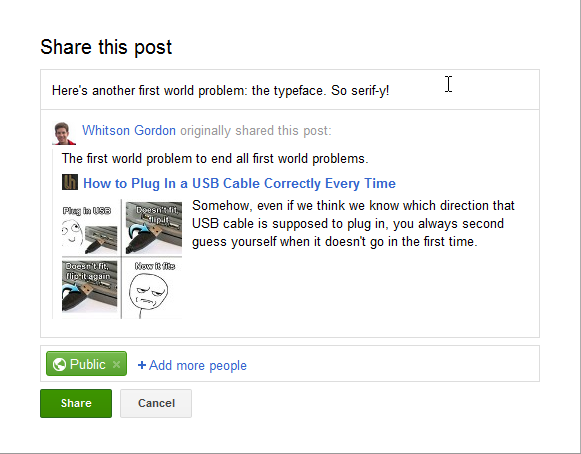
Unless it’s entirely self-explanatory, it’s a good idea to add a little note about why you’re sharing a post. Without a note from you, people in your circles might be surprised to see a post from someone they don’t know. It’s kind of like bringing someone new to a gathering of friends—you should probably introduce him and explain how you know him.
Tip
Clicking the Share link is the official means of sharing posts you like, but you can easily share a post via email, a blog post, or wherever. To do so, you need to copy the link from the post’s timestamp. Right-click the time to the right of the poster’s name (or, on a Mac, hold the ⌘ key and click), and choose “Copy link location,” “Copy shortcut,” or whatever similar option appears on the shortcut menu. You could also click the timestamp to bring the post up, by itself, in your browser, and then copy the link from your browser’s address bar. Then you can paste that web address into any email, Facebook post, or wherever else you want by right-clicking and choosing Paste, or hitting Ctrl-V (⌘-V on a Mac). Take note, though, that the usual Google+ privacy policies apply: unless the person clicking the link is in the circle the post was originally shared with or the post is set to Public, he’ll see a “Error: Page not found” message.
Editing, Deleting, and Controlling Your Posts
YOU MIGHT WONDER HOW valuable Google+’s circle, stream, and privacy controls are if the site lets anybody who can see your post share it with whoever they want. Well, you need not worry, as Google+ does place some restrictions on how far something can be shared.
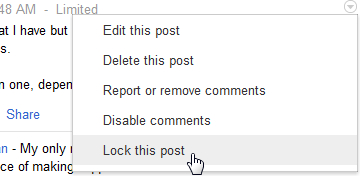
If someone posts something with the Public visibility option, then you can share it with whoever you like. But it’s a different story when someone attempts to share a post that you restricted to only a certain circle. Google+ gives you a few additional privacy controls that appear after you post something. To see them, click the gray arrow in a circle on the right side of your post. (If you don’t see the post in your main stream, try clicking over to your Profile page, which includes a Posts section.) The drop-down menu that appears gives you some options for editing and restricting access to your post.
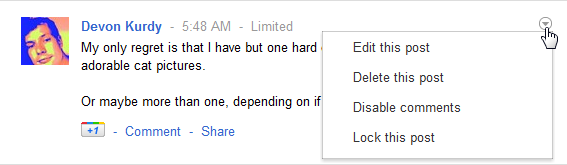
Not every thought you type into Google+ is going to be gold. You might decide later on that you phrased something the wrong way, that you mentioned the wrong person, or that you don’t want that post up at all. Or you might simply see a typo or bad link. Whatever the reason, select “Edit this post” in the drop-down menu to tweak the text of the post, or remove links, photos, or videos you included in it.
Note
You can’t add a location, video, or photo to a post when you’re editing it—which can be somewhat aggravating. So if you want a post to declare your whereabouts or focus on a particular photo or video, you’ll need to include those items from the get-go. You can, however, add links to a post you’re editing.

Change whatever you want about the text or extras, and then click “Save.” Just like when you edit comments you’ve written, your post will have a new timestamp with “(edited)” appended to it. One thing you can’t change when editing a post: the circles you initially shared it with. You can restrict how people in those circles are able to share your post (as explained in a moment), and share your post with more circles, but you can’t un-share a post without deleting it entirely. On that note, “Delete this post” is the second option in the drop-down menu. When you delete a post, Google+ removes it from your stream and the streams of everyone you shared it with. But as you’ll learn on Controlling Sharing, deleting a post isn’t the same as wiping the information it contained off the face of the earth. People may have spotted the post in their streams while it was up.
Controlling and Deleting Comments
The folks you share your posts with generally mean well. But sometimes their sense of humor and yours might not jibe. Or they may get into an argument in the comments of your post, or characterize aspects of what you posted in ways you don’t appreciate. Fortunately, you have some control over what goes on in the comments of your posts. In the drop-down menu shown on Controlling Sharing, choose Edit Post.
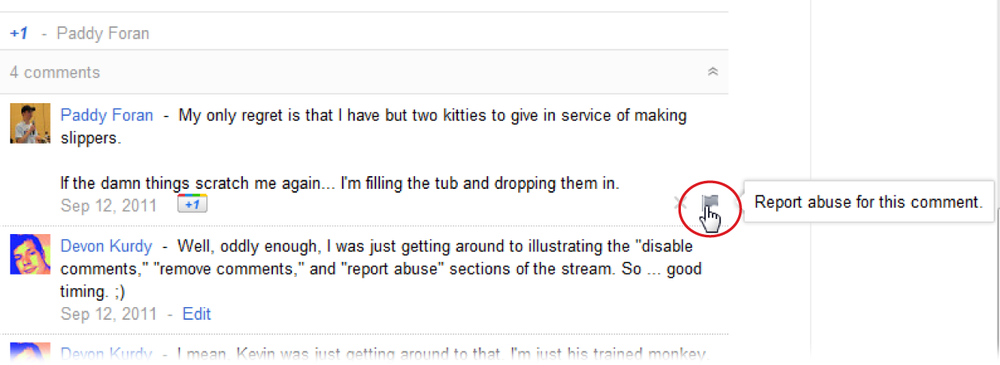
When you select this menu option, two icons appear at the right edge of each comment on your post when you mouse over them: an X and a flag. Click the X to remove the comment, or click the flag to remove the comment and report it to the Google+ team. You should only report a comment if you think it’s spam (if it says “Low-cost electronics, iPads, Viagra!,” for example) or an inappropriate or abusive remark that violates Google’s terms of service (which basically state that you can’t write anything hateful or obscene on the site). When you remove a comment, the person who wrote it receives a notification that you’ve done so. If you report a comment, the comment’s author will hear from Google’s community moderators, and, if the person gets reported a few times, likely get kicked off Google+ entirely.
Tip
If you want to head off bad comments at the pass, or prevent further clamor on a pointed post, you can choose “Disable comments” in the drop-down list instead. Doing so won’t remove any of the comments that have already been written about a post—that you’ll have to do manually as explained above—but it’ll keep people from writing new ones. If you change your mind later, you can click the same arrow and choose “Enable comments.”
Controlling Sharing
On Sharing Others’ Posts, you learned how to share a post written by a friend who’s in one of your circles. When someone posts a link using the Public visibility setting (Writing a post while viewing your main stream), anyone can link to it and see it, so sharing is simple.
But when you’re posting something to one of your hand-picked circles, you might not want to let those people share that post with the people in their circles. Just like with real-life storytelling and gossip-spreading, the results can sometimes turn an innocent quip or story into a great big drama. So Google+ includes two features that help keep sharing in check: a warning message and the ability to lock your posts.
When you post something to any group other than Public, if one of the people in your circles clicks that post’s Share link, Google+ shows them a little reminder that you didn’t share the post publicly, so you probably don’t want it shared with the whole online world.
The message is basically there to remind folks to be considerate, and most people will. But you never know when somebody—perhaps that old coworker of yours who got fired over an email incident back at WidgeTech—is going to test the limits of social graces. Because Google+’s polite reminder may not dissuade everyone, if you post something of a sensitive nature, you can clamp down on casual sharing of it. To do so, click the little gray arrow in the upper-right corner of your post and choose “Lock this post.” That way, your post won’t include a Share link.
That means your friends can no longer share your post—at least not in the easy way they could before. But keep in mind that if you put something online, there’s always a way for someone to share it in ways you don’t want. Even if you disable sharing and comments and do your best to keep a post inside your selected circles, people can still share your stuff by:
Copying the text of your post and then pasting it somewhere else in Google+, into an email, onto Facebook or Twitter, or wherever.
Taking a screenshot of your post (by pressing PrtSc on a Windows computer or ⌘-Shift-3 on a Mac), cropping the image, then posting it somewhere.
Telling other people about what you posted, whether on Google+, in person, or any other means.
So keep that in mind when you’re thinking about posting something. And if you come across a locked post, the person who wrote it is very firmly asking that you don’t share that joke, photo, or bit of humor with anyone else, even though you technically could.
Bottom line: If you really want to keep something private, don’t post it on Google+ or anywhere else online.
Blocking, Muting, and Reporting Posts
Not every post in your stream will be a winner, and some you might get downright sick of because they keep jumping to the top of your stream as they collect comments and +1s. That’s what that little arrow in the upper-right corner of each post is for—telling Google+ that a post is either too prominent or just plain bad, or that a person (probably someone who’s not in your circles) is continually shoving posts into your stream and you’d like it to stop.
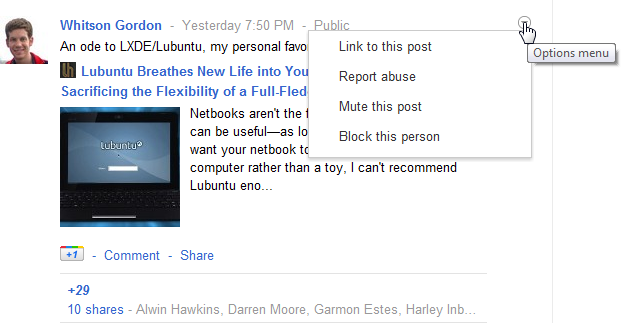
Click that arrow to display the Options menu, where you can choose from the following:
Link to this post. If the post has been published as Public, when you select this option, Google+ opens a new tab in your browser (or a new window, depending on your browser settings) showing just this post. Then you can select the web address in your browser’s address bar, copy it by pressing Ctrl+C (⌘-C on Mac), and then paste it wherever you’d like. It’s much the same as copying the post’s timestamp as explained in the Tip on Tip.
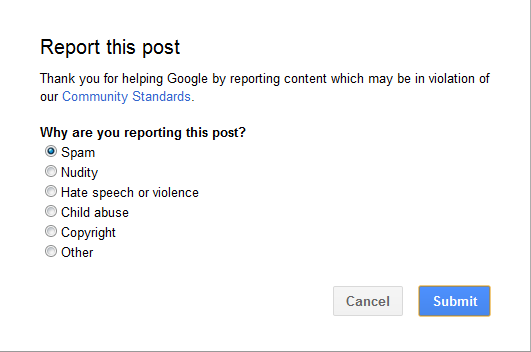
Report abuse. If a post is obscene, abusive, intentionally aggravating, or just pure spam, click this option to display a “Report this post” box where you can detail what’s wrong with the post.
Mute this post. If a post keeps appearing at the top of your stream either because it’s popular, it keeps getting updated, or it somehow triggers another of the signals Google+ uses to determine posts’ relevance (The Anatomy of a Stream) and you’re sick of seeing it, click this option. Doing so doesn’t harm the reputation of the person who posted it nor does it delete the post itself, it simply removes the post from your stream. In its place, you’ll see a thin bar noting that the post has been muted, with an “Undo mute” link you can click to bring it back.
Block this person. This option is meant mainly for people who show up in your stream because they keep mentioning you (Mentioning People in Posts), sharing specifically to you, or are somehow intruding on your Google+ experience. Blocking someone keeps you from seeing any more of their posts in your stream, no matter what they do to call your attention to them. They won’t know that you’ve blocked them unless they do some serious investigating into why their shared posts and comments on your posts aren’t showing up as they normally would.
When you select this option, you see the box shown on Blocking, Muting, and Reporting Posts. It explains that blocking someone removes that person’s ability to see and comment on things you post, you won’t see the things you’d normally see from that person (like posts and comments), and she won’t be in your circles anymore. When you post something as Public, she can still see that, but only if she happens across it somewhere outside her main Google+ stream. A new, red circle named Blocked will also appear on your Circles page; you can drag people into and out of it, just like regular circles.
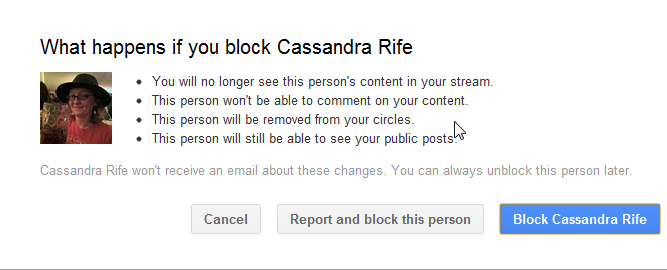
Note there are two block buttons: “Report and block this person,” and “Block Jane Doe.” Click “Report and block” when that person has posted, commented, or otherwise behaved in a way you think is intentionally harmful, obnoxious, spam-like, or otherwise against the social norms, and you think they should be booted off the site for everyone’s benefit. Click “Block Jane Doe” when you just don’t want that person pestering you anymore.