
Chapter 6. Multiproject builds
- Organizing a project’s source code into subprojects
- Modeling the build for a multiproject hierarchy
- Configuring project behavior with the Project API
- Declaring dependencies between projects
- Customizing your build with the Settings API
The code base of every active software project will grow over time. What started as a small project with a handful of classes may quickly become a collection of packages and classes with different responsibilities. To improve maintainability and prevent tight coupling, you’ll want to group code into modules based on particular functionality and logical boundaries. Modules are usually organized hierarchically and can define dependencies on each other. The build tool needs to be able to cope with these requirements.
Gradle provides powerful support for building modularized projects. Because every module in Gradle is a project, we call them multiproject builds (as opposed to Maven’s use of multimodule builds). This chapter explains techniques for modeling and executing a multiproject build with Gradle. By the end of the chapter, you’ll know how to apply the technique that best fits the needs of your own project and model your build appropriately.
Gradle support for multimodule builds will be explained with the help of your To Do web application. You’ll start by deconstructing the existing project structure and break out individual, functional subprojects. This newly created project layout will serve as a basis for modeling the build. Then we’ll go over the options for organizing your build logic and you’ll get to know the part of the Gradle API that helps define individual and common project behavior. Finally, you’ll learn how to control the project execution order by declaring project dependencies, and how to execute a single subproject or the full build for all participating subprojects from the root project. Not only will this chapter teach you the structure of a multiproject build, but you’ll also learn how to bring down your build’s execution time, something everyone can appreciate. You’ll start by refactoring the existing To Do application project structure into a modularized architecture.
6.1. Modularizing a project
In enterprise projects, the package hierarchy and class relationships can become highly complex. Separating code into modules is a difficult task, because it requires you to be able to clearly identify functional boundaries—for example, separating business logic from data persistence logic.
6.1.1. Coupling and cohesion
Two major factors will determine how easy it is to implement separation of concerns for a project: coupling and cohesion. Coupling measures the strength of relationships between specific code artifacts like classes. Cohesion refers to the degree to which components of a module belong together. The less coupled and the higher the cohesion of your code, the easier it will be to perform the restructuring of your project. Teaching good software design practices is beyond the scope of this book, but there are two guidelines you should keep in mind: minimize coupling and maximize cohesion.
An example of a modularized architecture done right is the Spring framework. Spring is an open source framework that provides a wide range of services needed in many enterprise Java applications. For example, the functionality of a service support for a simplified MVC web application development or transaction management is distributed as a JAR file. Services depend on each other if they need the functionality provided by a different module. Figure 6.1 shows all Spring modules of version 3.x and their interrelationships.
Figure 6.1. Spring’s modularized architecture

Spring’s architecture may look scary at first. It defines a lot of components that depend on each other. But in practice, you won’t need to import the whole framework with all components into your project. You can pick and choose which service of the framework you want to use. Thankfully, the dependencies between the components are specified via metadata. Using Gradle’s dependency management makes resolving these transitive dependencies a piece of cake.
In the following sections, you’ll modularize the To Do application and use Gradle’s multiproject features to build it. With the limited code base you have at the moment, this will be a much easier task than it is for developers of the Spring framework. We’ll get started by identifying the modules for your application.
6.1.2. Identifying modules
Let’s review the code you already wrote for the To Do application to find its natural boundaries. These boundaries will help you break the application code into modules. The following directory tree demonstrates the existing project structure:

You already did a good job of separating the concerns of the application by grouping classes with specific functionality into packages. You’re going to use these packages as guidelines for finding the functional boundaries of your application:
- Model: Data representation of to-do items
- Repository: Storage and retrieval of to-do items
- Web: Web components for handling HTTP requests and rendering to-do items and functionality in the browser
Even in your fairly simple application, these modules have relationships between each other. For example, the classes in the Repository module use the Model data classes to transport the data in and out of the data storage. Figure 6.2 gives the full picture of all proposed modules and their relationships.
Figure 6.2. Proposed modules for the To Do application

With the identified modules and their relationships in mind, you can get started breaking them out of the single project.
6.1.3. Refactoring to modules
It’s easy to refactor the existing project structure into the identified modules. For each of the modules, you’ll create a subdirectory with the appropriate name and move the relevant files underneath it. The default source directory src/main/java will stay intact for each of the modules. The only module that requires the default web application source directory src/main/webapp is the Web module. The following directory tree shows the modularized project structure:

That’s it—you modularized the To Do application. Now it’s time to take care of the build infrastructure.
6.2. Assembling a multiproject build
In the last section, you defined a hierarchical directory structure for your project. The full project consists of a root directory and one subdirectory per module. In this section, you’ll learn how to build such a project structure with Gradle.
Your starting point will be the obligatory build.gradle file on the root level of the directory tree. Create an empty build script and check the projects participating in your build by running gradle projects:
$ gradle projects
:projects
------------------------------------------------------------
Root project
------------------------------------------------------------
Root project 'todo'
No sub-projects
Gradle reports that you’re only dealing with a single project. When setting up a build with more than one project, Gradle’s vocabulary speaks of a multiproject build. The reason is that you’ll represent each of the modules as a distinct Gradle project. From this point forward, we won’t use the term module anymore in keeping with Gradle’s syntax; we’ll only talk about projects.
The overarching project located in the top-level directory is called the root project, and it has its own right to exist in a multiproject build. It coordinates building the subprojects and can define common or specific behavior for them. Figure 6.3 gives you a graphical overview of the hierarchical project structure you’re going to achieve.
Figure 6.3. Hierarchical multiproject structure for To Do application, which defines three subprojects

So far we’ve only dealt with the Gradle configuration of single-project builds. You saw that separating your code into multiple projects wasn’t all that hard. What’s missing is the build support that represents the root project and its subprojects. The declaration of subprojects in a multiproject build is done via the settings file.
6.2.1. Introducing the settings file
The settings file declares the configuration required to instantiate the project’s hierarchy. By default, this file is named settings.gradle and is created alongside the build.gradle file of the root project. The following listing shows the contents of the settings file. For each of the subprojects you want to be part of the build, you call the method include with the argument of the project’s path.
Listing 6.1. Settings file that adds subproject by path

The supplied project path in this snippet is the project directory relative to the root directory. Keep in mind that you can also model a deeper project hierarchy. A colon character (:) separates each level of the subproject hierarchy. For example, if you wanted to map the directory structure model/todo/items, you’d add the subproject via the path model:todo:items.
Executing the help task projects after adding the settings file will produce a different result:

By adding a single settings file, you created a multimodule build containing a root project and three subprojects. No additional configuration was needed. Let’s go deeper into the details of the settings file. You may have guessed already that there’s an API representation for it that you can use to query and modify the configuration of your build.
6.2.2. Understanding the Settings API representation
Before Gradle assembles the build, it creates an instance of type Settings. The interface Settings is a direct representation of the settings file. Its main purpose is to add the Project instances that are supposed to participate in a multiproject build. In addition to assembling your multiproject build, you can do everything you’re used to in your build.gradle script because you have direct access to the Gradle and Project interfaces. Figure 6.4 shows the relevant methods of the Settings interface and its associations.
Figure 6.4. Settings API representation. You can use the Settings instance to retrieve the project descriptor or project instance through the interface Gradle.
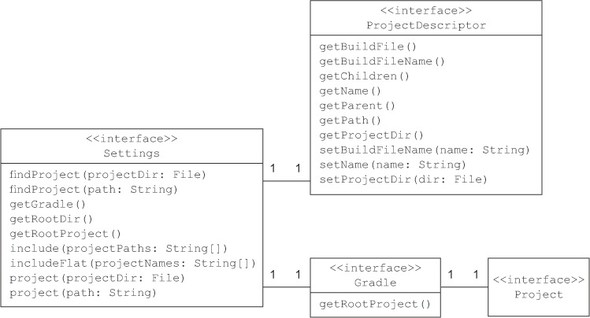
The important takeaway here is that you’re coding toward an instance of the interface Settings in your settings.gradle file. Any method of the interface Settings can be directly invoked as you did by calling include.
Next, we’ll discuss when the settings file is executed during the build lifecycle and what rules are applied for resolving the file.
If you need access to the Settings instance from your build.gradle file after the settings have been loaded and evaluated, you can register a lifecycle closure or listener. A great place to start is the method Gradle#settingsEvaluated(Closure) that provides the Settings object as a closure parameter.
6.2.3. Settings execution
Think back to chapter 4 when we discussed the three distinct lifecycle phases of a build. You may already have an idea during what phase the code of the settings file is evaluated and executed. It needs to happen during the initialization phase before any of the Project instances can be configured, as shown in figure 6.5.
Figure 6.5. The settings file is evaluated and executed during the initialization phase.

When executing a build, Gradle automatically figures out whether a subproject is part of a single- or multiproject build. Let’s examine the set of rules Gradle uses to determine the existence of a settings file.
6.2.4. Settings file resolution
Gradle allows you to run your build from the root project directory or any of the subproject directories as long as they contain a build file. How does Gradle know that a subproject is part of a multiproject build? It needs to find the settings file, which indicates whether the subproject is included in a multiproject build. Figure 6.6 shows the two-step process Gradle uses to find a settings file.
Figure 6.6. Settings file resolution is a two-step process.

In step 1, Gradle searches for a settings file in a directory called master with the same nesting level as the current directory. If no settings file is found in step 1, Gradle searches for a settings file in the parent directories, starting from the current directory. In the case of subproject2, the search would be suproject1 > root.
If one of the steps finds a settings file and the project is included in its definition, the project is considered part of a multiproject build. Otherwise, the project is executed as a single-project build.
Step 2 in the settings file resolution process applies to a hierarchical project layout you set up earlier. Let’s step back for a second and also examine the project layout shown in step 1.
There are two command-line parameters that are helpful in determining the search behavior for a settings file:
- -u, --no-search-upward: Tells Gradle not to search for a settings file in parent directories. This option is useful if you want to avoid the performance hit of searching all parent directories in a deeply nested project structure.
- -c, --settings-file: Specifies the location of the settings file. You may want to use this option if your settings filename deviates from the standard naming convention.
6.2.5. Hierarchical versus flat layout
Gradle projects can be structured hierarchically or with a flat layout, as shown in figure 6.7. We speak of a flat multiproject layout if the participating projects exist on the same directory level as the root project. As a consequence, this means that the nesting level for subprojects can only be one level deep. The layout you choose for your project is up to you. Personally, I prefer the hierarchical project layout, as it gives you a more fine-grained control to model your components.
Figure 6.7. Comparison of hierarchical and flat project layouts and their settings file configurations

Figure 6.7 compares the differences between setting up the To Do application project with a hierarchical and a flat layout. Instead of putting the build and settings file on the root level of the project, you’ll have to create a dedicated directory alongside your other subprojects. Choose the directory name master so you can execute the build from your subprojects, as discussed in the previous section. To indicate that you want to include projects on the same project nesting level as the root project, use the method includeFlat in the settings file.
In the next section, you’ll configure the build logic for each of the projects in your build.
6.3. Configuring subprojects
So far, you’ve split your application code based on functional responsibilities and rearranged it into individual subprojects. Now, you’ll take a similar approach to organizing your build logic in a maintainable fashion. The following points represent requirements common to real-world multiproject builds:
- The root project and all subprojects should use the same group and version property value.
- All subprojects are Java projects and require the Java plugin to function correctly, so you’ll only need to apply the plugin to subprojects, not the root project.
- The web subproject is the only project that declares external dependencies. The project type derives from the other subprojects in that it needs to build a WAR archive instead of a JAR and uses the Jetty plugin to run the application.
- Model the dependencies between the subprojects.
In this section, you’ll learn how to define specific and common behaviors for projects in a multiproject build, a powerful way to avoid having to repeat configuration. Some of the subprojects may depend on the compiled source code of other projects—in your application, the code from the project model is used by the repository project. By declaring project dependencies, you can make sure imported classes are available on the classpath. Before you fill your empty build.gradle file with life, we’ll review methods of the Project API I haven’t shown you yet but that are relevant in the context of multiproject builds.
6.3.1. Understanding the Project API representation
In chapter 4, I explained the properties and methods of the Project API that you’ll probably use the most in your day-to-day business. For implementing multiproject builds, you’ll need to get to know some new methods, as shown in figure 6.8.
Figure 6.8. Important methods of the Project API for implementing multiproject builds
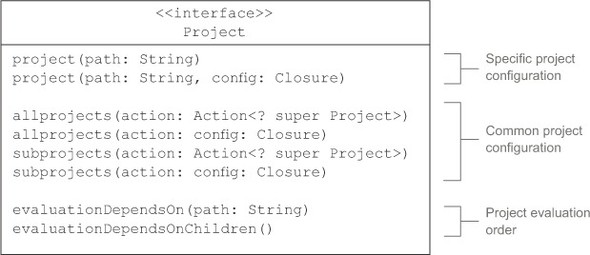
For declaring project-specific build code, the method project is used. At the very least, the path of the project (for example, :model) has to be provided.
Many times, you’ll find yourself wanting to define common behavior for all your projects or only the subprojects of your build. For each of these use cases, the Project API provides a specialized method: allprojects and subprojects. Let’s say you want to apply the Java plugin to all of your subprojects because you need to compile Java source code. You can do so by defining the code within the subprojects closure parameter.
The default evaluation order of projects in a multiproject build is based on their alphanumeric name. To gain explicit control over the evaluation order at configuration time of the build lifecycle, you can use the project evaluation methods evaluation-DependsOn and evaluationDependsOnChildren. This is especially the case if you need to make sure that a property is set for a project before it’s used by another project. We won’t discuss these methods in this chapter; for specific use cases, refer to Gradle’s online manual.
In this chapter, you’ll use all of the presented methods to configure your multiproject build. First, you’ll take the existing build code and apply it to only specific subprojects.
6.3.2. Defining specific behavior
Project-specific behavior is defined with the method project. To set up the build infrastructure for your three subprojects—model, repository, and web—you’ll create a project configuration block for each of them. The following listing shows the project definition within your single build.gradle file.
Listing 6.2. Defining project-specific build logic

You can see that the solution is far from perfect. Even though you defined an extra property for assigning the group and version for each subproject, you’re still left with duplicated code and the Java plugin has to be applied for each subproject individually. For now, just get the project running. You’ll improve on that code later.
Properties defined in a project are automatically inherited by its subprojects, a concept available in other build tools like Maven. In listing 6.2, the extra property projectIds declared in the root project is available to the subprojects model, repository, and web.
From the root directory of the multiproject build, you can execute tasks for individual subprojects. All you’ll need to do is name the concatenated project path and task name. Remember that paths are denoted by a colon character (:). For example, executing the task build for the subproject model can be achieved by referencing the full path on the command line:
$ gradle :model:build
:model:compileJava
:model:processResources UP-TO-DATE
:model:classes
:model:jar
:model:assemble
:model:compileTestJava UP-TO-DATE
:model:processTestResources UP-TO-DATE
:model:testClasses UP-TO-DATE
:model:test
:model:check
:model:build
This works great for the self-contained subproject model, because it has no dependencies on code from other subprojects. If you executed the same task for the subproject repository, you’d end up with a compilation error. Why is that? The subproject repository uses code from the subproject model. To function correctly, you’ll need to declare a compile-time dependency on the project.
6.3.3. Declaring project dependencies
Declaring a dependency on another project looks very similar to declaring a dependency on an external library. In both cases, the dependency has to be declared within the closure of the dependencies configuration block. Project dependencies have to be assigned to a particular configuration—in your case, the configuration compile provided by the Java plugin. The following listing outlines the project dependency declarations for all of your subprojects.
Listing 6.3. Declaring project dependencies

The subproject repository depends on the subproject model, and the subproject web depends on the sibling project repository. That’s all there is to modeling project dependencies. Doing so has three important implications:
- The actual dependency of a project dependency is the library it creates. In the case of the subproject model, it’s the JAR file. That’s why a project dependency is also called a lib dependency.
- Depending on another project also adds its transitive dependencies to the classpath. That means external dependencies and other project dependencies are added as well.
- During the initialization phase of the build lifecycle, Gradle determines the execution order of projects. Depending on another subproject means that it has to be built first. After all, you’re depending on its library.
Executing a task from the root project
After passing the initialization phase, Gradle holds an internal model of the project’s dependencies in memory. It knows that the subproject repository depends on model and the subproject web depends on repository. You don’t have to execute a task from a particular subproject—you can execute one for all projects of the build. Let’s say you want to execute the task build from the root project. Given the fact that Gradle knows the order in which the subprojects need to be executed, you’d expect the build to play out as shown in figure 6.9.
Figure 6.9. Multiproject task execution order when running the task build from the root project

You can prove the hypothesis by executing the task on the root level of your project:
$ gradle build
:model:compileJava
:model:processResources UP-TO-DATE
:model:classes
:model:jar
:model:assemble
:model:compileTestJava UP-TO-DATE
:model:processTestResources UP-TO-DATE
:model:testClasses UP-TO-DATE
:model:test
:model:check
:model:build
:repository:compileJava
:repository:processResources UP-TO-DATE
:repository:classes
:repository:jar
:repository:assemble
:repository:compileTestJava UP-TO-DATE
:repository:processTestResources UP-TO-DATE
:repository:testClasses UP-TO-DATE
:repository:test
:repository:check
:repository:build
:web:compileJava
:web:processResources UP-TO-DATE
:web:classes
:web:war
:web:assemble
:web:compileTestJava UP-TO-DATE
:web:processTestResources UP-TO-DATE
:web:testClasses UP-TO-DATE
:web:test
:web:check
:web:build
Executing a task from the root project is a real timesaver. Gradle executes the tasks that are required from all subprojects including the support for incremental builds. As much as this behavior is convenient and ensures that you’ll always have the latest class files in your classpath, you may want finer-grained control over when to build all dependent subprojects.
6.3.4. Partial multiproject builds
Complex multiproject builds with tens or even hundreds of dependent subprojects will significantly influence the average execution time. Gradle will go through all project dependencies and make sure that they’re up to date. During development, oftentimes you know which source files have been changed in what subproject. Technically, you don’t need to rebuild a subproject that you didn’t change. For these situations, Gradle provides a feature called partial builds. Partial builds are enabled through the command-line option –a or --no-rebuild. Suppose you only changed code in the subproject repository but don’t want to rebuild the subproject model. By using partial builds, you can avoid the cost of checking the subproject model and bring down your build execution time. If you’re working on an enterprise project with hundreds of subproject dependencies, you’ll be grateful for every second you can save when executing the build. The following command-line output shows the usage of this option:
$ gradle :repository:build -a
:repository:compileJava
:repository:processResources UP-TO-DATE
:repository:classes
:repository:jar
:repository:assemble
:repository:compileTestJava UP-TO-DATE
:repository:processTestResources UP-TO-DATE
:repository:testClasses UP-TO-DATE
:repository:test
:repository:check
:repository:build
The --no-rebuild option works great if you’re only changing files in a single project. As part of your day-to-day development practices, you’ll want to pull the latest version of the source code from the repository to integrate changes made by your teammates. To ensure that code didn’t break by accident, you’ll want to rebuild and test the projects your current project depends on. The regular build task only compiles the code of dependent projects, and assembles the JAR files and makes them available as project dependencies. To run the tests as well, execute the task buildNeeded, as shown in the following command-line output:
$ gradle :repository:buildNeeded
:model:compileJava
:model:processResources UP-TO-DATE
:model:classes
:model:jar
:model:assemble
:model:compileTestJava UP-TO-DATE
:model:processTestResources UP-TO-DATE
:model:testClasses UP-TO-DATE
:model:test UP-TO-DATE
:model:check UP-TO-DATE
:model:build
:model:buildNeeded
:repository:compileJava
:repository:processResources UP-TO-DATE
:repository:classes
:repository:jar
:repository:assemble
:repository:compileTestJava UP-TO-DATE
:repository:processTestResources UP-TO-DATE
:repository:testClasses UP-TO-DATE
:repository:test UP-TO-DATE
:repository:check UP-TO-DATE
:repository:build
:repository:buildNeeded
Any change you make to your project may have side effects on other projects that depend on it. With the help of the task buildDependents, you can verify the impact of your code change by building and testing dependent projects. The following command-line output shows its use in action:
$ gradle :repository:buildDependents
:model:compileJava
:model:processResources UP-TO-DATE
:model:classes
:model:jar
:repository:compileJava
:repository:processResources UP-TO-DATE
:repository:classes
:repository:jar
:repository:assemble
:repository:compileTestJava UP-TO-DATE
:repository:processTestResources UP-TO-DATE
:repository:testClasses UP-TO-DATE
:repository:test UP-TO-DATE
:repository:check UP-TO-DATE
:repository:build
:web:compileJava
:web:processResources UP-TO-DATE
:web:classes
:web:war
:web:assemble
:web:compileTestJava UP-TO-DATE
:web:processTestResources UP-TO-DATE
:web:testClasses UP-TO-DATE
:web:test UP-TO-DATE
:web:check UP-TO-DATE
:web:build
:web:buildDependents
:repository:buildDependents
6.3.5. Declaring cross-project task dependencies
In the last section, you saw that executing a specific task from the root project invokes all tasks with the same name across all subprojects, with the execution order for the task build determined by the declared compile-time project dependencies. If your project doesn’t rely on project dependencies, or defines a task with the same name for the root project and one or more subprojects, the story is different.
Default task execution order
Let’s assume you define a task named hello in the root project as well as all subprojects, as shown in the following listing. In each of the doLast actions, you print out a message on the console to indicate the project you’re in.
Listing 6.4. Cross-project task definition without dependencies

If you run the task hello from the root project, you’ll see the following output:
$ gradle hello
:hello
Hello from root project
:model:hello
Hello from model project
:repository:hello
Hello from repository project
None of the tasks declares a dependency on another task. So how does Gradle know in which order to execute the tasks? Simple: the task on the root level of the multiproject build is always executed first. For the subprojects, execution order is solely determined by the alphanumeric order of the names of the projects: model comes before repository. Keep in mind that the declaration order of the subprojects within the settings files doesn’t play any role in the execution order.
Controlling the task execution order
You can determine the task execution order by declaring a cross-project task dependency. To do so, you need to reference the path to the task from a different project. The next listing demonstrates how to ensure that the hello task from the subproject repository gets executed before the one from the subproject model.
Listing 6.5. Declaring cross-project task dependencies

If you run the task hello from the root project, you’ll notice that the dependent task is executed in the correct order:
$ gradle hello
:hello
Hello from root project
:repository:hello
Hello from repository project
:model:hello
Hello from model project
Controlling the execution order between tasks across different projects isn’t limited to tasks with identical names. The same mechanics apply if you need to control the execution order for tasks with different names. All you need to do is reference the full path when declaring the task dependency.
You have a basic multiproject build running and a general understanding of how to control the task execution order. Next, we’ll discuss methods for defining common behavior to improve your code’s readability and reusability.
6.3.6. Defining common behavior
In listing 6.2, you needed to apply the Java plugin to each of the subprojects individually. You also created an extra property named projectIds to define the group and version. You used that extra property to assign its values to the Project properties of the root project and its subprojects. This may not seem like a big problem in this fairly small project, but having to do this in larger projects with more than 10 subprojects can become very tedious.
In this section, you’ll improve the existing code by using the allprojects and subprojects methods. Figure 6.10 provides a visual representation of how each method applies to a multiproject build.
Figure 6.10. Defining common project behavior with the Project API

What does this mean for your project? You’ll want to use the allprojects method for setting the group and version properties of the root project and subprojects. Because the root project doesn’t define any Java code, you don’t need to apply the Java plugin. Only the subprojects are Java-specific. You can use the subprojects method to apply the plugins to just the subprojects. The following listing demonstrates the usage of the methods allprojects and subprojects in your multiproject build.
Listing 6.6. Configuring common project behavior

Executing this build script will produce the same result as the previous build. However, it’ll rapidly become clear that being able to define common project behavior has the potential to reduce duplicated code and improve the build’s readability.
6.4. Individual project files
The multiproject build you’ve defined so far only consists of a single build.gradle file and the settings.gradle file. As you add new subprojects and tasks to your build.gradle file, code maintainability will suffer. Having to wade through pages and pages of code to extend or modify your build logic is no fun. You can drive the separation of concerns even further by creating individual build.gradle files for each of the projects.
6.4.1. Creating build files per project
You’ll get started by setting up the build infrastructure. For each of the subprojects, you’ll need to create a build file with the default naming convention. The following directory tree shows the end result:

With the project files in place, you can now split up the build logic from the master build file and move it to the appropriate location.
6.4.2. Defining the root project’s build code
For your project, the contents of the root-level build file will look fairly simple after stripping subproject-specific code. All you need to keep is the allprojects and subprojects configuration blocks, as shown in the following listing.
Listing 6.7. The root project’s build.gradle file
allprojects {
   group = 'com.manning.gia'
   version = '0.1'
}
subprojects {
   apply plugin: 'java'
}
The remainder of the code will be moved to the build files of your subprojects. Next, we’ll focus on defining the build logic of your subprojects.
6.4.3. Defining the subprojects’ build code
Remember that the model subproject didn’t define any project-specific build logic. In fact, you didn’t even have to declare a project configuration block. As a consequence, you won’t have to declare any code in the subproject’s build.gradle file. Gradle knows that the subproject is part of the multiproject build because you included it in the settings file.
The build files for the subprojects repository and web won’t introduce any new code. You can simply take the existing project configuration blocks and copy them into the correct location. Having a dedicated Gradle file per project indicates that you’re dealing with a specific project. Therefore, enclosing your code into a project closure becomes optional. The following listing shows the contents of the build file for the repository subproject.
Listing 6.8. The build.gradle file of the repository subproject
dependencies {
   compile project(':model')
}
The build.gradle file for the subproject web should look equally familiar, as shown in the next listing.
Listing 6.9. The build.gradle file of the web subproject
apply plugin: 'war'
apply plugin: 'jetty'

repositories {
   mavenCentral()
}

dependencies {
   compile project(':repository')
   providedCompile 'javax.servlet:servlet-api:2.5'
   runtime 'javax.servlet:jstl:1.1.2'
}
Running this multiproject build produces the same result as having the same code in one master build file. On the upside, you significantly improved the readability and maintainability of the build code. In the next section, I’ll discuss some examples of customizing your projects even more.
6.5. Customizing projects
The standard Gradle build filename is build.gradle. In a multiproject build with many subprojects, you may want to be more expressive when it comes to naming your build files. Editing multiple build.gradle files in parallel and constantly switching between them easily becomes confusing when you’re using an IDE. This section will explain how to configure your project to use custom build filenames.
Let’s assume you want to build the following project structure: each of the subproject directory names is constructed of the prefix todo- and a speaking name for the project. For example, the directory for the subproject repository would be named todo-repository. The build filename, however, should only be represented by the actual project responsibility. The following directory tree shows the final result you want to accomplish:
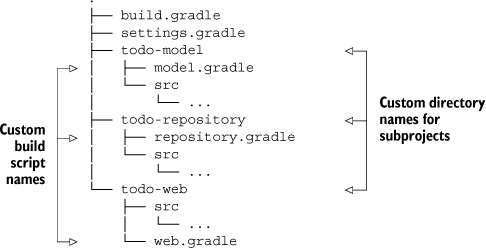
The key to making this project structure work again lies in the settings file. It provides more functionality than just telling your build which of the subprojects should be included. In fact, it’s a build script itself that’s executed during the evaluation phase of the build lifecycle. With the help of the Settings API outlined in section 6.2.2, you have direct access to the root project and its children. The following listing shows how to iterate over all subprojects to assign a custom build filename. In addition, you also set a custom name for the root project.
Listing 6.10. Settings file defining custom project script names

Though this example may not apply to your real-world projects, the possibilities of configuring a multiproject build to your liking are endless. In most cases it can be achieved without much effort. Keep in mind that the Settings API is your best friend.
6.6. Summary
Modularizing a project improves the quality attributes of your system—that is, reusability, maintainability, and separation of concerns. Two guidelines make it easy to achieve that for your software: minimize coupling and maximize cohesion.
In this chapter, you split the To Do application code base into modules. You created one module that holds the model classes, one that deals with the persistence of the data, and one that exposes the web application capabilities.
Gradle treats every module as a separate project. Every project can declare dependencies on other projects. Gradle’s toolbox provides extensive support for modeling and executing multiproject builds either as hierarchical or flat project structures. You learned that the settings file, executed during the initialization phase of the build lifecycle, determines which of the projects should be part of the build.
The Project API provides methods for declaring project-specific build code. It also allows for configuring common or subproject-specific build behavior. You learned that dependencies between projects in the current project hierarchy are declared using the same dependency mechanism as external dependencies.
The organization of your multiproject build code is very flexible. You can choose to use a single master build script, individual build scripts per project, or a mixed approach. The route you take depends on the requirements of your project. However, organizing build logic into individual scripts improves maintainability of your code the more subprojects you add to your build.
The Settings API available in your settings file can be used to adapt to unconventional multiproject layouts. The example demonstrated how easy it is to use custom build script names that deviate from the standard naming convention.
The next chapter is fully devoted to Gradle’s test support. We’ll explore the use of different test frameworks for writing unit, integration, and functional tests. We’ll also discuss how to write test code for your own build scripts.