
Chapter 8. Extending Gradle
This chapter covers
- Gradle’s extension mechanisms by example
- Writing and using script and object plugins
- Testing custom tasks and plugins
- Obtaining configuration from the build script through extension objects
In the previous chapters, we covered a lot of ground discussing how to build a self-contained sample project with Gradle. You added custom logic by declaring simple tasks and custom task classes within your build script. Often, a task becomes so useful that you’ll want to share it among multiple projects. Gradle provides various approaches for reusing code, each with its own unique advantages and drawbacks. Plugins take the concept of reusability and extensibility even further. They enhance your project with new capabilities by introducing conventions and patterns for a specific problem domain.
Earlier in the book, you saw how powerful plugins are. In chapter 3, you used the Java, War, and Jetty plugins to implement a task management web application. Applying these plugins to your project was as simple as adding a single line of code and enhanced your build with new capabilities. The Java plugin adds a standardized way of compiling, testing, and bundling Java code. The War plugin allows for building a WAR file, whereas the Jetty plugin deploys in an embedded Servlet container.
All of these plugins are small, opinionated frameworks that introduce default conventions and project layouts. However, your view of the world may be different when it comes to building Java or web applications. Gradle acknowledges that customization is a must-have feature. All core plugins allow for changing the default conventions, which makes it easy to adapt to nonstandard projects.
In this chapter, you’ll learn how to structure, implement, test, and build your own custom plugin. Our discussion will touch on topics such as development practices for reusable code, writing flexible tasks, and introducing the concept of convention over configuration. Let’s start with a look at the practical application for your plugin.
8.1. Introducing the plugin case study
The running example in this book is a web-based To Do application in Java. Through Gradle’s out-of-the-box plugin support, you were able to create a WAR file, deploy it to an embedded Servlet container, and test the application’s functionality in the browser. I bet you’re eager to show off your hard work to end users by deploying it to an internet-accessible web container. The traditional approach to hosting a web application is to manage your own web servers. Though you have full control over the infrastructure, buying and maintaining servers is expensive. Remember the last time you had to ask your infrastructure team to provide you with a server and the compatible runtime environment for your application? Provisioning the hardware and software delayed your time to market, and in the end, you didn’t even have root access to tweak your application’s runtime parameters. A quick and easy way to host an application is to use a platform as a service (PaaS), a combination of a deployment platform and a solution stack that in many cases is free of charge. A PaaS combines traditional application server functionality with support for scalability, load balancing, and high availability. Let’s bring Gradle into the equation.
8.1.1. Application management in the cloud with Gradle
Manually deploying an application to a server is a repetitive and error-prone task. Thankfully, many PaaS providers expose an API for managing their platform services and resources programmatically. With the help of Gradle, you can automate the deployment to remote containers and make it part of the project’s build lifecycle. Every web application needs to be launched to a runtime environment at some point in the development process, so it makes sense to write the code in a reusable fashion. Unfortunately, you can’t fall back to an existing Gradle core plugin, so you’ll need to roll your own implementation. This is a great way to practice your build tool’s extension mechanism. Before you get started writing code, let’s pick a PaaS provider that fulfills your requirements.
In the last couple of years many JVM PaaS providers have sprung up. Some vendors propose a programming model that requires you to conform to their specific software stack and APIs, such as a proprietary data storage implementation. You don’t want to lock yourself in, because you’d like to be able to transfer the web application to a different server environment later on. You’ll use CloudBees’ RUN services, also called RUN@cloud, an infrastructure-agnostic deployment platform and application runtime environment. CloudBees provides a Java-based client library to communicate with runtime services over HTTP. Using the library within a Gradle script is straightforward: define it as a classpath dependency and write tasks to use the API.
Figure 8.1 demonstrates how to interact with RUN@cloud within the microcosm of a single Gradle build script. The CloudBees API provides an HTTP-based programming interface for managing services and applications on the RUN@cloud platform. But what if your coworker wants to use the same tasks in their project? Avoid the urge to just duplicate the code! Friends don’t let friends copy and paste code—this maxim is true for build logic as well. The right approach is to formalize the code into a Gradle plugin. You’ll start your journey by creating an account on CloudBees.
Figure 8.1. Managing CloudBees runtime services through HTTP from a Gradle build script

8.1.2. Setting up the cloud environment
Before you can interact with CloudBees’ PaaS through its API, you need to provision an account. In this section, I’ll walk you through the signup and application setup process.
Signing up for a CloudBees account
Signing up a CloudBees account is easy and should take you less than 30 seconds to complete. Open your browser and enter the following URL to render the registration page on CloudBees: https://www.cloudbees.com/signup. Figure 8.2 shows the sign-up form. It requires you to fill out your email address, name, and password, as well as a username and domain. Please note that the value you enter into the input field Domain/Account will be used to construct the service URL for your applications with the following pattern: https://[app-name].[account-name].cloudbees.net.
Figure 8.2. Signing up for a CloudBees account

Upon successful submission, you’ll receive an email confirming your registration. You can now log in with your credentials. On the CloudBees landing page, you can find the services available to use. In this chapter we’ll only concentrate on the application services.
Before you can access any of the application runtime services, you need to select a subscription plan. Click the Applications link shown in figure 8.3 and select the free RUN@cloud plan by clicking the Subscribe button. On the following page add the application service to your account.
Figure 8.3. CloudBees Grand Central landing page

Provisioning the application
With application services set up, you’re ready to prepare your application. To create a new application, choose the Apps menu item on top of the page or the Applications link on the landing page. Both links will bring you to the application management page. Before you can deploy any application, you’ll need to provision it. Clicking the Create Application button will open a dialog, which should look similar to figure 8.4, that lets you enter the application name and supported runtime environment. Because you’ll want to deploy a WAR file, choose the value JVM Web Application (WAR) from the dropdown box and enter todo into the input field to represent the application name. Click the Finish button to initiate the application creation.
Figure 8.4. Provisioning the To Do application on RUN@cloud

That’s it—the application is ready to use. You just have to enter the appropriate URL in the browser. Because I chose the account name gradle-in-action in the registration form, my application URL is http://todo.gradle-in-action.cloudbees.net. Give it a try! The application URL will already resolve even though you haven’t deployed a WAR file yet.
In the management page, you can now configure the application, deploy new versions, get an overview of incoming requests, monitor memory usage and server load, and view the log files, all in one place accessible over a central dashboard. Feel free to familiarize yourself with the management functionality by browsing through the tabs.
Even though the application management dashboard is easy to use, you’d probably like to avoid manual labor at any cost. To this end, you’ll use the CloudBees API, which enables you to fully automate the communication with the services backend.
Setting up the API keys
Every request with the CloudBees API requires the caller to provide an API key and a secret key. The API key is unique to your account and clearly identifies the caller. The secret key is used to securely sign the HTTP web request to the CloudBees services. You can look up both keys under Account Settings > API Keys. Given the private nature of these values, a good practice is to store them in the gradle.properties file. You’ll want to avoid checking this file into version control. Making this file public would automatically grant access to your account to everyone that has access to your source code. If you haven’t created the file yet, now is a good time to do so. The following terminal commands show how to do this on *nix systems:
$ cd $HOME/.gradle
$ vi gradle.properties
In the properties file, add the following keys and replace the placeholders with the actual values of your account:
cloudbeesApiKey = Your-CloudBees-API-key
cloudbeesApiSecret = Your-CloudBees-API-secret
Setting up an account on CloudBees and provisioning an application is really painless. It probably took you less than five minutes to complete the whole process. Imagine how much work it would be to set up a similar runtime environment on a self-hosted server. Next, we’ll discuss the step-by-step game plan for building the plugin.
8.2. From zero to plugin
Plugin development in Gradle isn’t hard. You’ll need to get to know some new concepts while at the same time applying techniques you’ve already learned in previous chapters. Gradle distinguishes two types of plugins: script plugins and object plugins. A script plugin is nothing more than a regular Gradle build script that can be imported into other build scripts. With script plugins, you can do everything you’ve learned so far. Object plugins need to implement the interface org.gradle.api.Plugin. The source code for object plugins usually lives in the buildSrc directory alongside your project or a standalone project and is distributed as a JAR file. In this chapter, you’ll learn how to use both approaches.
In the spirit of agile development, you’ll iteratively build the functionality in digestible pieces. The goal is to get a first version up and running quickly to collect early feedback. From a high-level view, you’ll plan to build the CloudBees plugin in three major steps, as shown in figure 8.5. With each of the following iterations, we’ll identify the drawbacks of the previous approach and discuss how to improve on it as we go along.
Figure 8.5. Implementing the CloudBees plugin in three steps

In the first step, I want you to become familiar with the CloudBees API and experience its functionality firsthand. You’ll write two simple tasks in a script plugin: one for retrieving information on a provisioned application in your CloudBees account, and another one for deploying a WAR file to the cloud.
In step two, you’ll transfer the logic you’ve written in task action closures and encapsulate it into custom task classes. By exposing properties, the behavior of the task classes will become highly configurable and reusable. The property values will be provided by an enhanced task, the consumer of a task class.
In the final step, you’ll learn how to create a full-fledged object plugin. You’ll set up a standalone Groovy project to produce the plugin JAR file.
With the master plan in place, you’ll get started by writing some tasks to interact with the CloudBees client SDK.
8.3. Writing a script plugin
A script plugin is no different from your ordinary build.gradle file. You can use the same Gradle build language constructs. You’ll create a new script named cloudbees.gradle that will contain the future CloudBees tasks. Because the build script’s filename deviates from the default naming convention, you’ll need to use the –b command-line option to invoke it. Executing gradle –b cloudbees.gradle tasks should only present you with the default help tasks. Before you can write the first task, the build script needs to become aware of the CloudBees API client library.
8.3.1. Adding the CloudBees API library
To use an external library directly in a build script, you’ll need to declare it in its classpath. For that purpose, Gradle’s API class org.gradle.api.Project exposes the method buildscript. The method expects a single parameter, a closure that defines the dependencies you want to resolve denoted by the classpath configuration. The CloudBees API client library is conveniently located on Maven Central. You can target that repository by calling the method mavenCentral(). The following listing demonstrates how to add the latest version of the library to the build script’s classpath.
Listing 8.1. Adding the CloudBees API library to the build script’s classpath

Whenever the script is executed for the first time, the CloudBees library is downloaded and put into your local dependency cache. You’ll now be able to import and use any of the CloudBees SDK classes directly in your build script. Next, you’ll write your first task to interact with your CloudBees account.
8.3.2. Using the CloudBees API from tasks
The central class of the CloudBees API is the client implementation: com.cloudbees.api .BeesClient. Each of the exposed methods gives you access to a specific RUN@cloud platform service. Upon instantiation, the class expects you to provide the account credentials as well as the API’s URL, format, and version. Let’s look at an example:
BeesClient client = new BeesClient('https://api.cloudbees.com/api',
                     '24HE9X5DFF743671', '24QSXAHS1LAAVWDFAZS3TUFE6FZHK1DBYA=',
                     'xml', '1.0')
'24HE9X5DFF743671', '24QSXAHS1LAAVWDFAZS3TUFE6FZHK1DBYA=',
'xml', '1.0')
Preparing the client properties
It’s unlikely that you’ll have to change the API parameters in the near future. For now, you’ll define them as extra properties, as shown in the following code block:
ext {
   apiUrl = 'https://api.cloudbees.com/api'
   apiFormat = 'xml'
   apiVersion = '1.0'
}
You don’t want to share the API key and secret or check it into version control. In the last section, you already made an effort to store the values in your local gradle.properties file. Read these values and store them in the properties apiKey and secret:
if(project.hasProperty('cloudbeesApiKey')) {
   ext.apiKey = project.property('cloudbeesApiKey')
}

if(project.hasProperty('cloudbeesApiSecret')) {
   ext.secret = project.property('cloudbeesApiSecret')
}
Retrieving application information
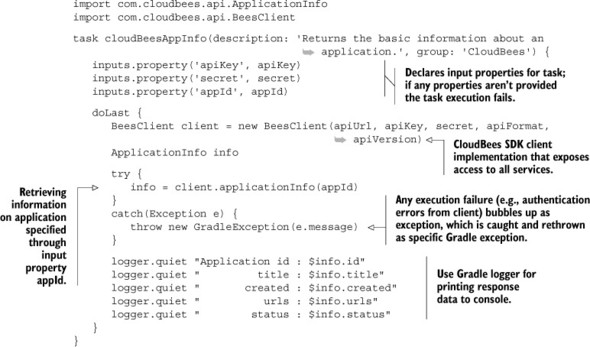
When setting up the CloudBees account, you provisioned an application with the name todo. The CloudBees API can be used to remotely retrieve information about an application without having to log on to the dashboard, as shown in the following listing.
Listing 8.2. Writing a task to list an available application on CloudBees account
Before executing the task, you’ll create another Gradle script file: build.gradle. The following code snippet demonstrates how an external script can be reused:
apply from: 'cloudbees.gradle'
Note that the value of the from property in the apply method call can be any kind of URL, such as an HTTP address like http://my.scripts.com/shared/cloudbees.gradle. Script plugins exposed over HTTP(S) are perfect candidates to be shared among departments in an organization. It’s time to give the task a spin. The following console output shows how to retrieve information on the application with the ID gradle-in-action/todo:
$ gradle -PappId=gradle-in-action/todo cloudBeesAppInfo
:cloudBeesAppInfo
...
Application id : gradle-in-action/todo
         title : todo
       created : Sun Sep 16 10:17:11 EDT 2012
          urls : [todo.gradle-in-action.cloudbees.net]
        status : hibernate
The output gives the application’s title, when it was created, under what URL it can be reached, and its current status. In this example the status is hibernate. Applications on a free plan will be put to sleep if they have been idle for too long to save resources for other applications. Upon the next request, the application will automatically be reactivated. This may take a few seconds. By successfully querying information about the application, you know that it exists under the given ID. Now, you’ll actually deploy a WAR file to it so you can enjoy the fruits of your hard work.
Deploying a WAR file
Listing 8.3 demonstrates that writing a task to deploy a WAR file with the CloudBees client API is very similar to retrieving information on an application. The only difference is that you’ll need to provide other input parameters, like the WAR file itself and an optional message.
Listing 8.3. Writing a task for deploying a WAR file
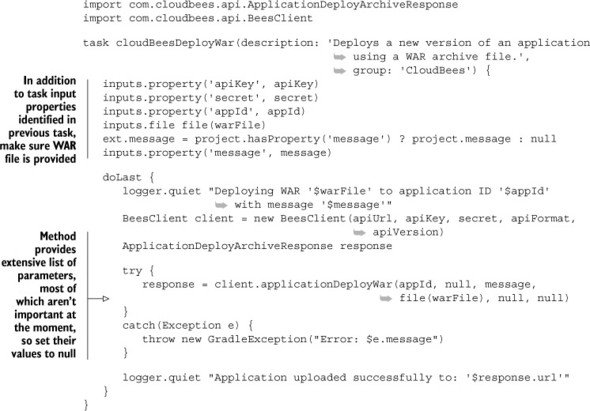
Here we go—the moment of truth. Deploy your To Do application to the cloud:
$ gradle -PappId=gradle-in-action/todo -PwarFile=todo.war
As shown in the console output, the deployment was successful. In the CloudBees application dashboard you should see the newly deployed version, as shown in figure 8.6.
Figure 8.6. Version 0.1 of the To Do application deployed to CloudBees

Of course, you don’t want to miss out on actually trying the application. Open the URL http://todo.gradle-in-action.cloudbees.net/ in the browser. The application is ready to be shown to your customers. You’ve seen how easy it is to write tasks to interact with the CloudBees API. Because you wrote the code in a shared script, you can manage applications from any other project that applies the script. Let’s go a step further and see how to improve your design by turning the simple tasks into custom task classes.
8.4. Writing custom task classes
In the last section, you saw how to create a shared script for interacting with a PaaS provider. By applying a script plugin, you provided your project with tasks for managing and deploying your web application in a cloud environment. Let’s review the pros and cons of this approach.
Pros:
- Tasks are reusable and can be imported by other projects.
- Tasks are configurable. The consuming script only needs to know about the required inputs.
- Up-to-date checks are available through the task’s input and output properties.
Cons:
- The logic of a task is defined through an action closure and therefore cannot be structured into classes and packages.
- The more tasks you add, the longer and less maintainable the build script gets.
- Testability through unit or integration tests is not given.
A simple task is a great solution for developing one-off implementations. Even though you took it to the extreme and provided configurable properties for your tasks, code maintainability and testability fell by the wayside. If you want to go one step further, your best bet is to implement your logic in a custom task. The behavior and properties are defined in a task class implementation. When using the custom task, you define how the task should behave by providing values for the properties. If you see your task code grow, custom tasks can help to structure and encapsulate your build logic.
8.4.1. Custom task implementation options
Gradle conveniently provides a default implementation that you can extend your class from: org.gradle.api.DefaultTask. In fact, many tasks of Gradle’s standard plugins inherit from DefaultTask.
There are multiple options for where your custom task class can be defined. The easiest way is to put it side by side with existing build code in your build script. The custom task gets compiled automatically and put into the classpath when invoking a task of your script.
Another option is to put it under the buildSrc directory in the root directory of your project. Make sure you stick to the source directory convention defined by the language plugin. If you write your custom task in Java, for example, you’ll want to put it under buildSrc/src/main/java. Gradle treats this directory as a default source directory and automatically tries to compile all source files whenever you run your build. Keep in mind that Gradle’s incremental build feature is supported here as well. Custom task classes that live under buildSrc are shared among all build scripts of your project and are automatically available in the classpath.
To make custom tasks transferable among projects, you can package them into a JAR file and declare it in your build script’s classpath. Figure 8.7 shows the various implementation options for custom tasks.
Figure 8.7. Custom task implementation options

8.4.2. Defining a custom task in buildSrc
For now, you’ll go with option 2. You’ll create custom task source files in the buildSrc directory, which is the optimal setup for using them later with an object plugin. All custom task classes will sit in the package com.manning.gia.plugins.cloudbees.tasks .app. The build script in the buildSrc directory declares the dependency on the CloudBees library. The final directory structure of your project will look as follows:

To see an example of how one of these custom task classes looks, you’ll rewrite your simple task for retrieving application information from CloudBees. The code in the next listing should look familiar.
Listing 8.4. Custom task for retrieving application information


The behavior of the task is encapsulated in the task action. To indicate which action to execute, mark the method start() with the annotation @TaskAction. The name of the task execution method can be picked arbitrarily as long as you don’t override the method with signature void execute() from the parent class. The behavior of the task action can be configured through properties—for example, appId for defining the application identifier.
In the custom task implementation you import classes from the CloudBees library. To make sure the classes can be compiled correctly, you’ll create a build script dedicated to your buildSrc project and declare the CloudBees library, as shown in the following listing.
Listing 8.5. Build script in buildSrc directory
repositories {
   mavenCentral()
}

dependencies {
   compile 'com.cloudbees:cloudbees-api-client:1.4.0'
}
Using the custom task
The custom task class can’t be executed by itself. To use and configure the behavior defined by the custom task, you’ll need to create an enhanced task. The enhanced task declares the type of task it uses, in this case CloudBeesAppInfo, as shown in the next listing.
Listing 8.6. Consuming the custom task

Within the task’s closure, assign the application identifier. Parse the value from a project property provided as command parameters. The API options and credentials are defined as extra properties within the build script. Executing the enhanced task will first compile all custom classes in the buildSrc project and then retrieve the application information from CloudBees:

We discussed how to implement and use a single custom task for interacting with the CloudBees backend. The custom task for deploying a WAR file, CloudBeesAppDeployWar, looks similar. You’ll find it in the provided code examples for the book.
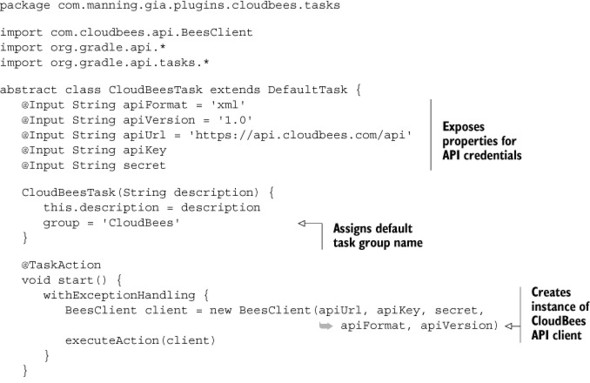
Improving on reusability through refactoring
When you compare both CloudBees custom tasks, you’ll find that both implementations look alike in structure. We can identify the following commonalities:
- Both classes create an instance of the CloudBees API client, BeesClient.
- They need to be provided with the CloudBees API options and credentials.
- You catch an exception when interacting with the CloudBees API and handle it appropriately.
- All CloudBees custom tasks are assigned to the task group CloudBees.
One of the benefits of dealing with actual classes for your task implementation is that you can make good use of principles of object-oriented programming. By creating a parent class, you can significantly simplify the code you have to write for any given CloudBees custom task. The following listing shows that all common characteristics just mentioned became a concern of the parent class.
Listing 8.7. Simplifying CloudBees interaction by introducing a parent task class

You’ll use the parent CloudBees task for one of your custom tasks. Listing 8.8 demonstrates how easy it is to deal with the CloudBees API. The task infrastructure is already set up for you. No more repetitive creation of the API client or handling of exceptions. You can just concentrate on implementing the business logic.
Listing 8.8. Simplified custom task

You already executed this task and know that it works. The more custom tasks you add to your project, the less you’ll feel inclined to manually rerun them each time you change the code to verify that they work. Next, you’ll build confidence in your code by writing tests to be prepared for future refactorings.
Testing a custom task
Gradle’s API provides test fixtures that allow you to test custom tasks and plugins under real working conditions. The idea is to hand you a dummy instance of a Gradle Project that exposes the same methods and properties as the one you use in your build scripts. This Project instance is provided through the method build() of the class org.gradle.testfixtures.ProjectBuilder and can be used in any of your test classes.
You’ll see the ProjectBuilder in action by writing a test for the custom task CloudBeesAppInfo with the help of the Spock framework, as shown in listing 8.9. You’ll start by creating the class CloudBeesAppInfoSpec.groovy in the directory buildSrc/src/test/groovy. As you can see in the listing, you use the same package as the class under test. Whenever you run the build, this class will automatically be compiled and the test cases will be executed.
Listing 8.9. Testing the custom task CloudBeesAppInfo using ProjectBuilder

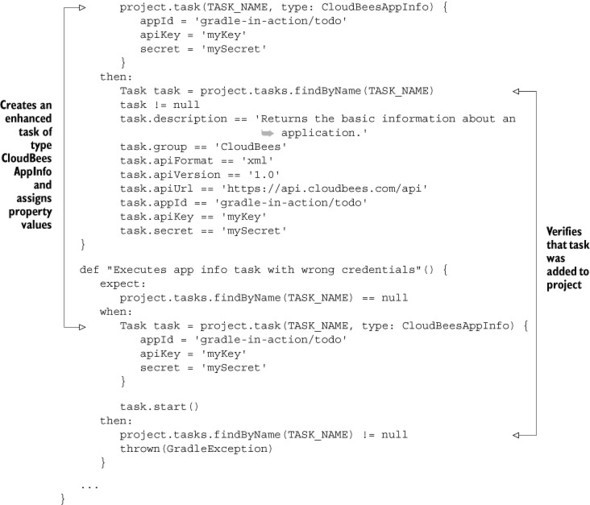
The ProjectBuilder opens new doors to developing your build code with a test-driven approach, though it’s limited in functionality. The Project instance produced by the ProjectBuilder doesn’t behave 100% like the real-world object. Certain behaviors, like the up-to-date checks for input/output annotation or the actual loading of Gradle properties from your home directory, aren’t implemented. In most cases, you can work around these shortcomings by writing additional code in your test class. Deep integration testing with a sophisticated toolkit is one of the items on the roadmap and will be available in a future version of Gradle. In the next section, we’ll discuss how to turn existing code into an object plugin and apply it from a different project.
8.5. Using and building object plugins
Implementing your logic as custom tasks produces a maintainable and testable solution. Bundled as a JAR file, tasks are fully reusable among independent projects. However, there are limitations to this approach. Let’s review the advantages and shortcomings of a packaged custom task implementation:
Pros:
- Custom logic is self-contained in a class and can be configured through enhanced tasks.
- Declarative incremental build support by marking task properties with annotations.
- Custom tasks can be tested through tests.
Cons:
- Custom tasks only expose single units of work. Providing additional boilerplate code, conventions, and lifecycle integration isn’t straightforward.
- A custom task can only be configured through an enhanced task. It’s lacking an expressive extension mechanism through a self-defined DSL.
- Functionality from other plugins can’t easily be used or extended.
Object plugins give you the most flexibility to encapsulate highly complex logic and provide a powerful extension mechanism to customize its behavior within your build script. As with custom task classes, you have full access to Gradle’s public API and your project model. Gradle ships with out-of-the-box plugins, called standard plugins, but can be extended by third-party plugins as well. Many plugins are self-contained. This means that they either rely on Gradle’s core API or deliver functionality through its packaged code. More complex plugins may depend on features from other libraries, tools, or plugins. Figure 8.8 shows how plugins fit into the overall architecture of Gradle.
Figure 8.8. Plugin architecture

In the previous chapters, you used various standard plugins covering support for programming languages and smooth integration with software development tools. Think back to chapter 3 and remember how applying the Java plugin extended your project’s functionality. As shown in figure 8.9, the plugin can provide a new set of tasks integrated into the execution lifecycle, introduce a new project layout with sensible defaults, add properties to customize its behavior, and expose configurations for dependency management.
Figure 8.9. Java plugin features

With the addition of a single line of code, your project was able to compile source code, run unit tests, generate a report, and package the project into a JAR file. All of this functionality came with minimal configuration effort from your side.
Standard plugins provide an impressive set of commonly used functionality. Real-world projects are rarely limited to off-the-shelf functionality. Third-party plugins, contributed by the Gradle community or developed and shared among members of an enterprise, can be used to enhance your build scripts with nonstandard capabilities. You may be used to sophisticated plugin portals that let you search for existing plug-ins, view their documentation, and even rate them. At the time of writing, Gradle doesn’t provide a centralized repository for community plugins. How do you know what’s out there, you may ask? Gradle provides a curated list of available community plugins on a wiki page: http://wiki.gradle.org/display/GRADLE/Plugins. Feels pretty clunky, doesn’t it? Gradleware recognizes the fact that a plugin portal is an important prerequisite for sharing and distributing plugins and has added it as a planned feature to Gradle’s development roadmap. For more information on its timeline, please refer to the roadmap’s dashboard (http://www.gradle.org/roadmap).
In this section, we’ll revisit how to use standard and third-party plugins in your build script. Next, we’ll study a plugin’s internals to get a deep understanding of its building blocks and mechanics. Finally, you’ll apply your knowledge by writing your own object plugin with all the bells and whistles.
8.5.1. Applying object plugins
Let’s revisit how to use an object plugin in a project. You’ve seen that a project can be configured to use a standard plugin by using the apply method. I explicitly use the word method here to underline that you’re calling the method apply on the API representation of a Gradle project, an instance of class org.gradle.api.Project. The method defines one parameter of type java.util.Map called options. The specific option you want to use here is plugin. A plugin can be applied to a build script by using its name or type.
Applying a plugin by name
The identifier of the plugin, the short name, is provided through the plugin meta-information. To apply the Java plugin to a project, pass in the key plugin with a value of java:
apply plugin: 'java'
Applying a plugin by type
Alternatively, you can use the class name of the plugin implementation. This is useful if the plugin doesn’t expose a name or if there’s a naming conflict between two different plugins. Applying a plugin by type makes it explicit but feels a bit more cumbersome:
apply plugin: org.gradle.api.plugins.JavaPlugin
A convenient side effect of using standard plugins is that they’re part of Gradle’s runtime. In most cases, the user doesn’t have to know about the libraries or the versions the plugin depends on. The Gradle distribution makes sure that all standard plugins are compatible. If you’re curious where to find these libraries, look at the directory lib/plugins of your Gradle installation.
Applying an external plugin
A build script doesn’t know about an external plugin until you add it to its classpath. You can do this by using the buildscript method that defines the location of the plugin, the repository, and the plugin dependency. The order in which the buildscript and apply methods are declared is irrelevant. During the configuration phase, Gradle will build the model of your project and connect the dots between the plugin and the build logic. An external plugin is treated like every other dependency in Gradle. Once it’s downloaded and put into the local dependency cache, it’s available for subsequent runs of the build. The following listing shows how to apply the external plugin tomcat for deploying web applications to an embedded Tomcat container.
Listing 8.10. Applying the tomcat plugin available on Maven Central
buildscript {
   repositories {
      mavenCentral()
   }

   dependencies {
      classpath 'org.gradle.api.plugins:gradle-tomcat-plugin:0.9.7'
   }
}
apply plugin: 'tomcat'
Applying an external plugin is surprisingly easy. The build script only needs to define the plugin dependency and its originating repository. In the following section, we’ll dissect the internals of a plugin to get a better understanding of its anatomy.
8.5.2. Anatomy of an object plugin
Figure 8.10 shows a high-level overview of the options you have when implementing an object plugin.
Figure 8.10. Implementation options for object plugins

There are four basic elements that are important for implementing an object plugin:
- Gradle gives you full flexibility over the location in which to place your plugin implementation. The code can live in the build script or the buildSrc directory, or it can be developed as a standalone project and in turn distributed as a JAR file.
- Every plugin needs to provide an implementation class, which represents the plugin’s entry point. Plugins can be written in any JVM language that compiles down to bytecode. I prefer Groovy because you can benefit from its dynamic language features and conciseness. However, you can also use Java or Scala to implement your build logic.
- A plugin applied to a project can be customized through its exposed extension objects. This is especially useful if the user wants to override the plugin’s default configuration from the consuming build script.
- The plugin descriptor is a property file containing meta-information about the plugin. Usually it contains a mapping between the plugin’s short name and the plugin implementation class.
Enough theory—it’s time to start building an object plugin. The plugin you’re about to create is going to use the custom tasks you implemented before.
8.5.3. Writing an object plugin
The minimal requirement for writing a plugin is to provide an implementation of the interface org.gradle.api.Plugin<Project>. The interface only defines a single method: apply(Project).
You’ll start by creating the plugin implementation class in the buildSrc project under the package com.manning.gia.plugins.cloudbees. This has several advantages. In the early phases of developing a plugin, you’ll want to have a quick feedback loop. Because you don’t have to package your plugin code, you can fully concentrate on implementing business logic while having full access to Gradle’s API. To represent the intent of the plugin, name the class CloudBeesPlugin, as shown in the following listing.
Listing 8.11. Implementing the plugin interface


As shown in the listing, you integrated your custom tasks and preconfigured them with default values. You didn’t stop there. Your plugin makes certain assumptions about the nature of the project that consumes the plugin. For example, you automatically apply the War plugin and use the produced artifact as input for the enhanced task cloudBeesAppDeployWar.
As a plugin developer, you often walk the fine line between capabilities and conventions provided by a plugin. On the one hand, you may want to enhance another project’s functionality; for example, through tasks. On the other hand, you may want to introduce conventions that make meaningful decisions for the user; for example, standardized project layouts. If the conventions impose a strong, opinionated view on the structure of the consuming project, it makes sense to separate basic functionality from conventions by creating two different plugins: a base plugin that contains the capabilities, and another one that applies the base plugin and preconfigures these capabilities by convention. This approach was taken by the Java plugin, which derives from the Java base plugin. For more information on their characteristics, please see appendix B or the online documentation.
You’ll apply the plugin to your project. To do so, use the plugin implementation type in build.gradle, as shown in the following code snippet:
apply plugin: com.manning.gia.plugins.cloudbees.CloudBeesPlugin
To verify that the task has been created, run gradle tasks. You should see the task named cloudBeesAppDeployWar listed. Currently, you’re retrieving the inputs for your custom tasks from the command line. You can improve on this design by obtaining this configuration from the consuming build script.
8.5.4. Plugin extension mechanism
Parsing command-line parameters to feed your tasks with inputs may not always be desirable. You can establish your own build language by exposing a DSL with its own unique namespace. Let’s look at the following listing. The code shows a closure named cloudBees that allows for setting values for properties you need as required input values for tasks from the consuming build script.
Listing 8.12. Providing a plugin DSL for capturing user input
cloudBees {
   apiUrl = 'https://api.cloudbees.com/api'
   apiKey = project.apiKey
   secret = project.secret
   appId = 'gradle-in-action/todo'
}
Gradle models these language constructs as extensions. An extension can be added to many Gradle objects like the Project or a Task, as long as they’re extension-aware. An object is considered to be extension-aware if it implements the interface org.gradle.api.plugins.ExtensionAware. Every extension needs to be backed by a model that captures the values provided in the user’s build script. The model can be a simple plain old Java or Groovy Bean. The next listing shows the extension model for the CloudBees plugin that you create in the package as your object plugin implementation.
Listing 8.13. Plugin extension POGO
package com.manning.gia.plugins.cloudbees

class CloudBeesPluginExtension {
   String apiUrl
   String apiKey
   String secret
   String appId
}
As shown in listing 8.12, you need to extend the backing Project of the build script that applied the CloudBees plugin. Extension-aware objects expose the method extensions() that returns a container for registering extension models with a name. The implementing interface of this container is org.gradle.api.plugins.Extension-Container. New extensions are registered through the method create. That method takes in a name and the model type as parameters. Once an extension is registered, you can query for the model values and assign them to custom task properties.
Extensions are used to extend the DSL of an object that is extension-aware. A registered extension model can expose properties and methods that can be used to establish new build language constructs for your build script. The typical use case for an extension is a plugin. Extra properties, on the other hand, are simple variables that can be created through the ext namespace. They’re meant to be used in the user space, the build script. Try to avoid using them in your plugin implementations.
Using extension values for feeding input properties of custom tasks can be a bit tricky. Remember that custom task properties are set during the configuration phase of the build lifecycle. At that point of time extension, values haven’t been populated. You can solve the problem of evaluation order by using the concept of convention mapping. The following listing demonstrates how to register and use your extension of type CloudBeesPluginExtension within the plugin implementation class.
Listing 8.14. Registering and using an extension

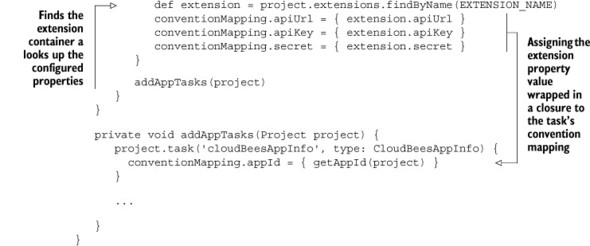
Every task of your plugin has a property named conventionMapping. To be more specific, every task derived from DefaultTask owns this property. You use this property to assign the extension model values to a task’s input or output fields. By wrapping the extension model value into a closure, you lazily set these values. This means that the value is only calculated when the task is executed. To retrieve the values of a property stored in convention mapping, you’ll need to explicitly use getter methods, as shown in the next listing. Keep in mind that trying to access a field directly will result in a null value.
Listing 8.15. Using properties set by convention mapping

Convention mapping is a powerful concept used by many Gradle core plugins to ensure that extension properties are evaluated at runtime. Even though the convention-Mapping property isn’t part of the public Task API, it’s your best bet to set a task’s input/output property values in combination with extensions.
There are other approaches to dealing with these kinds of situations, each with their own advantages and drawbacks. Usually, they’re highly dependent on your use case and the language you use to implement your plugin. Among them are lazy GStrings, Project#afterEvaluate, and more. This topic is heavily discussed on the Gradle online forum.
Next, you’ll equip your plugin with a more descriptive name.
8.5.5. Assigning a meaningful plugin name
By default, the name of a plugin is derived from the fully qualified class name that implements the interface org.gradle.api.Plugin. Even though the namespace is less susceptible to naming clashes with other plugins, it would be handy to be able to pick a shorter, more expressive plugin name.
For object plugins, you can provide this information in a property file located under META-INF/gradle-plugins. The name of the property file automatically determines the plugin name. For example, the file META-INF/gradle-plugins/cloudbees.properties exposes your plugin with the name cloudbees. Within the file, assign the fully qualified class name to the key implementation-class, as shown in the following listing.
Listing 8.16. Assigning a short identifier for plugin
implementation-class=com.manning.gia.plugins.cloudbees.CloudBeesPlugin
The next listing demonstrates how to apply the plugin with its short identifier in your build script.
Listing 8.17. Using the plugin short identifier
apply plugin: 'cloudbees'
From now on, you’ll only use the short identifier when you want to apply the CloudBees plugin. A plugin can be tested on the level of the implementation class as well. Next, you’ll bring your code coverage to 100% by writing a Spock test class for CloudBeesPlugin.groovy.
8.5.6. Testing an object plugin
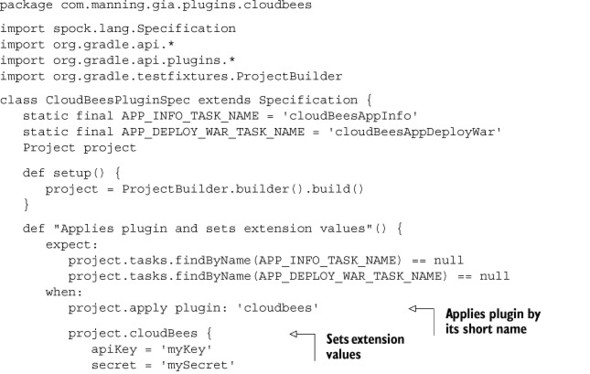
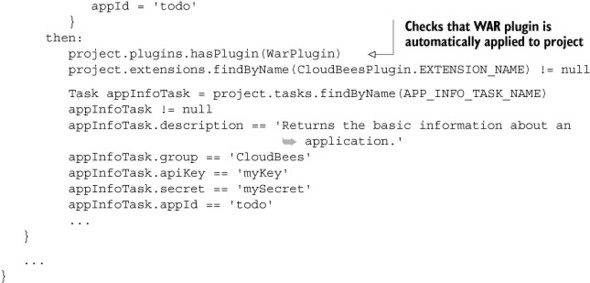
Testing your plugin code is as easy as testing custom tasks. The Project instance produced by ProjectBuilder provides the perfect setup for verifying your plugin’s functionality. In the following listing, you apply the plugin, set the extension values, and test for the correct behavior of the created tasks.
Listing 8.18. Writing a test for the plugin implementation class
As the next step, you’ll set up a standalone project for the plugin so you can build a JAR distribution that can be shared among independent projects.
8.5.7. Developing and consuming a standalone object plugin
Implementing a plugin in the buildSrc project is convenient if the code is supposed to be used from the build scripts of the main build; for example, in a multiproject build scenario. If you want to share a plugin across builds, you’ll need to develop it as a standalone project and publish the produced artifact to a repository.
Project and repository setup
In this section, you’ll move the existing plugin code to an independent project. Each time you want to release a new version of the plugin, the produced JAR file will be published to a local Maven repository named repo. The repository will live on the same directory level as the plugin project. The To Do web application will act as a plugin consumer. Its build script will define the local repository, declare the plugin as a dependency, and use the plugin tasks to interact with the CloudBees backend services. The following directory tree shows the final setup:

You’ll start by creating a new project for the plugin with the directory named plugin. You’ll copy the existing structure from the buildSrc directory to the new project. The todo project is a one-to-one copy from your existing To Do application multiproject build. You won’t need to create the directory for the local repository—it’s automatically generated at publishing time.
Building the plugin project
Writing the build code for the plugin is straightforward. The project doesn’t have access to the buildSrc infrastructure anymore, so you’ll need to declare dependencies on the Groovy and Gradle API libraries. Generating the POM for the plugin and publishing the artifacts to a Maven repository can be easily achieved with the Maven plugin. You’ll configure the Maven deployer to upload both files to a local directory. To clearly identify the artifact, assign a value to the plugin’s group, name, and version. The following listing shows the full plugin build script.
Listing 8.19. Build script of standalone plugin project

Before the plugin can be consumed by the To Do web application, you’ll upload it with the help of a task from the Maven plugin called uploadArchives. Executing the task should produce a similar output to the following:
$ gradle uploadArchives :compileJava UP-TO-DATE :compileGroovy :processResources :classes :jar :uploadArchives Uploading: com/manning/gia/cloudbees-plugin/1.0/cloudbees-plugin-
After publishing the artifact, you’ll find a new directory named repo. It contains the plugin’s JAR and POM files and is ready for consumption. In chapter 14, we’ll discuss the Maven plugin in more detail, as well as how to publish artifacts to publicly available repositories.
Using a Maven repository is the most convenient way of preparing an object plugin for consumption. The artifact automatically knows its own dependencies, which are declared in the POM file. Alternatively, the consuming project can also refer to the JAR file directly by declaring a file dependency. If you go with that option, you’ll need to handle the plugin’s transitive dependencies yourself.
Using the plugin from a project
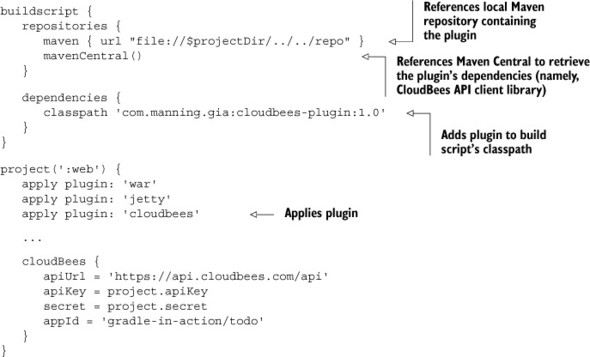
It’s time to use the plugin in your web project. The next listing demonstrates how easy it is to let your build script depend on the plugin, available in the local Maven repository.
Listing 8.20. Using the object plugin from the web project
That’s it—you’ve gotten to know all the important development practices that optimally prepare you for writing your own Gradle plugins.
8.6. Summary
Gradle provides a rich plugin ecosystem for reusing functionality through out-of-the-box standard plugins and third-party plugins contributed by the community. There are two types of plugins: script plugins and object plugins.
A script plugin is a regular Gradle build script with full access to Gradle’s API. Writing a script plugin is very easy, lowers the bar for sharing code, and can be applied to another project by a URL.
Object plugins usually contain more complex logic that requires appropriate structuring into packages and classes. The entry point of every object plugin is the interface Plugin that provides direct access to Gradle’s Project model. Many object plugins that can be shared among independent projects are packaged as JAR files, published to a repository, and consumed by adding them to the build script’s classpath.
In this chapter, you built a Gradle plugin for interacting with the CloudBees backend through an API library. For this purpose, we discussed two useful functionalities: deploying a WAR file to a CloudBees web container and retrieving runtime information about this application. You implemented the plugin’s functionality build step by step. You wrote simple tasks in a script plugin, translated these tasks into custom tasks located in the buildSrc project, and later turned this code into a full-fledged object plugin.
A plugin can expose its own DSL for configuring functionality. Extensions are powerful API elements for introducing the concept of convention over configuration into your plugin. You experienced a typical scenario by registering an extension that serves as a model for capturing user input for overriding default configuration values. Writing test code for your plugin is as important as writing it for application code. Gradle’s ProjectBuilder allows for creating a Project dummy representation that can be used to test custom components. Having tools like this removes impediments to writing tests for build code and encourages developers to aim for high code coverage.
The next chapter will be particularly helpful for users who have existing build infrastructure developed with Ant or Maven and who plan to migrate to Gradle. We’ll also talk about upgrading Gradle versions in your project and how to verify its success by comparing the outcomes of the builds before and after the migration.