
Chapter 11. Building polyglot projects
This chapter covers
- Managing JavaScript with Gradle
- Building a Gradle project with Java, Groovy, and Scala
- Exploring plugin support for other languages
In recent years, the interest in polyglot programming and its application in real-world, mission-critical software stacks has skyrocketed. The term polyglot programming was coined to describe projects that incorporate more than one language. That’s particularly true for the Java world. For web developers, the world can no longer do without a potpourri of JavaScript, corresponding frameworks, libraries, and CSS. Backend code or desktop applications are no longer built with Java alone. Other JVM-based languages like Groovy or Scala are added to the mix. It’s all about picking the right tool for the job. In this chapter, we’ll discuss how Gradle faces the challenge of organizing and building polyglot projects by using your To Do application as an example.
As Java developers, we’re spoiled by extensive tooling and build automation support. Concepts like build-time dependency management of external libraries and convention over configuration for project layouts have been around for years and are part of our day-to-day vocabulary. In JavaScript land, commonly accepted patterns and techniques for build automation are in their early stages of development. Gradle doesn’t provide first-class support for JavaScript and CSS, but we’ll discuss how to use its API to implement typical usage scenarios, like combining and minifying JavaScript files.
In past chapters, we mainly concentrated on building Java projects. Software stacks that incorporate a wide range of languages are a reality for many organizations. JVM-based languages are well supported by Gradle. We’ll drill into the details of using the core language plugins for building Java, Groovy, and Scala code. Along the way, we’ll touch on topics like compiler daemons and joint compilation.
In addition, many enterprises have to integrate with software written in non-JVM languages like C or C++. This chapter will give an overview of how to incorporate heterogeneous software infrastructure into a build. Let’s start by looking at build automation for modern web architectures.
11.1. Managing JavaScript with Gradle
A rich user experience has become the key to success for any application. This holds true for desktop, mobile, and web applications. Today, users demand the same look and feel for web applications as they do for native applications. Long gone are the days when customers were happy with static HTML pages and synchronous server roundtrips.
JavaScript has become the most popular programming language for the web that can meet this demand. Developers no longer have to depend on plain JavaScript to implement their features. Many application development frameworks and libraries (like jQuery, Prototype, and Backbone, to name just a few) are available to simplify the use of JavaScript development and to smooth the rough edges this language introduces.
JavaScript has moved far beyond client-side runtime environments. Platforms like Node.js (http://nodejs.org/) use JavaScript for implementing server-side applications as well. As a result, JavaScript is ubiquitous and grows in relevance.
11.1.1. Typical tasks when dealing with JavaScript
When dealing with JavaScript, various tasks come to mind that may be part of your workflow. In fact, some of them should sound familiar, because we discussed them in the context of your Java web application:
- Minification: JavaScript is often included in an HTML page as an external file. This means it has to be downloaded to the browser before it can be used to render the page. The smaller the byte footprint of such a file, the faster the page can be loaded. Minification aims to decrease the size of an original JavaScript file by applying smart optimizations such as removing comments, spaces, and tabs. One tool that helps you minify your JavaScript files is the Google Closure compiler (https://developers.google.com/closure/compiler/).
- Merging: The size of a JavaScript file isn’t the only factor playing a role in the loading performance of a page. Another problem is the number of HTTP requests needed for each JavaScript file included in your page. The more external JavaScript files requested, the longer the user has to wait until the page is rendered. Combining multiple JavaScript files into one can solve this problem.
- Testing: Similar to writing test code for server-side code, you also want to be able to verify the correct behavior of your JavaScript implementation. Testing frameworks like Jasmine (http://pivotal.github.io/jasmine/) let you write test code in JavaScript.
- Code analysis : JavaScript source code can be analyzed to find potential bugs and problems, structural issues, and abnormal style conventions. JSLint (http://www.jslint.com/lint.html), a program written in JavaScript, aims to spot these problems in an automated fashion.
- Transpiling: Some client-side programming languages like CoffeeScript or Dart provide their own syntax and language constructs. Unfortunately, these kinds of languages do not run in a browser. Transpiling, a specific kind of compilation, translates this source code into JavaScript to make it executable in the target environment.
If you try to incorporate all of these tasks in your To Do project without proper automation, there are many manual and repetitive steps that need to be performed before you can assemble the WAR file. For the same reasons laid out in chapter 1, you’ll want to avoid this situation under all circumstances. In this chapter, we won’t cover solutions to all tasks presented, but you’ll learn how to generally automate them with Gradle.
11.1.2. Using JavaScript in the To Do application
Let’s assume you start to modernize your To Do application. Instead of submitting the data to the server for each operation and rerendering the page, you change the functionality to exchange data via asynchronous JavaScript calls (AJAX) in the background. If the HTML user interface needs to be updated, you directly modify the document object model (DOM). As a result, the To Do application will behave similar to a desktop application with no page reload required.
To simplify the use of JavaScript, your application will use an external JavaScript library. Out of the many available libraries, pick JQuery (http://jquery.com/), an established, feature-rich, easy-to-use API for handling AJAX calls and manipulating the HTML DOM.
With the help of JQuery, you’ll implement updating the name of an existing To Do item in your list. This functionality requires two actions. Double-clicking the item’s name will bring the item name into edit mode by offering an input field to change its value. Pressing the Enter key while in editing mode will send the modified item name to the server, update the value in the data store, and exit the edit mode. These actions are implemented in the JavaScript files edit-action.js and update-action.js. We won’t discuss the content of these files here. Feel free to check out their implementation in the book’s source code examples. The following directory structure shows both JavaScript files, as well as the minified JQuery library in your web project:

Now, you could just download the JQuery library manually and put it into the directory src/main/webapp/js/ext. Many projects do that. Remember when we talked about dependency management for external Java libraries in chapter 5? You can apply the same concept for automatically resolving and downloading JavaScript files. Let’s see how this can be done.
11.1.3. Dependency management for JavaScript libraries
Historically, JavaScript developers didn’t bother with the concept of dependency management. We used to throw in external libraries with our application sources. As our code base grew, we had no way of knowing what JavaScript dependencies the project required and with what version. If we were lucky, the filename of the JavaScript library would indicate that.
If you exclusively work with JavaScript, this problem can be tackled by using the node package manager (NPM). Dependencies between JavaScript files can be modeled by using RequireJS (http://requirejs.org/). But what if you want to use JavaScript dependency management from Gradle? No problem; you can just use the standard Gradle dependency declaration and resolution mechanism.
There are some challenges we face with this approach, though. As JVM developers, we’re used to having access to all possible libraries we’d ever want to use. We pointed our build script to Maven Central and that was that. For JavaScript libraries, there’s no established hosting infrastructure. One of the hosting providers with a reasonable collection of popular, open source JavaScript libraries is Google Hosted Libraries (https://developers.google.com/speed/libraries/). Alternatively, you can directly use the hosted versions of a specific library if the project provides them.
On top of an insufficient JavaScript hosting infrastructure, you can’t depend on a unified descriptor format for libraries, similar to the pom.xml file for Maven repositories. This means that transitive JavaScript libraries, CSS, and even required images need to be declared explicitly.
Let’s look at how to retrieve the minified version of the library from JQuery’s download page. You’ll see a familiar pattern here. First, you define a custom configuration, and then you declare the library with the specific version in the dependencies configuration block. For downloading the library to your source code directory, create a new task of type Copy that uses your custom configuration. The following listing demonstrates how to wire this task up with other important tasks of your project to ensure that you fetch the JavaScript before running the application in Jetty or assembling the WAR file.
Listing 11.1. Using dependency management for consuming JavaScript libraries

Give the task a shot. You’ll run it from the root directory of your Gradle project:
$ gradle :web:fetchExternalJs
:web:fetchExternalJs
Download http://code.jquery.com/jquery-1.10.0.min.js
As expected, the JavaScript library is downloaded and ends up in the specified directory src/main/webapp/js/ext. You can now directly link to this library in your JSPs and HTML files. After its initial download, the task fetchExternalJs automatically knows that it doesn’t have to run again:
$ gradle :web:fetchExternalJs
:web:fetchExternalJs UP-TO-DATE
Your application source directory now contains all required JavaScript files. Feel free to check out the working application by running gradle :web:jettyRun. You’ll see that the application is fully functional.
You may ask yourself why the downloaded JavaScript file was put directly in your project’s source tree. Good point! Usually, you don’t want to mix versioned files with downloaded dependencies. This was done to support in-place web application deployment with the Jetty plugin using the jettyRun task. Unfortunately, the plugin doesn’t allow pointing to a secondary web application directory. Therefore, the jQuery JavaScript file needs to sit in the target web application location. There are ways to deal with this shortcoming. For example, you could exclude the file from versioning (please consult your VCS documentation).
You laid the groundwork for implementing additional automation tasks for your JavaScript code. In the next two sections, we’ll talk about how to build your own JavaScript automation with the help of standard Gradle tooling. In particular, we’ll look at how to implement minification and how to generate code quality metrics.
11.1.4. Merging and minifying JavaScript using a third-party Ant task
There are two essential optimizations every large JavaScript project needs to embrace: merging multiple JavaScript files into one and minifying its content. A tool that provides support for both of these tasks is the Google Closure Compiler (https://developers.google.com/closure/compiler/). One of its distributions is a Java library that can be directly included in a Gradle build, as shown in the following listing.
Listing 11.2. Declaring dependency on Google Closure Compiler library
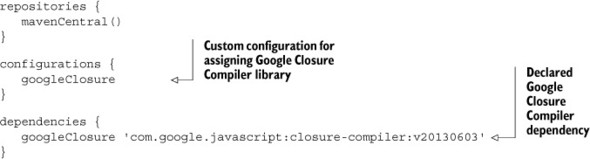
Apart from the plain Java API classes, this library includes an Ant task wrapping the provided functionality. It’s a matter of personal taste which of these approaches you use in your Gradle build—both of them work. For further examples, you’ll use the Ant task because it conveniently wraps the API. The next listing demonstrates a custom task written in Groovy that you’ll put into the directory buildSrc/src/main/groovy of your project. If you need a quick refresher on how to use an Ant task from Gradle, cross-reference chapter 9.
Listing 11.3. Calling Google Closure Compiler Ant task

For the custom task to function, an enhanced task of type GoogleClosureMinifier needs to set a list of input JavaScript files and the target output file, which will contain the combined and minified JavaScript code. The following listing uses the project’s fileTree method to derive the list of your application’s JavaScript files as input. The output file is defined as all-min.js and is created in the directory build/js.
Listing 11.4. Using custom task for minifying JavaScript

Executing the task minifyJs will first compile your minification custom task under buildSrc, and then produce a single, optimized JavaScript file:
$ gradle :web:minifyJs
:buildSrc:compileJava UP-TO-DATE
:buildSrc:compileGroovy
:buildSrc:processResources UP-TO-DATE
:buildSrc:classes
:buildSrc:jar
:buildSrc:assemble
:buildSrc:compileTestJava UP-TO-DATE
:buildSrc:compileTestGroovy UP-TO-DATE
:buildSrc:processTestResources UP-TO-DATE
:buildSrc:testClasses UP-TO-DATE
:buildSrc:test
:buildSrc:check
:buildSrc:build
:web:minifyJs
Being able to create an optimized JavaScript file is great, but now you have to change the references in your dynamic and static web page files. Of course, this process should be fully automated and integrated in your development process. In the next section, we’ll discuss one way to implement this.
11.1.5. JavaScript optimization as part of the development workflow
In production environments performance is key. That’s why many organizations choose to deploy optimized JavaScript files. The downside is that single-line, optimized JavaScript files are hard to read and not very useful for debugging or even diagnosing an issue. Therefore, you don’t want to package and run your application with only minified files. During development or in testing environments, you still want to use plain old JavaScript files. Obviously, at build time you need to be able to control whether your application JavaScript files need to be optimized and used.
There are many approaches to tackle this problem. Here, we’ll only discuss one of them. For your project, we’ll discuss a new project property named jsOptimized. If it’s provided on the command line, you indicate that optimizations should happen. If it’s not provided, use the original JavaScript files. Here’s an example of how to use it: gradle :web:war –PjsOptimize.
Gradle is flexible enough to support this requirement. Based on this optimization flag, you can configure your war task to trigger the minification, exclude the original JavaScript files, include the produced minified file, and change the JSP file to reference it. The following listing shows how to make this happen for your To Do application.
Listing 11.5. Conditional packaging and use of optimized JavaScript files
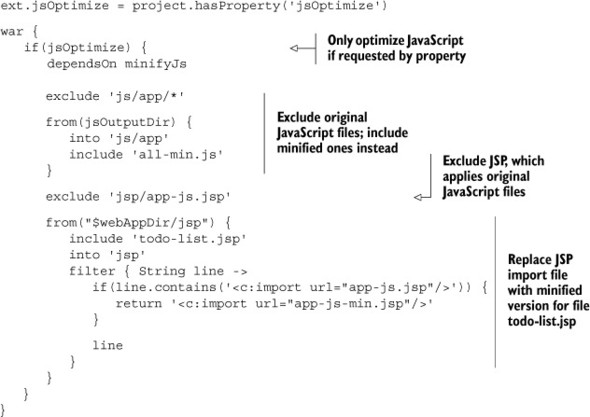
The trickiest part of this configuration is the replacement of the JavaScript import in the JSP file todo-list.jsp. To make life easier, you created two new JSP files that reference either the original JavaScript files or the minified file. At build time, you only need to replace the JSTL import statement if you decide to go with the optimized version. Keep in mind that the original source file isn’t touched. The file is changed on the fly when building up the WAR file.
This example covers one of the most common use cases for JavaScript developers. Let’s also look at introspecting JavaScript source files for code quality purposes.
11.1.6. JavaScript code analysis using an external Java library
Detecting issues and potential problems before the code gets deployed to production should be of concern to every JavaScript developer. JSHint is a popular tool written in JavaScript for detecting errors and potential issues in JavaScript code. To run JSHint, you’ll need to be able to execute it from Gradle. So how do you execute JavaScript from Gradle?
Rhino is an open source implementation of JavaScript written in Java. With the help of this library, you can run JavaScript files and therefore use JSHint in your build. In the next listing, you’ll retrieve Rhino from Maven Central and the JSHint JavaScript file from a hosted download URL.
Listing 11.6. Declaring Rhino and JSHint dependencies

You declared Rhino as a dependency—now let’s see it in action. Instead of using an Ant task, invoke the main method by assigning it to an enhanced Gradle task of type JavaExec. JSHint requires you to define a list of JavaScript files as arguments that it should examine. Under the hood, a Java invocation of Rhino for your application looks as follows:
java -jar rhino-1.7RC4.jar jshint-rhino-2.1.4.js edit-action.js update-action.js
The following listing demonstrates how to build this argument list and write the enhanced task for invoking the Rhino main class.
Listing 11.7. Executing the JSHint JavaScript with Rhino from Gradle

Executing the task for your fully functional application doesn’t report any issues:
$ gradle jsHint
:web:jsHint
However, try emulating a bug in your JavaScript by removing a semicolon at the end of a line in the file edit-action.js. You can see that JSHint rightfully complains about it and fails the build:
$ gradle :web:jsHint :web:jsHint Missing semicolon. (/Users/Ben/gradle-in-action/code/chapter11/todo-
11.1.7. Using a third-party Gradle JavaScript plugin
We saw that it’s really easy to incorporate third-party libraries to create sufficient tooling for JavaScript in your Gradle build. This can be accomplished by reusing Ant tasks, by executing Java applications with the help of the task type JavaExec, or even by calling external shell scripts. All it takes is a little bit of research and the eagerness to find the best tool for the job.
We all know that good developers are lazy—lazy because they hate doing monotonous and repetitive tasks. Most developers prefer to reuse existing functionality. There’s a community Gradle plugin that provides most of the functionality you’ve implemented and even more (for example, generating API documentation with JSDoc). Enter the Gradle JavaScript plugin (https://github.com/eriwen/gradle-js-plugin). The plugin is a good starting point for every project that incorporates JavaScript and doesn’t require you to implement your own tasks.
In this section, we’ll discuss how to use the plugin and its exposed DSL to optimize your JavaScript—that is, by combining and minifying it. First, pull in the plugin from Maven Central and apply it to your web project, as shown in the next listing.
Listing 11.8. Adding the JavaScript plugin to the build script’s classpath
buildscript {
   repositories {
      mavenCentral()
   }
   dependencies {
      classpath 'com.eriwen:gradle-js-plugin:1.5.1'
   }
}
apply plugin: com.eriwen.gradle.js.JsPlugin
The plugin describes JavaScript source directories with a dedicated name. This named JavaScript source set can then be used as input for one of the tasks the plugin defines. The following listing shows the JavaScript DSL in more detail. This code should look similar to what you’ve built so far, but is more readable and easier to understand.
Listing 11.9. Configuring the JavaScript plugin

The task usage is very similar to what you’ve experienced so far. To run minification on your files, execute the task minifyJs. This task first calls the combineJs task to merge your application JavaScript files before shrinking their size.
Requirements for optimizing CSS are in many cases no different from JavaScript. Similar tasks can be implemented to combine and minify CSS, except with other tools. For a quick start, check out the Gradle CSS plugin: https://github.com/eriwen/gradle-css-plugin.
Great, there’s third-party plugin support for JavaScript in Gradle. But what if your frontend team already implemented build automation that doesn’t use Gradle? Do you need to rewrite all their existing logic? Thankfully, you don’t. You can directly invoke other build automation tools from Gradle. Let’s examine this by the example of Grunt.
11.1.8. Executing Grunt from Gradle
If you’re deeply involved in the JavaScript community, you may know the build tool Grunt (http://gruntjs.com/). Grunt is targeted toward implementing common tasks like minifying, merging, and testing of JavaScript code in an automated fashion. With its plugin system and rapidly growing community, you’ll need to take into consideration existing JavaScript automation workflows.
To get started with Grunt, you first need to install the executable via NPM, the Node.js package manager. Please check the Grunt documentation for detailed information on how to install it. Based on your operating system, you’ll either end up with a batch script named grunt.cmd (Windows) or a shell script named grunt (*nix). This executable is used to evaluate and run a Grunt build. A Grunt build requires two mandatory files: the file Gruntfile.js defines the tasks and their configuration, and the file package.json defines the project metadata and required external dependencies (for example, plugins).
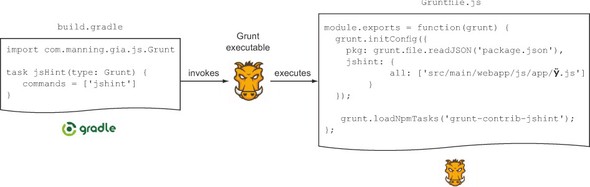
In this section, we’ll discuss how to call Grunt tasks from Gradle. This is a valuable approach for two reasons: either you already have an automation process in place and don’t want to rewrite this code in Gradle, or you want to drive build automation from a single tool that allows you to cover the full application stack. Figure 11.1 illustrates how executing the Grunt executable looks in practice.
Figure 11.1. Invoking the Grunt executable from Gradle
Let’s see this setup in action. Grunt doesn’t automatically install dependencies defined in package.json. If a user forgets about this step, the Grunt build will fail. To install these dependencies, navigate to the directory that contains the file and run the NPM with the command npm install. The NPM installs dependencies to the directory node_modules.
Of course, we, as automation specialists, want to make this happen automatically. Before running a Grunt task from Gradle, run the Node install command. The following listing demonstrates how to wrap this call with a Gradle task.
Listing 11.10. Task that installs Grunt dependencies via npm

If you take a closer look at figure 11.1, you’ll notice a task of type Grunt. Listing 11.11 shows the Groovy task Grunt, a class defined under buildSrc/src/main/groovy, which acts as a simple wrapper for invoking the Grunt executable. All you need to provide to the enhanced task are the commands (the Grunt tasks) defined in the Grunt build file.
Listing 11.11. Custom task for calling Grunt executable

Let’s assume you have an existing Grunt build that applies the JSHint plugin. The JSHint task is named jshint. To invoke this Grunt task, you create a new task of type Grunt and provide the Grunt task name as the command, as shown in the next listing.
Listing 11.12. Enhanced task executing the Grunt JSHint plugin

Run the task jsHint on your To Do application. The following command-line output shows the output from Grunt discovering an erroneous JavaScript file that’s missing a semicolon:
$ gradle :web:jsHint :buildSrc:compileJava UP-TO-DATE :buildSrc:compileGroovy ... :buildSrc:build :web:installGruntDependencies npm WARN package.json [email protected] No README.md file found! npm http GET https://registry.npmjs.org/grunt ... [email protected] node_modules/grunt ├── [email protected] ├── ... ... [email protected] node_modules/grunt-contrib-jshint └── [email protected] ([email protected], [email protected], [email protected],
After this extensive discussion about JavaScript integration with Gradle, we’ll look at Gradle support for JVM languages other than Java.
11.2. Building polyglot, JVM-based projects
The days when Java was the one and only language used for writing applications are over. Today, when we think about Java, we also refer to it as a mature development platform: the Java Virtual Machine (JVM). There’s a wide range of languages running on the JVM that are suitable for enterprise or server-side development. Among them are popular languages likes Groovy, Scala, Clojure, and JRuby. Why would you even want to use a different language than Java or mix them within a single project? Again, it’s all about the right tool for the job. You may prefer Java for its statically typed nature and library support to implement your business logic. However, Java’s syntax isn’t a natural fit for producing DSLs. This is where other, more suitable languages like Groovy come into play.
So far, we’ve discussed how to build Java applications, but there’s more to Gradle. It has first-class support for other JVM languages. In this section, we’ll look at how to organize and build Groovy and Scala projects and how to bring them all under one umbrella within a single project. Before we dive into the details, let’s take a step back and review some of the inner workings of the Java plugin, which to an extent builds the foundation for other language plugins.
11.2.1. Base capabilities of JVM language plugins
In chapter 8, we talked about a guiding principle for separating concerns in plugins: capabilities versus conventions. Let’s quickly recap this concept. A plugin that provides a capability oftentimes introduces new concepts or tasks, and a plugin that provides conventions imposes opinionated defaults for these concepts. What might sound very abstract becomes strikingly clear by dissecting the inner workings of the Java plugin.
Capabilities versus conventions in Java projects
What you see as a Gradle user when you apply the Java plugin to one of your projects is the full gamut of functionality. Your project is automatically equipped with the concept of source sets and Java-specific configurations, and exposes tasks as well as properties. This baseline Java support builds the foundation for every JVM language-based project. These capabilities are
- Configurations: compile, runtime
- Tasks per source set: compileJava, processResources, classes
- Lifecycle tasks: check, build, buildNeeded, buildDependents
- Properties: sourceCompatibility, targetCompatibility
Gradle also preconfigured your project with sensible default configurations, also called conventions—for example, production source code sits in the directory src/main/java, and test source code in src/test/java. These conventions aren’t set in stone and can be reconfigured, but they paint an initial opinioned view of your project. Some of the tasks in a Java project are based on the preconfigured source sets. The following list describes the opinionated bits of the Java plugin:
- Configurations: testCompile, testRuntime
- Source sets: main, test
- Tasks: jar, test, javadoc
The Java base plugin
The Java plugin separates capabilities and conventions. How does it do it? Capabilities are extracted into another plugin: the Java base plugin. Internally, the Java plugin applies the Java base plugin and adds the conventions on top, as shown in figure 11.2.
Figure 11.2. Java plugin automatically applies the Java base plugin
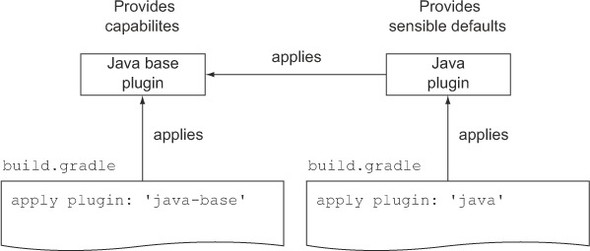
This separation of concerns has various implications. First of all, if your Java project doesn’t fit the default conventions introduced by the Java plugin, you can instead apply the Java base plugin and define your own conventions. Second, the Java base plugin can be used as the basis for building other JVM language plugins because they require similar concepts. This is a perfect example of code reuse and is applied to the core plugins for building Groovy and Scala projects. Before we look at how these base capabilities are applied, let’s explore another useful optimization you can use when compiling Java sources.
Speeding up Java compilation with the compiler daemon
By default, Gradle will fork a new JVM for every Java compilation task. Especially in large Java-based multiproject builds, this causes unnecessary overhead. You can speed up the compilation process by reusing an already-forked instance of a Java compilation process. In the following listing, you configure every task of type JavaCompile to run in fork mode, while at the same time using Gradle’s own Java compiler integration.
Listing 11.13. Activating the compiler daemon

When executing the multiproject build on the root level with gradle clean build, notice that the total time of your build is faster than without this modification. Internally, Gradle reuses the compiler daemon process across tasks even if they belong to a different subproject. After the build is finished, the compiler daemon process(es) are stopped. This means that they don’t outlast a single build. Next, we’ll focus on building and configuring Groovy projects.
11.2.2. Building Groovy projects
Groovy works nicely in conjunction with its older brother Java. It builds on top of Java, but has a more concise syntax and adds dynamic language features to the mix. Introducing Groovy to a Java project is as simple as adding the Groovy JAR file to its classpath.
In this book, you already used Groovy to write project infrastructure code. You used the Spock framework to write unit tests for your production application code. We also looked at how Groovy can be used to implement custom Gradle tasks. For conservative organizations, these are suitable use cases for incorporating Groovy, because the code isn’t deployed to a production environment. There are many good reasons why you may also want to use Groovy instead of Java for implementing production code. Groovy is a great match for writing DSLs with the help of its meta-programming features. This is something Gradle does itself. It uses Java to implement the core logic, but wraps it with Groovy to expose the powerful DSL you’re now accustomed to. Groovy support in Gradle is provided by the Groovy plugin. Let’s look at its features and see where the Java base plugin comes into play.
Groovy base and Groovy plugin
The Groovy plugin ecosystem imposes an analogous concept to separate capabilities and conventions as the Java plugin. To get a quick overview on how they play together, look at figure 11.3.
Figure 11.3. Groovy plugin inherits capabilities from the Java base plugin

Central to the figure are the Groovy base plugin and the Groovy plugin. The Groovy base plugin inherits all the capabilities of the Java base plugin and imposes its own conventions on top of it. Check out its feature list:
- Source set: groovy
- Tasks per source set: compileGroovy, compileTestGroovy
The Groovy plugin builds upon the Groovy base plugin and the Java plugin. The additional benefit that the plugin adds to the equation is a task of type Groovydoc. Executing this task generates the HTML API documentation for the Groovy source code. Next, you’ll convert one of the projects in your To Do application from a Java project into a Groovy project.
Minimal setup to get started
Turning a self-contained Java project into a Groovy project is easy. We’ll examine the conversion process by the example of your model project. Currently, this project only defines a single Java class file: ToDoItem.java. Before you turn this class into a Groovy class, you’ll add the build infrastructure code to the script model/build.gradle, as shown in the following listing.
Listing 11.14. Using Groovy to manage production source code
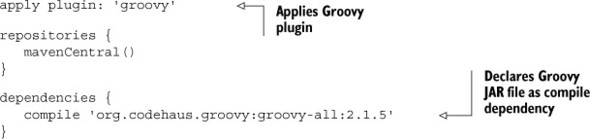
By applying the Groovy plugin, you equipped your project with the capabilities to compile Groovy source code and the default source sets that define where the compiler looks for the source code files.
Remember that the Groovy plugin automatically applies the Java plugin as well. This means that your project now contains a source set for Java sources and one for Groovy sources. Figure 11.4 shows the default project layout with the applied Groovy plugin.
Figure 11.4. Default source directories for projects applying the Groovy plugin

You may be aware that there are multiple distributions of the Groovy library. The file groovy-all contains all external dependencies (for example, Antlr and Apache Commons CLI) in a single JAR file archive to ensure compatibility between them. The file with the name groovy doesn’t contain these dependencies. You’re responsible for declaring these dependencies in your build script. No matter which distribution you choose, both will enable your project to compile Groovy source code.
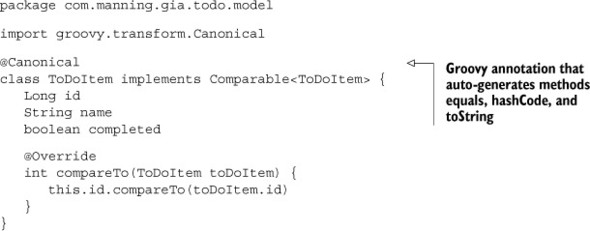
Keep in mind that this doesn’t mean that you’re required to have Java source files in your project. However, it enables you to mix Java and Groovy files in a single project. For now, just rename the existing Java class to ToDoItem.groovy and move the file under src/main/groovy with the package directory com.manning.gia.todo.model. It’s time to convert the bulky POJO class implementation into Groovy. The next listing demonstrates to what extreme the code could be condensed.
Listing 11.15. ToDoItem model class written in Groovy
Try out the build of your Groovy project. You can see that the task compileJava is marked UP-TO-DATE because you don’t have any Java source files under src/main/java. The task compileGroovy finds the file ToDoItem.groovy and compiles it. The following command-line output demonstrates this behavior:
$ gradle :model:build :model:compileJava UP-TO-DATE :model:compileGroovy Download http://repo1.maven.org/maven2/org/codehaus/groovy/groovy-
Customizing the project layout
If the default conventions introduced by the Groovy base plugin don’t fit your needs, you can redefine them in the same way as you can for Java projects. The underlying concept that enables you to reconfigure the default source directories is a SourceSet. In the following listing, you’ll say that the Groovy production source files should sit under src/groovy, and Groovy test source files should reside under test/groovy.
Listing 11.16. Customizing the default Groovy source set directories
sourceSets {
   main {
      groovy {
         srcDirs = ['src/groovy']
      }
   }

   test {
      groovy {
         srcDirs = ['test/groovy']
      }
   }
}
Java and Groovy joint compilation
I mentioned before that a single Gradle project can contain Java and Groovy files. To a developer, it feels natural to use Java classes from Groovy classes and vice versa. In the end, shouldn’t both source file types be compiled to bytecode? There’s a catch. Groovy can depend on Java, but Java can’t depend on Groovy.
To demonstrate this behavior, you’ll apply the Groovy plugin to the repository project. You’ll also turn the class ToDoRepository from a Java interface into a Groovy interface, as shown in the next listing.
Listing 11.17. Repository interface written in Groovy
package com.manning.gia.todo.repository

import com.manning.gia.todo.model.ToDoItem

interface ToDoRepository {
   List<ToDoItem> findAll()
   List<ToDoItem> findAllActive()
   List<ToDoItem> findAllCompleted()
   ToDoItem findById(Long id)
   Long insert(ToDoItem toDoItem)
   void update(ToDoItem toDoItem)
   void delete(ToDoItem toDoItem)
}
This interface has two implementations, both of which are still Java classes: InMemory-ToDoRepository.java and H2ToDoRepository.java. Now, if you compile the repository project, you’ll end up with a compilation error:
$ gradle :repository:classes :model:compileJava UP-TO-DATE :model:processResources UP-TO-DATE :model:classes UP-TO-DATE :model:jar UP-TO-DATE :repository:compileJava /Users/Ben/gradle-in-action/chapter11/todo-mixed-java-groovy/
Does this mean you can never depend on Groovy classes from Java classes? No. The key to making this work is called joint compilation, which allows you to freely mix Java and Groovy source code with bidirectional dependencies on each other. One way to address this issue is to put the Java source code together with the Groovy source code under the directory src/main/groovy. Alternatively, you can configure the Groovy compiler to enable joint compilation. The following listing shows what needs to be configured in your build to use this feature.
Listing 11.18. Reconfiguring source sets for joint compilation

After you add this code snippet to the build.gradle file of the repository project, joint compilation works as expected:
$ gradle :repository:classes
:model:compileJava UP-TO-DATE
:model:processResources UP-TO-DATE
:model:classes UP-TO-DATE
:model:jar UP-TO-DATE
:repository:compileJava UP-TO-DATE
:repository:compileGroovy
:repository:processResources UP-TO-DATE
:repository:classes
For the compiler nerds among us, let’s look at what happens under the hood:
1. The compiler parses the Groovy source files and generates stubs for them.
2. The Groovy compiler invokes the Java compiler and generates the stubs for Java source files.
3. With the Java stubs in the Groovy source path, the Groovy compiler can compile both.
With the techniques presented in this chapter, you should be able to set up your own project to incorporate Groovy, either as a standalone Groovy project or as a mixed Java and Groovy project. Next, we’ll explore Gradle’s support for Scala projects.
11.2.3. Building Scala projects
Scala is another language running on the JVM that has become increasingly popular in the past few years. The language is statically typed, combines object-oriented programming with support for functional programming, and is designed to express logic in an elegant, concise way. As with Groovy, Scala can use all Java libraries that a Java developer already knows. Scala has seen quite a bit of real-world adoption. Twitter reimplemented their backend services with Scala, and Foursquare moved on to Scala as well.
Scala support in Gradle is as sophisticated as the support for Groovy. In this section, we’ll explore the corresponding Scala language plugins. You’ll take an approach similar to what you did for Groovy to transform parts of your To Do application to Scala and build them with Gradle.
Scala base and Scala plugin
The Scala plugins are designed with the same concepts in mind as the Groovy plugins. The basic idea is to separate capabilities from conventions. In figure 11.5, you can see that Gradle provides two Scala plugins.
Figure 11.5. Scala plugin inherits capabilities from the Java base plugin

The Scala base plugin automatically applies the Java base plugin. You learned before that the Java plugin provides the capabilities for building Java-based projects. The Scala base plugin uses these capabilities and preconfigures default conventions for Scala projects, as shown in the following list:
- Source set: scala
- Tasks per source set: compileScala, compileTestScala
The Scala plugin internally applies not only the Scala base plugin, but also the Java plugin. This allows you to build Java and Scala source code within a single project. The feature the Scala plugin provides on top of the Scala base plugin is the ability to generate HTML API documentation for Scala source code. If you’re building a full-fledged Scala project, applying the Scala plugin is your best choice. Let’s see Scala in action.
Minimal setup to get started
To demonstrate the use of Scala within your To Do application, you’ll convert a Java class into a Scala class. The project in your build with the least complex source code is the model project. At the moment, this project’s build.gradle file doesn’t define any logic. The following listing applies the Scala plugin and declares the Scala library to get a hold on the Scala compiler.
Listing 11.19. Using Scala to manage production source code

After applying the Scala plugin, your project can compile any Scala source code found in the directories src/main/scala and src/test/scala. Figure 11.6 shows the groovy source set directories alongside the source directory conventions introduced by the Java plugin.
Figure 11.6. Default source directories for projects applying the Scala plugin

Next, you’ll transform the existing Java file ToDoItem.java into a Scala file. Every Scala source code file has the extension .scala. Go ahead and rename the file and move it under the directory src/main/scala. It’s time to change the source code to Scala, as shown in the next listing.
Listing 11.20. ToDoItem model class written in Scala
package com.manning.gia.todo.model

class ToDoItem extends Ordered[ToDoItem] {
   var id: Long = _
   var name: String = _
   var completed: Boolean = _

   def getId: Long = {
      id
   }

   def setId(id: Long) = {
      this.id = id
   }
   ...

   override def compare(that: ToDoItem) = this.id compare that.id

   override def equals(that: Any) = {
      that match {
         case t: ToDoItem => t.id == id && t.name == name
                              && t.completed == completed
         case _ => false
      }
   }
}
Even though you may not be well versed in Scala, the language syntax is relatively easy to decipher. In fact, the class doesn’t introduce any additional logic and works exactly like its Java counterpart. Executing the build for the model project produces the following output:
$ gradle :model:build :model:compileJava UP-TO-DATE :model:compileScala Download http://repo1.maven.org/maven2/org/scala-lang/scala-library/
We can see that the compileScala task initiates the download of the Scala library to be able to invoke the Scala compiler. As a result, your project compiles the Scala code, which can be used as a dependency for other projects in your build.
Customizing the project layout
If you’re unhappy with the default Scala source directories, feel free to redefine them. By now, you’ve used this concept various times, so the code in the next listing should come as no surprise. In this example, you’ll point the production source directory to src/scala and the test source directory to test/scala.
Listing 11.21. Customizing the default Scala source set directories
sourceSets {
   main {
      scala {
         srcDirs = ['src/scala']
      }
   }

   test {
      scala {
         srcDirs = ['test/scala']
      }
   }
}
Java and Scala joint compilation
Mixing Java and Scala source code within one Gradle project follows the same rules as for mixing Java and Groovy. What it boils down to is that Scala can depend on Java, but Java can’t depend on Scala. Bidirectional dependencies between these source code file types can only be achieved by joint compilation. You can either put the Java code into the Scala source directory (by default, src/main/scala) or reconfigure the source directory sets, as shown in the following listing.
Listing 11.22. Reconfiguring source sets for joint compilation

What happens when you configure Scala joint compilation? Joint compilation for Scala code works slightly differently than for Groovy code. The Scala compiler doesn’t directly invoke the Java compiler. The following steps should make this clear:
1. The Scala compiler parses and analyzes the Scala source code to figure out the dependencies on Java classes. The Scala compiler understands Java syntax, but doesn’t invoke the Java compiler.
2. The Scala sources are compiled. The compiler also produces a class file for each Java source file. However, these files don’t contain bytecode. They’re used for type checking between Java and Scala sources.
3. The Java compiler compiles the Java source code.
We covered the most basic skills required to build Scala projects. Optimizations like incremental compilation can reduce the compilation time even more. Please see the online documentation for more details. In the next section, we’ll go over the Gradle compilation and packaging support for some other languages, JVM-based and native.
11.3. Other languages
There are far more languages out there than we could possibly discuss in this book. Some of these languages are directly supported by a core plugin; others can be integrated with your build through a plugin developed by the Gradle community. Table 11.1 lists some of the more popular language plugins.
Table 11.1. Gradle plugins for popular programming languages
|
Language Homepage |
Gradle Plugin |
|
|---|---|---|
| C++ | http://www.cplusplus.com | Gradle core plugin |
| Clojure | http://clojure.org | https://bitbucket.org/clojuresque/clojuresque |
| Golo | http://golo-lang.org | https://github.com/golo-lang/gradle-golo-plugin |
| Kotlin | http://kotlin.jetbrains.org | http://repository.jetbrains.com/kotlin/org/jetbrains/kotlin/kotlin-gradle-plugin |
| R | http://www.programmingr.com | https://github.com/jamiefolson/gradle-plugin-r |
Even if you don’t find an appropriate plugin for the language you’re trying to incorporate into your build, you’re not out of luck. You learned that Ant tasks and Java APIs can be wrapped with a Gradle task. The same technique is used by the Groovy plugin, for example, which internally invokes the groovyc Ant task. Alternatively, you can always execute a compiler from the command line by creating an enhanced task of type Exec.
11.4. Summary
Today’s software projects embrace a wide range of programming languages, technologies, and libraries. It’s all about the right tool for the job. Whatever works best, increases productivity, or solves a problem in a more elegant way should be preferred. This maxim became increasingly important for projects that incorporate more than a single programming language, so-called polyglot projects. In this chapter, we discussed how to configure, manage, and build three different languages with Gradle: JavaScript and the two JVM-based languages, Groovy and Scala.
JavaScript has been the dominant language for creating dynamic web experiences for over a decade. Obviously, page-loading times influenced by the size of the JavaScript files play a significant role for end users. JavaScript files can be merged and minified to improve the page rendering performance. You learned that Gradle can help automate otherwise manual steps to perform these actions and integrate them with the development lifecycle of your To Do application. We didn’t stop there. We also explored how to simplify the required configuration of your JavaScript build code by using the community JavaScript plugin. Later, you wrapped existing Grunt build code with Gradle to provide a single, unified control unit for automating all components of your application.
The JVM-based languages Groovy and Scala are directly supported within a Gradle build. Gradle ships with first-class plugin support for both languages. Each language plugin builds on top of the Java base plugin to enforce a separation of capabilities from conventions. You transformed some of the existing To Do application Java classes into Groovy and Scala equivalents to demonstrate the use of these plugins. Source set conventions aren’t set in stone. You learned how to reconfigure them in case your project needs to adapt to a legacy project layout. Groovy and Scala source code can coexist with Java source code in a single project. Bidirectional dependencies between Java and Groovy or Scala require the use of joint compilation. We discussed how to prepare the compiler for handling such a scenario. In the last part of this chapter, we touched on other programming languages supported by Gradle.
The next chapter will focus on measuring the code quality of your project by integrating external tooling into the build process.