
Chapter 14. Artifact assembly and publishing
- Building artifacts and distributions
- Publishing artifacts to local, remote, and public Maven repositories
- Artifact assembly and publishing as part of the build pipeline
As a developer, you mainly deal with two kinds of artifacts during the software development process: source code and binary artifacts as results of your build. We’ve already seen examples of binary artifacts in this book, including JAR, WAR, and ZIP files.
Source code repositories provided by version control systems like Git or Subversion are designed to manage source code. They provide features like storing the changes between two versions of a file, branching, tagging, and many more. A source code file is usually small and can be handled well by a source code repository. Larger files, typically binaries, can degrade the performance of your repository, slow down the developer’s check-out process, and consume a lot of network bandwidth.
Binary repositories like JFrog Artifactory and Sonatype Nexus are well suited for storing binary artifacts. One of the most prominent binary repositives is Maven Central. They’re equipped to handle binary artifacts of large file sizes, provide a way to organize them, describe them with the help of metadata, and expose an interface (a user interface and/or API) to publish and download these artifacts.
In this chapter, we’ll look at how to define the artifacts your build is supposed to produce. We’ll also discuss how to generate metadata for these artifacts and publish them to local and remote repositories. The CloudBees plugin you wrote in chapter 8 is a perfect example to demonstrate this functionality. By publishing the artifact of the plugin, you can make its capabilities available to other Gradle users within your organization or to anyone on the web interested in using the plugin.
In the context of continuous delivery, publishing your artifact plays a crucial role. Once you package the delivery with a specific version, it’s ready to be deployed to various target environments for acceptance testing or to be given into the hands of the end user. It’s a good practice to build the artifact only once, deploy it to a binary repository, and reuse it whenever needed. We’ll discuss how to apply this concept to your To Do application as part of your build pipeline introduced in the last chapter.
Let’s start by bringing back your plugin code from chapter 8 and reviewing its assembly process.
14.1. Building artifacts and distributions
By default, every project that applies the Java plugin generates a single JAR file when the lifecycle task assemble is executed. In chapter 8, you made good use of this functionality when you created the plugin artifact for further distribution. The artifact filename consists of a name, which is derived from the base name (usually the project name), and a version number if it was set via the version property. The following directory tree shows the plugin artifact after generating it:

The file type of an archive might change based on the project type. For example, if you apply the War plugin, the generated archive is turned into a web archive (WAR file) with all its specific packaging characteristics.
While a single, project-type-specific artifact is sufficient for most applications, you may want to create additional artifacts as part of the assembly process. Gradle doesn’t impose any limitations on how many artifacts a project can produce. If you’re coming from Maven, which gives you a hard time for wanting to create more than one artifact per project, you may find this feature a welcome change.
So how do you add custom archives to your project? Gradle provides archive tasks like Zip, Tar, and Jar, available through the API package org.gradle.api.tasks.bundling. Chapter 4 presented an example of adding an enhanced task that packages a Zip file. It may be helpful to have a quick peek at the example again to refresh your memory.
To produce the output of a custom archive task, you’ll need to execute it on the command line or add it as a task dependency to another task. If you consider nonstandard artifacts part of your project’s delivery consumed by other users or projects, you’ll want to include them into the assembly process. Gradle offers a convenient and declarative way to add artifacts.
14.1.1. Declaring additional artifacts
Understanding how to declare additional project artifacts requires a bit of background information: every project that applies the Java plugin is equipped with the configuration archives. You can check its existence by invoking the dependencies task, as shown in the following command-line output:

The archives configuration declares the outgoing artifacts of a project. For Java projects, the artifact assigned to this configuration is the standard JAR file. Whenever you execute the task assemble, all declared artifacts are built. You’re going to enrich your plugin project by adding some more outgoing artifacts.
You’ll learn how to achieve this by example. As the popularity of your plugin grows, you’ll want to give your users deeper insights into the inner workings of your code. Plugin consumers are especially interested in learning about the exposed API. What could better serve this purpose than to provide them with the source code and the Groovydocs of your code?
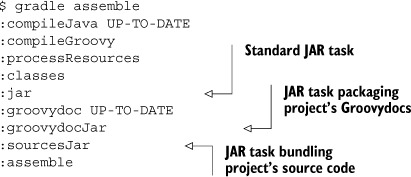
It’s common practice to deliver the source code and Groovydocs of a project in the form of JAR files. For your plugin project, this means that you’ll have to create two new tasks of type Jar. The source code JAR task needs to include the source files of all SourceSets. You’ll name the task sourcesJar. The task groovydocJar creates a JAR file containing the API documentation of your Groovy classes. To be able to include the project’s Groovydocs into a JAR file, you’ll need to generate them first. This can easily be achieved by letting the jar task depend on the groovydoc task provided by the Java plugin. Figure 14.1 shows the new archive tasks as part of the assemble task graph.
Figure 14.1. Tasks for creating additional artifact

Let’s discuss the implementation shown in listing 14.1. To clearly identify that the resulting JAR files belong to your plugin, it’s helpful to align the naming. For that purpose, you’ll add the suffix (also called classifier) sources to the JAR file containing source code and the suffix groovydoc to the JAR file containing the Groovydocs. When looking at some of the libraries on Maven Central, you’ll notice that this naming convention is a fairly common practice.
Listing 14.1. Declaring additional artifacts

There are two ways to make the new archive tasks part of the assemble task graph. You can go down the imperative route by adding the sourcesJar and groovydocJar as task dependencies. This approach probably looks the most familiar and straightforward to battle-scarred Ant users:
assemble.dependsOn sourcesJar, groovydocJar
This works fine and is a valid way to hook up the creation of all artifacts for a project. However, Gradle offers a more declarative mechanism. You can express what outgoing artifacts a project produces without saying how they’re created. Being declarative offers two benefits. On the one hand, it’s more readable and expressive. On the other hand, projects participating in more complex builds can directly refer to the outgoing artifacts of another project with the help of Gradle’s API.
To declaratively make the new archive tasks part of the assemble task graph, you’ll need to register them with the project’s instance of ArtifactHandler. The interface org.gradle.api.artifacts.dsl.ArtifactHandler is responsible for defining and publishing artifacts. To register new artifacts with the project, the method Project#artifacts is used. Within the closure, you can assign a task of type org .gradle.api.tasks.bundling.AbstractArchiveTask (for example, Jar, Zip, or Tar) to the archives configuration. Alternatively, you can also assign an instance of type java.io.File in case the artifact isn’t generated by an archive task.
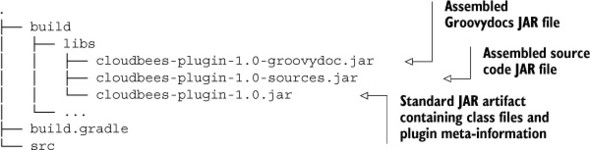
After assigning your archive tasks to the archives configuration, executing the assemble task will automatically invoke the creation of your custom JAR files:
As expected, these files end up in the build/libs directory side by side with the standard JAR file of the project:
You learned how easy it is to declare tasks that produce additional project artifacts and how to register them with the assembly lifecycle process. As part of your software delivery process, you may also want to create a single archive or even multiples archives containing a unique set of these artifacts. This requirement usually arises if you need to assemble distributions targeted toward different operating systems, specific groups of end users, or diverse product flavors of your software. Let’s see how creating distributions is supported in Gradle.
14.1.2. Creating distributions
Creating custom distributions in Gradle is a no-brainer. For each archive you want to create, you can add an enhanced task of type Zip or Tar. While this approach works great for a project with a small set of distributions, you’ll have to come up with a naming pattern for the tasks to clearly express their intent.
Gradle’s distribution plugin offers a more streamlined and declarative approach to solving this problem. The plugin exposes an expressive language that lets you describe a number of distributions for a project without having to manually declare tasks. The task creation is handled by the plugin under the hood. The plugin lets you generate a distribution in the form of a ZIP or TAR file.
Let’s say you want to create a distribution for your CloudBees plugin project that bundles the plugin JAR file, the sources JAR file, and the Groovydocs JAR file into a new archive. The following listing demonstrates how to apply the distribution plugin and specify the target directory content you want to bundle with the archive.
Listing 14.2. Building a distribution

With this code in place, you can decide whether you want to create a ZIP or TAR file for the distribution. The ZIP file can be generated by the task distZip, and the TAR file is built by the task distTar. Usually, you’ll just need one of these file formats. A TAR file is oftentimes a preferred format on UNIX operating systems. For a cross-platform distribution, a ZIP file is usually the preferred format. The following command-line output shows the creation of a ZIP distribution:
$ gradle assemble distZip
:compileJava UP-TO-DATE
:compileGroovy
:processResources
:classes
:jar
:groovydoc UP-TO-DATE
:groovydocJar
:sourcesJar
:assemble
:distZip
Distributions are placed into the directory build/distributions. The following directory tree shows the generated file:

The distribution plugin is designed to support more than a single distribution. For each additional distribution, you’ll need to add another named configuration block within the distributions closure. Listing 14.3 demonstrates an example. On top of the standard distribution that bundles all JAR files from the directory build/libs, you want to create a distribution that solely contains documentation files. As documentation files, you classify the source files JAR and the Groovydocs JAR.
Listing 14.3. Configuring a custom distribution
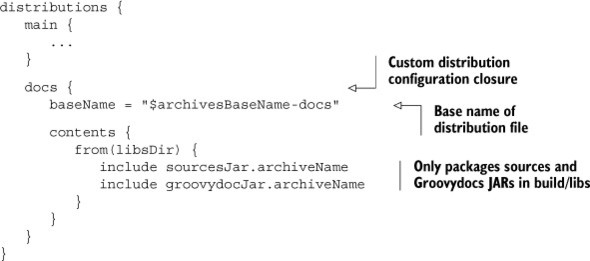
You may have noticed that the configuration block of the distribution is named docs. The plugin automatically derives the distribution task names for nonstandard distributions from the declared name. In addition to the already existing tasks, you can now generate the documentation distribution by using the tasks docsDistZip and docsDistTar. Generate the distribution—this time as a TAR file:
$ gradle assemble docsDistTar
:compileJava UP-TO-DATE
:compileGroovy UP-TO-DATE
:processResources UP-TO-DATE
:classes UP-TO-DATE
:jar UP-TO-DATE
:groovydoc UP-TO-DATE
:groovydocJar UP-TO-DATE
:sourcesJar UP-TO-DATE
:assemble UP-TO-DATE
:docsDistTar
The distribution output directory now also contains the expected TAR file:

You saw how to declare and build distributions for your plugin project. Though descriptive and powerful, the requirements in your project may call for more complex or platform-specific functionality; for example, creating a desktop installer or generating an RPM package. If you feel like the distribution plugin doesn’t cut the mustard, make sure to look at third-party Gradle plugins. Some of them may provide the functionality you’re looking for.
Let’s summarize what you’ve done so far: you enabled your project to produce the plugin JAR file and two documentation archives containing the project’s source code and Groovydocs. Now you’re ready to share the plugin with the world. Next, I’ll show how to publish these artifacts to a binary repository.
14.2. Publishing artifacts to a binary repository
In chapter 5, we mainly talked about dependency management from a consumer’s perspective. You learned how to declare dependencies and repositories within your build script. Gradle’s dependency manager would in turn try to locate these dependencies, download and store them in a local cache, and make them available to your build.
In this chapter, you’ll take on the role of the artifact producer. You’ll learn how to publish build artifacts to a local or remote repository. An important step in the publishing process is to generate metadata for these artifacts. This metadata, usually stored in an XML-based text file, can give sufficient information about the corresponding artifacts. The following list should give you an idea of some common types of metadata:
- General information about the artifact, like name, description, involved developers, and links to source code or documentation
- The available version of the artifact
- Transitive dependencies the artifact relies on
- The software license of an artifact a consumer has to comply to
Gradle can help with producing customized metadata and uploading the artifacts of a build to different types of repositories. Figure 14.2 demonstrates the interaction among a Gradle build, its produced artifacts, and some targeted binary repositories.
Figure 14.2. Publishing artifacts to local and remote repositories

The most common repository formats you’ll find in the wild are based on either Maven or Ivy. At the time of writing, Gradle doesn’t provide its own, specialized repository format. For our examples, you’ll see how to publish to the most widely used repository format: Maven.
14.2.1. Publishing to a Maven repository
Remember earlier in this chapter when you modified your plugin build to produce three different artifacts? You ended up with these files in your build/libs directory:
It’s time to publish them to a Maven repository for later consumption. We’ll look at how to publish them to three types of Maven repositories, as shown in figure 14.3:
Figure 14.3. Publishing artifacts to a Maven repository

- The local cache located in the directory <USER_HOME>/.m2/repository.
- A repository in an arbitrary directory on your local file system.
- A remote, binary repository accessible via HTTP(S). The following examples use the popular JFrog product Artifactory.
Projects in an enterprise setting shouldn’t rely on Maven Central as their primary source of dependency management. To be able to produce reliable and reproducible builds, an internal repository should be set up for catering to your projects. There are various products that can be used; for example, Sonatype Nexus (http://www.sonatype.org/nexus/) and JFrog Artifactory (http://www.jfrog.com/home/v_artifactory_opensource_overview). We won’t discuss how to set up such a repository. Please refer to the product’s installation manual for more information. For now, let’s assume you already set up Artifactory as your manager for dependencies running on the URL http://localhost:8081/artifactory.
14.2.2. Old versus new publishing mechanisms
Publishing artifacts is an important step in the lifecycle of a software component. Gradle came with support for publishing artifacts to a repository early on with the Upload task included as part of the Maven plugin. While the Maven plugin is used by early Gradle adopters and works well in production environments, it became apparent that a more descriptive and elegant DSL is needed to describe publications of a project.
Starting with version 1.3 of Gradle, a new publishing mechanism was introduced by the plugins maven-publish and ivy-publish. Even though it’s still an incubating feature, it coexists with the existing methods for publishing artifacts, but will supersede them in an upcoming version of Gradle. Given this outlook, most of our discussions will be based on the new publishing mechanism, because it’ll make your build script future-proof. In the following sections, you’ll use the maven-publish plugin for publishing the artifacts produced by your CloudBees plugin project to a Maven repository. A similar approach can be taken with the ivy-publish plugin if you prefer to use the Ivy repository format. The DSL exposed by both plugins looks fairly similar, so with minor modifications you can make it target Ivy as well. Let’s jump right in and see how to publish the plugin JAR to a Maven repository.
14.2.3. Declaring a software component as a Maven publication
Gradle projects that apply a specific plugin are preconfigured to produce a primary, outgoing artifact whenever the assemble task is executed. You already got to know various examples of this behavior. A project that applies the Java or Groovy plugin creates a JAR file, and a project that applies the War plugin packages a WAR file. In the context of the publishing plugin, this artifact is called a software component.
The following listing applies the Maven publishing plugin to your CloudBees project and uses its DSL to declare a single publication: a Java software component. When I speak of a Java software component, I mean the generated JAR file.
Listing 14.4. Publishing JAR component to a Maven repository

This configuration is all you need to generate the metadata for your JAR file and publish the file to a Maven repository. Because you haven’t yet defined a repository, you can only publish these files to the local Maven cache located in the directory .m2/repository. Check the list of publication tasks available to the project:

The project exposes three different publication tasks. This may look confusing at first, but it makes a lot of sense if you need fine-grained control over the publication process. By picking the right task, you can selectively say which artifact(s) you want to publish to what repository. You may have noticed that the arbitrary name you used for your publication became part of a task name: the name plugin became part of the task name publishPluginPublicationToMavenLocal. This makes for a very declarative way to construct a publication task name. Next, we’ll see these tasks in action.
14.2.4. Publishing a software component to the local Maven cache
The local Maven cache is of particular relevance for Gradle users for two reasons. In chapter 5, you learned that Gradle tries to reuse artifacts found in the local Maven cache. This is a major benefit to migrating Maven users, because the artifacts don’t have to be downloaded again. The other reason why you’d want to publish to the local Maven cache is if you work with a variety of projects that use different build tools. One project may use Gradle to publish an artifact; another project may use Maven to consume it.
Let’s assume you want to publish your plugin JAR file, including the generated POM file. The following console output shows the executed tasks:

In the process of publishing the JAR file, the POM file is generated by the task generate-PomFileForPluginPublication. Similar to the task publishPluginPublicationTo-Maven-Local, its name is derived from the declared name of the publication. You may wonder why the POM file isn’t listed as an uploaded artifact in the console output. No worries—it’s simply not logged. What you end up with are the following artifacts in the local Maven cache directory:

The uploaded artifacts follow the typical format for dependencies within a Maven repository. The directory com/manning/gia is derived from the project’s group property, the artifact ID (in your case, cloudbees-plugin) follows the project name, and the version reflects the value of the version property in your project. Files with the extension .md5 and .sha1 are checksum files. They’re used to check the integrity of the associated file.
By default, the name of the published artifact is derived from the project name. You may remember from earlier chapters that the project name corresponds with the name of your project directory. It’s important to understand that any change to properties like archivesBaseName won’t have an effect on the publication name, even though the assembled archive may have the naming you desire.
Sometimes you may want to use a different publication name. Every MavenPublication allows for configuring custom publication attributes. One of these attributes is the artifact ID of the publication, as shown in listing 14.4. Alternatively, you can also set the project name in your settings.gradle file. The following example demonstrates how to change the project name to my-plugin:
rootProject.name = 'my-plugin'
As a result, the published artifact would have the name my-plugin-1.0.jar, and the name of the directory in the local Maven cache would be com/manning/gia/my-plugin.
The same naming pattern is reflected in the dependency attributes groupId, artifactId, and version of the generated POM file. The following listing shows the full content of the file named cloudbees-plugin-1.0.pom.
Listing 14.5. Generated POM for published software component

At the time of the POM generation, the publication plugin automatically determines the project’s dependencies from the configuration runtime and declares them as transitive dependencies. Here, you can see that this is the case for the CloudBees API client library. Keep in mind that the publication API will only declare the dependencies that are relevant to the consumers of the JAR file. Dependencies that are used to build your project (for example, test libraries) aren’t included. Though this is a minor shift from Maven’s default philosophy of including both types of dependencies in the POM, build, and runtime information, it makes for much cleaner metadata without any drawbacks.
Great, you were able to publish the default outgoing project artifact. But what if you want to publish additional artifacts? Your plugin project has the specific need to provide the sources JAR and Groovydocs JAR for consumption as well. Let’s look at how these files can be declared using the publishing DSL.
14.2.5. Declaring custom artifacts for publication
Additional artifacts can be registered for publication by using the method artifact provided by the API class MavenPublication. The method requires you to provide one parameter. This parameter can either be any task of type AbstractArchiveTask, which is the case for both of your documentation JAR file tasks, or any object that can be translated into a java.io.File. The Javadocs of the publication API will give you examples that demonstrate the use of both types of declarations. The next listing shows how to assign the archive tasks sourcesJar and groovydocJar as Maven publications.
Listing 14.6. Publishing additional artifacts to a Maven repository

There’s one important detail to keep in mind when declaring custom artifacts. The publication plugin only allows a single artifact to be published with an empty classifier attribute. Usually this is the software component, which has the name cloudbees-plugin-1.0.jar. All other artifacts need to provide a classifier. For your sources JAR file, the classifier is sources, and for the Groovydocs JAR file this is groovydoc. Initiate the previously used publication task again and see if you can deliver your custom artifacts to the Maven cache:
$ gradle publishToMavenLocal :generatePomFileForPluginPublication :compileJava UP-TO-DATE :compileGroovy :processResources :classes :groovydoc :groovydocJar :jar :sourcesJar :publishPluginPublicationToMavenLocal Uploading: com/manning/gia/cloudbees-plugin/1.0/cloudbees-plugin-1.0.jar to repository remote at file:/Users/Ben/.m2/repository/ Transferring 43K from remote Uploaded 43K Uploading: com/manning/gia/cloudbees-plugin/1.0/cloudbees-plugin-1.0-
The console output now shows that all declared publications were uploaded to the repository. A quick check of the directory tree reveals the desired end result:

Perfect—all artifacts you wanted to make available to the Maven cache could be published. Consumers of the artifacts rely on the default POM metadata to resolve the plugin JAR file and its transitive dependencies. In section 14.2, we talked about the data a POM file can contain. The publishing API makes this data fully customizable. In the next section, we’ll discuss how to modify the generated POM.
14.2.6. Modifying the generated POM
The POM file that describes an artifact within a repository should be as informative as possible. At the very least, you should provide details about the purpose of your artifact, the software license, and a pointer to the documentation so that end users can get a lead on what functionality is provided and how to use it within their project. The best way to find out what information can be configured is to the check the POM reference guide at http://maven.apache.org/pom.html. The guide describes the XML structure and available tags for configuring a POM.
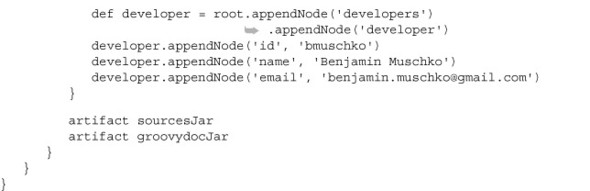
The generated standard POM can be modified with the help of the hook pom.withXml. By calling the method asNode(), you can retrieve the root node of that POM. New nodes can be added or existing ones modified (except for the identifiers groupId, artifactId, and version). The following listing shows how to add more information to your plugin POM.
Listing 14.7. Publishing additional artifacts to a Maven repository

The next listing shows the regenerated POM file, which now reflects your changes to the metadata.
Listing 14.8. Modified plugin POM
<?xml version="1.0" encoding="UTF-8"?>
<project xsi:schemaLocation="http://maven.apache.org/POM/4.0.0
          http://maven.apache.org/xsd/maven-4.0.0.xsd"
          xmlns="http://maven.apache.org/POM/4.0.0"
          xmlns:xsi="http://www.w3.org/2001/XMLSchema-instance">
   <modelVersion>4.0.0</modelVersion>
   <groupId>com.manning.gia</groupId>
   <artifactId>cloudbees-plugin</artifactId>
   <version>1.0</version>
   <dependencies>
      <dependency>
         <groupId>com.cloudbees</groupId>
         <artifactId>cloudbees-api-client</artifactId>
         <version>1.4.0</version>
         <scope>runtime</scope>
      </dependency>
   </dependencies>
   <name>Gradle CloudBees plugin</name>
   <description>Gradle plugin for managing applications and databases on
                 CloudBees RUN@cloud.</description>
   <inceptionYear>2013</inceptionYear>
   <licenses>
      <license>
         <name>The Apache Software License, Version 2.0</name>
         <url>http://www.apache.org/licenses/LICENSE-2.0.txt</url>
         <distribution>repo</distribution>
      </license>
   </licenses>
   <developers>
      <developer>
         <id>bmuschko</id>
         <name>Benjamin Muschko</name>
         <email>[email protected]</email>
      </developer>
   </developers>
</project>
So far, you’ve installed the published artifacts to the local Maven cache. What if you wanted to publish them to a Maven repository on your local file system or the Artifactory repository you set up earlier? Nothing easier than that—the publishing API allows for declaring repositories as well.
14.2.7. Publishing to a local Maven repository
In chapter 8, you used the “old” Maven plugin to upload your project’s artifact to a local Maven repository so it could be consumed by another Gradle project. You used this technique for testing your plugin functionality on your local machine without having to make it public. The same functionality is provided by the Maven publishing plugin.
Every repository you want to target needs to be declared in a repositories configuration block exposed by the publishing DSL. In the following listing, you’ll declare a single Maven repository located in the directory named repo parallel to the project directory.
Listing 14.9. Publishing to a local Maven repository
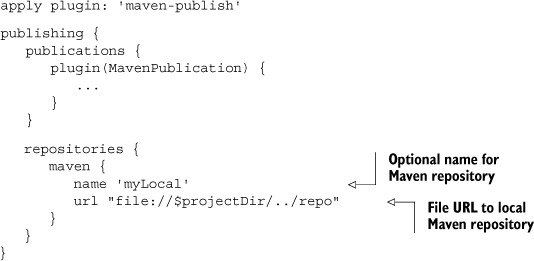
The name attribute of a repository is optional. If you assign a name, it becomes part of the corresponding publishing task. By assigning the name myLocal, your task is automatically named publishPluginPublicationToMyLocalRepository. This is especially useful when dealing with multiple repositories at the same time. Run the task:
$ gradle publishPluginPublicationToMyLocalRepository :generatePomFileForPluginPublication :compileJava UP-TO-DATE :compileGroovy UP-TO-DATE :processResources UP-TO-DATE :classes UP-TO-DATE :groovydoc UP-TO-DATE :groovydocJar UP-TO-DATE :jar UP-TO-DATE :sourcesJar UP-TO-DATE :publishPluginPublicationToMyLocalRepository Uploading: com/manning/gia/cloudbees-plugin/1.0/cloudbees-plugin-
Gradle is smart enough to automatically create the local repository even though its root directory doesn’t exist yet. As expected, you’ll find the uploaded artifacts in the correct location:

In the next section, we’ll also look at how to publish the same artifacts to a remote repository via HTTP.
14.2.8. Publishing to a remote Maven repository
Remote repositories are extremely helpful for making artifacts available to other teams or stakeholders within your organization. For testing purposes, we set up an Artifactory instance on our local machine. Keep in mind that this repository could sit anywhere within your corporate network as long as it’s accessible via HTTP(S). Artifactory preconfigures two Maven repositories with its default installation:
- libs-snapshot-local: Used for publishing artifacts that are considered under development with the version suffix -SNAPSHOT
- libs-release-local: Used for publishing production-ready artifacts without the –SNAPSHOT version suffix
Both of these repositories expose a dedicated HTTP URL and control how and who can upload artifacts. A secured repository requires you to supply the configured authentication credentials. If you don’t provide these properties, your build will fail because it couldn’t authenticate your upload. To prevent having to check in this sensible data into version control, you’ll feed these properties through your gradle.properties file. Gradle will read the contents of this file automatically at runtime and make the properties available to your build script. For now, you’re going to use the default Artifactory administration credentials:
artifactoryUsername = admin
artifactoryPassword = password
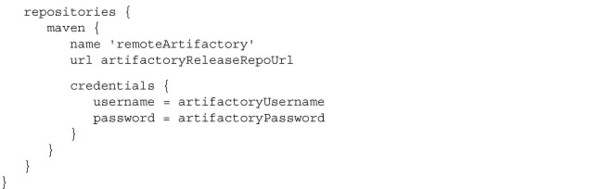
Next, you’ll write some code to publish your artifacts to one of these repositories based on the version property of your project. The following listing doesn’t look too different from previous examples. The biggest difference is that you also provide the credentials to the repository to authenticate the upload.
Listing 14.10. Publishing to a remote Maven repository
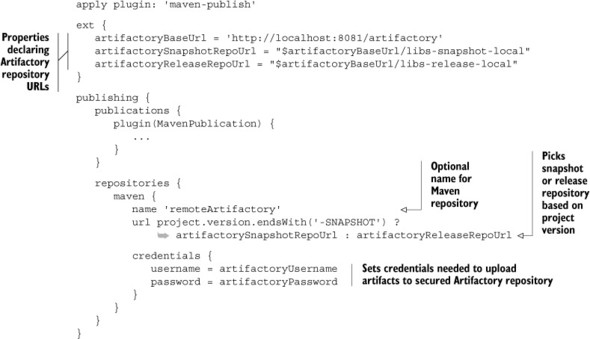
You named the remote repository remoteArtifactory. The publishing plugin incorporates the repository name into the name of the task used to upload your project artifacts to Artifactory:
$ gradle publishPluginPublicationToRemoteArtifactoryRepository :generatePomFileForPluginPublication :compileJava UP-TO-DATE :compileGroovy :processResources :classes :groovydoc :groovydocJar :jar :sourcesJar :publishPluginPublicationToRemoteArtifactoryRepository Uploading: com/manning/gia/cloudbees-plugin/1.0/cloudbees-plugin-
After uploading the artifacts to Artifactory, you should be able to browse the repository by the provided group ID. There’s a directory with the specified version containing the POM and JAR files of your CloudBees plugin (figure 14.4).
Figure 14.4. Uploaded artifacts in Artifactory repository browser

Some binary repository products provide a Gradle plugin to simplify the process of publishing. Such a plugin provides a standardized, product-specific DSL and can’t be used with other binary repositories. Think of it as a higher-level API sitting on top of the Gradle publishing API, while at the same time adding more features (for example, build information). Using a vendor plugin can reduce the code you need to write for publishing artifacts. These plugins should only be used if you know that your project is sticking with a particular product long term.
JFrog provides such a plugin for Artifactory. We won’t discuss how to use it, but feel free to check out its documentation at the following Wiki page: http://wiki.jfrog.org/confluence/display/RTF/Gradle+Artifactory+Plugin.
14.3. Publishing to a public binary repository
Publishing artifacts to a repository within your corporate network is a practical solution for sharing binaries among teams. It also takes care of protecting intellectual property from the outside world.
Organizations with a stake in open source software like to contribute their hard work to the Gradle community or anyone interested in using their code. This can either be achieved by making their binary repository internet-accessible or by uploading the artifacts to a public repository. The most popular public repositories are JFrog Bintray’s JCenter and Maven Central. In this chapter, you’ll learn how to publish your CloudBees plugin to both repositories. Let’s start by looking at Bintray.
14.3.1. Publishing to JFrog Bintray
JFrog Bintray (https://bintray.com/) is the new kid on the block among the public repositories. Bintray is more than just a provider for hosting binary repositories. It comes with a web dashboard, integrated search functionality, social features, artifact download statistics, and a RESTful API for managing your repositories and artifacts. Bintray was launched in early 2013 but quickly grew in popularity within its first months of existence. Currently, you see a lot of open source projects moving to Bintray. Before you can publish any artifacts to Bintray, you’ll need to set up an account.
Getting set up on Bintray
Bintray requires you to create an account, a repository, and a package before you can get started. This involves the following simple steps:
1. Open a browser, navigate to the URL https://bintray.com/, and sign up for a new account if you don’t have one yet.
2. After completing the signup process, log into the newly created account. Press the button New Repository to configure a repository. For your purposes, name this repository gradle-plugins and choose the Maven repository format.
3. Click the repository and create a new package with the name gradle-cloudbees-plugin. A package acts as a container for artifacts produced by a specific project. You can store any number of artifacts in a package.
4. Any artifact you publish to this package can only be downloaded as a Gradle project dependency if you provide your credentials in the repository configuration. To make this package public to any Gradle user, you can request it to be synced with Bintray’s JCenter, a free-of-charge public Maven repository. Only after JFrog approves your request will you be able to make your artifacts public.
Don’t worry if you get lost anywhere during the setup procedure or have additional questions. The Bintray user guide (https://bintray.com/docs/help/bintrayuserguide.html) can give you a more detailed insight into Bintray’s terminology and serves as a good quick-start manual. You’re going to bring your plugin artifacts into Bintray.
Uploading artifacts to a Bintray package
Architecturally, uploading artifacts to Bintray doesn’t look any different from your regular upload to a remote Maven repository (figure 14.5). The main difference is that you can share an artifact located in a private repository with JCenter, a public repository.
Figure 14.5. Publishing artifacts to Bintray

Bintray doesn’t require you to sign your artifacts before you upload them, but gives you the option of signing them after the fact. Therefore, you’ll only need some minor modifications to your original build script, as shown in the following listing. You’ll need to define a new Maven repository, provide the repository URL of your package, and give the Bintray credentials of your account.
Listing 14.11. Publishing to Bintray repository
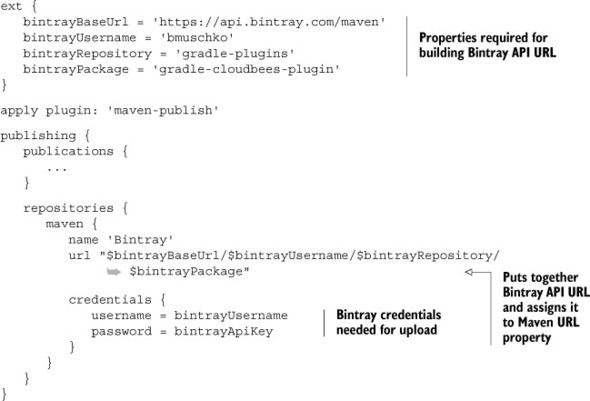
For security reasons, keep the credentials in the gradle.properties file under your home directory. The contents of this file should look similar to the following properties:
bintrayUsername = bmuschko
bintrayApiKey = 14a5g63385ad861d4c8210da795
You used an API key instead of a password in the credentials configuration block. You can find your API key in Bintray’s dashboard under the link Your Account > Edit > API Key. You’re all set; time to make the world a better place by publishing your plugin artifacts:
$ gradle publishPluginPublicationToBintrayRepository :generatePomFileForPluginPublication :compileJava UP-TO-DATE :compileGroovy UP-TO-DATE :processResources UP-TO-DATE :classes UP-TO-DATE :groovydoc UP-TO-DATE :groovydocJar UP-TO-DATE :jar :sourcesJar UP-TO-DATE :publishPluginPublicationToBintrayRepository Uploading: org/gradle/api/plugins/gradle-cloudbees-plugin/0.1/gradle-
Looks like the upload worked! You can also view the uploaded artifacts in the Bintray dashboard. The file browser under the package gradle-cloudbees-plugin > Versions > 0.1 > Files should look similar to figure 14.6.
Figure 14.6. Uploaded artifacts in Bintray dashboard

Never underestimate the power of open source. Once you put an artifact on a public repository, other developers may start to use it. Bintray doesn’t prevent you from deleting already-published versions of an artifact. Try to stay away from deleting existing versions of your artifacts because it might break other developer’s builds. If you need to fix a bug in your code, make sure to release a new version of your artifact and communicate the bug fix.
Consuming dependencies from Bintray’s JCenter
You published the artifacts and made them available on JCenter. They’re now ready for consumption. To configure a Gradle project to use your plugin from Bintray, declare a new reference to the JCenter repository available under the URL http://jcenter.bintray.com, as shown in the next listing.
Listing 14.12. Consuming the published plugin from Bintray

Looks pretty straightforward, right? Let’s also discuss what steps are required to publish the same plugin to Maven Central.
14.3.2. Publishing to Maven Central
Maven Central (http://repo1.maven.org/maven2/) is probably the most popular public repository for binary artifacts, particularly open source projects. Sonatype Nexus, responsible for managing the artifacts, forms the backbone of the repository. Figure 14.7 shows the interaction with Sonatype OSS.
Figure 14.7. Publishing artifacts to Sonatype OSS

Sonatype OSS has more specific requirements for publishing artifacts than Bintray. The following checklist (described in more detail in the usage guide under https://docs.sonatype.org/display/Repository/Sonatype+OSS+Maven+Repository+Usage+Guide) explains how to make binaries available to the world:
1. Sign up for a new Sonatype JIRA account at https://issues.sonatype.org/. You’ll need to wait until your account has been approved.
2. Create a new JIRA ticket at https://issues.sonatype.org/browse/OSSRH/ that describes the meta-information of your artifact (for example, groupId, project URL, and so on). Once your request is approved, you can start publishing with the requested groupId. For publishing with a different groupId, you’ll need to create another JIRA ticket.
3. Generate GNU Privacy Guard (GPG) signatures for all artifacts you wish to publish (shown in figure 14.7 with the file extension .asc). To generate these signatures, you can use the Gradle signing plugin. Check out the plugin documentation page for more information. One word of warning: at the time of writing, the new publishing API doesn’t provide out-of-the-box signing support. You may have to fall back to the old publishing API to achieve this.
4. Publish the artifacts with Gradle.
5. Log in to the Sonatype OSS user interface at https://oss.sonatype.org/. Navigate to the Staging Repositories page, choose your artifact, and press the Close button. After staging the artifact, it’s ready to be released. Press the Release button to initiate final release.
6. Before the promoted artifact can be accessed via Maven Central, Sonatype OSS needs to sync it with the central repository. This usually takes several hours.
7. Once an artifact is published, it can’t be deleted or modified.
The publishing process to Sonatype OSS requires a lot of manual steps and even more patience to wait for approvals. If you’re unsure which public repository to choose for your project, I recommend using Bintray over Sonatype OSS. Next, you’ll learn how to apply the concepts we’ve discussed so far to your To Do application.
14.4. Artifact assembly and publishing as part of the build pipeline
In the last chapter, you learned how to set up and configure Jenkins jobs to model a build pipeline for your To Do application. After getting to know the core concepts of creating a distribution and publishing it to a binary repository, you can now apply your knowledge to your web application. First, you’ll make some extensions to your existing Gradle build, and then you’ll extend your build pipeline by configuring a Jenkins job. Figure 14.8 shows where you stand in the process.
Figure 14.8. Creating the distribution in the context of the build pipeline

In the context of continuous delivery, there are some important practices to discuss. They ultimately determine how you’ll implement the artifact packaging and publishing.
14.4.1. Build binaries once
Before an application can be deployed to a target environment—for example, a UAT (user acceptance test)—for manual testing by the QA team, or to production to give it into the hands of the end users, the deliverable, also called the deployable artifact, has to be built. It’s not uncommon for teams to rebuild this deliverable for each environment individually. This practice is often based on the fact that they need to include environment-specific configuration; for example, to point to a dedicated database set up for that environment. While this approach works, it creates the unnecessary risk of introducing a difference to the deliverable. For example, the dependency manager may pick a newer version of a third-party library that became available on a repository that you didn’t intend to include. To avoid any side effects, you should only build your deliverable once and store it in a central location. As you learned earlier, a binary repository is the perfect fit for this use case.
14.4.2. Publish once, reuse later
Binary repositories require you to publish an artifact with unique attributes. In chapter 5, you learned that a Maven repository describes these attributes as groupId, artifactId, and version, also called coordinates. The main distinguishing difference between each artifact built by your pipeline is the version. The two other attributes, groupId and artifactId, will likely never change once you’ve settled on a meaningful value. Over time, you’ll notice that more and more versions of your artifact will be stored. Uploaded artifacts will stay in your repository until you delete them. Please refer to the product’s documentation on how to best achieve this. Figure 14.9 illustrates the process of publishing to a repository with incremental versions.
Figure 14.9. Publishing a WAR file to Artifactory with different versions

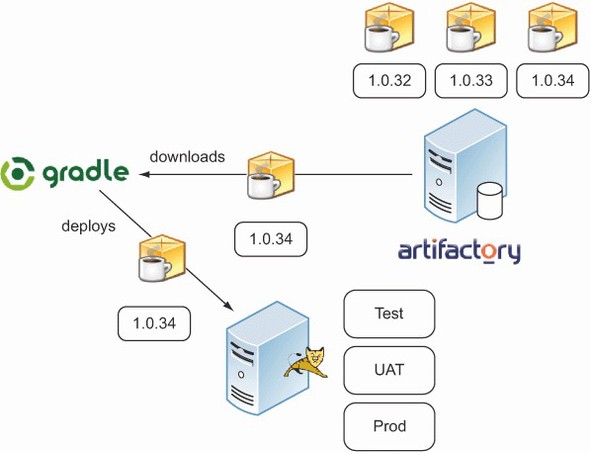
Once the artifact is uploaded to a binary repository with a specific version, you can retrieve it by these attributes and reuse it for later steps in the pipeline. A typical use case would be the deployment to various environments. Many repository products expose a RESTful API for downloading artifacts via HTTP(S). The URL includes the dependency attributes to uniquely identify the artifact. Figure 14.10 shows the download of a published artifact with a particular version from Artifactory for successive deployment purposes.
Figure 14.10. Retrieving a WAR file from Artifactory for deployment purposes
With this background information in mind, you’ll start by defining the versioning scheme for your project.
14.4.3. Picking an appropriate versioning scheme
Versioning your artifact becomes important at the time of assembly. In this section, we’ll discuss which versioning scheme plays well with the core principles of continuous delivery and how to implement an appropriate strategy with Gradle. Some build tools propose a standard format for your versioning scheme. Let’s see how Maven does it.
Maven’s versioning scheme
Conceptually, Maven distinguishes between snapshot and release versions. A snapshot version of an artifact indicates that it’s still under development and not ready to be released to production. This status is indicated by the filename suffix -SNAPSHOT (for example, todo-webapp-1.0-SNAPSHOT.war). Whenever the artifact is published to a binary repository, it’s uploaded with the same version. Any consumer of this artifact will only be able to retrieve the latest version of that snapshot version. Because there’s no concrete version attached to an artifact, you can’t link it to a unique revision in the VCS. This can become a major drawback when trying to debug an issue. For that reason, snapshot versions of a deliverable should never be deployed to the production environment.
At some point in development, it’s determined that the software is feature-complete. Once it passes the QA process, it’s ready to be released to production. At that time, the -SNAPSHOT suffix is taken off the version and it’s released to production. Now you’re dealing with a release version of the artifact. Ultimately, this means having to modify the version attribute in the POM file and checking it into VCS. Figure 14.11 demonstrates this versioning scheme.
Figure 14.11. Applying Maven’s standard versioning scheme in a build pipeline

A new development cycle starts by bumping up the major and/or minor version of your project; the -SNAPSHOT suffix is added again. What’s wrong with this way of assigning a project version? This is best explained by one of the core principles of continuous delivery.
Every commit can become a release
An important principle of continuous delivery is that every commit to your code base under version control can become a potential release to production. Of course, this will only happen if the software passes all phases defined by the build pipeline with the quality standards agreed on by the team.
Maven’s versioning philosophy is diametrically opposed to this release strategy. It assumes that you work on a feature for a certain period of time until it’s actually released. To be able to uniquely identify a version of an artifact during development, as well as in the live environment, you’ll need to set an appropriate version at the initial stage of your build pipeline. This version will carry through all the way to the pipeline stage that deploys the deliverable to production (figure 14.12).
Figure 14.12. Setting a dynamic, incrementing version number at the initial phase of the build pipeline

Next, we’ll look at how such a versioning scheme can be implemented with Gradle.
Versioning scheme fitted to continuous delivery
In chapter 4, you learned how to assign an instance of a custom class to determine the project version. You can directly apply this knowledge to build the project version for your To Do application. The exemplary version format will look like figure 14.13. It consists of three attributes: major version, minor version, and a build number.
Figure 14.13. Versioning scheme for To Do application
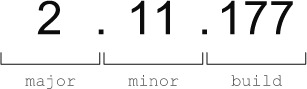
The major and minor attributes of the versioning scheme are configured in Gradle. They’ll change less often (for example, to indicate a new feature) and have to be incremented manually. The dynamic part of this versioning scheme is the build number. It’s incremented every time a build is kicked off—that is, at the initial step of the build pipeline.
Let’s look at the actual implementation of this versioning scheme in Gradle. The Groovy class named ProjectVersion, which resides in the package com.manning.gia, backs the version representation. Because you want to share this class among all projects of your build, you’ll create the class in the buildSrc directory, as shown in the following directory tree:
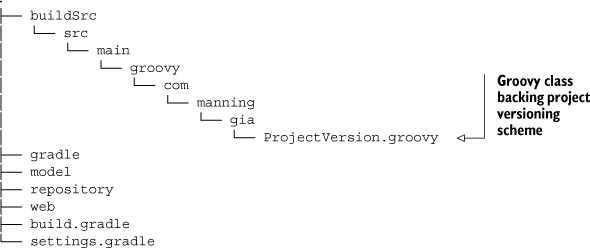
Let’s look at the class. The following listing shows the contents of the file Project-Version.groovy.
Listing 14.13. Groovy class representing the project version

You know that Gradle automatically compiles every class under the directory buildSrc when the build is run. This compiled class can now be used in any of your build scripts to implement the versioning scheme. For a clean separation of concerns, you’ll create a new script plugin in the directory gradle named versioning.gradle. As shown in the next listing, you import the class ProjectVersion, instantiate it with appropriate values, and assign it to the property version of org.gradle.api.Project.
Listing 14.14. Setting build information as script plugin

The build number you set here is an environment variable named SOURCE_BUILD _NUMBER. This variable is automatically available to your build when you execute it as part of your Jenkins build pipeline. In the last chapter, you set it as part of your initial job configuration via the parameterized trigger plugin. For a quick refresher, you may want to quickly jump back to section 13.5.2. With your versioning script plugin in place, you can now apply it to all projects of your build with the help of the allprojects configuration block, as shown in the following listing.
Listing 14.15. Providing the version to all projects of the build
allprojects {
   ...
   apply from: "$rootDir/gradle/versioning.gradle"
}
You can easily emulate building your WAR artifact without having to execute the Jenkins build pipeline. All you need to do is set the environment variable SOURCE_BUILD _NUMBER on the command line. The following example demonstrates how to assign the build number 42:
- *nix: export SOURCE_BUILD_NUMBER=42
- Windows: SET SOURCE_BUILD_NUMBER=42
If you assemble the WAR file now, you’ll see that the correct version number is applied to your artifact. You’ll find the correctly named file web-1.0.42.war under the directory web/build/libs.
Being able to identify a unique version of your artifact is essential for two reasons. It implies a releasable version and enables you to map the binary to the source code by tagging it in your VCS. The same versioning information can be included into the artifact to make it self-describing.
14.4.4. Including build information in a deployable artifact
Versioning information isn’t only useful at build time. On occasion, you may also want to know what version of your application is deployed to a given environment. This can be achieved by including the build information as a property file generated by a new task named createBuildInfoFile. At runtime, this property file can be read and displayed anywhere in your web application. The following listing demonstrates the required task configuration in the build file of your web subproject.
Listing 14.16. Including build information in a WAR file

To give you an idea of how the generated file may look, see the following example:
#Tue Apr 23 06:44:34 EDT 2013
version=1.0.134
timestamp=2013-04-23 06:44:11
We won’t discuss the custom code required to read and display these properties in your To Do application. Please refer to the book’s code examples to see how to achieve this with Java. With your artifact well prepared, you’re ready to push it to an internal binary repository for later deployments. Next, you’ll adapt the publishing code you wrote at the beginning of this chapter to upload the WAR file.
14.4.5. Publishing your To Do application WAR file
Publishing the WAR file to an internal Artifactory repository isn’t magic. You already have the essential knowledge on how to do this. The major difference here is that the software component you’re about to publish is a WAR file instead of a JAR file, as shown in the following listing.
Listing 14.17. Publishing to a remote Maven repository

All it takes to upload the WAR file is to run the task with the name publishToDoWeb-AppPublicationToRemoteArtifactoryRepository. Remember that this task name is put together by the publishing API based on the assigned publication and repository name. If you check the generated POM file, you may notice that a WAR publication doesn’t define any external dependencies. This is for a good reason: they’re already bundled with the WAR file in the directory WEB-INF/lib. In the next section, you’ll wire up this phase of your build pipeline to the existing jobs in Jenkins.
14.4.6. Extending the build pipeline
Creating the distribution and publishing it to a binary repository is an essential step for delivering your To Do application. You already implemented the Gradle side to support this functionality. Now it’s time to extend your build pipeline by configuring the corresponding job on Jenkins. From the last chapter, you may remember that you set up three Jenkins jobs executed in the following order:
1. todo-initial: Compiles the source code and runs the unit tests.
2. todo-integ-tests: Runs the integration tests.
3. todo-code-quality: Performs static code analysis using Sonar.
Bring up the Jenkins dashboard and add a new job called todo-distribution. To simplify its creation, feel free to clone it from the existing job named todo-code-quality. After the job is created, you’ll need to make some additional changes to step 3 of your build pipeline.
Step 3: Code quality
Add a parameterized build action that defines a build trigger on the job named todo-distribution. As far as parameters go, you’ll reuse the existing ones by choosing the option Current Build Parameters.
Perfect, you connected step 3 to step 4 by making it the downstream project. Next, you’ll put in some finishing touches on your newly created job.
Step 4: Distribution and publication
The configuration for this job looks very similar to the previous one. Have a quick look at this checklist to see if it’s set up correctly:
- In the Source Code Management configuration section, choose the option Clone Workspace and choose the parent project todo-initial.
- As the build step, you want to assemble the WAR file and publish it to Artifactory. Add a build step for invoking your Gradle script using the wrapper and enter the tasks assemble publish.
- Define the build name by incorporating the upstream build number parameter: todo#${ENV,var="SOURCE_BUILD_NUMBER"}.
With this configuration in place, your build pipeline view in Jenkins should look similar to figure 14.14. To verify its correct behavior, make sure to take the pipeline for a test drive.
Figure 14.14. Build pipeline view

Given the current status of your build pipeline, you’re close to deploying your To Do application to various target environments. Keep on reading to learn how to approach this task.
14.5. Summary
Most software needs to be assembled before it can be deployed to a target environment or installed to a particular location. During the assembly process, individual software components need to be put together in a meaningful, consumable format. A software delivery doesn’t have to be limited to a single artifact. Often it consists of multiple artifacts or distributions cut for a specific group of stakeholders or runtime environments.
Gradle supports creating artifacts for a wide range of archiving formats through core custom tasks like Jar or Zip, some of which are automatically preconfigured for your project if you apply a certain plugin. In addition to this functionality, the Gradle distribution plugin can be used to describe custom distributions through an expressive DSL, without actually having to define tasks in your build script. With these tools in your toolbox, it’s simple to produce the artifacts you need and flexibly react to new requirements for your delivery process.
Once the deliverable artifacts are built, they can be shared with other projects, teams, or literally every developer on the planet. Binary repositories provide the infrastructure for uploading, managing, browsing, and consuming any number or type of artifacts. In this chapter, you learned how to use Gradle’s publishing plugin to interact with a local or remote Maven repository. You took your plugin project from chapter 8, assembled the plugin JAR file, generated individualized metadata, and uploaded it to Artifactory, a popular binary repository. The most convenient option for sharing open source projects is to bring them into a public, internet-accessible repository. We discussed how to set up an account on Sonatype OSS (a.k.a. Maven Central) and JFrog Bintray and applied the publishing process to both repositories.
In the context of continuous delivery, assembling and publishing artifacts plays a crucial role. Whenever possible, you’ll want to package the artifacts just once to avoid potential side effects. After uploading the artifacts to a repository, they can be reused in a later step of the process for deployment purposes. You learned how to implement a flexible versioning strategy to clearly identify a set of artifacts. Later, you extended your build pipeline with a new job for packaging and publishing the WAR file produced by your To Do application.
In the last chapter of this book, you’ll finally roll out your To Do application to various target environments, write smoke tests to verify a successful deployment, and tag the release in version control.