
Lesson 35
AJAX
The web was designed to operate with the HTTP protocol. As mentioned previously, the HTTP protocol is a simple request/response protocol: The browser requests a resource, and a response is received and rendered.
This model worked well for document-centric websites because a document (an HTML page) or image could be requested and the response rendered directly in the browser. This model does not work so well for dynamic web applications.
A common requirement for web applications is to request additional information after a page has loaded. For instance, a browser-based chat application will constantly check for new messages and display them immediately via DOM manipulation. Without this functionality, the user is required to constantly refresh the entire web page to check for new messages.
Although it is possible to automatically refresh an entire web page at periodic intervals, the refresh process will not only cause a very noticeable delay but it will interrupt whatever the user is doing. For instance, if the user was halfway through typing a message, this message would be cleared out and lost.
In order to support web applications such as a chat application, Microsoft introduced a JavaScript feature into Internet Explorer called the XMLHttpRequest object all the way back in 1999. This allowed HTTP requests to be performed using JavaScript after the web page had loaded, and the response to be processed and incorporated directly into the DOM.
XMLHttpRequest was eventually reverse engineered into other browsers, and this approach has come to be called AJAX. Although AJAX predates HTML5, the technology behind it has been standardized as part of the HTML5 standards process.
Although it was slow to catch on, AJAX was potentially the most important technology leading to the widespread adoption of HTML-based web applications because it was finally possible to create truly dynamic web applications. A truly dynamic web application not only changes in response to user input, but it changes in response to new information received from external sources.
AJAX stands for Asynchronous JavaScript with XML:
- It is asynchronous because the HTTP request does not block the browser thread; instead, the HTTP response can be processed via a browser callback. This is an extremely important feature because it means the browser does not freeze while an HTTP request is in-flight.
- If AJAX were not asynchronous, the user of the imaginary chat application would not be able to continue typing a message while the browser was checking for new messages.
- AJAX is based on a JavaScript object called
XMLHttpRequest. As you will see, however, AJAX is typically used via libraries such as jQuery becauseXMLHttpRequestdoes not have the most intuitive API. - AJAX was originally used primarily with the XML data format. AJAX is now more often coupled with the JSON data format. Essentially, you can use any data format you want with AJAX.
This lesson will introduce AJAX and the jQuery functions that can be used to simplify server interactions. AJAX is different from the other technologies that you have looked at so far, however, because it also assumes code will be deployed to the web server to dynamically generate responses to requests.
Server-side technologies are beyond the scope of this book; therefore, the examples that you will look at will be based on static JSON responses. If you would like to learn more about creating server-side services for responding to AJAX requests, you may might want to look at technologies such as PHP or Node.js.
AJAX Requests
In this section, you will request data from the web server, and the web server will return a response from a static file. In order to make this available, take the contacts.txt file from the previous lesson (or from the book's website), rename it contacts.json, and copy it to the same directory as contacts.html. Once you have completed these steps, verify that it can be accessed from http://localhost:8080/contacts.json.
You can now write code for requesting this data from the web server after the web page has loaded. In this case, you will envisage a web application where many different clients can save contact information to a central repository. You can then synchronize with this central repository on request and save a copy of any contacts returned.
Begin by adding a new section to contacts.html, below the section added in the previous lesson:
<section id="serverImport">
     <div class="formRow">
        <a id="importFromServer" href="#">Import from server</a>
     </div>
</section>
Change the CSS in contacts.css so that this section uses the same styles as the fileImport section.
You will now add an event listener to this hyperlink in the init method of contacts.js, and add code to invoke the server:
$(screen).find('#importFromServer').click(function(evt) {
$.get("contacts.json", function( data ) {
console.log(data)
});
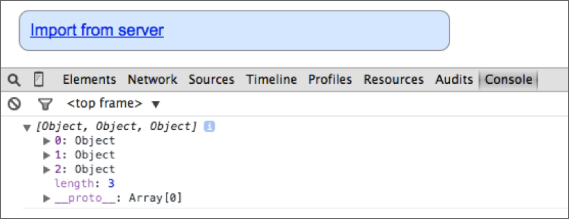
});With this code in place, open the console and press Import from server. Immediately after clicking this, the console should print out the result shown in Figure 35.1. This shows that three contact objects have been received in an array from the server.
The simplicity of this code hides the complexity of the operations that are being performed in the background:
- An HTTP GET request is sent to the server requesting a resource called
contacts.json. This is triggered by the invocation of$.get, which accepts the relevant URL as its first parameter. - A callback function is registered to listen for a response from the server. This is provided as a second parameter to
$.get. - The jQuery library receives an HTTP response. It detects that the response conforms to the JSON format and automatically parses the response into an array of contact objects.
- The parsed response is passed to the registered callback.
The beauty of libraries such as jQuery is that they abstract complex functionality behind a simple façade.
jQuery also supports an alternative function called $.ajax. This provides you more control over the underlying request and response, but is not necessary in most situations. For example, the previous example could be replaced with the following:
$.ajax({
    url: "contacts.json",
    dataType: "json",
    cache : false,
    type : "GET",
    timeout: 5000,
    success : function(data) {
        console.log(data);
    },
    error: function(jqXHR, textStatus, errorThrown ) {
        console.log(errorThrown);
    }
});
As you can see, this method allows you to specify:
- The URL of the request.
- The data format of the response. As you have seen, jQuery can usually determine this without it being specified.
- Whether the browser cache should be bypassed. Typically, you do want to avoid caching when requesting data from the server because the same request may result in a different response.
- The HTTP method to use: typically either
GETorPOST. - The maximum time (in milliseconds) to wait for a response before the request times out.
- The success and error callbacks.
In the previous example, the response contained JSON-encoded data. It is also common for an AJAX response to contain HTML-encoded data, which can then be injected directly into the DOM at the appropriate location.
In order to demonstrate this, create a resource in the same directory as contacts.html called notifications.html. Add the following HTML fragment to this file:
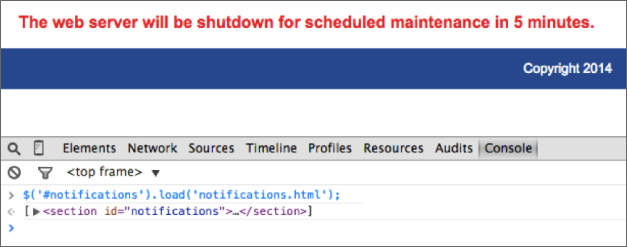
<p style="color:red;font-weight:bold;margin-left:20px;">
The web server will be shutdown for scheduled maintenance in 5 minutes.
</p>
Notice that this is only a fragment of HTML, not intended to be loaded directly into a browser.
Now, add the following section to contacts.html:
<section id="notifications">
</section>
This is an empty section that will be populated after the web page has loaded.
You can now reload the web page and execute the following into the console:
$('#notifications').load('notifications.html'),As soon as you execute this, the notifications.html resource will be loaded from the web server and populated into the element with the ID notifications, resulting in the effect shown in Figure 35.2.
You will notice in this case that you have not even registered a callback for loading the markup; the load method automatically assumes that when the response is received it should be loaded directly into the element selected.
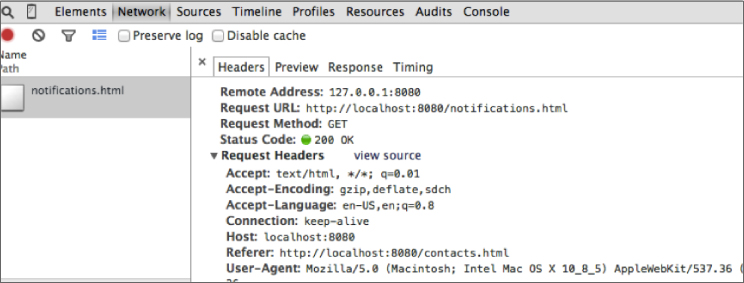
On a side note, you can also use the Network tab of the developer tools to analyze the underlying HTTP request and response. For example, Figure 35.3 shows the request sent in the previous example.
In most web applications, the HTML code fragment will be automatically generated based on specific criteria rather than a static block of HTML. In order to facilitate this, the second parameter to load can be an object or string that will be sent to the server along with the request. For example:
$('#notifications').load('notifications.html', {name:'dane'});Typically, whenever the browser needs to send data to the web server, the underlying HTTP method used will be POST rather than GET. If you execute this call, you should be able to confirm in the Network tab that the load method has automatically switched to POST and automatically encoded the properties from the object into the form data.
jQuery also provides a general purpose method called $.post that can be used for sending data to the server on a request and processing the response in any manner required.
Try It
This Try It looks at how you can create different themes for the web application so that users can choose the color scheme that suits them. In this case, themes will be developed as JavaScript files, and these will be dynamically loaded and executed via AJAX when selected by the user.
If a website supported many themes, it would be a waste of bandwidth to download all the themes for users because they are likely to use only one or two. It therefore makes far more sense to download themes “on-demand.”
The book's website contains three sample theme files:
orange_theme.jsred_theme.jspurple_theme.js
You can either use these or create your own. Each theme simply uses the jQuery css method to manipulate the background of elements, but you can choose to add more interesting effects if you like.
The theme files provided conform to the following format, but with different colors in each case:
$('header, footer').css('background', 'linear-gradient(to top, #C644FC , #5856D6)'),
$('thead').css('background', 'linear-gradient(to top, #C644FC , #5856D6)'),
$('#fileImport, #serverImport, #chooseTheme').css('background', '#DEDDF7'),
Lesson Requirements
In this lesson, you will need a set of theme files, which can be downloaded from the book's website. You will need a text editor and Chrome to complete this Try It.
Step-by-Step
- Open
contacts.html,contacts.js, andcontacts.cssin your text editor. Attempt to create the section shown in Figure 35.4 for selecting themes. This can be created using the knowledge techniques learned earlier in the book.
- Each square should be represented by a hyperlink element. The background of each square should be the dominant color in the theme. Each square should also be given a data attribute specifying its related JavaScript theme file. My version can be found at the end of this lesson, and produces the design seen in Figure 35.4:
- Add a click listener to the squares created in Step 1. Start by extracting the relevant script file from the element's data attribute.
- This code should be added in the
initmethod ofcontacts.js. - Use the jQuery
$.getScriptmethod to load and execute the relevant script from the server. The URL of the script should be passed as the first parameter to$.getScript. - Use the optional second parameter of
$.getScriptto register a callback method. Inside this, set a property in web storage indicating the theme file that the user has selected. This will allow you to remember the user's preferred theme when the page is reloaded. - When the web page is loaded, check to see whether a theme has been saved in web storage. If it has, use
$.getScriptto load this theme. This code can be placed in the$(document).readycallback ofcontacts.html.
The following are the HTML changes I added for the themes section:
<section id="chooseTheme">
    <div class="formRow">Choose a theme
        <a class="theme" href="#" style="background:#C644FC" data-theme-file="purple_theme.js"></a>
        <a class="theme" href="#" style="background: #FF5E3A" data-theme-file="red_theme.js"></a>
        <a class="theme" href="#" style="background:#FF9500" data-theme-file="orange_theme.js"></a>
    </div>
</section>
The relevant CSS changes were as follows:
#fileImport, #serverImport, #chooseTheme {
    margin: 20px;
    border: 1px solid #999999;
    border-radius: 10px;
    width: 400px;
    padding: 10px 10px 0px 10px;
    background: #DAECFF;
}
.theme {
    width: 20px;
    height: 20px;
    display: inline-block;
    border: 1px solid #999999;
    border-radius: 3px;
}
I then added the following to contacts.js to listen for the user selecting a theme:
$(screen).find('.theme').click(function(evt) {
    var url = $(evt.target).data().themeFile;
    $.getScript(url, function() {
        localStorage.setItem('theme', url);
    });
});
Finally, I added the following to the $(document).ready section:
if (localStorage.theme) {
    $.getScript(localStorage.theme);
}