
Lesson 19
jQuery Events
Although you have come a long way in your understanding of jQuery, it is not possible to unlock the full power of jQuery until you are introduced to jQuery events.
jQuery is typically used to manipulate the DOM after the page has loaded, but an event needs to trigger this. This event might be:
- A mouse event, such as the user clicking on an element
- A keyboard event, such as the user typing into an input field
- A form event, such as the value of a select element changing
- A screen event, such as the window being resized
Just as it is possible to listen for events such as these using the native DOM API, it is possible to listen for these events with jQuery. In fact, jQuery is actually providing a wrapper around DOM events so all the events discussed in this lesson are ultimately based on the underlying DOM events.
Although this lesson is technically an introduction to jQuery events, I will use it as an opportunity to bring together everything you have learned about jQuery so far.
Registering Event Listeners
Registering event listeners begins with selecting the element that will generate the event. Once selected, the appropriate method is invoked to register an event listener, and it is passed a callback function that should be invoked when the event occurs. For instance, this code can be added to the init function in contacts.js to add a mouse click listener to the submit button:
$(screen).find('form input[type="submit"]').click(
    function(evt) {
        evt.preventDefault();
    }
);
This code first finds the submit button inside the form, and then calls the click method on it. As you can see, the callback function accepts an event object that contains important contextual information about the event that has occurred. In this example, you are invoking a method on the event object to prevent the default behavior of the submit button, which would be to post the form data to the server.
You can now enhance the event listener to perform a number of other tasks:
- Check whether the form is valid according to the rules you added in Lesson 8.
- If the form is valid, extract a serialized version of the form using the function you wrote in the previous lesson.
- Create a new
trelement based on the data in the serialized object. - Add the new
trelement to the table body.
The event listener for this will be one of the most complex blocks of code you have seen so far, so take a look at it first: I will then walk you through it line by line:
$(screen).find('form input[type="submit"]').click(
    function(evt) {
        evt.preventDefault();
        if ($(evt.target).parents('form')[0].checkValidity()) {
            var contact = this.serializeForm();
            var html = '<tr><td>'+contact.contactName+'</td>'+
                '<td>'+contact.phoneNumber+'</td>'+
                '<td>'+contact.emailAddress+'</td>'+
                '<td>'+contact.companyName+'</td>'+
                '<td><time datetime="'+contact.lastContacted+'">'+
                contact.lastContacted+'</time>'+
                '<div class="overlay">'+contact.notes+'</div></td></tr>';
            $(screen).find('table tbody').append(html);
        }
    }.bind(this)
);
You have already looked at the purpose of the first line of the function. The second line of the function tests whether or not the form is valid. First, this line finds the jQuery element that has generated the event $(evt.target); from this you can use the parents function to find the form that the event occurred within.
Once the form has been found, you can use the native DOM method checkValidity to determine if the form is valid. Because this is a native DOM method, you convert the jQuery selection to a native DOM object by accessing the first (and only) element in the selection using [0]. It is also possible to use .get(0) to achieve the same result.
You only want to execute the rest of the functionality in this event listener if the form is valid so the remainder of the function is inside an if statement.
Once you have confirmed that the form is valid, you next use the serializeForm method to create an object from the data in the form. Because this method resides on the same object, you would expect to invoke this method by prefixing it with this:
var contact = this.serializeForm();There is, however, more to this line of code than meets the eye. The event listener itself is a function inside a method. When a function is placed inside a method, the object it uses as its environment is not the object itself, as you can see in the following simple example:
var obj = {
    methodA : function() {
        console.log('Outer this is '+this);
        function inner() {
             console.log('Inner this is '+this);
        }
        inner();
    }
}
obj.methodA();
This block of code creates an object with a single method called methodA. Inside this method, a function is created called inner, which is then invoked. At the end, methodA is invoked: This will cause both the method and the inner function to write to the console the identity of their this reference. Somewhat surprisingly, it prints the following:
Outer this is [object Object]
Inner this is [object Window]
Because the inner function uses the window as its this object, it cannot invoke methods or properties on the object it is actually executing within.
There are two common solutions to this problem. The first is to declare a local variable with a reference to this, and use that inside the function. Traditionally, the local variable is named that.
var obj = {
    methodA : function() {
        console.log('Outer this is '+this);
        var that = this;
        function inner() {
             console.log('Inner this is '+that);
        }
        inner();
    }
}
obj.methodA();
Executing this now produces the expected results:
Outer this is [object Object]
Inner this is [object Object]
The other way to solve this problem is to use the bind method I introduced earlier in the book. As you remember from Lesson 12, the bind method allows you to provide an object that will act as the this reference for a function, and it returns a new function permanently bound to it. You can therefore rewrite this functionality as follows:
var obj = {
    methodA : function() {
        console.log('Outer this is '+this);
        inner  = function() {
            console.log('Inner this is '+this);
        }.bind(this);
        inner();
    }
}
obj.methodA();
Notice that you are now saying that inner is a function bound to the methodA's this reference (which is the object); thus, both the method and the function have the same reference to this, and the function produces the expected results:
Outer this is [object Object]
Inner this is [object Object]
This can be a difficult concept to grasp, so you may want to work through the preceding examples to assure yourself exactly how it works.
As you can see, this is exactly the approach you have used with the click event listener, and therefore this.serializeForm() works inside the event listener, just as it would outside the event listener.
If you need further evidence of the problem being solved here, remove .bind(this) once you have the code working: Without this code, this.serializeForm() will attempt to access a function called serializeForm on the window object, which will be undefined.
Once the object has been extracted from the form, you use simple string concatenation to create a tr element populated with data. String concatenation such as this is somewhat error prone, so you will find a better solution to this functionality in the next lesson.
Once the HTML has been constructed, it is simply added as the last child of tbody using the append function.
Once you have a working example, you will add two additional lines to the end of the event listener to:
- Clear the form of all values (thereby leaving it ready to add a new contact).
- Hide the input section of the page.
This can be achieved with the following two lines:
$(screen).find('form :input[name]').val(''),
$(screen).find('#contactDetails').hide();
Notice that the second line simply uses the helper method hide, rather than setting the display property to none: This achieves the same result, but is more concise.
Delegated Event Listeners
You may have noticed a couple of problems with the save functionality. For a start, the company name does not display properly (I will address this later in the book). Second, if you add notes and hover over the last contacted field, the popup does not display because the event listeners you added for the time elements were added when the DOM loaded, and this new time element did not exist at that point.
One solution to this is to add relevant event listeners after you add new elements to the DOM. This is an error-prone approach, however. A better solution is to use delegated events.
With a delegated event, you select an element you know is in the DOM when the page loads (such as the tbody element), and bind an event listener to any of its descendants (such as time elements). The great thing about delegated events is that the descendants do not need to exist when the event listener is registered; any newly added descendants will automatically be bound to the relevant event listener.
You can therefore rewrite this block of code from earlier in the book using jQuery delegated events:
var timeElements = document.getElementsByTagName('time'),
for (var i = 0; i < timeElements.length; i++) {
    timeElements[i].addEventListener("mouseenter", function(event) {
        event.target.nextElementSibling.style.display = 'block';
     });
     timeElements[i].addEventListener("mouseleave", function(event) {
         event.target.nextElementSibling.style.display = 'none';
     });
}
You can use the jQuery on method to add a delegated event listener to a particular sub-tree of the DOM. The on method accepts the following parameters:
- A space-separated list of events to listen for
- A selector to find the descendants that will generate the events
- The function to execute when the event occurs
Replace the preceding code with the following:
$(screen).find('tbody').on("mouseenter mouseleave", "td > time",
   function(evt) {
       if (evt.type === "mouseenter") {
           $(evt.target).siblings('.overlay').show();
        } else {
             $(evt.target).siblings('.overlay').hide();
        }
    }
);
Notice in this case that you register a single event listener and then determine from the event object which type of event has occurred. You then use the show and hide methods to dictate whether the popup is displayed or hidden.
If you now reload the page, first ensure that the popup functionality works for existing rows. If you now add a new contact, and save it along with a date and notes, the popup will display when the user hovers over it, just like it did for rows in the table when the page loaded.
The events you have looked at in the last two sections have dealt with mouse-based events. The other most common mouse-based events that can be listened for are:
dblclick: Similar to click, but fires only if the same element is clicked twice in quick successionmousedown: Fires when the user presses the mouse button downmouseup: Fires when the user releases the mouse buttonmousemove: Fires any time the mouse moves. Naturally, this event is fired often so it is important not to perform intensive processing every time this event fires.
Form Events
The previous sections have focused on mouse events. The other main categories of event are form events and keyboard events. These two categories are inherently linked because the focus for keyboard events will be form elements. Thus, you will group these two categories of event together.
In this section, you will create an event listener that displays how many characters the user has typed into a textarea. To begin, you will add a new span element next to the textarea in the form:
<div class="formRow">
    <label for="notes">Notes</label>
    <textarea cols="40" rows="6" name="notes" class="validated" maxlength="1000"></textarea>
    <span class="textCount"></span>
</div>
The span will be updated to include a character count every time the user types a character into the textarea.
Once this is in place, the following can be added to the init method in contacts.js:
$(screen).find('textarea').keyup(function(evt) {
    if ($(evt.target).siblings('.textCount')) {
       var characters = $(evt.target).val().length;
       $(evt.target).siblings('.textCount').text(characters + ' characters'),
    }
 });
This code starts by finding any textareas in the form, and then uses the keyup method to add an event listener whenever the user releases a keyboard key while typing in the textarea. When this occurs, you will determine if the textarea has a sibling span element for recording text counts. If it does, you will determine the number of characters currently typed into the field and update the text on the span accordingly.
If you now reload the web page and start typing into the textarea, you should see a text count updating in real time, as shown in Figure 19.1.

The great thing about this solution is that it is generic. You can enable this functionality for any future textareas by adding the relevant span as its sibling.
The other most useful form and keyboard events are as follows:
change: This event is called whenever the value in a form field changes. This can be applied to any form input field, but in the case of text-based input fields, the event only fires once the user leaves the field. This is the reason you could not usechangein the example earlier in this section.focus: This event is invoked when an input field receives focus.keydown: This is essentially the same askeyup, but is fired as soon as the key is pressed.keypress: This event is not covered by official documentation so it can vary from browser to browser. As a general rule, this is equivalent tokeydown, but only fires if the key pressed would produce a visual character; for example, it would not be fired if the Shift key were pressed.
Screen Events
The final major category of event is screen events. The most useful screen event is ready. The JavaScript examples so far have placed JavaScript at the end of the web page to make sure the DOM has loaded before element selection begins.
The ready event provides a safer way to ensure that the DOM has fully loaded before you attempt to manipulate it. It is possible to register a ready event listener by enclosing the browser's document object in a jQuery selector and invoking the ready method on it. For instance, you could change the code in contacts.html as follows:
$(document).ready(function(evt) {
    var mainElement = document.getElementById('contactScreen'),
    var screen = contactsScreen(mainElement);
    screen.init();
});
A companion function for ready is load. This is similar, but only executes when all the resources (such as JavaScript source files, images, and CSS files) have finished loading.
The other main browser-based event is the resize event. This fires whenever the user resizes the window. This event should be bound to the browser's window object:
$(window).resize(function(evt) {Animation
Earlier in this lesson, you looked at how the hide and show functions could be used instead of changing the display type of an element. As it happens, jQuery supports many other helpers for displaying and hiding elements, complete with animated effects. These are a great way to make the web page feel more alive to users.
In order to see how simple this can be, change the event listener for hiding and showing the notes popup as follows:
if (evt.type === "mouseenter") {
    $(evt.target).siblings('.overlay').slideDown();
} else {
    $(evt.target).siblings('.overlay').slideUp();
}
If you reload the web page and hover over a time element, you will notice that the popup is displayed as though it is being dragged down like a projector screen. Likewise, when it is hidden, it is as though the projector screen has been released again.
It is possible to control how long the entire effect takes by providing a time in milliseconds as the first parameter to these functions: The default is 400 milliseconds (0.4 of a second). It is also possible to control many other aspects of the animation process. These features will not be discussed in this book, but you can easily learn more from the jQuery website.
jQuery also supports other effects. For instance the fadeIn and fadeOut functions can be used to animate the opacity of an element as it is displayed or hidden. This has a similar effect to approaching an object through a thick fog: It starts out pale and blurry and eventually becomes fully opaque.
Try It
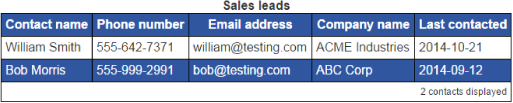
In this Try It, you will use event listeners to add new functionality to the table. When the user hovers over any row, you will change it so that the background color becomes blue and the foreground color becomes white. This will help users read across the row if they are phoning or emailing the contact. The finished result will look like Figure 19.2 when the user hovers over a row in the table.
Lesson Requirements
You will need the CRM web application, and you will need to have loaded the jQuery library using one of the techniques outlined earlier in this section of the book.
In order to work through this example, you might want to start with a simple event listener and place a breakpoint to allow you to debug code when the event is fired. This will allow you to try out code in the context of an event. Once you have working code, you can copy it into the JavaScript file.
Step-by-Step
- As with all the event listeners, you will add code to the
initmethod incontacts.js. - Because new rows can be added to the table after the DOM has loaded, the event listener will need to be a delegated event listener. Therefore, start by selecting the
tbodyelement, and use theonmethod to register an event listener. - The two events that you should listen for are
mouseenterandmouseleave. Add these as the first parameter toon. - The second parameter to
onis the element that will generate the event. Because you want to be able to hover over any element in the row, addtras the selector. - Add a function as the third parameter to
on, and have this accept a single parameter calledevt. - Within the event listener function, use the event object passed as the parameter to determine the event that has occurred. This can be extracted from the
typeproperty of the event. - If the event is a
mouseenterevent, you need to change two styles on the target of the event. This can be achieved using thecssmethod on the target of the event, as you saw earlier in this lesson:- Change the
colorproperty towhite. - Change the
backgroundproperty to#3056A0.
- Change the
- If the event is a
mouseleaveevent, you want to clear the inline styles added. This can be achieved by using theremoveAttrmethod to remove thestyleattribute. - If you reload the web page now and try this out, you will notice a problem. Only a single cell will be shaded when the user hovers over it, not the entire row.
- In order to determine the cause of this problem, set a breakpoint on the first line of the event listener.
With the breakpoint in place, hover over a cell. Once the breakpoint is hit, move to the Console tab and type
evt.target. This will confirm that the target of the event is actually atdelement rather than thetrelement that the event listener was registered with. This is because thetdelement is the specific element the user was hovering over when the event occurred. - In order to circumvent this problem, you can use the
closesttraversal operation to find the closesttrelement to the element that fired the event, and modify the style of this element.There is one remaining problem with this solution. Because of CSS inheritance, the color of the text in the overlay is also white now, meaning it cannot clearly be read. This is a perfect opportunity to use the
!importantattribute in CSS so add the following to the.overlayrule incontacts.css:color: #333333 !important;Your finished version of the code should look like this:
$(screen).find('tbody').on("mouseenter mouseleave", "tr", function(evt) {
    if (evt.type === "mouseenter") {
        $(evt.target).closest('tr').css('color', 'white'),
        $(evt.target).closest('tr').css('background', '#3056A0'),
    } else {
        $(evt.target).closest('tr').removeAttr('style'),
    }
});