
Lesson 32
Application Cache
In the previous two lessons, you learned how data can be stored inside the web browser. Although this approach meant the web application was no longer reliant on Internet connectivity to access data, the web application was still very much dependent on an Internet connection to in order to load resources such as HTML pages, JavaScript files, images, and CSS files.
For instance, if you shut down the web server and attempt to run the web application, you will receive an error message that the web page is unavailable.
There are, however, many scenarios where you might wish to use a web application without Internet connectivity. This is increasingly true now that web applications are regularly accessed from portable devices, which may not have access to networks for periods of time.
Offline-able web applications was clearly a feature that needed to be addressed in order for browser-based web applications to become a viable alternative to desktop applications; therefore HTML5 introduced a technology called the application cache.
The application cache is a mechanism for specifying a set of resources that should be stored inside the browser after they are accessed the first time. From this point forward they will be accessed directly from the browser, removing all reliance on Internet connectivity.
In this lesson, you will learn how to configure a web application to work with the application cache, along with approaches for interacting with the application cache via the JavaScript API.
Manifest Files
The key to understanding the application cache is the manifest file. This file specifies the files that should be stored inside the browser, together with any other configuration information required.
In order to get started with the application cache, create a file called contacts.appcache in the same directory as the contacts.html web page. Within this, add the following contents:
CACHE MANIFEST
contacts.html
contacts_print.css
contacts.css
contacts.js
jquery-2.1.1.js
jquery-tables.js
jquery-time.js
jquery-ui.css
jquery-ui.js
images/ui-bg_highlight-soft_100_eeeeee_1x100.png
FALLBACK:
NETWORK:
*
The application cache consists of three sections: An empty line separates these sections from one another.
The first section is introduced with the heading CACHE MANIFEST. This section lists all the resources in the web application that need to be cached offline. As you can see, each resource is listed on a new line and can consist of a relative URL, an absolute URL, or even a URL to a resource on a different web server.
The (optional) second section is introduced with the heading FALLBACK. This section allows you to specify that alternative resources should be used when a resource is unavailable and has not been cached offline. For instance, the web application may display the status of the web application using an image; the fallback section may therefore appear as follows:
FALLBACK:
online.png offline.png
This configuration states that the browser should attempt to use online.png, but if that is not available due to network connectivity, it should resort to using offline.png. In this case, there is an assumption that offline.png is included in the application cache, thereby ensuring that it is available without network connectivity.
The final (optional) section is the NETWORK section. This section specifies the files that can be loaded from the network if they are not listed in the application cache. This is almost always set to *, which means any files not listed in the application cache can be loaded from the network.
Once the manifest file has been defined, the next step is to link it to an HTML page. This will ensure that when the HTML page is requested from the server the first time, the manifest file will be automatically processed, and the appropriate resources stored in the application cache.
The application cache can be linked to an HTML page via the manifest attribute on the html element. For example:
<html lang="en" manifest="contacts.appcache">Once you have added this, open Chrome with the console open and request the contacts.html web page from the web server with the URL http://localhost:8080/contacts.html. When you do this, you should see the output shown in Figure 32.1.
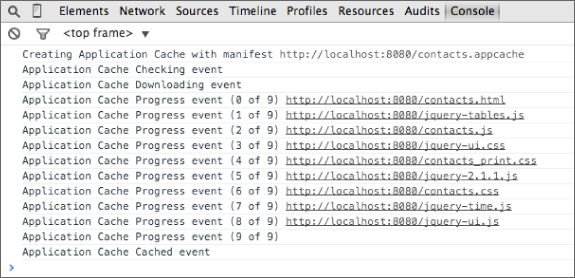
Chrome performs the following operations when it detects a manifest file:
- It first checks the manifest to see whether it has previously downloaded these resources. At this point, the browser generates a “checking” event.
- Once it determines that it needs to download resources, the browser generates a “downloading” event and begins downloading resources one by one into the cache, generating a “progress” event after each resource is cached.
- Once all the resources are downloaded, the browser generates a “cached” event.
This process is referred to as the application cache lifecycle.
As you will see shortly, it is possible to register callbacks to listen for these events. You can also use a special URL within Chrome to view any applications that have been cached. To see this, browse to chrome://appcache-internals. You should see contents similar to that in Figure 32.2:
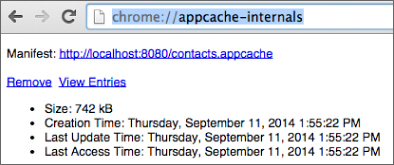
This page can also be used to see exactly which resources have been cached and to remove the application cache entirely.
You should now be able to shut down your web server and attempt to access the web application. The web application should load exactly the same as it would with the web server running, and the user should not notice anything different when using the web application.
There are two important points to note about the download process:
- If the browser cannot access one of the resources listed, it will abort the entire caching process. This means it is vitally important that if you delete a resource, you also remove it from the manifest file. It is also a good idea to check the console to ensure that the caching process is working as expected.
- When the web page is accessed, the resources are actually downloaded twice. They are initially downloaded for display to the user, and then, when the manifest is detected, they are downloaded again. You will look at this feature in more detail when you look at how resources are refreshed when they are modified.
Updating Resources
With any web application, resources are likely to change over time. This presents a problem for the application cache, however, because unlike with traditional browser caching, the browser will not ever check to see whether any of the resources have been modified.
After resources are cached, they are always served from the application cache, even if the web server is accessible. The only way to cause the browser to update resources is to change something in the manifest file itself. This is simple enough if you are adding or removing resources, but presents an issue if the resources are the same but have been updated, because nothing in the manifest would change.
The typical way around this is to add a comment to the manifest and change this comment when you need a new version of the web application to be downloaded. For instance, you could add the following to the end of the manifest:
# version 1.1The # symbol at the start of the line indicates that this is a comment and should not be processed by the browser. Despite this, a change to a comment counts as a change to the manifest.
The web browser does not behave entirely as expected when resources have changed. The behavior is as follows:
- The browser loads the web application using the cached resources.
- The manifest file is downloaded from the web server and checked to see if it has been updated.
- If it has been updated, all resources are downloaded whether they have changed or not.
This means that the browser will still be displaying the old version of the web application until the web page is refreshed in the browser. With a single page web application, it may be quite some time until the web page is refreshed so you will look at a workaround to this issue shortly.
Cache Events
As mentioned earlier, it is possible to register callbacks to listen for the various events that occur during the application cache lifecycle. This can be useful for detecting the fact that a new version of the web application is available, and potentially informing the user, or automatically refreshing the web application as a result.
The basic mechanism for registering event listeners is as follows:
applicationCache.addEventListener('updateready', function() {
    console.log('An update is ready'),
});
The applicationCache object is provided by the browser, and event listeners can be added for a variety of events via the addEventListener method. The most common of these events are:
downloading: This event fires when the browser determines it needs to download resources from the web server.progress: This event fires every time an individual resource is downloaded.error: This event fires if the manifest file cannot be downloaded, or if one of the resources cannot be downloaded.updateready: This event fires when a new set of resources has completed downloading.
It is possible to use these events to ensure the updated version of the web application is displayed immediately after it is downloaded.
There is a general purpose JavaScript function for reloading a web page:
location.reload();This means it is possible to request that the browser reload the web application as soon as a new set of resources has been downloaded and stored in the application cache:
applicationCache.addEventListener('updateready', function() {
    location.reload();
});
Try It
This Try It walks you through an example of updating resources in the application cache and detecting that they have updated correctly. The primary purpose of this Try It is to ensure that you fully understand the application cache lifecycle.
Lesson Requirements
To complete this lesson, you will need a text editor for writing code and Chrome for running the completed web page. It is also expected that you have completed the steps in the body of the lesson before starting this Try It.
Step-by-Step
- Remove the line of code that will cause the application cache to reload the web page on an
updatereadyevent. - Open the contacts web application and verify that the application cache is functioning as expected by browsing to
chrome://appcache-internals. Make a note of both the Last Update Time and the Last Access Time. - Click the View entries link, and verify that all the resources have downloaded.
- Refresh the
contacts.htmlpage in the browser and then verify that the Last Access Time is updated in thechrome://appcache-internalsweb page. You should also notice that the Last Update Time does not change. - Make an obvious change to the
contacts.htmlpage such as displaying the text in the heading. - Reload the web application and verify that the change is not visible inside the browser. This demonstrates that the resource is always accessed directly from the cache.
- Change the comment in the
contacts.appcachefile to indicate that the version has changed. - Open the console and refresh the web page. The console should show that new resources are being downloaded, but these should not be visible.
- Refresh the web page one more time. This time, the application cache should determine that no updates are required, but the changes downloaded in Step 8 should finally display.
- Browse to
chrome://appcache-internalsand verify that the Last Update Time has been updated as expected.