Lesson 34
Files
Files and file systems have always been one of the most important concepts in computing because they provide a convenient mechanism for providing input to, and storing output from, computer software.
Despite this, browsers have been extremely limited in the manner they can interact with files or the file system. This interaction has been limited to the file input type, which can be declared as follows:
<input type="file" name="selectedFile"/>This creates an input type that allows a file to be selected from the file system. For instance, in Chrome, the input field appears as you see in Figure 34.2, while in Firefox, the input type appears as you see in Figure 34.1.


Once a file is selected, its content will be submitted to the web server when the form is submitted: The file contents can then be accessed by the web server and processed.
Despite its simplicity, the file input type is extremely important to HTML, and many of the most popular sites on the Internet could not exist without it. Any time you select a file from your computer and post it to a website, you are using this input type.
Despite this, the file input type is also very constrained. These constraints stem primarily from security concerns. For instance, imagine if the browser supported the following functionality:
- Add a hidden file input field to a form, programmatically select a file using JavaScript, and programmatically submit the form to the server.
- Change the appearance of the button on the file input field so it looks like a submit button, but when it is pressed, select a file from the file system, and submit the form.
Clearly these represent huge security holes because they allow a web page to access files on your device without your knowledge or permission. It is vitally important that web pages are not able to access files from your file system in this manner.
In order to ensure that the file input field is not misused, the following restrictions apply:
- The browser dictates the appearance of the
fileinput type, and it is not possible to change this appearance with CSS or JavaScript. In addition, most browsers now prevent the user from typing a filename into a text box, and insist that the file is chosen from the operating system's file chooser. - Browsers do not allow an initial filename to be specified, even though the
valueattribute technically supports this. This is to prevent the web page from suggesting a sensitive filename. - It is not possible to interact with the
fileinput field using JavaScript. For instance, it is not possible to read the file contents without sending the file to the web server.
This lesson will examine an important API that overcomes some of these restrictions, in particular, allowing a file to be processed with JavaScript.
FileReader API
There are many reasons why it may be useful to process a file with JavaScript rather than simply submitting it to the server:
- It allows the file to be validated before it is submitted to ensure it is appropriate in terms of type, size, or contents.
- It allows the file to be pre-processed, and potentially reduces the amount of data sent to the server.
- It allows files to be processed without an Internet connection, assuming the application is loaded via the application cache.
In order to provide this functionality, the FileReader API has been introduced in HTML5. This API works with the conventional file input field, but allows you to listen for files being selected. Once the user has selected a file it is possible to read its contents via JavaScript.
It is important to realize that the FileReader API does not allow you to programmatically open files from the user's file system because this would represent a major security loophole. It is only possible to read the contents of a file once the user has explicitly selected it in some manner.
In order to demonstrate the FileReader API, you will add functionality to the CRM web application so that a file can be selected. You will assume that this file contains an array of contacts stored in JSON format, which you can then save.
In order to begin, you need to add a new section to contacts.html for selecting files. This can be added after the contactList section:
<section id="fileImport">
    <div class="formRow">
        <label for="importJSONFile">Import contacts</label>
        <input type="file" id="importJSONFile" name="importJSONFile">
    </div>
</section>
You can style this any way you like, but I added the following to contacts.css, which resulted in the design you see in Figure 34.3:
#fileImport {
    margin: 20px;
    border: 1px solid #999999;
    border-radius: 10px;
    width: 400px;
    padding: 10px 10px 0px 10px;
    background: #DAECFF;
}
There is nothing special about this file input field at this stage: It is identical to the file input fields that have been available since HTML4.
The next step is to add a change event listener to the file input field, just as you would with any other input field. The following code can be added to contacts.js:
$(screen).find('#importJSONFile').change(function(evt) {
    var reader = new FileReader();
    reader.onload = function(evt) {
        console.log('New file selected'),
        console.log(evt.target.result);
    };
    reader.readAsText(event.target.files[0]);
});
The event listener starts by constructing an instance of the FileReader object. This object contains a set of methods supporting the reading of files that have been selected.
Next, you register an onload event listener with the FileReader that will fire when the file has been read. At this stage, you have only received a notification that a file has been selected. The file will be read asynchronously by the API when requested, and the contents passed to this event listener.
Within the onload callback, the file content is available as a JavaScript string from evt.target.result. You will look at how the file contents are converted to a string shortly. In this example, you will simply write the contents to the console.
Finally, once the callback has been registered, you request the API to read the file with the following line of code:
reader.readAsText(event.target.files[0]);This will cause the file contents to be read into a JavaScript string, and will then invoke the onload callback function.
As you can see, the selected file is available from the files property of the input field. Because the file input field supports the selection of multiple files, the files property contains an array of files. In this case, I have assumed that the user has only selected a single file, but obviously it would be trivial to loop through the array and read each file selected.
In this case, I have also assumed that the file contains textual contents, and that it makes sense to read the contents into a JavaScript string. The FileReader object also supports methods such as readAsArrayBuffer and readAsBinaryString when dealing with binary files.
In order to use this API, create a file called contacts.txt that should contain three contacts encoded in JSON format. This file is available from the book's website, or you can create it yourself:
[{"contactName":"James Cook","phoneNumber":"55521882", "emailAddress":"[email protected]", "companyName":"2","notes":"This is a note","lastContacted":"09/18/2014"},
{"contactName":"William Pitt","phoneNumber":"555919911","emailAddress":"[email protected]", "companyName":"3","notes":"Test","lastContacted":"09/01/2014"},
{"contactName":"Dane Cameron","phoneNumber":"555291111","emailAddress":"[email protected]", "companyName":"3","notes":"My note","lastContacted":"09/18/2014"}]
Once the file is created, ensure that you can read it with the file input field and that its contents are printed to the console.
In addition, if you place a breakpoint on the line that reads the file, you can access information about the file, as you can see in Figure 34.4.
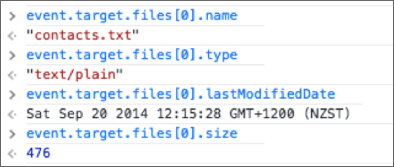
This metadata can be very useful when determining how to read the file, or even if you should read the file.
The final step is to save the contacts in the file using your existing store method. This can be achieved as follows:
            $(screen).find('#importJSONFile').change(function(evt) {
                var reader = new FileReader();
                reader.onload = function(evt) {
                    var contacts = JSON.parse(evt.target.result);
                    for (var i = 0; i < contacts.length; i++) {
                        this.store(contacts[i]);
                    }
                    location.reload();
                }.bind(this);
                reader.readAsText(event.target.files[0]);
            }.bind(this));
There are a couple of points to note about this code. The first is that it contains a callback within a callback. In both cases, the callback function is bound to this, which means that the call to this.store works as expected.
Second, note that instead of updating the table as each contact is added, you simply call reload on the web page once all the contacts are saved.
If you load the contacts.txt file, it should result in the three contacts being added to the table.
Other File-Related APIs
The FileReader API is the most widely supported of the file related APIs introduced in HTML5, but it is not the only API to deal with files and file systems.
The most ambitious of the file-related APIs is the FileSystem API. This API not only allows files to be read, but it also allows them to be created, and provides access to a full range of file system functions such as creating directories and deleting files.
This may sound like a very dangerous idea because clearly you do not want a web page deleting files or creating enormous files without your permission. For this reason, the FileSystem API does not allow the web page to access the operating system's file system; it provides the domain access to a sandboxed file system that is kept entirely separate from other domains and the underlying operating system.
For this reason, the FileSystemAPI does not provide much functionality that cannot be implemented using the other storage APIs demonstrated earlier in the book, but you may wish to investigate it further if you are writing a web application that deals extensively with files.
The biggest problem with the FileSystem API, however, is that it is not widely supported. Support currently limited to Chrome and Opera.
Try It
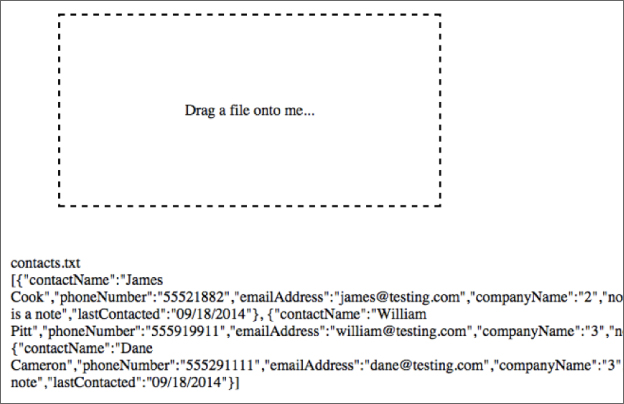
In this Try It, you look at how it is possible to select files via drag and drop. This section therefore ties together two topics: the ability to use the drag-and-drop API and the ability to read the contents of a file selected in this manner.
Using drag and drop for selecting files has become increasingly common and provides a more intuitive interface for many users.
Lesson Requirements
In this lesson, you will create a standalone web page for reading files selected via drag and drop. The web page will be based on the dropfile.html web page available from the book's website.
You will need a text editor and Chrome to complete this Try It.
Step-by-Step
- Open the
dropfile.htmlfile from the book's website in your text editor. - The function that you are required to implement is the
dropfunction. This will be invoked whenever a file is dropped onto the rectangle with the dashed border. - Recall from Lesson 9 the way in which the
dataTransferobject can be accessed. This will contain an additional property calledfiles, which will contain an array of the files selected. Assign the first element in this array to a variable calledfile. - Construct a new
FileReaderobject and add anonloadcallback. Within the callback, extract the contents of the file using the techniques outlined earlier in this lesson, and set them as the text for the element with the IDfileContents. - Use the
readAsTextmethod on theFileReaderto initiate the loading of the file stored in thefilevariable. - Access the
nameof the file, and set this as the text for the element with the IDfileDetails.
Figure 34.5 shows the result of dragging the contacts.txt file onto the drop zone.