Lesson 38
Location API
Developing web applications for mobile phones can simply mean utilizing the techniques and technologies associated with responsive web design and ensuring that the user receives the best possible experience regardless of the screen resolution.
It can also open up a whole world of possibilities, however, by taking advantage of the features and services that are unique to mobile devices. For instance, mobile devices typically provide a variety of services that can be used in applications:
- The ability to detect the location of the device
- The ability to detect motion—for instance, the user moving the device side to side
- The ability to know which direction the device is facing
- The ability to take photos and videos
- The ability to connect to periphery devices using wireless technologies such as Bluetooth
- The ability to receive and generate notifications
Unfortunately it is not currently possible to interact with most of these services via JavaScript because they are only made available with native APIs, and these vary across platforms.
One API that is available in JavaScript, however, is the Geolocation API. This lesson looks at how you can take advantage of this API to create a web application that tracks a user's motion.
The Geolocation API is available in JavaScript via the navigator.geolocation object. This API is available in all the most common browsers, regardless of the device the browser is running on.
Despite the fact that the Geolocation API is available on all devices, it has obvious uses on mobile devices because these change location on a regular basis, and the user is more likely to perform actions in relation to his or her current location. These devices also typically have more accurate mechanisms for determining location, such as GPS.
In order to see the Geolocation API in action, open contacts.html via the web server, open the console and enter the following:
> navigator.geolocation.getCurrentPosition(function(location) {
    console.log('Latitude: '+ location.coords.latitude);
    console.log('Longitude: '+ location.coords.longitude);
    console.log('Altitude: '+ location.coords.altitude);
    console.log('Accuracy: '+ location.coords.accuracy);
});
When you enter this code, Chrome adds a message at the top of the screen, as shown in Figure 38.1.

The Geolocation API specification states that the browser must obtain permission before providing access to the user's location. This is similar to the approach taken with mobile phone apps when they are installed, and it prevents websites from accessing a user's location against the user's will.
Browsers employ a variety of approaches to ask for this permission, and most will either remember the decision made by the user or provide you with an option for this decision to be remembered.
One consequence of this approach is that you can only use the Geolocation API in a web page downloaded from a web server, not from a web page loaded directly from the file system. This is because the permission is associated with your origin—localhost:8080 in this case—and pages loaded from the file system do not have an origin.
Once you click Allow, your coordinates will be printed to the console. For example:
Latitude: -41.22799199999996
Longitude: 174.88613729999998
Altitude: null
Accuracy: 25
The latitude and longitude are expressed as numbers. For latitude, a positive number indicates North, a negative number indicates South, and a value of 0 indicates the equator. The numbers will always be in the range –90 through to 90.
For longitude, a positive value indicates East, while a negative value indicates West. The value 0 indicates Greenwich, London, while all other locations have a value in the range –180 through to 180.
The Geolocation API also provides altitude information. This will typically only be available if the location information is obtained via GPS, or an in-built altimeter, but when available represents the number of meters the device is above sea level.
Finally, the API provides information regarding how accurate the location information is. As you can see, in my case Chrome was capable of finding my location within 25 meters.
Devices have a variety of mechanisms for determining your location:
- The most accurate form of location information is via GPS. Later in the lesson, you see how you can specifically request the device to provide information via GPS, where supported.
- Where GPS information is not available, the device will typically attempt to calculate its location based on the WiFi access points that are within range and their relative strengths. This is how my location was obtained in the previous example and proves reasonably accurate.
- Where a device has access to cellular networks, it may also try to triangulate its location from the signal strength of cellular towers that are within range. This will typically only be accurate to within a few hundred meters.
- Where no other information is available, the device may need to determine its location based solely on IP address. This is likely to be an approximation at best, and could be wrong by an enormous amount.
Different devices will determine location using different approaches, but the main lesson to understand is that location information will not always be accurate, and you must take this inaccuracy into account when designing web applications.
Monitor Movement
In this section, you will use the Geolocation API to monitor the distance traveled by a user, along with their current speed. In order to implement this, your web application will sample the user's location intermittently, and record the user's location at each point in time. By comparing two points in terms of both location and time, you can determine the speed that the user is traveling.
In order to implement this web application, you need a mechanism for determining the distance between two points. Although you could write this functionality yourself, it makes sense to reuse existing code where available. You will use a library created by Google, which is available on the book's website (google.geometry.js). You can also download it from the following URL:
http://maps.google.com/maps/api/js?sensor=true&libraries=geometry
Start by creating the following web page, and name it locate.html:
<!DOCTYPE html>
<html lang="en">
<head>
<meta charset="utf-8">
<meta name="viewport" content="width=device-width, initial-scale=1">
<script src="google.geometry.js"></script>
<script src="jquery-2.1.1.js"></script>
<style>
body {
font-family: Arial, Helvetica, sans-serif;
margin: 2em;
font-size: 2em color: #333333;
background:#E6DEDC;
}
#summary {
width:80%; min-height: 4em;
border: 1px solid #e2e2e2;
margin: 1em 0 1em 0;max-width: 20em;
}
.button {
font-size:2em;font-weight:bold;
color:white;background:#1BA61B;
width:7em; text-align:center;
text-decoration:none;line-height:2em;
display: inline-block;
}
.row {
padding:0.5em;
}
.row label {
width:9em;display: inline-block;
}
</style>
</head>
<body>
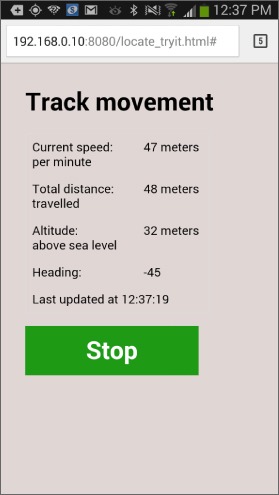
<h1>Track movement</h1>
<div id="summary">
<div class="row">
<label>Current speed:</label>
<span id="currentSpeed"></span>
</div>
<div class="row">
<label>Total distance:</label>
<span id="distance"></span>
</div>
<div class="row">
<label>Altitude:</label>
<span id="altitude"></span>
</div>
<div class="row message"></div>
</div>
<a href="#" class="button" id="activate">Start</a>
</body>
<script>
</script>
</html>This will produce the output shown in Figure 38.2.

The web page has been created according to the the principles of responsive web design, as outlined in Lesson 37, and therefore will function on small or large screens.
The screen consists of a button for starting the tracking and an area for displaying output. Notice that it also imports the jQuery library, which you will use to add dynamic functionality.
The functionality will be implemented as a module with a single public method. Add the following to the script block:
locationModule = function locationModule() {
    var lastPosition = null;
    var totalDistance = 0;
    var id = null
    function updateLocation(position) {
    }
    return {
        toggleState: function(evt) {
            if (lastPosition) {
                lastPosition = null;
                lastPositionTime = null;
                totalDistance = 0;
                navigator.geolocation.clearWatch(id);
                $(evt.target).text('Start'),
            } else {
                startTime = $.now();
                id = navigator.geolocation.watchPosition(updateLocation,
                function(error) {console.log(error)},
                {maximumAge: 3000, timeout: 20000,
                    enableHighAccuracy: true });
                $(evt.target).text('Stop'),
            }
        }
    }
}();
$('#activate').click(locationModule.toggleState);
This has been implemented as a module because it needs to store state as the web application executes. The state includes the total distance covered and the last position recorded. Using a module allows this state to be stored as private variables that cannot be manipulated by other code.
The method exposed by the module is called toggleState. This method either starts or stops the tracking, depending on its current state. The application is considered to be running if it has a lastPosition; otherwise, it is considered stopped. As you can see, this method is invoked when the button with the ID activate is clicked.
This application needs to sample the user's position at regular intervals. Obviously, you could use a combination of setInterval and getCurrentPosition for this, but the Geolocation API provides a specific method for this purpose called watchPosition, which accepts the following parameters:
- A success callback: Identical to the one used with
getCurrentPosition. - An optional error callback: Invoked if it is not possible to obtain the user's location.
- An optional set of options that act as hints to the API: In this case, you have specified that you would like an accurate location if possible (using GPS), that you would like to be informed of the user's location every 3 seconds (
maximumAge), and that you would like to be notified of the user's location no later than 20 seconds afterwatchPositionis invoked (timeout). If the device cannot obtain a location in accordance with this contract, the error callback will be invoked.
These three parameters are also accepted by the getCurrentPosition method.
The call to watchPosition returns a number. This needs to be stored by the application because it needs to be provided if you wish to cancel the tracking. You can see this in the following line of code:
navigator.geolocation.clearWatch(id);You can now implement the updateLocation callback, which is currently an empty function:
var lastPosition = null;
var totalDistance = 0;
var id = null
function updateLocation(position) {
    var updateDate = new Date(position.timestamp);
    $('.message').text('Last updated at ' +updateDate.getHours() +
       ':'+ updateDate.getMinutes()+':'+updateDate.getSeconds());
    if (lastPosition) {
       // time in milliseconds since last reading
       var timeSinceLastReading = position.timestamp-lastPosition.timestamp;
       // distance travelled in meters
       var distance = google.maps.geometry.spherical.computeDistanceBetween
        (new google.maps.LatLng(position.coords.latitude,
            position.coords.longitude),
         new google.maps.LatLng(lastPosition.coords.latitude,
             lastPosition.coords.longitude));
       totalDistance = totalDistance + distance;
       if (timeSinceLastReading / 1000 > 0) {
           var metersPerMinute = distance / (timeSinceLastReading
               / 60 / 1000);
           $('#currentSpeed').text(Math.round(metersPerMinute) +
              ' meters per minute'),
       }
       $('#distance').text(Math.round(totalDistance) + ' meters travelled'),
       if (position.coords.altitude) {
           $('#altitude').text(Math.round(position.coords.altitude) +
              ' meters above sea level'),
       }
    }
    lastPosition = position;
}
You always need two positions in order to determine movement, so the first time this callback is invoked, it will simply update a message onscreen stating the last time a reading was obtained, and set the lastPosition variable to the location retrieved.
On subsequent invocations, this function will compare the new location to the previous location in both time and distance.
To determine the time between two invocations, you can use the timestamp property. This contains information on the exact timestamp (time in milliseconds) the user was in this location, not the time that the callback function was invoked.
In order to determine the distance between two locations, you utilize the computeDistanceBetween method from the Google API. To use this, you need to transform the coordinates you receive into instances of the google.maps.LatLng class.
Once you know the time and distance traveled, you can compute the speed at which the user is traveling. For the purposes of this exercise, you will only make this computation if the two readings have different timestamps; otherwise, you would be dividing by zero.
You need to calculate the meters traveled per minute. Therefore, you divide the total distance traveled by the time since the last reading, then 60, then 1000. For instance, if the user had traveled 20 meters, and there were 10,000 milliseconds between the readings, you would calculate:
- distance = 20 / (10,000 / 1000/60)
- distance = 20 / (10 / 60)
- distance = 20 / 0.16666
- distance = 120
If the user traveled 20 meters in 10 seconds, he is likely to travel 120 meters in a minute, so this is the expected answer.
You will also update a message onscreen for the total distance covered, and the current altitude if it is available.
Loading the Application
Although you can use this web application from your desktop or laptop, it makes far more sense to try it with a mobile device. To use this application on a mobile device, you first need to make it available via your web server.
In order for your mobile device to connect to your web server, you will need to ensure the port is “open” and also find the appropriate IP address to connect to. These instructions will then explain how to request web pages from within your local network—for instance, your home WiFi network on both Windows and OS X.
These instructions assume that your mobile device and the computer running your web server are both attached to the same WiFi network.
Windows Instructions
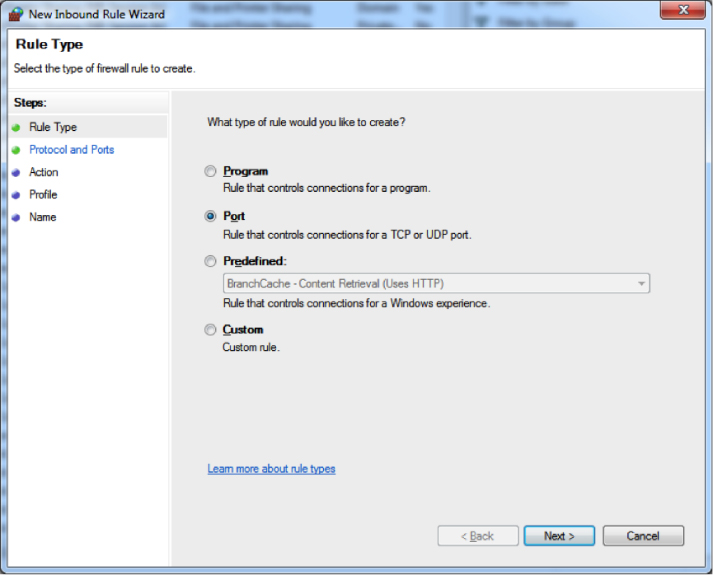
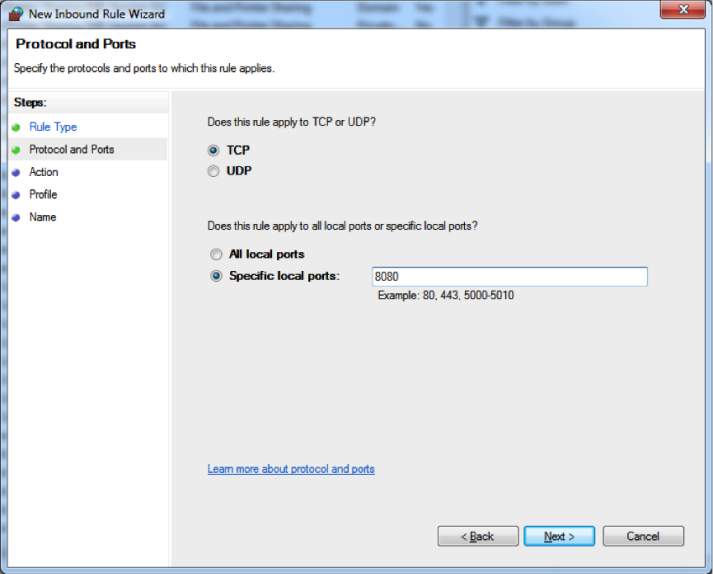
You will need to ensure that your computer firewall is either turned off or configured to allow Mongoose to accept inbound connections. This can be configured via the New Inbound Rule Wizard and involves opening port 8080, as shown in Figures 38.3 and 38.4.
You will then need to determine the IP address of the computer hosting the web server. There are many ways to do this, but the easiest is to open a command prompt and type ipconfig. Your IP address will be listed as IPv4 Address, as you can see in Figure 38.5.
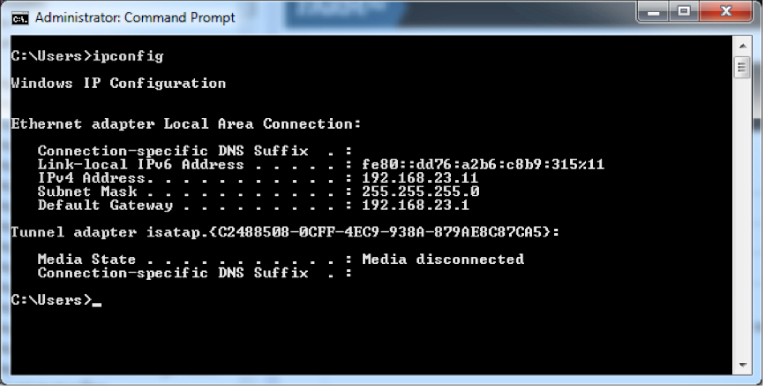
You should now be able to load the web page from your mobile device using the relevant IP address, and the port used by Mongoose—for example, http://192.168.23.11:8080/locate.html.
OS X Instructions
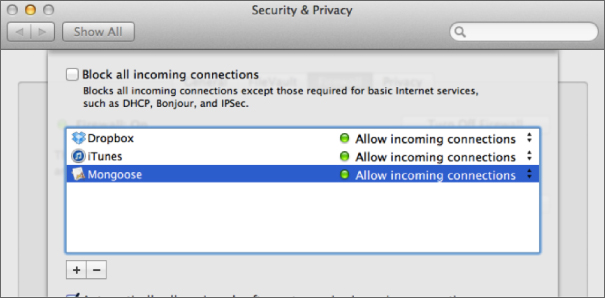
You will need to ensure that your computer firewall is either turned off or configured to allow Mongoose to accept incoming connections. This can be configured via the Security & Privacy menu in System Preferences (see Figure 38.6).
You will then need to determine the IP address of your computer. This can be found in the Network options of System Preferences, as Figure 38.7 illustrates.
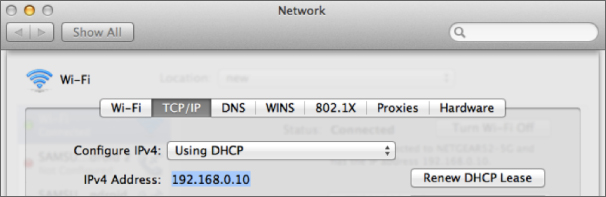
You should now be able to load the web page from your mobile device using the relevant IP address and the port used by Mongoose—for instance, http://192.168.0.10:8080/locate.html.
Using the Application
Once the web application is loaded on your mobile phone, you can begin using it by pressing the Start button. As you start walking, you should see the screen update with your distance traveled.
Because the web page is being loaded from your web server on your WiFi network, you will not be able to reload the web page once you are outside the range of your WiFi network. You could, however, choose to configure an application cache to make this web application available offline, as outlined in Lesson 32.
Try It
In this Try It, you will enhance the capabilities of the web application developed in this lesson:
- You will display to the user the direction they are heading in.
- You will smooth variations in the user's speed per minute by averaging the last five recordings (assuming five are available).
Lesson Requirements
In this lesson, you will need the locate.html page, which can be downloaded from the book's website if you have not created it. You will also need two libraries used by this web page (jQuery and Google geometry), which are also available from the book's website.
Step-by-Step
- Open
locate.htmlin your text editor and in Chrome. - Start by adding a new
divto the summary section for displaying the user's heading or direction. This should follow the same pattern as the other headings. - The user's heading can be calculated in the same manner as her distance traveled by using the
computeHeadingmethod. Invoke this with the current and previousLatLngobjects and store the result in a variable. - The heading represents the degrees from true North. Round this to a whole number, and output it onscreen.
- Create a private array in the module for storing the last five calculations of
metersPerMinute. - After
metersPerMinuteis calculated, add it to the array using thepushmethod. - If the array contains more than five members, remove one using the
shiftmethod. This approach ensures that the array uses a last in, first out (LIFO) strategy. - Create a private function for averaging the contents of an array. Try to use the
reducemethod to calculate the sum of the members in the array, and then divide this by the length of the array. - Set the
currentSpeedto the average of the last five readings.
Your finished version will look something like Figure 38.8.