Lesson 4
Introduction to CSS
The first three lessons of the book introduced you to a large number of tags, but it has so far not been possible to style the presentation of these tags when they appear onscreen. As mentioned, HTML5 has removed most of the remaining presentation-based tags and attributes, and presentation and style are instead the responsibility of another technology called Cascading Style Sheets (CSS).
The main reason for this is a concept called “separation of concerns.” The HTML markup language is responsible for providing the content of the page, while CSS is responsible for the presentation and styling of this content. This means it is possible to change either without affecting the other.
For instance, it is usually possible to completely restyle an existing web page without changing the HTML at all. Additionally, it is possible to change the content of a web page without needing to change the CSS at all.
This lesson will introduce the fundamentals of CSS, and will mainly focus on the way individual elements can be styled. In the next lesson, you will consolidate this knowledge, and also look at how CSS behaves when elements interact with one another.
The HTML5 specification includes a companion specification called CSS3—version 3 of Cascading Style Sheets—that greatly enhances the power of CSS. You will look in-depth at CSS3 later in the book, but for the next two lessons you will focus on the fundamentals of CSS.
CSS Selectors
In this section, you will get started with CSS by styling the web page developed in Lesson 2. This page utilized header and paragraph elements to format text, and also included images and hyperlinks. Ensure you have the following HTML available to work with in this section:
<!DOCTYPE html>
<html lang="en">
<head>
    <meta charset="utf-8">
</head>
<body>
    <h1>This is a top level heading</h1>
    <h2>This is a second level heading</h2>
    <h3>This is a third level heading</h3>
    <p>This is the first paragraph</p>
    <p>This is the second paragraph</p>
<blockquote>
        Tell me and I forget. Teach me and I remember. Involve me and I learn.
        <cite>Benjamin Franklin</cite>
    </blockquote>
<p>Please click <a href="page2.html">here</a> to view page 2</p>
<p>This is a photo I took in Cambridge
<img src="photo1.jpg" title="Cambridge, England" width="200"></p>
</body>
</html>
As you will see, CSS can be included in a web page in three different ways. This section will focus on a single approach: adding CSS within a style element in the head of the web page.
In order to apply a style to an element, you first need a way of selecting the elements that you wish to style. CSS provides four key selection mechanisms, the most simple of which is to select the elements based on their tag name. For instance, if you wanted to select all the h1 elements in the document and display them in a red font, you could add the following to the head section:
<style>
    h1 {
        color: red;
    }
</style>
If you refresh the web page, the top header will display in red.
This simple example demonstrates most of what you need to know about the syntax of CSS. You start by specifying the selector: h1 in this case. Next, you place a set of stylistic properties between curly brackets where each stylistic property is in the form of a name/value pair. In this case, the name of the property is color (technically this is foreground color), while the value is red. A colon separates the name and value, and the whole construct is concluded with a semicolon. I will refer to this entire construct as a CSS rule.
It is possible to add multiple stylistic properties to the same selection. The following rule also specifies the font-family and the fact that the text should be underlined.
<style>
    h1 {
        color: red;
        text-decoration:underline;
        font-family: Arial, Helvetica, sans-serif;
    }
</style>
Figure 4.1 shows the result.

The font-family property has a more interesting value than color. Many fonts are proprietary; therefore, you cannot be sure which fonts the user's browser will provide. The value of the property therefore contains a list of fonts in priority order. In this case, the value states:
- Try to use Arial if it is available.
- If that is not available use Helvetica.
- If that is not available use any sans-serif font.
Imagine now that you want this style to apply to all the headings in the web page. Obviously, you could duplicate this rule three times and select h1, h2 and h3 in three separate rules. You always want to avoid duplication if you can, however, because it leads to maintenance issues.
There are, in fact, two ways you can achieve this without duplication. The first is by specifying the three different tags separated by a comma:
h1, h2, h3 {
    color: red;
    text-decoration:underline;
    font: Arial, Helvetica, sans-serif;
}
A more elegant solution, however, is to use classes. Any element can be assigned one or more classes with the class attribute. A class is just an arbitrary name you choose and usually describes some aspect that a set of elements have in common. For example:
<h1 class="redHeader">This is a top level heading</h1>
<h2 class="redHeader">This is a second level heading</h2>
<h3 class="redHeader">This is a third level heading</h3>
In this case, redHeader is the class name. It is then possible to style all elements with this class using the following selector:
.redHeader {
    color: red;
    text-decoration:underline;
    font: Arial, Helvetica, sans-serif;
}
Notice the dot at the start of the selector: This always implies that you are selecting elements by a class. If you redisplay the web page, all three headers will display with the specified properties.
If you want to assign two classes to an element, the class names are separated by a space. For example:
<h1 class="redHeader pageHeading">This is a top level heading</h1>You can then select elements based on either of these classes.
Another common way to select elements is by their id. Any element can be given an id, but, unlike classes, IDs must be unique within a document. The following is an example of a paragraph with an id:
<p id="firstParagraph">This is the first paragraph</p>It is then possible to create a CSS rule that selects this element as follows:
#firstParagraph {
    font-weight: bold;
}
Notice that the selector begins with a # to indicate it is based on id. This particular example will display the paragraph with the matching id in bold.
The final common way to select elements is via pseudo-classes. These allow you to select elements based on features that cannot be expressed by the other selectors, for instance, every even numbered row in a table.
If you consider the firstParagraph example, you may notice that there is a potential issue lurking here. If a new paragraph is added before the current first paragraph, you would need to remember to swap the id onto this element—which would be easy to forget. A better option is to state that you want the first paragraph to be in bold, without specifying which paragraph is the first in the document. This can be achieved as follows:
p:first-of-type {
    font-weight: bold;
}
This selector first selects all the p elements, and then limits this selection to just the first element found of its type. Because all the elements returned have the type of p, the first-of-type selector will return the first p element in the document. Pseudo-class selectors always begin with a single or double colon.
Pseudo-classes are also useful for providing styles to elements based on their state. For instance, if you wanted links to turn green when the user hovered over them, you could use the following selector:
a:hover {
    color: green;
}
There is no way to perform this selection without pseudo-classes.
When selecting the first paragraph in the document, you are actually combining two types of selector: an element selector and a pseudo-class selector. It turns out that you can combine selectors in many interesting ways.
For example, if I wanted to select all the h1 elements that had the class redParagraph, I could use the following selector:
h1.redHeader {
    text-align: center;
}
Notice that there is no space between the element selector and the class selector. Alternatively, if I wanted to select all h1 elements that had both the redHeader and pageHeader classes, I could use the following:
h1.redHeader.pageHeader {
    text-align: center;
}
Alternatively, you can select elements only when they are children of elements returned by other selections. For instance, you can specify that the cite element should be capitalized, but only when it is a child of a blockquote element (which, as it happens, it always is):
blockquote cite {
    text-transform: uppercase;
}
Notice in this case there is a space between the two selections. This will match cite elements if they are a descendant of a blockquote element, even if blockquote is not their immediate parent. Another way to think about this is two distinct selections. CSS first selects all the blockquote elements, and then it searches for any cite elements that are descendants.
With the > operator, it is possible to specify that the selection should only occur if the element is an immediate child of the first selection:
blockquote > cite {
    text-transform: uppercase;
}
CSS Files and Inline Styles
So far, you have used the style element to add CSS to a web page. Although this is an easy way of adding CSS, it has the disadvantage that you cannot use the same CSS across multiple pages.
It is therefore far more common to place all the CSS in a file with a .css extension and link it to each web page that needs to use it. In order to try this out, save the styles you have added so far in a file called examples.css. Place this in the same folder as the HTML page, but do not include the style element.
Now, remove the whole style element from the head of the document, and replace it with the following:
<link rel="stylesheet" type="text/css" href="examples.css">Again, the href attribute is using a relative URL to load the style sheet, but it could also use an absolute URL. If you reload the web page it should display the same as before.
An alternative way of specifying CSS properties is via the style attribute on individual elements. Although this approach is generally discouraged, it can be useful when a style is unique to a single element. As you will also see, these styles have a higher precedence, so it can be a useful approach for overriding global styles. The following is an example:
<blockquote style="color: #888888;font-size:12px;">Notice that the inline styles use the same basic syntax: Colons separate names and properties, and semicolons separate styles. Obviously, they do not include a selector because they are applied to the element they are declared on.
Specificity
The same element may match multiple CSS rules. When this occurs, all the properties defined in all the rules are applied to the element. You have already seen an example of this with the h1 element.
Imagine, however, if you had the following in your style sheet:
         h1 {
             color: blue;
         }
         h1.redHeader {
             color: green;
         }
         .redHeader {
             color: pink;
         }
All three of these styles match the first header in the document; therefore, what color should it be assigned? The answer to this lies in a concept called specificity. In order to determine the style to use, CSS assigns points to each rule that matches an element based on its selector:
- If the selector matches on an element or pseudo-element 1 point is assigned.
- If it matches on class or pseudo-class, 10 points are assigned.
- If it matches based on
id, 100 points are assigned. - If the style is contained in a
styleattribute on the element, 1,000 points are assigned—which usually ensures it automatically wins.
You can therefore determine which of these three rules should be used:
- Rule 1 matches on an element so it receives 1 point.
- Rule 2 matches on an element and a class so it receives 11 points.
- Rule 3 matches on a class so it receives 10 points.
As a result, the color of the header should be green.
It is, of course, possible that two styles will have the same specificity. In this case, the rule defined last will have precedence. If the two rules are in the same external style sheet, the rule that occurs closest to the end will win. If they are in separate style sheets, the last style sheet declared in the web page will win.
There is one important exception to this rule. If a style is so important that you never want it to be overwritten by a rule with a higher specificity, you can assign it a tag called important. For instance, if the following two rules were defined:
         h1 {
             color: blue;
             text-align: center !important;
         }
         h1.redHeader {
             color: green;
             text-align: left
         }
the color will be green because of specificity, but the text will be aligned in the center because it is marked as important. It is best not to overuse this approach, but it works well in an emergency.
Inheritance
Obviously, it is annoying to need to style every single element. There are many cases where you want many elements to share the same style, and therefore it would be convenient to specify that the style applies to an element and all its descendants. This concept is called inheritance because styles are inherited from a parent.
CSS supports this concept for many, but not all, styles. For instance, you may want all the text in the document to use the same font family. You could therefore specify the following:
body {
    font-family: Arial, Helvetica, sans-serif;
}
Because all the visual elements in the document have the body element as a parent (even if not a direct parent), all the elements in the document will inherit this style. Likewise, if you were to specify the following:
blockquote {
    text-decoration: underline;
}
the text for both the blockquote and cite elements will be underlined.
Inheritance does not always make sense, however. Imagine that you used the border property to add a 1-pixel solid black border around the blockquote.
blockquote {
    border: 1px solid black;
}
Should a separate border be drawn around the cite element? I think you can probably agree that borders should not be inherited, and, in fact, they are not.
If you would like to inherit a non-inherited style, you can do so by using the following syntax:
cite {
    border: inherit;
}
Browser Defaults
All browsers have a set of default styles that they apply to elements. These defaults include font types and sizes, the space between lines and paragraphs and the weight of the fonts on table headers. Browser defaults are only used when you do not provide your own style for an element.
One problem with browser defaults is that they tend to vary between browser vendors. This may mean your web page looks perfect in Chrome but looks terrible in IE because it is picking up a default.
Because of these issues, it is common to completely remove the browser defaults. This is typically performed using a separate style sheet called reset.css (you will find examples on the Internet), which is then the first style sheet that is loaded on each page.
Chrome Scratch Pad
When experimenting with CSS, it can be an annoyance to make changes to the style sheet, save the changes, and reload the web page. Fortunately, Chrome makes it easy to experiment with styles directly in the browser. In order to demonstrate this, right-click on the first h1 element and choose Inspect Element.
On the left-hand side of the console, you will see the control shown in Figure 4.2.
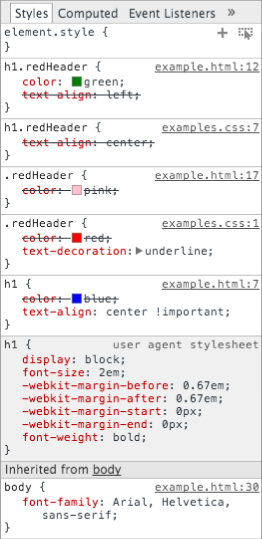
This is telling you all the rules that match the element, from the most specific at the top, to the least specific at the bottom. Any time that a style is not used because of specificity, a line is drawn through it.
At the bottom of this panel, you can see the styles inherited from the browser defaults (called “user agent stylesheet”) and those inherited from other elements (for instance, body).
This can be very useful for determining why certain styles are used. For instance, have a look at the example in Figure 4.2 and determine which rule provided the text-align property and why.
You can also change styles, or add styles to any of these rules: Thesechanges will be reflected in the web page in real time. You can also eliminate any styles you want by clearing the checkbox that appears next to them when you hover over them.
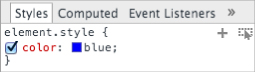
Additionally, if you click on the very first rule called element.style, you can add new rules just for this element. For instance, you could make the color of the header blue by adding the property demonstrated in Figure 4.3.
Try It
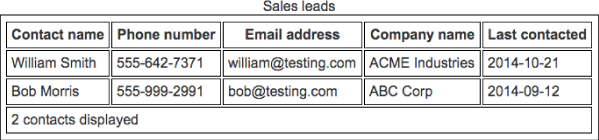
In this Try It, you will style the table that you created in Lesson 4 to hold contact information.
Lesson Requirements
You will need the contacts.html file from Lesson 4, a text editor, and a web browser.
Step by Step
- Start by creating a file called
contacts.cssin the same folder ascontacts.html. - Add a link in the head section of
contacts.htmlto the CSS file following the instructions earlier in the lesson. - Set the font family for the entire document to use
Arial, Helvetica, sans-serif. Remember that you will need a rule that matches thebodyelement. - Add a 1-pixel solid black border to the elements
table,th, andtd. You will find an example of a border style earlier in this lesson. - Load the page in Chrome. You will notice that there is a double border around cells (see Figure 4.4) because each cell has its own border, and there is a gap between these. To fix this, add a new style to this rule with the property
border-collapse, and a value ofcollapse. This will collapse the duplicate borders into a single border. - Add some space between the content and the border of each cell (
tdelement). Add a property calledpadding, and set this to5px. - Add a style for the
theadelement. Set thebackgroundto the color#3056A0, and set thecolortowhite. - Set the
captionfor the table to display inbold, but ensure this is only applied ifcaptionis a child of atableelement. - Set the
fontof thetfootelement to be three-quarters the size of the font used elsewhere. Hint: Setting the font to2emwould double the size of the font (you will look at this setting further in the next lesson). In addition, set the text alignment to be on the right-hand side of the table. - Every second row of the table body should be given a background color of
#E6E6F5. In order to select every second row, use the pseudo-class selectortr:nth-child(even), but ensure this is only applied to children oftbodybecausetheadandtbodyalso havetrelements.When complete, the table should look like the screenshot in Figure 4.5.