
The authentication was implemented to the backend using JWT. In Chapter 4, Securing and Testing Your Backend, we created JWT authentication, and the /login endpoint is allowed to everyone without authentication. In the frontend's login page we have to first call /login endpoint to get the token. After that, the token will be included to all requests we are sending to the backend, as was demonstrated in Chapter 4, Securing and Testing Your Backend.
Let's first create a login component that asks for credentials from the user to get a token from the backend:
- Create a new file, called Login.js, in the components folder. Now, your file structure of the frontend should be the following:

- Open the file in the VS Code editor view and add the following base code to the login component. We are also importing SERVER_URL because it is needed in a login request:
import React, { Component } from 'react';
import {SERVER_URL} from '../constants.js';

class Login extends Component {
  render() {
    return (
      <div>
      </div>
    );
  }
}

export default Login;
- We need three state values for authentication. Two for the credentials (username and password) and one Boolean value to indicate the status of authentication. The default value of the authentication status state is false. Create the constructor and introduce states inside the constructor:
constructor(props) {
  super(props);
  this.state = {username: '', password: '',
    isAuthenticated: false};
}
- In the user interface, we are going to use the Material-UI component library, as we did with the rest of the user interface. We need text field components for the credentials and a button to call a login function. Add imports for the components to the login.js file:
import TextField from '@material-ui/core/TextField';
import Button from '@material-ui/core/Button';
- Add imported components to a user interface by adding these to the render() method. We need two TextField components, one for the username and one for the password. One RaisedButton component is needed to call the login function that we are going to implement later in this section:
render() {
  return (
    <div>
      <TextField name="username" placeholder="Username"
      onChange={this.handleChange} /><br/>
      <TextField type="password" name="password"
       placeholder="Password"
      onChange={this.handleChange} /><br/><br/>
      <Button variant="raised" color="primary"
       onClick={this.login}>
        Login
     </Button>
    </div>
  );
}
- Implement the change handler for the TextField components to save typed values to the states:
handleChange = (event) => {
  this.setState({[event.target.name] : event.target.value});
}
- As shown in Chapter 4, Securing and Testing Your Backend, the login is done by calling the /login endpoint using the POST method and sending the user object inside the body. If authentication succeeds, we get a token in a response Authorization header. We will then save the token to session storage and set the isAuthenticated state value to true. The session storage is similar to local storage but it is cleared when a page session ends. When the isAuthenticated state value is changed, the user interface is re-rendered:
login = () => {
  const user = {username: this.state.username, password: this.state.password};
  fetch(SERVER_URL + 'login', {
    method: 'POST',
    body: JSON.stringify(user)
  })
  .then(res => {
    const jwtToken = res.headers.get('Authorization');
    if (jwtToken !== null) {
      sessionStorage.setItem("jwt", jwtToken);
      this.setState({isAuthenticated: true});
    }
  })
  .catch(err => console.error(err))
}
- We can implement conditional rendering, which renders the Login component if the isAuthenticated state is false or the Carlist component if isAuthenticated state is true. We first have to import the Carlist component to the Login component:
import Carlist from './Carlist';
And then implement the following changes to the render() method:
render() {
  if (this.state.isAuthenticated === true) {
    return (<Carlist />)
  }
  else {
    return (
      <div>
        <TextField type="text" name="username"
         placeholder="Username"
        onChange={this.handleChange} /><br/>
        <TextField type="password" name="password"
         placeholder="Password"
        onChange={this.handleChange} /><br/><br/>
        <Button variant="raised" color="primary"
         onClick={this.login}>
          Login
        </Button>
      </div>
    );
  }
}
- To show the login form, we have to render the Login component instead of the Carlist component in the App.js file:
// App.js
import React, { Component } from 'react';
import './App.css';
import Login from './components/Login';
import AppBar from '@material-ui/core/AppBar';
import Toolbar from '@material-ui/core/Toolbar';

class App extends Component {
  render() {
    return (
      <div className="App">
        <AppBar position="static" color="default">
          <Toolbar>CarList</ Toolbar>
        </ AppBar>
        <Login />
      </div>
    );
  }
}

export default App;
Now, when your frontend and backend are running, your frontend should look like the following:

And if you log in using the user/user or admin/admin credentials, you should see the car list page. If you open the developer tools, you can see that the token is now saved to session storage:

The car list is still empty, but that is correct because we haven't included the token to the request yet. That is needed for JWT authentication, which we will implement in the next phase:
- Open the Carlist.js file in the VS Code editor view. To fetch the cars, we first have to read the token from the session storage and then add the Authorization header with the token value to the request. You can see the source code of the fetch function here:
// Carlist.js
// Fetch all cars
fetchCars = () => {
  // Read the token from the session storage
 // and include it to Authorization header
  const token = sessionStorage.getItem("jwt");
  fetch(SERVER_URL + 'api/cars',
  {
    headers: {'Authorization': token}
  })
  .then((response) => response.json())
  .then((responseData) => {
    this.setState({
      cars: responseData._embedded.cars,
    });
  })
  .catch(err => console.error(err));
}
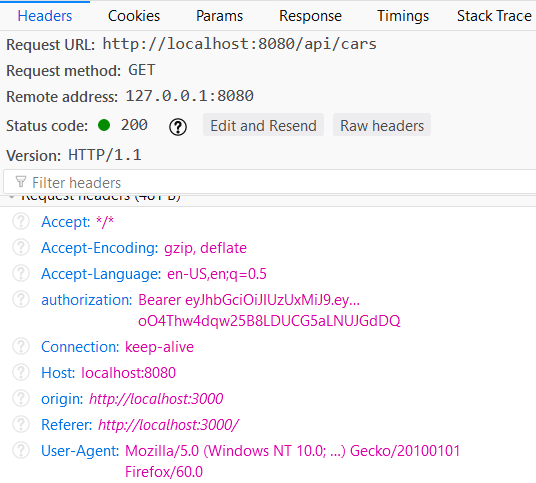
- If you log in to your frontend, you should see the car list populated with cars from the database:

- Check the request content from the developer tools; you can see that it contains the Authorization header with the token value:
All other CRUD functionalities need the same modification to work correctly. The source code of the delete function looks like the following, after the modifications:
// Delete car
onDelClick = (link) => {
  const token = sessionStorage.getItem("jwt");
  fetch(link,
    {
      method: 'DELETE',
      headers: {'Authorization': token}
    }
  )
  .then(res => {
    this.setState({open: true, message: 'Car deleted'});
    this.fetchCars();
  })
  .catch(err => {
    this.setState({open: true, message: 'Error when deleting'});
    console.error(err)
  })
}
The source code of the add function looks as follows, after the modifications:
// Add new car
addCar(car) {
  const token = sessionStorage.getItem("jwt");
  fetch(SERVER_URL + 'api/cars',
  { method: 'POST',
      headers: {
        'Content-Type': 'application/json',
        'Authorization': token
      },
      body: JSON.stringify(car)
  })
  .then(res => this.fetchCars())
  .catch(err => console.error(err))
}
And finally, the source code of the update function looks like this:
// Update car
updateCar(car, link) {
  const token = sessionStorage.getItem("jwt");
  fetch(link,
  { method: 'PUT',
    headers: {
      'Content-Type': 'application/json',
      'Authorization': token
    },
    body: JSON.stringify(car)
  })
  .then( res =>
    this.setState({open: true, message: 'Changes saved'})
  )
  .catch( err =>
    this.setState({open: true, message: 'Error when saving'})
  )
}
Now, all the CRUD functionalities are working after you have logged in to the application.
In the final phase, we are going to implement an error message that is shown to an end user if authentication fails. We are using the Material-UI SnackBar component to show the message:
- Add the following import to the Login.js file:
import Snackbar from '@material-ui/core/Snackbar';
- Open the state for Snackbar, as we did in Chapter 10, Adding CRUD Functionalities:
// Login.js
constructor(props) {
  super(props);
  this.state = {username: '', password: '',
  isAuthenticated: false, open: false};
}
We also need a state handler for the Snackbar open state to close Snackbar after the time that we set in the Snackbar autoHideDuration props:
handleClose = (event) => {
  this.setState({ open: false });
}
- Add Snackbar to the render() method:
<Snackbar
  open={this.state.open} onClose={this.handleClose}
  autoHideDuration={1500}
  message='Check your username and password' />
- Set the open state value to true if the authentication fails:
login = () => {
  const user = {username: this.state.username,
      password: this.state.password};
  fetch('http://localhost:8080/login', {
    method: 'POST',
    body: JSON.stringify(user)
  })
  .then(res => {
    const jwtToken = res.headers.get('Authorization');
    if (jwtToken !== null) {
      sessionStorage.setItem("jwt", jwtToken);
      this.setState({isAuthenticated: true});
    }
    else {
      this.setState({open: true});
    }
  })
  .catch(err => console.error(err))
}
If you now log in with the wrong credentials, you can see the toast message:

The logout functionality is much more straightforward to implement. You basically just have to remove the token from session storage and change the isAuthenticated state value to false, as shown in the following source code:
logout = () => {
    sessionStorage.removeItem("jwt");
    this.setState({isAuthenticated: false});
}
Then with conditional rendering, you can render the Login component instead of Carlist.
If you want to implement a menu using React Router, it is possible to implement so-called secured routes that can be accessed only when a user is authenticated. The following source code shows the secured route that shows the routed component if the user is authenticated, otherwise it redirects to a login page:
const SecuredRoute = ({ component: Component, ...rest, isAuthenticated }) => (
  <Route {...rest} render={props => (
    isAuthenticated ? (
      <Component {...props}/>
    ) : (
      <Redirect to={{
        pathname: '/login',
        state: { from: props.location }
      }}/>
    )
  )}/>
)
Here is the example of the Switch router that is using SecuredRoute, which we defined in the previous example. The Login and Contact components can be accessed without authentication, but Shop needs authentication:
 <Switch>
    <Route path="/login" component={Login} />
    <Route path="/contact" component={Contact} />
    <SecuredRoute isAuthenticated={this.state.isAuthenticated}
      path="/shop" component={Shop} />
    <Route render={() => <h1>Page not found</h1>} />
  </Switch>