
Chapter 3. Challenges in Mobile Testing
In Chapter 1, “What’s Special about Mobile Testing?” I described the unique aspects of mobile testing, covering user expectations, data networks, mobile devices, and mobile release cycles. But there are, of course, other topics that make mobile testing a special and challenging job.
This chapter contains more mobile testing challenges together with their possible solutions.
The Customer
As I mentioned in Chapter 1, customers and their expectations are one of the main challenges for mobile developers and testers.
To satisfy customers, it’s really important that you gather information about your possible target customers and their needs. If you release an app without any kind of knowledge of your target group, the app will most likely not be installed or it will receive really bad reviews. This leads to fewer downloads, and customers may even download an app from your competitor.
In order to handle the customer challenge, you need to gather as much information about your potential users as possible. This, in turn, means that you need to incorporate the specifics of your target group, such as age, gender, and geographical background, during the development and testing process. You need information such as the following:
• Gender
• Age
• Monthly income (important for possible app business models)
• Educational background
• Geographical background (e.g., do they live in a city?)
• What apps they use and what kind
• Smartphone habits (how often they check their smartphone)
• Whether they use a competitor’s apps and if so, how, and are they happy with them
• What devices they use
Important
Be careful when asking people personal questions as you could end up infringing upon privacy laws.
Another way of getting information about your target group is to conduct interviews: invite your customers to your office and ask them about their mobile usage and habits. If you encounter problems getting the answers to all of these questions or are not allowed to ask your potential customers directly, you can use services such as Mobile Personas1 to get general information about the behavior of mobile users.
If you gather, analyze, and group that kind of information, you will most likely have more than one type of person the app will be made for. To satisfy the different types of customers, it is helpful to create so-called personas2 to represent their various needs. Personas were introduced by Alan Cooper3 in 1998 in his book The Inmates Are Running the Asylum.
2. www.usability.gov/how-to-and-tools/methods/personas.html
3. www.cooper.com/journal/2008/05/the_origin_of_personas
Personas are fictional characters that are representative of your real customers. Personas are a common and very useful way to identify user motivations, expectations, problems, habits, and goals.
Personas can help you to make decisions about your app, such as feature set, possible gestures, and design. Personas can help a mobile team get a feel for their customers’ needs and problems. You as a mobile tester can align your daily workflow to the persona description. Table 3.1 presents an example of a typical persona.
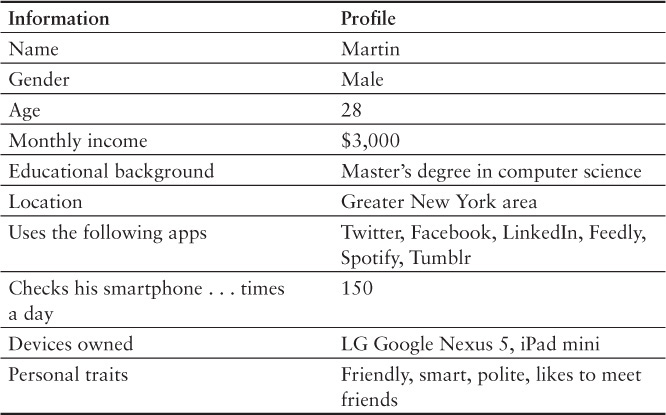
You can also write a persona description, such as this one:
Martin is a 28-year-old tech-savvy male with a master’s degree in computer science. He lives in New York and is a frequent smartphone user who checks his smartphone around 150 times a day. Martin uses apps like Twitter, Facebook, Spotify, and Tumblr. His monthly income is about $3,000. Martin is a friendly, smart, and polite person who likes to meet friends.
With the aid of personas and knowledge of their habits, it’s a bit easier to test a mobile app as the testing process is more focused on customer needs than on the tester’s expectations or habits.
Personas are a good way to handle the customer challenge when it comes to mobile testing. Once the personas are in place, the mobile team should try to find real customers who match the personas. Once you’ve found some customers, talk to them and ask them questions about your app and discuss possible additional features. Invite users to a usability testing session in your office. This way the users feel connected with the company and your app. Another way of getting user feedback or engagement is a beta testing phase. This is a common approach; some big mobile app vendors4 invite customers to test beta versions of new apps to collect feedback at an early development stage so they can improve the app before going live.
Other valuable sources of information about your customers are the app stores of the different vendors and the ratings for and comments about your app. Read the comments carefully and learn from them. Of course, there may be lots of comments that don’t deliver any useful insights. However, there are users who complain about usability, bugs, or problems you have never heard of, and those comments are extremely useful for you and your team. More information about app store reviews, ratings, and comments can be found in Chapter 7, “Mobile Test and Launch Strategies.”
Customer Summary
Do the following in order to maximize the chances that you will satisfy your customers:
• Gather user information.
• Create personas.
• Use personas while testing.
• Invite customers to usability tests.
• Interview customers about your product.
• Invite customers to be beta testers.
• Check the app store reviews and learn from the useful comments.
Mobile Platforms and Fragmentation
In the previous chapters I explained the different mobile vendors and mobile platforms, so you now know what’s inside a mobile device. You also know that for some mobile platforms there is more than one mobile device manufacturer.
Fragmentation is a huge problem in the mobile world and especially in the Android world. Based on the numbers from OpenSignal,5 nearly 19,000 Android devices are available on the market. It’s simply not possible and, as you will see, not necessary to test on all of those devices. This problem isn’t just limited to Android; other mobile platforms such as iOS, Windows Phone, and BlackBerry are also affected by fragmentation. The possible hardware and software combinations on those platforms can also be a problem.
5. http://opensignal.com/reports/2014/android-fragmentation/
The next several sections of this chapter present some solutions for handling fragmentation while testing.
Mobile Device Groups
One solution for handling device fragmentation in your mobile testing project is to group your mobile test devices. If the devices are grouped, you can test on only some devices (one to three) from each group, which helps you downsize the amount of testing work. I’ve adopted this approach in all of my mobile proj-ects and it has proven very efficient. Based on your target customer group, you can create three device groups (this example assumes that the target group is really tech savvy).
The first group has the highest priority: A. Devices in this group are most likely to be new devices with powerful hardware and a big screen with a high resolution and pixel density. They also usually have the latest operating system version installed. Devices in this group must be fully supported by your app in terms of functionality, design, and usability.
• Group 1, Priority A:
• High-end devices
• Dual/quad-core CPU
• RAM >=2,048MB
• Display size >=5″
• Retina, full HD display
• Latest operating system that is available for the device
The second group has medium priority: B. Devices in this group are midrange devices with average hardware such as a smaller CPU, screen resolution, and size than the devices in group A. The operating system version is probably less than one year old. The devices in this group should fully support the app in terms of functionality and usability. The design doesn’t need to be perfect for this group due to the smaller screens.
• Group 2, Priority B:
• Midrange devices
• Dual-core CPU
• RAM <2,048MB
• Display size <5″
• No Retina or full HD display
• Software less than one year old
The third group has low priority: C. Devices in this group have a small CPU and a small screen resolution and density. The software version is more than one year old. Devices in this group still have to fully support the app in terms of functionality, but the design and usability may differ from the other groups because the hardware may be too slow to provide sufficient responsiveness.
• Group 3, Priority C:
• Slow devices
• Single-core CPU
• RAM <1,024MB
• Display size <4″
• Low screen resolution
• Operating system more than one year old
Once you have defined device groups, you need to make sure you keep them current by monitoring the mobile device market for new devices that match your target groups. On the other hand, you can remove older devices from your device groups if your customers don’t use them anymore. And last but not least, you need to check your group criteria from time to time to make sure they still sufficiently cover your customer spectrum.
With the aid of such device groups, you’ll find it much easier to handle device fragmentation and have the right devices for testing.
A nice Web page provided by Google is “Our Mobile Planet,”6 where you can get information based on the country, the age, the gender, and the behavior of users. Such information can be used when the target customer is unknown.
6. http://think.withgoogle.com/mobileplanet/en/
Important
Device groups may vary greatly from project to project!
Mobile Device Labs
Depending on the mobile app project, you may need lots of devices for testing, which is of course very expensive and time-consuming. A good alternative to buying all of your testing devices is to rent them.
You can use mobile device labs or device clouds to rent the testing devices you need. However, before you rent test devices, keep the device grouping in mind to downsize the amount of testing required for all those virtual and physical devices.
Currently there are plenty of mobile device lab providers that offer mobile test devices within the cloud. Mobile developers and testers are able to upload the app file to the cloud, select the devices, and start manual or automated testing.
The main advantage of such services is that you don’t have to worry about buying new devices and maintaining them. However, before choosing a mobile cloud provider, you should check whether the provider offers testing on real devices, simulators, or emulators.
A mobile cloud testing provider should:
• Test on real devices
• Be able to use emulators or simulators as well
• Not use jailbroken or rooted devices
• Be able to test on different mobile platforms if possible
• Be able to write test automation scripts in different programming languages
• Offer continuous integration
• Have some performance monitoring in place
• Generate a test report at the end of the test cycle
Testing your mobile app in the cloud on emulators or simulators can be very annoying due to performance issues. Using emulators or simulators on a local machine is often already fairly slow; using them on the Internet via a Web GUI can be even slower.
Even if the provider offers testing on real devices, it’s still possible that the performance may not be the same as when testing on a local physical device. The latency may be too high, which can lead to very slow reactions on the device. Scrolling, tapping, or just loading the app can take a long time, which may have a big impact on your testing and the subsequent results.
Another thing to look out for when choosing a cloud provider is to make sure you have exclusive access to the physical devices and that your app is deleted once the test session is complete. Check that the provider offers a private test cloud; otherwise your app may still be installed on the test devices for subsequent customers to see. Discovering such an issue while evaluating a provider is a clear warning sign that should not be ignored. If security and privacy are important to you, consider picking another provider.
The following providers offer a mobile device test cloud:
• AppThwack (https://appthwack.com/)
• CloudMonkey LabManager (www.cloudmonkeymobile.com/labmanager)
• Keynote Mobile Testing (www.keynotedeviceanywhere.com/)
• Mobile Labs (http://mobilelabsinc.com/)
• Perfecto Mobile (www.perfectomobile.com/)
• Sauce Labs (https://saucelabs.com/)
• Testmunk (www.testmunk.com/)
• TestObject (http://testobject.com/)
• TouchTest (www.soasta.com/products/touchtest/)
• Xamarin Test Cloud (http://xamarin.com/test-cloud)
Important
This list is by no means complete. Just browse the Internet to search for more providers that fit in your environment.
If you don’t want to buy every testing device for your company or don’t want to use a cloud provider (or maybe you’re not allowed to use one), there is another way of getting physical mobile devices: ODLs, or Open Device Labs.
Open Device Labs were introduced by the mobile community with the aim of establishing physical stores where mobile testers, developers, and anyone involved in the mobile business can obtain devices for testing purposes. The primary goal of these Open Device Labs is that everyone can borrow devices for free! In order to make this idea successful, Open Device Labs need device donations from individuals or companies who want to support the mobile community. Depending on your geographical region, you might have an Open Device Lab nearby. The Web site7 provides a nice map that shows you where your nearest Open Device Lab is located. You should definitely try them!
Chapter 7 includes mobile test labs and Open Device Labs as part of the mobile testing strategy and also provides further information on this topic.
In this part of the chapter you have learned that there are three possible solutions to the problem of how to handle mobile fragmentation:
• Grouping the devices you need for testing
• Mobile device labs in the cloud
• Using physical devices from an Open Device Lab
Sensors and Interfaces
Every smartphone has a variety of sensors and interfaces that can be accessed by the installed apps to provide useful features to users. The actual sensors and interfaces used depend on the app’s specific use case. The installed sensors and interfaces are really complex and are potentially susceptible to electrical interference.
As a mobile tester it’s your responsibility to ensure that the implemented sensors and interfaces are used correctly. It’s also important to verify that failing sensors don’t affect the app in a negative way.
Ambient Light Sensor
The ambient light sensor is able to determine how much light is available in the current location and automatically adjust the screen’s brightness by means of software in order to prolong the device’s battery life.
If your app makes use of the ambient light sensor in any way, you should test your app in different locations with different prevailing light situations. For example, test your app in a dark room, outside in the sunshine, or at your workplace to see if the app responds correctly. Be creative with your testing environments.
Different locations could include:
• A dark room
• Your workplace with a desk lamp on
• Outside in the sunshine
• Rooms with different lights on the ceiling
Proximity Sensor
Another little helper is the proximity sensor, which determines how close the phone is located, such as to a face or surface. It can be used to automatically turn off the display without any physical contact. This prevents you from accidentally clicking or touching buttons on an active screen. It’s also useful for saving battery life.
Make sure you also test the usage of the proximity sensor in different locations with different light situations as well as with different kinds of surfaces to see whether the app is using the sensor correctly.
Different locations and surfaces could include the following:
• A dark room
• Your workplace with a desk lamp on
• Outside in the sunshine
• Your hand moving over the display
• Your hand close to the display
• The device moving toward your face
• The device’s display moving toward a mirror or pane of glass
Acceleration Sensor
The acceleration sensor detects changes in the device’s movement. The most common use case for this sensor is when the device is rotated between portrait and landscape modes. This sensor is used in nearly every app if the developers implemented a portrait and landscape view. If both modes are supported, you should change the orientation of the device a lot during testing. By doing so, you will probably find lots of UI glitches because the UI elements could be moved to a different position. It is also likely that the app will crash, for example, when data is fetched from the backend while a UI refresh is being performed.
Gyroscope Sensor
The gyroscope sensor is used to either measure or maintain the orientation of the device. Unlike an accelerometer, which measures the linear acceleration of a device, a gyroscope measures the device’s exact orientation. This means that the device is able to detect 360-degree motion. Thanks to the accelerometer and gyroscope sensors, the device is able to operate on six axes—left and right, up and down, forward and backward—and track roll, yaw, and pitch rotations.
The combination of both sensors is mostly used in gaming apps such as flight simulations to control a plane with real physical movements. Keep the six axes in mind when testing your app, and test each axis separately as well as multiple axes at once to be sure the app is responding correctly.
Magnetic Sensor
A magnetic sensor is able to measure the strength and orientation of magnetic fields around the device. This sensor is mostly used by apps that require compass information, such as for navigation. With the aid of this sensor the device is able to determine the direction in which it’s facing: west, east, north, or south.
If your app uses the magnetic sensor, you should also test it in different locations. For example, if you’re using the app in a building where you’re surrounded by lots of metal, the magnetic sensor may deliver false information or data, which can lead to adverse side effects in your app.
Different locations could include the following:
• Inside a building
• Outside on the street
• When stuck in traffic
• Near buildings with lots of metal
Pressure, Temperature, and Humidity Sensors
These three sensors are not included in every smartphone yet, but they will be soon. All three sensors can be used to collect more data about the user’s current location to provide apps with useful information such as the current temperature, current altitude based on atmospheric pressure, and humidity.
These sensors are used, for example, by outdoor or weather apps. Again, make sure you test these sensors in different locations with different temperatures, pressures, altitudes, and humidities. You can, of course, simulate pressure or humidity in a test lab situation to check that the sensors are working correctly, but testing them in real situations could produce side effects that aren’t likely to happen in a lab.
Location Sensor
You certainly know the location sensor, better known as GPS. Thanks to GPS, apps can determine the current device location. GPS is used in lots of different kinds of apps such as map apps, camera apps, and social media apps. Users can share their current location with apps and send their current position, for example, to friends to let them know where they are.
If your app uses GPS to determine the device’s current position, be sure that the GPS sensor is switched off after use. Otherwise the device’s battery will be empty very soon.
GPS functionality should of course be tested in various locations, such as in the countryside or in downtown sprawl with lots of huge buildings. In both scenarios you may find that the current location is incorrect or not found by the GPS sensor. This is especially true in cities due to interference caused by surrounding buildings. If the GPS signal is not strong enough to determine the current location, check that the Wi-Fi or network-based location finding feature of the phone is activated to locate the phone. A low GPS signal can also cause performance problems within your app due to difficulties in calculating the current position. When testing the GPS function of your app, keep an eye on the temperature of your device. Using GPS will heat up your device, consume lots of battery, and therefore possibly influence the performance of your app. I also recommend that you turn GPS off to see how your app reacts to this scenario.
Touchless Sensor
Another sensor that is not built into every smartphone is a touchless sensor. In most cases this sensor is built into the front of the device to accept touchless gestures from a finger or a hand. What this means is that you can swipe between photos in your photo gallery simply by waving your hand over the screen. Or you can answer a phone call by holding the device next to your ear without touching the answer button.
If your app supports touchless gestures, be sure every gesture also works at different angles.
Sensors Summary
Most of the sensors just described are influenced by the user’s current location and surroundings. Any kind of movement is very important while testing your app and the device’s sensors. It’s also useful to test the sensors in combination with one another to check that your app responds correctly to changes of sensor data.
Possible sensor tests could include the following:
• Walk while using the app as this simulates back-and-forth motion.
• While walking, suddenly stop for a few moments before continuing on your way.
• Shake and rotate the device.
• Simulate vibrations as if you’re on a train or in a car.
• Perform extreme movements such as spinning or rotating the device.
• Use the app outdoors in sunny, cloudy, and dark locations.
• Use the app indoors with normal light or under a lamp.
• Wave your hands in front of the device.
• Test the edge cases, for example: GPS coordinates 0,0; temperature at 0 degrees; waterproof devices in areas with high humidity.
• Check to see if the app can be used on devices that don’t have built-in sensors and interfaces.
While performing these tasks, watch out for app crashes or freezes. Check that the UI elements are visible and displayed correctly on the screen, especially in different light situations. Keep an eye on the performance of the app and the smartphone’s battery lifetime as well.
Touchscreen
The biggest and most important interface in smartphones is the touchscreen. Thanks to the touch-sensitive screen, users can use one or more fingers on the device to create gestures that the phone is able to convert into commands.
Important
The description of touchscreen technologies here is simplified. If you want to get more detailed information about them, please do some online research.
There are basically two kinds of touchscreen technologies available. The first is the resistive screen that is made out of various layers and reacts to pressure. Usually this kind of touchscreen is made for use with a stylus. Whenever you have to sign for a parcel delivery, you probably sign on a resistive screen. This technology has one big drawback: it doesn’t support multitouch gestures.
That is the reason why the second technology, capacitive touchscreens, is used in smartphones. Capacitive screens react to touch rather than pressure and support multitouch gestures.
Capacitive screens consist of an insulator, which in most cases is glass coated with a transparent conductor like indium tin oxide. Since the human body is also an electrical conductor, touching the capacitive screen results in a distortion of the screen’s electrostatic field. This distortion is then converted into data that the device hardware is able to understand.
The following gestures are possible on a capacitive touchscreen:
• Touch: Touch the screen with a fingertip.
• Long touch: Touch the screen for a longer time.
• Swipe: Move your fingertip over the screen.
• Tap: Briefly touch the screen with a finger.
• Double tap: Briefly touch the screen with a fingertip twice.
• Drag: Move a finger over the screen without losing contact with the screen.
• Multitouch: Use two or more fingers on the screen at the same time.
• Pinch open: Touch the screen with two fingers and move them apart.
• Pinch close: Touch the screen with two fingers and bring them closer together.
• Rotate: Use two fingers on the screen and rotate them. Some apps, such as map apps, will rotate the content in the app.
The variety of possible touch gestures poses a special challenge while testing a mobile app. You should keep all the possible touch gestures in mind and use them while testing. A good way to see if an app can stand up to touch gestures is to use multiple fingers on the touchscreen at the same time. You should also perform several different touch gestures very quickly on the screen to see how the app reacts and handles the inputs. Also watch out for performance issues or UI glitches that can happen while using multitouch gestures.
One important factor to note about touchscreens is the current weather conditions. They can affect your fingers and prevent touches from being registered properly. Therefore, it’s a good idea to also use the different gestures in different weather conditions such as on cold or hot days or on a day with high or low humidity to see how the app reacts to your gestures on the touchscreen.
Microphones
Another way of communicating with your app is by using your voice or sound. Most smartphones have more than one microphone installed. Usually there are up to three microphones, one at the front, one at the back (near the camera), and one at the bottom of the device. The three microphones ensure very good voice recording from all possible angles and regardless of the phone’s position.
When testing sound inputs via the microphone, make sure you do the following:
• Test voice input indoors with normal sound and in noisy situations.
• Test the app indoors with more background noise such as in an office or restaurant.
• Test the app outdoors with background noises coming from a street or cars.
• Check that the app can handle the user muting and unmuting the phone or the microphone.
• Start other apps that generate sounds, such as music apps, and check the behavior of your app.
• Use the volume up and down buttons to increase or decrease the sound level and check the behavior of the app.
• Check that voice inputs are processed correctly.
• If the voice input is stored on the phone, check that playback is working properly.
• Test the voice input in a real-life environment (the purpose of the app).
While testing the sound inputs in all the different surroundings, watch out for input delays or distortion in the recording or playback mode. Keep an eye on the performance of the app and the phone to see if the device freezes or crashes due to a lack of hardware resources (especially when saving the inputs). And don’t forget to check the digital rights management (DRM) when working with voice or sound inputs.
Camera
A typical smartphone has at least one camera, usually located at the back of the smartphone. However, most of today’s smartphones already have two cameras: a rear-facing and a front-facing camera. The rear camera is used to take high-resolution pictures, and the front camera is mostly used for video chatting with a lower resolution. Also, most of the rear-facing cameras have a flash included.
Cameras are used in a variety of mobile apps for taking pictures or videos. Some apps use the camera as a scanner to capture information using OCR (optical character recognition) or other kinds of shapes. Good examples of this include QR (Quick Response) codes, scanning apps, or apps that scan business cards to transform them into digital contacts in your phone. Some apps just use the LED flash to act as a flashlight.
If your app uses the camera, test it with a variety of mobile devices that match your target customer group. Every smartphone has a unique camera with a unique lens, flash, and resolution. The different resolutions of the camera have an impact on the image size. The higher the resolution, the bigger the pictures are. Be sure to test the camera function with different resolutions and camera types in order to see if the app is able to process both small and large images.
Besides that, you should check the performance of the app while the camera mode is activated. The camera takes up a lot of the device’s hardware resources, which can have an adverse impact on the app and cause it to crash or freeze. Heavy camera use can heat up the camera sensor and can cause hardware damage, so be sure that this is not possible within your app. Finally, don’t forget to test that the app can use an image stabilizer to prevent the camera from taking blurry pictures. The same applies to video capturing within your app.
System Apps
Most preinstalled apps from device manufacturers are system apps. There are often preinstalled apps such as a contact app, a phone app, a calendar app, and the like. However, on most of the mobile platforms users are able to install apps that replace the system apps. The main reasons users do this is bad usability or the lack of functionality on the part of the system apps. If you check the app stores of the different vendors for calendar apps, for instance, you’ll find plenty of apps with far more features than the preinstalled ones.
A really interesting example of this is keyboard apps on smartphones. Such apps are likely to have an impact on your app. On Android phones and tablets (and, since iOS 8, also on iOS devices), users are able to replace the preinstalled keyboard app with special keyboards that offer a totally different way of typing and keyboard layouts. There are conventional tap keyboards (like QWERTY), keyboards with different layouts (multiple symbols per key), keyboards with tap-slider functions, and keyboards that offer a swiping method to insert text.
Changing the keyboard can have an influence on your app. For example, the keyboard may be much taller than the standard one and therefore hide UI elements that are important to interact with, or the screen might not recognize that it needs to scroll. You may come across important keys that are missing from the keyboard, thus possibly rendering your app unusable in some cases. It is also possible for settings to get lost within your phone, and your app might cause freezes or crashes.
This is just one example of how replaced system apps can have an impact on your app. If your app interacts with one of the preinstalled system apps, keep in mind that users are able to replace them with other apps. You need to have an overview of popular apps that replace system apps in order to test their integration and interaction with your app.
Internationalization (I18n) and Localization (L10n)
Another challenge that needs to be handled during the mobile development process is the internationalization (I18n) and localization (L10n) of mobile apps. I18n is the process of designing software applications in such a way that they can be adapted to various languages and geographical regions throughout the world, without changing the code base and while the software is running (some apps and some mobile platforms require a restart).
L10n is the process of adapting the internationalized software to a specific language or region by adding locale-specific elements or translating the text.
It’s really important to test both I18n and L10n if your app is designed to be used in different countries. You must be sure that the different languages will not break your UI elements or have an influence on the app’s usability.
Important
Many languages have their own character set, and one word can have a very different width and height.
Have a look at the example word logout. If you compare the word with translations from Germany, France, Turkey, and Russia, you will see lots of difference in characters, width, and height:
• Logout (English)
• Ausloggen (German)
• Déconnexion (French)
• Çıkış yap (Turkish)
• (Russian)
Both the German word Ausloggen and the French word Déconnexion are much longer than Logout. The Turkish version even consists of two words. As a sample, Asian languages can be used as “short” languages, while German and Portuguese are considered “long” languages. All translations can lead to a UI glitch or even break your design rules. When testing an app in different languages, check that every text translation will fit into the UI elements and that every screen has the same look-and-feel. Also check that the different characters and font types can be stored in the local database.
The same applies to date formats that are used within apps. Depending on the country or region in question, different date formats are also used. You need to check that the correct format is shown depending on the region settings of the phone. You should also test the parsing from one date format to another.
The following date formats are commonly used:
• DD/MM/YYYY (Day/Month/Year)
• DD.MM.YYYY
• DD-MM-YYYY
• MM/DD/YYYY (Month/Day/Year)
• MM.DD.YYYY
• MM-DD-YYYY
• YYYY/MM/DD (Year/Month/Day)
• YYYY.MM.DD
• YYYY-MM-DD
If your app is going to be used in different countries or regions in the world, make sure you add the important languages based on your target customer group in order to provide a good user experience. When testing the app, you need to check it in every language. You also need to check that the language switch is working to be sure that only a single language is shown depending on the device’s language settings. Also check the fallback language of your app. To test this, change the device language to one that is not supported and check that the app uses the implemented fallback language. Languages and date formats should never be mixed up within the app. If you want to test if the used language is correct, you should ask a native speaker in order to avoid using misleading translations or text that is simply wrong.
Important
The different languages and date formats must be considered during the design phase of the app so that designers can plan the look-and-feel of the app in all of the provided languages. Late changes due to translation issues can delay the release date of the app or negatively affect the app’s design.
Mobile Browsers
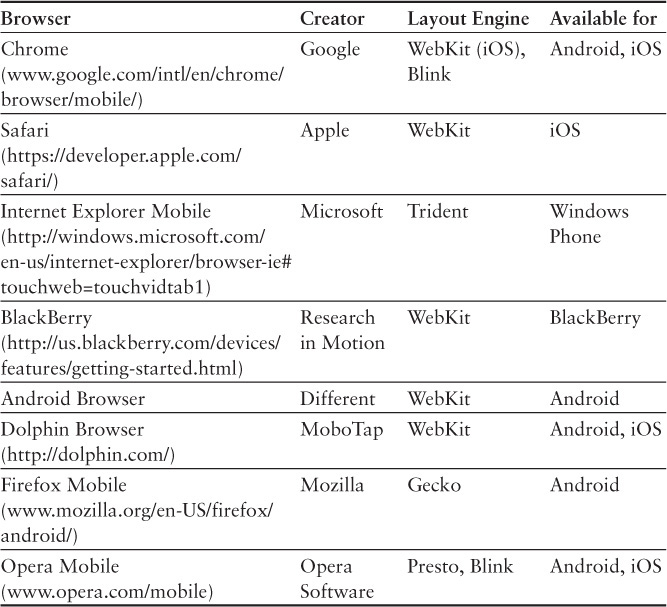
If you’re testing a mobile Web app, you will of course need to do so in a mobile Web browser. Mobile Web browsers are optimized to display Web content such that they can be accessed on smaller screens. Unfortunately, there is more than one mobile Web browser available in different versions of the different mobile platforms. Besides that, the browsers use different layout engines such as the following:
• Blink (www.chromium.org/blink)
• Gecko (https://developer.mozilla.org/en-US/docs/Mozilla/Gecko)
• Presto (www.opera.com/docs/specs/)
• Trident (http://msdn.microsoft.com/en-us/library/aa741312(v=vs.85).aspx)
• WebKit (www.webkit.org/)
Depending on the layout engine, browser settings, and browser version, mobile Web apps may look and behave very differently. This is especially the case for the different browser layout engines. Every browser layout engine handles standards like HTML, CSS, and JavaScript differently. Not every browser has implemented the complete feature set or the latest version of the various languages (HTML, CSS, JavaScript), which can lead to differences in behavior.
To be sure that your mobile Web app works on different browsers, test it on different mobile platforms such as Android, iOS, Windows Phone, or BlackBerry together with different browser versions. This is of course the same problem native apps have: fragmentation. However, testing mobile Web apps can be more difficult because now you have another variable added to your testing matrix: the different Web browsers. This means that you have to focus on the different browser versions, mobile platforms, and operating system versions.
The mobile Web browsers listed in Table 3.2 are available for the different mobile platforms. To see which browser layout engine is used by which browser version, check the browser vendor Web sites.
Important
Not every browser is available on every platform. Table 3.2 shows the most used mobile Web browsers.8 The table is not complete.
As you can see, testing a mobile Web app on different mobile browsers can also be a real challenge. To keep the amount of testing work needed for mobile Web browsers to a minimum, you should create mobile browser groups or add mobile browser requirements to the device groups. If you create browser groups, prioritize them based on your target customer group and only test your Web app within these groups.
Summary
Chapter 3 was one of the first hands-on chapters of this book. You are now able to create your own personas based on the information about your target customer group and the usage of your app. Those personas will help you to focus your development and testing efforts on your target group and not waste time on unnecessary features.
In addition to personas, you now know how to handle device fragmentation in the mobile world. Testing your app on every mobile device is not possible or economical. Based on your target group, you can define so-called mobile device groups to test only on the devices within each group. This will help you to downsize the testing effort dramatically. Another approach to handling device fragmentation is to use mobile device labs.
As you know, mobile devices are packed with lots of sensors and interfaces, and if your app uses them, you need to test them as well. Testing the different sensors and interfaces was another big topic in this chapter. For each sensor and interface, testing ideas were provided.
When your app is available in different countries and supports different languages, the section “Internationalization (I18n) and Localization (L10n)” should help you remember to test your app against those languages and settings related to locations from around the world.
The chapter closed with an overview of the different mobile browsers that are currently available on the market.