
5
LINES AND SEGMENTS

A point and a direction describe an infinite, straight line, with no start or end. Two distinct points bound a segment, which has a finite length but contains infinite points. In this chapter, we’ll focus on these two primitives, line segments and lines. We’ll implement both with the help of the points and vectors we implemented in the previous chapter.
We’ll also spend some time understanding and implementing two algorithms: one that computes the closest point to a segment, and another that computes segment intersections. These algorithms use some vital concepts from geometry that will serve as the foundation for more complex problems. We’ll take our time implementing these operations to make sure we understand them, so get your Python IDE ready and grab a pen and paper—it’ll be helpful to sketch some diagrams the old-school way.
Segment Class
Between any two points in the plane exists a unique segment, a straight line with finite length containing infinite points. Figure 5-1 depicts a segment between two points: S and E.
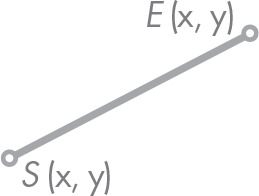
Figure 5-1: Segment defined between the points S and E
Let’s start by creating a class named Segment with two attributes: a start point S and an end point E. This is how our project’s structure looks so far:
Mechanics
|- geom2d
| |- __init__.py
| |- nums.py
| |- point.py
| |- point_test.py
| |- vector.py
| |- vector_test.py
| |- vectors.py
Right-click the geom2d package, select New ▸ Python File, name it segment, and click OK. PyCharm adds the .py extension for you, but if you’re using another IDE, you may need to add it yourself. In the file, enter the class as it’s written in Listing 5-1.
from geom2d.point import Point


class Segment:
    def __init__(self, start: Point, end: Point):
        self.start = start
        self.end = end
Listing 5-1: Segment initialization
We start by importing the Point class from the geom2d.point module. Then, we define the Segment class with an initializer that accepts two points: start and end. These are stored in corresponding attributes.
Note that we are typing the parameters; more specifically, we’re saying they must be of type Point. These are the type hints we saw in Chapter 2, mostly for the IDE to give us some context help. If the IDE knows both start and end are objects from Point, it’ll detect if we’re trying to use any attribute the class doesn’t implement. But it’s important to realize this won’t prevent us from passing the wrong argument type at runtime. In fact, if you try the following in the console:
>>> from geom2d.segment import Segment
>>> s = Segment("foo", "bar")

>>> s.start
'foo'
you should see that Python allowed us to pass strings instead of Points without complaining, as type hints are ignored by Python’s interpreter at runtime.
The Segment’s Direction
An important property of a segment is its direction, defined as a vector going from its start point S to its end point E. If we call it ![]() , we can compute it using Equation 5.1.
, we can compute it using Equation 5.1.

The normalization of the direction vector yields the direction versor, also commonly used in many operations with segments. The direction vector is a vector with the same length as the segment and parallel to it, with a direction going from its start point toward the end point. The direction versor is the normalized version of the direction vector, that is, a vector with the same direction but with unitary length.
The direction versor ![]() , given the segment with a length of l, is then as shown in Equation 5.2.
, given the segment with a length of l, is then as shown in Equation 5.2.

NOTE
Most of the time when we say segment’s direction, we’ll mean direction versor ![]() , but we’ll also sometimes use that phrase to refer to the direction vector
, but we’ll also sometimes use that phrase to refer to the direction vector ![]() . If that’s the case, we’ll explicitly note it. So, if nothing is said, assume by direction we mean the direction versor.
. If that’s the case, we’ll explicitly note it. So, if nothing is said, assume by direction we mean the direction versor.
Let’s implement both as properties of the class. Enter the code in Listing 5-2 in your segment.py file.
from geom2d.point import Point
from geom2d.vectors import make_vector_between, make_versor_between


class Segment:
    --snip--

    @property
    def direction_vector(self):
        return make_vector_between(self.start, self.end)

    @property
    def direction_versor(self):
        return make_versor_between(self.start, self.end)
Listing 5-2: Calculating a segment’s direction vector and versor
Since we’re using the make_vector_between and make_versor_between factory functions we defined in vectors.py, these two attributes are straightforward to implement. We simply make a vector or versor between our start and end points.
Now, as important as the direction of the segment is, it’s just as important that we know the direction perpendicular to it. We might use this perpendicular direction, for instance, to compute the velocity direction of a particle colliding against a straight line, which may represent a wall or the ground, such as the case in Figure 5-2.
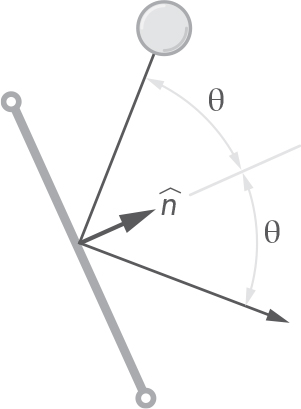
Figure 5-2: Computing the collision angle using the normal direction
Rotating the direction versor ![]() π/4 radians (90°) yields the segment’s normal versor. Computing this versor is quite simple using Vector’s perpendicular attribute. Enter the new property in Listing 5-3 in the Segment class.
π/4 radians (90°) yields the segment’s normal versor. Computing this versor is quite simple using Vector’s perpendicular attribute. Enter the new property in Listing 5-3 in the Segment class.
class Segment:
    --snip--

    @property
    def normal_versor(self):
        return self.direction_versor.perpendicular()
Listing 5-3: Computing a vector perpendicular to the segment’s direction
This new property we have added works by chaining two attributes: direction_versor and perpendicular. We first call self’s direction_versor to obtain the segment’s direction versor. The result is an instance of Vector, upon which we call the perpendicular method, which returns a versor perpendicular to the segment’s direction.
We could have stored the direction versor in a new variable and then called the perpendicular method on that variable:
def normal_versor(self):
    d = self.direction_versor
    return d.perpendicular()
In this case, the d variable doesn’t add readability to the code, and since we use it only once, we can chain both methods and return the result. You’ll see this pattern used often in our code.
You can see a visual representation of the concepts we just implemented in Figure 5-3. The segment on the left shows the direction vector ![]() , with its origin at S (the start point) and tip at E (the end point). The segment on the right shows the normalized version
, with its origin at S (the start point) and tip at E (the end point). The segment on the right shows the normalized version ![]() of the direction vector and its perpendicular counterpart
of the direction vector and its perpendicular counterpart ![]() , the direction and normal versors, respectively.
, the direction and normal versors, respectively.
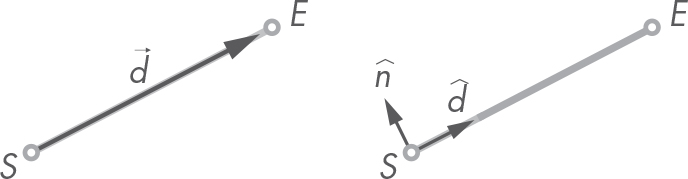
Figure 5-3: Segment direction vector (left) and direction and normal versors (right)
We’ll skip writing unit tests in this section, but that doesn’t mean you shouldn’t do them. From here on out, I won’t write tests for every method we do, just some chosen ones, so we can keep focus and get through the content. But it’s a great exercise for you to write unit tests for these untested methods. You can refer to the tests in the Mechanics project accompanying the book.
The Segment’s Length
Another important property of a segment is its length, or the distance between its end points.
Calculating Length
There are at least two ways we can compute the length of the segment: we can either compute the distance between points S and E or compute the length of the direction vector ![]() .
.
We’ll use the first one, which is shown in Listing 5-4, but if you prefer, you can implement the second one. The result should be the same.
class Segment:
    --snip--

    @property
    def length(self):
        return self.start.distance_to(self.end)
Listing 5-4: Calculating the length of a segment
Note again that using our previously implemented methods makes this calculation a breeze. Your segment.py file should look like Listing 5-5 at this point.
from geom2d.point import Point
from geom2d.vectors import make_vector_between, make_versor_between


class Segment:
    def __init__(self, start: Point, end: Point):
        self.start = start
        self.end = end

    @property
    def direction_vector(self):
        return make_vector_between(self.start, self.end)

    @property
    def direction_versor(self):
        return make_versor_between(self.start, self.end)

    @property
    def normal_versor(self):
        return self.direction_versor.perpendicular()

    @property
    def length(self):
        return self.start.distance_to(self.end)
Let’s test the method we just wrote.
Unit Testing Length
To make sure we made no mistakes implementing the length property, let’s write a unit test. Start by creating a new test file. Right-click the geom2d package, select New ▸ Python File, name it segment_test.py, and click OK. Then enter the code in Listing 5-6.
import math
import unittest

from geom2d.point import Point
from geom2d.segment import Segment


class TestSegment(unittest.TestCase):

    start = Point(400, 0)
    end = Point(0, 400)
    segment = Segment(start, end)

    def test_length(self):
        expected = 400 * math.sqrt(2)
        actual = self.segment.length
        self.assertAlmostEqual(expected, actual)
Listing 5-6: Testing a segment’s length property
We import the unittest and math modules and the Segment and Point classes. Then, we define two points: start at (400, 0) and end at (0, 400). Using these points, we create segment, which is our test subject. Following Rule 1 for good unit tests, a test should fail for one and only one reason, our expected result is expressed directly as ![]() , which comes from
, which comes from ![]() . The temptation here would be to write the following:
. The temptation here would be to write the following:
expected = self.start.distance_to(self.end)
However, that would violate Rule 1, as the test could fail for more than one reason. Moreover, in this case, both the expected and actual values would be computed using the same method: distance_to. This breaks the test’s independence from the code it’s supposed to test.
Run the test by clicking the green play button to the left of the TestSegment class definition and selecting Run ‘Unittests for segment’. You can run it from the console like so:
$ python3 -m unittest geom2d/segment_test.py
It may seem silly to test the distance property because the only thing it does is call the distance_to method, which has already been tested. Even with such simple implementations we could have made mistakes such as, for example, trying to compute the distance using the same point twice:
self.start.distance_to(self.start)
As you probably know from your own experience, we developers make mistakes like this more often than not.
The t Parameter and Middle Points
We said earlier that there are an infinite number of points between the endpoints E and S of a segment. How do we go about obtaining them? It’s common to use a parameter with values going from 0 to 1 (inclusive) to obtain every point along the segment. We’ll call this parameter t and define it as done in Equation 5.3.
All points between the segment’s start and end points can be obtained by varying the value of t. For t = 0, we get exactly the segment’s start point S. Similarly, for t = 1, we get the end point E. To compute any middle point P given a value of t, we can use Equation 5.4.

By realizing that the vector in the previous expression is exactly the direction vector as defined in Equation 5.1, we can simplify the expression as in Equation 5.5.
We can easily implement Equation 5.5 using Point’s displaced method. Enter the method point_at in Listing 5-7 into your Segment class file (segment.py).
class Segment:
    --snip--

   def point_at(self, t: float):
      return self.start.displaced(self.direction_vector, t)
Listing 5-7: Obtaining a point from a segment using parameter t
By displacing the start point by the direction vector t times (with 0.0 ≤ t ≤ 1.0), we obtain any point on the segment. Let’s implement a property that directly yields the middle point of the segment, that is, the point for t = 0.5 (see Figure 5-4).

Figure 5-4: A segment’s middle point
This is a special point we’ll be computing often, so we want a convenient way of obtaining it. Enter the code in Listing 5-8).
class Segment:
    --snip--

    @property
   def middle(self):
       return self.point_at(0.5)
Listing 5-8: Segment’s middle point
Validating t Values
You may have realized that in point_at, we don’t check that the passed-in t value is inside the expected range given by Equation 5.3. We can pass it a wrong value for t, and it works without complaining, yielding points that are out of the segment. For instance, if we passed it a value of t = 1.5, we’d obtain the point depicted in Figure 5-5.
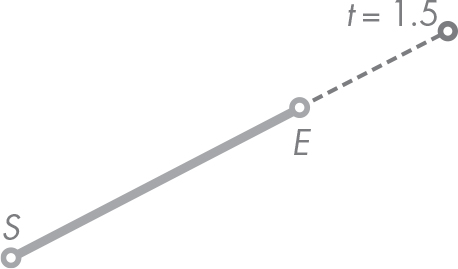
Figure 5-5: Point out of the segment for t = 1.5
Without validating the t value, this method silently fails by returning a point that the user may be tricked into thinking lies between the segment end points. By silently fail, we mean that the result is conceptually wrong, but the method happily computes it for us without any kind of warning or complaint that there may be some kind of error.
Robust software fails fast, meaning that as soon as an erroneous condition is detected, the program panics and quits, if possible with a message giving comprehensive information about the error.
This may sound scary, but it helps a lot. Imagine we allow users to pass a wrong value of t to our point_at(t) method. Now say that the user without noticing passes in a t like 739928393839. . . You can imagine the point obtained from this value is quite far from the segment that is supposed to contain it. Such a value wouldn’t crash our program, and it would continue to execute. We may not notice that we’ve gotten such a value until some calculation several minutes later, when everything fails. Debugging all of what happened before we found the error could take hours (or maybe days, depending on the complexity of the code and how far the error spread). It’d be much simpler if we could detect the wrong value right away. Perhaps we could tell the user something like this:
Oops! We were expecting the value of 't' to be in the  range [0, 1],
but you gave us a value of '739928393839'.
This message is crystal clear. It’s telling the user the program had to quit because of an error. This error could have gotten worse had the program continued to execute. The nice thing is the user gets the chance to analyze where the wrong value came from and take action to prevent it from happening again.
NOTE
Here we’re using the word user to reference anyone using our code, not the end user of the applications we write. This includes yourself, as you’ll be the user of your own code quite often.
Since there’s going to be a bunch of functionality defined for the t parameter, we’d better create a module for it. At this point, your project’s structure should look like this:
Mechanics
|- geom2d
| |- __init__.py
| |- nums.py
| |- point.py
| |- point_test.py
| |- segment.py
| |- segment_test.py
| |- vector.py
| |- vector_test.py
| |- vectors.py
Create a new file inside the geom2d package named tparam.py. Inside it, enter the code from Listing 5-9.
MIN = 0.0
MIDDLE = 0.5
MAX = 1.0


def make(value: float):
    if value < MIN:
        return MIN

    if value > MAX:
        return MAX

    return value


def ensure_valid(t):
    if not is_valid(t):
        raise TParamError(t)


def is_valid(t):
    return False if t < MIN or t > MAX else True


class TParamError(Exception):
    def __init__(self, t):
        self.t = t

    def __str__(self):
        return f'Expected t to be in [0, 1] but was {self.t}'
Listing 5-9: Validating parameter t values
We start by defining three useful constants. There’s MIN, the minimum value t can take. There’s MIDDLE, the value of (MIN + MAX) / 2. Finally, there’s MAX, the maximum value t can take.
These values are going to be used a lot, so instead of writing magic numbers (numbers that appear hard-coded without explanation about their nature) everywhere, we’ve given them a name to understand what they refer to.
Once we’ve defined the values, we define the function make to create a parameter with a valid value. Then comes the function ensure_valid, which checks that t is not less or greater than the range limits using another method: is_valid. If t has a value outside the valid range, an exception is raised. TParam Error is an implementation of Python’s Exception. This is a user-defined exception we provide with a nice formatted message. In the initializer for TParam Error, we pass the offending t value, and in the special method __str__, we return the actual message. Recall that a class may define the __str__ method to provide a textual (string) representation of the instance when it’s called.
To see how it prints the message, try the following in the console:
>>> from geom2d import tparam
>>> tparam.ensure_valid(10.5)
Traceback (most recent call last):
  --snip--
geom2d.tparam.TParamError: Expected t to be in [0, 1] but was 10.5
The error message is nice and clear:
Expected t to be in [0, 1] but was 10.5
Let’s use this validation in the point_at method from the Segment class. First, import the module in your segment.py file:
from geom2d import tparam
Go back to segment.py and refactor point_at(t) to include the validation, as in Listing 5-10.
def point_at(self, t: float):
    tparam.ensure_valid(t)
    return self.start.displaced(self.direction_vector, t)
Listing 5-10: Validating values of t in segment’s point_at method
Then refactor the middle property to remove the 0.5 magic number as shown in Listing 5-11.
@property
def middle(self):
    return self.point_at(tparam.MIDDLE)
Listing 5-11: Removing the magic number from our middle point computation
If you followed along, your segment.py file should look like Listing 5-12.
from geom2d import tparam
from geom2d.point import Point
from geom2d.vectors import make_vector_between, make_versor_between


class Segment:
    def __init__(self, start: Point, end: Point):
        self.start = start
        self.end = end

    @property
    def direction_vector(self):
        return make_vector_between(self.start, self.end)

    @property
    def direction_versor(self):
        return make_versor_between(self.start, self.end)

    @property
    def normal_versor(self):
        return self.direction_versor.perpendicular()

    @property
    def length(self):
        return self.start.distance_to(self.end)

    def point_at(self, t: float):
        tparam.ensure_valid(t)
        return self.start.displaced(self.direction_vector, t)

    @property
    def middle(self):
        return self.point_at(tparam.MIDDLE)
Listing 5-12: The Segment class
With our Segment class complete, let’s write some tests.
Unit Testing Segment Points
Since we’ll use point_at as part of more complex computations, we really want to make sure it works, so let’s start with a test to assert that if it passes a wrong value of t, an exception is actually raised. This gives us the opportunity to learn a new assertion method: assertRaises.
In the file segment_test.py, start by importing the tparam module:
from geom2d import tparam
Then write the test in Listing 5-13.
class TestSegment(unittest.TestCase):

    start = Point(400, 0)
    end = Point(0, 400)
    segment = Segment(start, end)

    --snip--

    def test_point_at_wrong_t(self):
        self.assertRaises(
         ➊ tparam.TParamError,
         ➋ self.segment.point_at,
         ➌ 56.7
        )
Listing 5-13: Testing wrong values of t
This assertion is a bit more complex than the ones we’ve seen so far. We are passing it three arguments. First is the expected exception to be raised (TParamError) ➊. Second, we pass the method that is expected to raise the exception ➋. Last, we pass the arguments to be passed into the previous method (point_at in this case) as comma-separated arguments ➌.
The assertion can be read as follows:
assert that method 'point_at' from instance 'self.segment'
raises an exception of type 'tparam.TParamError'
when called with arguments '56.7'
If point_at accepted more than one argument, you would include them as arguments of assertRaises. Now, let’s include the two test cases from Listing 5-14.
class TestSegment(unittest.TestCase):

    start = Point(400, 0)
    end = Point(0, 400)
    segment = Segment(start, end)

    --snip--

    def test_point_at(self):
        t = tparam.make(0.25)
        expected = Point(300, 100)
        actual = self.segment.point_at(t)
        self.assertEqual(expected, actual)

    def test_middle_point(self):
        expected = Point(200, 200)
        actual = self.segment.middle
        self.assertEqual(expected, actual)
Listing 5-14: Testing the point_at method
In the first test case, we ensure that a middle point for a valid t value, 0.25 in this case, yields the expected point. Using Equation 5.4, this point can be computed as follows:

The second test is for the middle attribute, which computes the point at t = 0.5. Take a pen and some paper and make sure point (200, 200) is right in our test. Then run all the tests in the segment_test.py file to make sure all of them pass. You can do this from the console as follows:
$ python3 -m unittest geom2d/segment_test.py
Closest Point
Now suppose we want to know what the segment’s point is that is closest to an outside point. If the outside point is not aligned with the segment, that is, a line perpendicular to the segment going through the point doesn’t intersect with the segment, then the closest point has to be one of the two end points: S or E. If, on the other hand, the point is aligned with the segment, the intersection between the perpendicular line and the segment itself yields the closest point. Figure 5-6 illustrates this.
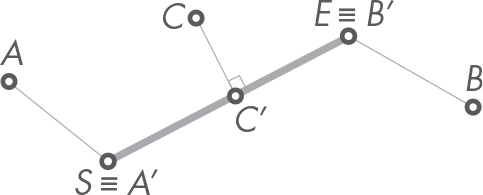
Figure 5-6: A segment’s closest points
In the figure, point S ≡ A′ is the closest point to A, point E ≡ B′ is the closest point to B, and C′ is the closest point to C. Let’s see how we can implement this procedure.
The Algorithm
With the help of the method projection_over from Chapter 4, we can find the closest point easily. We’ll use P as the external point, l as the length of the segment, and the various points, segments, and vectors in Figure 5-7.
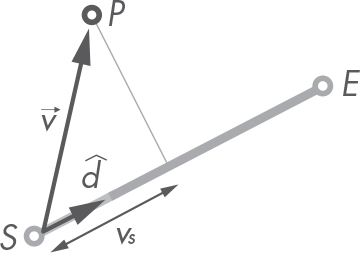
Figure 5-7: Auxiliary vectors for the algorithm that computes a segment’s closest point
The algorithm is as follows:
- Compute a vector
 going from segment’s S to external point P.
 - Compute the projection of over the segment’s direction versor,
 .
. - Depending on the value of the projection, call it vs. The closest point P′ can be calculated using Equation 5.6.

If the value of the projection vs is negative, the projection lies outside the segment on S’s side; hence, the closest point is S. For numbers greater than l, the projection over the segment’s direction is longer than the segment itself. Thus, the result is the end point E. For any value of vs in the closed range [0,l], we obtain the point by displacing S in the direction of ![]() vs times. Figure 5-7 depicts this last case where the external point P is aligned with the segment.
vs times. Figure 5-7 depicts this last case where the external point P is aligned with the segment.
The code for this operation is in Listing 5-15.
class Segment:
    --snip--

   def closest_point_to(self, p: Point):
       v = make_vector_between(self.start, p)
       d = self.direction_versor
       vs = v.projection_over(d)

       if vs < 0:
           return self.start

       if vs > self.length:
           return self.end

       return self.start.displaced(d, vs)
Listing 5-15: Closest point to a segment
We start by computing vector ![]() . We then get vs: the projection of
. We then get vs: the projection of ![]() over the segment’s direction versor
over the segment’s direction versor ![]() . If vs is smaller than zero, we return the start point. If greater than the length of the segment, we return the end point; otherwise, we compute the displacement of the start point that yields the resulting point on the segment.
. If vs is smaller than zero, we return the start point. If greater than the length of the segment, we return the end point; otherwise, we compute the displacement of the start point that yields the resulting point on the segment.
Unit Testing Closest Points
Let’s test the three different cases defined earlier, namely, vs < 0, vs > l, and 0 < vs < l. Listing 5-16 shows the code for the tests.
class TestSegment(unittest.TestCase):

    start = Point(400, 0)
    end = Point(0, 400)
    segment = Segment(start, end)

    --snip--

    def test_closest_point_is_start(self):
        p = Point(500, 20)
        expected = self.start
        actual = self.segment.closest_point_to(p)
        self.assertEqual(expected, actual)

    def test_closest_point_is_end(self):
        p = Point(20, 500)
        expected = self.end
        actual = self.segment.closest_point_to(p)
        self.assertEqual(expected, actual)

    def test_closest_point_is_middle(self):
        p = Point(250, 250)
        expected = Point(200, 200)
        actual = self.segment.closest_point_to(p)
        self.assertEqual(expected, actual)
Listing 5-16: Testing a segment’s closest point
To better understand the tests, it may be a good exercise to draw the segment and each of the external points by hand to see whether you can figure out why the expected results have the values they have. Your drawing should look similar to Figure 5-8. Furthermore, trying to solve the three cases by hand will presumably give you some insight into the algorithm.
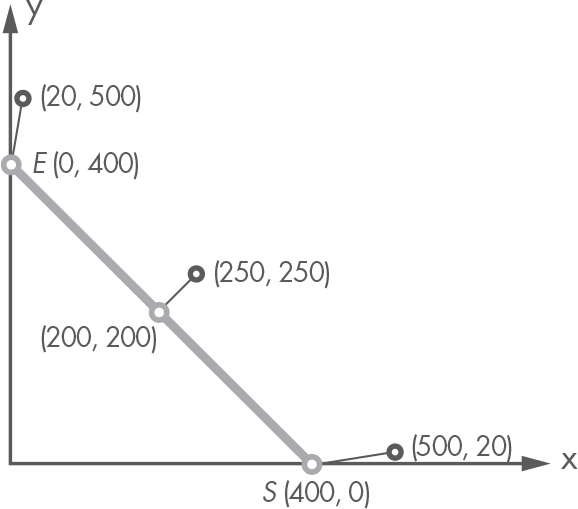
Figure 5-8: The segment’s closest points and their test cases
Don’t forget to run all tests and make sure they all succeed. You can do this from the console as follows:
$ python3 -m unittest geom2d/segment_test.py
Distance to a Point
Now that we know the closest point in the segment to an external point, we can easily compute the distance between it and the segment. Enter the method in Listing 5-17.
class Segment:
    --snip--

   def distance_to(self, p: Point):
       return p.distance_to(
           self.closest_point_to(p)
       )
Listing 5-17: Computing the distance from a point to the segment
As you can see in the code, the distance between the segment and any given external point is the distance between the point and that in the segment that is closest to it. Simple, isn’t it?
Segment Intersections
Now we get to the fun stuff. How do we test whether two segments intersect? If they do intersect, how do we compute the intersection point? Consider the cases from Figure 5-9.
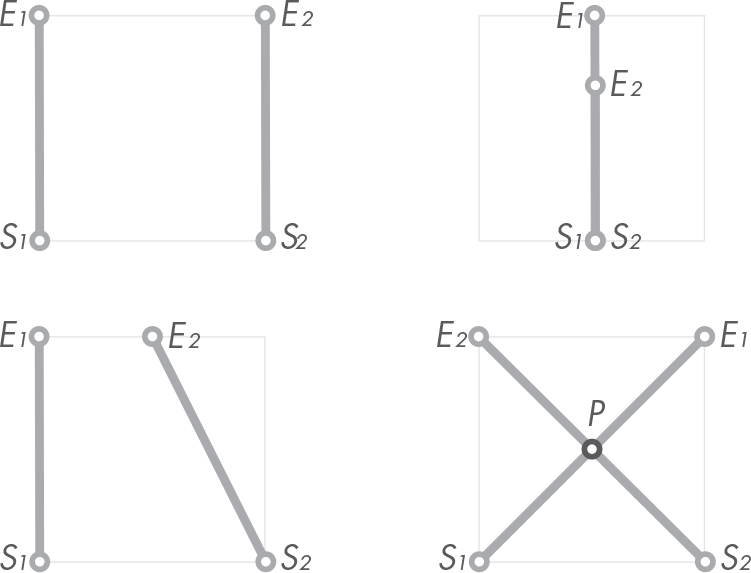
Figure 5-9: Possible segment intersection cases
The two cases from the left column have no intersection, but there is a difference between them. In the first case, the direction vectors of the segments are parallel (![]() ×
× ![]() = 0). Thus, it’s easy to know there will be no intersection. In the other case, if instead of segments we had infinite lines, there would be an intersection point. It might be far from where the segments are, but there’d be one nonetheless. As we’ll see in the following equations, we’ll have to compute the intersection point as if we were working with lines and then ensure the point lies inside both segments.
= 0). Thus, it’s easy to know there will be no intersection. In the other case, if instead of segments we had infinite lines, there would be an intersection point. It might be far from where the segments are, but there’d be one nonetheless. As we’ll see in the following equations, we’ll have to compute the intersection point as if we were working with lines and then ensure the point lies inside both segments.
In the upper-right case, the two segments overlap; hence, there is more than one intersection point—an infinite number, to be precise. For our analysis we’ll define two possible cases: segments either have an intersection point or don’t intersect at all (we won’t be considering the upper-right case). We’ll forget about the overlapping case since we won’t be needing it for our applications, and we want simplified code.
Overlapping Segments
If we were to include the case where the segments overlap, the return object for the intersection function could be either a Point or a Segment. A function that returns different object types is hard to work with. Once we have the result, we’d need to check what type of object we got and act accordingly. This could look as follows:
result = seg_a.intersection_with(seg_b)

if type(result) is Point:
    # intersection is a point
elif type(result) is Segment:
    # intersection is a segment
else:
    # no intersection
But this code is messy. There are better ways of handling this logic, but we won’t get into it, as for us there will be either an intersection point or no intersection at all. That will make our code simpler and easier to work with.
Let’s take a look at the algorithm.
The Algorithm
Let’s find the intersection point of a case like the one in the lower right of Figure 5-9. Say we have two segments:
- Segment 1 with start point S1 and end point E1
- Segment 2 with start point S2 and end point E2
We can compute every point in segment 1, let’s call it P1, using the following expression,
where t1 is the parameter that goes from 0 to 1 and ![]() is the direction vector (not versor) for the segment. Similarly, here is segment 2:
is the direction vector (not versor) for the segment. Similarly, here is segment 2:
To find the intersection point, we have to look for a pair of values t1 and t2 such that P1(t1) = P2(t2):
If both segments intersect, plugging those t parameter values in their respective segment expressions should result in the same point, the intersection point P. Let’s rewrite the expression in its vector form:

We can use this form to obtain a scalar system of two equations and two unknowns, t1 and t2:
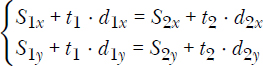
I’ll spare you the details and give you the result, though it may be a good exercise to solve the system yourself for t1 and t2. The final expressions for the t parameters are as shown in Equations 5.7 and 5.8.


Here, ΔSx = S2x – S1x, ΔSy = S2y – S1y, and ![]() . Note that these formulas would yield ∞ if the segments were parallel
. Note that these formulas would yield ∞ if the segments were parallel ![]() . We can’t attempt a division by zero; that would raise an exception in our Python code, so we’ll need to detect this case before we try to compute the values of t1 and t2.
. We can’t attempt a division by zero; that would raise an exception in our Python code, so we’ll need to detect this case before we try to compute the values of t1 and t2.
With these two values computed for the case where segments were not parallel, we have two possible outcomes:
- Values t1 and t2 are both inside range [0, 1]. The intersection point belongs to both segments.
- One or both of t1 and t2 are outside range [0, 1]. The intersection point is outside of at least one of the segments.
Now we’re ready to implement the logic in an algorithm. In your segment.py file, implement the intersection_with method as shown in Listing 5-18.
class Segment:
    --snip--

    def intersection_with(self, other):
        d1, d2 = self.direction_vector, other.direction_vector

        if d1.is_parallel_to(d2):
            return None

        cross_prod = d1.cross(d2)
        delta = other.start - self.start
        t1 = (delta.u * d2.v - delta.v * d2.u) / cross_prod
        t2 = (delta.u * d1.v - delta.v * d1.u) / cross_prod

        if tparam.is_valid(t1) and tparam.is_valid(t2):
            return self.point_at(t1)
        else:
            return None
Listing 5-18: Intersection between two segments
We start by storing both segments’ direction vectors in the variables d1 and d2 using Python’s multiple assignment. With the multiple assignment, several values can be assigned to variables at once. Then we check whether the directions are parallel, in which case we return None. If we find the segments aren’t parallel, we compute ![]() and ΔS and store them in the variables cross_prod and delta. With the help of these values, we then compute t1 and t2. If these values are inside their valid range, we then return the resulting intersection point by calling point_at on the current Segment object (self). Make sure you understand that we could have computed P using t2 and called point_at on other. The result would’ve been the same.
and ΔS and store them in the variables cross_prod and delta. With the help of these values, we then compute t1 and t2. If these values are inside their valid range, we then return the resulting intersection point by calling point_at on the current Segment object (self). Make sure you understand that we could have computed P using t2 and called point_at on other. The result would’ve been the same.
NOTE
Similarly to other languages such as Java or C# with null, one should use None judiciously. Use it for cases where having an empty-like value is a perfectly valid outcome. For instance, in our intersection_with method, None represents the case where there exists no intersection point.
Unit Testing Segment Intersections
As we advance with the book material and our code becomes more complex, testing these code fragments will become more involved. The method we just wrote for computing intersection between segments has a couple of branches or paths the execution can take. With the objective of being as exhaustive as possible with our unit tests, let’s compile every case we want covered (see Table 5-1).
Table 5-1: Segment Intersection Algorithm Outcomes
Segment Directions |
t1 |
t2 |
Intersection Result |
|
— |
— |
None |
|
Out of range |
Out of range |
None |
|
In range |
Out of range |
None |
|
Out of range |
In range |
None |
|
In range |
In range |
|
We’ll be writing unit tests for the first and last cases from Table 5-1; I’ll leave the other three as an exercise for you. In file segment_test.py, include the tests in Listing 5-19 in the TestSegmentclass.
class TestSegment(unittest.TestCase):

    start = Point(400, 0)
    end = Point(0, 400)
    segment = Segment(start, end)

    --snip--

    def test_parallel_segments_no_intersection(self):
        other = Segment(Point(200, 0), Point(0, 200))
        actual = self.segment.intersection_with(other)
        self.assertIsNone(actual)

    def test_segments_intersection(self):
        other = Segment(Point(0, 0), Point(400, 400))
        expected = Point(200, 200)
        actual = self.segment.intersection_with(other)
        self.assertEqual(expected, actual)
Listing 5-19: Testing segment intersections
So, in the first test, we construct a parallel segment and assert that the intersection between the two is None with the assertion assertIsNone, which checks that the passed-in value is None. In the second, we construct a segment perpendicular to the first one that intersects it at (200, 200) and assert we get that point as the result. You can run all the tests in the file from the IDE by clicking the green play button or from the console as follows:
$ python3 -m unittest geom2d/segment_test.py
Can you come up with the segments needed for the other three cases?
Equality and String Representation
Just as we did with the Point and Vector classes, we want to overload the == operator so that Python understands two segments with equal start and end points as logically equal, and we want to implement a __str__ method so we can get a nice string representation of the segment. Enter the code in Listing 5-20 in the segment.py file.
class Segment:
    --snip--

   def __eq__(self, other):
       if self is other:
           return True

       if not isinstance(other, Segment):
           return False

       return self.start == other.start
              and self.end == other.end

   def __str__(self):
       return f'segment from {self.start} to {self.end}'
Listing 5-20: Equality of segments and string representation
We’ll add one last property once we’ve developed the Line class. If you followed along, your Segment class should look similar to Listing 5-21.
from geom2d import tparam
from geom2d.point import Point
from geom2d.vectors import make_vector_between, make_versor_between


class Segment:
    def __init__(self, start: Point, end: Point):
        self.start = start
        self.end = end

    @property
    def direction_vector(self):
        return make_vector_between(self.start, self.end)

    @property
    def direction_versor(self):
        return make_versor_between(self.start, self.end)

    @property
    def normal_versor(self):
        return self.direction_versor.perpendicular()

    @property
    def length(self):
        return self.start.distance_to(self.end)

    def point_at(self, t: float):
        tparam.ensure_valid(t)
        return self.start.displaced(self.direction_vector, t)

    @property
    def middle(self):
        return self.point_at(tparam.MIDDLE)

    def closest_point_to(self, p: Point):
        v = make_vector_between(self.start, p)
        d = self.direction_versor
        vs = v.projection_over(d)

        if vs < 0:
            return self.start

        if vs > self.length:
            return self.end

        return self.start.displaced(d, vs)

    def distance_to(self, p: Point):
        return p.distance_to(
            self.closest_point_to(p)
        )

    def intersection_with(self, other):
        d1, d2 = self.direction_vector, other.direction_vector

        if d1.is_parallel_to(d2):
            return None

        cross_prod = d1.cross(d2)
        delta = other.start - self.start
        t1 = (delta.u * d2.v - delta.v * d2.u) / cross_prod
        t2 = (delta.u * d1.v - delta.v * d1.u) / cross_prod

        if tparam.is_valid(t1) and tparam.is_valid(t2):
            return self.point_at(t1)
        else:
            return None

    def __eq__(self, other):
        if self is other:
            return True

        if not isinstance(other, Segment):
            return False

        return self.start == other.start
               and self.end == other.end

    def __str__(self):
        return f'segment from {self.start} to {self.end}'
Listing 5-21: The Segment class
Line Class
An infinite line can be described by a base point B and a direction vector ![]() , like that in Figure 5-10.
, like that in Figure 5-10.
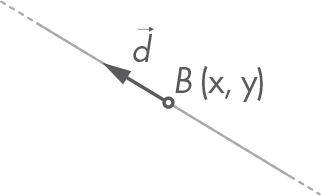
Figure 5-10: A line with a base point B and direction vector ![]()
Lines are useful helper primitives; with them we can build more complex geometries and operations. One common usage of lines, for example, is finding where two nonparallel directions intersect. You’ll see in the next chapter how operations such as constructing a circle out of three points are effortless using line intersections.
Let’s create a new Line class with these two properties: a base point and a direction. In the geom2d package, add a new file named line.py and enter the code in Listing 5-22.
from geom2d.point import Point
from geom2d.vector import Vector


class Line:
    def __init__(self, base: Point, direction: Vector):
        self.base = base
        self.direction = direction
Listing 5-22: Line initialization
The initializer sets our properties base and direction based on the values passed into their corresponding arguments. Like before, we’ve typed the base and direction arguments so our IDE can warn us of any potential errors.
Let’s now provide two methods that check whether a line is parallel or perpendicular to another line (Listing 5-23).
class Line:
   --snip--

   def is_parallel_to(self, other):
       return self.direction.is_parallel_to(other.direction)

   def is_perpendicular_to(self, other):
       return self.direction.is_perpendicular_to(other.direction)
Listing 5-23: Checking whether lines are parallel or perpendicular
We didn’t implement these methods for Segment, because our concern was with the segment’s infinite points and how they’re located in the plane; here, on the other hand, we’re working with directions. Working with directions requires knowledge of their relative positioning; Are they parallel? Are they perpendicular?
With lines, the question is usually about how they are positioned with respect to other lines; with segments, the question is usually about how they are positioned themselves.
To check whether two lines are parallel, we could simply access their direction properties and use their methods like so:
d1 = line_one.direction
d2 = line_two.direction
d1.is_parallel_to(d2)
This is definitely possible, but it’s not considered good practice. There is a guideline commonly known as the principle of least knowledge or law of Demeter, which states that “you should only talk to your immediate friends.” In this case, as we are working with lines, lines are our immediate friends. The Line properties base point and direction vector are not our immediate friends; thus, we shouldn’t ask them for stuff. If we need something from them, we have to ask our immediate friend, the Line holding such properties, to do it for us.
So, here’s how we should check whether two lines are parallel or perpendicular:
line_one.is_parallel_to(line_two)
Let’s also include two more methods to create new lines that are perpendicular or parallel to an existing line and that go through a point. In your file, enter the code in Listing 5-24.
from geom2d.point import Point
from geom2d.vector import Vector


class Line:
    --snip--

    def perpendicular_through(self, point: Point):
        return Line(point, self.direction.perpendicular())

    def parallel_through(self, point: Point):
        return Line(point, self.direction)
Listing 5-24: Creating perpendicular and parallel lines
The method perpendicular_through receives point as an argument and returns a new line, which uses that base point and direction vector perpendicular to the original line. Similarly, parallel_through constructs a new line with the given base point but using the same direction vector as the original line.
Line Intersections
A general algorithm to compute the intersection between two segments was explained in depth earlier in the chapter. The algorithm was based on the start point and direction vector of segments but can be extended to work with lines by using the base point of the line instead of the start point of the segment. The nice thing is that in the case of lines, parameters t1 and t2 are not bounded to range [0, 1]; they can go from – ∞ to ∞.
If we rewrite Equations 5.7 and 5.8 for lines, we get Equations 5.9 and 5.10.


In this case, ΔBx = B2x – B1x, and ΔBy = B2y – B1y. For these formulas to yield the correct values, recall that ![]() . Since the t values are not bounded anymore, there’s no need to compute both t1 and t2 and check whether they fall into the range [0, 1]. Computing one of them will suffice in getting the resulting intersection point. Let’s choose Equation 5.9 to compute t1. With t1, we can determine the actual intersection point as follows:
. Since the t values are not bounded anymore, there’s no need to compute both t1 and t2 and check whether they fall into the range [0, 1]. Computing one of them will suffice in getting the resulting intersection point. Let’s choose Equation 5.9 to compute t1. With t1, we can determine the actual intersection point as follows:
Implement method intersection_with in your Line class as in Listing 5-25.
from geom2d.point import Point
from geom2d.vector import Vector
from geom2d.vectors import make_vector_between


class Line:
   --snip--

   def intersection_with(self, other):
       if self.is_parallel_to(other):
           return None

       d1, d2 = self.direction, other.direction
       cross_prod = d1.cross(d2)
       delta = make_vector_between(self.base, other.base)
       t1 = (delta.u * d2.v - delta.v * d2.u) / cross_prod

       return self.base.displaced(d1, t1)
Listing 5-25: Calculating the intersection between two lines
The code looks similar to the algorithm in Segment, but it’s a bit simpler. To check for parallelism, we use the self method instead of using the directions. As we implemented is_parallel_to on the Line class, it makes sense to use it (and it helps the code read even better!).
Unit Testing Line Intersections
Let’s make sure our tweaked algorithm works. Create a new file line_test.py and enter the test for the Line class in Listing 5-26.
import unittest

from geom2d.line import Line
from geom2d.point import Point
from geom2d.vector import Vector


class TestLine(unittest.TestCase):

    def test_parallel_lines_no_intersection(self):
        l1 = Line(Point(0, 0), Vector(1, 1))
        l2 = Line(Point(10, 10), Vector(1, 1))
        self.assertIsNone(l1.intersection_with(l2))

    def test_lines_intersection(self):
        l1 = Line(Point(50, 0), Vector(0, 1))
        l2 = Line(Point(0, 30), Vector(1, 0))
        actual = l1.intersection_with(l2)
        expected = Point(50, 30)
        self.assertEqual(expected, actual)
Listing 5-26: Testing line intersections
In the first test, test_parallel_lines_no_intersection, we create two parallel lines with different base points but the same direction vectors. We then assert intersection_with returns None. The second test, test_lines_intersection, creates two lines, the first of which is vertical at x = 50 and the second horizontal at y = 30; hence, the intersection point is (50, 30).
Run the tests by clicking the green play button beside the class definition. You should see this in the console:
Ran 2 tests in 0.001s

OK

Process finished with exit code 0
You can also run the tests from the console:
$ python3 -m unittest geom2d/line_test.py
Listing 5-27 contains all the code we wrote for the Line class.
from geom2d.point import Point
from geom2d.vector import Vector
from geom2d.vectors import make_vector_between


class Line:
    def __init__(self, base: Point, direction: Vector):
        self.base = base
        self.direction = direction

    def is_parallel_to(self, other):
        return self.direction.is_parallel_to(other.direction)

    def is_perpendicular_to(self, other):
        return self.direction.is_perpendicular_to(other.direction)

    def perpendicular_through(self, point: Point):
        return Line(point, self.direction.perpendicular())

    def parallel_through(self, point: Point):
        return Line(point, self.direction)

    def intersection_with(self, other):
        if self.is_parallel_to(other):
            return None

        d1, d2 = self.direction, other.direction
        cross_prod = d1.cross(d2)
        delta = make_vector_between(self.base, other.base)
        t1 = (delta.u * d2.v - delta.v * d2.u) / cross_prod

        return self.base.displaced(d1, t1)
Segment’s Bisector
Now that we have both segments and lines, we can implement a new attribute in Segment: its bisector. This attribute is the line going through the segment’s middle point M that’s perpendicular to it. Figure 5-11 illustrates this concept.

Figure 5-11: A segment’s bisector
Computing a bisector line for a segment is simple since we already have access to the segment’s middle point and normal versor (don’t forget to import the Line class), as shown in Listing 5-28.
from geom2d import tparam
from geom2d.line import Line
from geom2d.point import Point
from geom2d.vectors import make_vector_between, make_versor_between


class Segment:
    --snip--

    @property
   def bisector(self):
       return Line(self.middle, self.normal_versor)
Listing 5-28: Segment’s bisector
In the next chapter, we’ll be using the bisectors of segments to create a circle passing through three points—a common way of obtaining circles in CAD software. In Part III of the book, we’ll create a program that computes a circle passing through three points and draws a beautiful image with captions indicating its center and radius.
Summary
In this chapter, we used the Point and Vector classes to create two new primitives: Segment and Line. Both have a defined direction, and both represent a set of infinite aligned points, but segments are bounded between two points, whereas lines have no ends.
We also implemented a way of obtaining the infinite points in Segment using a parameter t that is defined in the range [0, 1]. There was no need to do the same for Line, as we’re not usually interested in what points make it up.
We then created two algorithms: we included a method in the Segment class that looks for its closest point to an external point. Although we didn’t implement it in Line, we could have done so. We used this method to compute the distance from a point to a segment. We also implemented an algorithm to compute intersections between two segments and two lines. These intersections result in a point or the value None returned. Lastly, we used the Line class to represent the bisector of a segment.
These linear primitives are going to prove invaluable for building more complex ones called polygons, the topic of our next chapter.