
Chapter 2. Selectors and Methods: Grab and Go
jQuery helps you grab web page elements and do all kinds of things with them. In this chapter, we’ll dig into jQuery selectors and methods. With jQuery selectors, we can grab elements on our page, and with methods we can do stuff to those elements. Like a massive book of magic spells, the jQuery library lets us change tons of things on the fly. We can make images disappear and reappear out of thin air. We can select a certain piece of text and animate the change to its font size. So, on with the show—let’s grab some web page elements and go!
Jump for Joy needs your help
You receive an email from your friend, who is a professional portrait photographer. She wants to roll out a “Jump for Joy” promotion that allows users to win deals on a package of prints. She needs your help making the promotion work.
From: Emily |
Subject: Jump for Joy Promotion! |
Hey, |
I saw your tweet that you’re doing more interactive web work these days, so I was hoping you could help me with making some interactive stuff for the “Jump for Joy” promotion on my website. I’d like to give my visitors a chance to receive a discount off their purchase before they check out, to encourage them to click around the site some more (and hopefully buy more as a result!). |
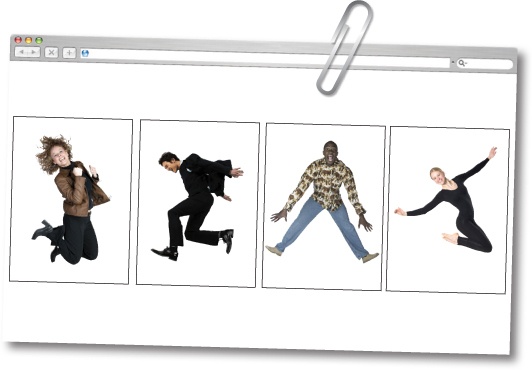
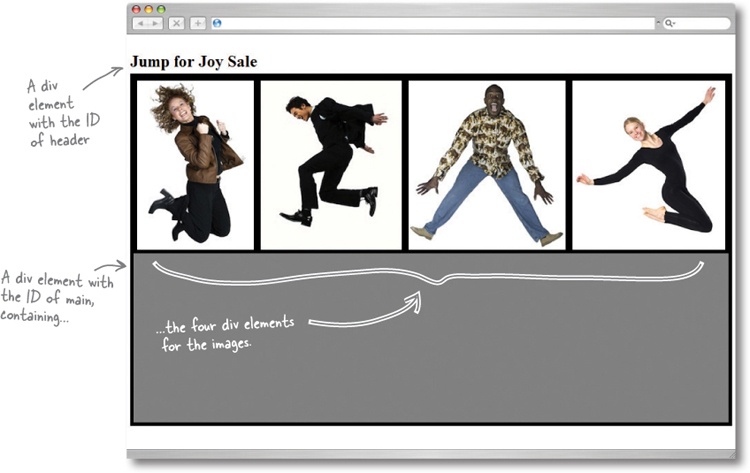
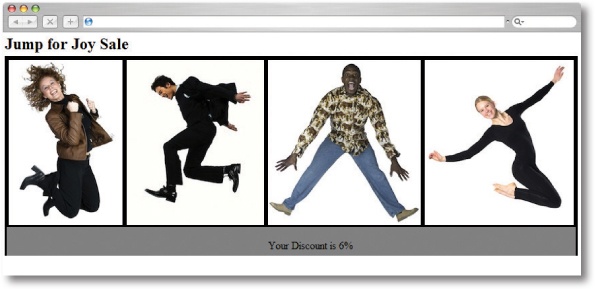
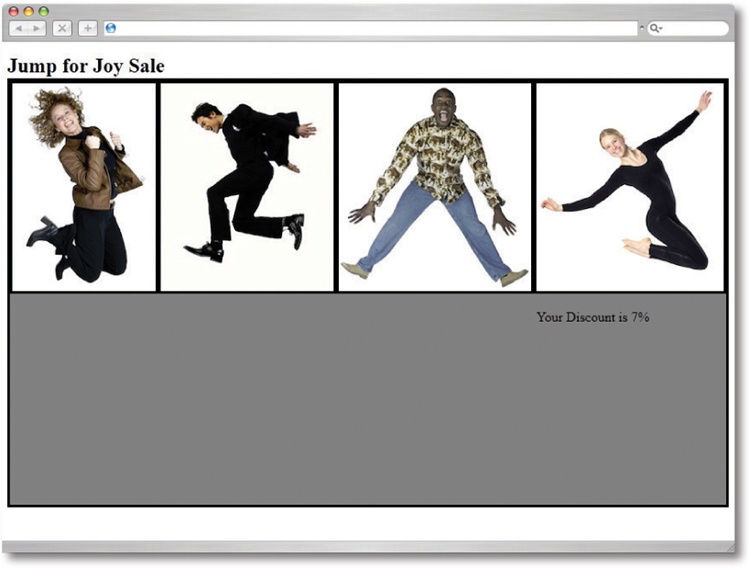
The page should have four sections with one of four images per section. I need a message that says “Your Discount is” that displays a random discount amount (between 5 and 10 percent). When a user clicks on one of the sections, the message should appear below the image in that section. If a user clicks again, I’d like to get rid of the last message and display a new one. |
I’ve attached a mockup of how I want it to look. |
Think you can help?? |
-- |
Emily |
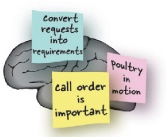
What are the project requirements?
Emily is a great photographer, but her request is kind of all over the place. Let’s take a closer look at that email and figure out what she is really asking for. Before you can even start writing any jQuery, you want to be super clear on what the project (or user) requirements are.
Make it Stick
Converting user requests into actual project requirements is an important skill that gets better with practice and time.
Whoa! Hold your horses there, hoss!
Working out project requirements first is a good habit to get into for every jQuery project you’ll work on. But before we jump right into writing jQuery code, we need to do a little work setting up the structure and styles first. We did a bit of this in Chapter 1, and now we’ve got even more to set up before we get any jQuery goodness going.
Dig in with divs
We need four clickable areas on the page, so let’s make those first. The most useful and flexible HTML element for our purposes is the <div> tag. The <div> tag serves very well in the structure role, since it’s a block-level element. We can also easily style div elements to act exactly as we want them to.
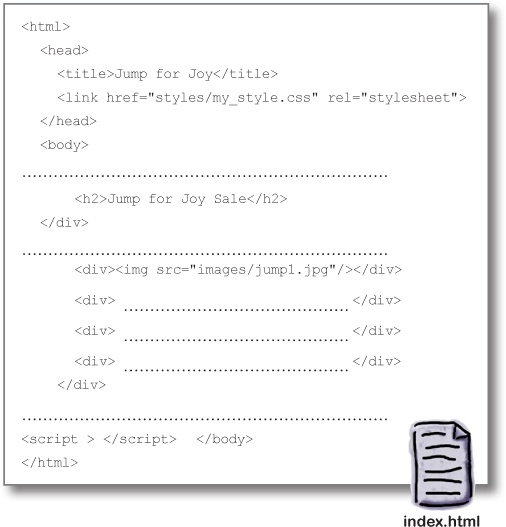
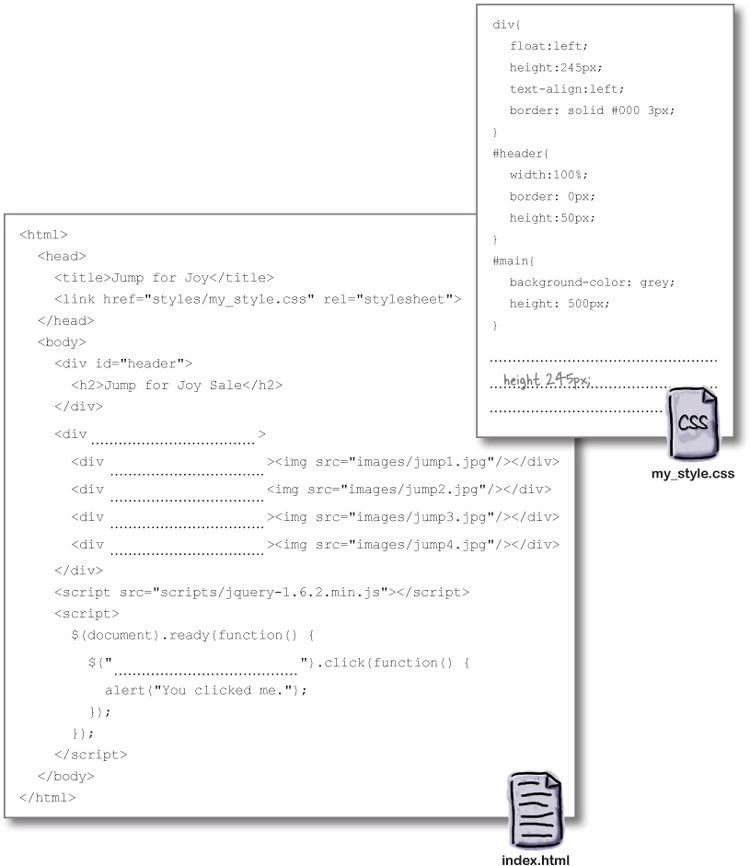
Open your favorite text editor to create the HTML and CSS files you’ll need. Below is the starter code with some key elements missing. Add the following items to the page and check them off as you’re done:
A tag to include the jQuery library, version 1.6.2. | |
A | |
A | |
Inside each of the four |

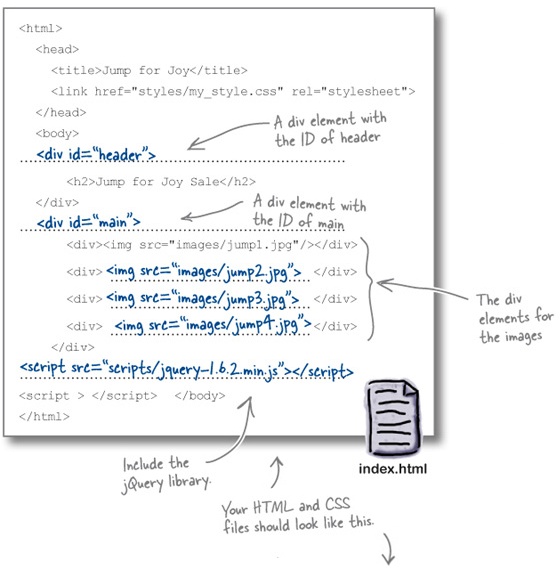
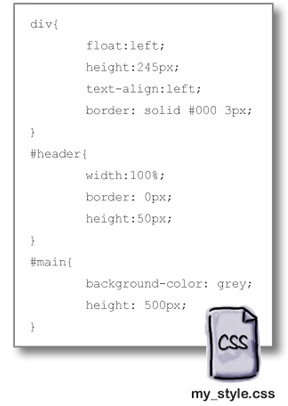
Open your favorite text editor and create the HTML and CSS files to solve this exercise. Below is the starter code with some key elements missing. Once you’ve added the following items, your page should look like our solution.
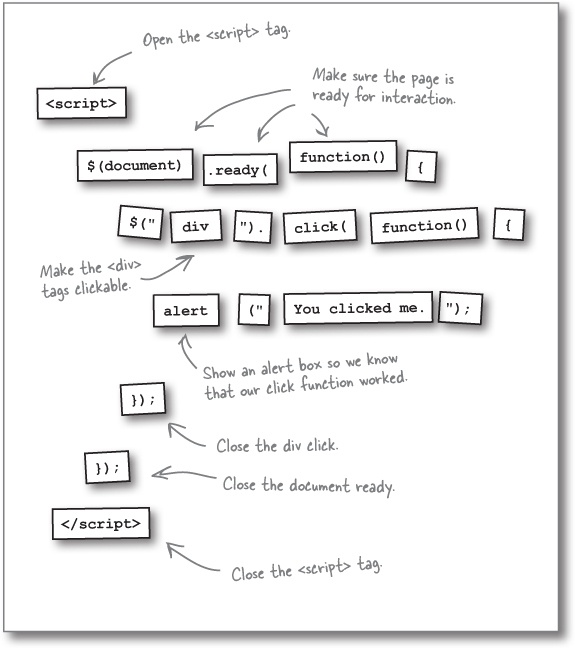
A click event up close
As we’ve seen, making an element clickable with jQuery is easy.
Clicking on a page element causes an event to trigger on the page, and can also run functions. We’ll get more in depth into events and functions later on, but for now, let’s just review how the click event works on a paragraph (or <div>) tag.


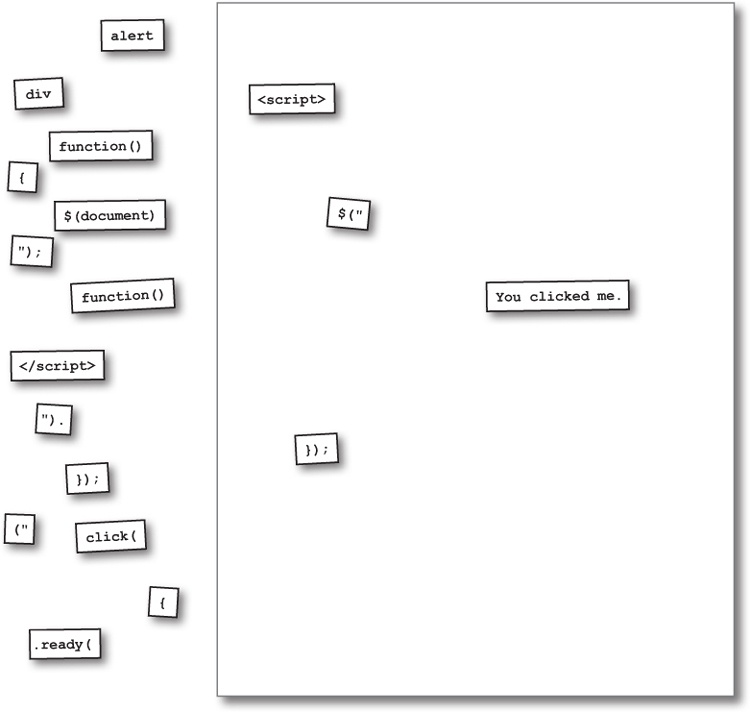
Add the click method to your page
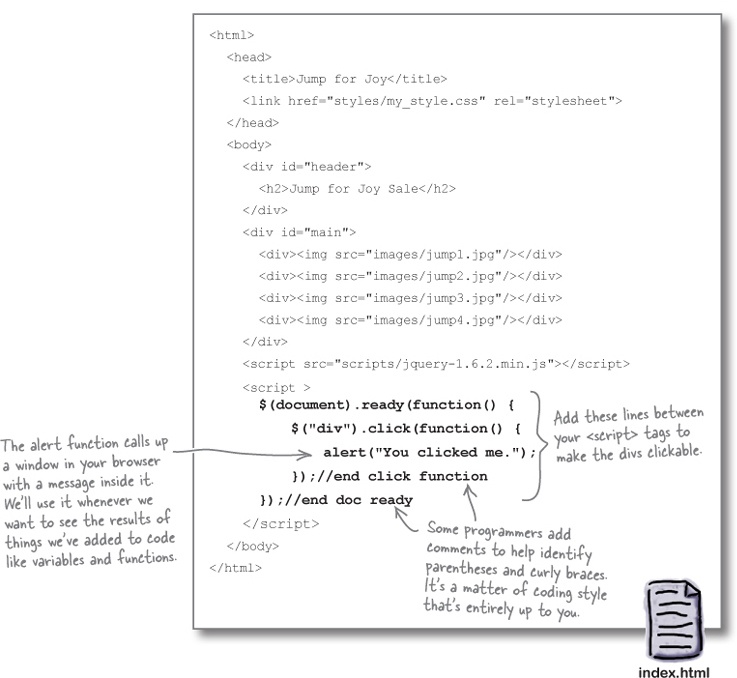
Using the code you put together in the magnets solution on the previous page, update your HTML file to include this script. Don’t forget to put it inside a <script> tag!
Do this!
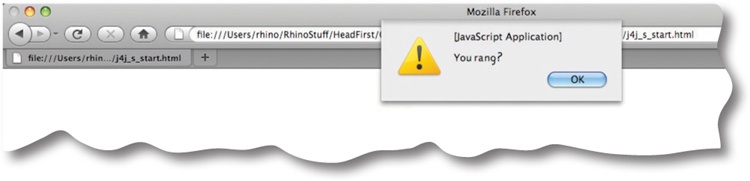
Open the page up in your favorite browser to make sure everything’s working. You should see the alert message now as you click around the images on the page.
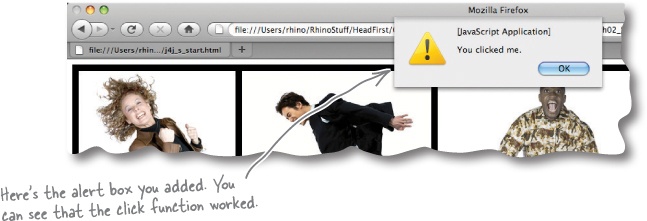
Hmmm, that is a problem.
It looks like we’ve gotten a bit click-happy. Let’s take a look at that click event again.
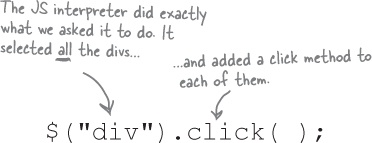
In fact, you don’t even have to click on the images to get that message. Our page structure has div elements nested in another div, so when you click on those, the browser thinks you’ve clicked on both, and you might get two alerts in that case. Clearly, we need to narrow down what we’re asking jQuery to do here...
Get more specific
The issue is that we haven’t been specific enough in our selection. So how can we get at the four sub-divs and leave out the larger container div? Remember from Chapter 1 that jQuery selectors use CSS classes and IDs. We can get even more specific about which elements we want jQuery to grab by adding classes and IDs to those elements.

Classing up your elements
In CSS, classes are used to group elements together and give them common style attributes. You can have one or more elements on the page that have the same class. For jQuery, we can use the same class selector, and affect the same group of elements with jQuery methods. Both CSS and jQuery use the “.” to signify a class, which makes it super easy to start classing up your code.

ID-entifying elements
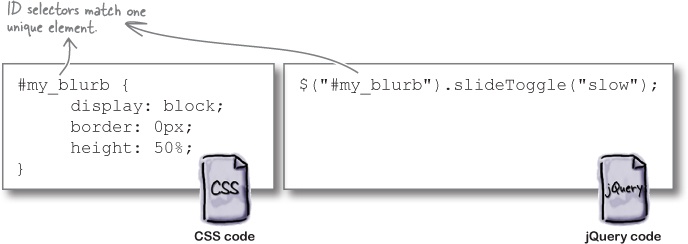
An ID selector is used to identify a single, unique element on a page. In jQuery, as in CSS, the # symbol is used to identify an ID selector. IDs are great when you want to get specific with an element, or when there is only going to be one of that kind of element on the page, like a page header or footer.
Check the boxes in the appropriate columns to indicate what you can use classes for and what you can use IDs for. Remember, sometimes a class and an ID can do the same job!
Wire up your web page
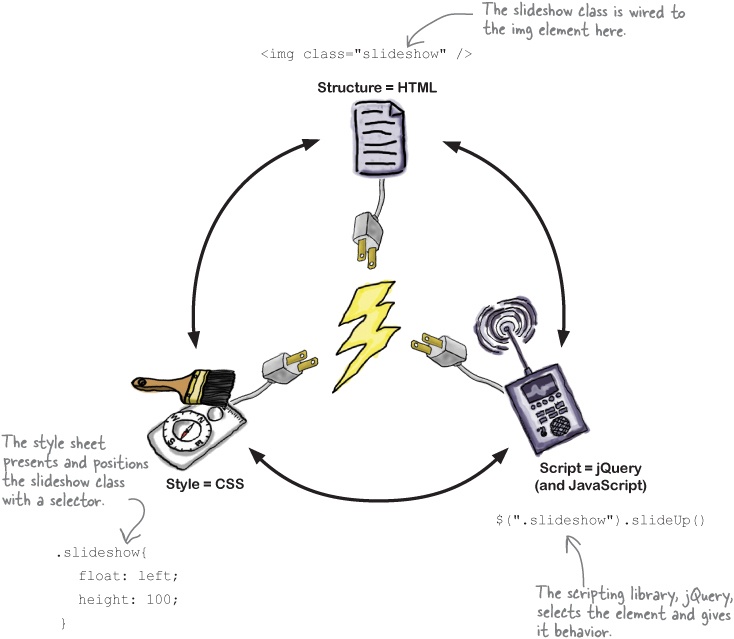
Classes and IDs are common ground for the three layers of a web page that we looked at in Chapter 1: structure, style, and script. Selectors are where those layers get wired together so they can all work in concert. HTML provides the building blocks (i.e., elements and their attributes), or structure of the web page. CSS provides the style, or the presentation and position of those elements. JavaScript and jQuery provide the script that controls the behavior or function of those elements.
Imagine that we have a class called slideshow for an image we want to run the slideUp method on:
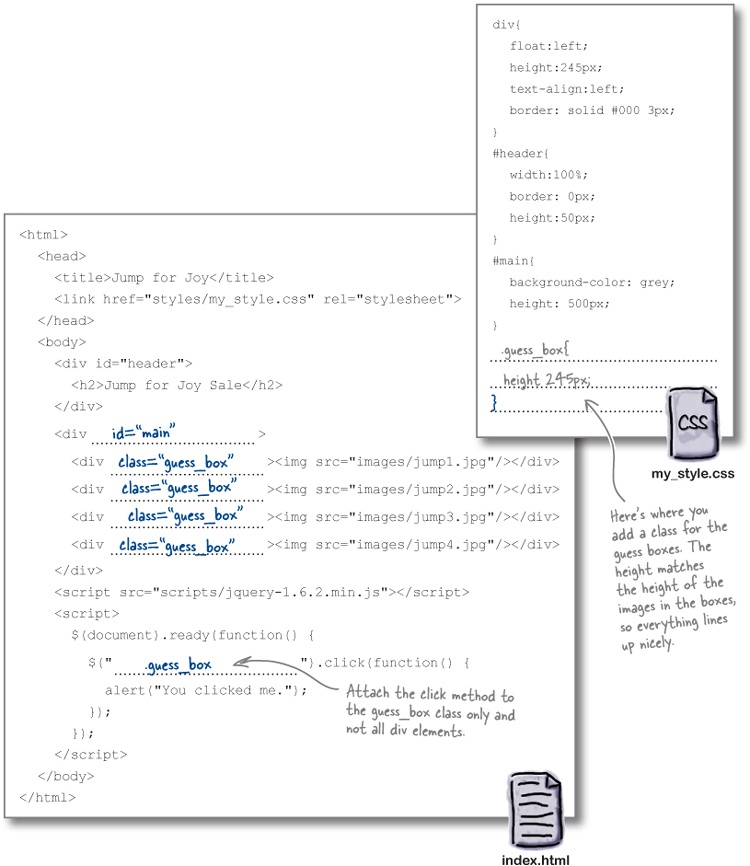
Update the structure, style, and script in your page to make only the four image div sections clickable. In the CSS file, create a CSS class (called guess_box) and apply it to the html and the script. It looks like one of our div elements lost its ID attribute too. Can you figure out which one and put it back?
Meanwhile, back to our list
Let’s have a look at our requirements to-do list to see where we are on building everything that Emily asked for:
Actually, not very hard.
There are several things involved in displaying a message to the user. Don’t forget, it could be a different message for each user who visits the site.
Creating some storage space
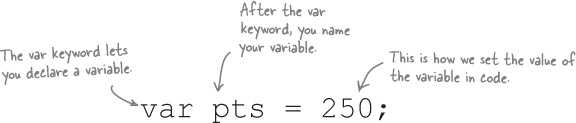
The next requirement on our list is to show some text that will stay the same as our script runs: “Your Discount is”. But beside that, we need to hold a number that will change or vary depending on the random amount. We need a way to carry that information throughout the script—our page needs a way to store that information. Storing information (or data) that varies is a perfect job for variables. When we want variables in jQuery, we use JavaScript variables.
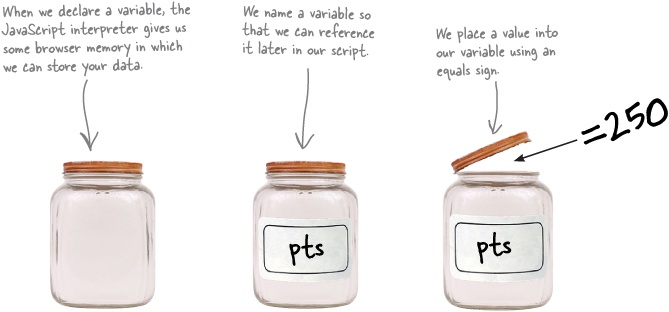
Now, whenever we want to get the data we stored, we just ask for it by its variable name.
Mix things up with concatenation
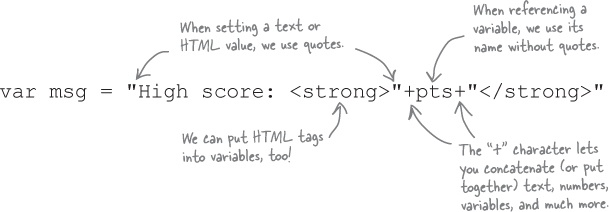
For many of our jQuery scripts, we’ll be storing different kinds of data: numbers, text, or true or false values. In many cases, especially when we need to display different messages to our visitors, we’ll be mixing HTML with these other kinds of data, which gives our web pages even more power. So, how do we go about combining our variables with other values? We use concatenation. Imagine you have a video game where you have a variable called pts that stores the highest score, and you need to display it to the winner:
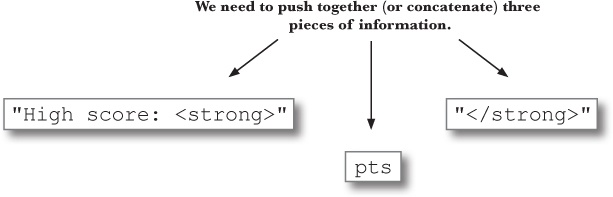
Which give us:

Meanwhile, back in the code...
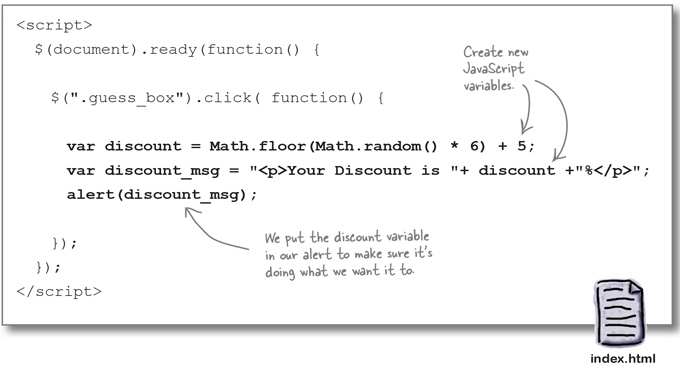
Now that you’ve got a variable set up to store your concatenated discount message, you just need to update what’s in between your <script> tags, so let’s focus there.
Do this!
Insert your message with append
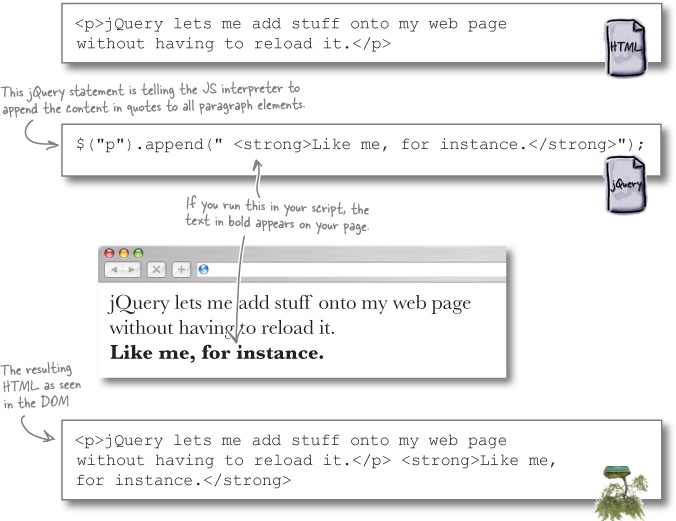
You’ve got your message ready to go, but how do you display it on the page below the image that’s been clicked? If you think of adding a new message as inserting it into the page, jQuery provides several ways to insert content into an existing element. We’ll cover some more useful ones in more depth in Chapter 4, but for now, let’s just look quickly at the append action.

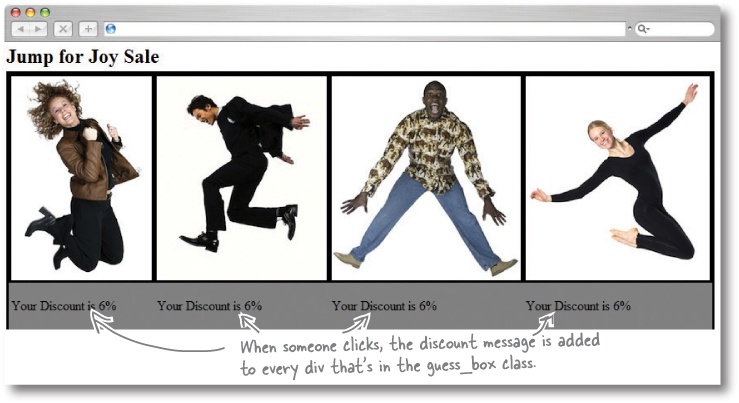
Everything works great, but...
The discount variable is generating a random number and appends the message to our page the way we expected, but it has an unexpected side effect: the discount shows up over and over again in every div.
That’s not what we wanted to happen. So what went wrong?
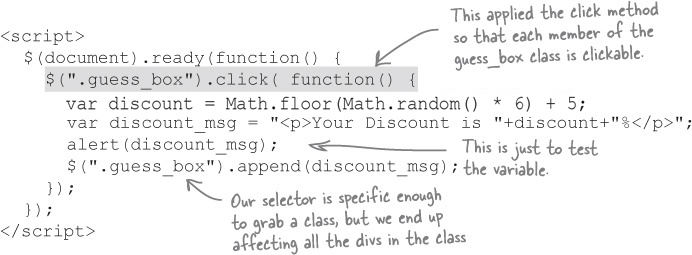
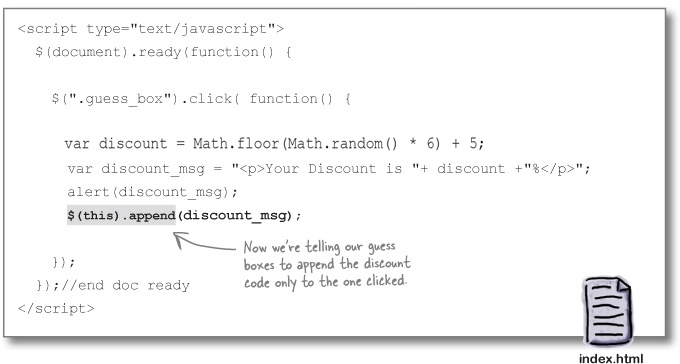
We need to append the discount variable only to the individual div that’s clicked. So, how do we select only the one that was clicked and append the discount variable to that one?
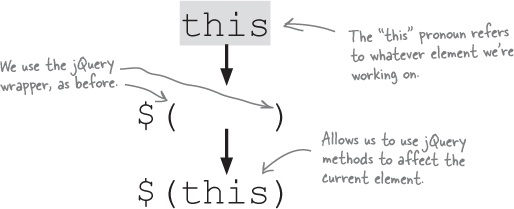
Give me $(this) one
Throughout this chapter, we’ve been looking at jQuery selectors and how they return elements that jQuery methods use. And very often, we want to be really specific about which element we’re selecting. When it comes to specificity, the simplest selector to write is $ (this). (All you have to remember is the pronoun “this,” after all.) The $ (this) selector gives us an easy way to point to the current element.
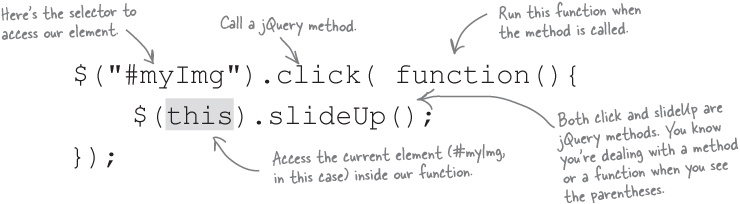
It’s important to think about $ (this) as context-dependent. In other words, $ (this) means different things depending on where or when you use it. One of the best places to use it is within a function that runs when a jQuery method is called:
Put $ (this) to work
Let’s see if $ (this) can help us solve our problem. Update your code to use $ (this), as shown in bold below.
Do this!
Open the page up in your favorite browser to make sure everything’s working. Pay special attention to the alert to make sure that we got the discount variable right. Make sure to click several times to check that the random number concatenated into the discount variable works too.
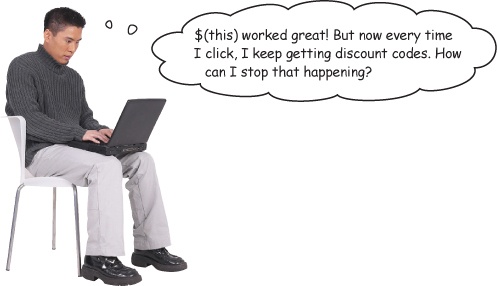
Great question!
That leads us right to the last step on our to-do list:
Good riddance with remove
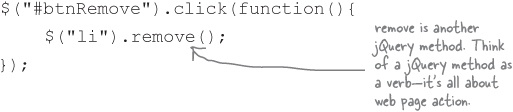
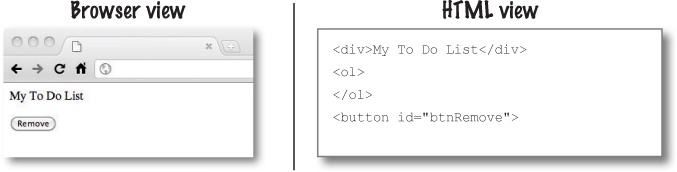
So how do we get rid of the last message and make a new one? Use the remove method. The remove method allows us to take an element, or a group of elements, off of the page. Let’s have a look at a really simple page with a list and a button.
Here’s what it looks like in the browser, and the HTML that creates it.
And here’s the code for the button, which will remove all the list items from your list:
Looking again at the page in the browser and the HTML—after jQuery is finished—we can see that all our list items are gone, even in the HTML!

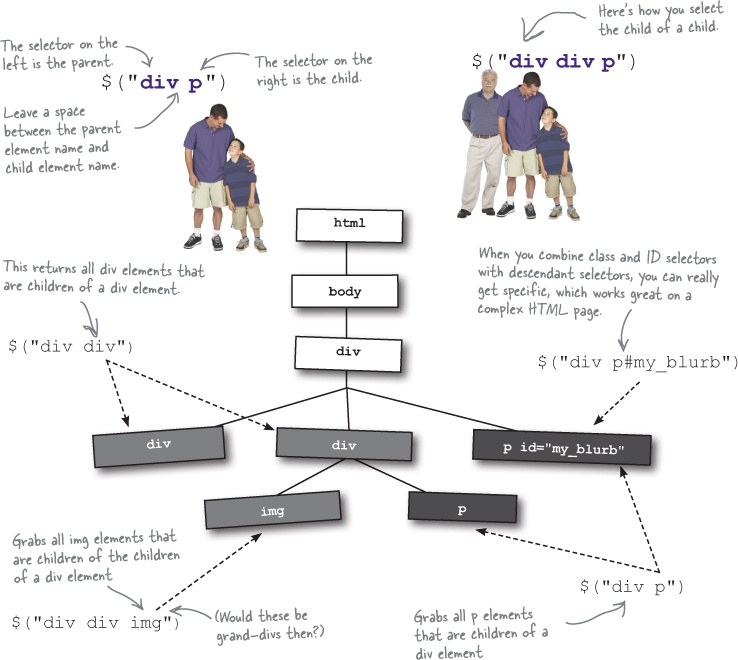
Dig down with descendant selectors
Descendant selectors are yet another selector we can use with jQuery, and they happen to fit our situation perfectly. With descendant selectors, we can specify relationships between elements. We can select children, parents, or siblings.
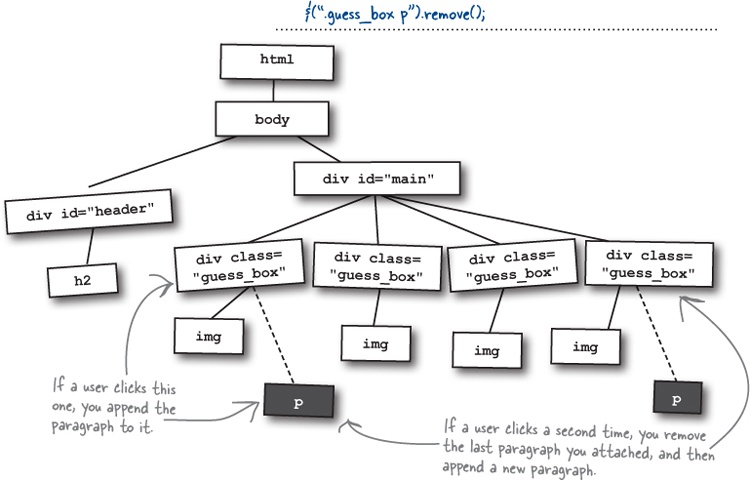
Start by using the .guess_box class selector, followed by a descendant p selector to access the paragraph you added. Then, use the remove method to take all the p elements in any element with the class of guess_box off the page.

Yes, the order in which you add or remove your elements is important.
You can’t remove an element before you add it, and there’s no point removing an element just after you add it, right?
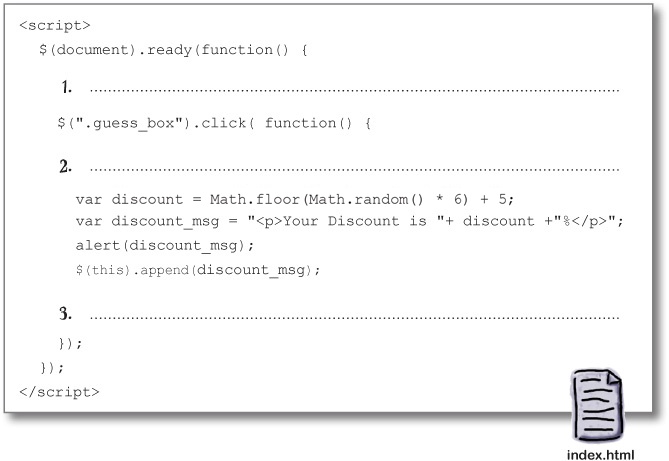
Your job is to decide where the remove statement should go. Write the statement on the line numbered 1, 2, or 3 below. Then explain why you put it there. Think about when you need to remove the paragraph, and use the process of elimination to pick the correct place to do that.
Why I think the statement goes there:
_______________________________________________________________
_______________________________________________________________
_______________________________________________________________
_______________________________________________________________
_______________________________________________________________
Your job is to decide where the remove statement should go. Write the statement on the line numbered 1, 2, or 3 below. Then explain why you put it there. Think about when you need to remove the paragraph, and use the process of elimination to pick the correct place to do that.

Why I think the statement goes there:
The remove statement can’t go on line 1 because it would be outside of the click function for the guess box. The statement can’t go on line 3 because that would remove what I just appended. I want to remove the last discount message before generating a new one, so I’ll put it as the first line of the code block (inside the curly braces) for the guess_box click.
Watch it!
The order and timing of when you make your jQuery calls is important.
This is true especially when you are giving important information to your visitors and removing it again. We’ll look more into the timing and order of on-screen effects in Chapter 5.
Add the line of code you just wrote to your index.html file. Then, open the page up in your favorite browser to make sure everything’s working. Click several times to check that the random number concatenated into the discount variable works too, and that the old discount values are removed properly, before appending the new code.
Your turn to jump for joy
Congratulations! You nailed the requirements and made the campaign work.
From: Emily |
Subject: Re: Jump for Joy Promotion! |
Thank you so much for doing this for me. My site is so much better. |
I hope people enjoy my photos as much as I enjoy my new page! |
-- |
Emily |
> PS. I’ve attached a self-portrait of me with my photo gear when I saw the new web page... No prizes for guessing what I’m doing! |

Your jQuery Toolbox
You’ve got Chapter 2 under your belt and now you’ve added the basics of jQuery selectors and jQuery methods to your toolbox.
$ (this)
Selects the “current” element.
The meaning of $ (this) will change throughout your code, depending on where it is being referenced.
jQuery methods
method — A jQuery method is reusable code defined in the jQuery library. You use methods to do stuff in jQuery and in JavaScript. Think of a method as a verb—it’s all about web page action.
.append — Inserts the specified content into the DOM. It gets added to the end of whatever element calls it.
.remove — Takes elements out of the DOM.
Selectors
$ (this) — Selects the current element.
$(“div”) — Selects all the div elements on the page.
$(“div p”) — Selects all the p elements that are directly inside div elements.
$(“.my_class”) — Selects all the elements with the my_class class.
$(“div.my_class”) — Selects only the divs that have the my_class class. (Different types of elements can share a class.)
$(“#my_id”) — Selects the element that has the ID of my_id.