
Chapter 5. jQuery Effects and Animation: A Little Glide in Your Stride
Making things happen on your page is all well and good, but if you can’t make it look cool, people won’t want to use your site. That’s where jQuery effects and animation come in. In this chapter, you’ll learn how to make elements transition on your page over time, show or hide specific pieces of elements that are relevant, and shrink or grow an element on the page, all before your users’ eyes. You’ll also see how to schedule these animations so they happen at various intervals to give your page a very dynamic appearance.
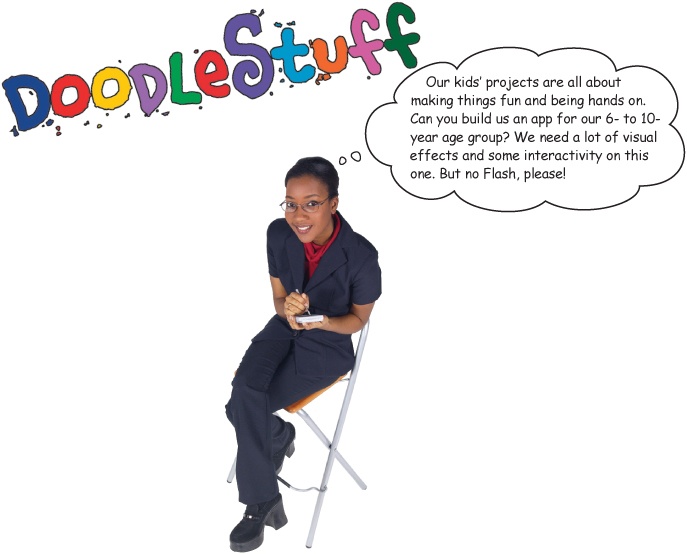
DoodleStuff needs a web app
DoodleStuff supplies Webville kids with cool art supplies. A few years ago, DoodleStuff started up a popular website that provides interactive art apps for kids. The company’s fan base has grown so fast that it has trouble keeping up with requests.
To cater to DoodleStuff’s new, wider audience, the web projects director wants to build an app that doesn’t use Flash or any other browser plug-ins.
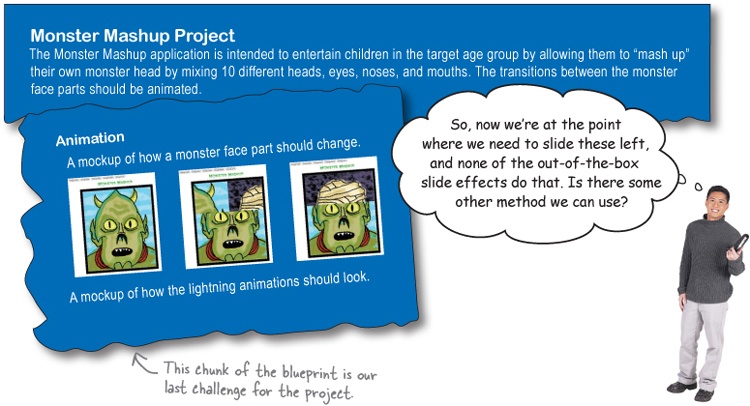
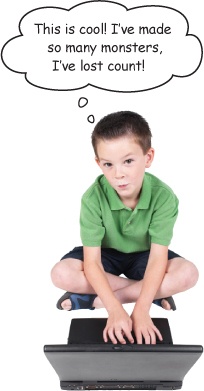
Do the Monster Mashup
Here’s the project blueprint from the web projects director, along with the graphic designer’s files for the app.
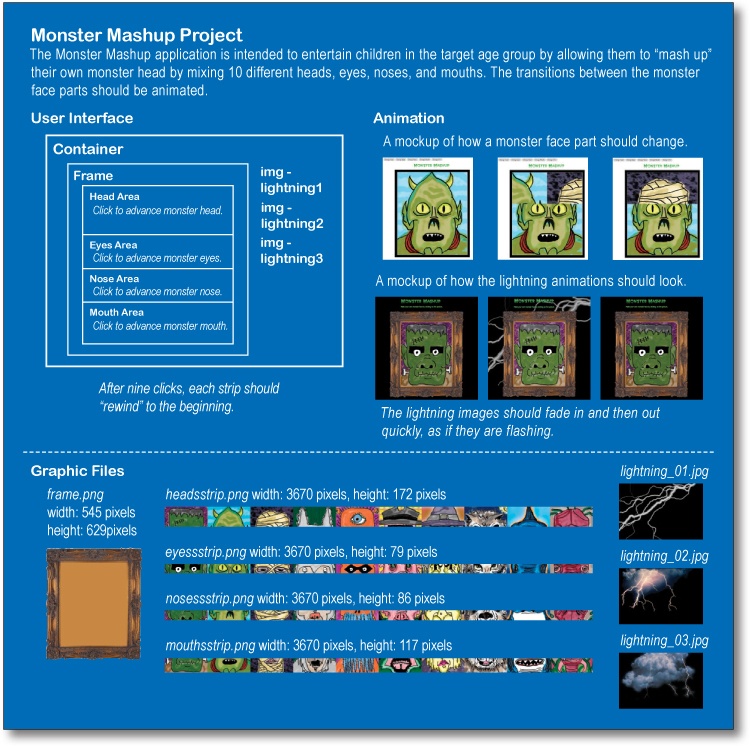
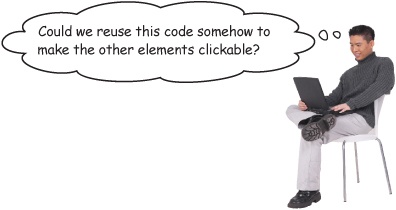
You have a lot of detail on the project requirements and the graphic files you need, but the graphic designer didn’t write any HTML or CSS—that’s where you’ll need to get started. What do you need to do to set that up?
Monster Mashup needs layout and positioning
We’ve certainly had a lot to say about getting your structure and style right out of the gate before you write any jQuery. And it’s even more important now—if you don’t get your layout and position right up front, your effects and animations can go wrong, fast. There’s nothing worse than staring at your jQuery code and wondering why it’s not doing what you want it to do in the browser. It’s a good idea to sketch up your ideas and think about what’s going to happen on screen.
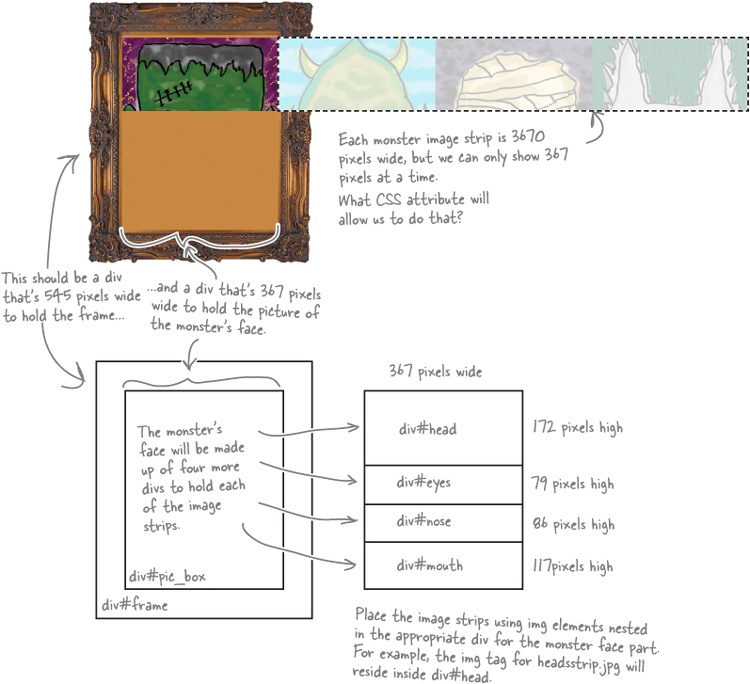
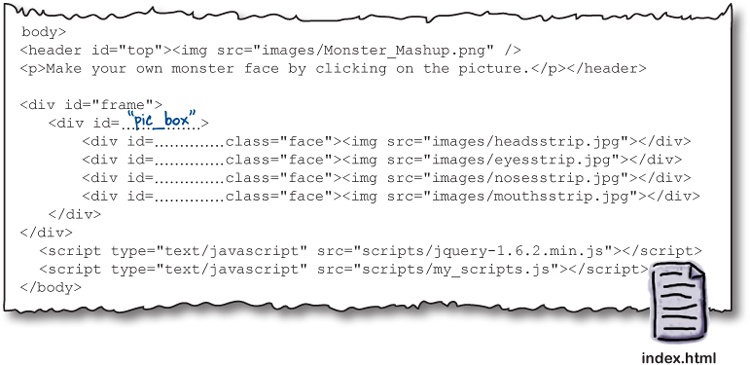
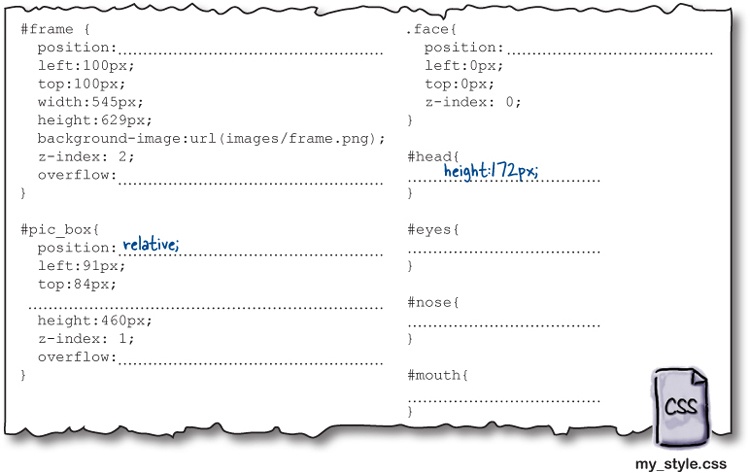
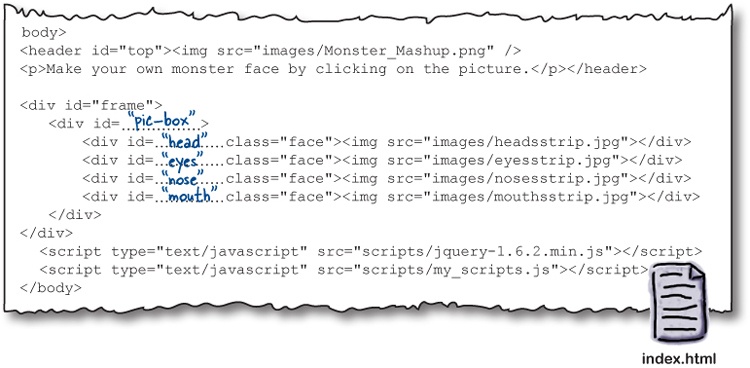
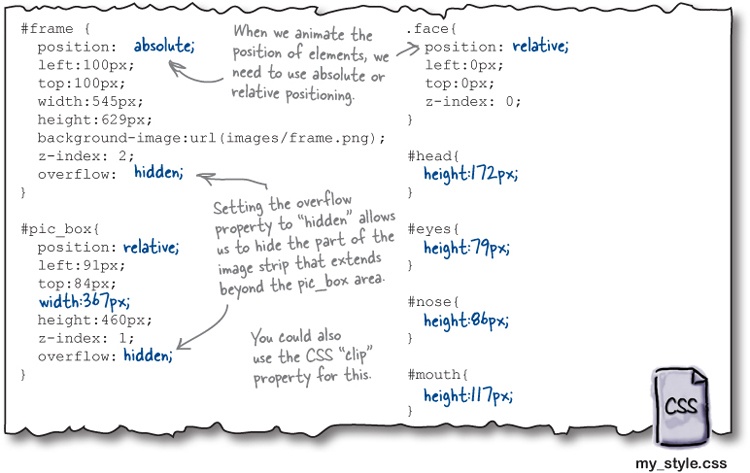
A little more structure and style
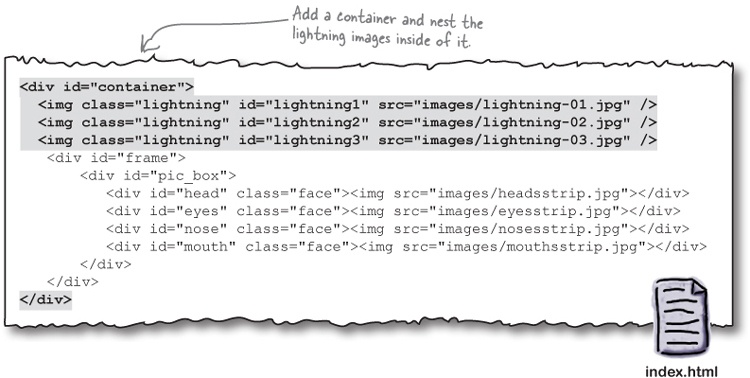
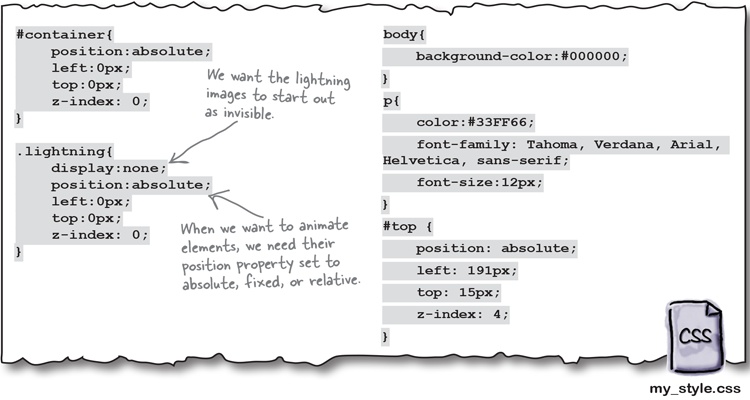
Next up are the structural changes to the HTML and CSS files. Add the code below to your index.html and my_style.css files. You can grab the image files from www.thinkjquery.com/chapter05.
Do this!
Make the interface click
Now that we have the Monster Mashup laid out visually, let’s set up the rest of the user interface section called for in the blueprint. This part is all about clicking to make stuff happen, and you’ve done that for four chapters now. Setting this up should be a cake walk.
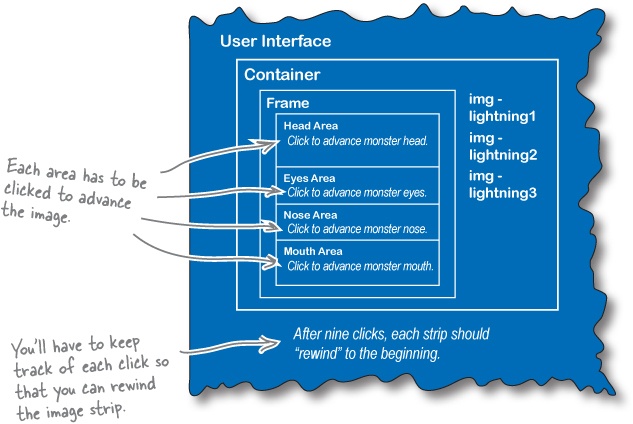
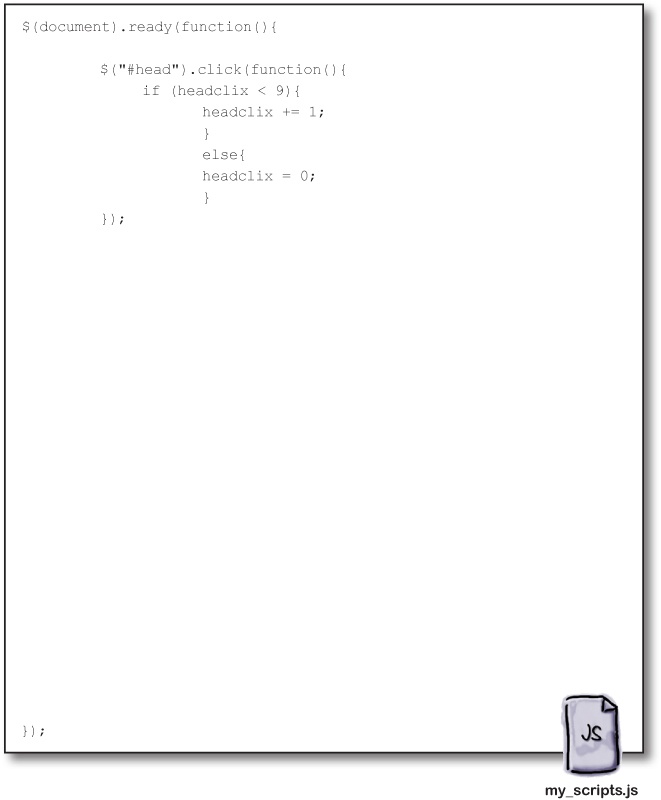
Put the code magnets in proper order to make the div#head element clickable. Make sure to sequence the variables and conditional statements in the right order so that you can detect the ninth click.
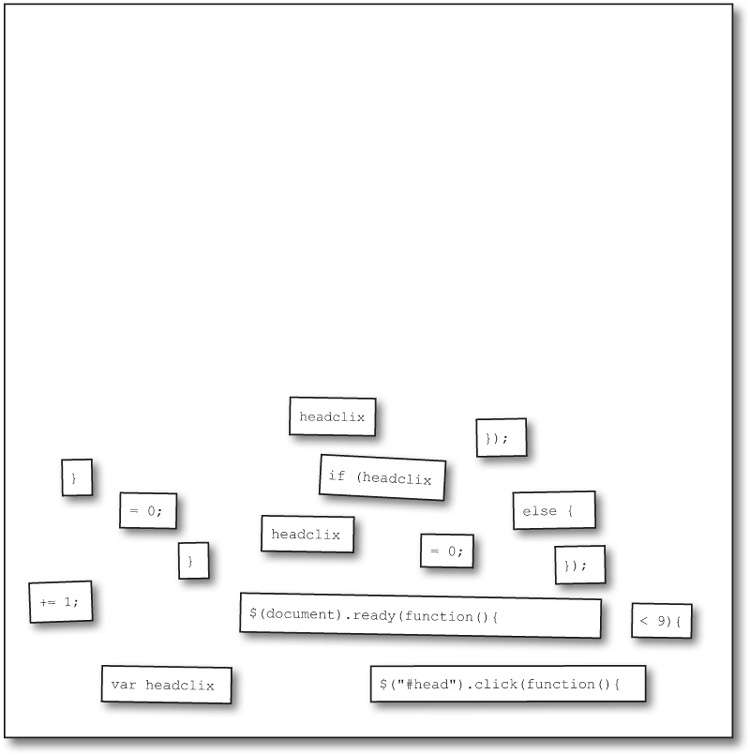
Put the code magnets in proper order to make the div#head element clickable. Make sure to sequence the variables and conditional statements in the right order so that you can detect the ninth click.

Absolutely!
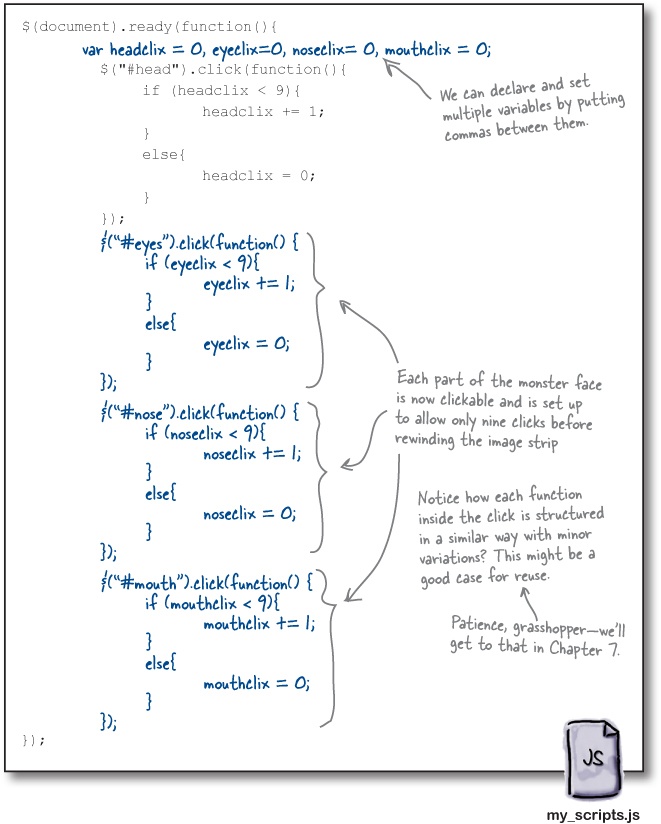
Each of the elements follows a similar pattern to the div#head element (with a few variations in things like the variable name).
Make the lightning effect
Next up is the lightning effect. Let’s review what the blueprint calls for before trying to make the effect work.
Potentially. But there might be a better way.
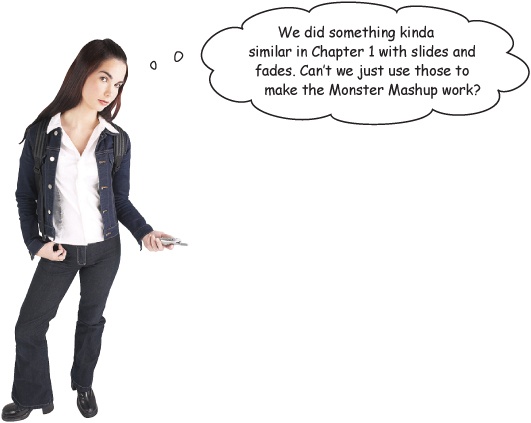
We looked at jQuery’s out-of-the-box effects in Chapter 1, but let’s dig in a little more.
How does jQuery animate elements?
When the browser loads a CSS file, it sets the visual properties of the elements on the page. Using jQuery’s built-in effects, the JS interpreter changes those CSS properties and animates the change right before your eyes. But it’s not magic...it’s all about CSS properties. Let’s look again at a few you’ve already seen.
hide, show, and toggle change the CSS display property

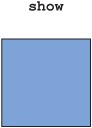
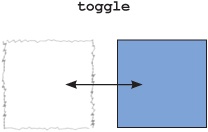
jQuery effects change CSS properties on the fly, making the page change right before your users’ eyes.
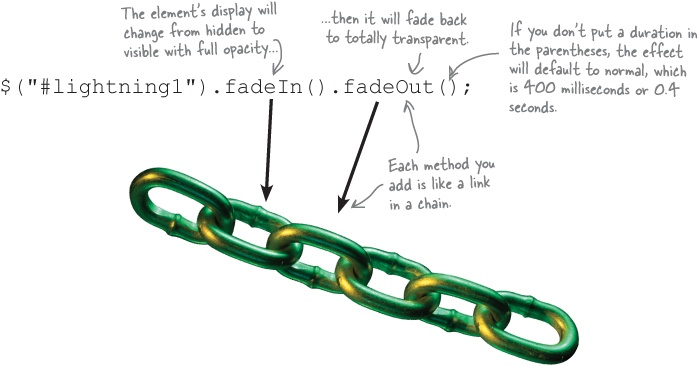
Fade effects animate the CSS opacity property
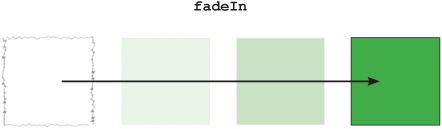
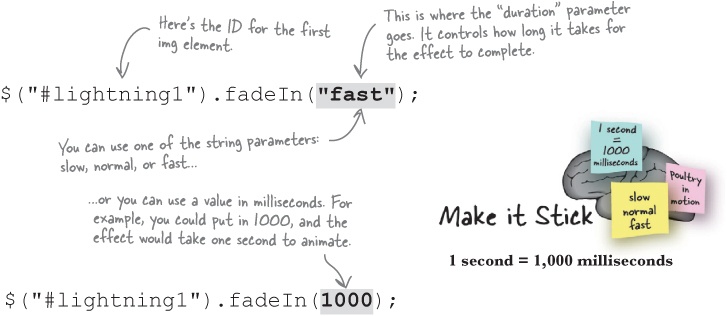
With fadeIn, the JavaScript interpreter changes the CSS opacity property for the selected element from 0 to 100.
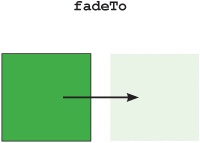
fadeTo lets you animate the selected element to a specific opacity percentage.
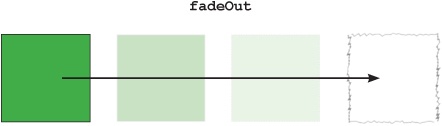
With fadeOut, the JavaScript interpreter changes the CSS opacity property for the selected element from 100 to 0, but it keeps space on the page for the element.
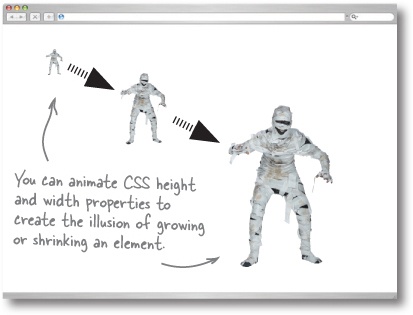
Sliding is all about height
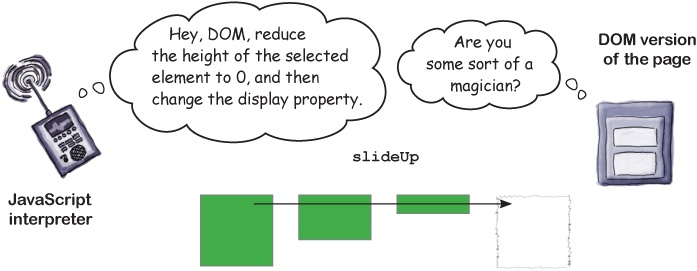
The JavaScript interpreter tells the DOM to change the CSS height property for the selected element(s) to 0 and then sets the display property to none. It’s essentially a hide with a slide.
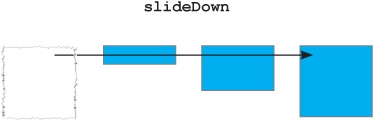
The JavaScript interpreter makes the selected element(s) appear by animating its height from 0 to whatever the height is set to in the CSS style.

The JavaScript interpreter checks if the image is at full height or 0 height and switches the slide effect depending on what it finds. If the element has a height of 0, the JavaScript interpreter slides it down. If the element is at its full height, the JavaScript interpreter slides the elements up.
jQuery only includes out-of-the-box effects for sliding elements up or down.
You won’t find a slideRight or slideLeft method in jQuery (at least at the time of this writing). Don’t worry, we’ll sort this out a bit later...
You won’t find a slideRight or slideLeft method in jQuery.
Put fade effects to work
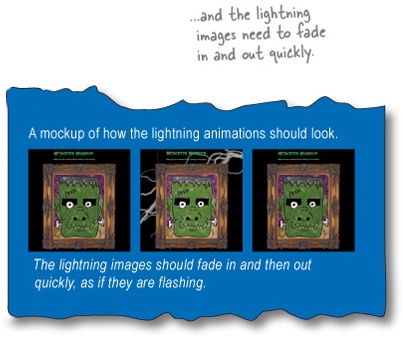
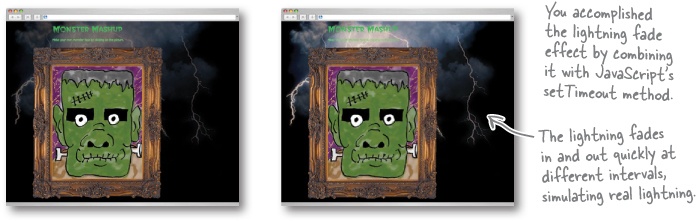
The blueprint calls for the lightning images to fade in and out, but we need to do this quickly so it looks like they’re flashing. Let’s dig into fade effects a bit deeper to see how we can make the lightning work.
Combine effects with method chains
The lightning will need to fade in and out, and over and over again. Instead of writing those effects separately, you can use chaining, which you used briefly in Chapter 4 when you needed to climb up the DOM. Method chains are a feature of jQuery that links together methods to run on a returned set of elements. They’ll make the lightning effects easier and cleaner to write, so let’s take a closer look.
Striking back with a timed function
So now you’ve got lightning that can fade in and out, but the project requirements are for the lightning to keep striking. Real lightning zaps through the sky and then there’s usually an interval of time before another zap crosses the sky. So we need a way to do the fade repeatedly.
Think back to earlier chapters where you needed to do a repeated task; what did you use? That’s right: functions! They showed up first in Chapter 3 to make a reusable click function and a randomizer, and now you can use functions to run the fades, wait a bit, and then do them again at a given interval. That will provide the slick effect of lots of flashing lighting for the Monster Mashup. Let’s take a look at a function that will do this.
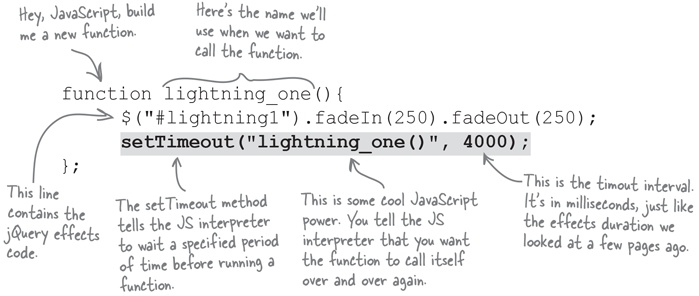
In just three lines of code, you have a timed lightning function for the first lightning image. Now, try writing the functions for the other two lightning images.
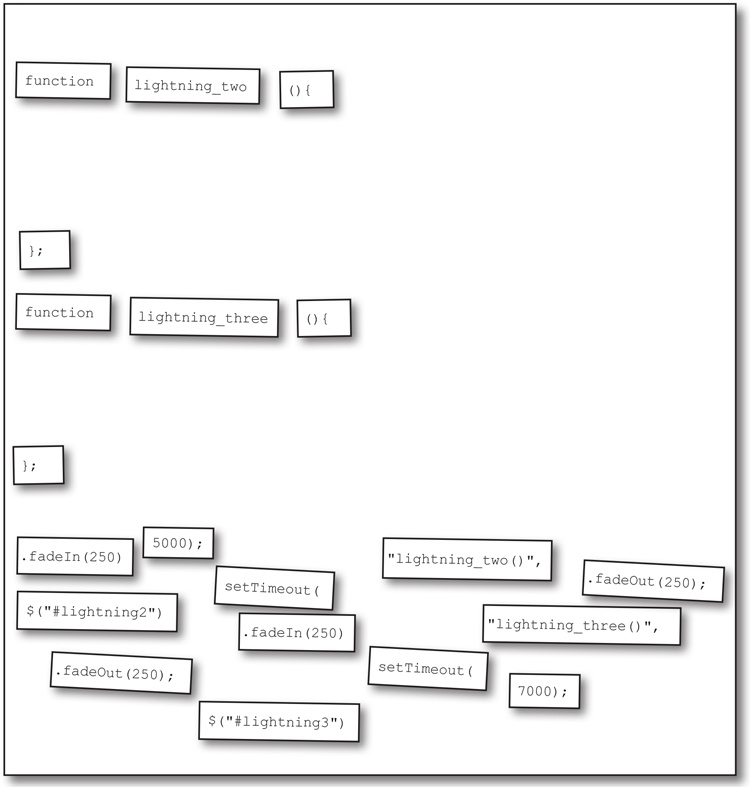
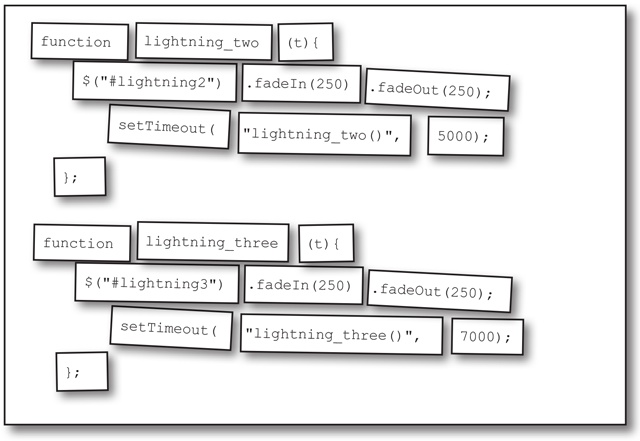
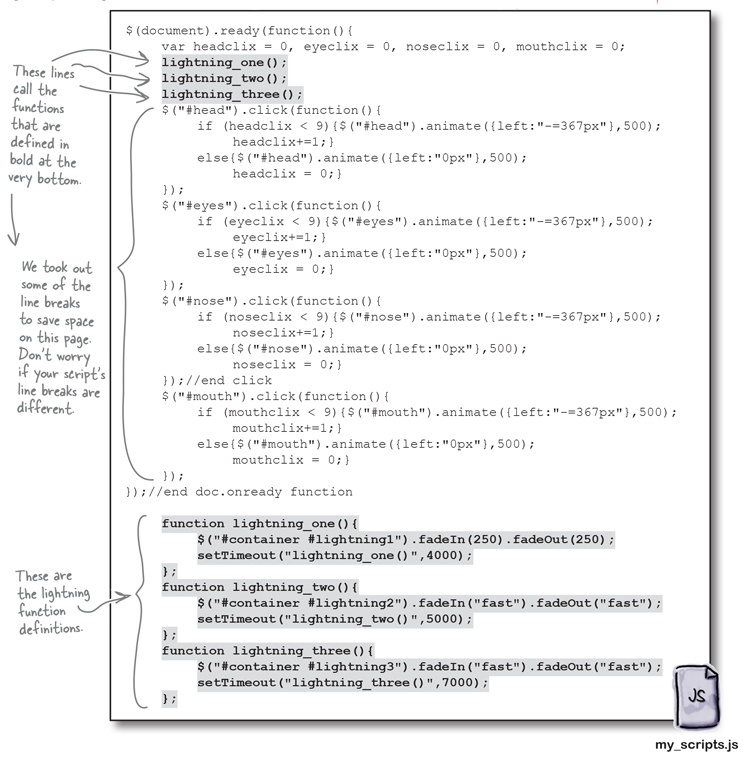
Add the lightning functions to your script
Using the code you put together in the exercise on the previous page, update your script file for Monster Mashup.
Do this!
So far, you’ve got the click functions working, and you made the three lightning images fade in and out at different intervals. Let’s take a look at the blueprint to see what’s left to do.
Out-of-the-box effects are great, but they don’t let you do everything you want.
It’s time to make a custom effect that will slide the monster face parts left.
DIY effects with animate
So jQuery has no slideRight or slideLeft method, and that’s exactly what you need to do at this stage of the project. Does this mean that your Monster Mashup project is dead?
Never fear—jQuery offers the animate method for building your own effects. With animate, you can create custom animations that do many more things than the out-of-the-box effects do. The animate method allows you to animate CSS properties of the selected element(s), and it also allows you to animate multiple properties at the same time.
Let’s have a look at some of the things you can do with the animate method.
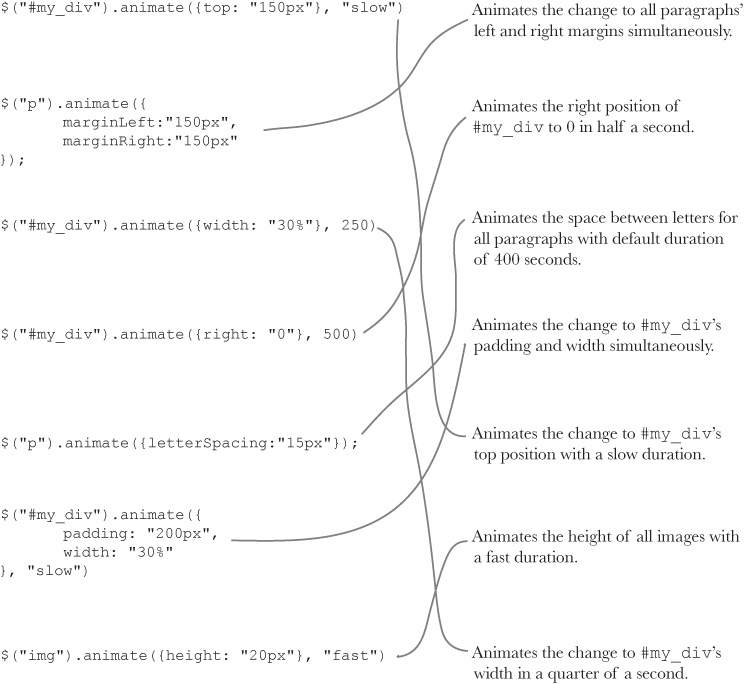
What can and can’t be animated
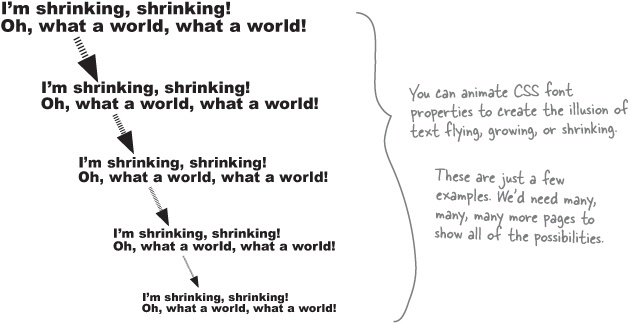
With the animate method, you can also dynamically alter font properties to create text effects. You can also animate multiple CSS properties in one animation call, which adds to the palette of cool stuff your web app can do.
As cool as the animate method is, it has some limits. Under the hood, animation uses lots of math (which, thankfully, you don’t have to worry about), so you are limited to working only with CSS properties that have numerical settings. Know your limits, but let your imagination run wild—animate offers all kinds of flexibility and fun.
Text effects
Watch it!
The animate method will only work on CSS properties that use numbers for their settings.
borders, margin, paddingelement height, min-height,andmax-heightelement width, min-width,andmax-widthfont sizebottom, left, right,andtop positionbackground positionletter spacing, word spacingtext indentline height
On the surface, animate works a lot like other methods you’ve already worked with.
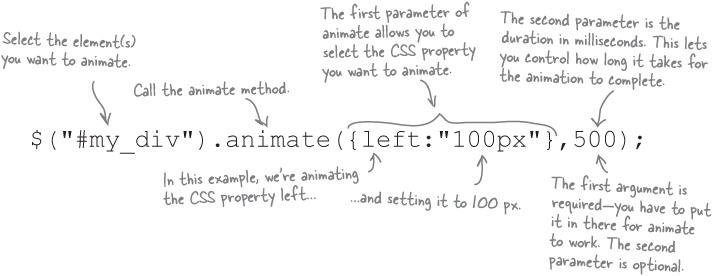
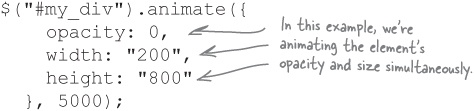
But one of the most powerful features of animate is its ability to change multiple properties of the selected element(s) at the same time.
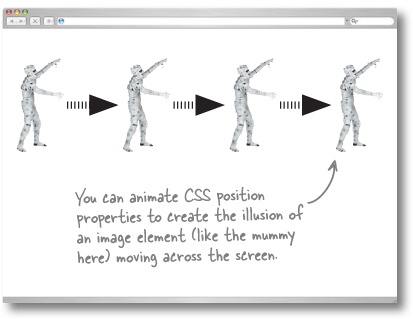
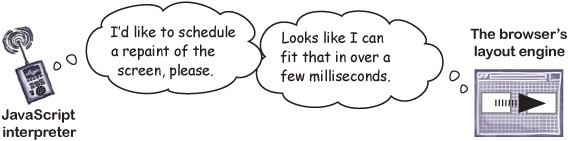
animate changes style over time
The visual effects and animation you see on a movie or television screen use the illusion of motion. Effects technicians and animators take a sequence of images and play them one at a time at a specific rate to accomplish that illusion—you’ve likely seen the low-tech flip books that accomplish this effect as you fan through the pages.
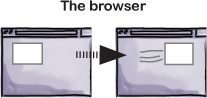
The same thing happens with a browser screen, except that we don’t have a series of images to work with. Instead, the JavaScript interpreter repeatedly runs a function that changes the style of the animated element. The browser draws (or repaints) these changes to the screen. The user sees an illusion of motion or change to an element as that element’s style changes.
When animate runs, the JavaScript interpreter sets a timer for the duration of the animation.
The JavaScript interpreter tells the browser’s layout engine to change the CSS property specified in the parameters of the animate method. The browser’s layout engine renders those CSS properties visually onto the screen.
The JavaScript interpreter repeatedly calls the function that changes the CSS property of the element until the timer set in step 1 runs out. Each time that function runs, the change shows on screen.
The visitor sees the illusion of movement as the browser renders the changes to the element.
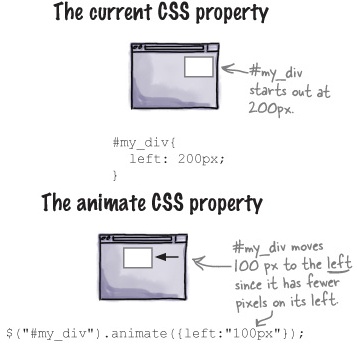
From where to where exactly?
An important thing to remember about animate is that it changes the current CSS property to the CSS property that you set in the first parameter. To make your custom animation effective, you need to think hard about what you have currently set in the CSS. In the previous example, we changed the left position of #my_div to 100px. What will happen on screen depends entirely on the current CSS left property setting of #my_div.
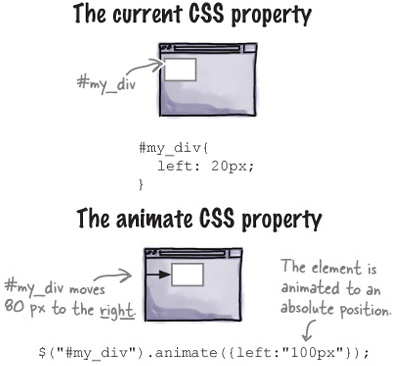
If the current property is a different value, we’ll get a different result.
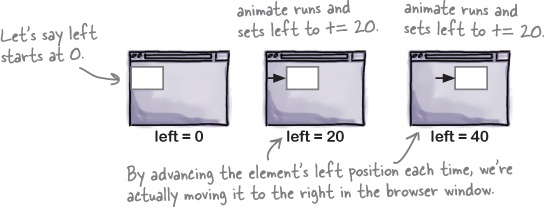
It’s all relative.
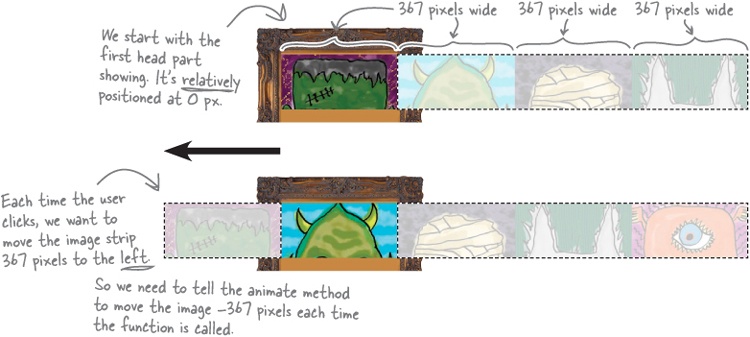
To make the Monster Mashup monster face parts slide the way we want them to, we have to think about what their current positions are and how we want them to change relative to what their positions were the last time animate changed them.
Absolute vs. relative element movement
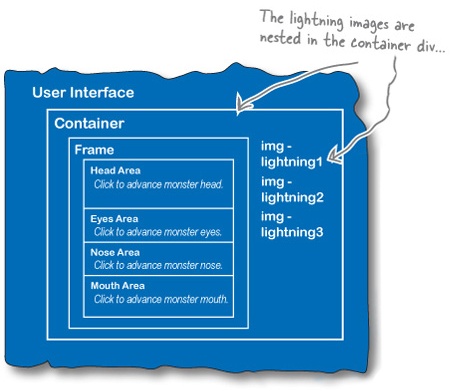
Remember that we nested the image strips we want to show inside a div with an ID of #pic_box. The left property of div#pic_box is set to 91px in the current CSS. To achieve the left slide effect that we want, let’s think about how we want to move the image strips.
Think about the example of absolute animation on the previous page.

Relative animation = move it this much each time
With an absolute animation, you move an element to an absolute postion on the visual grid. With a relative animation, you move the element relative to where it was the last time any animation moved it.
But how do we make an element move relatively with the animate method?
Move stuff relatively with operator combinations
There are some special JavaScript operators that move element(s) the same amount every time the animate method is called. These are known as assignment operators because they are normally used to assign a value to a variable in such a way that the variable adds the new value to its current value. It sounds a lot more complex than it really is.

These operator combinations help you create a relative animation by allowing you to set a value to what it’s currently at plus or minus a number of pixels.
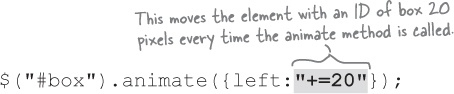
Here’s what will happen to #box every time the animate method above is called.
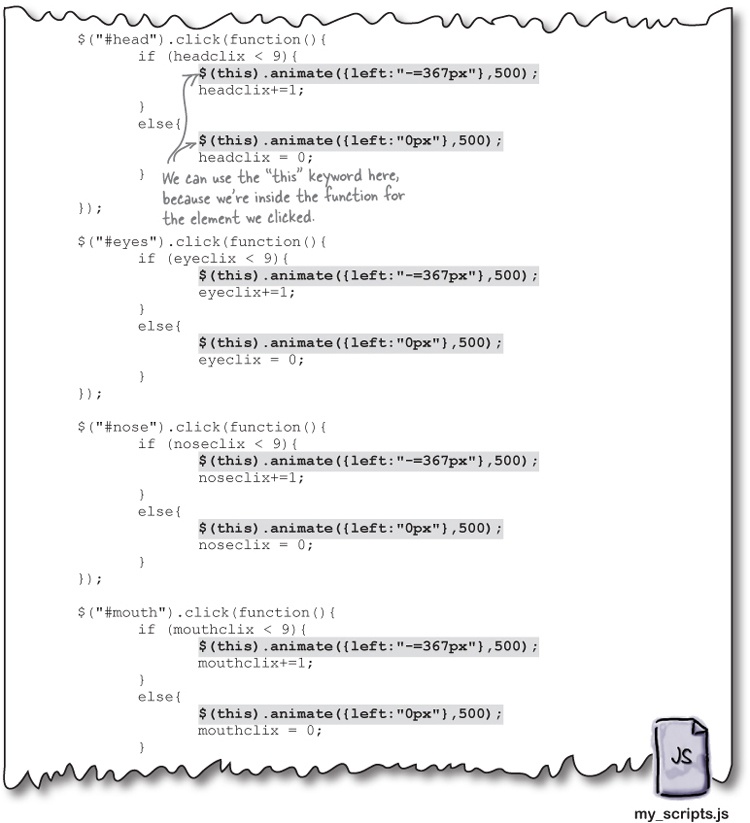
Add the animate functions to your script
Using the code you put together in the exercise on the previous page, update your script file for Monster Mashup.
Do this!
It’s time to sit back and give your left brain something to do. It’s your standard crossword; all of the solution words are from this chapter.
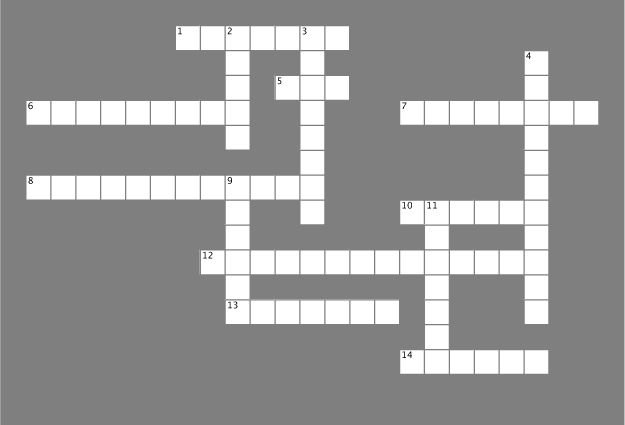
Across | Down |
1. 5. jQuery effects and animation are about manipulating ___ on the fly. 6. ___________ = 1,000 milliseconds. 7. Parameter that controls how long it takes for the effect to complete. 8. Creates the illusion of an element moving on the screen. 10. Effect method that lets you animate the selected element to a specific opacity. 12. jQuery feature that allows you to link together methods you want to run on a returned set of elements. 13. The 14. You can animate CSS ______ and | 2. The effect to use when you want to animate an element’s 3. When you want to animate elements, you need their position property set to ________, 4. Effects method works like this: if the selected element has a height of 0, the JS interpreter slides it down. If the element is at its full height, the JS interpreter slides the elements up. 9. When you run this jQuery effect, the JS interpreter changes the CSS opacity property for the selected element from 0 to 100. 11. The jQuery library offers this method when you want to build custom effects. |
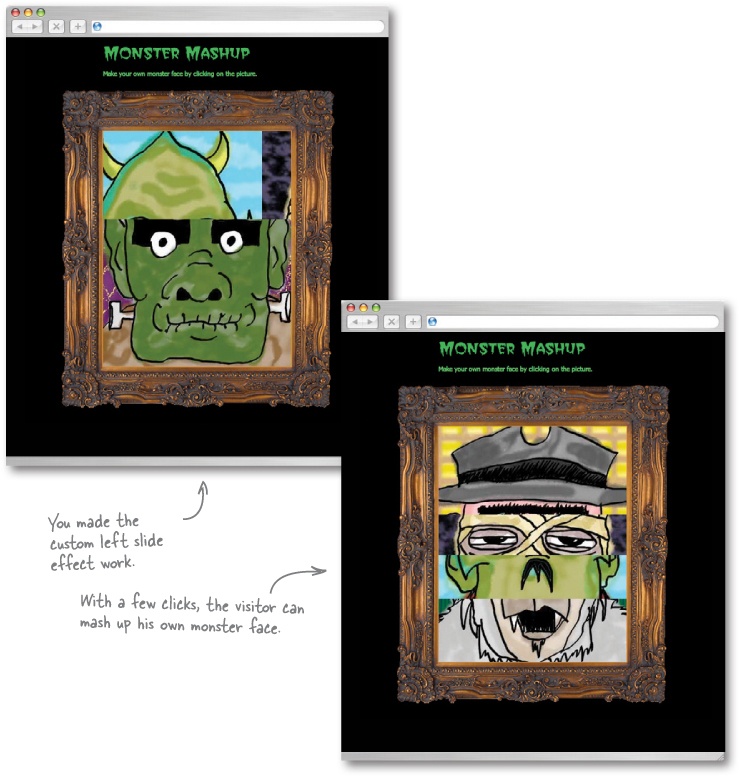
Look, Ma, no Flash!
The web projects director is pleased with the results of Monster Mashup. You used jQuery’s out-of-the-box effects combined with your own custom effects tailored to the customer’s needs.


Your jQuery Toolbox
You’ve got Chapter 5 under your belt and now you’ve added jQuery fade and slide effects plus custom animation to your toolbox.
animate
Lets you create custom animations when out-of-the-box jQuery effects aren’t enough.
Animates CSS properties over time.
Only works with CSS properties that have numerical settings.
Elements can be moved either absolutely or relatively.
Operator combinations (=, +, -) make relative animation much easier.