
Chapter 1. Getting started
In this chapter, you’ll learn how to get Flex 4 and how to build a few basic Flex 4 apps. Your goal is to grasp the basic structure and syntax of a Flex 4 application. We’ll also explore a high-level picture of the Flex 4 ecosystem.

Why Flex 4?
Chances are you already know why you want to use Flex, so I won’t bore you. In case you don’t, what follows is the one-paragraph version.

Flex 4 is a sexy framework that lets you write code that feels more like coding a desktop application—except it runs inside the Flash Player. Because it targets the Flash Player, you can build new rich Internet applications (RIAs) without worrying about browser compatibility nonsense, JavaScript, CSS, and so on. Because Flex 4 targets one platform (Flash 10), you don’t have to worry about platform compatibility issues. The write once, run anywhere (WORA) dream that client-side Java programmers had—before it turned into write once, debug everywhere—can finally be realized, but with Flex. Flex achieves what previous technologies such as Java applets failed miserably in attempting: applications that feel like desktop applications but that run inside any modern web browser on Windows and Mac. We can use Flex 4 to build RIAs today that look and feel more like Web 3.0 than many of the “me too [point oh]” sites you see copying 37signals and each other today.

Flex 4 overview
Now that you’re excited about Flex 4, let’s take a deep breath and get an overview of the platform. This section will present a high-level overview; don’t worry if you don’t understand a particular point here; rest assured I’ll explain it later.
In Flex 4, we write code in MXML (XML files with an .mxml extension; M for Macromedia, the company that created Flex and that was acquired in 2005 by Adobe) and ActionScript (text files with an .as extension) files and compile them into an SWF file (that is, a Flash movie), which runs in the Flash Player. This SWF is usually referenced by an HTML file, so that when a user with a modern web browser loads the HTML file, it plays the Flash movie (prompting the user to download Flash 10 if it’s not present). The SWF contained in the web page can interact with the web page it’s contained in and with the server it was sent from.
Even if you’ve never created a Flash movie in your life, don’t consider yourself a designer, and wouldn’t recognize the Timeline if you tripped over it, you can use Flex to create attractive applications that run in the Flash Player. Flex development is easily learned by any intermediate-level developer with either web (HTML and JavaScript) or desktop UI (such as Windows Forms or Java Swing) programming experience. A Flex 4 application is just a Flash movie (SWF), which lives inside a web page loaded by a web browser that has Flash 10 installed.
Flex vs. Ajax? Flex and Ajax?

Now that we have seen what Flex is, let’s consider the main alternative to Flex: Ajax. (Silverlight doesn’t count—yet—since it doesn’t have a large enough installed base to be a pragmatic choice for a consumer-facing application.)
The question of when to use Flex, when to use Ajax, and when to use both is extremely controversial. There’s no one right answer: it depends on many factors, including the size of your application, the skills of your developers, how important search engine optimization is, and so on. Furthermore, as both Flex and Ajax frameworks evolve, the answer itself evolves. That said, there’s one question I like to use: “Are you building a publication or an application?” The more “application like” what you’re building is, the better a fit Flex usually is. (Another way of thinking about this is to ask yourself if you could visualize your app being or competing with a desktop application.)
Getting Flex 4 and Flash Builder 4
So, since this is a book about Flex 4, and since you’re presumably interested enough in Flex 4 to be reading or browsing it, the next step is for us to actually download Flex 4 and play with it. Somewhat confusingly, Flex 4 applications are built using something called Flash Builder 4. (In Flex 1, 2, and 3 this was called Flex Builder.) The marketing rationale for this is as follows: Flex applications can be built in conjunction with designers using something called Flash Catalyst, so it makes sense for them to both be called Flash Something, to emphasize that they play nicely together. Second, Flex applications are compiled into Flash movies (SWFs), just as Flash applications developed in Adobe Flash CS4 are compiled into SWFs. However, since the code editor in Flex Builder 3 was so much better than in Flash CS4, many Flash developers were using Flex Builder to build SWFs, without actually using the Flex framework. Or, they’d use Flex Builder and Flash CS4 together. So, Adobe realized that since they had Flash CS4 and Flash Catalyst, they should rename Flex Builder to Flash Builder to fit in.

Looking a little deeper, the real reason Flex Builder could be renamed Flash Builder is that Flex has been so successful in making the Flash Platform something that’s considered suitable for enterprise use, not something that’s dismissed as intended for games and annoying ads. So, instead of the Flex name having to essentially run away from the Flash brand, it can be used for the open source Flex framework and all the corporate branding can be Flash.


Let’s begin by downloading Flash Builder 4. Currently it’s available at http://labs.adobe.com/technologies/flashbuilder4/; once the final release of Flex 4 is made, this URL will change and you’ll find the new URL on Adobe.com easily enough (hint: Google). A trial version is available that should last long enough for you to follow along with this book. Download the stand-alone version, not the Eclipse plug-in version, if you want to follow along with the book verbatim.

Flash Builder is Adobe’s Eclipse-based IDE for building Flex applications. However, you can also do Flex development using the Flex Software Development Kit (SDK) without Flash Builder: just use your favorite text editor and the command-line compiler that comes with the SDK. This book won’t go into how to do that, since most people will end up using Flash Builder.
Should I use Flash Builder Or JUST the Flex SDK?
While the SDK is free, using it isn’t as easy as using Flash Builder. So, even if you plan to use the SDK, I recommend using Flash Builder to learn Flex: not only do you get to defer your decision long enough to finish the book (during which time you may decide you like Flash Builder enough to pay for it), you’ll also learn Flex faster with Flash Builder providing code-completion support and the design mode, which lets you drag and drop Flex components to lay out a UI.
Beginning the workshop
With this completed, we begin the workshop sessions. These workshop sessions will be grouped into chapters containing thematically related sessions. However, each of these is stand-alone, so they all begin on new pages.
Each workshop session is a separate project in the code zip file. You can follow along with each workshop session by creating a new project in Flash Builder 4. Just choose File > New > Flex Project to open the New Flex Project dialog. Enter a name for the project in the Project name field and click Finish. It doesn’t matter what you name the projects; I named them all session01, session02, and so on in the code zip file. However, note that the project name is used to name the main application, so if you want the main application to be named appropriately, use CamelCase for the name. (In chapter 7, for example, the main application is SocialStalkr so that’s what the project should be named.)
Session 1. Hello! Flex

This is the first workshop session. In it, we build our first complete Flex application, shown next. Note that the code listing titles show you the exact path to the files in the code zip file, which you can download from http://manning.com/armstrong3/.
SESSION01/SRC/HELLO.MXML
<?xml version="1.0" encoding="utf-8"?>
<s:Application
  xmlns:fx="http://ns.adobe.com/mxml/2009"
  xmlns:s="library://ns.adobe.com/flex/spark"
  xmlns:mx="library://ns.adobe.com/flex/halo">
  <s:Label="Hello! Flex 4"
    fontSize="128"/>
</s:Application>
The root of a Flex application is the Application tag. This application contains a Label component with the text “Hello! Flex 4.” (For now, ignore the various xmlns lines; we’ll get to that later in this chapter.) Running this application gives us our first Flex application.

Key Points
- Flex applications start with an Application tag.
- Flex applications can be built with very little code.
Session 2. Dispatching and listening for events
After you get past all the hype about RIAs, Flex development is distinguished by the pervasiveness of two main things: events and data binding. In this session, we’ll see how events work; in the next, we’ll explore data binding. It may seem odd to dive right into events and data binding before even looking at how Flex applications are structured, but since events and data binding are everywhere in Flex, it’s preferable to confront them right away so that the other examples aren’t mysterious.

In this section, we’ll create an app that contains three Buttons: button1, button2, and button3. All Buttons dispatch a MouseEvent of type click (actually MouseEvent.CLICK) when the user clicks them; we’ll show how to handle this in three different ways in this session. We’ll make clicking one of the buttons add the text “Button 1 clicked” (or 2 or 3) to a Label text component. For layout, we’ll put these Buttons and the Label into a VGroup, as shown here.

session02/src/Hello.mxml
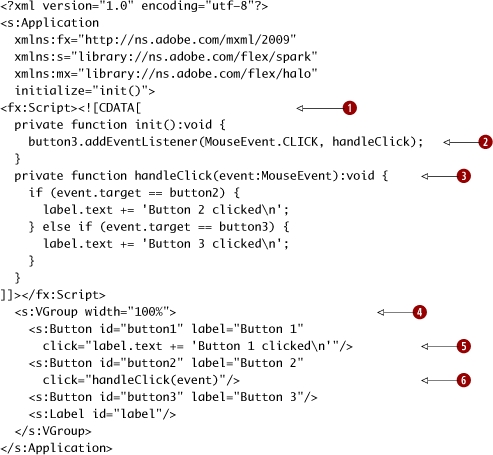
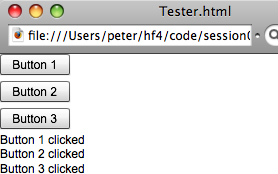
Running the application and clicking the button1, button2, and button3 Buttons in order produces the screenshot shown here.
Key points
- Events can be handled either in the attributes directly or in explicitly written event handler functions.
- Event handlers can be attached to UI components in MXML attribute values or in ActionScript addEventListener calls.
- Event objects have a target property, which is the source of the event.
- In MXML, components can be nested in Group objects. HGroup and VGroup are subclasses of Group that lay out their children horizontally and vertically.
Session 3. The Bindable annotation and data binding
Now that we have seen how to use events, let’s look at data binding. Data binding is the most unique[1] thing about Flex. It’s a powerful feature that’s easy to use, and Flex 4 has added a new two-way data binding feature to make it even easier. Data binding is also easy to abuse, with negative consequences for performance (this is covered in great depth in an excellent one-hour presentation titled “Diving in the Flex Data Binding Waters,”[2] by Michael Labriola. Once you’re comfortable enough with Flex 4 and data binding that you’re curious about how it works under the covers, I highly recommend spending the time to watch this presentation.)
1 Flex data binding is no longer as unique—other frameworks such as JavaFX have added their own implementations of data binding, largely in response to the popularity of data binding in Flex.
2http://www.slideshare.net/michael.labriola/diving-in-the-flex-data-binding-waters-presentation?src=embed

In this session, we’ll learn the basics of one-way and two-way data binding. We’ll start by building an example that uses one-way data binding twice, to copy the text of two text inputs into each other. We’ll also create a Label that uses data binding to show the length of the String in the textInput1.
session03/src/OneWay.mxml

|
|
Each TextInput’s text property is bound (with the {} syntax) to the other TextInput’s text property. |
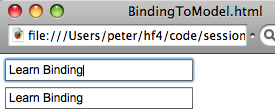
Running the application, we can type text in and see the following screen.

Well, that was pretty cool! However, let’s not stop there: let’s get even lazier. What if we want to bind the text properties of both TextInputs to each other, but we want to type even less? Flex 4 introduces a new feature to Flex: two-way data binding. Let’s see how that works.
session03/src/TwoWay.mxml
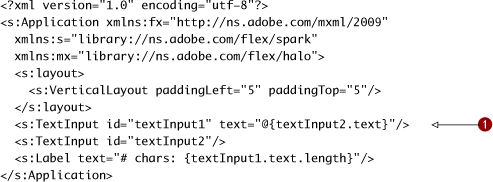
|
|
The textInput1 text property binding has the even more magical @{} syntax, which means “bind this both ways.” Note that the text property of the textInput2 has no binding now, whereas before it used to have the binding text="{textInput1.text}". |
Running the application, we see the identical output as before.
Binding isn’t just for stupid UI tricks, however: it’s primarily used to get data in and out of ActionScript 3 model objects. So, let’s create a model object now in ActionScript, and then see how binding works with it. In Flex 4 you write code in one of two ways: in MXML (.mxml) files or in ActionScript 3 (.as) files. We’ll create our first ActionScript file now and cover ActionScript more thoroughly in chapter 2.
session03/src/model/Task.as

|
|
The Bindable annotation on the name variable ensures it can be the source of a data binding. |
Next, let’s create a new application that uses this model. (You can copy and paste, then modify the OneWay.mxml application to save time.)
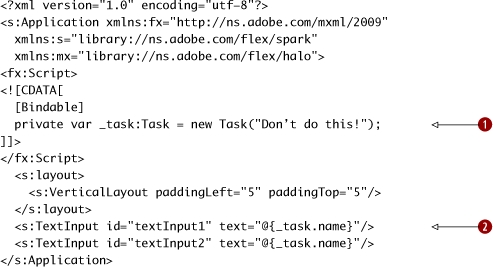
session03/src/BindingToModel.mxml

|
|
We create a new Task variable, _task, which is Bindable, and initialize the name property to Learn Binding. |
|
|
The _task variable’s name property (which is also Bindable) is bound to the text property of both textInput1 and textInput2. |
Running the application, we see that the TextInputs are both bound to the name property. Typing in either of them and then focusing out (by, say, pressing the Tab key) assigns the text to the model’s name property, which then updates the other TextInput’s text.
But we’re feeling lazy; why don’t we try using two-way data binding?
session03/src/TwoWayBindingClobbersModel.mxml
|
|
We initialize a new Task just like before. |
|
|
We use two-way data binding with interesting results. |
Once we run the application, we see a surprise. (Well, if you looked at the filename, it’s not a surprise.)

The _task.name got clobbered by the initially blank text of the TextInputs! (Note that typing in them does work, however.) So, be careful, especially with two-way data binding.
Now that we introduced events and data binding, let’s see what a slightly larger Flex application looks like, so that we can explore the structure of Flex applications.
Key points
- Data binding “magically” copies the value of one property to another property. (Well, it’s not magic: PropertyChangeListeners are used. But for the purposes of chapter 1 of this book, it’s magic.)
- For data binding to work (and not generate compiler warnings), the [Bindable] annotation must be used on the property that’s the source of the data binding as well as on the variable that contains the reference to the Object with the property in question.
- Two-way data binding saves time when dealing with UI components, but be careful when using it with models.
Session 4. Flex application structure overview

Now that we’ve seen the required Hello World example (this is a Hello book after all!), let’s get a sense of the structure of a real Flex application by building one. Specifically, we’re going to build a to-do list. We want to build something like this screenshot.
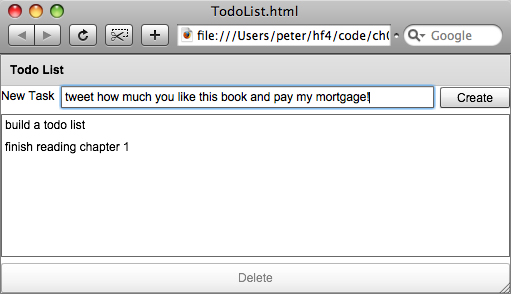
This application has a panel with a title of “Todo List,” a label with the text “New Task,” a text input to enter the new task name, a button for the user to click to create the new task, a big area to list tasks, and a typically overstuffed delete button. (We need at least one gratuitously huge button if we’re going to be Web 2.0 compliant! There’s no benefit to the panel itself, but it looks nicer than just putting the controls directly in the application—it lets us pretend we’re putting some thought into design.)
Next, we’re going to build this UI. We’ll lay out the application UI with MXML, and add logic with ActionScript. (XML is a good markup language for laying out a UI, but it’s a terrible language to write real procedural logic in. Thankfully, Flex doesn’t force us to do that!) We’ll see how we can introduce behavior by adding ActionScript 3 code to both our MXML file (in a Script tag) and to a stand-alone ActionScript 3 file.

Note that the purpose of this workshop session is just to show the big picture; the details of how everything works aren’t especially important right now. (I’ll explain them at a very high level so that the example makes a bit of sense, but I don’t want us to get bogged down.) I want this session to give you a sense of the big picture, of why we’re here and what we’re trying to do. We’ll untangle the details in the workshop sessions ahead.
First, we create a new Task ActionScript class, which is inside a text file with an .as extension. In Flex 4 you write code in one of two ways: in MXML (.mxml) files or in ActionScript 3 (.as) files. (You can actually create multiple classes in one file, but we’ll ignore that for now.)
We’re going to create this Task class inside a package, specifically the com.pomodo.model package. Flex supports packages in the same way that languages such as Java do, and the backward domain name syntax is a convention just as it is in Java. So, next we create a compomodomodel directory structure in the src directory. (Pomodo is just a meaningless fake company name, derived from the Italian word “pomodoro”—I like to do book examples using the Pomodo name since I own the pomodo.com domain name and thus can do what I want with it. So, since pomodo.com would be its domain name, the backward domain name for use in package names is com.pomodo.)
session04/src/com/pomodo/model/Task.as

|
|
This is the com.pomodo.model package. ActionScript 3 typically uses the same “backwards domain name” convention as Java, so we create a com.pomodo.model.Task class in the compomodomodel. |
|
|
We’re also creating a variable called name of type String, which we’re indicating can be the source of a data binding with the [Bindable] annotation. Briefly, this annotation means that other code can be automatically notified when the value changes. |
|
|
We’re creating a constructor, with a default value of an empty String for the Task name parameter. Since this parameter has a default value, we can omit it and invoke the constructor with no arguments. In this constructor, we set the name variable to the name passed in, using the this keyword to establish which name we’re referring to. |
Note
ActionScript 3 supports packages with fewer restrictions than it did in ActionScript 2. It also supports namespaces. There are many details about what you can and can’t do with classes, packages, and namespaces; we’ll keep things simple and use the “one class per file” and “package in its folder” approach because it’s the most straightforward.
Next, we lay out the UI and add code to create and destroy Tasks.
session04/src/TodoList.mxml

|
We begin by creating an fx:Script element to hold ActionScript code inside a CDATA block. |
|
|
|
Next, we add imports, which make the classes accessible in this class. |
|
|
We then create a _tasks variable of type ArrayCollection, and initialize it to a new ArrayCollection. This variable is the source of a data binding in the List, so we need to mark it with the [Bindable] annotation. |
|
|
The createTask function calls the addItem method of the _tasks ArrayCollection with a new Task whose name is the value of the newTaskTI.text. This function has a void return value, meaning it returns nothing. |
|
|
The deleteSelectedTask function calls the removeItemAt method of the _tasks ArrayCollection, removing the task whose index is the taskList.selectedIndex. |
|
|
Next, we create a Panel whose title is “Todo List.” It has a width and height of 100 percent, meaning it will take up the full width and height that are left after taking into account the padding of the parent application. |
|
|
The first component we create inside the Panel is a VGroup, which is a container for other components that lays out its children vertically. |
|
|
The first of these children is an HGroup, which is also a container of other user interface components and lays out its children horizontally. Inside the HGroup, we create a Label, a TextInput, and a Button. |
|
|
This is the New Task label. |
|
|
The TextInput has an id of newTaskTI. In MXML, the id property of a component becomes its variable name (the MXML file is a class, and the id is the name of a public member variable inside that class). If we don’t provide an id for a component, Flex provides one for us—but then we don’t know what it is, so we can’t refer to the component in our code. Sometimes this is fine: we don’t need to refer to the Button, so we don’t bother giving it an id. Note that the newTaskTI calls createTask whenever it broadcasts the enter event. |
|
|
We also modify the Create button to call createTask when it broadcasts its click event. |
|
|
The taskList has a labelField of name (since that is the property of the Task that we want displayed). |
|
|
The taskList has its dataProvider bound to the _tasks. This means that the List component displays a vertical list of items that are driven by data supplied from a data provider, in this case the ArrayCollection _tasks. Specific properties of the members of the data provider object can be chosen as the values to display, in this example, the name property of the Task object is chosen for that role by being supplied as the value of the labelField attribute. |
|
|
Finally, the Delete button has its enabled property bound to whether there’s a non-null selectedItem in the taskList (thus preventing a user from trying to delete a nonexistent Task) and has its click event handled and trigger the deleteSelectedTask function. We only want the Delete button to be visibly available (as opposed to being grayed out and inactive) when the user has clicked on a specific item in the list. The selectedItem property of the list is bound to whatever item in the list is selected, and will be null if none are selected. So, we capitalize on this fact to control the enabled state of the Delete button. |
Key points
- Flex applications typically consist of many MXML and ActionScript components, which are stored in .mxml and .as files. These components are organized into packages.
- MXML is used for UI layout and ActionScript (both in MXML Script blocks and in ActionScript files) is used for behavior. You can even put ActionScript code (for example, function calls) inside the values of MXML attributes, such as click="deleteSelectedTask()".
- These components communicate via data binding and by manually dispatching events.
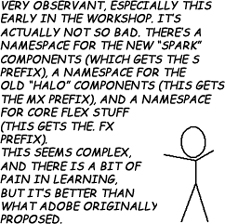
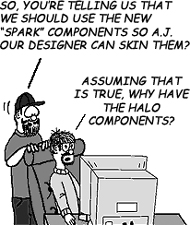
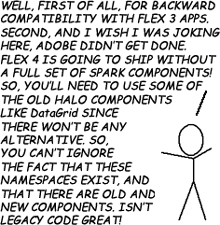
Session 5. Spark, Halo, and Flex 4 namespaces
Before we go further, we should confront something that stares at you when you first look at a Flex 4 application: namespaces, and why we need three of them. To grasp this, we need to understand the story of Flex components.
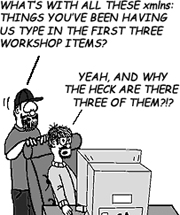
Once upon a time (in Flex 1.0, 1.5, 2, and 3), all the components were something called “Halo” components, since they had a nice glow. (If my memory is correct, in Flex 1 and 1.5 this used to be green; in Flex 2 and 3 it was blue.) Anyway, since there was one set of components, they were all in the same namespace. In Flex 3, this namespace was http://www.adobe.com/2006/mxml, so Flex applications looked like this:
<?xml version="1.0" encoding="utf-8"?>
<mx:Application xmlns:mx="http://www.adobe.com/2006/mxml"
    layout="absolute">
     <mx:Button label="Hello World"/>
</mx:Application>
Simple, isn’t it? One namespace, which gets assigned the prefix mx, letting you write things like mx:Button, mx:Application, and so forth. This simplicity hid a big problem, however: the Halo components weren’t easily “skinnable” by designers, meaning that their visual appearance couldn’t be changed easily without lots of programming. To “skin” them beyond what you control with Cascading Style Sheets (CSS), you’d typically have to subclass them and do a lot of custom coding. Since Flash and Flex are making their way into a lot of design-oriented development shops like agencies, this kind of thing happens more than the average Java or .NET developer would expect. And nobody wants to be wrestling with overriding core Flex component behavior agency timetables and deadlines.

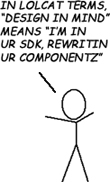
So, since Adobe understands designers better than most large companies, one of the themes Adobe had for Flex 4 is “Design in Mind.” In marketing terms, this means that Adobe cares about designer-developer workflow and is striving to optimize it.
In this workshop session, we’re going to see what a Flex 4 application using only Halo components looks like. We’ll build the same application as the previous workshop session, a Todo List. This is useful since, as a Flex developer, you’ll probably still need to use some Halo components on a daily basis (we’ll go into which ones more in chapter 5). Those of you who have developed Flex 3 applications before will find this code very familiar.
session05/src/TodoList.mxml
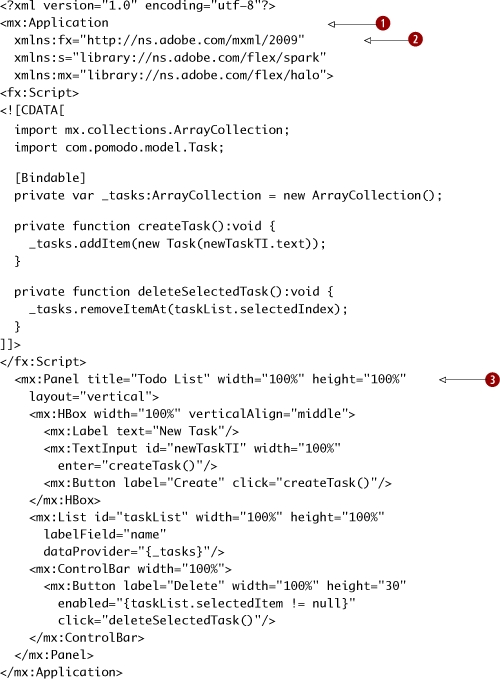
|
For those who are new to Flex, the root tag is an mx:Application, since it is a Halo application. (If you look back at the previous workshop sessions, you’ll see that the root tag we’ve been using has been s:Application [for a Spark application].) |
|
|
|
We create the three XML namespaces: First, the fx prefix for the core Flex namespace (http://ns.adobe.com/mxml/2009); second, the s prefix for the new Spark components namespace (library://ns.adobe.com/flex/spark); and third, the mx prefix for the old Halo components namespace (library://ns.adobe.com/flex/halo). |
|
Finally, we create a bunch of Halo components, like Panel, HBox, Label, List, and ControlBar. HBox and VBox are the Halo functional equivalent of HGroup and VGroup in Spark. |
Next, we create a Task class that’s identical to the Task class in workshop session 3.
session05/src/com/pomodo/model/Task.as
package com.pomodo.model {
    public class Task {
        [Bindable]
        public var name:String;

        public function Task(name:String = "") {
            this.name = name;
        }
    }
}
Running this application, we see the application shown here:

Those of you who have Flex 3 experience may be surprised: this doesn’t look like a Halo application in Flex 3! The reason for this is simple: Adobe understands that you need to mix and match Halo and Spark components in Flex 4, so they changed the style of the Halo components in Flex 4 to match the Spark components.

Key points
- Flex 4 applications typically use three XML namespaces, since Flex 4 is introducing an entirely new set of components (the Spark components).
- The old school Halo components are what were used in Flex 1-3. They have the mx prefix by convention, since that’s what was used in Flex 1 through 3. The namespace for the Halo components is library://ns.adobe.com/flex/halo. You still need to use the Halo components where there are no Spark equivalents yet, such as DataGrid.
- The new Spark components use, by convention, an s prefix for the new namespace of library://ns.adobe.com/flex/spark. These components have “Design in Mind,” which will allow designers and developers to work together in a more harmonious way.
- The fx prefix is for the core Flex namespace (http://ns.adobe.com/mxml/2009). This is for things like declarations, metadata, and script blocks—basically, for nonvisual language elements.
What’s next?
In this chapter we had a quick tour of Flex 4, got up and running, learned the basics of events and data binding, and even explored what the heck all these xmlns things mean. In the next chapter full of workshop sessions, we’ll go a bit slower, learning ActionScript 3 and the Flex 4 fundamentals.
No, I won’t bore you with an introduction to object-oriented programming; in this book I’m assuming you are a software developer already—just not a Flex one (yet).