
8
Wireless Network Pirating

The wireless internet presents users with a whole new set of challenges in preventing black hat attacks. Obviously, the main difference between wireless networks and the wired networks discussed in Chapter 6 is that they’re, well, wireless. Wireless networking uses radio waves to send data between devices, which means that, like the title of the 1981 hit song by Phil Collins, it’s in the air tonight.
Joking aside, the wireless internet can be much easier for adversaries to attack because physical isolation—one of the main ways to defend against attacks on wired networks—won’t work. You can potentially prevent unwanted people from accessing wired networks by, for instance, locking an office building. This doesn’t work for wireless networks, because the wireless device signals travel through those barriers and can be picked up by someone on the outside.
In this chapter, you’ll learn how wireless networks work and what makes them unique. After covering the underlying mechanics, we’ll move on to discuss how attackers use those features to exploit wireless networks and steal data they send. Then we’ll explore a few vital defenses you can use to secure your wireless network, whether at home or in an office environment. As an exercise, you’ll learn how to secure a typical wireless router.
How Wireless Networks Work
Wireless networks don’t use cables to transmit data; instead, the devices send wireless signals using antennas. These antennas can be external, protruding from the device like alien ears, or internal, like those likely in your laptop. Modern wireless devices have multiple antennas to increase the amount of signal they can process.
The devices on the network send and receive signals to and from a central device called a Wireless Access Point (WAP), which is usually your router or switch. The WAP manages all the communication between devices by either passing the signal to another device on the wireless network or sending it to a wired network.
Wireless networks are set up in two different ways. In infrastructure mode, the WAP acts as both a router and a switch, serving as a gateway to the internet for the entire network. That said, there are also types of WAPs that don’t have routing or advanced switching capabilities and will merely pass traffic directly between a wireless and wired network.
The other way to create a wireless network is in ad-hoc mode. In this configuration, there is no central WAP. Instead, each device connects directly to another device using a wireless signal. Because the devices are connected directly to one another, there is no need for a central device. Each device sends information directly to the device it’s connected to. A great example of an ad-hoc network is when you connect two Bluetooth devices. Bluetooth is a form of wireless communication designed to be used over short distances, for instance, when connecting a phone to a car system to play music. When you connect a Bluetooth device to your phone or car, you’re creating an ad-hoc wireless network. (This is also an example of the personal area networks discussed in Chapter 2.)
Figure 8-1 shows an example of a network diagram for each type of wireless network.
Devices can find and recognize the signals sent by different wireless networks using the WAP’s unique identifier, called the Service Set Identifier (SSID). Basically, this is the name of the wireless network and is what appears when you connect your device to the network, as shown in Figure 8-2. WAPs usually broadcast their SSIDs, so any device listening for a wireless signal can see them, although they can also hide their SSIDs, which forces you to know the ID to connect.
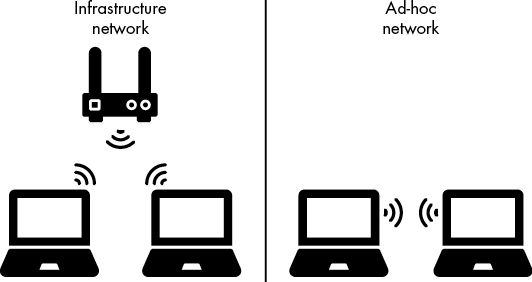
Figure 8-1: Infrastructure versus ad-hoc network setup
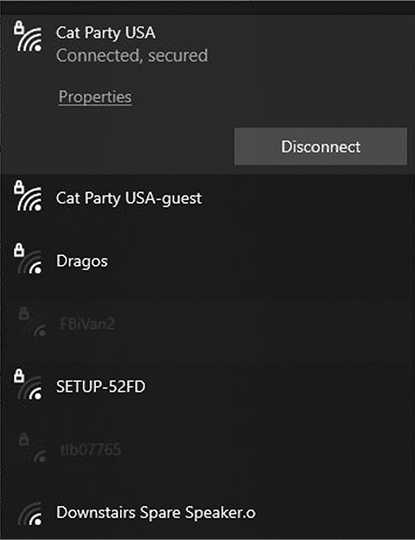
Figure 8-2: Examples of SSIDs for wireless networks
Once you choose a wireless network, your device connects to it using a process called association. Typically, a device like a laptop or phone can associate with only one wireless network at a time, but a WAP can associate with multiple devices simultaneously. The WAP will then manage the traffic sent to each device, making sure each one has a chance to use the signal without them interfering with each other.
Modern wireless networks can handle many connected devices. But when they reach capacity, the devices will start to experience slower speeds or lose connection to the wireless network. For this reason, it’s important to consider how you’ll use the network before you plug in your WAP. In a small house, you can usually get away with one access point in a centrally located area. In an office building or larger area, you’ll need multiple access points to load-balance the network so no single device gets overloaded.
However, having multiple access points can sometimes cause issues, particularly when a device can’t easily connect between the different networks because it can’t associate with the new access point. To alleviate this problem, you can create a mesh network. Mesh networks combine multiple WAPs into one large wireless network with a single SSID. This allows people to move their devices freely between them without losing the wireless signal, as long as they stay within the bounds of the mesh network.
Wireless Standards
Part of what has made wireless technology so successful is the creation of widely adopted standards that enable interoperability among devices. Interoperability in this case means that one wireless-enabled device can easily communicate with pretty much any other wireless device, no matter which companies manufactured them. This is largely due to the work of the Wi-Fi Alliance, an organization that promotes wireless standards. Essentially, if a wireless device follows certain guidelines, it can refer to its device as Wi-Fi enabled.
The main standard that companies follow is known as IEEE 802.11. The Institute of Electronic and Electrical Engineers (IEEE) is an organization that produces standards, and 802.11 is just a number that categorizes that particular standard. However, that number has now become synonymous with wireless technology. In fact, it’s become so common that you’ve probably heard or seen it before, perhaps on a router you bought for your home or office.
As wireless technology evolved, new substandards were created to govern new types of wireless networks. The first two major substandards were 802.11a and 802.11b, which use different radio wavelengths to send information. The 802.11a standard uses the 5 GHz band, whereas 802.11b uses the 2.4 GHz band. The 2.4 GHz band reaches farther but is slower, whereas 5 GHz is faster but doesn’t reach as far. Today, these differences are largely moot, because most modern wireless devices use both standards (more on that momentarily).
Later standards integrated new features. 802.11g improved on 802.11b, producing a faster, stronger signal. Next came 802.11n, which added a technology called Multiple-In Multiple-Out (MIMO). MIMO allows a device to use multiple antennas to amplify the amount of traffic a wireless device can send and receive at one time. This feature drastically increased a WAP’s capacity, allowing for many more devices on a network at one time without causing slowdowns or dropped signals. MIMO also allows devices to use 2.4 and 5 GHz signals at the same time. The 802.11ac and 802.11ax standards later improved upon MIMO and other signal-strengthening technologies to enable incredibly fast data transfer speeds. Released in 2019, 802.11ax is still being adopted. Table 8-1 lists each of the standards along with some facts about them.
Table 8-1: IEEE 802.11 Standards
| Standard | Signal type | Max range | Speed |
| 802.11a | 5 GHz | 120 m | 54 Mbps (megabits/second) |
| 802.11b | 2.4 GHz | 140 m | 11 Mbps |
| 802.11g | 2.4 GHz | 140 m | 54 Mbps |
| 802.11n | 2.4/5 GHz | 250 m | 600 Mbps |
| 802.11ac | 5 GHz | 120 m | 3466 Mbps (3.4 Gbps) |
| 802.11ax | 2.4/5/6 GHz | 120 m | 9608 Mb/s (9.6 Gbps) |
Wireless Security
Another interesting aspect of the IEEE standards is that they make security an integral part of their functionality. Their designers attempted to defeat some of the more obvious attacks against wireless from the beginning rather than reacting to them after the fact. Although not perfect by any means (as you’ll see in “Wireless Attacks” on page 147), this emphasis on security helped create wireless security standards that have persisted through many iterations.
Wireless Authentication
One of the problems with wireless is that it can be very difficult to determine who is using the network. Because the network isn’t constrained by traditional physical boundaries, such as walls or doors, it must use authentication protocols to allow only the right people to access it. The other issue is that when you send in your authentication, it travels over the wireless network, where an adversary could intercept it. So you also must encrypt your traffic to ensure your credentials remain secret.
Basically, there are two methods of authenticating to a wireless network. The first is Personal or PSK (pre-shared key) mode. This is most likely the method you’re familiar with; it requires you to enter a password when you want to join the wireless network. As discussed in Chapter 5, a password is only as strong as you make it; so a weak password using Personal mode will make it easier for a black hat to break into your wireless network. However, it’s an easy method to use at home, because it doesn’t require any additional equipment or maintenance outside of the WAP that you set up. It’s also easy to share the password to allow people to join your wireless network. This is why guest Wi-Fi networks in coffee shops or other public places use Personal mode.
The other general method of authentication for wireless networks is Enterprise mode, in which authentication is handled by an authentication database. The WAP forwards authentication attempts to the database to validate. The database then tells the WAP whether or not that device is authorized to be on the wireless network. These requests are sent using the Extensible Authentication Protocol (EAP), which encrypts them, making it harder for an attacker to intercept them. EAP also has the added benefit of running many different types of authentication protocols, so it can integrate with many authentication methods.
One advantage of using Enterprise mode, sometimes called 802.1X, is that it provides a way to create a unified method of authentication for wireless access and access to the network attached to the WAP. So instead of having to remember or enter multiple credentials, a person can just authenticate once to access everything they need. Another advantage is that it provides very strong authentication methods that are difficult to break. The drawback is that all these components require a lot of management and cost. Therefore, you’re unlikely to see Enterprise mode used in homes or even small businesses.
Wireless Encryption
Another important facet of wireless security is ensuring that the data sent over the network isn’t read by a black hat. It’s possible for an adversary to capture a wireless signal, stealing any data sent between a device and the WAP. To protect the wireless network, WAPs employ special encryption algorithms.
The first of these, Wired Equivalent Privacy (WEP), was introduced as part of the original 802.11 standard and attempted to provide the same level of encryption as was used on wired networks at the time. However, this algorithm didn’t live up to its name. The problem was it didn’t have a long enough encryption key. As you’ll learn in the next chapter, if an encryption algorithm’s key is too short, attackers can easily break it.
Knowing there were problems with security in WEP, the Wi-Fi Alliance helped create a new encryption standard called Wi-Fi Protected Access (WPA). The idea was to create a stopgap measure to mitigate the problems with WEP while an even better standard was being worked on. WPA used a protocol called the Temporal Key Integrity Protocol (TKIP) to supplement the key size of WEP encryption and make it harder to break. However, flaws still existed in how the key was used, and an adversary could still break the encryption.
Eventually, another version of WPA, aptly named WPA2, met the goal: it provides encryption security equal to that of wired networks. WPA2 used an entirely new encryption algorithm called the Advanced Encryption Standard (AES; more on this in Chapter 9) to provide a strong level of encryption. WPA2 also included the 802.1X standard discussed earlier. This continues to be the go-to standard for wireless security. Although not flawless, as you’ll see shortly, it provides a high level of encryption and authentication that prevents attackers from sniffing wireless signals or joining a wireless network without permission.
It’s important to note that even though all modern WAPs support WPA2, they often also support legacy standards like WEP and WPA. For this reason, it’s critical to check your WAPs to ensure they’re not using a legacy standard with considerable flaws.
Wireless Attacks
The most popular attacks against wireless networks are man-in-the-middle attacks, like those discussed in Chapter 2. The reason is that wireless networks inherently make it easy for an adversary to intercept communication between the WAP and the devices connecting to the wireless network.
Other popular attacks include wireless sniffing and DoS. Wireless sniffing is largely mitigated through the use of strong encryption, but if you’re using a weak algorithm like WEP, it’s still a viable attack. DoS attacks are also effective because it’s relatively easy to cause interference with wireless signals, sometimes even unintentionally.
Let’s walk through some specific examples of attacks that adversaries use against wireless networks so you’ll know how a black hat might accomplish them.
Rogue Access Points
One way for an adversary to create a man-in-the-middle situation is to imitate an access point and trick an unsuspecting person into connecting to it. This is known as a rogue access point, which allows the adversary to see any traffic that is sent by the victim to the fake access point. This attack is particularly easy to achieve with a wireless network because it doesn’t require expensive equipment. In fact, it can usually be accomplished with open source software and a computer’s wireless card.
Once the attacker turns their system into a rogue access point, anyone who connects to it will send their traffic to it as if it were a legitimate device. Even worse, the adversary will often create a bridge to a real WAP, passing the traffic to the internet and making it difficult for the victim to know that something is wrong, because they can still visit websites without any problems.
Another form of man-in-the-middle attack is called the Evil Twin attack. In this variation, an attacker copies the name of a legitimate wireless network to trick people into connecting to it. To do this, the adversary first finds the names of legitimate networks in the area by wardriving, which is a technique they use to set their wireless card to pick up all signals, even hidden ones. This gives them information about where wireless networks are located. Once they have a target, the attacker turns their device into a rogue access point with the same SSID as their target. Then they wait for someone to connect to it, thinking it’s a legitimate access point. Figure 8-3 shows an example of this man-in-the-middle attack.

Figure 8-3: An example of an Evil Twin attack
It’s fairly easy to trick users into thinking the fake access point is authentic. Because many places offer guest Wi-Fi, a black hat only has to make their network look like one of the guest networks to get people to join. This is especially easy in crowded places where many guest network options are available, such as an airport. Combine these networks with the networks that stores located throughout the terminals might offer, and users have numerous options. Effortlessly, an adversary can hide in plain sight (which is why you should never, and I really mean never, use a public wireless network in an airport).
The worst part of an Evil Twin attack is that many devices save a network’s information so they can connect to it later. These devices might automatically connect to the Evil Twin when they pick up an SSID they remember. Essentially, when you tell your device to remember a network, it will regularly send out association frames looking for that SSID. When it hears an answer, it will connect to that WAP regardless of whether or not it’s the legitimate one. So it’s imperative to check which wireless network your computer is connected to and ensure it’s on the correct one.
Disassociation Attacks
As mentioned earlier, connecting a device to a WAP is called association. To associate with a network, the device must send a request using a chunk of data called a frame. When the WAP receives this association request frame, it begins communicating with the device to establish a connection to the wireless network. This is also when authentication occurs, if required.
In a disassociation attack, a black hat reads a device’s MAC address from the network, copies it, and sends a disassociation frame to the WAP on its behalf. The disassociation frame does (you guessed it) the opposite of an association frame; it disconnects a device from the WAP. The device must then reassociate with the access point. The attacker can perform this attack repeatedly, effectively blocking communication between the victim and the WAP.
A disassociation attack provides an adversary with a few benefits. First, it creates a DoS state for the victim. Second, it gives the adversary a chance to get the victim to connect to a rogue access point to accomplish a man-in-the-middle attack. Third, it can be used as a means to grab authentication material to crack the password or encryption key used to secure the network. Many of the attacks against wireless encryption start by sending a large amount of association or disassociation frames to record the encrypted material that is being sent between the device and the WAP. Once the attacker has enough of this encrypted material, they can more easily use their system to brute-force the encryption key the WAP uses. This is why weak keys, like those WEP uses, are such a problem; it takes less encrypted communication to break the key, which makes it relatively fast to do.
Jamming
Another way for an adversary to attack a wireless network is to cause interference, jamming the signal so legitimate users can’t connect to it. Wireless networks are especially susceptible to jamming because they rely so heavily on radio frequencies produced by many other devices, such as microwaves. So it’s easy to create extra noise for jamming because many of these devices, such as telephones and wireless keyboards, will already be close to the WAP. In fact, it’s easy for you to accidentally create a jamming condition. Placing devices next to powerful electronics, such as servers and large kitchen appliances, can slow down or even completely block out a wireless network.
This is especially true for 2.4 GHz networks, because many electronic devices produce that band of frequency. You can even jam a 2.4 GHz WAP by placing it too close to another WAP. The 2.4 GHz range is broken down into 12 channels. All but three of these channels overlap in some way, leaving 1, 6, and 11 as the only viable options. If two devices are on the same or overlapping channels, they’ll interfere with one another, preventing users from using the WAP effectively, if at all.
Although 5 GHz networks do suffer from interference, that range has 23 nonoverlapping channels available, make it more resistant to ambient interference from other devices.
Setting Up a Wireless Network with Security in Mind
The best defense against an attack on your wireless network is to set up your WAP with security in mind. When you place your devices carefully, you can eliminate some of the opportunity a black hat might have to attack the wireless network in the first place. To do this properly, you’ll need a well-organized and effective plan. One way to do this is to create a wireless network diagram, which is a map of the area where you’ll locate your wireless network. Then add notes on where the WAP should go, how far the wireless network should extend, and what type of network you’re creating.
For example, you might want to set up a wireless network that will work throughout an office building. By using a wireless diagram, you can get a general sense of how far each WAP will send its signal and how many WAPs you’ll need to cover the entire building. You’ll also be able to place the access points in such a way that the signal is reachable only when users are inside the building. This will make it more challenging for an adversary to attack the network; they’ll now have to bypass physical barriers, such as locked doors, to begin their wireless attack.
Wireless diagrams are also ideal for ensuring that you’re not placing a WAP near devices that might cause interference. Figure 8-4 shows an example of a wireless network diagram.
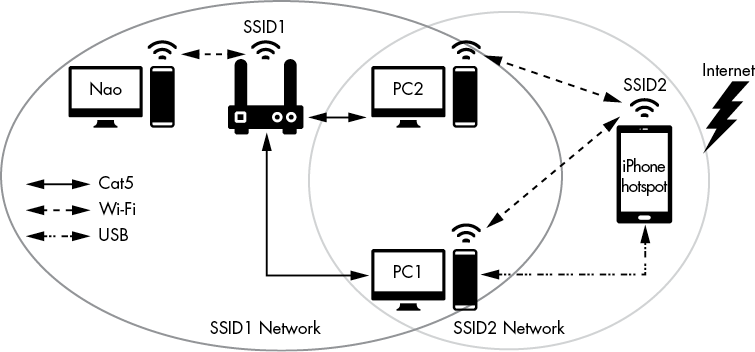
Figure 8-4: An example of a network diagram
Using a wireless network diagram, you can set up your WAPs and ensure they’re configured properly. Verify that they’re using WPA2 for encryption and either 802.1X authentication or a strong passphrase. Also, make sure they’re segmented on their own subnetwork on your internal network. That way, any traffic traveling from the wireless subnetwork to the main internal network will have to pass through extra access controls before the traffic is allowed, similar to how DMZs work.
After you’ve set up the network and verified the configuration, you need to routinely move around the area that the wireless network encompasses and wardrive for any rogue access points or Evil Twin attacks. This is called a site survey. By sniffing your own wireless network, you’ll not only be able to see whether any attackers are attempting to spoof it, but you’ll also be able to find any hidden SSIDs an adversary might be using to access your network. In one famous example, an attacker posing as a janitor was switching out keyboards with identical models that included a small wireless transmitter and keylogger malware. The black hat was able to steal the keylogging data using the wireless transmitter. Although this is an extreme case, it’s a perfect example of how an attacker might sneak a wireless device into your internal network to later use it for access.
The main detail to remember is that wireless networks might require even more security than wired networks because of how easy it is to pick up a wireless signal. That doesn’t mean you can’t use a wireless network; you just need to be smart doing so. Whenever possible, avoid sending sensitive data over a wireless network without encrypting it first. That way, even if the wireless network encryption is broken, your data will remain encrypted.
In general, you should also avoid using public wireless networks, such as those that coffee houses and airports offer. You have no idea who might be listening in, so it’s best to avoid them altogether. In addition, always make sure your wireless network is using at least WPA2 encryption or later. WPA and WEP are too easy to break to be trusted as security protocols. With these tips in mind, you can avoid black hat sniffers and enjoy the freedom of wireless access.
Exercise: Secure Your WAP
In this exercise, you’ll learn how to enable your WAP’s various security settings. Although certain configuration details vary based on the WAP model you own, for demonstration purposes, we’ll focus on how the features work rather than any particular model’s mechanisms. This approach should give you an idea of what keywords to look for in your WAP’s settings and how certain tools should work. Let’s start by setting up an access point.
Setting Up Your Access Point
Many access points include a setup wizard that you can use when initially setting them up. To access this wizard, you must turn on the access point and wait for it to fully boot. You should then see lights on the WAP indicating the wireless connection is running.
Most wireless access points create a default wireless network when they’re first booted. Often, you’ll find the name of this wireless network on the back of the access point or in the device’s documentation. Once you find the network, you can connect to it, either as an open access point or by using the given credentials, which are usually printed on the device. If you don’t find a default network for the device, you might have to connect to it directly with an Ethernet cable.
Once you’re connected to the default wireless network or the device, you’ll need to access the setup wizard. This often requires knowing the default IP address assigned to the device upon starting. Again, you’ll usually find this number printed on the WAP or in its documentation. A common IP address used by default is 192.168.1.1, but there are definitely variations. After finding the IP address, enter it into your web browser and press ENTER. The browser should connect to the device and either bring up the wizard or the administrative menu to begin the setup process.
For example, Figure 8-5 shows the home page for the wizard that an ASUS wireless router uses.
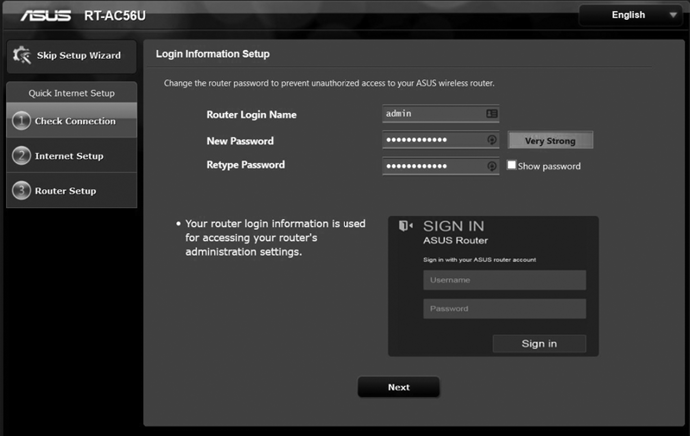
Figure 8-5: A wireless access point setup wizard
The wizard should prompt you to enter a password. Ensure that you use a strong password for the administrator account, which allows you to log in and change the router’s settings. Many routers include a default password for the admin account, especially if they’re issued by an ISP. You should always change this default password to prevent others from using it to gain access to the settings. Even if the password is unique to that router, it’s still possible for a person to discover it, because they’re often printed on the router.
Next, enter an SSID, or name, for your wireless network. Sometimes the router will use a default name when you first start it. But if you uniquely name it, it will be easy to recognize among a list of other names, especially if you live in an area with multiple networks, like an apartment complex. Naming your network is also a great way to give it some personality; for instance, my network name is Cat Party USA.
Once you’ve set up the SSID, you can make sure the WAP’s security features are configured properly.
Setting Up Wireless Security
The first security setting you’ll want to check is the router’s wireless encryption standard. Many routers automatically use WPA2 and might even enable it during the initial setup of the device. However, it’s always best to check the standard used and that it’s set up correctly to ensure the best encryption available.
To do this, you’ll need to find your router’s security settings. Often, they’ll be listed on the wireless network configuration menu or in a separate security configuration menu. Figure 8-6 shows an example of this menu for the ASUS router.

Figure 8-6: Wireless encryption options
You’ll be presented with several options, the best of which for home networks is usually WPA2-Personal. It allows you to set up a pre-shared key, which is essentially a password you’ll use to join the network. Remember to use strict password best practices, as discussed in Chapter 5. Because others will be able to access the login menu, make sure the password is strong enough to resist brute-force attacks or other password-cracking techniques.
You can also choose the encryption standard to use with your network. We’ll discuss encryption in more detail in the next chapter; for now, know that the best option to select is AES, which is currently the most effective standard and provides extremely strong encryption.
Next, let’s look at a few other security features you need to configure. The first is Wi-Fi Protected Setup (WPS). This feature allows you to access a WAP without having to enter long passwords or do other complicated security setup. The idea is that to log in to the network, you use a PIN code or press a physical button located on the WAP. However, WPS is flawed, and it’s possible to brute-force the PIN code to gain access to the network. In general, it should be disabled. You can usually find the configuration settings for WPS in the wireless network settings. Figure 8-7 shows an example of what this setting might look like.

Figure 8-7: The WPS setting
You should also look at your WAP’s remote access settings. It’s possible that someone can access your WAP’s administrative side from the internet without having to be on the network. This is dangerous, because it can lead to an adversary gaining access to the device without having to be physically near it. Check your settings to make sure nobody can access the WAP from the WAN (aka the internet). Figure 8-8 shows an example of the remote access settings.
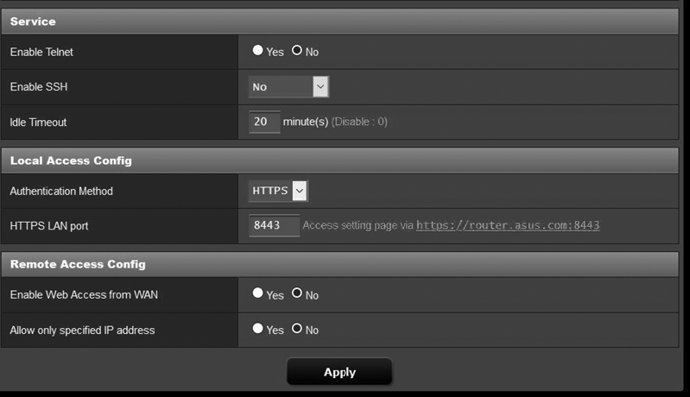
Figure 8-8: Remote access settings for an ASUS WAP
Another remote setting to check is how the connection to the access point settings is secured. Avoid using Telnet or HTTP. Neither provide encryption, meaning it’s possible for an adversary to see what you’re doing whenever you modify the settings on the router. Instead, use SSH or HTTPS. SSH requires more setup, because you must create a special encryption key for your device; the easiest option is to use HTTPS. This will secure the connection to the WAP when you use your web browser to access the administrative settings.
Enabling Filtering
Filtering allows you to selectively accept connections based on parameters of your choosing, and then block all other devices or traffic. Depending on your router model, you might have several options for filtering. Let’s look at some of the more common options available.
One option, port filtering, allows you to filter traffic based on the port number associated with it. Using port filtering is a great way to limit which protocols your network allows. For example, you might block port 21 because it’s associated with FTP, which is an unencrypted way to move files over a network. You might also want to block port 23, which Telnet uses; it’s also an unsecure remote access protocol.
Regardless of what you want to block, be careful. As with all filtering, it’s possible that blocking a port will cause unintended consequences. For example, you could accidentally block an application that you’re using. Figure 8-9 shows an example of port filtering settings. In this example, the WAP allows you to set certain times at which to block ports and displays whether you’re specifying a whitelist or blacklist.
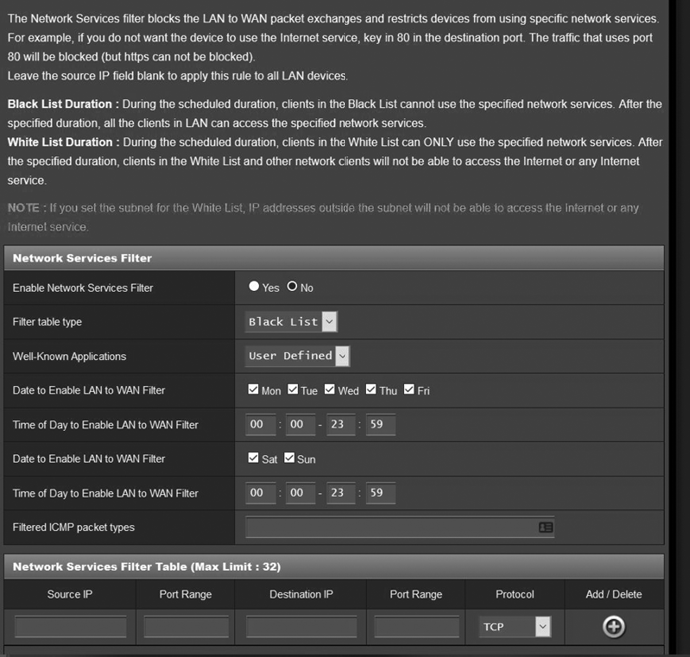
Figure 8-9: Port filtering settings for an ASUS router
Another form of filtering, URL filtering, allows you to block certain URLs, or even phrases used in the URLs, from being resolved by the WAP. Basically, when someone tries to access one of these URLs through the WAP, the WAP will recognize the website address and block it. This is a great way to create parental controls or limit unwanted content from being accessible on your wireless network. However, URL filtering requires that you be very specific, and it can often filter legitimate websites by accident. As with port filtering, it’s best to test it to make sure it’s working properly.
Another common filtering option for WAPs is MAC address filtering. As discussed in Chapter 6, switches use MAC addresses to determine where they should send traffic on a LAN. MAC filtering lets you filter access to the wireless network by device, using either a blacklist or a whitelist. Typically, a whitelist is most effective, because you’re more likely to know the MAC addresses of the devices you want on the network than those of the devices you don’t want. If a device tries to connect to the wireless network without being on the whitelist, the WAP will reject it.
Although MAC filtering is an excellent way to limit who can access a network, it’s not the best at stopping black hats. Because MAC addresses are sent unencrypted, an attacker can easily sniff wireless networks and collect the MAC address of a device that is allowed on the network. Once they have an address on the whitelist, they can easily spoof it to gain access. Typically, it doesn’t matter to MAC filters if two devices have the same MAC address as long as that MAC address is on the list. This is a good example of why it’s important to layer your network’s protections: although MAC filtering might not be effective on its own, it adds to a device’s overall security.
Figure 8-10 shows an example of MAC filtering settings.
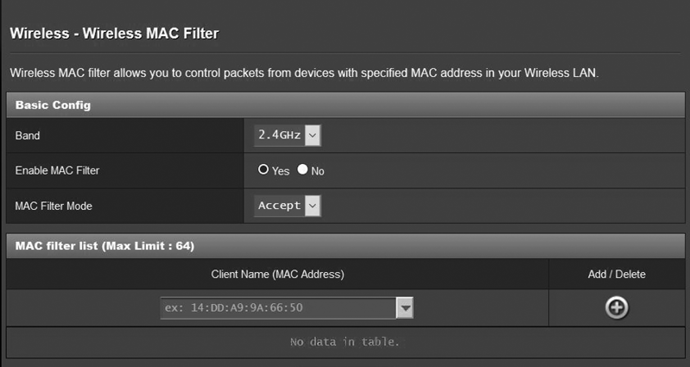
Figure 8-10: MAC filtering settings on an ASUS router
With these settings in place, your WAP will be secure and guard against attackers and unwanted actions by legitimate users. Although configuring all these setting might seem like a lot of work, it’s always better to be safe than sorry. You don’t have to use every feature mentioned to secure your network, but the more layers of security you have in place, the less likely it is that a malicious attack will occur.
Conclusion
Wireless networks present a unique security challenge. Although convenient, a network’s capability to span a large area makes it easy for attackers to access. It’s also possible for an attacker to trick people into using a wireless network that they control. This is why it’s important to use only wireless networks you trust and avoid using public wireless networks. For your own wireless networks, using encryption (such as WPA2) and authentication (like 802.1X) can help prevent attackers from compromising them, allowing you to use the internet with more confidence in your network’s security.