


Implementing IBM DS8000 Multi-Target Metro Mirror - Global Mirror environment with high availability for the CSM Server
In this chapter, we describe how to configure and test the resiliency of a Multi-Target Metro Mirror - Global Mirror solution in case of double failure that includes the primary (Active) CSM server.
The following tasks are covered in this chapter:
6.1 Introduction
Many businesses require their applications to be continuously available and cannot tolerate any service interruption. Loss of a disaster recovery capability is considered a severe impact to the business.
For example, if the production site fails, swapping to a Metro Mirror target allows applications to continue running. However, without another target to act as a safeguard in case of a disaster, many business applications are left unprotected.
6.1.1 Scenario overview
In this scenario, we test the resiliency of a Multi-Target Metro Mirror - Global Mirror solution in case of double failure.
The current environment has a Metro Mirror relation between PoK (H1) and Manhattan (H2) managed in a parallel sysplex configuration. Also, the PoK (H1) site has another target in NJ (H3). The replication to NJ (H1-H3) is asynchronous (GM).
Due to business considerations (for example, the Z administrator should administer the CSM server), the Copy Services Manager is installed on z/OS so the Host Connection for the Sysplex is ZOS_NATIVE (Java Native Interface - JNI).
In case of a failure on H1-H2, the HyperSwap manages the disk I/O operations, but a question arises: What happens in case of double failure?
Let’s assume we have a planned outage on Manhattan (H2) and the H1-H2 is suspended. An unexpected failure occurs in PoK (H1), and the parallel sysplex becomes unavailable. In this situation, the data is still available in NJ (H3) and we can fail over to this site and activate the applications. The main issue here is that the Copy Services Manager server is also unavailable because the parallel sysplex is down and we don’t have a tool to issue the storage failover.
There are two options in this situation:
a. Use storage interface (dscli) to perform the failover actions:
This requires complex operations and, in case of multiple sessions and relations, failover could be time-consuming, making recovery time unacceptable.
b. Alternatively, we can use a Standby CSM server on the third site:
This is easy to manage because CSM can take over and resume replication management on the Standby CSM server. This gives access to all CSM sessions, and you can issue the failover actions.
Moreover, the standby CSM server can be activated on the DS8000 HMC1 in NJ (H3).
For the scenario described in this section, we have performed the following steps:
1. Configuring the Standby CSM Server on H3 (DS8000 HMC)
2. Double failure occurs (simulation)
3. Standby CSM server takes over
4. Use the CSM (now active) to issue failover on H3
5. Recover H1 and H2 sites and failback production in H1
6.2 Configuring and testing high availability for the CSM Server
|
Note: Starting with DS8000 Version 8.1, Copy Services Manager comes preinstalled on the Hardware Management Console (HMC). Therefore, you can enable the Copy Services Manager software that is already on the hardware system. Doing so results in shorter CSM environment setup time, and eliminates the need to maintain a separate server for Copy Services functions.
The HMC embedded version is the Basic Edition of the CSM server, which allows you to connect only to an LDAP repository for remote authentication. You can obtain (pending valid CSM entitlement) the full product license key from either IBM Passport Advantage® or IBM Data storage feature activation.
|
6.2.1 Configuring the Standby CSM Server on H3 HMC
The following steps must be performed to prepare the embedded CSM in DS8000 HMC:
1. Connect by browser using HMC management IP or fully qualified domain name (FQDN), which are case-sensitive:
https://<HMC_IP>/CSM/
|
Attention:
•There is no need to specify the 9559 port: The HMC uses a proxy so that CSM uses the same certificate. This is because certain deployments may require changing the DS8000 HMC certificate.
•If you do not use the “/” character after “CSM” in the URL, the browser returns a Console Internal Error (HTTP status code: 404).
|
2. Log in using the default user and password (csmadmin/passw0rd). After first login, the password for the csmadmin user can be changed. Move the mouse over the csmadmin user on the upper-right side of the GUI, and then click Edit Password, as shown in Figure 6-1.

Figure 6-1 Edit the password
In this step, we upgrade the CSM server, applying the license file:
1. From the CSM GUI, click the Update Licenses menu and browse for the License file. Use your license key (see “Configuring the Standby CSM Server on H3 HMC” on page 129). Optionally you can use a Try-and-Buy key, as shown in Figure 6-2.

Figure 6-2 Updating CSM Licenses
2. Inform the two CSM servers of each other and their roles:
a. Connect to the active CSM server and define the Standby CSM server. From the GUI, go to the Settings menu and click Management Servers. In the management section, click Define Standby.
b. Connect to the designated Standby CSM server, and define it as a standby server:
i. From the GUI go to Settings menu and click Management Servers.
ii. In management section, click Set this Server as Standby.
In both cases, the new window asks for the partner CSM server. See Figure 6-3 on page 131.
|
Important: Defining a server as Standby wipes any existing configuration on the designated standby CSM server. As a precaution, when you run this action from the Active CSM server, you are asked for the username and password of the standby CSM server.
|

Figure 6-3 Defining the standby CSM Server
3. The warning message informs about the overwrite of any existing configuration on the designated standby CSM server. See Figure 6-4.

Figure 6-4 Overwrite warning for the designated Standby CSM server
4. After clicking Yes, the two servers initiate the database synchronization from the active CSM server to the Standby CSM server. The Management Server status reflects the process as Synchronization Pending (see Figure 6-5 on page 132).

Figure 6-5 Synchronization Pending
5. When the synchronization is complete, the Standby server is ready to take over.
6.2.2 Simulating (primary) CSM server and sysplex failure
The DR solution used for testing is a Multi-Target Metro Mirror - Global Mirror managed partially (on the synchronous replication) by a sysplex. The production is running in PoK (H1) is in a Metro Mirror relation with Manhattan (H2) for high availability.
Additionally, the data is asynchronously replicated from PoK (H1) to the third site, NJ (H3). Copy Services Manager (MT_MM-GM) session configured for this solution is shown in Figure 6-6.

Figure 6-6 Multi-Target Metro Mirror - Global Mirror session in CSM
Complete the following steps:
1. The first (simulated) failure is a planed outage for DS8000 maintenance in Manhattan (H2) site. This disables the HyperSwap, but the production continues without impact in PoK (H1). In our case, we bring offline all volumes in H2. We can see the message from z/OS after the first failure in Example 6-1.
Example 6-1 HyperSwap disabled
RESPONSE=N64
IOSHM0303I HyperSwap Status 623
Number of configurations: 1
Replication Session: MT_MM-GM____H1H2
Socket Port: 14000
HyperSwap disabled:
One or more members unable to verify PPRC secondary device connectivity
N64:
Member unable to verify PPRC secondary device connectivity
N65:
Member unable to verify PPRC secondary device connectivity
Swap Highest Priority: No
Disallow Non-MultiTarget System: No
New member configuration load failed: Partition
Planned swap recovery: Disable
Unplanned swap recovery: Partition
FreezeAll: Yes
Stop: No
2. Copy Services Manager detects this status and marks the H1-H2 MM relation with error status Severe, as shown in Figure 6-7.

Figure 6-7 HyperSwap session error
3. The “planned outage” means that the H2 volumes are unavailable, so we suspend the H1-H2 relation (see Figure 6-8).

Figure 6-8 Suspend H1-H2

Figure 6-9 Session Suspended (Partial)
4. The second failure brings down the PoK (H1) site. To simulate this failure, the volumes in H1 are set offline in z/OS. This causes the parallel sysplex to go down, and, as a direct consequence, the CSM server becomes unavailable (Active CSM server running in z/OS on one of the parallel sysplex members). The CSM GUI is unreachable, as shown in Figure 6-10.

Figure 6-10 CSM GUI time-out
Also, on the stora ge level, the Global Mirror relations become suspended with consistency in NJ site. This can be verified with dscli, as shown in Example 6-2.
Example 6-2 Checking relations’ status (dscli)
dscli> lspprc -type gcp 0500-05FF
Date/Time: 26 octombrie 2016 03:44:41 EEST IBM DSCLI Version: 7.7.21.39 DS: IBM.2107-75FAW31
ID State Reason Type SourceLSS Timeout (secs) Critical Mode First Pass Status
==================================================================================
0500:0500 Suspended Host Source Global Copy 05 120 Disabled True
0500:0500 Suspended Host Source Global Copy 05 120 Disabled True
0501:0501 Suspended Host Source Global Copy 05 120 Disabled True
0501:0501 Suspended Host Source Global Copy 05 120 Disabled True
0502:0502 Suspended Host Source Global Copy 05 120 Disabled True
0502:0502 Suspended Host Source Global Copy 05 120 Disabled True
0503:0503 Suspended Host Source Global Copy 05 120 Disabled True
0503:0503 Suspended Host Source Global Copy 05 120 Disabled True
0504:0504 Suspended Host Source Global Copy 05 120 Disabled True
0504:0504 Suspended Host Source Global Copy 05 120 Disabled True
0505:0505 Suspended Host Source Global Copy 05 120 Disabled True
0505:0505 Suspended Host Source Global Copy 05 120 Disabled True
0506:0506 Suspended Host Source Global Copy 05 120 Disabled True
0506:0506 Suspended Host Source Global Copy 05 120 Disabled True
.........
.........
053E:053E Suspended Host Source Global Copy 05 120 Disabled True
053E:053E Suspended Host Source Global Copy 05 120 Disabled True
053F:053F Suspended Host Source Global Copy 05 120 Disabled True
053F:053F Suspended Host Source Global Copy 05 120 Disabled True
dscli>
|
Note: The output in Example 6-2 on page 136 displays two lines for each volume pair because of two suspended relations: H1-H2 and H1-H3.
|
6.2.3 Takeover on Standby CSM server
In an actual situation, we still have consistent data in the third site, NJ (H3). Because the CSM server in PoK (H1) is unavailable, we have to take over on the standby CSM server, which is located in NJ (H3):
1. From the GUI of the standby CSM server, go to Settings → Management Servers and click the Takeover option from Select Action, as shown in Figure 6-11 on page 137.

Figure 6-11 CSM server takeover
2. When the CSM server in NJ (H3) takes over, it becomes the active server (stand-alone) as shown in Figure 6-12.

Figure 6-12 CSM server in NJ site after takeover
3. We can now perform sessions operations. We can see the suspended status but also the consistent data in NJ (J3), as shown in Figure 6-13.

Figure 6-13 Inactive session viewed from CSM server in NJ
The gray arrow between H1 and H3 represents an inactive asynchronous copy. Because we want to move the production to H3, we have to completely suspend all relations and recover in the NJ site.
4. Next, we suspend H1-H3, as shown in Figure 6-14.

Figure 6-14 Suspend H1-H3
This creates a consistent copy of the data (volumes in H3) which is available for restarting production, as shown in Figure 6-15.

Figure 6-15 Consistent volumes H3

Figure 6-16 Recover
6. The H3 volumes in NJ site are now ready to start the production, but the data copy option (to H1 or H2) is disabled for the moment. CSM considers the possibility to revert to original data in H1 or H2 and prevent accidentally overwriting the data. In our case, we confirm that the production is in NJ (H3), as shown in Figure 6-17.

Figure 6-17 Confirm Production in Site 3 (NJ)
6.2.4 Recovering H1 and H2 sites and failback to H1
The data in PoK (H1) and Manhattan (H2) sites is now obsolete due to the production running in NJ (H3). To failback the production under the sysplex, we must first start the replication to these sites:
1. From Session Actions click Start and chose the option to copy data asynchronously from NJ (H3) to PoK (H1) and then to Manhattan (H2). This initiates the Global Copy relations, as shown in Figure 6-18.

Figure 6-18 Starting GC H3-H1-H2
2. While the data is copied to H1 and to H2, the Session state changes to Preparing. We can monitor the copy progress for each site, as shown in Figure 6-19.

Figure 6-19 Preparing session for recovery
In certain situations, especially after a real failure of the entire site, before moving the production back you might need to perform more tests to ensure that everything is configured properly. For example, we want to have consistent data in PoK (H1) for tests, but also we want production to run in parallel in NJ (H3).
3. Because we have initiated a Global Copy to H1, the data is not consistent in H1. CSM provides two options to achieve data consistency in H1. The session has to be suspended with one of the following options:
– Suspend while Global Copy is active. This changes the replication in synchronous MM and the production affects performance because of the (long) distance between H1-H3 (see Figure 6-20).

Figure 6-20 Suspend session
– Suspend When Drained (Figure 6-21). This option is asking the administrator to pause the I/O on H3 and wait for synchronization. In this case H1 becomes consistent.

Figure 6-21 Suspend when drained
|
Note: Optionally, to avoid performance impact on production, Metro Mirror - Global Mirror with Site 3 Global Mirror session can be used instead.
This provides additional journal volumes in PoK (J1) and Manhattan (J2), and the Goal Copy process is followed by Global Mirror, which provides consistent data in H1 without any effect on performance.
|
Whichever option is chosen, consistent data in H1 becomes available and ready for testing (for example, start application with isolate IPs). After all tests are performed and we want to recover in H1, we have to start GC H3-H1-H2 again to update all of the changes performed in H3 since the relation was suspended.
When the Out-of-Sync tracks are again zero or almost zero, and the relations’ progress is 100%, we can suspend the relations with option when Drained. Now, applications must be stopped in H3 and restarted in H1.
4. We recover in H1, as shown in Figure 6-22.

Figure 6-22 Recovering H1
5. Now the Session status is Normal and the Targets are available. This means that the volumes in PoK (H1) are back in production, but the data is not replicated to other sites yet, as shown in Figure 6-23.

Figure 6-23 Session back to normal
6. The first step after switching back to PoK and the applications are up and running, is to confirm the production at Site 1 and enable the possibility to start replication to other sites, as shown in Figure 6-24.

Figure 6-24 Confirm Production at Site 1
7. Next, we start replication to NJ (H3). We initiate asynchronous copy (Global Copy) to both H2 and H3 to replicate all changed tracks/blocks, as shown in Figure 6-25.

Figure 6-25 Start GC H1-H2 and H1-H3
8. We wait for copy progress to complete (100%) and we start GM on H1-H3 as shown in Figure 6-26.

Figure 6-26 Start GM H1-H3
9. We observe the information about Global Mirror replication (such as Data Exposure, shown in Figure 6-27).
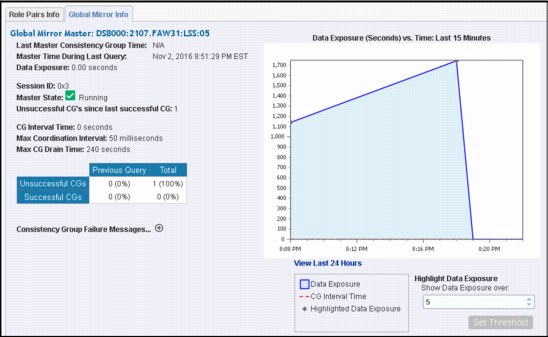
Figure 6-27 Global Mirror information
10. We start also the Metro Mirror (H1-H2) as shown in Figure 6-28.
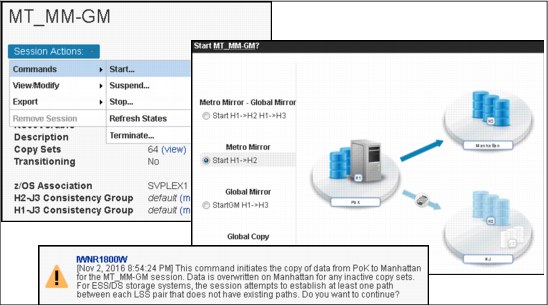
Figure 6-28 Start MM H1-H2
11. Because the session is configured to be managed by parallel sysplex, the MM will also activate, and, after a while, HyperSwap and the configuration is back in the initial phase, as shown in Figure 6-29.

Figure 6-29 Initial state (after recovery)
6.2.5 Recovering the initial CSM server
We can now activate the initial Copy Services Manager server. The database of the initial CSM server is obsolete because the CSM server has been unavailable and it needs to update its configuration.
Reverting to the initial CSM server in PoK can be done assigning it as the standby server to the active CSM server that is running in NJ (H3). The process is repeated in reverse. This overwrites the configuration of the CSM server in PoK and synchronizes it with the current one from the CSM server in NJ. After synchronization is complete, we repeat the takeover and make the Copy Services Manager server running on z/OS the Active CSM server:
1. After the z/OS system is running on PoK (H1), you can connect to the initial CSM server using the browser.
The server configuration data is outdated (the configuration before failure still exists). The GUI shows that this is the active server, but status is Disconnected Consistent.
The currently active CSM server from NJ (H3) is known as STANDBY (see Figure 6-30). Also, you can have access to sessions but they are not actual.

Figure 6-30 Disconnected Consistent status
2. Before assigning this CSM server as Standby we have to remove the old standby definition, as shown in Figure 6-31.

Figure 6-31 Remove Standby definition
3. After the standby definition is removed, we can “Set this Server as Standby” for the active CSM server in NJ (H3). This removes any old configurations and synchronizes with the active server, as shown in Figure 6-32.

Figure 6-32 Set this Server as Standby
•When the configuration becomes synchronized, we issue the takeover, as shown in Figure 6-33.

Figure 6-33 Initiating takeover to the CSM server in PoK
|
Attention: Taking over from the active CSM server doesn’t mean that the roles switch and that the old active server becomes the standby.
|
4. Finally, we assign the CSM server in NJ as the standby server. We use the Settings → Management Servers section and chose Define Standby Server, as shown in Figure 6-34.

Figure 6-34 Defining Standby Server
1 Check for DS8880 HMC version (firmware Release 8.1 or later) for CSM support.
..................Content has been hidden....................
You can't read the all page of ebook, please click here login for view all page.