


Implementation scenario for IBM Platform LSF
This chapter highlights the general challenges for high-performance computing (HPC) clusters. It includes some of the major features of IBM Platform LSF and the way these features can help to address the challenges of HPC clusters.
This chapter includes the following sections:
3.1 Valid hardware resources to ensure that the setup can use IBM Platform LSF
The IBM Redbooks publication IBM Platform Computing Solutions, SG24-8073, presented the IBM Platform range of products. As explained in Chapter 3 of that book, these products were installed on an IBM iDataPlex® cluster. This environment in this chapter uses the same hosts, which are all iDataPlex M3 servers that are based on an Intel Xeon X5670 6-core processor. Each node has a dual socket for 12 cores per node. In IBM Platform LSF terms, each node has 12 slots. To change LSF to use threads rather than cores for slots, see 3.15, “Hyper-Threading technology” on page 92.
IBM Platform Computing Solutions, SG24-8073, also explained how to plan for IBM Platform LSF and how to install the product. This book highlights the features of IBM Computing LSF, such as queue configurations and scheduling policies, that you can use in your cluster to make the best usage of it.
3.2 Sizing for I/O-intensive clusters
Two ideologies of thought surround I/O-intensive clusters. You probably have some large central data storage device. This device might or might not be backed up to auxiliary storage, such as tape, but it is most likely protected by a RAID mechanism. This storage device is attached to one or more hosts that share the data. It might be shared by using a point-to-point protocol such as Network File System, (NFS). Alternatively, it might use a shared, parallel, distributed file system such as IBM General Parallel File System (GPFS).
Each compute node usually has a local disk, although you might have diskless compute nodes. In some industries, the administrators copy the files off the central storage to the local disk for processing before the job begins. Then, they copy the output back to the central storage after the job finishes. This copy can use NFS or rsync.
In some industries, the administrator chooses to work on the data, directly off the parallel distributed file system. This approach save time from copying the data from the central storage to the local nodes.
Some jobs might require a large amount of preprocessing and post-processing. The systems that have this requirement are larger (although fewer) than the compute nodes. They normally have more memory and might even have their own local RAID arrays or graphics processing units (GPUs). Getting data to these nodes, in a timely manner, before the main compute jobs runs is critical. You do not want to spend half the job time copying the data to the nodes, when no other job is running. Similarly, when copying data from these nodes, complete other productive tasks; do not wait for the I/O to complete.
Sizing the cluster for I/O-intensive workloads varies depending on the data movement method that you use. Usually it depends on the amount of data that is being processed. If you have a few or smaller input files, you can copy them. However, if you have many or large input files, it might not be possible to copy them over. Creating multiple jobs with dependencies can help with this problem. Alternatively, implementing IBM Platform Process Manager can also help with the workflow.
The speed of the copy depends on the interconnect that is being used (Ethernet or InfiniBand), the number of nodes that are requesting the file, and the number of nodes that are serving it. The speed of the interconnect is fixed. You cannot vary this speed. However, you can vary the number of nodes that are requesting the file (job size) and the number of nodes that are serving the files.
Most users quote how many GB per second they require and how many GB or TB of space they need. Most vendors can calculate the hardware that is required based on this value. With a parallel distributed file system, the more disks you have, the faster the parallel file system will go.
3.3 Considerations for GPGPU intensive clusters
A massive growth has occurred in the use of General Purpose Graphics Processing Units (GPGPU). These devices can provide massive amounts of vector operations that certain codes can take advantage of. Recently, several of the top ten most powerful super computers have taken advantage of GPGPUs.
GPGPUs are devices that are attached to a general-purpose host system. This general-purpose system provides access to the file system and memory. This system then uses external libraries and system calls to use the facilities that are provided by the GPU.
When you use hosts with GPUs, you must inform IBM Platform LSF of these resources. Typically a system has one or two GPUs attached to it, depending on the number of sockets on the host. Probably more x86 cores than GPUs are attached to the system. Normally you do not share GPUs between jobs. For best performance, treat them as an exclusive resource.
To use nVidia GPGPUs with IBM Platform LSF, install the specific elims to identify and monitor these devices. The elims must match the version of CUDA (a parallel computing platform and programming model ) that is installed on the host systems. For more information about elims, see 3.13, “Defining external resources (elims)” on page 85.
Alternatively, you can define a GPU queue and place the hosts with GPUs in that queue. For more information about defining a queue, see 3.4, “Job queues” on page 51. If you have many nodes with GPUs and only have a few jobs that can take advantage of these GPUs, this approach might not be an effective use of resources. Normally several more x86 cores are on a single host than GPU cores that are on the host.
3.4 Job queues
A queue is a cluster-wide or network-wide holding place for jobs. Each queue might implement different job scheduling and control policies. A system administrator designs the number of queues, the resources that are available to that queue, and the policies on that queue. Users then submit jobs against these queues for execution on hosts within the cluster.
3.4.1 Defining queues
When you define a queue, ask the following questions:
•Which users will access and possibly manage this queue?
•Which hosts and resources are defined against this queue?
•Does this queue have an exclusive execution restriction?
•What type of jobs will we run on these queues? How long will they execute for?
All definitions for queues are stored in the lsb.queues file. You create a queue by modifying the lsb.queue file and by adding a few lines as shown in Example 3-1.
Example 3-1 Modifying the lsb.queue file
Begin Queue
QUEUE_NAME = shortjobs
DESCRIPTION = for short running jobs
ADMINISTRATORS = sdenham
PRIORITY = 75
USERS = aortiz asasaki yjw tmgr1 tmgr2
CPULIMIT = 2
RUNLIMIT = 5 10
CORELIMIT = 0
MEM = 800/100
SWP = 500/50
HOSTS = i05n46 i05n47
End Queue
Begin Queue
QUEUE_NAME = exclusive
PRIORITY = 70
EXCLUSIVE = Y
HOSTS = i05n47 i05n48 i05n49 i05n50 i05n51
DESCRIPTION = used for exclusive MPI jobs
End Queue
In the scenario in this chapter, we added two new queues. The first queue is for short-running jobs, is administered by user sdenham, and is accessible by a few select users. Setting up user sdenham as a queue administrator should reduce the load on the administrator. This user can perform operations (such as starting, stopping, or canceling jobs) on other user jobs within the queue. However, this user cannot edit any IBM Platform LSF configuration files nor can this user start or stop IBM Platform LSF.
The second queue, which is called exclusive, is for larger jobs, such as Message Passing Interface (MPI) jobs that prefer not to share resources with other jobs. For more information about exclusive scheduling, see 3.5.4, “Exclusive scheduling” on page 59. This second queue is open to anyone to use. Host i05n47 is in both queues. A host can be a member of many queues. The more queues that you have, the more complex the scheduling is to understand and manage. Using application profiles can help reduce the number of queues. For information about application profiles, see 3.9, “Application profiles” on page 73.
After you add these new lines, run the badmin reconfig command to communicate the new queues to IBM Platform LSF. To see the new queues, you can enter the bqueues command. For a more detailed view of the queues and to verify their expected behavior, use the -l flag (Example 3-2).
Example 3-2 Verifying the queues
$ bqueues -l shortjobs
QUEUE: shortjobs
-- for short running jobs
PARAMETERS/STATISTICS
PRIO NICE STATUS MAX JL/U JL/P JL/H NJOBS PEND RUN SSUSP USUSP RSV
75 0 Open:Active - - - - 1 1 0 0 0 0
Interval for a host to accept two jobs is 0 seconds
DEFAULT LIMITS:
RUNLIMIT
5.0 min of i05n45.pbm.ihost.com
MAXIMUM LIMITS:
CPULIMIT
2.0 min of i05n45.pbm.ihost.com
RUNLIMIT
10.0 min of i05n45.pbm.ihost.com
CORELIMIT
0 M
SCHEDULING PARAMETERS
r15s r1m r15m ut pg io ls it tmp swp mem
loadSched - - - - - - - - - 500M 800M
loadStop - - - - - - - - - 50M 100M
USERS: asasaki aortiz tmgr1 tmgr2 yjw
HOSTS: i05n46 i05n47
ADMINISTRATORS: sdenham
In Example 3-2 on page 52, a run limit is on the shortjobs queue. Any job that does not complete within the run limit is first warned and then ultimately stopped if it exceeds this limit. This queue is for short running jobs. You do not want any jobs to use all the slots.
3.4.2 Default queue
The default queue is defined in the lsb.params file. By default, the queue is the normal queue and the interactive queue. When a user submits a job, IBM Platform LSF chooses the best queue to send the job to. If the user does not specify a queue, the best queue is chosen based on the input parameters of the job. For example, if the job is an interactive job, the interactive queue is chosen automatically (Example 3-3).
Example 3-3 Automatic default queue selection
$ bsub -I ./Ijob
Job <4719> is submitted to default queue <interactive>.
<<Waiting for dispatch ...>>
<<Starting on i05n45.pbm.ihost.com>>
hi
i05n45
Type something in then:
exit
$ bsub ./Ijob
Job <4720> is submitted to default queue <normal>.
Using the bsub -I command indicates that the job is an interactive job (the jobs takes input from stdin) and this job is placed on the interactive queue. However, if you resubmit the job without the -I flag, the job is sent to the normal queue.
To change the order or to choose different queues, update the DEFAULT_QUEUE setting in the lsb.params file and restart the master batch daemon (MBD) by using the breconfig command.
3.4.3 Managing queues
Queues can be in one of several states. A queue can be open and accepting jobs, or a queue can be closed, meaning that it rejects any job that is submitted. After jobs are on the queue, they are dispatched depending upon the status of the queue. If the queue is active, jobs are dispatched. If the queue is inactive, jobs are held on the queue. Table 3-1 shows how to modify the status of a queue.
Table 3-1 Modifying the status of a queue
|
Status
|
Command
|
Meaning
|
|
open
|
badmin qopen queuename
|
Accept jobs
|
|
close
|
badmin qclose queuename
|
Reject jobs
|
|
active
|
badmin qact queuename
|
Dispatch jobs
|
|
inactive
|
badmin qinact queuename
|
Hold jobs
|
To drain a queue, you change the queue status to close, but leave the queue active so that jobs can continue to be dispatched. Under normal circumstances, queues are open and active. However, you can specify periods in which queues are active or inactive, such as a queue that is run nightly. Users can submit jobs to this queue during the day, but the queue becomes active only at night when it dispatches jobs.
To remove a queue, comment the Begin Queue and End Queue lines (Example 3-4). You do not need to comment the queue configuration. Then, run the badmin reconfig command again.
Example 3-4 Removing a queue
# Begin Queue
QUEUE_NAME = interactive
DESCRIPTION = default for interactive jobs
PRIORITY = 80
INTERACTIVE = ONLY
NEW_JOB_SCHED_DELAY = 0
HOSTS = i05n45
# End Queue
3.5 Job scheduling
After you define the queues, consider the type of scheduling policy you want on these queues. IBM Platform LSF supports several scheduling policies. The following scheduling policies can coexist within the same cluster:
•First come, first served (FCFS)
•Preemption
•Fairshare
•Exclusive
•Backfill
The following sections describe the policy types, their advantages, and how to configure them.
3.5.1 First come, first served
First come, first served is the default scheduling policy. IBM Platform LSF attempts to dispatch jobs onto the run queue in the order they are received. FCFS is simple to understand and use. However, using this policy can cause long-running, low-priority jobs to force higher-priority, short-running jobs to go into a pending state for an unacceptable time.
3.5.2 Preemption scheduling
Preemption scheduling is similar to FCFS. Jobs are submitted and run in the order they are received. However, unlike FCFS, higher priority jobs can force other longer running jobs to be suspended while the higher priority jobs get a chance to run. After the higher priority jobs are finished, the lower priority jobs are will be resumed. Preemption scheduling includes the following types:
•Job slot preemption
•Advanced reservation (see 3.14, “Using advance reservations” on page 87)
•License preemption (by using License Scheduler)
This type of scheduling solves the problem of longer running, lower priority jobs that monopolize run queues. Example 3-5 shows the configuration of preemption scheduling on two queues.
Example 3-5 Preemption configuration and scheduling
Begin Queue
QUEUE_NAME = short
PRIORITY = 70
HOSTS = i05n45 i05n46 i05n47 # potential conflict
PREEMPTION = PREEMPTIVE[normal]
End Queue
Begin Queue
QUEUE_NAME = normal
PRIORITY = 40
HOSTS = i05n45 i05n46 i05n47 # potential conflict
PREEMPTION = PREEMPTABLE[short]
End Queue
In Example 3-5, jobs that run on the normal queue can be preempted by jobs that run on the short queue, if a resource constraint is on the three nodes in these queues.
|
Suspended jobs: Jobs that are SUSPENDED are not stopped nor checkpointed (stopped, checked, and restarted). A job does not release its resources when it is suspended.
|
One of the potential issues with preemption scheduling is that large jobs, which use the entire memory of many nodes, can be difficult to suspend and resume. If a process uses all the memory of a machine, the process or job is then suspended. It does not release its resources. The operating system must free some memory by paging some of the memory pages of the larger, suspended job. When some memory becomes available, the higher priority jobs can run. After they run, the operating system has to page the memory pages back to resume the original job (possibly on all the effected nodes). This process can take a large amount of time. Before you use preemption, you must understand the characteristics of the jobs that are running on the cluster and whether they can be preempted.
Jobs that are selected for preemption are selected from the least-loaded hosts first. However, it is possible to change this characteristic. You can choose to preempt jobs that run for the least amount of time or to avoid preempting jobs that nearly finished their execution. You can also limit the number of times a job can be preempted. Otherwise, it might never finish on a busy system.
By adding the values that are shown in Example 3-6 to the lsb.params and lsb.applications files, you can influence the preemption.
Example 3-6 Limiting preemption behavior
NO_PREEMPT_FINISH_TIME = 10
MAX_JOB_PREEMPT = 2
NO_PREEMPT_RUN_TIME=60
These settings prevent jobs that have been running for over 60 minutes or jobs that have just 10 minutes left to run. They preempt only jobs that have a maximum of two times.
3.5.3 Fairshare scheduling
Fairshare scheduling divides access to the cluster resources by using shares. It prevents one user from monopolizing all the cluster resources by taking the following factors into consideration:
•Users share assignment
•Job slots that are reserved and in use
•Run time of running jobs
•Cumulative actual processor time
•Historical run time of finished jobs
When a user submits a job, the number of shares or priority decreases. The submitted job gets this priority in the queue. If a user submits many jobs, these jobs have a lower priority compared to another user who submits fewer jobs, providing all jobs use a similar amount of resources. However, after the job finishes, the priority increases.
The following types of fairshare scheduling can be implemented:
•Queue (equal share or user hierarchical)
•Cross queue
•Host partition
Queue equal share
Each user is given an equal number of shares. Example 3-7 shows a round-robin queue with equal shares given to all users.
Example 3-7 Round-robin queue
Begin Queue
QUEUE_NAME = roundrobin
PRIORITY = 40
FAIRSHARE = USER_SHARES[[default,1]]
USERS = parkera sdenham yjw akumar
End Queue
Figure 3-1 illustrates the definition of the round-robin queue. In this queue, the four users have an equal share. Theoretically, each user gets 25% of the resources that are available.
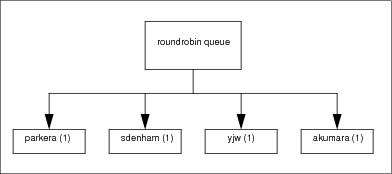
Figure 3-1 Resources available in the round-robin queue
Queue user hierarchical
You might have a situation where you do not want to allocate resources equally between users. You might want to give certain users or projects more shares than others. These groups might pay for more resources within the shared cluster, or their projects might have a higher priority than others. Therefore, you want to ensure that they can use more of the resources within the cluster but not monopolize the cluster.
You can then break down the shares within the cluster into groups and then into users within each group. Figure 3-2 shows this break down between two different groups STG and ITS. These two groups then have several users, each with their own numbers of shares.

Figure 3-2 Hierarchical queues
The best way to calculate these shares is out of 10. In this example, the shares of STG (5) plus the shares of ITS (5) is 10. STG gets 70% of the resources, and ITS gets only 30% of the resources. The same breakdown applies to the users. Of the 70% of resources that STG receives, user parkera gets 60% of the resources, and users sdenham and yjw each get only 20% of the resources.
Example 3-8 shows how to define these shares in the lsb.users file.
Example 3-8 Defining shares
Begin UserGroup
GROUP_NAMEGROUP_MEMBERUSER_SHARES
userGroupB8(sdenham yjw)()
STG (parkera userGroupB8@)([parkera,6] [userGroupB8@,2])
ITS (akumara mayesp)([default,5])
End UserGroup
Example 3-9 shows how to configure the lsb.queues file. In Example 3-9, FAIRSHARE is set up against the queue. You can use different shares for different groups on different queues. You can have multiple hierarchy queues.
Example 3-9 Configuring the queue
Begin Queue
QUEUE_NAME = hierarchicalQueue
PRIORITY = 40
USERS = STG ITS
FAIRSHARE = USER_SHARES[[STG,7] [ITS,3]]
End Queue
To check the share allocation, enter the bugroup -l command as shown in Example 3-10.
Example 3-10 Checking the share allocation
$ bugroup -l
GROUP_NAME: userGroupB8
USERS: sdenham yjw
GROUP_NAME: STG
USERS: parkera userGroupB8@
SHARES: [parkera, 6] [userGroupB8@, 2]
GROUP_NAME: ITS
USERS: mayesp akumara
SHARES: [mayesp, 5] [default, 5] [akumara, 5]
You can use the bqueues -l command to discover the share allocation on the queue itself.
Cross queue
By using cross-queue fair sharing, you can apply the policy of prioritizing user or groups of users access to resources within a single queue across multiple queues. This way, if a user uses different queues, the priority is taken into account across all the queues. When you define cross-queue fairsharing, you create a master queue. Within this master queue, you define subordinate queues that inherit their policy from the master queue. You can create multiple subordinate queues for each master. However, a subordinate queue cannot be a member of multiple master queues.
Example 3-11 shows the definition of a master queue, called master, and two subordinate queues.
Example 3-11 Showing the master queue definition
Begin Queue
QUEUE_NAME = master
DESCRIPTION = master queue definition cross-queue
PRIORITY = 50
FAIRSHARE = USER_SHARES[[STG@,6] [ITS@,4]]
FAIRSHARE_QUEUES = normal-q short-q
HOSTS = hostGroupA # resource contention
End Queue
Begin Queue
QUEUE_NAME = short-q
DESCRIPTION = short jobs
PRIORITY = 70 # highest
HOSTS = hostGroupA
RUNLIMIT = 5 10
End Queue
Begin Queue
QUEUE_NAME = normal-q
DESCRIPTION = default queue
PRIORITY = 40 # lowest
HOSTS = hostGroupA
End Queue
Host partition
All previous fairshare policies examined users and queues by using host partitions, although you can handle resource contention on the hosts. You can use a host partition, for example, if some hosts had special hardware and you wanted to prevent users from monopolizing this hardware.
To enable host partition fairsharing, you update the lsb.hosts file as shown in Example 3-12.
Example 3-12 Updating the lsb.hosts file
Begin HostPartition
HPART_NAME = GPUSystems
HOSTS = i05n48 i05n49
FAIRSHARE = USER_SHARES[[ITS@,3] [STG@,7]]
End HostPartition
3.5.4 Exclusive scheduling
As the name implies, exclusive scheduling gives a job exclusive use of the server host. This policy can be useful when a job is sensitive to other jobs that are running on the same host. To use a host exclusively, you must submit the job by using the bsub -x command. By default, exclusive jobs cannot be preempted, although you can override this setting. The second queue in Example 3-1 on page 52 shows the definition of an exclusive queue. Typically, exclusive queues are used for parallel MPI jobs, in combination with backfill scheduling.
3.5.5 Backfill scheduling
Backfill scheduling works by looking at the run limit that is specified on a job to calculate when a job will finish and work backwards from there. Backfill scheduling is best used with large parallel jobs. By using traditional FCFS scheduling, small sequential jobs always win because these jobs can start as soon as a slot becomes available. Parallel jobs must wait for enough resources or slots to become available before they start. By using backfill scheduling, smaller jobs to slots in between larger jobs can use up smaller spare slots.
Figure 3-3 shows six hosts (hostA - host F). A job (A) is using three of these hosts, and another job (B) is waiting in the queue to use all six hosts. It must wait until job A finishes before it is dispatched. However, job C needs only two hosts and will run for 3 minutes. Therefore, the scheduler can slot job C onto the free hosts that job A is not using, without affecting the start time of job B. If the user did not specify this 3-minute run time, the job is not dispatched. If the job uses more than 3 minutes, it is stopped.
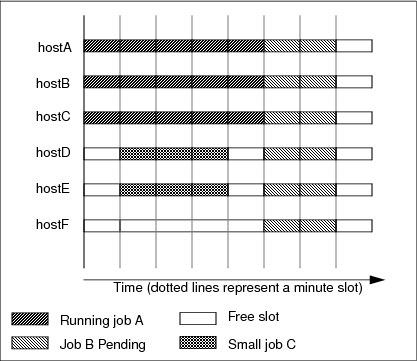
Figure 3-3 Showing job slots on hosts
By using backfill scheduling, the smaller jobs can be slotted in, but a processor limit must be specified to take advantage of back fill scheduling. This way, the dispatcher can calculate where to place the jobs. If the user does not specify a limit, no limit is assumed. In this example, job C would not be dispatched before job B.
Example 3-13 shows a queue that is defined with backfill scheduling.
Example 3-13 Defining a queue with backfill scheduling
Begin Queue
QUEUE_NAME = backFill
DESCRIPTION = used for parallel jobs
PRIORITY = 45
RES_REQ = select[ncpus==8 && ut<0.15]
BACKFILL = Y
RUNLIMIT = 20 300
SLOT_RESERVE = MAX_RESERVE_TIME[300]
End Queue
|
Tip: Jobs in a backfill queue can also be preempted. However, a high priority queue cannot preempt a backfill queue if a higher priority queue reserves resources.
|
Consider using backfill scheduling when you use exclusive queues because IBM Platform LSF can more efficiently use the available resources.
3.6 Goal-oriented scheduling
By using goal-based scheduling, you can ensure that users or jobs can gain access to key resources such as slots, hosts, or software licenses.
You might want to schedule a workload for many business reasons such as an impending deadline or a contractual obligation, such as a service-level agreement (SLA).
Goal-oriented scheduling is configured in the lsb.serviceclasses file. When you define a service class, you must decide the service-level goals:
Deadline Indicates when jobs within the service class should finish by
Throughput The number of jobs that should finish per hour
Velocity The number of concurrent jobs that should run
Each goal might also have an optional time window when the goal is active. For example, you can define periods for hour runs or weekend runs. You can have multiple time periods for a service class, but they must not overlap.
3.6.1 Defining a service class
Example 3-14 shows how to define two new service classes that are called weekend and engineering. In this example, we want to ensure that jobs submitted against the weekend service class finish by Monday morning. Only the engineering department is guaranteed to run 10 jobs per hour.
Example 3-14 Defining a service class
Begin ServiceClass
NAME = Weekend
PRIORITY = 20
GOALS = [DEADLINE timeWindow (5:18:00-1:8:30)]
DESCRIPTION = "weekend regression testing"
End ServiceClass
Begin ServiceClass
NAME = Engineering
PRIORITY = 20
USER_GROUP = eng
GOALS = [THROUGHPUT 10 timeWindow ()]
DESCRIPTION = "constant throughput for CEs"
End ServiceClass
After you add the lines to lsb.serviceclasses file and restart the Load Information Manager (LIM) and MBD, enter the bsla command to verify that they are active (Example 3-15).
Example 3-15 Viewing a service class
$ bsla
SERVICE CLASS NAME: Weekend
-- "weekend regression testing"
PRIORITY: 20
GOAL: DEADLINE
ACTIVE WINDOW: (5:18:00-1:8:30)
STATUS: Inactive
SLA THROUGHPUT: 0.00 JOBS/CLEAN_PERIOD
NJOBS PEND RUN SSUSP USUSP FINISH
0 0 0 0 0 0
----------------------------------------------------------------------
SERVICE CLASS NAME: Engineering
-- "constant throughput for CEs"
PRIORITY: 20
USER GROUP: eng
GOAL: THROUGHPUT 10
ACTIVE WINDOW: Always Open
STATUS: Active:On time
SLA THROUGHPUT: 0.00 JOBS/CLEAN_PERIOD
OPTIMUM NUMBER OF RUNNING JOBS: 0
NJOBS PEND RUN SSUSP USUSP FINISH
0 0 0 0 0 0
Notice that a time window was not provided for the engineering department, which means that the service level is always active. Only the eng group can use this window, unlike the weekend service class, which is available to everyone.
3.6.2 Using a service class
To use a service class, the user submits their job against the class as shown in Example 3-16.
Example 3-16 Submitting a job against a service class
$ bsub -sla Weekend myjob
The sla parameter names the service class to be used, which is weekend in this example. Specify a run limit with the job, which you can specify on the queue against the application profile or on the command line (using the -W parameter). When you specify a job limit, the scheduler can properly calculate the service class. If the scheduler cannot detect how long a job will run, how can it accurately calculate the deadline of the job or how many jobs to schedule per hour?
3.7 Job submission
After you define the queues and the scheduling policies of these queues, you can start using them. To submit a job to the job queue, you enter the bsub command. You can run the bsub command by using a script, a command line, with a spool file or run interactively. You can also use the web interface through IBM Platform Application Center if you have installed it.
The bsub command has many options. Table 3-2 lists the common flags that are used throughout this book.
Table 3-2 Common flags that are used with the bsub command
|
Flag
|
Function
|
|
-n #
|
Number of cores that are required for a job
|
|
-q qname
|
Submit a job to a specified queue
|
|
-R string
|
Resource selection criteria
|
|
-U reservation
|
Submit a job against a defined advance reservation
|
|
-P project
|
Submit a job against a named project
|
|
-app name
|
Use a defined application profile
|
|
-x
|
Have exclusive use of a server host
|
|
-W
|
Specify a wall clock limit for a job
|
You can learn about the bsub command options in Running Jobs with IBM Platform LSF, SC27-5307, at the following address or in the online manual by typing the man bsub command:
The IBM Platform LSF daemons that run on server hosts report resource usage periodically to the master. The master host gathers this information and calculates where to dispatch jobs based on the information that it receives from the hosts and the user requirements.
A resource can be classified as one of the following values:
•Numeric, for example, amount of memory, number of cores
•String, for example, host type or host status
•Boolean, for example, presence of a particular feature such as a GPU
These resources can be built in and discovered by IBM Platform LSF, or they can be defined externally by the site administrators (see 3.13, “Defining external resources (elims)” on page 85).
Table 3-3 shows static host information that is discovered by IBM Platform LSF when it starts.
Table 3-3 Static host information
|
Resource
|
Measures
|
Unit
|
|
type
|
Host type
|
String
|
|
model
|
Host model
|
String
|
|
hname
|
Host name
|
String
|
|
cpuf
|
CPU factor (relative)
|
Numeric
|
|
server
|
Host can run jobs
|
Boolean
|
|
rexpri
|
Remote execution priority (nice)
|
Numeric
|
|
ncpus
|
Number of cores
|
Numeric
|
|
ndisks
|
Number of local disks
|
Numeric
|
|
maxmem
|
Maximum RAM available
|
Numeric (MB)
|
|
maxswp
|
Maximum swap available
|
Numeric (MB)
|
|
maxtmp
|
Maximum available in /tmp
|
Numeric (MB)
|
When you select a resource, the requirement string is divided into the sections that are shown in Table 3-4.
Table 3-4 String usages
|
Requirement
|
Usage
|
|
Selection
|
select[selection_string]
|
|
Job usage
|
rusage[rusage_string]
|
|
Ordering
|
order[order_string]
|
|
Locality
|
span[span_string]
|
|
Same
|
same[same_string]
|
The span and same sections as shown in Table 3-4 are specifically for parallel jobs. For example, you can use the following command to select hosts with more that 1 GB of available memory. The following commands are shown with different string parameters:
$ bsub -R "select[type==any && mem>1024]" myJob
The select string was dropped if it is first in the resource requirement. The following command selects nodes with six cores and a utilization of less than 0.5 or nodes with 12 cores and a utilization of less than 0.75:
$ bsub -R "(ut<0.50 && ncpus==6) || (ut<0.75 && ncpus==12)" myJob2
The following command selects machines with more than six cores and 4 GB of memory, ordering them by utilization (lowest first) and reserving 300 MB of swap and 1 GB of memory for the duration of the job:
$ bsub -R "select[ncpus>6 && mem>4096] order[ut] rusage[swap=300,mem=1024]" myJob3
The next command runs a 32-way job on three hosts where their utilization is less than 0.20 and prioritizes them based on the lowest utilization:
$ bsub -n 32 -R "select[ut<0.20] order [ut] span[hosts=3]" myJob4
The next command runs a 64-way job on the parallel queue in exclusive host mode on the same type of hosts that use 12 slots per host. The job runs for 12 hours.
$ bsub -n 64 -x -W 12:0 -q parallel -R "select[type=any] span[ptile=12]" myJob5
You can also use multiple -R options as follows:
$ bsub -R "select[tmp > 100]" -R "select[ut<0.10]" -R "order[ut]" myjob5
These examples can be useful if you implement script job submission and want to build them by using the command line. IBM Platform LSF merges these individual selects into one and selects hosts that meet the criteria.
3.7.1 Job arrays
A job array is an IBM Platform LSF structure that allows a sequence of jobs to be submitted together. These jobs share executable file, but have different input and output files.
The advantage of using job arrays is that the job array can be controlled as a single unit. However, IBM Platform LSF schedules each individual element of the array separately. Job arrays can be used, for example, for bulk file conversion, image rendering, or regression testing.
Jobs arrays are submitted by using the bsub command as shown in Example 3-17.
Example 3-17 Submitting job arrays
$ bsub -J "aptest[1-8]" -i “"inputfile.%I" -o "outputfile.%J.%I" APsapp
In Example 3-17, a job with eight elements, called aptest, is submitted. The value %I is replaced by IBM Platform LSF to be the array element number (1 - 8 in this example). The value %J is the job number.
Example 3-18 shows a small script, called APsapp, that we created.
Example 3-18 Sample script for job arrays
#!/bin/bash
echo
echo Called on `hostname` at `date`
echo Input parameters are $*
echo STDIN is:
cat -
sleep 5
exit 0
In the same directory, we created eight files in the range inputfile.1 - inputfile.8. These files are used as stdin for the script in Example 3-18. After you submit the job, you can check the output by running the bjobs command (Example 3-19).
Example 3-19 bjobs output for job arrays
$ bjobs
JOBID USER STAT QUEUE FROM_HOST EXEC_HOST JOB_NAME SUBMIT_TIME
3462 lsfadmi RUN normal i05n45.pbm. i05n47.pbm. aptest[1] Oct 29 15:06
3462 lsfadmi RUN normal i05n45.pbm. i05n47.pbm. aptest[2] Oct 29 15:06
3462 lsfadmi RUN normal i05n45.pbm. i05n47.pbm. aptest[3] Oct 29 15:06
3462 lsfadmi RUN normal i05n45.pbm. i05n47.pbm. aptest[4] Oct 29 15:06
3462 lsfadmi RUN normal i05n45.pbm. i05n47.pbm. aptest[5] Oct 29 15:06
3462 lsfadmi RUN normal i05n45.pbm. i05n47.pbm. aptest[6] Oct 29 15:06
3462 lsfadmi RUN normal i05n45.pbm. i05n47.pbm. aptest[7] Oct 29 15:06
3462 lsfadmi RUN normal i05n45.pbm. i05n47.pbm. aptest[8] Oct 29 15:06
Example 3-19 shows each job that is running. They all have the same job number. If the user (or administrator) wants to cancel the entire job, it is easy to do. You can also reference individual tasks within the job by using JOBID[array number], for example, bjobs "3462[2]" or bkill "3462[8]".
After the job finishes, we had eight new files in the range outputfile.3461.1 - outputfile3461.8. Example 3-20 shows the output for each file.
Example 3-20 stdout from job element
Sender: LSF System <[email protected]>
Subject: Job 3461[1]: <aptest[1-8]> Done
Job <aptest[1-8]> was submitted from host <i05n45.pbm.ihost.com> by user <lsfadmin> in cluster <cluster1>.
Job was executed on host(s) <i05n47.pbm.ihost.com>, in queue <normal>, as user <lsfadmin> in cluster <cluster1>.
</home/lsfadmin> was used as the home directory.
</gpfs/fs1/home/home/lsfadmin> was used as the working directory.
Started at Mon Oct 29 15:05:31 2012
Results reported at Mon Oct 29 15:05:37 2012
Your job looked like:
------------------------------------------------------------
# LSBATCH: User input
/gpfs/fs1/home/home/lsfadmin/APsapp
------------------------------------------------------------
Successfully completed.
Resource usage summary:
CPU time : 0.03 sec.
Max Memory : 1 MB
Max Swap : 36 MB
Max Processes : 1
Max Threads : 1
The output (if any) follows:
Called on i05n47 at Mon Oct 29 15:05:31 EDT 2012
Input parameters are
STDIN is:
1
Example 3-20 shows the output from stdout. Obviously our script can create eight new files instead of sending its output to stdout. However, without passing any parameters, we would have to identify the element within the array from the environment variable LSB_BATCH_JID. This value is different for each element of the array, for example, 3462[1] to 3462[8].
By default, IBM Platform LSF allows a maximum of 1000 elements in a job array. You can increase this value to a maximum of 65534 by changing the MAX_JOB_ARRAY_SIZE parameters in the lsb.params file.
3.7.2 Lifecycle of jobs
A job goes through several states from the time it is started to the time it ends. Table 3-5 lists the states of a job.
Table 3-5 Lifecycle for different jobs
|
Job state
|
Description
|
|
PEND
|
Waiting in a job queue to be scheduled and dispatched
|
|
RUN
|
Dispatched to hosts and running
|
|
DONE
|
Finished normally with a zero exit value
|
|
PSUSP
|
Suspended by its owner or the IBM Platform LSF administrator while in the PEND state
|
|
USUSP
|
Suspended by its owner or the IBM Platform LSF administrator after it is dispatched
|
|
SSUSP
|
Suspended by the LSF system after it is dispatched
|
|
EXIT
|
Abnormally terminated job
|
When you submit a job, you can see how it changes through each of these states. Example 3-21 shows a job that is submitted to IBM Platform LSF.
Example 3-21 Sample job
$ cat job.sh
echo $SHELL
export sleep_time=1000
if [ $# -eq 1000 ] ; then
sleep_time=$1
fi
date
sleep ${sleep_time}
date
Example 3-21 shows the sample job that is submitted to IBM Platform LSF. Example 3-22 shows its initial state.
Example 3-22 Initial state of the job
$ bsub -o job.out -e job.err < job.sh
Job <2219> is submitted to default queue <normal>.
$ bjobs
JOBID USER STAT QUEUE FROM_HOST EXEC_HOST JOB_NAME SUBMIT_TIME
2219 yjw RUN normal i05n45.pbm. i05n47.pbm. *ime};date Oct 15 16:56
The job was submitted and is now running. After you suspend the job, you can check its state as shown in Example 3-23.
Example 3-23 Stopping the job and checking its state
$ bstop 2219
Job <2219> is being stopped
$ bjobs
JOBID USER STAT QUEUE FROM_HOST EXEC_HOST JOB_NAME SUBMIT_TIME
2219 yjw USUSP normal i05n45.pbm. i05n47.pbm. *ime};date Oct 15 16:56
The job is now suspended. You can resume the job and check its state as shown in Example 3-24.
Example 3-24 Resuming a stopped job and checking its state
$ bresume 2219
Job <2219> is being resumed
$ bjobs 2219
JOBID USER STAT QUEUE FROM_HOST EXEC_HOST JOB_NAME SUBMIT_TIME
2219 yjw RUN normal i05n45.pbm. i05n47.pbm. *ime};date Oct 15 16:56
The job continues to run. You can then terminate the job as shown in Example 3-25.
Example 3-25 Terminating the job
$ bkill 2219
Job <2219> is being terminated
$ bjobs 2219
JOBID USER STAT QUEUE FROM_HOST EXEC_HOST JOB_NAME SUBMIT_TIME
2219 yjw EXIT normal i05n45.pbm. i05n47.pbm. *ime};date Oct 15 16:56
Figure 3-4 shows the different states that a job can go through, and the various commands that you can use to change the state.
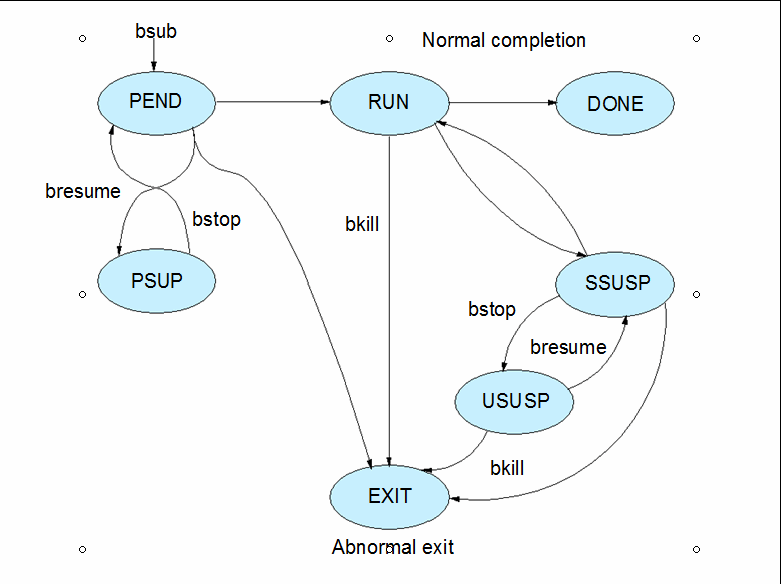
Figure 3-4 Different states of a job and the commands to manage them
3.8 Compute units
Most clusters are composed of enclosure-based systems that are divided into multiple node groups. These node groups typically communicate through a local, high-speed interconnect, which, in turn, can connect to a backbone or core switch so that all nodes can communicate with each other. Using compute units can influence where IBM Platform LSF dispatches work to get the best performance from this interconnect. For example, when you run large MPI jobs, you want to ensure the lowest latency between nodes by dispatching nodes that are connected to the same switch. Figure 3-5 shows the concept of compute units within a rack.

Figure 3-5 Showing compute units within racks
Compute units define a hierarchy within the cluster. Each enclosure shares a common local switch. These switches are then connected to other switches within the cluster. Running jobs on nodes within the same enclosure minimizes network hops between nodes and minimizes latency. Using compute units makes IBM Platform LSF topology-aware when scheduling jobs. When you use larger jobs, you can also ensure that jobs run on the same racks or balance work evenly between racks.
3.8.1 Configuring compute units
To create compute units, you must modify two files. First, you modify the lsb.params file to define the compute unit types. You add the following line to the lsb.params file before the End statement (Example 3-26).
Example 3-26 Defining the compute unit
COMPUTE_UNIT_TYPES = enclosure rack cabinet
We defined the hierarchy of our compute units as enclosure, rack, and cabinet. We then modified the lsb.hosts file to define the relationship between the nodes in the cluster as shown in Example 3-27.
Example 3-27 Defining the compute unit hierarchy
Begin ComputeUnit
NAME MEMBER TYPE
encl1 (i05n46 i05n47) enclosure
encl2 (i05n48 i05n49) enclosure
encl3 (i05n50 i05n51) enclosure
rack1 (encl1 encl2) rack
rack2 (encl3) rack
End ComputeUnit
Example 3-28 adds nodes i05n46 and i05n47 in enclosure encl1. Nodes i05n48 and i05n49 are in enclosure encl2. Both of these enclosures are in rack1. Nodes i05n50 and i05n51 are in a separate enclosure, which is also in a separate rack. To reread the configuration, you can use the badmin reconfig command. Then, you can verify the compute units by using the bmgroup command (Example 3-28).
Example 3-28 Adding the nodes into enclosures
$ bmgroup -cu
NAME TYPE HOSTS
encl1 enclosure i05n46.pbm.ihost.com i05n47.pbm.ihost.com
encl2 enclosure i05n48.pbm.ihost.com i05n49.pbm.ihost.com
encl3 enclosure i05n50.pbm.ihost.com i05n51.pbm.ihost.com
rack1 rack encl1/ encl2/
rack2 rack encl3/
3.8.2 Using compute units
After you define compute units are, users can submit their jobs against the compute units by using the CU job resource requirement as shown in Example 3-29.
Example 3-29 Submitting jobs
$ bsub -n 16 -R "cu[type=enclosure;pref=minavail]" ...
In Example 3-29, type is the name of the compute unit that we defined in the lsb.params file in Example 3-26 on page 69. In this case, type is either enclosure or rack.
The pref value defines the order of the compute units. Compute units with a higher preference value are considered first during scheduling. In this case, compute units (or enclosures) with fewer free slots than compute units with more slots are preferable to enclosures with more free slots. This way, you can pack smaller jobs into enclosures and leave other enclosures free for larger jobs as shown in Figure 3-6 on page 71. This figure shows 16 hosts in each enclosure and each host with four slots.
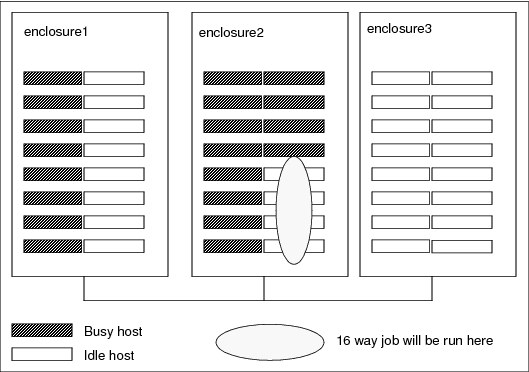
Figure 3-6 Enclosures status
In Figure 3-6, the scheduler selects enclosure2 over the other enclosures, even though the other enclosures have more free slots available.
When you run a much larger job on a cluster with enclosures that are similar in size to the enclosures shown in Figure 3-6, use the maxavail parameter. This way, the jobs can be dispatched on enclosures with more free slots to maximize the jobs that are running in the same enclosure.
Figure 3-7 illustrates a situation of minimizing the number of enclosures used. In this case, we run a 96-slot job on enclosures with only 64 slots per enclosure so that the jobs must span enclosures.

Figure 3-7 Jobs spanning enclosures
In Figure 3-7, the scheduler favors enclosure1 and enclosure2 because they have the most free slots, even though the job fits in enclosure2. You can also limit the number of compute units your job runs on. Suppose you have 64 slot enclosures and you want to ensure your jobs to run only in single enclosures. Example 3-30 shows the command to run within a single enclosure.
Example 3-30 Showing command to run within a single enclosure
$ bsub -n 32 -R ”cu[type=enclosure:maxcus=1]” ...
In Example 3-30, IBM Platform LSF ensures that the 32 slots are allocated from the same enclosure by setting the value maxcus to 1. Jobs are rejected if too many slots are requested for the size of enclosures that are configured. By minimizing the number of enclosures, you can keep the job traffic localized within the enclosure.
By using compute units, you can also balance jobs equally across all the compute units. Alternatively, you can ensure to gain exclusive access to an entire compute unit, assuming the administrator allows it. This way, you can minimize traffic from other jobs that are running in the same enclosure from competing with your job, which might be necessary if you have jobs that are sensitive to other network traffic. Example 3-31 shows how to submit a job equally across all compute units.
Example 3-31 Balanced compute unit access
$ bsub -n 64 -R "cu[balance]" ....
The command that is shown in Example 3-31 on page 72 submits the job evenly among the compute units, using as few compute units as possible. Therefore, the command tries one compute unit first. If the first one is not possible to use, the command tries the second compute unit. If the second one is not possible to use, the command tries the third compute unit. For example, the scheduler places all 64 slots on one compute unit or 32 slots on two compute units.
In exclusive mode (Example 3-32), a job can start only when no other jobs are running within the compute unit. After the exclusive jobs starts, no other jobs can use nodes within that compute unit, which ensures that no other job can use the bandwidth for this enclosure.
Example 3-32 Exclusive compute unit access
$ bsub -n 64 -R "cu[excl:type=enclosure]" ....
Example 3-32 sets exclusivity on the enclosure, but you can do it at the rack level.
|
Exclusive mode: CU exclusive is not enabled by default. The administrator must enable it.
|
To enable exclusive mode, the administrator must enable exclusive access on the queue (see 3.5.4, “Exclusive scheduling” on page 59), or by adding the parameter that is shown in Example 3-33 to the queue definition.
Example 3-33 Enabling exclusive compute unit resources
EXCLUSIVE = CU[CU_TYPE]
In Example 3-33, CU_TYPE is the compute unit type that the administrator wants to allow exclusive access to. In this example, we used enclosure.
3.9 Application profiles
By using application profiles, you can improve the management of application submissions and the queues within the cluster. With application profiles, system administrators can map common execution requirements such as resources that are required for a common set of specific job containers.
Applications that require pre-execution or post-execution commands or resource limits can be grouped, which should reduce the number of queues and configurations within the cluster. Users will find it easier because they can specify the job characteristics for the job, rather than specifying them on the queue or the command line.
3.9.1 Defining application profiles
Application profiles are defined in the lsb.applications file. This file contains many examples and comments to help you build your own profiles. Example 3-34 shows a simple profile setup in the test environment.
Example 3-34 Sample application profile
Begin Application
NAME = dyna
DESCRIPTION = ANSYS LS-DYNA
CPULIMIT = 48:0 # Max 48 hours of host
RUNTIME = 24:0 # Default estimated run time (not hard limit)
MEMLIMIT = 45000000 # Machines have 48GB memory - allow for O/S
PROCLIMIT = 128 # job processor limit
PRE_EXEC = /gpfs/fs1/lsdyna/scripts/testq_pre >> /tmp/pre.$$.out
POST_EXEC = /gpfs/fs1/lsdyna/scripts/testq_post >> /tmp/post.$$.out
REQUEUE_EXIT_VALUES = 55 255 78
MAX_JOB_REQUEUE = 1
BIND_JOB = BALANCE
End Application
Example 3-34 on page 73 shows a sample application profile for LS-DYNA. This parallel application has exclusive access to the hosts and will potentially run for a long period. This scenario uses the default run time of 24 hours, but a user can change this setting. We specify a run time because we might submit this job to an exclusive queue with a backfill scheduler. The processes are bound equally between the cores on each slot to maximize performance.
MEMLIMIT was imposed to prevent the job from using swap because Linux can overcommit memory. Pre-execution and post-execution scripts are specified to set up the job and possibly validate that the environment is ready to run the job. Requeue values are set so that, if the job fails, the job is automatically resubmitted (at least once). This feature is useful if the job fails over a weekend and the user is expecting the results on Monday. The job can run for a maximum of 48 hours, which is a hard limit, unlike RUNTIME to aid scheduling.
3.9.2 Using application profiles
After you define the application profile in the lsb.applications file, reconfigure IBM Platform LSF to make it aware of the changes. You can then list the available profiles and use them as shown in Example 3-35.
Example 3-35 List of available application profiles
$ bapp
APP_NAME NJOBS PEND RUN SUSP
dyna 0 0 0 0
$ bapp -l dyna
APPLICATION NAME: dyna
-- ANSYS LS-DYNA
STATISTICS:
NJOBS PEND RUN SSUSP USUSP RSV
64 64 0 0 0 0
PARAMETERS:
CPULIMIT
720.0 min
PROCLIMIT
128
FILELIMIT DATALIMIT CORELIMIT
20000 K 20 G 20 G
REQUEUE_EXIT_VALUES: 55 255 78
PRE_EXEC: /gpfs/fs1/lsdyna/scripts/testq_pre >> /tmp/pre.$$.out
POST_EXEC: /gpfs/fs1/lsdyna/scripts/testq_post >> /tmp/post.$$.out
$ bsub -app dyna -n 32 -q exclusive -We 12:0
Because this parallel job uses the exclusive queue, which is managed by a backfill scheduler, we must submit an estimated job execution time, which we did by specifying an estimated run time of 12 hours. Otherwise, a default of 24 hours is assumed, which is the RUNTIME in the profile. After 48 hours, the job terminates because the CPULIMIT is set in the application profile.
3.10 Job submission prechecks and setup
Suppose you want to verify jobs that the users are submitting and are not doing anything outside the limits of the system. How do you validate all jobs that are submitted to the system before they are dispatched? Any job that does not meet certain requirements is rejected at the submission stage, rather than languishing on the queue, waiting for resources it does not have, or using all the resources it is not entitled to use.
You can also run scripts or programs before and after a job runs. You can use these scripts to validate that certain resources are available before the job starts or to take corrective action to ensure that the job runs and then clean up after execution. For more information about pre-execution and post-execution scripts, see 3.10.3, “Pre-execution and post-execution job scripts” on page 79.
Jobs can be validated by IBM Platform LSF when they are submitted or modified or when a checkpointed job is restarted by using the esub script. Example 3-36 shows a script that runs when the user submits the job. This script ensures that only the right user can submit jobs against the right project. First, you must create the $LSF_SERVERDIR/esub file, which contains the script that is shown in Example 3-36.
Example 3-36 Script that runs when a user submits a job
#!/bin/bash
if [ "$LSB_SUB_PARM_FILE" != " " ] ; then
. $LSB_SUB_PARM_FILE
# source bsub options
USER=`whoami`
if [ "$LSB_SUB_MODIFY" = "Y" ] ; then # bmod
echo "Job has been modified">&2
elif [ "$LSB_SUB_RESTART" = "Y" ] ; then # brestart
echo "Job has been restarted">&2
elif [ "$LSB_SUB_PROJECT_NAME" = "Project1" -a "$USER" != "sdenham" ]
then
echo "Only sdenham can charge Project1">&2
exit $LSB_SUB_ABORT_VALUE
# abort job submission
else
echo "Job submission accepted">&2
exit 0
fi
fi
Make sure that the new file is executable. We create the file as the root user and then modify it so that the lsfadmin user can modify the file. We now attempt to submit a job against this project as two different users to see what happens (Example 3-37).
Example 3-37 Submitting the job with two different users
[sdenham ~]$ bsub -P Project1 -q normal -n 4 sleep 10
Job submission accepted
Job <2231> is submitted to default queue <normal>.
[sdenham ~]$ logout
[root ~]# su - parkera
[parkera ~]$ bsub -P Project1 -q normal -n 4 sleep 10
Only sdenham can charge Project1
Request aborted by esub. Job not submitted.
As you can see, the job can be submitted only against the project by user sdenham.
The esub script is run only on the submission host and uses the credentials of the user who submitted the job. When the esub script runs, LSF defines the environment variables when the job is submitted. We can verify the variables with the rules that the administrators choose to write. These parameters are stored in the $LSB_SUB_PARM_FILE file. As shown in Example 3-36 on page 75, we source these values on line 2. For a complete list of variables type man esub or see Chapter 50, “External Job Submission and Execution Controls,” in Administering IBM Platform LSF, SC22-5346, at:
Example 3-38 shows the settings of the values.
Example 3-38 Sample submission values
LSB_SUB_QUEUE="normal"
LSB_SUB_PROJECT_NAME="Project1"
LSB_SUB_NUM_PROCESSORS=4
LSB_SUB_MAX_NUM_PROCESSORS=4
By looking at the variables that are shown in Example 3-38, you can see how rules can easily be written to validate user jobs. This example is written in shell, but you can choose a language, such as Perl or Python, to write your scripts. IBM Platform LSF determines whether to allow a job into the queue based on the exit code of the script.
Example 3-39 verifies that the user did not request too many processor slots.
Example 3-39 Script to check whether the user exceeded the number of slots
#!/bin/bash
# Define maximum number of slots a user can request
MAX_SLOTS=5
if [ "$LSB_SUB_PARM_FILE" != " " ]
then
. $LSB_SUB_PARM_FILE
# source bsub options
USER=`whoami`
if [ ! -z "$LSB_SUB_NUM_PROCESSORS" ] ; then
if [ $LSB_SUB_NUM_PROCESSORS -ge $MAX_SLOTS ]
then
echo "Maximum number of slots exceeded. Job terminated" >&2
echo "You requested $LSB_SUB_NUM_PROCESSORS Max is $MAX_SLOTS" >&2
exit $LSB_SUB_ABORT_VALUE
fi
echo "Job submission accepted" >&2
fi
exit 0
fi
When we run the request with too many slots, we see the output that is shown in Example 3-40.
Example 3-40 Verification that the number of slots is exceeded
$ bsub -n 10 sleep 10
Maximum number of slots exceeded. Job terminated
You requested 10 Max is 5
Request aborted by esub. Job not submitted.
3.10.1 Modifying a submitted job
The esub script can validate user scripts and correct them if the administrator specifies this task in their script. The script in Example 3-41 modifies the submission queue based on the user ID. Again we create the $LSF_SERVERDIR/esub file.
Example 3-41 Script to modify the queue based on a user ID
#!/bin/bash
if [ "$LSB_SUB_PARM_FILE" != " " ]
then
. $LSB_SUB_PARM_FILE
# source bsub options
USER=`whoami`
if [ "$LSB_SUB_QUEUE" = "priority" -a "$USER" != "sdenham" ]
then
echo "Only sdenham can submit to priority queue" >&2
echo "Changing the queue to the normal queue" >&2
echo 'LSB_SUB_QUEUE="normal"' > $LSB_SUB_MODIFY_FILE
fi
echo "Job submission accepted" >&2
exit 0
fi
Example 3-42 shows the output when you attempt to submit jobs.
Example 3-42 Verification of job queue changing script
[sdenham ~]$ bsub -n 4 -q priority sleep 10
Job submission accepted
Job <2245> is submitted to queue <priority>.
[sdenham ~]$ logout
[root ~]# su - parkera
[parkera ~]$ bsub -n 4 -q priority sleep 10
Only sdenham can submit to priority queue
Changing the queue to the normal queue
Job submission accepted
Job <2246> is submitted to queue <normal>.
In Example 3-42, the user sdenham can use the priority queue, but when user parkera attempts to use it, the job is automatically submitted to the normal queue instead of being rejected. You can use the esub script to validate every job that is submitted, verifying that the job has a valid wall clock limit and modifying this limit based on historical information. This process makes job scheduling more efficient.
3.10.2 Using multiple esub scripts
The examples in the previous sections use one esub script to validate all jobs that are submitted. You can specify an esub script at submission by using the -a flag at submission (Example 3-43).
Example 3-43 Submitting a job by using the esub -a script
$ bsub -a forecast -n 32 -q priority a.out
The script in Example 3-43 creates the $LSF_SERVERDIR/esub.forecast file. This script contains the validation that is required to submit this job.
|
Mandatory esub script: You can define a mandatory esub script by modifying the lsf.conf file and adding the following line:
LSB_ESUB_METHOD="sitea"
Where $LSF_SEVERDIR/esub.sitea is the script that is run at submission. If this file does not exist, no job enters the queue.
|
Ultimately, you can run three esub scripts against a submitted job as shown in Figure 3-8.

Figure 3-8 Using multiple esub scripts
Modifying one script to manage all jobs within a cluster is difficult. Therefore, it makes sense to use separate esub scripts for each type of job and then to use application profiles (see 3.9, “Application profiles” on page 73) to ensure that the right script runs against the right job.
3.10.3 Pre-execution and post-execution job scripts
In addition to esub scripts that check a job at the submission stage, you can run scripts or programs before the job runs and after the job has completed. You can use these scripts to verify the setup that is required for the environment for a successful job run. For example, the scripts can ensure that a certain file system is available, create working directories for the job, and, if necessary, take corrective actions. After the job completes, the script can copy the data back to a central file system or clean up after the job.
A user can submit a job with a pre-execution script by using the following syntax on the bsub script:
$ bsub -E /fullpath/pre_job job1
Where fullpath is the full path to the script on a shared file system. As the administrator, you can also set up a pre-execution script on a queue that runs before the user specified script. Example 3-44 shows the key information for specifying this option.
Example 3-44 Queue with a pre-execution script
Begin Queue
QUEUE_NAME = normal-q
DESCRIPTION = default queue
PRIORITY = 40 # lowest
PRE_EXEC = /gpfs/fs1/apps/bin/pre_job
HOSTS = i05n47
End Queue
The best way to run a pre-execution script is by using an application profile. By using this method, you can have different scripts for each application, rather than one script on the queue. Additionally users do not have to remember to specify the script when they submit a job. Example 3-45 shows an application profile with pre-execution and post-execution scripts.
|
Return code: Any script that runs before the job, must exit with a return code of 0 (rc=0). If not, the job goes into a PEND state. If exit code 99 is set, the job exits without running.
|
Example 3-45 Application profile with pre-execution and post-execution scripts
Begin Application
NAME = ZZTestApp
DESCRIPTION = Test profile for ZZ jobs
RUNTIME = 4:0
PROCLIMIT = 32
PRE_EXEC = /gpfs/fs1/apps/bin/ZZPre_exec
POST_EXEC = /gpfs/fs1/apps/bin/ZZPost_exec
End Application
Post-execution scripts
Post-execution scripts are always run after the job exits, even if it exits abnormally. You can define these scripts on the queue, as shown in Example 3-46 on page 80, or at the job level by using the bsub -Ep command. You can use an application profile (as shown in Example 3-45) similar to what you use for the pre-execution scripts. If you use job scripts and queue scripts, the queue script runs after the job-level script.
Example 3-46 Queue with a post-execution script
Begin Queue
QUEUE_NAME = short-q
DESCRIPTION = short jobs
PRIORITY = 70 # highest
POST_EXEC = /gpfs/fs1/apps/bin/post_job
HOSTS = i05n47
RUNLIMIT = 5 10
End Queue
|
Tip: When you submit parallel jobs, the pre-execution and post-execution scripts run only on the first execution host.
|
3.11 Job resizing
By using job resizing, jobs can ramp up the number of resources they require or release resources early. Suppose you have a job that requires 12 cores, but initially the job can run on 4 cores. Toward the end, the job can run only on 1 core because the last parts of the job involve I/O (compiling the output file into a single file).
The job size changes during the lifecycle of the job, and its core or slot requirements change. By enabling Resizable Jobs on a queue, you can specify a minimum and maximum number of slots that are required. IBM Platform LSF dispatches the job when the minimum number of slots is available. Then, as more cores come available, IBM Platform LSF allocates these cores to the job and, optionally, runs a command to inform the job of the new resources. Toward the end of the job, the job can run the bresize command to release its slots. Other jobs can then use the released slots. If the last part of a job is I/O, releasing the resources allows other jobs to start faster. Figure 3-9 on page 81 illustrates this effect.
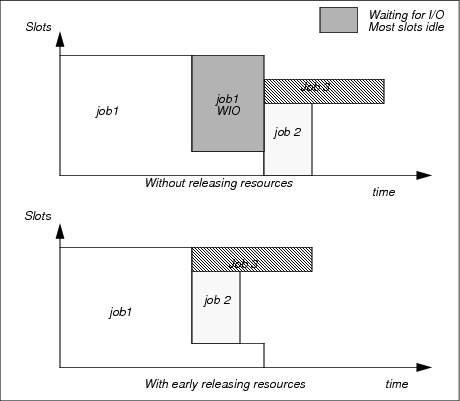
Figure 3-9 Job packing with early release
With job 1 releasing its resources early, jobs 2 and 3 can start, while job 1 finishes its I/O. The I/O needs only a few slots in comparison to the rest of the job, which needs many slots. Similarly, if job 3 is resizable, it can start with fewer slots and then use more slots as they become available, reducing its overall run time even more.
3.11.1 Enabling resizable jobs
Resizable jobs are enabled by default. However, the best way to use resizable jobs is with an application profile (see 3.9, “Application profiles” on page 73). Users can submit a job by using the bsub command as follows:
$ bsub -n 2,8 myresizablejob -rnc /gpfs/fs1/apps/resizecommand
The command requests a minimum of two slots and a maximum of eight slots. When resources are added or removed, the resizecommand command is run.
3.11.2 Using application profiles
By using application profiles, you have more control over jobs. After a job finishes with most of the resources, although it might have some post processing to complete, you can release its slots (resources) by using the bresize release command. By using this command, a job can release all of its slots (except one slot on the first execution host) or a selection of slots on selected nodes. This command runs on the first execution host of a job when slots are added or removed. This command is also used to inform the running job of a change to the number of slots.
Example 3-47 shows an application profile with the resizable options in bold.
Example 3-47 Application profile with resizable jobs
Begin Application
NAME = adamsApp
DESCRIPTION = Test profile for resizeable jobs
CPULIMIT = 1:0 # Max 1 hours of host
RUNTIME = 1:0 # Default estimated run time (not hard limit)
MEMLIMIT = 45944508 # Machines have 48GB memory - allow for O/S
PROCLIMIT = 12 # job processor limit
RESIZABLE_JOBS = Y # Allow jobs resizable
RESIZE_NOTIFY_CMD = /gpfs/fs1/apps/resize.sh
End Application
You then submit the jobs as shown in Example 3-48 and resize them during execution. As shown in Example 3-48, we request a minimum of two slots (up to a maximum of 4). IBM Platform LSF provides four slots. We then resize the job, releasing all the resources except for one slot. We anticipate that the job will normally resize itself, rather than letting an administrator (or the job owner) resize it.
Example 3-48 Submitting and resizing a job
$ bsub -n 2,4 -app adamsApp sleep 500
Job submission accepted
Job <3052> is submitted to default queue <normal>.
$ bjobs
JOBID USER STAT QUEUE FROM_HOST EXEC_HOST JOB_NAME SUBMIT_TIME
3052 lsfadmi RUN normal i05n45.pbm. i05n47.pbm. sleep 500 Oct 26 10:50
i05n47.pbm.ihost.com
i05n47.pbm.ihost.com
i05n47.pbm.ihost.com
$ bresize release all 3052
Job resize request is submitted.
$ bjobs
JOBID USER STAT QUEUE FROM_HOST EXEC_HOST JOB_NAME SUBMIT_TIME
3052 lsfadmi RUN normal i05n45.pbm. i05n47.pbm. sleep 500 Oct 26 10:50
In the application profile, we specified a program to run when a resize command is received. This program gathers the environment variables as shown in Example 3-49. By using these environment variables, a job can calculate where it is running and releases the appropriate resources. Example 3-49 highlights some of the more interesting environment variables that help with this task. After all, we might not want to release all slots on all of the hosts.
Example 3-49 Resizable job environment variables
LSB_APPLICATION_NAME=adamsApp
LSB_BATCH_JID=3052
LSB_CHKFILENAME=/home/lsfadmin/.lsbatch/1351263015.3052
LSB_DJOB_HB_INTERVAL=10
LSB_DJOB_HOSTFILE=/home/lsfadmin/.lsbatch/1351263015.3052.hostfile
LSB_DJOB_HOSTFILE_MODTIME=1351263041
LSB_DJOB_HOSTFILE_SIZE=21
LSB_DJOB_NUMPROC=4
LSB_DJOB_RU_INTERVAL=10
LSB_ECHKPNT_RSH_CMD=ssh
LSB_EEXEC_REAL_GID=
LSB_EEXEC_REAL_UID=
LSB_EXEC_CLUSTER=cluster1
LSB_EXIT_PRE_ABORT=99
LSB_HOSTS='i05n47.pbm.ihost.com '
LSB_JOBEXIT_STAT=0
LSB_JOBFILENAME=/home/lsfadmin/.lsbatch/1351263015.3052
LSB_JOBID=3052
LSB_JOBINDEX=0
LSB_JOBNAME='sleep 500'
LSB_JOBPGIDS='25286 '
LSB_JOBPIDS='25286 '
LSB_JOBRES_PID=25286
LSB_JOB_EXECUSER=lsfadmin
LSB_MCPU_HOSTS='i05n47.pbm.ihost.com 1 '
LSB_QUEUE=normal
LSB_RESIZABLE=Y
LSB_RESIZE_EVENT=shrink
LSB_RESIZE_HOSTS='i05n47.pbm.ihost.com 3 '
LSB_RESIZE_NOTIFY_FAIL=1
LSB_RESIZE_NOTIFY_FAIL_CANCEL_REQ=2
LSB_RESIZE_NOTIFY_OK=0
LSB_SUB_HOST=i05n45.pbm.ihost.com
LSB_TRAPSIGS='trap # 15 10 12 2 1'
LSB_UNIXGROUP_INT=itso
LSFUSER=lsfadmin
LSF_BINDIR=/gpfs/fs1/lsf/8.3/linux2.6-glibc2.3-x86_64/bin
LSF_EAUTH_AUX_PASS=yes
LSF_EAUTH_CLIENT=user
LSF_EAUTH_SERVER=mbatchd@cluster1
LSF_EGO_ENVDIR=/gpfs/fs1/lsf/conf/ego/cluster1/kernel
LSF_ENVDIR=/gpfs/fs1/lsf/conf
LSF_INVOKE_CMD=bsub
LSF_LIBDIR=/gpfs/fs1/lsf/8.3/linux2.6-glibc2.3-x86_64/lib
LSF_LOGDIR=/gpfs/fs1/lsf/log
LSF_SERVERDIR=/gpfs/fs1/lsf/8.3/linux2.6-glibc2.3-x86_64/etc
LSF_VERSION=24
If you want to release two slots on host i05n47, you issue the following command:
$ bresize release "2*i05n47" 3052
Example 3-50 shows this command and the results of running it.
Example 3-50 Job submission with variable slot release
$ bsub -n 2,4 -app adamsApp sleep 500
Job submission accepted
Job <3053> is submitted to default queue <normal>.
$ bjobs
JOBID USER STAT QUEUE FROM_HOST EXEC_HOST JOB_NAME SUBMIT_TIME
3053 lsfadmi RUN normal i05n45.pbm. i05n49.pbm. sleep 500 Oct 26 11:13
i05n49.pbm.ihost.com
i05n49.pbm.ihost.com
i05n49.pbm.ihost.com
$ bresize release "2*i05n49" 3053
Job resize request is submitted.
$ bjobs
JOBID USER STAT QUEUE FROM_HOST EXEC_HOST JOB_NAME SUBMIT_TIME
3053 lsfadmi RUN normal i05n45.pbm. i05n49.pbm. sleep 500 Oct 26 11:13
i05n49.pbm.ihost.com
3.12 Idle job detection
Make sure that your resources are being used efficiently. As cluster owners, you want to get as close to 100% utilization as possible. Unfortunately users can submit jobs that hang or submit interactive jobs as batch jobs so that they hang while waiting for input. By using idle job detection, IBM Platform LSF identifies these idle jobs so that the administrator can intervene and take corrective actions.
By default, IBM Platform LSF checks for idle jobs every minute. You can tune this value by changing EADMIN_TRIGGER_DURATION in the lsb.params file. Setting the value too low can cause false positives, and setting the value too high might not trigger exceptions quickly enough.
To use idle job detection, you also need to set the JOB_IDEL parameter for the job queue. We modified our queue as shown in Example 3-51.
Example 3-51 Queue definition with idle detection
Begin Queue
QUEUE_NAME = normal
EXCLUSIVE = CU[enclosure]
PRIORITY = 30
NICE = 20
INTERACTIVE = NO
JOB_IDLE = 0.10
DESCRIPTION = For normal low priority jobs, running only if hosts are lightly loaded.
End Queue
The JOB_IDLE parameter value must be in the range 0 - 1.0. It represents the processor time or run time.
Example 3-52 shows the submission and start time of an idle job.
Example 3-52 Submitting an idle job
$ bsub -n 1 -app adamsApp sleep 800
Job submission accepted
Job <3565> is submitted to default queue <normal>.
$ bjobs
JOBID USER STAT QUEUE FROM_HOST EXEC_HOST JOB_NAME SUBMIT_TIME
3565 lsfadmi RUN normal i05n45.pbm. i05n45.pbm. sleep 800 Oct 30 16:32
Example 3-53 shows the mail that is received from IBM Platform LSF within a few minutes of the idle job starting.
Example 3-53 Mail to the administrator showing the idle job
From [email protected] Tue Oct 30 16:34:04 2012
Return-Path: <[email protected]>
Date: Tue, 30 Oct 2012 16:34:04 -0400
From: LSF <[email protected]>
Subject: Job Exceptions
Status: R
--------------------------------
Idle jobs: (1)
--------------------------------
JOB_ID IDLE_FACTOR
3565 0.00
3.13 Defining external resources (elims)
IBM Platform LSF gathers many indices, such as free memory, system load, and free slots, on each host. This process aids the scheduler in determining where to dispatch jobs. But what if you want to add your own values? For example, maybe you want to favor hosts that have more free space in their local scratch file system, nodes that have mounted a certain file system, or nodes that have a higher uptime.
You can write your own programs to gather external resource information and then give this information to the scheduler.
3.13.1 External resource gathering
First, you must decide what external resources you want to gather. Consider whether these resources are static or dynamic. These resources must be defined in the Resource section of the lsf.shared file.
You must also define the location of the resource in the ResourceMap section of the lsf.cluster.clustername file. In this example, we gather the amount of time that the server was started and the free space in the /tmp file system. These values are classified as dynamic resources because they change.
We modified the lsf.shared file as shown in Example 3-54 by inserting the lines that are highlighted in bold in the Resource section of the file.
Example 3-54 Defining external resources
Begin Resource
RESOURCENAME TYPE INTERVAL INCREASING DESCRIPTION # Keywords
uptime Numeric 60 N (Time in days server has been up)
scratch Numeric 60 N (Free space in MB in /scratch)
EndResource
You must follow several rules when you define a new resource. For example, the name cannot begin with a number or contain certain symbols. For information about these rules, type man lsf.cluster to access the online manual, or see the section about configuring the lsf.shared resources in Administering IBM Platform LSF, SC22-5346, at:
You then add the lines that are shown in Example 3-55 to the lsf.cluster.clustername file.
Example 3-55 Defining the scope of external resources
Begin ResourceMap
RESOURCENAME LOCATION
uptime ([default])
tmpfree ([default])
End ResourceMap
Example 3-55 shows the external resource gathering program that runs on all hosts within the cluster (default). You can limit where the program is run based on individual hosts, the master host, or host groups. Running this script on all hosts in the cluster might not be beneficial if you have jobs that need exclusive access to all cores for long running jobs. Depending on how many interrupts your resource gathering script uses, it can slow down a long running job.
Alternatively you can run the script on the master host, which checks an external system, such as an external license server, for values.
Finally, you must write the elim script to gather the indices that you need. In this example, we installed the script that is shown in Example 3-56 in the $LSF_SERVERDIR/elim file. When you create the script, you must follow these rules for the script:
•Use the name elim or elim.name.
•Run the script in an endless loop.
•Place the script in the $LSF_SERVERDIR directory.
•Ensure that the script is executable and is owned by the root user.
•Verify that the script reports or generates output in the following format:
K name1 $value1 name2 $value2 nameN $valueN
Where:
– K is the number of value pairs that are returned.
– name is the name of the resource as defined in the lsf.shared file.
– value is the value of the resource.
Test the script outside of IBM Platform LSF to ensure that it returns the right values before you integrate it into IBM Platform LSF. The script must be able to run on its own, and you must be able to verify the values that are returned (Example 3-56).
Example 3-56 External resource gathering script
#!/bin/sh
uptime=0
while true ; do
# all hosts including master, will gather the following:
upt=`uptime | grep days` # Catch machines that have been up minutes!
if [ ! -z "$upt" ] ; then
uptime=`echo $upt | awk '{print $3}'`
fi
# We don't have /scratch, so use /tmp instead!
scrafree=`df -k /tmp | grep /tmp | awk '{print $3 / 1024}'`>&2
echo 2 uptime $uptime scratch $scrafree
# the same INTERVAL values defined in lsf.shared
sleep 60
done
If you defined the script to run on certain nodes, verify whether the script is available on these hosts and verify the output there. After you refresh LIM and MBD on all hosts, you can verify the values by using the lsload -l command as shown in Example 3-57.
Example 3-57 Verifying values of external resources
$ lsload -l
HOST_NAME status r15s r1m r15m ut pg io ls it tmp swp mem uptime scratch
i05n45.pbm.ihost.com ok 0.0 0.1 0.1 10% 0.0 3 1 0 3689M 4G 45G 4.0 3689.4
i05n46.pbm.ihost.com ok 0.0 0.1 0.0 14% 0.0 4 0 19 3688M 4G 45G 3.0 3688.8
i05n47.pbm.ihost.com ok 0.0 0.0 0.0 0% 0.0 2 1 0 3690M 4G 46G 0.0 3690.0
i05n48.pbm.ihost.com ok 0.0 0.0 0.0 0% 0.0 1 0 27 3686M 4G 46G 4.0 3686.0
i05n49.pbm.ihost.com ok 0.0 0.0 0.0 0% 0.0 1 0 5040 3686M 4G 46G 4.0 3686.0
In Example 3-57, you can see the external resource indices at the end of the line (highlighted in bold). For example, node i05n47 was up for less than one day.
3.13.2 Using an external resource
After the administrator installs and tests the external resources, users can use these resources as part of their job submission. For example, a user might dispatch a job only to hosts where the free space in /scratch is greater than 100 MB (Example 3-58).
Example 3-58 Job submission with external resources
$ bsub -R "scratch > 100" myApp
Alternatively, a user might dispatch only jobs to hosts that have been running for more than two days, favoring nodes that are running the longest (Example 3-59).
Example 3-59 Job submission that favors systems with a higher uptime
$ bsub -R "select[uptime > 2] order [uptime]" myApps
3.14 Using advance reservations
Consider a situation where you have to run a certain job, possibly everyday, to get output by a certain period. For example, you need to run a daily weather forecast for broadcast on the six o’clock news. How can you guarantee that the right resources will be available, at the right time, for your job to run? You can reserve a whole series of hosts, just for your job to run at certain key times, but this approach might be a waste of resources when your job is not running. The answer is to use an advance reservation.
With an advance reservation, you can reserve a certain set of resources for your jobs to run on and at fixed periods. Only authorized users or groups can use this resource during this period. New jobs are unlikely to be dispatched to these systems during the period that the advance reservation is active.
When a reservation becomes active, IBM Platform LSF attempts to run all the jobs that are associated with that reservation. Any job that was running before, but that is not associated with the reservation, is suspended on the resources that are defined by the reservation. The exception is if the reservation is not using all the resources that are allocated, in which case these jobs would continue as normal.
If you want to prevent jobs from being suspended, all jobs must be submitted with a run limit by using the bsub -W command. The -W parameter signals the scheduler to calculate how long a job needs, and if it might overlap with an advance reservation on a host, to avoid dispatching this job to that host.
3.14.1 Defining an advance reservation
By default, only administrators or the root user of IBM Platform LSF can define reservations. IBM Platform LSF users can view only the reservations and then, if authorized, they can use them. You can modify this default behavior by editing the lsb.resources file.
When you define a reservation, you must know the following information:
•The number of processors to reserve
•The list of hosts that are required
•The start time and end time of the reservation
•The users or groups that can use the reservation
Use careful planning with these parameters because, when a reservation ends, jobs that are running against the reservation are terminated, unless their termination time was modified by using the bmod -t command.
To create an advance reservation, you use the brsvadd command. In Example 3-60, we create a reservation against 32 processors, on three hosts, between 17:00 and 18:00 for the user sdenham.
Example 3-60 Adding an advance reservation
$ brsvadd -n 32 -m "i05n45 i05n46 i05n47" -u sandy -b 17:00 -e 18:00
Reservation sandy#0 is created
To check for advance reservations, enter the brsvs command as shown in Example 3-61.
Example 3-61 Checking for advance reservations
$ brsvs
RSVID TYPE USER NCPUS RSV_HOSTS TIME_WINDOW
sandy#0 user sandy 0/32 i05n45.pbm.:0/12 10/15/17/0-10/15/18/0
i05n46.pbm.ihost.com:0/12
i05n47.pbm.ihost.com:0/8
Example 3-61 creates a single reservation. For example, if you want user sandy to have exclusive access to this resource everyday, you set up a recurring reservation as shown in Example 3-62.
Example 3-62 Creating a recurring advance reservation
$ brsvadd -n 32 -m "i05n45 i05n46 i05n47" -u sandy -t "18:00-19:00"
Reservation sandy#2 is created
$ brsvs
RSVID TYPE USER NCPUS RSV_HOSTS TIME_WINDOW
sandy#2 user sandy 0/32 i05n45.pbm.:0/12 18:00-19:00 *
i05n46.pbm.ihost.com:0/12
i05n47.pbm.ihost.com:0/8
Example 3-62 shows the time window with an asterisk next to it, indicating a recurring reservation.
The system creates the reservation name based on the user ID or group ID that is specified in the command. You can also give the advance reservation a name by using the -N flag. The user should provide the name of the advance reservation, rather than using a system generated name (Example 3-63).
Example 3-63 Naming a recurring advance reservation
$ brsvadd -n 16 -m "i05n45 i05n46" -u sandy -t "15:00-16:00" -N "Forecast_PM1" -d "Afternoon Forecast"
Reservation Forecast_PM1 is created
$ brsvs
RSVID TYPE USER NCPUS RSV_HOSTS TIME_WINDOW
Forecast_PM1 user sandy 0/16 i05n45.pbm.:0/12 15:00-16:00 *
i05n46.pbm.ihost.com:0/4
The name can help to avoid confusion when you decide which jobs to run against which advance reservation.
3.14.2 Using a reservation
After the administrator creates the reservation, you can use it. Example 3-64 shows the user sandy submitting a job against the advance reservation by using the bsub command.
Example 3-64 Using an advance reservation
denham@i05n45 $ brsvs
RSVID TYPE USER NCPUS RSV_HOSTS TIME_WINDOW
sandy#2 user sandy 0/32 i05n45.pbm.:0/12 18:00-19:00 *
i05n46.pbm.ihost.com:0/12
i05n47.pbm.ihost.com:0/8
sandy@i05n45 $ bsub -U sandy#2 -n 2 sleep 500
Job <2220> is submitted to default queue <normal>.
sandy@i05n45 $ bjobs
JOBID USER STAT QUEUE FROM_HOST EXEC_HOST JOB_NAME SUBMIT_TIME
2220 sandy PEND normal i05n45.pbm. sleep 500 Oct 15 17:47
sandy@i05n45 $ bjobs -l
Job <2220>, User <sandy>, Reservation <sandy#2>, Project <default>, Status
<PEND>, Queue <normal>, Command <sleep 500>
Mon Oct 15 17:47:51: Submitted from host <i05n45.pbm.ihost.com>, CWD <$HOME>, 2
Processors Requested;
PENDING REASONS:
Job is waiting for advance reservation to become active;
SCHEDULING PARAMETERS:
r15s r1m r15m ut pg io ls it tmp swp mem
loadSched - - - - - - - - - - -
loadStop - - - - - - - - - - -
By using the -U flag with the bjobs command, the user can specify the name of the advance reservation to use. You can then see the job waiting for the advance reservation to become open. After the reservation is open, the job starts.
3.14.3 Modifying an advance reservation
By default, only IBM Platform LSF administrators or a root user can modify advance reservations. You can modify the reservation by adding or removing resources, by modifying the time window, or by disabling occurrences of the advance reservation. Example 3-65 shows how to delete an existing advance reservation by using the brsvdel command.
Example 3-65 Deleting an advance reservation
$ brsvdel sandy#0
Reservation <sandy#0> is being deleted
$ brsvs
No reservation found
You can also disable a single instance of a recurring advance reservation as shown in Example 3-66.
Example 3-66 Disabling a single advance reservation
$ brsvmod disable -tn Forecast_PM1
Reservation will be disabled on Tue Oct 16.
The reservation cannot be reenabled for this period.
Are you sure? [y/n] y
Reservation Forecast_PM1 is modified
$ brsvs -l
RSVID TYPE USER NCPUS RSV_HOSTS TIME_WINDOW
Forecast_PM1 user sandy 0/16 i05n45.pbm.:0/12 15:00-16:00 *
i05n46.pbm.ihost.com:0/4
Reservation Status: Inactive
Description: Afternoon Forecast
Reservation disabled for these dates:
Tue Oct 16 2012
Next Active Period:
Wed Oct 17 15:00:00 2012 - Wed Oct 17 16:00:00 2012
Creator: lsfadmin
Reservation Type: CLOSED
|
Tip: After you disable an occurrence of a recurring advance reservation, you cannot re-enable that occurrence.
|
It is likely that the users will request more resources for the reservation. By using the brsvmod command, you can add more hosts. Example 3-67 demonstrates the addition of another host (i05n47) with 12 processors to an existing reservation.
Example 3-67 Adding another resource to an advance reservation
$ brsvs
RSVID TYPE USER NCPUS RSV_HOSTS TIME_WINDOW
Forecast_PM1 user sandy 0/16 i05n45.pbm.:0/12 15:00-16:00 *
i05n46.pbm.ihost.com:0/4
$ brsvmod addhost -n 12 -m "i05n47" Forecast_PM1
Reservation Forecast_PM1 is modified
$ brsvs
RSVID TYPE USER NCPUS RSV_HOSTS TIME_WINDOW
Forecast_PM1 user sandy 0/28 i05n47.pbm.:0/12 15:00-16:00 *
i05n45.pbm.ihost.com:0/12
i05n46.pbm.ihost.com:0/4
3.14.4 Creating a system reservation
You can also create a reservation so that no user jobs can run on a host or series of hosts. For example, the system administrators need to perform scheduled system maintenance, such as a firmware upgrade. In this case, you can create a system reservation so that only system tasks can be run. Example 3-68 shows the creation of a system reservation.
Example 3-68 Creating a system reservation
$ brsvadd -m "i05n45 i05n46" -s -b 17:01:00 -e 17:02:00
Reservation system#1 is created
$ brsvs
RSVID TYPE USER NCPUS RSV_HOSTS TIME_WINDOW
system#1 sys - 0/24 i05n45.pbm.:0/12 10/17/1/0-10/17/2/0
i05n46.pbm.ihost.com:0/12
Notice that we do not specify slots as the whole host is reserved for system use. This reservation is scheduled for the 17th of the current month between 01:00 and 02:00 in the morning on hosts i05n45 and i05n46.
3.14.5 Advance reservation accounting
How do you know whether users are making efficient usage of reservations? How do you know whether they reserve a whole chunk of machines everyday and then do not use them, wasting the resource? How do you know whether their reservation is the wrong size? To check the usage of a reservation, you can use the bacct command as shown in Example 3-69. This example shows that user sandy is not efficiently using the reservation, which consumes only 0.2 seconds of the hour-long reservation.
Example 3-69 Verifying reservation usage
$ bacct -U sandy#2
Accounting about advance reservations that are:
- accounted on advance reservation IDs sandy#2,
- accounted on advance reservations created by lsfadmin,
-----------------------------------------------------------------------------
RSVID TYPE CREATOR USER NCPUS RSV_HOSTS TIME_WINDOW
sandy#2 user lsfadmin sandy 32 i05n45.pbm.:12 18:00-19:00 *
i05n46.pbm.ihost.com:12
i05n47.pbm.ihost.com:8
SUMMARY:
Total number of jobs: 1
Total CPU time consumed: 0.2 second
Maximum memory of a job: 2.0 MB
Maximum swap of a job: 231.4 MB
Total active time: 1 hour 0 minute 0 second
3.15 Hyper-Threading technology
Hyper-Threading was introduced to improve the multithreading capabilities of some processors. Some applications work well with Hyper-Threading enabled. Applications with a mix of processing and I/O can take advantage of Hyper-Threading. However, some codes cannot, and enabling Hyper-Threading can have an even more detrimental impact on performance. Before you enable Hyper-Threading, check and test the characteristics of your application.
By default, IBM Platform LSF determines the number of cores on a host and schedules the jobs against the number of cores. Example 3-70 shows the output when checking cores.
Example 3-70 Core verification
$ lim -t
Host Type : X86_64
Host Architecture : x6_5866_IntelRXeonRCPUX5670293GHz
Physical Processors : 2
Cores per Processor : 6
Threads per Core : 2
License Needed : 12 core(s)
Matched Type : X86_64
Matched Architecture : x15_6789_IntelRXeon
Matched Model : Intel_EM64T
CPU Factor : 60.0
$ bhosts
HOST_NAME STATUS JL/U MAX NJOBS RUN SSUSP USUSP RSV
i05n45.pbm.ihost.c ok - 12 0 0 0 0 0
i05n46.pbm.ihost.c ok - 12 0 0 0 0 0
i05n47.pbm.ihost.c ok - 12 0 0 0 0 0
i05n48.pbm.ihost.c ok - 12 0 0 0 0 0
i05n49.pbm.ihost.c ok - 12 0 0 0 0 0
$ lshosts i05n46
HOST_NAME type model cpuf ncpus maxmem maxswp server RESOURCES
i05n46.pbm. X86_64 Intel_EM 60.0 12 47G 4G Yes (mg)
In Example 3-70 on page 92, each of system has 12 cores and, therefore, 12 slots per node. However, if you want to schedule by threads rather than by cores, you need to add the line that is shown in Example 3-71 to the lsf.conf file.
Example 3-71 Schedule by threads
EGO_DEFINE_NCPUS=threads
You then restart LIM by using the lsreconfig command, restart MBD by using the brconfig command, and run the same commands as shown in Example 3-72.
Example 3-72 Thread verification
$ bhosts
HOST_NAME STATUS JL/U MAX NJOBS RUN SSUSP USUSP RSV
i05n45.pbm.ihost.c ok - 24 0 0 0 0 0
i05n46.pbm.ihost.c ok - 24 0 0 0 0 0
i05n47.pbm.ihost.c ok - 24 0 0 0 0 0
i05n48.pbm.ihost.c ok - 24 0 0 0 0 0
i05n49.pbm.ihost.c ok - 24 0 0 0 0 0
$ lshosts i05n46
HOST_NAME type model cpuf ncpus maxmem maxswp server RESOURCES
i05n46.pbm. X86_64 Intel_EM 60.0 24 47G 4G Yes (mg)
As Example 3-72 shows, each host now has 24 slots. Remember to test your code to ensure that it works well with Hyper-Threading before you enable this feature.
|
Tip: Having twice as many job slots does not affect your license. IBM Platform LSF is licensed by core, not by thread.
|
If you want a mixed environment, for example, where some machines have Hyper-Threading and others without Hyper-Threading must disable it in the BIOS. Example 3-73 shows how to disable Hyper-Threading on one of the nodes by using the IBM Advanced Settings Utility (ASU).
Example 3-73 ASU command to disable HT
$ asu64 set uEFI.ProcessorHyperThreading Disable --host 129.40.127.49
IBM Advanced Settings Utility version 9.20.77G
Licensed Materials - Property of IBM
(C) Copyright IBM Corp. 2007-2012 All Rights Reserved
Connected to IMM at IP address 129.40.127.49
uEFI.ProcessorHyperThreading=Disable
Waiting for command completion status.
Command completed successfully.
On other systems, you can usually enter the BIOS setup utility and disable HT. You then restart the host. Run the same lshosts command, and you see the results that are shown in Example 3-74.
Example 3-74 lshosts command results after restarting the host
$ lshosts
HOST_NAME type model cpuf ncpus maxmem maxswp server RESOURCES
i05n45.pbm. X86_64 Intel_EM 60.0 24 47G 4G Yes (mg)
i05n46.pbm. X86_64 Intel_EM 60.0 24 47G 4G Yes (mg)
i05n47.pbm. X86_64 Intel_EM 60.0 24 47G 4G Yes ()
i05n48.pbm. X86_64 Intel_EM 60.0 24 47G 4G Yes ()
i05n49.pbm. X86_64 Intel_EM 60.0 12 47G 4G Yes ()
$ bhosts
HOST_NAME STATUS JL/U MAX NJOBS RUN SSUSP USUSP RSV
i05n45.pbm.ihost.c ok - 24 0 0 0 0 0
i05n46.pbm.ihost.c ok - 24 0 0 0 0 0
i05n47.pbm.ihost.c ok - 24 0 0 0 0 0
i05n48.pbm.ihost.c ok - 24 0 0 0 0 0
i05n49.pbm.ihost.c ok - 12 0 0 0 0 0
As shown in Example 3-74, host i05n49 is now back to 12 cores per slot.
3.16 Changing the paradigm with guaranteed resources
You must configure the resources so that everyone gets their fair share of the cluster. It is acceptable for everyone to use your compute resource as a single entity. However, when different departments or projects fund the resource, things can become more complex. These departments or projects will pay for, and might expect, a certain amount of the cluster to be used exclusively by them.
By using traditional methods, you might set up different queues for each cost center, with some shared nodes as overflow between departments. Alternatively you can set up fewer queues and configure fair sharing between departments as explained in “Queue user hierarchical” on page 57. The only problem is that fairshare queuing assumes that everyone is busy all the time. If they have offset workloads, which are combined with long running jobs, one department might not be able to get onto the cluster.
Vertical thinking can result in the concept of towers and boundaries, which is inflexible. If one department has little or no work, some of the compute resource are wasted. Instead, you need to think across the cluster. You might establish the following policy for the departments:
“You can have these resources that you paid for, but if you are not using them, we will lend them to someone else. However, when you need them back, they will be quickly returned”.
This policy is similar to the concept described in 3.6, “Goal-oriented scheduling” on page 61, where you set deadlines for jobs or a certain velocity of jobs. You must set up guaranteed resources.
3.16.1 Configuring guaranteed resources
Configuring guaranteed resources is similar to SLA-based scheduling. You set up a service class for the group of users that you want to use it. However, this time the goal is guarantee. Example 3-75 shows a service class definition with a goal of guaranteed resources.
Example 3-75 Service classes for guaranteed resources
Begin ServiceClass
NAME = blade_engine
GOALS = [ GUARANTEE ]
ACCESS_CONTROL = USERS[tmgr1 tmgr2] QUEUES[normal priority]
AUTO_ATTACH = Y
DESCRIPTION = Service class for the fan blade engineering team
End ServiceClass
Begin ServiceClass
NAME = design
GOALS = [ GUARANTEE ]
ACCESS_CONTROL = USERS[akumar alinegds] QUEUES[normal priority]
AUTO_ATTACH = Y
DESCRIPTION = Service class for design team
End ServiceClass
Begin ServiceClass
NAME = it
GOALS = [ GUARANTEE ]
ACCESS_CONTROL = USERS[denhams] QUEUES[normal priority]
AUTO_ATTACH = Y
DESCRIPTION = Service class for the IT group
End ServiceClass
Example 3-75 shows the lines that you add to the lsb.serviceclasses file. These lines define three groups of users. As the example shows, we still have queues. Therefore, users can prioritize or schedule different types of jobs. However, these queues might be few and global, spanning across the cluster.
Now define a guaranteed resource pool in the lsb.resources file. The guaranteed resource pool defines which slots or hosts are defined against the service class. They also define a policy to loan unused resources.
Example 3-76 shows how to define a resource pool that is called GROUP1, which sets five machines in the pool and guarantees three machines to engineering and one to design and IT. You do not have to enter specific values, and you can specify percentages.
Example 3-76 Defining guaranteed resource pools
Begin GuaranteedResourcePool
NAME = GROUP1
TYPE = hosts
HOSTS = i05n46 i05n47 i05n48 i05n49 i05n50
DISTRIBUTION = [blade_engine,3] [design,1] [it,1]
DESCRIPTION = A resource pool used by Blade engineering, Design and IT
LOAN_POLICIES = QUEUES[normal] CLOSE_ON_DEMAND
End GuaranteedResourcePool
Blade engineering does not necessarily get the same three machines each time, but rather they get three machines from the pool.
The defined loan policy defines that jobs that are submitted to the normal queue can borrow resources from other departments, if their own resources are full. However, if the owner wants their resources back, the running job is stopped. You can restrict the type of job that can be dispatched to the loaned hosts.
For example, if the IT departments jobs are typically short running, and engineering jobs are long running, but infrequent, you can define a duration on the load as shown in Example 3-77. Here, only jobs with a run time of less than 15 minutes are put on a loaned machine.
Example 3-77 Restricting jobs on loaned hosts
LOAN_POLICIES = QUEUES[normal] DURATION [15]
3.16.2 Using guaranteed resources
The users submit their jobs against the service class the same way as explained in 3.6.2, “Using a service class” on page 62, and as shown in Example 3-78.
Example 3-78 Submitting a job against an SLA
$ bsub -sla blade_engine -q normal myapp
3.16.3 Viewing guaranteed resources
To examine the guaranteed resources, use the bresources command as shown in Example 3-79. The result shows how many machines are in the pool and who they are guaranteed for.
Example 3-79 Viewing guaranteed resources
$ bresources -g -l -m
GUARANTEED RESOURCE POOL: GROUP1
A resource pool used by Blade engineering, Design and IT
TYPE: hosts
DISTRIBUTION: [blade_engine, 3] [design, 1] [it, 1]
LOAN_POLICIES: QUEUES[normal] CLOSE_ON_DEMAND
HOSTS: i05n46 i05n47 i05n48 i05n49 i05n50
STATUS: ok
RESOURCE SUMMARY:
TOTAL 5
FREE 5
GUARANTEE CONFIGURED 5
GUARANTEE USED 0
GUAR GUAR TOTAL
CONSUMERS CONFIG USED USED
blade_engine 3 0 0
design 1 0 0
it 1 0 0
Hosts currently in the resource pool:
i05n46 i05n47 i05n48 i05n49 i05n50
..................Content has been hidden....................
You can't read the all page of ebook, please click here login for view all page.