


Getting started with KVM provisioning
This appendix describes the steps to use the graphical tool KVM Virtual Machine Manager (virt-manager command) to start the virtual machines for IBM Platform Cluster Manager Advanced Edition KVM provisioning (assuming that you are not familiar with KVM virtualization).
KVM provisioning
The Red Hat Enterprise Linux (RHEL) 6.2 Virtualization package is installed on the hypervisor host that is deployed with IBM Platform Cluster Manager Advanced Edition KVM provisioning as described in Chapter 7, “IBM Platform Cluster Manager Advanced Edition” on page 211. The virtualization package includes the virtualization tools to help with create and manage virtual machines. Virtual Machine Manager is the light-weight graphical tool. virsh is the command-line tool.
To start Virtual Machine Manager on the hypervisor host i05q54, from the management server, run ssh -X i05q54 and run virt-manager. All the running guests and resources that are used by the guests are displayed on the Virtual machine manager main window.
The following sections illustrate the steps to create the storage pool kvm1_vol (size 8000 MB) in the logical volume /dev/VolGroup00/kvmVM (size 15 GB) that is used to create a new virtual machine.
Creating the storage pool
To convert a VM that is created in IBM Platform Cluster Manager Advanced Edition to a template, the VM needs to be created in a Logical Volume Manager (LVM)-based storage pool in the logical volume /dev/VolGroup00/kvmVM. You can create the storage pool by using virt-manager or the command-line interface virsh.
Follow these steps:
1. From the menu of the main window, select Edit → Connection Details and click the Storage tab. The only active storage pool that is displayed in Figure D-1 is the file system directory-based storage pool default.

Figure D-1 Storage tab
2. To add a storage pool, press the + icon in the lower-left corner to display the Add a New Storage Pool window (Figure D-2).

Figure D-2 Specify the name and type of storage device (Step 1 of 2)
We enter guest_images for the name of the storage pool and choose logical: LVM Volume Group for the Type of the storage pool to be added.

Figure D-3 Specify the storage location (Step 2 of 2)
For Target Path, which is the location of the existing LVM volume group, we choose a name (/dev/guest_images) that is associated with the name of the storage pool.
The Source Path is the name of the LVM, which is /dev/VolGroup00/kvmVM, which is created with the command lvcreate.
Click Build Pool to create a logical volume group from the LVM source device.
4. Click Finish to build the logical volume-based storage pool. The LVM volume group guest_images is displayed in the Storage panel when the build completes, as shown in Figure D-4.

Figure D-4 New storage pool created
The LVM volume group guest_images is displayed in the Storage panel when the build completes, as shown in Figure D-4.
5. The next step is to build the disk volume in the storage pool guest_images. Select guest_images and click New volume to display the Add a Storage Volume wizard (Figure D-5).
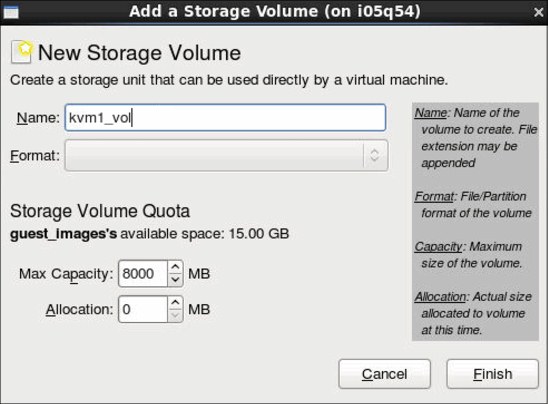
Figure D-5 Specify the name and size of storage volume
Enter the name of the volume (kvm1_vol) and the capacity of the volume (8000 MB) to be created as shown in Figure D-5. Click Finish to create the volume.
6. The volume kvm1_vol of size 7.81 GB is displayed in the Volumes panel on completion of the build as shown in Figure D-6. A new virtual machine can be created by using this new volume.

Figure D-6 New storage volume created
7. We can now use the new storage volume to create a virtual machine. Start by clicking the Create a new virtual machine icon in the upper-left corner of the Virtual Machine Manager main window panel (Figure D-7).
Figure D-7 Install media to build the new VMn
8. For IBM Platform Cluster Manager Advanced Edition to create a VM by using the template that we converted from building this VM, the install media that is entered in Figure D-7 must be accessible on the hypervisor host. We enter the RHEL 6.2 ISO image that is on a local file system on the hypervisor host. Click Forward.

Figure D-8 Defining a storage volume to create a new virtual machine
Select the storage volume that is defined on the logical volume-based storage pool to build the VM. In Figure D-8, we select /dev/guest_images/kvm1_vol that was created in Figure D-6 on page 347. Click Forward to continue with the step-by-step customization to start installation of the guest operating system on the VM.
..................Content has been hidden....................
You can't read the all page of ebook, please click here login for view all page.