


IBM Platform Load Sharing Facility (LSF) product family
In this chapter, we describe IBM Platform LSF and a set of add-on products that can be installed to complement its functionality. The following topics are discussed in this chapter:
4.1 IBM Platform LSF overview
As data centers increase in size and complexity, it becomes more difficult to manage workloads, scale applications, and ensure that the use of hardware and other resources, such as software licenses, is optimal. Users need the ability to use applications and clusters anywhere and automate their data flows. Administrators need to be able to monitor cluster resources and workloads, manage software licenses, identify bottlenecks, monitor service-level agreements (SLAs), and plan capacity.
The IBM Platform LSF software family helps address all of these problems. IBM Platform LSF is a powerful workload management platform for demanding, distributed mission-critical High Performance Computing (HPC) environments. It provides a comprehensive set of intelligent, policy-driven scheduling features so that you can use all of your compute infrastructure resources and help ensure optimal application performance. IBM Platform LSF manages batch workloads. It allows a distributed compute network to function as a large supercomputer by matching supply with demand. It intelligently distributes the right jobs to the right resources, optimizing resource utilization and minimizing waste. It makes multiple computing resources appear to users as a single system image, and it load-balances across shared computing resources.
IBM Platform LSF provides optional add-ons that can be installed for an extended set of capabilities as shown in Figure 4-1. For details about add-ons, see 4.2, “IBM Platform LSF add-on products” on page 36.
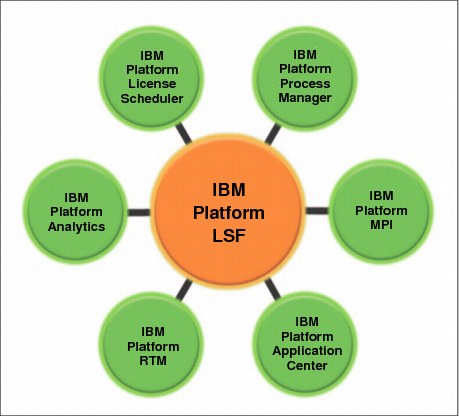
Figure 4-1 IBM Platform LSF family
IBM Platform LSF is used by the premier companies in the HPC industry. It adds value in comparison to other workload management software due to its high scalability and performance, and to its tracking and monitoring capabilities. Additionally, it supports several operating systems and architectures:
•IBM AIX 5, 6, and 7 on POWER
•HP UX B.11.31 on PA-RISC
•HP UX B.11.31 on IA64
•Solaris 10 and 11 on Sparc
•Solaris 10 and 11 on x86-64
•Linux on x86-64 Kernel 2.6 and 3.0
•Linux on POWER Kernel 2.6 and 3.0
•Microsoft Windows 2003, 2008, XP, and 7 32-bit and 64-bit
•Mac OS 10.x
•Cray XT
IBM Platform LSF has a large global support organization behind it, making it a reliable solution especially for commercial activities.
IBM Platform LSF basic structure
An IBM Platform LSF cluster can be divided into two groups of hosts: management hosts and compute hosts. Management hosts provide specialized services to the cluster; compute hosts run the user workload. Figure 4-2 shows the IBM Platform LSF basic structure with the job lifecycle and the communication paths between the daemons in the cluster.
Figure 4-2 IBM Platform LSF job lifecycle
Figure 4-2 shows the following steps:
1. Submit a job. You submit a job from an LSF client or server with the bsub command. If you do not specify a queue when you submit the job, the job is submitted to the default queue. Jobs are held in a queue and wait to be scheduled. These jobs are in the PEND state.
2. Schedule job. The master batch daemon (mbatchd) looks at jobs in the queue and sends the jobs for scheduling to the master batch scheduler (mbschd) at a preset time interval. mbschd evaluates jobs and makes scheduling decisions that are based on job priority, scheduling policies, and available resources. mbschd selects the best hosts where the job can run and sends its decisions back to mbatchd.
Resource information is collected at preset time intervals by the master load information manager (LIM) daemon from LIMs on server hosts. The master LIM communicates this information to mbatchd, which in turn communicates it to mbschd to support scheduling decisions.
3. Dispatch the job. As soon as mbatchd receives scheduling decisions, it immediately dispatches the jobs to hosts.
4. Run job. The slave batch daemon (sbatchd):
a. Receives the request from mbatchd
b. Creates a child sbatchd for the job
c. Creates the execution environment
d. Starts the job by using a remote execution server (res).
5. Return output. When a job is completed, it is assigned the DONE status if the job completed without any problems. The job is assigned the EXIT status if errors prevented the job from completing. sbatchd communicates job information, including errors and output to mbatchd.
6. Send email to client. mbatchd returns the job output, job error, and job information to the submission host through email.
|
IBM Platform LSF terminology:
•Job is a command that is submitted to IBM Platform LSF Batch. A job can take more than one job slot.
•Task is an interactive command that is submitted to IBM Platform LSF Base.
•Queue is a network-wide holding place for jobs that implement different job scheduling and control policies
•Job slot is the basic unit of processor allocation in IBM Platform LSF. A job slot can be more than one per processor.
|
GUI interface
IBM Platform LSF does not provide a GUI interface, but the full workload and cluster management functionality is available by the command line. Some of the functionalities that are offered by IBM Platform LSF, for example, job submission and resources management, are available through a GUI by using the optional add-ons.
Scheduling features
IBM Platform LSF provides an advanced set of scheduling features:
•Fairshare scheduling
•Topology and core-aware scheduling
•Preemption
•Backfill scheduling
•Resource reservations
•Serial or parallel controls
•Advanced reservation
•Job starvation
•License scheduling
•SLA-based scheduling
•Absolute priority scheduling
•Checkpoint and resume
•Job arrays
•Graphics processing unit (GPU)-aware scheduling
•Plug-in schedulers
Fault tolerance
IBM Platform LSF architecture is designed to provide fault tolerance for vital components so that they can recover from a failure:
•Master hosts
If the master becomes unavailable, another master host candidate takes over. The IBM Platform LSF working directory must be available through a shared file system in the master and master candidate hosts.
•Hosts and host groups
If a host or host group becomes unavailable, only the jobs that are running on the host are affected (re-queued or lost, depending on how they are submitted).
•Jobs
Jobs can be submitted as rerunnable so that they automatically run again from the beginning. Or, they can be submitted as checkpointable on another host if they are lost because of a host failure.
By providing fault tolerance to these components, an LSF cluster can also recover from failures where the cluster is partitioned by a network failure and where the network is partitioned. Fault tolerance depends on the event log file, which logs every event in the system.
For more information about fault tolerance for IBM Platform LSF clusters, see the IBM Platform LSF Foundations Guide, SC22-5348-00.
Security
By default, IBM Platform LSF controls user accounts internally, but it also offers a security plug-in for integration with third-party security mechanisms, such as Lightweight Directory Access Protocol (LDAP), Kerberos, and Active Directory. Security for IBM Platform LSF cluster requires two steps. It first checks whether the user is valid by verifying its password (authentication) and then checks the user permissions (authorization).
With IBM Platform LSF, you can create a customized executable (eauth) to provide external authentication of users, hosts, and daemons. This feature provides a secure transfer of data within the authentication data stream between IBM Platform LSF clients and servers. By creating your own eauth executable, you can meet the security requirements of your cluster.
MultiCluster support
IBM Platform LSF offers MultiCluster support. Different clusters in different locations can be managed by one IBM Platform LSF instance. This approach makes workload management and cluster administration easier, and makes your infrastructure highly scalable. MultiCluster support allows users to access more resources, increasing productivity, resource usage, and performance.
There are two ways to share resources by using MultiCluster support:
•The job forwarding model allows a cluster that has no available resources to send jobs to a cluster that has resources available. In this method, IBM Platform LSF tries to schedule job execution in the local hosts before you attempt to send jobs to other clusters. Each cluster controls its own resources.
•In the resource leasing model, one cluster is configured to borrow resources from other clusters, and it takes control of the resources. One cluster always schedules the jobs.
For more details about MultiCluster, see IBM Platform MultiCluster Overview, SC22-5354-00.
IBM Platform Make
IBM Platform Make is a load-sharing, parallel version of GNU Make. It uses the same makefiles as GNU Make and behaves similarly except that additional command-line options control parallel execution. IBM Platform Make used to be sold as a separate product. Now, it is installed by default with IBM Platform LSF Standard Edition. IBM Platform Make is based on GNU Make and supports most GNU Make features. For more information about IBM Platform Make, see “Using lsmake” in Administering IBM Platform LSF, SC22-5346-00.
Floating clients
The floating clients feature allows users to set IBM Platform LSF to enable job submission from hosts in a configured IP range without explicitly listing all client hosts in the lsf configuration files (the common behavior). It is easier for cluster administrators to manage client hosts on organizations with many workstations and users that are likely to submit and query jobs.
Live reconfiguration
Some IBM Platform LSF cluster configurations can be changed live and take effect immediately. Live reconfiguration needs to be enabled for use at the file lsf.conf. You need to run lsadmin reconfig and badmin mbdrestart to apply the new parameter setting. You can use live reconfiguration to make the following changes:
•Add hosts to the cluster
•Create a user group
•Create or update limits
•Add a user share to the fairshare queue
•Add consumers to a guaranteed resource pool
Mixed clusters
IBM Platform LSF supports mixed environments. Hosts of various architectures and operating systems can exist in the same cluster. IBM Platform LSF offers functionality to allow user mapping between UNIX and Windows environments. You can submit jobs to be executed in hosts that have different environments than the environment of the submission hosts.
LSF application programming interfaces
IBM Platform LSF provides application programming interfaces (APIs) that can be used by programmers to develop their own applications. Programmers can use the distributed resource management services that are provided by LSF without worrying about operating systems or architecture details. By using the LSF APIs, programmers can develop applications to automate tasks. Programmers can automate tasks, such as delete jobs, view jobs output, and move jobs between hosts, enable parallel job execution, and control the cluster.
The following services are available for use through APIs:
•Configuration information service
•Dynamic load information service
•Placement advice service
•Task list information service
•Master selection service
•Remote execution service
•Remote file operation service
•Administration service
•LSF batch system information service
•Job manipulation service
•Log file processing service
•LSF batch administration service
New in IBM Platform LSF 8.3
IBM Platform LSF licenses are no longer managed by FLEXnet. License enforcement is now contractual. Also, there is new support for AIX7 on POWER, Solaris 11 on SPARC and x86-64, Linux 3.0 on POWER and x86-64, and Mac OS 10.7. Additionally, IBM Platform LSF now allows the visualization of system runtime configuration and additional accounting data for completed job events. IBM Platform LSF has the following edition-specific changes:
•IBM Platform LSF 8.3 Express Edition:
– Targeted at the low-end, high volume market that has fairly simple scheduling requirements. For a complete list of the functions that are not available for job scheduling, see Release Notes, GI13-1885-00.
– Included in IBM Platform HPC Express Edition.
– Supports a maximum of 100 server hosts and 100 static clients.
– Integration with IBM Platform Process Manager and IBM Platform Analytics is not supported.
•IBM Platform LSF 8.3 Standard Edition:
– Platform MultiCluster, Make, and Floating Client are included (no longer separately licensed).
– No performance or scalability restrictions exist.
|
Requirement: To use the new features that are introduced in IBM Platform LSF Version 8.3, you must upgrade all hosts in your cluster to IBM Platform LSF Version 8.3.
LSF 6.x, 7.x, 8.0, and 8.0.1 servers are compatible with IBM Platform LSF Version 8.3 master hosts. All LSF 6.x, 7.x, 8.0, and 8.0.1 features are supported by IBM Platform LSF Version 8.3 master hosts.
|
Enterprise Grid Orchestrator
The IBM Platform Enterprise Grid Orchestrator (EGO) is an optional (yet highly suggested) part of IBM Platform LSF that can be enabled during IBM Platform LSF installation. When enabled in IBM Platform LSF, it provides computing resources to IBM Platform LSF from sharing resources across the enterprise grid as the central resource broker.
|
Important: EGO is not aware of jobs and its resource distribution policies do not interfere with job scheduling. EGO provides resources to IBM Platform LSF per request. IBM Platform LSF allocates the resources to the jobs according to its own scheduling policies.
|
Figure 4-3 shows IBM Platform LSF architecture with EGO enabled. IBM Platform LSF runs on top of EGO.

Figure 4-3 IBM Platform LSF architecture
When enabled, EGO ensures that the following conditions apply:
•Demands of competing business services are addressed.
•Resources are dynamically allocated.
•Configured resource distribution policies are enforced.
•High availability and business continuity are available through disaster scenarios.
•Divergent and mixed computing resources are consolidated into a single virtual infrastructure that can be shared transparently between many business users.
EGO performs resource management with two key responsibilities:
•Manage and distribute resources
•Provide process execution facilities
|
EGO: When IBM Platform LSF is installed without EGO enabled, resource allocation is done by IBM Platform LSF in its core. Part of the EGO functionality is embedded on IBM Platform LSF, therefore, enabling the application to perform the parts of the job for which EGO is responsible. When EGO is enabled, it adds more fine-grained resource allocation capabilities, high availability services to sbatch and res, and faster cluster startup.
Customization: Throughout this book, each IBM Platform application has its own customized EGO version for resource orchestration.
|
Key EGO concepts
The following ideas are key EGO concepts:
Consumers A consumer represents an entity that can demand resources from the cluster. A consumer might be a business service, a business process that is a complex collection of business services, an individual user, or an entire line of business.
EGO resources Resources are physical and logical entities that can be requested by a client. For example, an application (client) requests a processor (resource) to run. Resources also have attributes. For example, a host has attributes of memory, processor utilization, and operating system type.
Resource distribution tree
The resource distribution tree identifies consumers of the cluster resources and organizes them into a manageable structure.
Resource groups Resource groups are logical groups of hosts. Resource groups provide a simple way of organizing and grouping resources (hosts) for convenience. Instead of creating policies for individual resources, you can create and apply them to an entire group. Groups can be made of resources that satisfy a specific requirement in terms of OS, memory, swap space, CPU factor, or that are explicitly listed by name.
Resource distribution plans
The resource distribution plan, or resource plan, defines how cluster resources are distributed among consumers. The plan includes the differences between consumers and their needs, resource properties, and various other policies that concern consumer rank and the allocation of resources. The distribution priority is to satisfy the reserved ownership of each consumer, then distribute remaining resources to consumers that have demand.
Services A service is a self-contained, continuously running process that accepts one or more requests and returns one or more responses. Services can have multiple concurrent service instances that run on multiple hosts. All EGO services are automatically enabled by default at installation. Run egosh to check service status. If EGO is disabled, the egosh command cannot find ego.conf or cannot contact vemkd (not started). The following message is displayed: You cannot run the egosh command because the administrator has chosen not to enable EGO in lsf.conf: LSF_ENABLE_EGO=N.
EGO user accounts A user account is an IBM Platform system user that can be assigned to any role for any consumer in the tree. User accounts include optional contact information, a name, and a password
Figure 4-4 on page 36 shows the EGO concepts in the context of the resource allocation lifecycle.

Figure 4-4 IBM Platform LSF EGO concepts resource allocation lifecycle
|
EGO: EGO has four system components:
•VEMKD is the VEM kernel daemon that runs on the master host. It starts other daemons and responds to allocation requests.
•EGOSC is the EGO service controller that requests the appropriate resources from the VEMKD and controls service instances.
•The process execution manager (PEM) works for the VEMKD by starting, controlling, and monitoring activities, and by collecting and sending runtime resource usage.
|
4.2 IBM Platform LSF add-on products
A set of optional add-ons is offered for IBM Platform LSF to help workload management. It allows users to become more productive.
4.2.1 IBM Platform Application Center
IBM Platform Application Center offers a customizable web interface for users to manage jobs and analyze cluster resource utilization (Figure 4-5 on page 37). It provides an easy to use interface that allows job submission without programming. Users can view job status and job results, act on jobs (such as suspend or resume), and visualize job input, output, and error files.
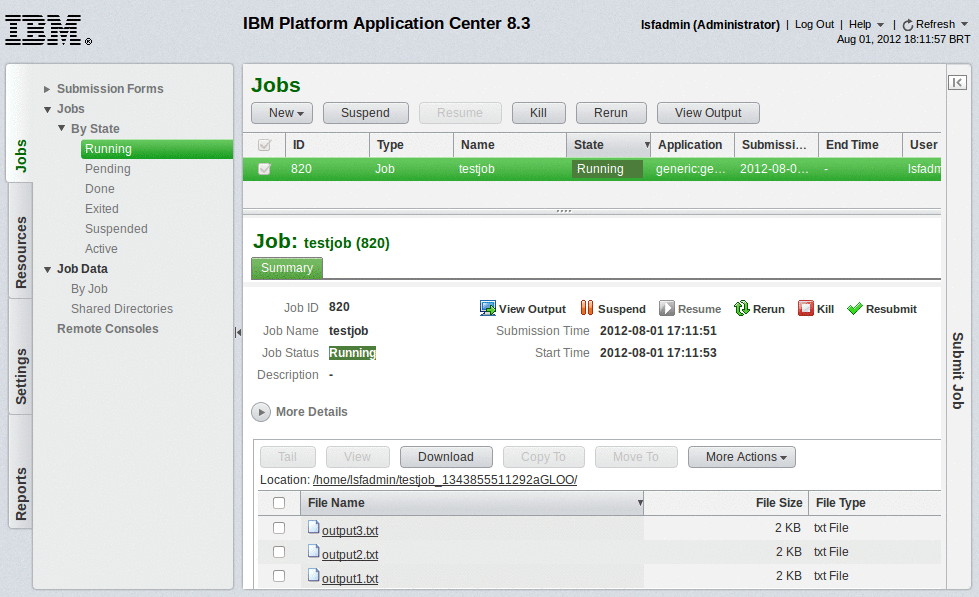
Figure 4-5 IBM Platform Application Center Jobs tab
IBM Platform Application Center also offers a dashboard with details about cluster health and cluster performance statistics as well as reports about resource usage per host (Figure 4-6 on page 38). You can create a rack configuration to represent your environment and allocate your machines to the proper racks by using the command rackconfig.
|
Maximum: The maximum rack size in the IBM Platform Application Center is 42U (not configurable).
|
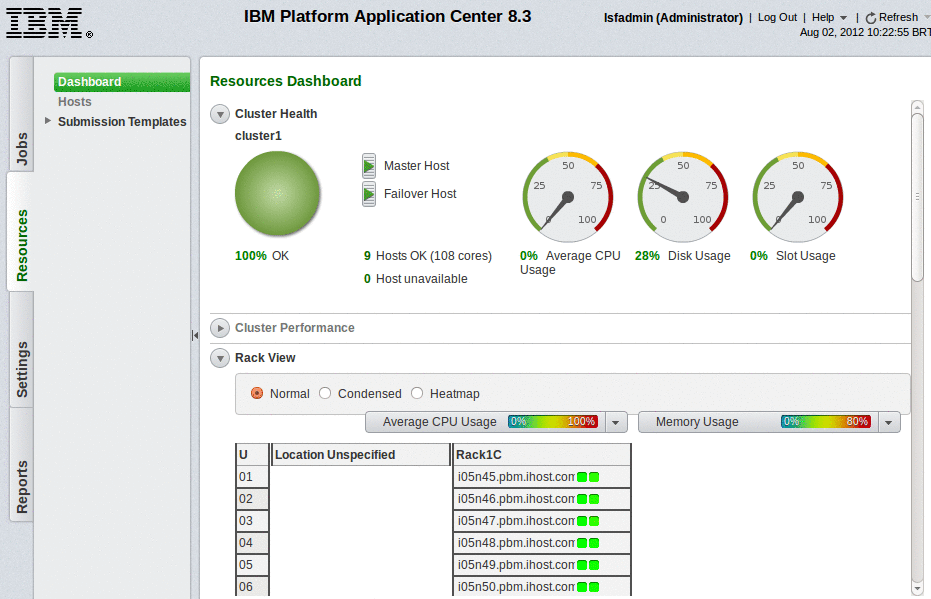
Figure 4-6 IBM Platform Application Center Dashboard
The software ships with several templates of the most commonly used applications that can be customized and published for use to create a solution more quickly. Additionally, users can create their own templates for job submission to make job submission easier, faster, and less error prone.
The product offers a set of built-in reports for cluster analysis (Figure 4-7 on page 39). These reports are the most common reports that are required for identifying areas of improvement on your cluster. Custom reports can also be created from the web interface to satisfy specific needs. If you are interested in more detailed reports, see 4.2.2, “IBM Platform RTM” on page 40.
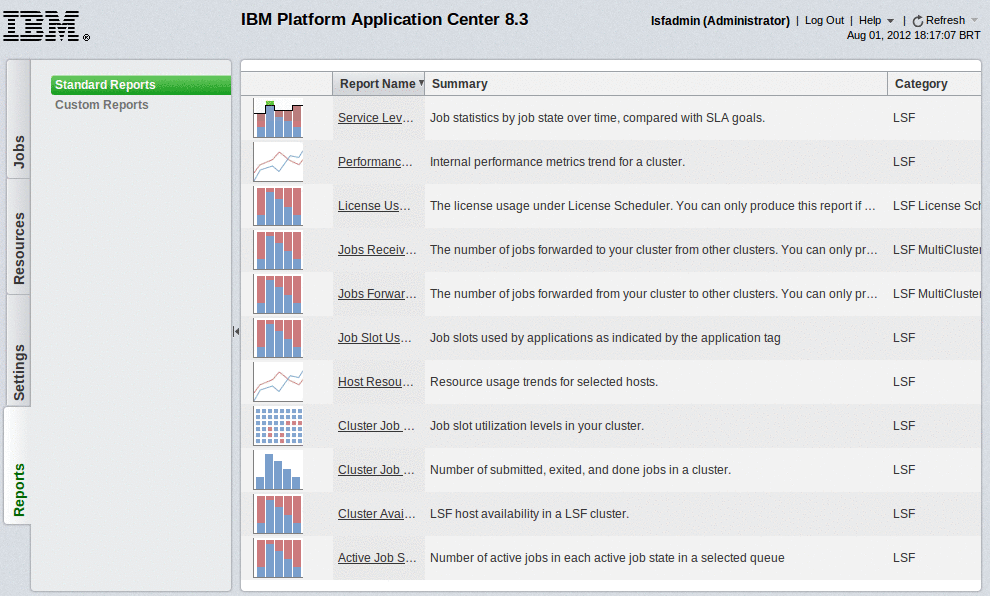
Figure 4-7 IBM Platform Application Center Reports tab
IBM Platform Application Center can also be integrated with IBM Platform License Scheduler (LS) and IBM Platform Process Manager (PPM). This integration offers users the capability to visualize license usage across the cluster. You can monitor job flow execution and trigger flows through a web interface; therefore, you have a centralized means to control the overall status of your LSF cluster.
You can find documentation about how to use IBM Platform Application Center from the web interface (see Figure 4-8). Details about how to configure IBM Platform Application Center are in the file pac_admin_guide.pdf, which ships with the product.
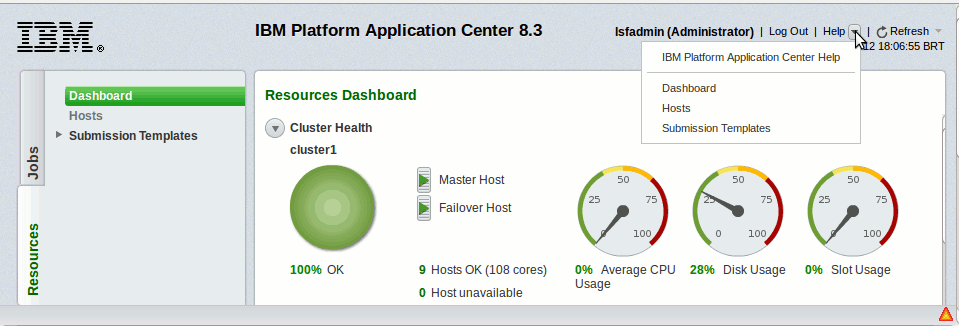
Figure 4-8 IBM Platform Application Center Help
4.2.2 IBM Platform RTM
As clusters increase in size and workload, cluster administrators require more powerful tools to allow cluster management and monitoring and to help identify issues that might negatively affect performance. Moreover, they require a tool for tracking all aspects of their clusters without having to resort to multiple sources to gather information about the clusters.
IBM Platform RTM addresses these issues by offering a comprehensive workload monitoring, reporting, and management tool for IBM Platform LSF environments:
•Provides access to detailed information about workloads and hosts in the cluster
•Allows the creation of alarms and several types of graphs
•Offers an interface for server log visualization and enables users to run common administrative tasks (such as restarting LSF cluster processes and performing operations on jobs) through a GUI - all in one centralized web interface
•Offers capability to monitor several clusters so that it is easier for the user to manage multiple environments and collect metrics about usage of the overall clusters
|
Note: IBM Platform RTM uses Cacti as a rich graphical user interface framework to provide monitoring, reporting, and alerting functions that are specific to the LSF environment. Cacti is a complete RRDTool-based graphing solution that is developed by The Cacti Group. The LSF capabilities are included as a Cacti plug-in so that you can use them together. IBM Platform RTM can offer LSF-specific monitoring and reporting capabilities in addition to the capabilities of the open source Cacti package. If you are familiar with Cacti, you are familiar with the IBM Platform RTM GUI.
|
The reports in IBM Platform RTM differ from the reports in IBM Platform Application Center in that they provide detailed information about every aspect of the cluster. With the reports in IBM Platform RTM, users can develop a more detailed understanding of the cluster resource utilization and workload flow. A good example is the information that is provided about jobs. In IBM Platform RTM, you can visualize job submission details. In IBM Platform RTM, you can see information about the job execution environment, job status history, job graphs, and host graphs that illustrate resource consumption during job execution. In IBM Platform Application Center, a smaller set of information is available. See Figure 4-9 on page 41 for an example of IBM Platform RTM job information.

Figure 4-9 IBM Platform RTM Job Detail tab
IBM Platform RTM can help cluster administrators in the following tasks:
•Determining problems
•Monitoring the overall cluster
•Tuning performance by identifying idle capacity and removing bottlenecks
•Increasing user productivity and improving the level of service
•Planning capacity
•Reducing costs
|
Important: IBM General Parallel File System (GPFS) monitoring is not available on IBM Platform RTM 8.3.
|
4.2.3 IBM Platform Process Manager
IBM Platform Process Manager is a workload management tool for users to automate their business processes in UNIX and Windows environments by creating and managing flow definitions. A flow definition is a collection of jobs, job arrays, subflows, and their relationships that represents work items and their dependencies. In addition to creating job flow definitions, users can also schedule jobs by using IBM Platform Process Manager.
The tool consists of the following components:
•Process Manager Server (represented in Figure 4-10 by “Process Manager Host”)
•Process Manager Client:
– Process Manager Designer:
• The Flow Editor
• The Calendar Editor
– The Flow Manager
You can use a failover host to provide redundancy for the Process Manager Server. For an illustration of the IBM Platform Process Manager components, see Figure 4-10.

Figure 4-10 IBM Platform Process Manager components
Users can create job flow definitions in the Process Manager Client and then submit them to the Process Manager Server. The Process Manager Server manages job dependencies within the flow and controls the submission to the IBM Platform LSF master host. The IBM Platform LSF master host provides resource management and load balancing, runs the job, and returns job status to the Process Manager Server. Job flow status can be monitored by the user from the IBM Platform Process Manager as shown in Figure 4-11 on page 43.
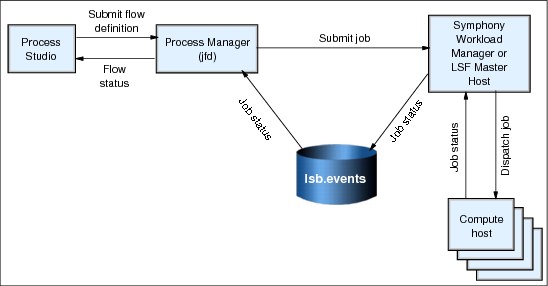
Figure 4-11 IBM Platform Process Manager data flow
Job flows can be easily defined graphically in the Flow Editor. With the Flow Editor, you can create jobs and their relationships, and define dependencies on files or time dependencies. For an example of a simple job flow definition, see Figure 4-12.
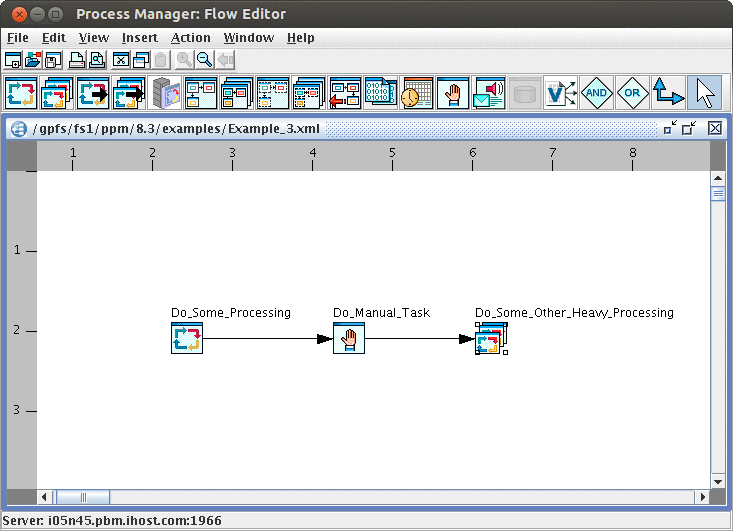
Figure 4-12 IBM Platform Process Manager flow definition
From the Flow Editor, you can also create jobs that are based on predefined application templates. The IBM Platform Process Manager offers extended functionality so that you can submit work to applications outside of LSF without intensive programming. You can create your own application templates in XML, which can be converted into simple user interfaces that facilitate job submission by allowing the user to visually configure the job.
The software provides a couple of templates for the user. The template zOS_Template.xml is in the directory JS_HOME/8.3/examples of the installation. It is converted to the interface in Figure 4-13 when it is moved to the directory JS_HOME/work/templates.

Figure 4-13 IBM Platform Process Manager Application Definition
With the Calendar Editor (which is also offered by the Platform Process Manager), users can easily define calendars. These calendars are used by Process Manager to calculate the dates on which a job or flow runs. The users can then use the Flow Manager to monitor and control running flows and obtain history information about completed flows.
4.2.4 IBM Platform License Scheduler
IBM Platform License Scheduler controls the software license sharing in your organization. It is meant to help companies easily implement more flexible, hierarchical license sharing policies. These policies accurately represent business needs and enable high utilization and throughput throughout the organization.
IBM Platform License Scheduler works with FlexNet products to control and monitor license usage. It can work with multiple license servers that serve licenses to multiple clusters, as shown in Figure 4-14 on page 45.

Figure 4-14 IBM Platform License Scheduler license allocation
IBM Platform License Scheduler manages the scheduling of the license tokens, but it is the license server that actually supplies the licenses. Applications continue to retrieve the licenses from the license server and are unaware of the license scheduler. IBM Platform License Scheduler interacts with jobs in the LSF cluster.
When jobs require a license to run applications, the license scheduler provides them with a token before they can run the application. The number of tokens that is available from LSF corresponds to the number of licenses that is available from FlexNet. The number of licenses in use by running jobs never exceeds the number of available licenses. Figure 4-15 on page 46 illustrates how IBM Platform LSF interacts with IBM Platform License Scheduler when jobs are submitted.

Figure 4-15 IBM Platform License Scheduler job submission
License tokens are handed to jobs according to a set of license scheduling policies that is defined by the user. These policies do not influence job scheduling priority though. Jobs continue to be considered for dispatch according to the policies that are defined in the IBM Platform LSF clusters. LSF policies have priority over license scheduler policies.
Modes of operation
IBM Platform License Scheduler supports two modes of operation:
•Cluster mode (Figure 4-16) focuses on maximizing license usage (new in IBM Platform License Scheduler 8.0). License ownership and sharing can be configured within each cluster instead of across multiple clusters. Preemption of jobs (and licenses) also occurs within each cluster.
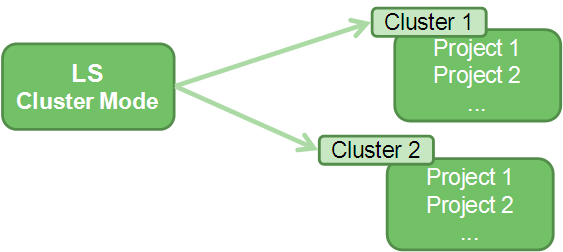
Figure 4-16 IBM Platform License Scheduler cluster mode
In cluster mode, license tokens are reused by LSF when a job finishes (which results in higher license utilization for short jobs). In project mode, IBM Platform License Scheduler checks demand from license owners across all LSF clusters before allocating license tokens. The process of collecting and evaluating demand for all projects in all clusters slows down each scheduling cycle.
•Project mode (Figure 4-17) focuses on having licenses that are used by the group that owns the licenses. Projects can span multiple clusters.
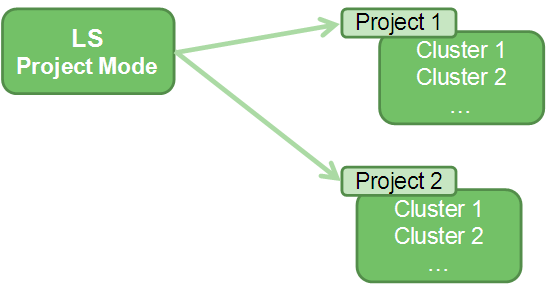
Figure 4-17 IBM Platform License Scheduler project mode
For details about which mode might be the best for your cluster environments, see Chapter 2 on page 25 of Using IBM Platform License Scheduler, SC22-5352-00.
Distribution policies
With IBM Platform License Scheduler, you configure how license tokens are shared among projects or clusters. The distribution policies vary according to the mode of operation in use:
•Cluster mode:
– Static distribution policies: A portion of the licenses is allocated to the cluster, and the number of licenses never changes.
– Dynamic distribution policies: A portion of the licenses is allocated to the cluster, but the number of licenses can change according to the cluster demand. The amount can vary according to a defined buffer.
|
Project mode: It is possible to configure guaranteed shares with both distribution policies in cluster mode. See “Guaranteed service-level agreement (SLA) scheduling” on page 48 for more details.
|
– Fairshare distribution policy: Portions of the licenses are assigned to each project, but licenses can be used according to demand. If the demand exceeds the number of available licenses, share assignments are followed. There is no preemption. If license redistribution is required, jobs finish running before license redistribution is done.
– Ownership and preemption distribution policy: Shares of the total licenses are assigned to each license project. Owned shares of licenses are also assigned. Unused licenses are shared wherever there is demand. However, when demand exceeds the number of licenses, the owned share is reclaimed by using preemption.
– Active ownership distribution policy: Active ownership allows ownership to automatically adjust based on project activity. Ownership is expressed as a percent of the total ownership for active projects. The actual ownership for each project decreases as more projects become active. Set the percentage ownership values to total more than 100% to benefit from active ownership.
– Non-shared license distribution policy: Some licenses are designated as non-shared. They are reserved for exclusive use instead of being shared when not in use.
For more details about the distribution policies and when to use each policy, see Using IBM Platform License Scheduler, SC22-5352-00.
Guaranteed service-level agreement (SLA) scheduling
Guaranteed SLA scheduling allows sites to guarantee resources to groups of jobs. Jobs can be grouped by user, fairshare group, project, license project, queue, application profile, or some combination of these classifications. Guarantees for license resources can only be configured when IBM Platform License Scheduler is configured in cluster mode. Guaranteed SLAs are configured in IBM Platform LSF. For more information, see Administering IBM Platform LSF, SC22-5346-00, and IBM Platform LSF Configuration Reference, SC22-5350-00.
The implementation of guaranteed SLAs depends on the configuration of service classes and resource pools. Service classes allow jobs to access guaranteed resources. Jobs can be explicitly attached to a service class on job submission, for example, bsub -sla serviceclass_name. Or, jobs can be automatically attached to service classes under certain conditions. For example, the service class defines that jobs submitted to a specific project are automatically attached to that SLA.
Service classes can be configured to restrict the jobs that can be attached to the SLA, for example, jobs that belong to project 1. Service classes use resources from resource pools. The resource pools provide a minimum resource guarantee to jobs that are in the service classes. When the user configures resource pools, the user defines the shares of the resources in the resource pool that are allocated to each defined service class. Resource pools can guarantee resources of any type (Figure 4-18).

Figure 4-18 IBM Platform License Scheduler guaranteed resource pools
Service classes can use resources from different resource pools and resource pools can allocate resources to different service classes. Figure 4-19 shows the service class SLA1 that uses resources from the resource pools Guarantee pool 1 and Guarantee pool 2. The pool Guarantee pool 1 guarantees 50 slots for use by jobs that are attached to SLA1. The pool Guarantee pool 2 guarantees 50 licenses for use by jobs that are attached to SLA1.

Figure 4-19 IBM Platform License Scheduler example
Other than configuring resource shares for service classes, you can optionally configure loaning policies when licenses are not in use. Loans can be restricted to short jobs. You can also restrict loans when consumers with unused guaranteed resources have pending loads.
4.3 Implementation
For this book, we install the following software in our infrastructure:
•IBM Platform LSF 8.3 Standard Edition
•IBM Platform Application Center 8.3 Standard Edition
•IBM Platform RTM 8.3
•IBM Platform Process Manager 8.3
All software is installed in the shared file system (/gpfs/fs1). This installation uses only part of the available nodes. The environment configuration after all software is installed is shown in Figure 3-1 on page 16.
To complete the installation of all software that is covered in this chapter, we follow the steps in the installation documents that are shipped with each product. You can also find the installation documents for LSF and its add-ons at the IBM Publications Center:
We provide the publication numbers of each installation manual in Table 4-1 on page 109. The IBM Platform LSF software family is mature and the software installation is straightforward. We offer tips and details about specific parts of the installation in the next sections to help you through the installation without any major challenges.
Suggestions
This section provides a few suggestions while you implement the IBM Platform Computing solutions:
•IBM Platform suggests in the installation manuals to install each application on different master and master candidate nodes. You want to avoid add-ons, which might be installed on the same machine, that affect the job scheduling performance with their high resource consumption.
•If you install IBM Platform LSF on a shared file system, for example, the IBM General Parallel File System (GPFS), be careful when you source the commands in the bash profile. If the shared file system becomes unavailable, you might not be able to access operating system commands, and your machine is unavailable. If you want to add the path to the LSF commands to the bash_profile, always add it to the end of the list:
PATH=$PATH:/gpfs/fs1/lsf
•Plan your installation ahead and carefully check the pre-installation requirements.
•Although it might seem like significant work, it is a good idea to read the entire installation manual before you initiate an installation because additional installation tips are in the document. Also, it helps to have an overall understanding of the entire installation process before you start to work on it.
4.3.1 IBM Platform LSF implementation
To complete the IBM Platform LSF installation, we followed the steps in Installing IBM Platform LSF on UNIX and Linux, SC22-5358-00. This document is included with the product or can be accessed at the IBM publication site:
Example 4-1 shows the output of an LSF installation.
Example 4-1 IBM Platform LSF installation log
[root@i05n36 lsf8.3_lsfinstall]# ./lsfinstall.-f install.config
Logging installation sequence in /gpfs/fs1/install/LSF/temp/lsf8.3_lsfinstall/Install.log
International Program License Agreement
Part 1 - General Terms
BY DOWNLOADING, INSTALLING, COPYING, ACCESSING, CLICKING ON
AN "ACCEPT" BUTTON, OR OTHERWISE USING THE PROGRAM,
LICENSEE AGREES TO THE TERMS OF THIS AGREEMENT. IF YOU ARE
ACCEPTING THESE TERMS ON BEHALF OF LICENSEE, YOU REPRESENT
AND WARRANT THAT YOU HAVE FULL AUTHORITY TO BIND LICENSEE
TO THESE TERMS. IF YOU DO NOT AGREE TO THESE TERMS,
* DO NOT DOWNLOAD, INSTALL, COPY, ACCESS, CLICK ON AN
"ACCEPT" BUTTON, OR USE THE PROGRAM; AND
* PROMPTLY RETURN THE UNUSED MEDIA, DOCUMENTATION, AND
Press Enter to continue viewing the license agreement, or
enter "1" to accept the agreement, "2" to decline it, "3"
to print it, "4" to read non-IBM terms, or "99" to go back
to the previous screen.
1
LSF pre-installation check ...
Checking the LSF TOP directory /gpfs/fs1/lsf ...
... Done checking the LSF TOP directory /gpfs/fs1/lsf ...
You are installing IBM Platform LSF - 8.3 Standard Edition.
Checking LSF Administrators ...
LSF administrator(s): "lsfadmin"
Primary LSF administrator: "lsfadmin"
[Tue Jul 17 16:32:37 EDT 2012:lsfprechk:WARN_2007]
Hosts defined in LSF_MASTER_LIST must be LSF server hosts. The
following hosts will be added to server hosts automatically: i05n45 i05n46.
Checking the patch history directory ...
... Done checking the patch history directory /gpfs/fs1/lsf/patch ...
Checking the patch backup directory ...
... Done checking the patch backup directory /gpfs/fs1/lsf/patch/backup ...
Searching LSF 8.3 distribution tar files in /gpfs/fs1/install/LSF/temp Please wait ...
1) linux2.6-glibc2.3-x86_64
Press 1 or Enter to install this host type:
You have chosen the following tar file(s):
lsf8.3_linux2.6-glibc2.3-x86_64
Checking selected tar file(s) ...
... Done checking selected tar file(s).
Pre-installation check report saved as text file:
/gpfs/fs1/install/LSF/temp/lsf8.3_lsfinstall/prechk.rpt.
... Done LSF pre-installation check.
Installing LSF binary files " lsf8.3_linux2.6-glibc2.3-x86_64"...
Creating /gpfs/fs1/lsf/8.3 ...
Copying lsfinstall files to /gpfs/fs1/lsf/8.3/install
Creating /gpfs/fs1/lsf/8.3/install ...
Creating /gpfs/fs1/lsf/8.3/install/scripts ...
Creating /gpfs/fs1/lsf/8.3/install/instlib ...
Creating /gpfs/fs1/lsf/8.3/install/patchlib ...
Creating /gpfs/fs1/lsf/8.3/install/lap ...
Creating /gpfs/fs1/lsf/8.3/install/conf_tmpl ...
... Done copying lsfinstall files to /gpfs/fs1/lsf/8.3/install
Installing linux2.6-glibc2.3-x86_64 ...
Please wait, extracting lsf8.3_linux2.6-glibc2.3-x86_64 may take up to a few minutes ...
... Adding package information to patch history.
... Done adding package information to patch history.
... Done extracting /gpfs/fs1/install/LSF/temp/lsf8.3_linux2.6-glibc2.3-x86_64.tar.Z.
Creating links to LSF commands ...
... Done creating links to LSF commands ...
Modifying owner, access mode, setuid flag of LSF binary files ...
... Done modifying owner, access mode, setuid flag of LSF binary files ...
Creating the script file lsf_daemons ...
... Done creating the script file lsf_daemons ...
... linux2.6-glibc2.3-x86_64 installed successfully under /gpfs/fs1/lsf/8.3.
... Done installing LSF binary files "linux2.6-glibc2.3-x86_64".
Creating LSF configuration directories and files ...
Creating /gpfs/fs1/lsf/work ...
Creating /gpfs/fs1/lsf/log ...
Creating /gpfs/fs1/lsf/conf ...
Creating /gpfs/fs1/lsf/conf/lsbatch ...
... Done creating LSF configuration directories and files ...
Creating a new cluster "cluster1" ...
Adding entry for cluster cluster1 to /gpfs/fs1/lsf/conf/lsf.shared.
Installing lsbatch directories and configurations ...
Creating /gpfs/fs1/lsf/conf/lsbatch/cluster1 ...
Creating /gpfs/fs1/lsf/conf/lsbatch/cluster1/configdir ...
Creating /gpfs/fs1/lsf/work/cluster1 ...
Creating /gpfs/fs1/lsf/work/cluster1/logdir ...
Creating /gpfs/fs1/lsf/work/cluster1/live_confdir ...
Creating /gpfs/fs1/lsf/work/cluster1/lsf_indir ...
Creating /gpfs/fs1/lsf/work/cluster1/lsf_cmddir ...
Adding server hosts ...
Host(s) "i05n45 i05n46 i05n47 i05n48 i05n49 i05n50" has (have) been added to the cluster "cluster1".
Adding LSF_MASTER_LIST in lsf.conf file...
... LSF configuration is done.
... Creating EGO configuration directories and files ...
Creating /gpfs/fs1/lsf/conf/ego ...
Creating /gpfs/fs1/lsf/conf/ego/cluster1 ...
Creating /gpfs/fs1/lsf/conf/ego/cluster1/kernel ...
Creating /gpfs/fs1/lsf/work/cluster1/ego ...
... Done creating EGO configuration directories and files.
Configuring EGO components...
... EGO configuration is done.
... LSF license, entitlement and inventory tag files are installed.
Creating lsf_getting_started.html ...
... Done creating lsf_getting_started.html
Creating lsf_quick_admin.html ...
... Done creating lsf_quick_admin.html
lsfinstall is done.
To complete your LSF installation and get your
cluster "cluster1" up and running, follow the steps in
"/gpfs/fs1/install/LSF/temp/lsf8.3_lsfinstall/lsf_getting_started.html".
After setting up your LSF server hosts and verifying
your cluster "cluster1" is running correctly,
see "/gpfs/fs1/lsf/8.3/lsf_quick_admin.html"
to learn more about your new LSF cluster.
After installation, remember to bring your cluster up to date
by applying the latest updates and bug fixes.
IBM Platform LSF can be installed with EGO enabled or disabled. If you install the IBM Platform Application Center with redundancy, EGO is required. On our environment, we initially installed IBM Platform LSF without EGO enabled. Then, we enabled it when we installed the IBM Platform Application Center. We used the instructions in “Before installing: Enable EGO in your LSF cluster” on page 34 of the manual Installing IBM Platform Application Center, SC22-5358-00.
Consider the following guidelines when you install IBM Platform LSF:
•Install IBM Platform LSF as root and start the cluster as root.
•If you use LDAP to manage user accounts, create the cluster admin user (lsfadmin) on the LDAP server.
•If you did not enable EGO on your LSF installation, we suggest that you run hostsetup on all compute nodes. It configures the nodes to automatically start and stop LSF daemons in the system startup and shutdown.
•The LSF master node issues commands across the cluster by using rsh or ssh. You can configure which command to use by configuring the variable LSF_RSH in lsf.conf (when you install LSF without EGO enabled). The default is for LSF to use rsh. If rsh is not enabled, your cluster initialization fails with the error message “Connection refused”.
IBM Platform LSF is predefined for you to submit and schedule jobs to the LSF cluster. You can create, manage, and configure queues and resource utilization policies; track jobs; and add nodes to the cluster. You are presented with a default setup of the LSF cluster, however, this setup might not be ideal for your workload. To take full advantage of IBM Platform LSF functionality and tune your cluster utilization, configure your LSF cluster resources according to your workload demands.
|
Resource allocation: IBM Platform LSF is already implemented to allocate resources efficiently. Avoid creating restrictions on resource allocation unless necessary.
|
For an overview of LSF internals before you configure your cluster, see IBM Platform LSF Foundations Guide, SC22-5348-00. For details about the complete set of available functionality, see Administering IBM Platform LSF, SC22-5346-00.
For examples of how to use IBM Platform LSF, see “Submitting jobs with bsub” on page 322 and “Adding and removing nodes from an LSF cluster” on page 334.
4.3.2 IBM Platform Application Center implementation
To complete the IBM Platform Application Center Standard Edition installation, we followed the steps in Installing and Upgrading IBM Platform Application Center, SC22-5397-00. This document ships with the product and is available at the IBM publications site:
For this book, we install IBM Platform Application Center on a shared file system (/gpfs/fs1) with IBM Platform Application Center failover and failover of the MySQL database. We use two instances of MySQL 5.1.32. Each instance is installed locally in the master and master candidate nodes. (It is possible to install IBM Platform Application Center with failover by using a single MySQL database. In this case, failover of the MySQL database is not enabled. For instructions, see the installation document).
Figure 4-20 shows the IBM Platform Application Center structure when it is installed with MySQL database failover enabled.
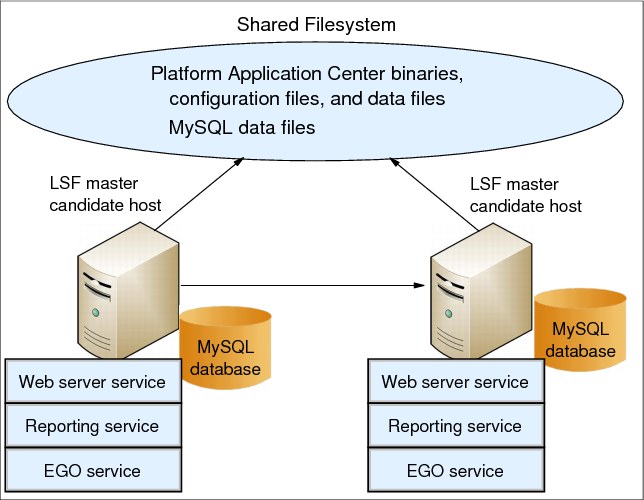
Figure 4-20 IBM Platform Application Center implementation with MySQL failover
When you install IBM Platform Application Center with MySQL database failover, you do not need to worry about configuring redundancy for MySQL. EGO provides failover services for IBM Platform Application Center. If the primary host for the application fails, EGO starts IBM Platform Application Center and MySQL in the secondary host. MySQL data files for IBM Platform Application Center are stored in the shared drive so the database on the secondary file system uses the same data on the shared directory when it is started. The MySQL configuration file (/etc/my.cnf) is not updated with the location of the data files for the IBM Platform Application Center database. The data dir for the application to use is passed as a parameter when EGO starts the MySQL server.
|
Important: You do not need to create the IBM Platform Application Center schema or configure the database connection after installation. The installation process already performs that task for you.
|
Installation notes
Consider the following installation notes when you deploy the IBM Platform Application Center:
•When you run the command ./pacinstall.sh to install IBM Platform Application Center, the option --prefix is not required. The shared directory that is used for the installation location is already defined in the variable PAC_TOP at step 3 on page 35 of Installing and Upgrading IBM Platform Application Center, SC22-5397-00.
•For this book, the master node on which the IBM Platform Application Center is installed is also the master node candidate for IBM Platform Symphony. The web interface of both applications runs on port 8080, by default. To guarantee that the two web interfaces are accessible when they both run on the same server, we use port 18080 instead of 8080 for the IBM Platform Application Center web interface. To change the ports where the IBM Platform Application Center web interface is available, edit the file PAC_TOP/gui/conf/wsm_webgui.conf and change the variables as shown in Example 4-2.
|
Tip: It is simpler to change the ports where the web interface for IBM Platform Application Center is available than to change the ports for IBM Platform Symphony. If the two web interfaces might conflict in your environment, change the IBM Platform Application Center configuration instead of the IBM Platform Symphony configuration.
|
•By default, the URL to access IBM Platform Application Center and the URL to access IBM Platform Symphony are the same URL, for example, http://i05n46.pbm.ihost.com:<port>/platform. Because both applications use cookies to store session information, the sessions of your users are lost if they access the two applications at the same time with their browser (even after you change the ports on which the web interfaces are available). To fix this issue, you need to configure two different URLs for the web interfaces on your Domain Name System (DNS). Or, the suggested approach is to choose two different sets of master and master candidate hosts when you install IBM Platform applications.
Example 4-2 IBM Platform Application Center web interface configuration
#Tomcat relative port
CATALINA_START_PORT=18080
CATALINA_STOP_PORT=18085
CATALINA_HTTPS_START_PORT=18443
See Example 4-3 on page 56 for the installation log of this implementation.
Example 4-3 IBM Platform Application Center installation logs
-----------------------------------------------------------------
I N S T A L L A T I O N E N V I R O N M E N T S U M M A R Y
-----------------------------------------------------------------
Started: Thu Jul 19 17:51:04 EDT 2012
User ID: uid=0(root) gid=0(root) groups=0(root),1(bin),2(daemon),3(sys),4(adm),6(disk),10(wheel)
Installing from host:
i05n45 ( Linux i05n45 2.6.32-220.el6.x86_64 #1 SMP Wed Nov 9 08:03:13 EST 2011 x86_64 x86_64 x86_64 GNU/Linux)
#**********************************************************
# REQUIRED PARAMETERS
#**********************************************************
#
# ---------------------
. /gpfs/fs1/lsf/conf/profile.lsf
# ---------------------
# Sets the LSF environment.
# Replace (/gpfs/fs1/lsf/conf) with the full path to your LSF
# configuration directory. {REQUIRED}
#
# ----------------------------
export MYSQL_JDBC_DRIVER_JAR="/usr/share/java/mysql-connector-java-5.1.12.jar"
# ----------------------------
# Full path to the MySQL JDBC driver. {REQUIRED}
#
# IBM Platform Application Center uses a MySQL database. You can download
# the driver from http://www.mysql.com/downloads/connector/j/
#
# If your database does not reside locally on the host, you must also use
# the parameter USE_REMOTE_DB=Y in this file.
#
# ---------------------
export JS_ENVDIR=""
# ---------------------
# Full path to Process Manager configuration directory. {REQUIRED IF YOU HAVE PROCESS MANAGER}
# This is the directory that contains the js.conf file.
#
# Note: If Process Manager is installed on a shared filesystem, install
# IBM Platform Application Center on the shared filesystem.
# If Process Manager is installed locally, IBM Platform Application Center MUST BE INSTALLED
# ON THE SAME HOST.
#
#**********************************************************
# OPTIONAL PARAMETERS
# (Check default values before installing)
#**********************************************************
# -----------------
export PAC_TOP="/gpfs/fs1/pac"
# -----------------
# Full path to the top-level installation directory
#
# The file system containing PAC_TOP must have enough disk space for
# all host types (approximately 400 MB per host type).
#
# Default: No entitlement. Very limited functionality is available.
#
# --------------------
export USE_REMOTE_DB="N"
# -------------------
# Specify this parameter if your MySQL database is not local
# to the host on which you are installing.
#
# Note that if you specify this parameter, no database is
# created. You need to manually create the MySQL database
# from the schema files provided for PAC.
#
# Default: Database is created locally on the host on which
# you are installing.
#
# --------------------
export REPOSITORY=""
# -------------------
# When jobs run, output data is created for each job.
# Use this parameter to specify a different location for
# storing job data.
#
# Requirements:
# - This directory must be a shared directory which can be
# accessed from any LSF server host.
#
# - Root must have write permission on this directory.
# This is required to create a subdirectory
#
# Default: /home/user_name of each user that is running jobs.
#
#**************************************************************
# FAILOVER PARAMETERS
# (Specify these parameters ONLY if you want failover for PAC)
#**************************************************************
#
# To specify failover for PAC, you must enable these two parameters.
# Note: For failover to work, LSF_ENABLE_EGO must be set to Y in
# lsf.conf of your LSF cluster.
#
# --------------------
export FAILOVER_HOST="i05n45 i05n46"
# --------------------
# Failover hosts for IBM Platform Application Center.
# The hosts you specify here must be the same hosts listed
# in LSF_MASTER_LIST in lsf.conf for your LSF cluster.
#
# Default: no failover
#
# ----------------------
export PAC_EGO_CONTROL="Y"
# ----------------------
# Enables EGO to control PAC services. This is a requirement
# for failover to occur. PAC services must be managed by EGO.
#
# Default: No failover, PAC services are not managed by EGO.
#
-----------------------------------------------------------------
The specified MYSQL_DATA_DIR does not exist. Creating directory /gpfs/fs1/pac/data
Trying to connect to mysql ...
Creating MYSQL database for IBM Platform Application center ...
Done creating MYSQL database.
IBM Platform Application Center is successfully installed under /gpfs/fs1/pac
To complete your installation and get IBM Platform Application Center up and running,
follow these steps:
1. Enable event streaming in your LSF cluster:
Set ENABLE_EVENT_STREAM=Y in lsb.params
badmin reconfig
2. Set the IBM Platform Application Center environment:
source /gpfs/fs1/pac/cshrc.platform
OR
. /gpfs/fs1/pac/profile.platform
3. Log in to EGO:
egosh user logon -u Admin -x Admin
4. Restart EGO on master host:
egosh ego restart master_host
5. Check IBM Platform Application Center services are started (plc, purger, jobdt, WEBGUI):
egosh service list
After starting services, use the following URL to connect:
http://i05n45:8080
On our environment, we installed IBM Platform Process Manager after IBM Platform Application Center. For details about enabling job flow management in IBM Platform Application Center after you install IBM Platform Process Manager, see 4.3.4, “IBM Platform Process Manager implementation” on page 98.
Submitting jobs
Users can submit jobs from IBM Platform Application Center by using submission forms. Submission forms make job submission less error prone. They provide an interface that makes it easier for the user to understand the required configuration and input for the job to run successfully. IBM Platform Application Center ships with a set of application templates that can be published (after they are adapted to your environment) and used for job submission. You see all of the available application templates in the Resources tab, Submission Templates view. When you select any of the available templates and publish them (if they are in the state Unpublished), they are available for users at the Jobs tab, Submission Forms view.
In Figure 4-21, we show how to submit a basic job by using the generic template. The generic template can run any command or script that you provide to it as input. (In this template, the script needs to be on the remote server. It is possible to create a template that accepts scripts from the local user machine and upload it to the server for execution.) Advanced options are not required for this job to run.

Figure 4-21 IBM Platform Application Center job submission
After you submit the job for execution, a web page similar to Figure 4-22 on page 60 is displayed with all of the details about the job. IBM Platform Application Center creates a directory for each job that runs and puts job data in it. The name of the job directory is <appname_timestamp>, and it is created in the user job repository. The job repository can be defined in the configuration file PAC_TOP/gui/conf/Repository.xml (by default, it is the directory /home). The user job directory is job_repository/user (for example, /home/lsfadmin). In Figure 4-22 on page 60, the job directory is /home/lsfadmin/testjob_1345064116383v469e and the user job repository is /home/lsfadmin.
|
Different user job repositories: To configure different user job repository locations, change the file PAC_TOP/gui/conf/Repository.xml and restart IBM Platform Application Center. Only one job repository location can be configured. If other locations are configured, only the first location is considered. It is also possible to configure job repositories per application. For more information about how to configure application-level repositories, see Administering IBM Platform Application Center, SC22-5396-00.
|
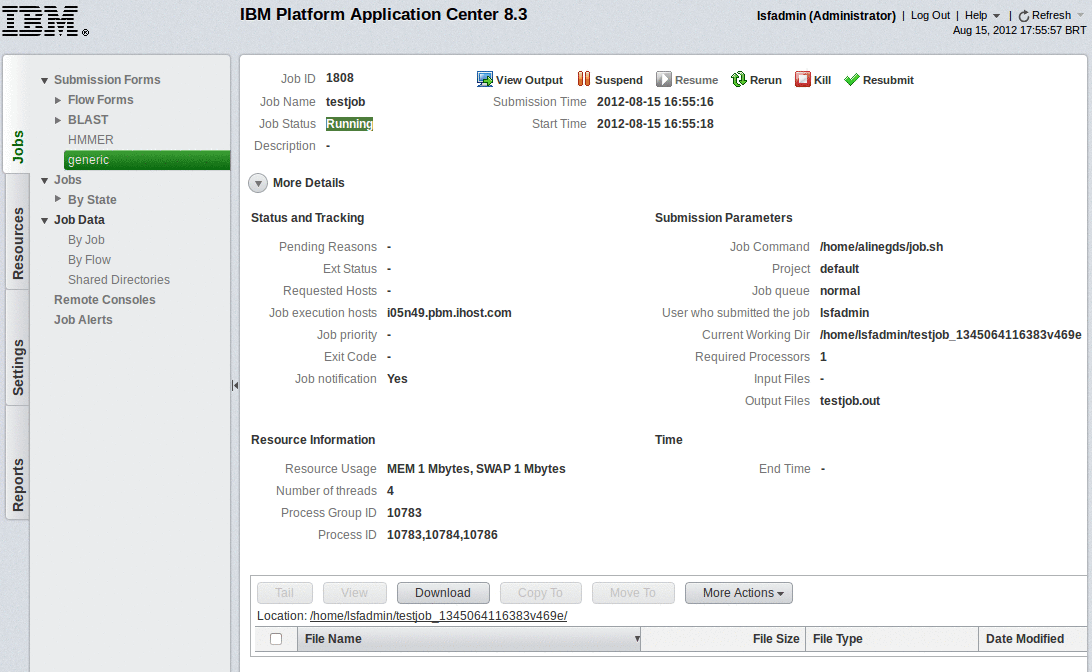
Figure 4-22 IBM Platform Application Center job submission details
After execution, you can access the input, output, and error files from IBM Platform Application Center at the Jobs tab, Job Data view. Job data is also available from the Jobs view, but for a limited time. IBM Platform Application Center retrieves data from IBM Platform LSF to show in this view. By default, IBM Platform LSF keeps finished job information in the mbatchd memory for 1 hour. You can change that duration by changing the parameter CLEAN_PERIOD value in the IBM Platform LSF configuration file lsb.params (at directory LSB_CONFDIR/cluster_name/configdir). Then, run badmin reconfig.
|
Job data purging: The job data is purged from the system after some time. For more information, see job data purging in Administering IBM Platform Application Center, SC22-5396-00.
|
Configuring shared directories
You might want to configure additional shared directories that are available to all users in the cluster. When shared directories are configured, you can share files with other users through the IBM Platform Application Center interface. Users need at least read permission to the directory so that it can be shared. To add a new shared directory, change the file PAC_TOP/gui/conf/Repository.xml. Example 4-4 shows how to add the directory /gpfs/fs1/shared to the list of shared directories.
Example 4-4 IBM Platform Application Center adding shared directories
<?xml version="1.0" encoding="UTF-8"?>
<ParamConfs>
<Configuration>
<Repository>
<User>all</User>
<Path>/home</Path>
</Repository>
<ShareDirectory>
<Path>/gpfs/fs1/shared</Path>
</ShareDirectory>
</Configuration>
</ParamConfs>
Figure 4-23 shows how you can share files by using the shared directory through a GUI. Use the Job Data view in the Job tab. Click a job, select the file that you want to share, click in Move To, and select the shared dir. The file is available for other users to access it in the shared directory.

Figure 4-23 IBM Platform Application Center shared directories
Creating application templates
You might be interested in creating your own application templates to make it easier for users to submit jobs. You can create templates from the Resources tab. You can create new application templates by copying and then modifying existing templates (Figure 4-24). Select the template that you want to use, click Save As, then click the new template that you saved to modify it. When you save a new template, it is in the state Unpublished. Users can only submit jobs from templates that are in state Published.
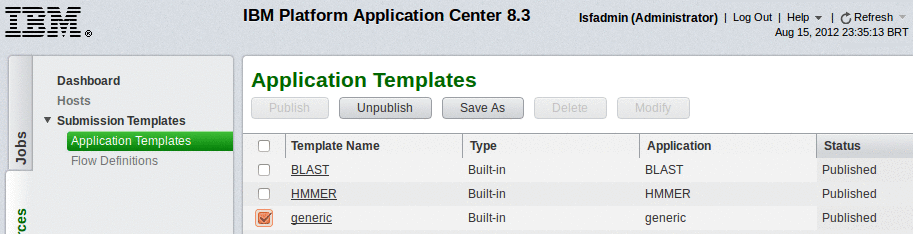
Figure 4-24 IBM Platform Application Center Application Templates
There are two parts to create an application template: configuring the submission script and configuring the submission form. The submission form is what the user sees when the user tries to submit a job and where the user enters the required information to run the job. The submission script is what IBM Platform Application Center runs to submit the job to the IBM Platform LSF cluster. In Figure 4-25 on page 62, we show an application template that we created for NAMD based on the generic template. NAMD is a parallel molecular dynamics code that is designed for high-performance simulation of large biomolecular systems (extracted from http://www.ks.uiuc.edu/Research/namd/). To create the submission form that you see, we changed the original form in the generic template by removing several fields and keeping only the fields that users need to provide as input to the job. We also changed the location of the fields by clicking and dragging them to the desired location. To change the names of fields and their IDs, we edited them by clicking the field and then clicking Edit.
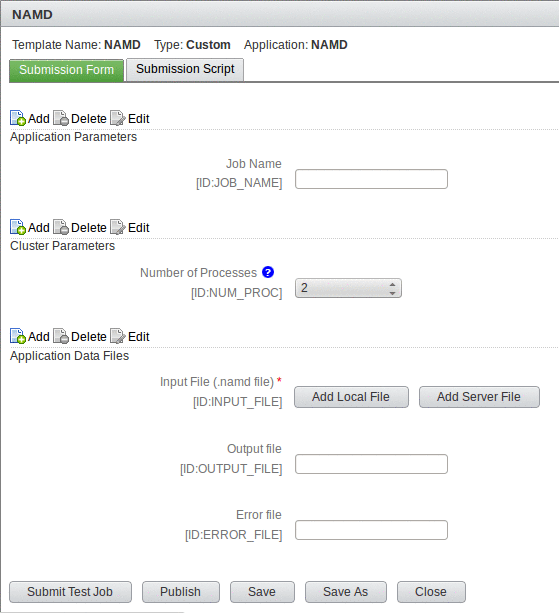
Figure 4-25 IBM Platform Application Center submission template
After you create the submission form, you create the submission script. IBM Platform Application Center offers a script with a few useful functions that you can use in your submission script. To use the functions, import the script as shown in Example 4-5.
Example 4-5 IBM Platform Application Center source common functions
#Source COMMON functions
. ${GUI_CONFDIR}/application/COMMON
In our simple submission script, we check whether users provided the required fields for job submission, set the value of the fields, and start the job by using the command bsub. After we create the submission script, we submit a test job to see if it works. If everything looks fine, we click Publish to make it available for users in the Submission Forms view in the Jobs tab. In Example 4-6 on page 63, we show our submission script.
Example 4-6 IBM Platform Application Center submission script
#/bin/sh
#Source COMMON functions
. ${GUI_CONFDIR}/application/COMMON
# NAMD options
if [ -z "$INPUT_FILE" ] ; then
echo "Specify a valid namd input (.namd) file." 1>&2
exit 1
else
INPUT_FILE=`formatFilePath "${INPUT_FILE}"`
INPUT_FILE=`basename ${INPUT_FILE} .namd`
fi
# LSF Options
LSF_OPT=""
if [ -n "$JOB_NAME" ]; then
JOB_NAME_OPT="-J "$JOB_NAME""
else
JOB_NAME_OPT="-J `basename $OUTPUT_FILE_LOCATION`"
fi
if [ -n "$OUTPUT_FILE" ]; then
OUTPUT_FILE=`formatFilePath "${OUTPUT_FILE}"`
LSF_OPT="$LSF_OPT -o $OUTPUT_FILE"
fi
if [ -n "$ERROR_FILE" ]; then
ERROR_FILE=`formatFilePath "${ERROR_FILE}"`
LSF_OPT="$LSF_OPT -e $ERROR_FILE"
fi
NUM_PROC_OPT="-n $NUM_PROC"
JOB_RESULT=`/bin/sh -c " bsub ${NUM_PROC_OPT} ${JOB_NAME_OPT} ${LSF_OPT} /gpfs/fs1/mpi_apps/NAMD_2.8/OUTPUT/runit ${INPUT_FILE} 2>&1"`
export JOB_RESULT OUTPUT_FILE_LOCATION
${GUI_CONFDIR}/application/job-result.sh
Managing the cluster
IBM Platform Application Center offers some reports in the Reports tab to help users manage their clusters. You can generate reports for specific durations and export data to csv files. Figure 4-26 on page 64 shows an example of a cluster availability report.

Figure 4-26 IBM Platform Application Center cluster availability report
If the existing reports do not meet all your needs, you can create custom reports that are based on the template of the existing reports. You need to become familiar with the IBM Platform Application Center database schema.
Flow definitions
Unlike application templates, flow definitions cannot be created in IBM Platform Application Center. They must be created in IBM Platform Process Manager. For more details, see 4.3.4, “IBM Platform Process Manager implementation” on page 98. You can see and manage (trigger/release/publish/unpublish/hold) flow definitions from IBM Platform Application Center though. You can see the available flow definitions from the Resources tab, Submission Templates, Flow Definitions. Figure 4-27 on page 65 shows an example of the flow forms that are available for submission by the logged on user (lsfadmin).
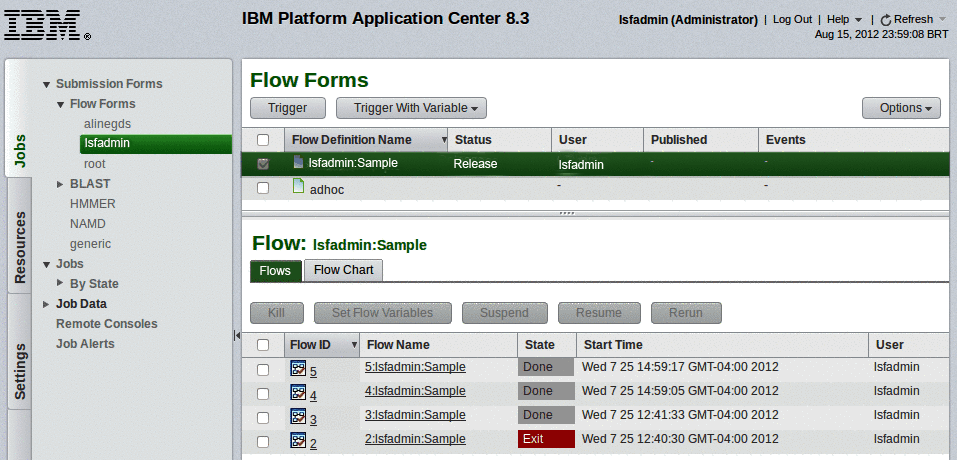
Figure 4-27 IBM Platform Application Center flow definitions
4.3.3 IBM Platform RTM implementation
To complete the IBM Platform RTM installation, we followed the steps in Installing IBM Platform RTM, SC27-4757-00. This document ships with the product and is at the IBM publications site:
IBM Platform RTM 8.3 ships with a new all-in-one script to install the software. Installing IBM Platform RTM 8.3 involves the following steps:
1. Download all the IBM Platform RTM installation packages.
2. Download all the third-party components.
3. Run the all-in-one script to install.
You do not need to install any of the third-party software that you download; the IBM Platform RTM installation script installs it for you. The installation script also tunes the configuration of the MySQL server that is installed on the IBM Platform RTM host. Ensure that there are no databases in the MySQL server that you use for this installation. Or, make a backup before you start. On our environment, we use a dedicated MySQL server for IBM Platform RTM.
For our installation, we decide to keep MySQL data files on the shared file system. We link the original location of the MySQL server data directory to the directory in the shared file system that we want to use. (This step is not required for the installation.) See Example 4-7.
Example 4-7 IBM Platform RTM MySQL data folder
[root@i05n47 /]# ls -ld /var/lib/mysql
lrwxrwxrwx 1 mysql mysql 19 Jul 20 12:06 /var/lib/mysql -> /gpfs/fs1/rtm/mysql
Unlike the other IBM Platform tools, IBM Platform RTM is installed locally on the server at /opt/rtm. There is no option to install it on a shared file system (or another location). Example 4-8 on page 66 shows the installation logs of a clean IBM Platform RTM installation.
Example 4-8 IBM Platform RTM installation logs
[root@i05n47 x86_64]# ./rtm-install.sh
Untar IBM JRE package...
Untar IBM LAP package completed.
International Program License Agreement
Part 1 - General Terms
BY DOWNLOADING, INSTALLING, COPYING, ACCESSING, CLICKING ON
AN "ACCEPT" BUTTON, OR OTHERWISE USING THE PROGRAM,
LICENSEE AGREES TO THE TERMS OF THIS AGREEMENT. IF YOU ARE
ACCEPTING THESE TERMS ON BEHALF OF LICENSEE, YOU REPRESENT
AND WARRANT THAT YOU HAVE FULL AUTHORITY TO BIND LICENSEE
TO THESE TERMS. IF YOU DO NOT AGREE TO THESE TERMS,
* DO NOT DOWNLOAD, INSTALL, COPY, ACCESS, CLICK ON AN
"ACCEPT" BUTTON, OR USE THE PROGRAM; AND
* PROMPTLY RETURN THE UNUSED MEDIA, DOCUMENTATION, AND
Press Enter to continue viewing the license agreement, or
enter "1" to accept the agreement, "2" to decline it, "3"
to print it, "4" to read non-IBM terms, or "99" to go back
to the previous screen.
1
1672 blocks
License is accepted.
Install downloaded packages...
Downloaded packages installed.
Install RTM RPMs...
Loaded plugins: product-id, refresh-packagekit, security, subscription-manager
Updating certificate-based repositories.
Setting up Local Package Process
Examining ./php-snmp-5.3.3-3.el6_1.3.x86_64.rpm: php-snmp-5.3.3-3.el6_1.3.x86_64
./php-snmp-5.3.3-3.el6_1.3.x86_64.rpm: does not update installed package.
Examining ./NOOSS/x86_64/rtm-advocate-8.3-1.x86_64.rpm: rtm-advocate-8.3-1.x86_64
Marking ./NOOSS/x86_64/rtm-advocate-8.3-1.x86_64.rpm to be installed
Examining ./NOOSS/x86_64/rtm-flexlm-8.3-1.x86_64.rpm: rtm-flexlm-8.3-1.x86_64
Marking ./NOOSS/x86_64/rtm-flexlm-8.3-1.x86_64.rpm to be installed
Examining ./NOOSS/x86_64/rtm-fusionchart-8.3-1.x86_64.rpm: rtm-fusionchart-8.3-1.x86_64
Marking ./NOOSS/x86_64/rtm-fusionchart-8.3-1.x86_64.rpm to be installed
Examining ./NOOSS/x86_64/rtm-ioncube-8.3-1.x86_64.rpm: rtm-ioncube-8.3-1.x86_64
Marking ./NOOSS/x86_64/rtm-ioncube-8.3-1.x86_64.rpm to be installed
Examining ./NOOSS/x86_64/rtm-lic-pollers-8.3-1.x86_64.rpm: rtm-lic-pollers-8.3-1.x86_64
Marking ./NOOSS/x86_64/rtm-lic-pollers-8.3-1.x86_64.rpm to be installed
Examining ./NOOSS/x86_64/rtm-lsf701-poller-8.3-1.x86_64.rpm: rtm-lsf701-poller-8.3-1.x86_64
Marking ./NOOSS/x86_64/rtm-lsf701-poller-8.3-1.x86_64.rpm to be installed
Examining ./NOOSS/x86_64/rtm-lsf702-poller-8.3-1.x86_64.rpm: rtm-lsf702-poller-8.3-1.x86_64
Marking ./NOOSS/x86_64/rtm-lsf702-poller-8.3-1.x86_64.rpm to be installed
Examining ./NOOSS/x86_64/rtm-lsf703-poller-8.3-1.x86_64.rpm: rtm-lsf703-poller-8.3-1.x86_64
Marking ./NOOSS/x86_64/rtm-lsf703-poller-8.3-1.x86_64.rpm to be installed
Examining ./NOOSS/x86_64/rtm-lsf704-poller-8.3-1.x86_64.rpm: rtm-lsf704-poller-8.3-1.x86_64
Marking ./NOOSS/x86_64/rtm-lsf704-poller-8.3-1.x86_64.rpm to be installed
Examining ./NOOSS/x86_64/rtm-lsf705-poller-8.3-1.x86_64.rpm: rtm-lsf705-poller-8.3-1.x86_64
Marking ./NOOSS/x86_64/rtm-lsf705-poller-8.3-1.x86_64.rpm to be installed
Examining ./NOOSS/x86_64/rtm-lsf706-poller-8.3-1.x86_64.rpm: rtm-lsf706-poller-8.3-1.x86_64
Marking ./NOOSS/x86_64/rtm-lsf706-poller-8.3-1.x86_64.rpm to be installed
Examining ./NOOSS/x86_64/rtm-lsf-8.3-1.x86_64.rpm: rtm-lsf-8.3-1.x86_64
Marking ./NOOSS/x86_64/rtm-lsf-8.3-1.x86_64.rpm to be installed
Examining ./NOOSS/x86_64/rtm-lsf8-poller-8.3-1.x86_64.rpm: rtm-lsf8-poller-8.3-1.x86_64
Marking ./NOOSS/x86_64/rtm-lsf8-poller-8.3-1.x86_64.rpm to be installed
Examining ./NOOSS/x86_64/rtm-lsfpollerd-8.3-1.x86_64.rpm: rtm-lsfpollerd-8.3-1.x86_64
Marking ./NOOSS/x86_64/rtm-lsfpollerd-8.3-1.x86_64.rpm to be installed
Examining ./OSS/x86_64/rtm-admin-plugin-8.3-1.x86_64.rpm: rtm-admin-plugin-8.3-1.x86_64
Marking ./OSS/x86_64/rtm-admin-plugin-8.3-1.x86_64.rpm to be installed
Examining ./OSS/x86_64/rtm-doc-8.3-1.x86_64.rpm: rtm-doc-8.3-1.x86_64
Marking ./OSS/x86_64/rtm-doc-8.3-1.x86_64.rpm to be installed
Examining ./OSS/x86_64/rtm-extras-8.3-1.x86_64.rpm: rtm-extras-8.3-1.x86_64
Marking ./OSS/x86_64/rtm-extras-8.3-1.x86_64.rpm to be installed
Examining ./OSS/x86_64/rtm-gridalarms-plugin-8.3-1.x86_64.rpm: rtm-gridalarms-plugin-8.3-1.x86_64
Marking ./OSS/x86_64/rtm-gridalarms-plugin-8.3-1.x86_64.rpm to be installed
Examining ./OSS/x86_64/rtm-gridcstat-plugin-8.3-1.x86_64.rpm: rtm-gridcstat-plugin-8.3-1.x86_64
Marking ./OSS/x86_64/rtm-gridcstat-plugin-8.3-1.x86_64.rpm to be installed
Examining ./OSS/x86_64/rtm-gridpend-plugin-8.3-1.x86_64.rpm: rtm-gridpend-plugin-8.3-1.x86_64
Marking ./OSS/x86_64/rtm-gridpend-plugin-8.3-1.x86_64.rpm to be installed
Examining ./OSS/x86_64/rtm-grid-plugin-8.3-1.x86_64.rpm: rtm-grid-plugin-8.3-1.x86_64
Marking ./OSS/x86_64/rtm-grid-plugin-8.3-1.x86_64.rpm to be installed
Examining ./OSS/x86_64/rtm-license-plugin-8.3-1.x86_64.rpm: rtm-license-plugin-8.3-1.x86_64
Marking ./OSS/x86_64/rtm-license-plugin-8.3-1.x86_64.rpm to be installed
Examining ./OSS/x86_64/rtm-meta-plugin-8.3-1.x86_64.rpm: rtm-meta-plugin-8.3-1.x86_64
Marking ./OSS/x86_64/rtm-meta-plugin-8.3-1.x86_64.rpm to be installed
Examining ./OSS/x86_64/rtm-ptskin-plugin-8.3-1.x86_64.rpm: rtm-ptskin-plugin-8.3-1.x86_64
Marking ./OSS/x86_64/rtm-ptskin-plugin-8.3-1.x86_64.rpm to be installed
Examining ./OSS/x86_64/rtm-release-8.3-1.x86_64.rpm: rtm-release-8.3-1.x86_64
Marking ./OSS/x86_64/rtm-release-8.3-1.x86_64.rpm to be installed
Examining ./OSS/x86_64/rtm-rtmssh-plugin-8.3-1.x86_64.rpm: rtm-rtmssh-plugin-8.3-1.x86_64
Marking ./OSS/x86_64/rtm-rtmssh-plugin-8.3-1.x86_64.rpm to be installed
Examining ./OSS/x86_64/rtm-thold-plugin-8.3-1.x86_64.rpm: rtm-thold-plugin-8.3-1.x86_64
Marking ./OSS/x86_64/rtm-thold-plugin-8.3-1.x86_64.rpm to be installed
Examining ./3RDPARTY/python-cherrypy-3.1.2-1.noarch.rpm: python-cherrypy-3.1.2-1.el6.rf.noarch
./3RDPARTY/python-cherrypy-3.1.2-1.noarch.rpm: does not update installed package.
Resolving Dependencies
--> Running transaction check
---> Package rtm-admin-plugin.x86_64 0:8.3-1 will be installed
---> Package rtm-advocate.x86_64 0:8.3-1 will be installed
---> Package rtm-doc.x86_64 0:8.3-1 will be installed
---> Package rtm-extras.x86_64 0:8.3-1 will be installed
---> Package rtm-flexlm.x86_64 0:8.3-1 will be installed
---> Package rtm-fusionchart.x86_64 0:8.3-1 will be installed
---> Package rtm-grid-plugin.x86_64 0:8.3-1 will be installed
---> Package rtm-gridalarms-plugin.x86_64 0:8.3-1 will be installed
---> Package rtm-gridcstat-plugin.x86_64 0:8.3-1 will be installed
---> Package rtm-gridpend-plugin.x86_64 0:8.3-1 will be installed
---> Package rtm-ioncube.x86_64 0:8.3-1 will be installed
---> Package rtm-lic-pollers.x86_64 0:8.3-1 will be installed
---> Package rtm-license-plugin.x86_64 0:8.3-1 will be installed
---> Package rtm-lsf.x86_64 0:8.3-1 will be installed
---> Package rtm-lsf701-poller.x86_64 0:8.3-1 will be installed
---> Package rtm-lsf702-poller.x86_64 0:8.3-1 will be installed
---> Package rtm-lsf703-poller.x86_64 0:8.3-1 will be installed
---> Package rtm-lsf704-poller.x86_64 0:8.3-1 will be installed
---> Package rtm-lsf705-poller.x86_64 0:8.3-1 will be installed
---> Package rtm-lsf706-poller.x86_64 0:8.3-1 will be installed
---> Package rtm-lsf8-poller.x86_64 0:8.3-1 will be installed
---> Package rtm-lsfpollerd.x86_64 0:8.3-1 will be installed
---> Package rtm-meta-plugin.x86_64 0:8.3-1 will be installed
---> Package rtm-ptskin-plugin.x86_64 0:8.3-1 will be installed
---> Package rtm-release.x86_64 0:8.3-1 will be installed
---> Package rtm-rtmssh-plugin.x86_64 0:8.3-1 will be installed
---> Package rtm-thold-plugin.x86_64 0:8.3-1 will be installed
--> Finished Dependency Resolution
Dependencies Resolved
==================================================================================
Package Arch Version Repository Size
==================================================================================
Installing:
rtm-admin-plugin x86_64 8.3-1 /rtm-admin-plugin-8.3-1.x86_64 108 k
rtm-advocate x86_64 8.3-1 /rtm-advocate-8.3-1.x86_64 258 k
rtm-doc x86_64 8.3-1 /rtm-doc-8.3-1.x86_64 61 k
rtm-extras x86_64 8.3-1 /rtm-extras-8.3-1.x86_64 41 k
rtm-flexlm x86_64 8.3-1 /rtm-flexlm-8.3-1.x86_64 1.7 M
rtm-fusionchart x86_64 8.3-1 /rtm-fusionchart-8.3-1.x86_64 699 k
rtm-grid-plugin x86_64 8.3-1 /rtm-grid-plugin-8.3-1.x86_64 4.6 M
rtm-gridalarms-plugin x86_64 8.3-1 /rtm-gridalarms-plugin-8.3-1.x86_64 290 k
rtm-gridcstat-plugin x86_64 8.3-1 /rtm-gridcstat-plugin-8.3-1.x86_64 117 k
rtm-gridpend-plugin x86_64 8.3-1 /rtm-gridpend-plugin-8.3-1.x86_64 132 k
rtm-ioncube x86_64 8.3-1 /rtm-ioncube-8.3-1.x86_64 6.5 M
rtm-lic-pollers x86_64 8.3-1 /rtm-lic-pollers-8.3-1.x86_64 502 k
rtm-license-plugin x86_64 8.3-1 /rtm-license-plugin-8.3-1.x86_64 1.1 M
rtm-lsf x86_64 8.3-1 /rtm-lsf-8.3-1.x86_64 3.3 M
rtm-lsf701-poller x86_64 8.3-1 /rtm-lsf701-poller-8.3-1.x86_64 16 M
rtm-lsf702-poller x86_64 8.3-1 /rtm-lsf702-poller-8.3-1.x86_64 16 M
rtm-lsf703-poller x86_64 8.3-1 /rtm-lsf703-poller-8.3-1.x86_64 19 M
rtm-lsf704-poller x86_64 8.3-1 /rtm-lsf704-poller-8.3-1.x86_64 20 M
rtm-lsf705-poller x86_64 8.3-1 /rtm-lsf705-poller-8.3-1.x86_64 21 M
rtm-lsf706-poller x86_64 8.3-1 /rtm-lsf706-poller-8.3-1.x86_64 21 M
rtm-lsf8-poller x86_64 8.3-1 /rtm-lsf8-poller-8.3-1.x86_64 24 M
rtm-lsfpollerd x86_64 8.3-1 /rtm-lsfpollerd-8.3-1.x86_64 462 k
rtm-meta-plugin x86_64 8.3-1 /rtm-meta-plugin-8.3-1.x86_64 126 k
rtm-ptskin-plugin x86_64 8.3-1 /rtm-ptskin-plugin-8.3-1.x86_64 811 k
rtm-release x86_64 8.3-1 /rtm-release-8.3-1.x86_64 98
rtm-rtmssh-plugin x86_64 8.3-1 /rtm-rtmssh-plugin-8.3-1.x86_64 1.3 M
rtm-thold-plugin x86_64 8.3-1 /rtm-thold-plugin-8.3-1.x86_64 706 k
Transaction Summary
=========================================================================================
Install 27 Package(s)
Total size: 159 M
Installed size: 159 M
Is this ok [y/N]: y
Downloading Packages:
Running rpm_check_debug
Running Transaction Test
Transaction Test Succeeded
Running Transaction
Installing : rtm-lsfpollerd-8.3-1.x86_64 [ ] 1/27
Installing : rtm-lsfpollerd-8.3-1.x86_64 [##### ] 1/27
Installing : rtm-lsfpollerd-8.3-1.x86_64 [########## ] 1/27
Installing : rtm-lsfpollerd-8.3-1.x86_64 [############### ] 1/27
Installing : rtm-lsfpollerd-8.3-1.x86_64 [#################### ] 1/27
Installing : rtm-lsfpollerd-8.3-1.x86_64 [######################### ] 1/27
Installing : rtm-lsfpollerd-8.3-1.x86_64 [############################## ] 1/27
Installing : rtm-lsfpollerd-8.3-1.x86_64 [################################### ] 1/27
Installing : rtm-lsfpollerd-8.3-1.x86_64 [#################################### ] 1/27
Installing : rtm-lsfpollerd-8.3-1.x86_64 1/27
Installing : rtm-grid-plugin-8.3-1.x86_64 [ ] 2/27
Installing : rtm-grid-plugin-8.3-1.x86_64 [# ] 2/27
Installing : rtm-grid-plugin-8.3-1.x86_64 [## ] 2/27
Installing : rtm-grid-plugin-8.3-1.x86_64 [### ] 2/27
Installing : rtm-grid-plugin-8.3-1.x86_64 [#### ] 2/27
Installing : rtm-grid-plugin-8.3-1.x86_64 [##### ] 2/27
Installing : rtm-grid-plugin-8.3-1.x86_64 [###### ] 2/27
Installing : rtm-grid-plugin-8.3-1.x86_64 [####### ] 2/27
Installing : rtm-grid-plugin-8.3-1.x86_64 [######## ] 2/27
Installing : rtm-grid-plugin-8.3-1.x86_64 [######### ] 2/27
Installing : rtm-grid-plugin-8.3-1.x86_64 [########## ] 2/27
Installing : rtm-grid-plugin-8.3-1.x86_64 [########### ] 2/27
Installing : rtm-grid-plugin-8.3-1.x86_64 [############ ] 2/27
Installing : rtm-grid-plugin-8.3-1.x86_64 [############# ] 2/27
Installing : rtm-grid-plugin-8.3-1.x86_64 [############## ] 2/27
Installing : rtm-grid-plugin-8.3-1.x86_64 [############### ] 2/27
Installing : rtm-grid-plugin-8.3-1.x86_64 [################ ] 2/27
Installing : rtm-grid-plugin-8.3-1.x86_64 [################# ] 2/27
Installing : rtm-grid-plugin-8.3-1.x86_64 [################## ] 2/27
Installing : rtm-grid-plugin-8.3-1.x86_64 [################### ] 2/27
Installing : rtm-grid-plugin-8.3-1.x86_64 [#################### ] 2/27
Installing : rtm-grid-plugin-8.3-1.x86_64 [##################### ] 2/27
Installing : rtm-grid-plugin-8.3-1.x86_64 [###################### ] 2/27
Installing : rtm-grid-plugin-8.3-1.x86_64 [####################### ] 2/27
Installing : rtm-grid-plugin-8.3-1.x86_64 [######################## ] 2/27
Installing : rtm-grid-plugin-8.3-1.x86_64 [######################### ] 2/27
Installing : rtm-grid-plugin-8.3-1.x86_64 [########################## ] 2/27
Installing : rtm-grid-plugin-8.3-1.x86_64 [########################### ] 2/27
Installing : rtm-grid-plugin-8.3-1.x86_64 [############################ ] 2/27
Installing : rtm-grid-plugin-8.3-1.x86_64 [############################# ] 2/27
Installing : rtm-grid-plugin-8.3-1.x86_64 [############################## ] 2/27
Installing : rtm-grid-plugin-8.3-1.x86_64 [############################### ] 2/27
Installing : rtm-grid-plugin-8.3-1.x86_64 [################################ ] 2/27
Installing : rtm-grid-plugin-8.3-1.x86_64 [################################# ] 2/27
Installing : rtm-grid-plugin-8.3-1.x86_64 [################################## ] 2/27
Installing : rtm-grid-plugin-8.3-1.x86_64 [################################### ] 2/27
Installing : rtm-grid-plugin-8.3-1.x86_64 2/27
Installing : rtm-flexlm-8.3-1.x86_64 [ ] 3/27
Installing : rtm-flexlm-8.3-1.x86_64 [# ] 3/27
Installing : rtm-flexlm-8.3-1.x86_64 [## ] 3/27
Installing : rtm-flexlm-8.3-1.x86_64 [#### ] 3/27
Installing : rtm-flexlm-8.3-1.x86_64 [##### ] 3/27
Installing : rtm-flexlm-8.3-1.x86_64 [####### ] 3/27
Installing : rtm-flexlm-8.3-1.x86_64 [######## ] 3/27
Installing : rtm-flexlm-8.3-1.x86_64 [########## ] 3/27
Installing : rtm-flexlm-8.3-1.x86_64 [########### ] 3/27
Installing : rtm-flexlm-8.3-1.x86_64 [############# ] 3/27
Installing : rtm-flexlm-8.3-1.x86_64 [############## ] 3/27
Installing : rtm-flexlm-8.3-1.x86_64 [############### ] 3/27
Installing : rtm-flexlm-8.3-1.x86_64 [################# ] 3/27
Installing : rtm-flexlm-8.3-1.x86_64 [################### ] 3/27
Installing : rtm-flexlm-8.3-1.x86_64 [#################### ] 3/27
Installing : rtm-flexlm-8.3-1.x86_64 [##################### ] 3/27
Installing : rtm-flexlm-8.3-1.x86_64 [####################### ] 3/27
Installing : rtm-flexlm-8.3-1.x86_64 [######################## ] 3/27
Installing : rtm-flexlm-8.3-1.x86_64 [########################## ] 3/27
Installing : rtm-flexlm-8.3-1.x86_64 [########################### ] 3/27
Installing : rtm-flexlm-8.3-1.x86_64 [############################# ] 3/27
Installing : rtm-flexlm-8.3-1.x86_64 [############################## ] 3/27
Installing : rtm-flexlm-8.3-1.x86_64 [############################### ] 3/27
Installing : rtm-flexlm-8.3-1.x86_64 [################################# ] 3/27
Installing : rtm-flexlm-8.3-1.x86_64 [################################### ] 3/27
Installing : rtm-flexlm-8.3-1.x86_64 [#################################### ] 3/27
Installing : rtm-flexlm-8.3-1.x86_64 [###################################### ] 3/27
Installing : rtm-flexlm-8.3-1.x86_64 [####################################### ] 3/27
Installing : rtm-flexlm-8.3-1.x86_64 [######################################## ] 3/27
Installing : rtm-flexlm-8.3-1.x86_64 3/27
Installing : rtm-lic-pollers-8.3-1.x86_64 [ ] 4/27
Installing : rtm-lic-pollers-8.3-1.x86_64 [#### ] 4/27
Installing : rtm-lic-pollers-8.3-1.x86_64 [##### ] 4/27
Installing : rtm-lic-pollers-8.3-1.x86_64 [########## ] 4/27
Installing : rtm-lic-pollers-8.3-1.x86_64 [########### ] 4/27
Installing : rtm-lic-pollers-8.3-1.x86_64 [################ ] 4/27
Installing : rtm-lic-pollers-8.3-1.x86_64 [################### ] 4/27
Installing : rtm-lic-pollers-8.3-1.x86_64 [####################### ] 4/27
Installing : rtm-lic-pollers-8.3-1.x86_64 [######################### ] 4/27
Installing : rtm-lic-pollers-8.3-1.x86_64 [############################## ] 4/27
Installing : rtm-lic-pollers-8.3-1.x86_64 [################################## ] 4/27
Installing : rtm-lic-pollers-8.3-1.x86_64 [################################### ] 4/27
Installing : rtm-lic-pollers-8.3-1.x86_64 4/27
Installing : rtm-advocate-8.3-1.x86_64 [ ] 5/27
Installing : rtm-advocate-8.3-1.x86_64 [# ] 5/27
Installing : rtm-advocate-8.3-1.x86_64 [## ] 5/27
Installing : rtm-advocate-8.3-1.x86_64 [### ] 5/27
Installing : rtm-advocate-8.3-1.x86_64 [#### ] 5/27
Installing : rtm-advocate-8.3-1.x86_64 [############# ] 5/27
Installing : rtm-advocate-8.3-1.x86_64 [################### ] 5/27
Installing : rtm-advocate-8.3-1.x86_64 [###################### ] 5/27
Installing : rtm-advocate-8.3-1.x86_64 [####################### ] 5/27
Installing : rtm-advocate-8.3-1.x86_64 [######################## ] 5/27
Installing : rtm-advocate-8.3-1.x86_64 [########################## ] 5/27
Installing : rtm-advocate-8.3-1.x86_64 [############################## ] 5/27
Installing : rtm-advocate-8.3-1.x86_64 [################################### ] 5/27
Installing : rtm-advocate-8.3-1.x86_64 [#################################### ] 5/27
Installing : rtm-advocate-8.3-1.x86_64 [##################################### ] 5/27
Installing : rtm-advocate-8.3-1.x86_64 [###################################### ] 5/27
Installing : rtm-advocate-8.3-1.x86_64 5/27
Installing : rtm-admin-plugin-8.3-1.x86_64 [ ] 6/27
Installing : rtm-admin-plugin-8.3-1.x86_64 [######## ] 6/27
Installing : rtm-admin-plugin-8.3-1.x86_64 [##################### ] 6/27
Installing : rtm-admin-plugin-8.3-1.x86_64 [###################### ] 6/27
Installing : rtm-admin-plugin-8.3-1.x86_64 [####################### ] 6/27
Installing : rtm-admin-plugin-8.3-1.x86_64 [######################## ] 6/27
Installing : rtm-admin-plugin-8.3-1.x86_64 [######################### ] 6/27
Installing : rtm-admin-plugin-8.3-1.x86_64 [########################## ] 6/27
Installing : rtm-admin-plugin-8.3-1.x86_64 [############################ ] 6/27
Installing : rtm-admin-plugin-8.3-1.x86_64 [############################# ] 6/27
Installing : rtm-admin-plugin-8.3-1.x86_64 [################################## ] 6/27
Installing : rtm-admin-plugin-8.3-1.x86_64 6/27
Installing : rtm-license-plugin-8.3-1.x86_64 [ ] 7/27
Installing : rtm-license-plugin-8.3-1.x86_64 [## ] 7/27
Installing : rtm-license-plugin-8.3-1.x86_64 [### ] 7/27
Installing : rtm-license-plugin-8.3-1.x86_64 [#### ] 7/27
Installing : rtm-license-plugin-8.3-1.x86_64 [##### ] 7/27
Installing : rtm-license-plugin-8.3-1.x86_64 [###### ] 7/27
Installing : rtm-license-plugin-8.3-1.x86_64 [######## ] 7/27
Installing : rtm-license-plugin-8.3-1.x86_64 [######### ] 7/27
Installing : rtm-license-plugin-8.3-1.x86_64 [########## ] 7/27
Installing : rtm-license-plugin-8.3-1.x86_64 [########### ] 7/27
Installing : rtm-license-plugin-8.3-1.x86_64 [############ ] 7/27
Installing : rtm-license-plugin-8.3-1.x86_64 [############# ] 7/27
Installing : rtm-license-plugin-8.3-1.x86_64 [############### ] 7/27
Installing : rtm-license-plugin-8.3-1.x86_64 [################ ] 7/27
Installing : rtm-license-plugin-8.3-1.x86_64 [################# ] 7/27
Installing : rtm-license-plugin-8.3-1.x86_64 [################### ] 7/27
Installing : rtm-license-plugin-8.3-1.x86_64 [#################### ] 7/27
Installing : rtm-license-plugin-8.3-1.x86_64 [##################### ] 7/27
Installing : rtm-license-plugin-8.3-1.x86_64 [###################### ] 7/27
Installing : rtm-license-plugin-8.3-1.x86_64 [####################### ] 7/27
Installing : rtm-license-plugin-8.3-1.x86_64 [######################## ] 7/27
Installing : rtm-license-plugin-8.3-1.x86_64 [######################### ] 7/27
Installing : rtm-license-plugin-8.3-1.x86_64 [########################## ] 7/27
Installing : rtm-license-plugin-8.3-1.x86_64 [########################### ] 7/27
Installing : rtm-license-plugin-8.3-1.x86_64 [############################ ] 7/27
Installing : rtm-license-plugin-8.3-1.x86_64 [############################# ] 7/27
Installing : rtm-license-plugin-8.3-1.x86_64 [############################### ] 7/27
Installing : rtm-license-plugin-8.3-1.x86_64 [################################ ] 7/27
Installing : rtm-license-plugin-8.3-1.x86_64 7/27
Installing : rtm-gridcstat-plugin-8.3-1.x86_6 [ ] 8/27
Installing : rtm-gridcstat-plugin-8.3-1.x86_6 [## ] 8/27
Installing : rtm-gridcstat-plugin-8.3-1.x86_6 [#### ] 8/27
Installing : rtm-gridcstat-plugin-8.3-1.x86_6 [######## ] 8/27
Installing : rtm-gridcstat-plugin-8.3-1.x86_6 [######### ] 8/27
Installing : rtm-gridcstat-plugin-8.3-1.x86_6 [########################## ] 8/27
Installing : rtm-gridcstat-plugin-8.3-1.x86_6 [########################### ] 8/27
Installing : rtm-gridcstat-plugin-8.3-1.x86_6 [############################ ] 8/27
Installing : rtm-gridcstat-plugin-8.3-1.x86_6 [############################## ] 8/27
Installing : rtm-gridcstat-plugin-8.3-1.x86_6 [############################### ] 8/27
Installing : rtm-gridcstat-plugin-8.3-1.x86_64 8/27
Installing : rtm-gridalarms-plugin-8.3-1.x86_ [ ] 9/27
Installing : rtm-gridalarms-plugin-8.3-1.x86_ [###### ] 9/27
Installing : rtm-gridalarms-plugin-8.3-1.x86_ [########## ] 9/27
Installing : rtm-gridalarms-plugin-8.3-1.x86_ [############## ] 9/27
Installing : rtm-gridalarms-plugin-8.3-1.x86_ [################ ] 9/27
Installing : rtm-gridalarms-plugin-8.3-1.x86_ [################# ] 9/27
Installing : rtm-gridalarms-plugin-8.3-1.x86_ [################## ] 9/27
Installing : rtm-gridalarms-plugin-8.3-1.x86_ [################### ] 9/27
Installing : rtm-gridalarms-plugin-8.3-1.x86_ [#################### ] 9/27
Installing : rtm-gridalarms-plugin-8.3-1.x86_ [########################### ] 9/27
Installing : rtm-gridalarms-plugin-8.3-1.x86_ [############################ ] 9/27
Installing : rtm-gridalarms-plugin-8.3-1.x86_ [############################# ] 9/27
Installing : rtm-gridalarms-plugin-8.3-1.x86_ [############################## ] 9/27
Installing : rtm-gridalarms-plugin-8.3-1.x86_ [############################### ] 9/27
Installing : rtm-gridalarms-plugin-8.3-1.x86_64 9/27
Installing : rtm-doc-8.3-1.x86_64 [ ] 10/27
Installing : rtm-doc-8.3-1.x86_64 [# ] 10/27
Installing : rtm-doc-8.3-1.x86_64 [############# ] 10/27
Installing : rtm-doc-8.3-1.x86_64 [######################### ] 10/27
Installing : rtm-doc-8.3-1.x86_64 [########################### ] 10/27
Installing : rtm-doc-8.3-1.x86_64 [############################## ] 10/27
Installing : rtm-doc-8.3-1.x86_64 [################################## ] 10/27
Installing : rtm-doc-8.3-1.x86_64 [##################################### ] 10/27
Installing : rtm-doc-8.3-1.x86_64 [######################################## ] 10/27
Installing : rtm-doc-8.3-1.x86_64 [########################################### ] 10/27
Installing : rtm-doc-8.3-1.x86_64 10/27
Installing : rtm-gridpend-plugin-8.3-1.x86_64 [ ] 11/27
Installing : rtm-gridpend-plugin-8.3-1.x86_64 [## ] 11/27
Installing : rtm-gridpend-plugin-8.3-1.x86_64 [#### ] 11/27
Installing : rtm-gridpend-plugin-8.3-1.x86_64 [######## ] 11/27
Installing : rtm-gridpend-plugin-8.3-1.x86_64 [################ ] 11/27
Installing : rtm-gridpend-plugin-8.3-1.x86_64 [######################### ] 11/27
Installing : rtm-gridpend-plugin-8.3-1.x86_64 [########################## ] 11/27
Installing : rtm-gridpend-plugin-8.3-1.x86_64 [########################### ] 11/27
Installing : rtm-gridpend-plugin-8.3-1.x86_64 [############################## ] 11/27
Installing : rtm-gridpend-plugin-8.3-1.x86_64 [############################### ] 11/27
Installing : rtm-gridpend-plugin-8.3-1.x86_64 11/27
Installing : rtm-thold-plugin-8.3-1.x86_64 [ ] 12/27
Installing : rtm-thold-plugin-8.3-1.x86_64 [# ] 12/27
Installing : rtm-thold-plugin-8.3-1.x86_64 [## ] 12/27
Installing : rtm-thold-plugin-8.3-1.x86_64 [### ] 12/27
Installing : rtm-thold-plugin-8.3-1.x86_64 [#### ] 12/27
Installing : rtm-thold-plugin-8.3-1.x86_64 [##### ] 12/27
Installing : rtm-thold-plugin-8.3-1.x86_64 [###### ] 12/27
Installing : rtm-thold-plugin-8.3-1.x86_64 [####### ] 12/27
Installing : rtm-thold-plugin-8.3-1.x86_64 [######### ] 12/27
Installing : rtm-thold-plugin-8.3-1.x86_64 [########## ] 12/27
Installing : rtm-thold-plugin-8.3-1.x86_64 [############ ] 12/27
Installing : rtm-thold-plugin-8.3-1.x86_64 [############## ] 12/27
Installing : rtm-thold-plugin-8.3-1.x86_64 [################ ] 12/27
Installing : rtm-thold-plugin-8.3-1.x86_64 [################## ] 12/27
Installing : rtm-thold-plugin-8.3-1.x86_64 [#################### ] 12/27
Installing : rtm-thold-plugin-8.3-1.x86_64 [##################### ] 12/27
Installing : rtm-thold-plugin-8.3-1.x86_64 [######################## ] 12/27
Installing : rtm-thold-plugin-8.3-1.x86_64 [########################### ] 12/27
Installing : rtm-thold-plugin-8.3-1.x86_64 [############################ ] 12/27
Installing : rtm-thold-plugin-8.3-1.x86_64 [############################## ] 12/27
Installing : rtm-thold-plugin-8.3-1.x86_64 [################################ ] 12/27
Installing : rtm-thold-plugin-8.3-1.x86_64 [################################# ] 12/27
Installing : rtm-thold-plugin-8.3-1.x86_64 [################################## ] 12/27
Installing : rtm-thold-plugin-8.3-1.x86_64 12/27
Installing : rtm-meta-plugin-8.3-1.x86_64 [ ] 13/27
Installing : rtm-meta-plugin-8.3-1.x86_64 [# ] 13/27
Installing : rtm-meta-plugin-8.3-1.x86_64 [## ] 13/27
Installing : rtm-meta-plugin-8.3-1.x86_64 [############### ] 13/27
Installing : rtm-meta-plugin-8.3-1.x86_64 [################ ] 13/27
Installing : rtm-meta-plugin-8.3-1.x86_64 [################# ] 13/27
Installing : rtm-meta-plugin-8.3-1.x86_64 [################## ] 13/27
Installing : rtm-meta-plugin-8.3-1.x86_64 [############################## ] 13/27
Installing : rtm-meta-plugin-8.3-1.x86_64 [################################ ] 13/27
Installing : rtm-meta-plugin-8.3-1.x86_64 [################################### ] 13/27
Installing : rtm-meta-plugin-8.3-1.x86_64 13/27
Installing : rtm-rtmssh-plugin-8.3-1.x86_64 [ ] 14/27
Installing : rtm-rtmssh-plugin-8.3-1.x86_64 [## ] 14/27
Installing : rtm-rtmssh-plugin-8.3-1.x86_64 [### ] 14/27
Installing : rtm-rtmssh-plugin-8.3-1.x86_64 [##### ] 14/27
Installing : rtm-rtmssh-plugin-8.3-1.x86_64 [###### ] 14/27
Installing : rtm-rtmssh-plugin-8.3-1.x86_64 [######## ] 14/27
Installing : rtm-rtmssh-plugin-8.3-1.x86_64 [########## ] 14/27
Installing : rtm-rtmssh-plugin-8.3-1.x86_64 [########### ] 14/27
Installing : rtm-rtmssh-plugin-8.3-1.x86_64 [############# ] 14/27
Installing : rtm-rtmssh-plugin-8.3-1.x86_64 [############## ] 14/27
Installing : rtm-rtmssh-plugin-8.3-1.x86_64 [################ ] 14/27
Installing : rtm-rtmssh-plugin-8.3-1.x86_64 [################## ] 14/27
Installing : rtm-rtmssh-plugin-8.3-1.x86_64 [################### ] 14/27
Installing : rtm-rtmssh-plugin-8.3-1.x86_64 [##################### ] 14/27
Installing : rtm-rtmssh-plugin-8.3-1.x86_64 [####################### ] 14/27
Installing : rtm-rtmssh-plugin-8.3-1.x86_64 [######################## ] 14/27
Installing : rtm-rtmssh-plugin-8.3-1.x86_64 [######################### ] 14/27
Installing : rtm-rtmssh-plugin-8.3-1.x86_64 [########################## ] 14/27
Installing : rtm-rtmssh-plugin-8.3-1.x86_64 [########################### ] 14/27
Installing : rtm-rtmssh-plugin-8.3-1.x86_64 [############################ ] 14/27
Installing : rtm-rtmssh-plugin-8.3-1.x86_64 [############################# ] 14/27
Installing : rtm-rtmssh-plugin-8.3-1.x86_64 [############################## ] 14/27
Installing : rtm-rtmssh-plugin-8.3-1.x86_64 [############################### ] 14/27
Installing : rtm-rtmssh-plugin-8.3-1.x86_64 [################################ ] 14/27
Installing : rtm-rtmssh-plugin-8.3-1.x86_64 [################################# ] 14/27
Installing : rtm-rtmssh-plugin-8.3-1.x86_64 14/27
Installing : rtm-extras-8.3-1.x86_64 [### ] 15/27
Installing : rtm-extras-8.3-1.x86_64 [#### ] 15/27
Installing : rtm-extras-8.3-1.x86_64 [######## ] 15/27
Installing : rtm-extras-8.3-1.x86_64 [############ ] 15/27
Installing : rtm-extras-8.3-1.x86_64 [############# ] 15/27
Installing : rtm-extras-8.3-1.x86_64 [################# ] 15/27
Installing : rtm-extras-8.3-1.x86_64 [################### ] 15/27
Installing : rtm-extras-8.3-1.x86_64 [####################### ] 15/27
Installing : rtm-extras-8.3-1.x86_64 [################################# ] 15/27
Installing : rtm-extras-8.3-1.x86_64 [################################### ] 15/27
Installing : rtm-extras-8.3-1.x86_64 [#################################### ] 15/27
Installing : rtm-extras-8.3-1.x86_64 [####################################### ] 15/27
Installing : rtm-extras-8.3-1.x86_64 [######################################## ] 15/27
Installing : rtm-extras-8.3-1.x86_64 15/27
Installing : rtm-release-8.3-1.x86_64 [######################### ] 16/27
Installing : rtm-release-8.3-1.x86_64 16/27
Installing : rtm-lsf703-poller-8.3-1.x86_64 [ ] 17/27
Installing : rtm-lsf703-poller-8.3-1.x86_64 [# ] 17/27
Installing : rtm-lsf703-poller-8.3-1.x86_64 [## ] 17/27
Installing : rtm-lsf703-poller-8.3-1.x86_64 [### ] 17/27
Installing : rtm-lsf703-poller-8.3-1.x86_64 [#### ] 17/27
Installing : rtm-lsf703-poller-8.3-1.x86_64 [##### ] 17/27
Installing : rtm-lsf703-poller-8.3-1.x86_64 [###### ] 17/27
Installing : rtm-lsf703-poller-8.3-1.x86_64 [####### ] 17/27
Installing : rtm-lsf703-poller-8.3-1.x86_64 [######## ] 17/27
Installing : rtm-lsf703-poller-8.3-1.x86_64 [######### ] 17/27
Installing : rtm-lsf703-poller-8.3-1.x86_64 [########## ] 17/27
Installing : rtm-lsf703-poller-8.3-1.x86_64 [########### ] 17/27
Installing : rtm-lsf703-poller-8.3-1.x86_64 [############ ] 17/27
Installing : rtm-lsf703-poller-8.3-1.x86_64 [############# ] 17/27
Installing : rtm-lsf703-poller-8.3-1.x86_64 [############## ] 17/27
Installing : rtm-lsf703-poller-8.3-1.x86_64 [############### ] 17/27
Installing : rtm-lsf703-poller-8.3-1.x86_64 [################ ] 17/27
Installing : rtm-lsf703-poller-8.3-1.x86_64 [################# ] 17/27
Installing : rtm-lsf703-poller-8.3-1.x86_64 [################## ] 17/27
Installing : rtm-lsf703-poller-8.3-1.x86_64 [################### ] 17/27
Installing : rtm-lsf703-poller-8.3-1.x86_64 [#################### ] 17/27
Installing : rtm-lsf703-poller-8.3-1.x86_64 [##################### ] 17/27
Installing : rtm-lsf703-poller-8.3-1.x86_64 [###################### ] 17/27
Installing : rtm-lsf703-poller-8.3-1.x86_64 [####################### ] 17/27
Installing : rtm-lsf703-poller-8.3-1.x86_64 [######################## ] 17/27
Installing : rtm-lsf703-poller-8.3-1.x86_64 [######################### ] 17/27
Installing : rtm-lsf703-poller-8.3-1.x86_64 [########################## ] 17/27
Installing : rtm-lsf703-poller-8.3-1.x86_64 [########################### ] 17/27
Installing : rtm-lsf703-poller-8.3-1.x86_64 [############################ ] 17/27
Installing : rtm-lsf703-poller-8.3-1.x86_64 [############################# ] 17/27
Installing : rtm-lsf703-poller-8.3-1.x86_64 [############################## ] 17/27
Installing : rtm-lsf703-poller-8.3-1.x86_64 [############################### ] 17/27
Installing : rtm-lsf703-poller-8.3-1.x86_64 [################################ ] 17/27
Installing : rtm-lsf703-poller-8.3-1.x86_64 [################################# ] 17/27
Installing : rtm-lsf703-poller-8.3-1.x86_64 17/27
Installing : rtm-lsf706-poller-8.3-1.x86_64 [ ] 18/27
Installing : rtm-lsf706-poller-8.3-1.x86_64 [# ] 18/27
Installing : rtm-lsf706-poller-8.3-1.x86_64 [## ] 18/27
Installing : rtm-lsf706-poller-8.3-1.x86_64 [### ] 18/27
Installing : rtm-lsf706-poller-8.3-1.x86_64 [#### ] 18/27
Installing : rtm-lsf706-poller-8.3-1.x86_64 [##### ] 18/27
Installing : rtm-lsf706-poller-8.3-1.x86_64 [###### ] 18/27
Installing : rtm-lsf706-poller-8.3-1.x86_64 [####### ] 18/27
Installing : rtm-lsf706-poller-8.3-1.x86_64 [######## ] 18/27
Installing : rtm-lsf706-poller-8.3-1.x86_64 [######### ] 18/27
Installing : rtm-lsf706-poller-8.3-1.x86_64 [########## ] 18/27
Installing : rtm-lsf706-poller-8.3-1.x86_64 [########### ] 18/27
Installing : rtm-lsf706-poller-8.3-1.x86_64 [############ ] 18/27
Installing : rtm-lsf706-poller-8.3-1.x86_64 [############# ] 18/27
Installing : rtm-lsf706-poller-8.3-1.x86_64 [############## ] 18/27
Installing : rtm-lsf706-poller-8.3-1.x86_64 [############### ] 18/27
Installing : rtm-lsf706-poller-8.3-1.x86_64 [################ ] 18/27
Installing : rtm-lsf706-poller-8.3-1.x86_64 [################# ] 18/27
Installing : rtm-lsf706-poller-8.3-1.x86_64 [################## ] 18/27
Installing : rtm-lsf706-poller-8.3-1.x86_64 [################### ] 18/27
Installing : rtm-lsf706-poller-8.3-1.x86_64 [#################### ] 18/27
Installing : rtm-lsf706-poller-8.3-1.x86_64 [##################### ] 18/27
Installing : rtm-lsf706-poller-8.3-1.x86_64 [###################### ] 18/27
Installing : rtm-lsf706-poller-8.3-1.x86_64 [####################### ] 18/27
Installing : rtm-lsf706-poller-8.3-1.x86_64 [######################## ] 18/27
Installing : rtm-lsf706-poller-8.3-1.x86_64 [######################### ] 18/27
Installing : rtm-lsf706-poller-8.3-1.x86_64 [########################## ] 18/27
Installing : rtm-lsf706-poller-8.3-1.x86_64 [########################### ] 18/27
Installing : rtm-lsf706-poller-8.3-1.x86_64 [############################ ] 18/27
Installing : rtm-lsf706-poller-8.3-1.x86_64 [############################# ] 18/27
Installing : rtm-lsf706-poller-8.3-1.x86_64 [############################## ] 18/27
Installing : rtm-lsf706-poller-8.3-1.x86_64 [############################### ] 18/27
Installing : rtm-lsf706-poller-8.3-1.x86_64 [################################ ] 18/27
Installing : rtm-lsf706-poller-8.3-1.x86_64 [################################# ] 18/27
Installing : rtm-lsf706-poller-8.3-1.x86_64 18/27
Installing : rtm-lsf702-poller-8.3-1.x86_64 [ ] 19/27
Installing : rtm-lsf702-poller-8.3-1.x86_64 [# ] 19/27
Installing : rtm-lsf702-poller-8.3-1.x86_64 [## ] 19/27
Installing : rtm-lsf702-poller-8.3-1.x86_64 [### ] 19/27
Installing : rtm-lsf702-poller-8.3-1.x86_64 [#### ] 19/27
Installing : rtm-lsf702-poller-8.3-1.x86_64 [##### ] 19/27
Installing : rtm-lsf702-poller-8.3-1.x86_64 [###### ] 19/27
Installing : rtm-lsf702-poller-8.3-1.x86_64 [####### ] 19/27
Installing : rtm-lsf702-poller-8.3-1.x86_64 [######## ] 19/27
Installing : rtm-lsf702-poller-8.3-1.x86_64 [######### ] 19/27
Installing : rtm-lsf702-poller-8.3-1.x86_64 [########## ] 19/27
Installing : rtm-lsf702-poller-8.3-1.x86_64 [########### ] 19/27
Installing : rtm-lsf702-poller-8.3-1.x86_64 [############ ] 19/27
Installing : rtm-lsf702-poller-8.3-1.x86_64 [############# ] 19/27
Installing : rtm-lsf702-poller-8.3-1.x86_64 [############## ] 19/27
Installing : rtm-lsf702-poller-8.3-1.x86_64 [############### ] 19/27
Installing : rtm-lsf702-poller-8.3-1.x86_64 [################ ] 19/27
Installing : rtm-lsf702-poller-8.3-1.x86_64 [################# ] 19/27
Installing : rtm-lsf702-poller-8.3-1.x86_64 [################## ] 19/27
Installing : rtm-lsf702-poller-8.3-1.x86_64 [################### ] 19/27
Installing : rtm-lsf702-poller-8.3-1.x86_64 [#################### ] 19/27
Installing : rtm-lsf702-poller-8.3-1.x86_64 [##################### ] 19/27
Installing : rtm-lsf702-poller-8.3-1.x86_64 [###################### ] 19/27
Installing : rtm-lsf702-poller-8.3-1.x86_64 [####################### ] 19/27
Installing : rtm-lsf702-poller-8.3-1.x86_64 [######################## ] 19/27
Installing : rtm-lsf702-poller-8.3-1.x86_64 [######################### ] 19/27
Installing : rtm-lsf702-poller-8.3-1.x86_64 [########################## ] 19/27
Installing : rtm-lsf702-poller-8.3-1.x86_64 [########################### ] 19/27
Installing : rtm-lsf702-poller-8.3-1.x86_64 [############################ ] 19/27
Installing : rtm-lsf702-poller-8.3-1.x86_64 [############################# ] 19/27
Installing : rtm-lsf702-poller-8.3-1.x86_64 [############################## ] 19/27
Installing : rtm-lsf702-poller-8.3-1.x86_64 [############################### ] 19/27
Installing : rtm-lsf702-poller-8.3-1.x86_64 [################################ ] 19/27
Installing : rtm-lsf702-poller-8.3-1.x86_64 [################################# ] 19/27
Installing : rtm-lsf702-poller-8.3-1.x86_64 19/27
Installing : rtm-lsf701-poller-8.3-1.x86_64 [ ] 20/27
Installing : rtm-lsf701-poller-8.3-1.x86_64 [# ] 20/27
Installing : rtm-lsf701-poller-8.3-1.x86_64 [## ] 20/27
Installing : rtm-lsf701-poller-8.3-1.x86_64 [### ] 20/27
Installing : rtm-lsf701-poller-8.3-1.x86_64 [#### ] 20/27
Installing : rtm-lsf701-poller-8.3-1.x86_64 [##### ] 20/27
Installing : rtm-lsf701-poller-8.3-1.x86_64 [###### ] 20/27
Installing : rtm-lsf701-poller-8.3-1.x86_64 [####### ] 20/27
Installing : rtm-lsf701-poller-8.3-1.x86_64 [######## ] 20/27
Installing : rtm-lsf701-poller-8.3-1.x86_64 [######### ] 20/27
Installing : rtm-lsf701-poller-8.3-1.x86_64 [########## ] 20/27
Installing : rtm-lsf701-poller-8.3-1.x86_64 [########### ] 20/27
Installing : rtm-lsf701-poller-8.3-1.x86_64 [############ ] 20/27
Installing : rtm-lsf701-poller-8.3-1.x86_64 [############# ] 20/27
Installing : rtm-lsf701-poller-8.3-1.x86_64 [############## ] 20/27
Installing : rtm-lsf701-poller-8.3-1.x86_64 [############### ] 20/27
Installing : rtm-lsf701-poller-8.3-1.x86_64 [################ ] 20/27
Installing : rtm-lsf701-poller-8.3-1.x86_64 [################# ] 20/27
Installing : rtm-lsf701-poller-8.3-1.x86_64 [################## ] 20/27
Installing : rtm-lsf701-poller-8.3-1.x86_64 [################### ] 20/27
Installing : rtm-lsf701-poller-8.3-1.x86_64 [#################### ] 20/27
Installing : rtm-lsf701-poller-8.3-1.x86_64 [##################### ] 20/27
Installing : rtm-lsf701-poller-8.3-1.x86_64 [###################### ] 20/27
Installing : rtm-lsf701-poller-8.3-1.x86_64 [####################### ] 20/27
Installing : rtm-lsf701-poller-8.3-1.x86_64 [######################## ] 20/27
Installing : rtm-lsf701-poller-8.3-1.x86_64 [######################### ] 20/27
Installing : rtm-lsf701-poller-8.3-1.x86_64 [########################## ] 20/27
Installing : rtm-lsf701-poller-8.3-1.x86_64 [########################### ] 20/27
Installing : rtm-lsf701-poller-8.3-1.x86_64 [############################ ] 20/27
Installing : rtm-lsf701-poller-8.3-1.x86_64 [############################# ] 20/27
Installing : rtm-lsf701-poller-8.3-1.x86_64 [############################## ] 20/27
Installing : rtm-lsf701-poller-8.3-1.x86_64 [############################### ] 20/27
Installing : rtm-lsf701-poller-8.3-1.x86_64 [################################ ] 20/27
Installing : rtm-lsf701-poller-8.3-1.x86_64 [################################# ] 20/27
Installing : rtm-lsf701-poller-8.3-1.x86_64 20/27
Installing : rtm-lsf704-poller-8.3-1.x86_64 [ ] 21/27
Installing : rtm-lsf704-poller-8.3-1.x86_64 [# ] 21/27
Installing : rtm-lsf704-poller-8.3-1.x86_64 [## ] 21/27
Installing : rtm-lsf704-poller-8.3-1.x86_64 [### ] 21/27
Installing : rtm-lsf704-poller-8.3-1.x86_64 [#### ] 21/27
Installing : rtm-lsf704-poller-8.3-1.x86_64 [##### ] 21/27
Installing : rtm-lsf704-poller-8.3-1.x86_64 [###### ] 21/27
Installing : rtm-lsf704-poller-8.3-1.x86_64 [####### ] 21/27
Installing : rtm-lsf704-poller-8.3-1.x86_64 [######## ] 21/27
Installing : rtm-lsf704-poller-8.3-1.x86_64 [######### ] 21/27
Installing : rtm-lsf704-poller-8.3-1.x86_64 [########## ] 21/27
Installing : rtm-lsf704-poller-8.3-1.x86_64 [########### ] 21/27
Installing : rtm-lsf704-poller-8.3-1.x86_64 [############ ] 21/27
Installing : rtm-lsf704-poller-8.3-1.x86_64 [############# ] 21/27
Installing : rtm-lsf704-poller-8.3-1.x86_64 [############## ] 21/27
Installing : rtm-lsf704-poller-8.3-1.x86_64 [############### ] 21/27
Installing : rtm-lsf704-poller-8.3-1.x86_64 [################ ] 21/27
Installing : rtm-lsf704-poller-8.3-1.x86_64 [################# ] 21/27
Installing : rtm-lsf704-poller-8.3-1.x86_64 [################## ] 21/27
Installing : rtm-lsf704-poller-8.3-1.x86_64 [################### ] 21/27
Installing : rtm-lsf704-poller-8.3-1.x86_64 [#################### ] 21/27
Installing : rtm-lsf704-poller-8.3-1.x86_64 [##################### ] 21/27
Installing : rtm-lsf704-poller-8.3-1.x86_64 [###################### ] 21/27
Installing : rtm-lsf704-poller-8.3-1.x86_64 [####################### ] 21/27
Installing : rtm-lsf704-poller-8.3-1.x86_64 [######################## ] 21/27
Installing : rtm-lsf704-poller-8.3-1.x86_64 [######################### ] 21/27
Installing : rtm-lsf704-poller-8.3-1.x86_64 [########################## ] 21/27
Installing : rtm-lsf704-poller-8.3-1.x86_64 [########################### ] 21/27
Installing : rtm-lsf704-poller-8.3-1.x86_64 [############################ ] 21/27
Installing : rtm-lsf704-poller-8.3-1.x86_64 [############################# ] 21/27
Installing : rtm-lsf704-poller-8.3-1.x86_64 [############################## ] 21/27
Installing : rtm-lsf704-poller-8.3-1.x86_64 [############################### ] 21/27
Installing : rtm-lsf704-poller-8.3-1.x86_64 [################################ ] 21/27
Installing : rtm-lsf704-poller-8.3-1.x86_64 [################################# ] 21/27
Installing : rtm-lsf704-poller-8.3-1.x86_64 21/27
Installing : rtm-lsf-8.3-1.x86_64 [ ] 22/27
Installing : rtm-lsf-8.3-1.x86_64 [# ] 22/27
Installing : rtm-lsf-8.3-1.x86_64 [## ] 22/27
Installing : rtm-lsf-8.3-1.x86_64 [### ] 22/27
Installing : rtm-lsf-8.3-1.x86_64 [#### ] 22/27
Installing : rtm-lsf-8.3-1.x86_64 [##### ] 22/27
Installing : rtm-lsf-8.3-1.x86_64 [###### ] 22/27
Installing : rtm-lsf-8.3-1.x86_64 [####### ] 22/27
Installing : rtm-lsf-8.3-1.x86_64 [######## ] 22/27
Installing : rtm-lsf-8.3-1.x86_64 [######### ] 22/27
Installing : rtm-lsf-8.3-1.x86_64 [########## ] 22/27
Installing : rtm-lsf-8.3-1.x86_64 [########### ] 22/27
Installing : rtm-lsf-8.3-1.x86_64 [############ ] 22/27
Installing : rtm-lsf-8.3-1.x86_64 [############# ] 22/27
Installing : rtm-lsf-8.3-1.x86_64 [############## ] 22/27
Installing : rtm-lsf-8.3-1.x86_64 [############### ] 22/27
Installing : rtm-lsf-8.3-1.x86_64 [################ ] 22/27
Installing : rtm-lsf-8.3-1.x86_64 [################# ] 22/27
Installing : rtm-lsf-8.3-1.x86_64 [################## ] 22/27
Installing : rtm-lsf-8.3-1.x86_64 [################### ] 22/27
Installing : rtm-lsf-8.3-1.x86_64 [#################### ] 22/27
Installing : rtm-lsf-8.3-1.x86_64 [##################### ] 22/27
Installing : rtm-lsf-8.3-1.x86_64 [###################### ] 22/27
Installing : rtm-lsf-8.3-1.x86_64 [####################### ] 22/27
Installing : rtm-lsf-8.3-1.x86_64 [######################## ] 22/27
Installing : rtm-lsf-8.3-1.x86_64 [######################### ] 22/27
Installing : rtm-lsf-8.3-1.x86_64 [########################## ] 22/27
Installing : rtm-lsf-8.3-1.x86_64 [########################### ] 22/27
Installing : rtm-lsf-8.3-1.x86_64 [############################ ] 22/27
Installing : rtm-lsf-8.3-1.x86_64 [############################# ] 22/27
Installing : rtm-lsf-8.3-1.x86_64 [############################## ] 22/27
Installing : rtm-lsf-8.3-1.x86_64 [############################### ] 22/27
Installing : rtm-lsf-8.3-1.x86_64 [################################ ] 22/27
Installing : rtm-lsf-8.3-1.x86_64 [################################# ] 22/27
Installing : rtm-lsf-8.3-1.x86_64 [################################## ] 22/27
Installing : rtm-lsf-8.3-1.x86_64 [################################### ] 22/27
Installing : rtm-lsf-8.3-1.x86_64 [#################################### ] 22/27
Installing : rtm-lsf-8.3-1.x86_64 [##################################### ] 22/27
Installing : rtm-lsf-8.3-1.x86_64 [###################################### ] 22/27
Installing : rtm-lsf-8.3-1.x86_64 [####################################### ] 22/27
Installing : rtm-lsf-8.3-1.x86_64 [######################################## ] 22/27
Installing : rtm-lsf-8.3-1.x86_64 [######################################### ] 22/27
Installing : rtm-lsf-8.3-1.x86_64 [########################################## ] 22/27
Installing : rtm-lsf-8.3-1.x86_64 [########################################### ] 22/27
Installing : rtm-lsf-8.3-1.x86_64 22/27
Installing : rtm-lsf705-poller-8.3-1.x86_64 [ ] 23/27
Installing : rtm-lsf705-poller-8.3-1.x86_64 [# ] 23/27
Installing : rtm-lsf705-poller-8.3-1.x86_64 [## ] 23/27
Installing : rtm-lsf705-poller-8.3-1.x86_64 [### ] 23/27
Installing : rtm-lsf705-poller-8.3-1.x86_64 [#### ] 23/27
Installing : rtm-lsf705-poller-8.3-1.x86_64 [##### ] 23/27
Installing : rtm-lsf705-poller-8.3-1.x86_64 [###### ] 23/27
Installing : rtm-lsf705-poller-8.3-1.x86_64 [####### ] 23/27
Installing : rtm-lsf705-poller-8.3-1.x86_64 [######## ] 23/27
Installing : rtm-lsf705-poller-8.3-1.x86_64 [######### ] 23/27
Installing : rtm-lsf705-poller-8.3-1.x86_64 [########## ] 23/27
Installing : rtm-lsf705-poller-8.3-1.x86_64 [########### ] 23/27
Installing : rtm-lsf705-poller-8.3-1.x86_64 [############ ] 23/27
Installing : rtm-lsf705-poller-8.3-1.x86_64 [############# ] 23/27
Installing : rtm-lsf705-poller-8.3-1.x86_64 [############## ] 23/27
Installing : rtm-lsf705-poller-8.3-1.x86_64 [############### ] 23/27
Installing : rtm-lsf705-poller-8.3-1.x86_64 [################ ] 23/27
Installing : rtm-lsf705-poller-8.3-1.x86_64 [################# ] 23/27
Installing : rtm-lsf705-poller-8.3-1.x86_64 [################## ] 23/27
Installing : rtm-lsf705-poller-8.3-1.x86_64 [################### ] 23/27
Installing : rtm-lsf705-poller-8.3-1.x86_64 [#################### ] 23/27
Installing : rtm-lsf705-poller-8.3-1.x86_64 [##################### ] 23/27
Installing : rtm-lsf705-poller-8.3-1.x86_64 [###################### ] 23/27
Installing : rtm-lsf705-poller-8.3-1.x86_64 [####################### ] 23/27
Installing : rtm-lsf705-poller-8.3-1.x86_64 [######################## ] 23/27
Installing : rtm-lsf705-poller-8.3-1.x86_64 [######################### ] 23/27
Installing : rtm-lsf705-poller-8.3-1.x86_64 [########################## ] 23/27
Installing : rtm-lsf705-poller-8.3-1.x86_64 [########################### ] 23/27
Installing : rtm-lsf705-poller-8.3-1.x86_64 [############################ ] 23/27
Installing : rtm-lsf705-poller-8.3-1.x86_64 [############################# ] 23/27
Installing : rtm-lsf705-poller-8.3-1.x86_64 [############################## ] 23/27
Installing : rtm-lsf705-poller-8.3-1.x86_64 [############################### ] 23/27
Installing : rtm-lsf705-poller-8.3-1.x86_64 [################################ ] 23/27
Installing : rtm-lsf705-poller-8.3-1.x86_64 [################################# ] 23/27
Installing : rtm-lsf705-poller-8.3-1.x86_64 23/27
Installing : rtm-lsf8-poller-8.3-1.x86_64 [ ] 24/27
Installing : rtm-lsf8-poller-8.3-1.x86_64 [# ] 24/27
Installing : rtm-lsf8-poller-8.3-1.x86_64 [## ] 24/27
Installing : rtm-lsf8-poller-8.3-1.x86_64 [### ] 24/27
Installing : rtm-lsf8-poller-8.3-1.x86_64 [#### ] 24/27
Installing : rtm-lsf8-poller-8.3-1.x86_64 [##### ] 24/27
Installing : rtm-lsf8-poller-8.3-1.x86_64 [###### ] 24/27
Installing : rtm-lsf8-poller-8.3-1.x86_64 [####### ] 24/27
Installing : rtm-lsf8-poller-8.3-1.x86_64 [######## ] 24/27
Installing : rtm-lsf8-poller-8.3-1.x86_64 [######### ] 24/27
Installing : rtm-lsf8-poller-8.3-1.x86_64 [########## ] 24/27
Installing : rtm-lsf8-poller-8.3-1.x86_64 [########### ] 24/27
Installing : rtm-lsf8-poller-8.3-1.x86_64 [############ ] 24/27
Installing : rtm-lsf8-poller-8.3-1.x86_64 [############# ] 24/27
Installing : rtm-lsf8-poller-8.3-1.x86_64 [############## ] 24/27
Installing : rtm-lsf8-poller-8.3-1.x86_64 [############### ] 24/27
Installing : rtm-lsf8-poller-8.3-1.x86_64 [################ ] 24/27
Installing : rtm-lsf8-poller-8.3-1.x86_64 [################# ] 24/27
Installing : rtm-lsf8-poller-8.3-1.x86_64 [################## ] 24/27
Installing : rtm-lsf8-poller-8.3-1.x86_64 [################### ] 24/27
Installing : rtm-lsf8-poller-8.3-1.x86_64 [#################### ] 24/27
Installing : rtm-lsf8-poller-8.3-1.x86_64 [##################### ] 24/27
Installing : rtm-lsf8-poller-8.3-1.x86_64 [###################### ] 24/27
Installing : rtm-lsf8-poller-8.3-1.x86_64 [####################### ] 24/27
Installing : rtm-lsf8-poller-8.3-1.x86_64 [######################## ] 24/27
Installing : rtm-lsf8-poller-8.3-1.x86_64 [######################### ] 24/27
Installing : rtm-lsf8-poller-8.3-1.x86_64 [########################## ] 24/27
Installing : rtm-lsf8-poller-8.3-1.x86_64 [########################### ] 24/27
Installing : rtm-lsf8-poller-8.3-1.x86_64 [############################ ] 24/27
Installing : rtm-lsf8-poller-8.3-1.x86_64 [############################# ] 24/27
Installing : rtm-lsf8-poller-8.3-1.x86_64 [############################## ] 24/27
Installing : rtm-lsf8-poller-8.3-1.x86_64 [############################### ] 24/27
Installing : rtm-lsf8-poller-8.3-1.x86_64 [################################ ] 24/27
Installing : rtm-lsf8-poller-8.3-1.x86_64 [################################# ] 24/27
Installing : rtm-lsf8-poller-8.3-1.x86_64 [################################## ] 24/27
Installing : rtm-lsf8-poller-8.3-1.x86_64 [################################### ] 24/27
Installing : rtm-lsf8-poller-8.3-1.x86_64 24/27
Installing : rtm-ptskin-plugin-8.3-1.x86_64 [ ] 25/27
Installing : rtm-ptskin-plugin-8.3-1.x86_64 [# ] 25/27
Installing : rtm-ptskin-plugin-8.3-1.x86_64 [## ] 25/27
Installing : rtm-ptskin-plugin-8.3-1.x86_64 [#### ] 25/27
Installing : rtm-ptskin-plugin-8.3-1.x86_64 [##### ] 25/27
Installing : rtm-ptskin-plugin-8.3-1.x86_64 [###### ] 25/27
Installing : rtm-ptskin-plugin-8.3-1.x86_64 [####### ] 25/27
Installing : rtm-ptskin-plugin-8.3-1.x86_64 [######## ] 25/27
Installing : rtm-ptskin-plugin-8.3-1.x86_64 [######### ] 25/27
Installing : rtm-ptskin-plugin-8.3-1.x86_64 [########## ] 25/27
Installing : rtm-ptskin-plugin-8.3-1.x86_64 [########### ] 25/27
Installing : rtm-ptskin-plugin-8.3-1.x86_64 [############ ] 25/27
Installing : rtm-ptskin-plugin-8.3-1.x86_64 [############### ] 25/27
Installing : rtm-ptskin-plugin-8.3-1.x86_64 [################## ] 25/27
Installing : rtm-ptskin-plugin-8.3-1.x86_64 [#################### ] 25/27
Installing : rtm-ptskin-plugin-8.3-1.x86_64 [##################### ] 25/27
Installing : rtm-ptskin-plugin-8.3-1.x86_64 [###################### ] 25/27
Installing : rtm-ptskin-plugin-8.3-1.x86_64 [####################### ] 25/27
Installing : rtm-ptskin-plugin-8.3-1.x86_64 [######################## ] 25/27
Installing : rtm-ptskin-plugin-8.3-1.x86_64 [######################### ] 25/27
Installing : rtm-ptskin-plugin-8.3-1.x86_64 [############################ ] 25/27
Installing : rtm-ptskin-plugin-8.3-1.x86_64 [############################## ] 25/27
Installing : rtm-ptskin-plugin-8.3-1.x86_64 [############################### ] 25/27
Installing : rtm-ptskin-plugin-8.3-1.x86_64 [################################ ] 25/27
Installing : rtm-ptskin-plugin-8.3-1.x86_64 [################################# ] 25/27
Installing : rtm-ptskin-plugin-8.3-1.x86_64 25/27
Installing : rtm-fusionchart-8.3-1.x86_64 [### ] 26/27
Installing : rtm-fusionchart-8.3-1.x86_64 [#### ] 26/27
Installing : rtm-fusionchart-8.3-1.x86_64 [####### ] 26/27
Installing : rtm-fusionchart-8.3-1.x86_64 [########## ] 26/27
Installing : rtm-fusionchart-8.3-1.x86_64 [############# ] 26/27
Installing : rtm-fusionchart-8.3-1.x86_64 [################ ] 26/27
Installing : rtm-fusionchart-8.3-1.x86_64 [################### ] 26/27
Installing : rtm-fusionchart-8.3-1.x86_64 [##################### ] 26/27
Installing : rtm-fusionchart-8.3-1.x86_64 [######################## ] 26/27
Installing : rtm-fusionchart-8.3-1.x86_64 [########################### ] 26/27
Installing : rtm-fusionchart-8.3-1.x86_64 [############################# ] 26/27
Installing : rtm-fusionchart-8.3-1.x86_64 [################################ ] 26/27
Installing : rtm-fusionchart-8.3-1.x86_64 [################################### ] 26/27
Installing : rtm-fusionchart-8.3-1.x86_64 26/27
Installing : rtm-ioncube-8.3-1.x86_64 [ ] 27/27
Installing : rtm-ioncube-8.3-1.x86_64 [# ] 27/27
Installing : rtm-ioncube-8.3-1.x86_64 [## ] 27/27
Installing : rtm-ioncube-8.3-1.x86_64 [### ] 27/27
Installing : rtm-ioncube-8.3-1.x86_64 [#### ] 27/27
Installing : rtm-ioncube-8.3-1.x86_64 [##### ] 27/27
Installing : rtm-ioncube-8.3-1.x86_64 [###### ] 27/27
Installing : rtm-ioncube-8.3-1.x86_64 [####### ] 27/27
Installing : rtm-ioncube-8.3-1.x86_64 [######## ] 27/27
Installing : rtm-ioncube-8.3-1.x86_64 [######### ] 27/27
Installing : rtm-ioncube-8.3-1.x86_64 [########## ] 27/27
Installing : rtm-ioncube-8.3-1.x86_64 [########### ] 27/27
Installing : rtm-ioncube-8.3-1.x86_64 [############ ] 27/27
Installing : rtm-ioncube-8.3-1.x86_64 [############# ] 27/27
Installing : rtm-ioncube-8.3-1.x86_64 [############## ] 27/27
Installing : rtm-ioncube-8.3-1.x86_64 [############### ] 27/27
Installing : rtm-ioncube-8.3-1.x86_64 [################ ] 27/27
Installing : rtm-ioncube-8.3-1.x86_64 [################# ] 27/27
Installing : rtm-ioncube-8.3-1.x86_64 [################## ] 27/27
Installing : rtm-ioncube-8.3-1.x86_64 [################### ] 27/27
Installing : rtm-ioncube-8.3-1.x86_64 [#################### ] 27/27
Installing : rtm-ioncube-8.3-1.x86_64 [##################### ] 27/27
Installing : rtm-ioncube-8.3-1.x86_64 [###################### ] 27/27
Installing : rtm-ioncube-8.3-1.x86_64 [####################### ] 27/27
Installing : rtm-ioncube-8.3-1.x86_64 [######################## ] 27/27
Installing : rtm-ioncube-8.3-1.x86_64 [######################### ] 27/27
Installing : rtm-ioncube-8.3-1.x86_64 [########################## ] 27/27
Installing : rtm-ioncube-8.3-1.x86_64 [########################### ] 27/27
Installing : rtm-ioncube-8.3-1.x86_64 [############################ ] 27/27
Installing : rtm-ioncube-8.3-1.x86_64 [############################# ] 27/27
Installing : rtm-ioncube-8.3-1.x86_64 [############################## ] 27/27
Installing : rtm-ioncube-8.3-1.x86_64 [############################### ] 27/27
Installing : rtm-ioncube-8.3-1.x86_64 [################################ ] 27/27
Installing : rtm-ioncube-8.3-1.x86_64 [################################# ] 27/27
Installing : rtm-ioncube-8.3-1.x86_64 [################################## ] 27/27
Installing : rtm-ioncube-8.3-1.x86_64 [################################### ] 27/27
Installing : rtm-ioncube-8.3-1.x86_64 [#################################### ] 27/27
Installing : rtm-ioncube-8.3-1.x86_64 [##################################### ] 27/27
Installing : rtm-ioncube-8.3-1.x86_64 [###################################### ] 27/27
Installing : rtm-ioncube-8.3-1.x86_64 [####################################### ] 27/27
Installing : rtm-ioncube-8.3-1.x86_64 27/27
Installed products updated.
Installed:
rtm-admin-plugin.x86_64 0:8.3-1 rtm-advocate.x86_64 0:8.3-1
rtm-doc.x86_64 0:8.3-1 rtm-extras.x86_64 0:8.3-1
rtm-flexlm.x86_64 0:8.3-1 rtm-fusionchart.x86_64 0:8.3-1
rtm-grid-plugin.x86_64 0:8.3-1 rtm-gridalarms-plugin.x86_64 0:8.3-1
rtm-gridcstat-plugin.x86_64 0:8.3-1 rtm-gridpend-plugin.x86_64 0:8.3-1
rtm-ioncube.x86_64 0:8.3-1 rtm-lic-pollers.x86_64 0:8.3-1
rtm-license-plugin.x86_64 0:8.3-1 rtm-lsf.x86_64 0:8.3-1
rtm-lsf701-poller.x86_64 0:8.3-1 rtm-lsf702-poller.x86_64 0:8.3-1
rtm-lsf703-poller.x86_64 0:8.3-1 rtm-lsf704-poller.x86_64 0:8.3-1
rtm-lsf705-poller.x86_64 0:8.3-1 rtm-lsf706-poller.x86_64 0:8.3-1
rtm-lsf8-poller.x86_64 0:8.3-1 rtm-lsfpollerd.x86_64 0:8.3-1
rtm-meta-plugin.x86_64 0:8.3-1 rtm-ptskin-plugin.x86_64 0:8.3-1
rtm-release.x86_64 0:8.3-1 rtm-rtmssh-plugin.x86_64 0:8.3-1
rtm-thold-plugin.x86_64 0:8.3-1
Complete!
Starting RTM
Initialising IBM Platform RTM essential services: [ OK ]
Initialising IBM Platform RTM database: [ OK ]
Initialising IBM Platform LSF 7.0 Update 1 Poller: [ OK ]
Initialising IBM Platform LSF 7.0 Update 2 Poller: [ OK ]
Initialising IBM Platform LSF 7.0 Update 3 Poller: [ OK ]
Initialising IBM Platform LSF 7.0 Update 4 Poller: [ OK ]
Initialising IBM Platform LSF 7.0 Update 5 Poller: [ OK ]
Initialising IBM Platform LSF 7.0 Update 6 Poller: [ OK ]
Initialising IBM Platform LSF 8 Poller: [ OK ]
Starting IBM Platform RTM essential services: [ OK ]
Starting IBM Platform RTM extra services: [ OK ]
Configuring grid control
Grid control enables users to control LSF clusters, hosts, queues, and jobs by running common administrative commands through IBM Platform RTM. To enable Grid control for your cluster, follow the configuration steps on page 29 of Installing IBM Platform RTM, SC27-4757-00. When grid control is enabled on IBM Platform RTM, the user for whom you enable grid control authority does not need to be the LSF cluster administrator. This user is allowed to run commands on the cluster by using the credentials of the LSF cluster administrator. Figure 4-28 on page 85 shows step 2 on page 29 of Installing IBM Platform RTM, SC27-4757-00.
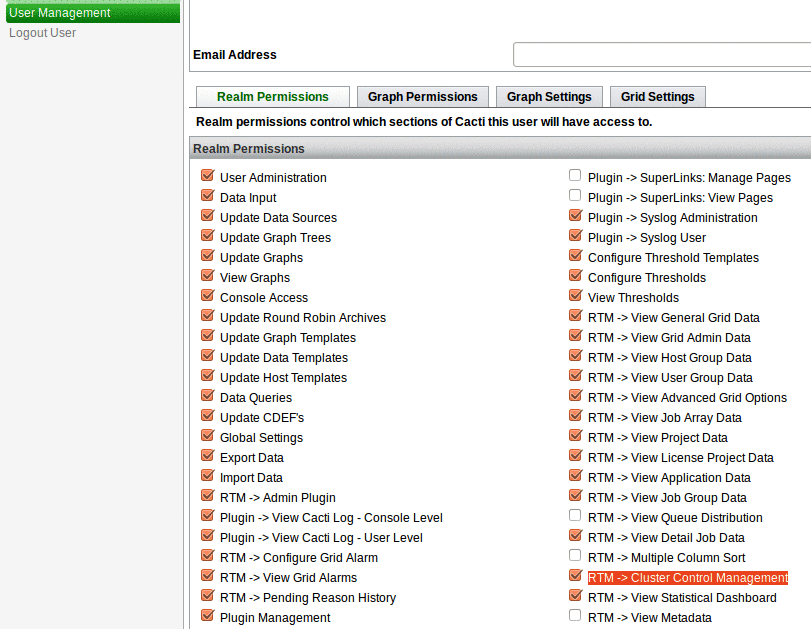
Figure 4-28 IBM Platform RTM grid control configuration
Figure 4-29, Figure 4-30 on page 86, and Figure 4-31 on page 86 show step-by-step how to start LIM on your cluster nodes by using IBM Platform RTM after grid control is enabled.
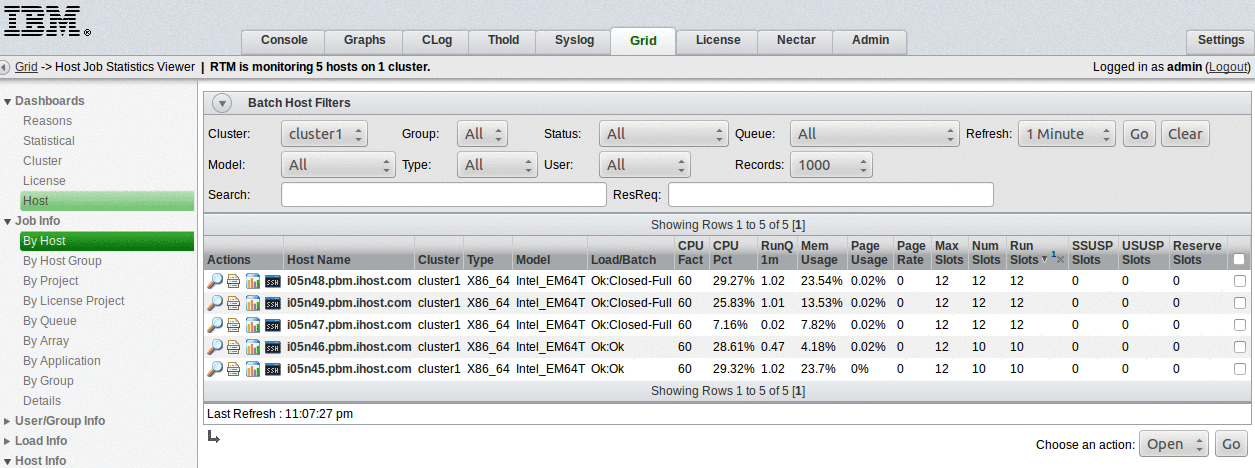
Figure 4-29 IBM Platform RTM: Restarting LIM 1
Figure 4-30 on page 86 shows the restart of LIM in IBM Platform RTM.

Figure 4-30 IBM Platform RTM: Restarting LIM 2
Figure 4-31 shows the restart window (part 3) of LIM in IBM Platform RTM.

Figure 4-31 IBM Platform RTM: Restarting LIM 3
For more details about the available commands that you can run by using the IBM Platform RTM interface, see IBM Platform RTM Administrator Guide, SC27-4756-00.
Monitoring clusters
By using IBM Platform RTM, administrators can monitor their entire clusters. They can have access to details about all hosts in the clusters and view utilization metrics and details about jobs that run on the hosts. Figure 4-32 on page 87 shows the overall status of all hosts in the cluster that we use for this book.
Figure 4-32 IBM Platform RTM Grid view
If you are interested in details about the jobs that run on a specific host in the cluster, you can click the host name from the view in Figure 4-32. For example, we selected the host i05n49. Figure 4-33 shows what we see after we click host i05n49. The jobs that run on this node are shown in pink, which means that they run below CPU target efficiency. They are displayed in pink to indicate an alarm condition. This alarm means that we can send more jobs to run on this node to improve efficiency for users.
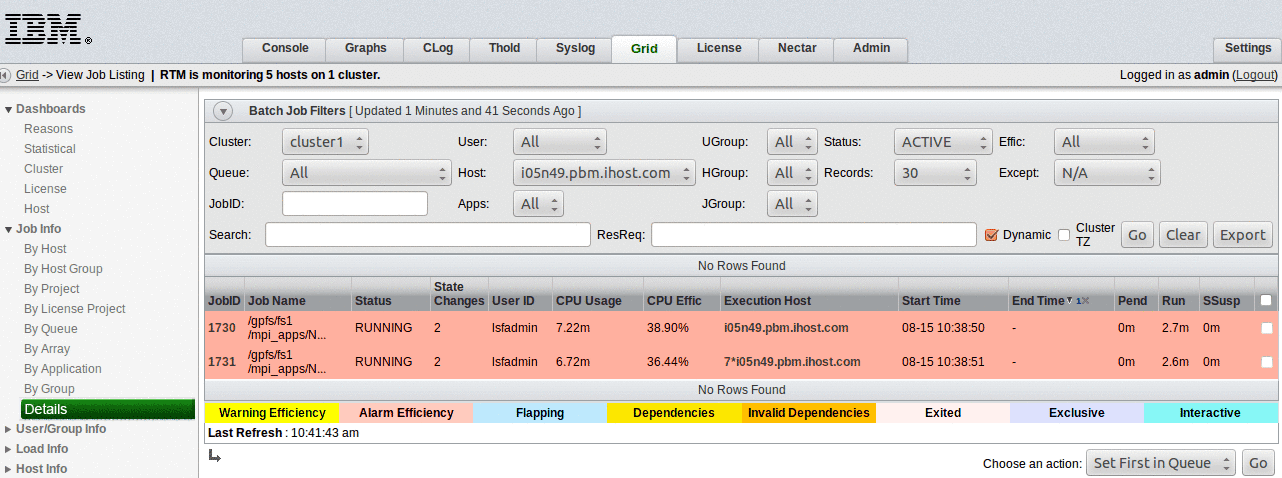
Figure 4-33 IBM Platform RTM host information
To see more details about the host that runs the jobs on Figure 4-33, click the host name in the column Execution Host. IBM Platform RTM shows you additional information about the host configuration and load and batch information. IBM Platform RTM also displays several host graphs to help you analyze host conditions. For an example of the available host graphs, see Figure 4-34 on page 88.
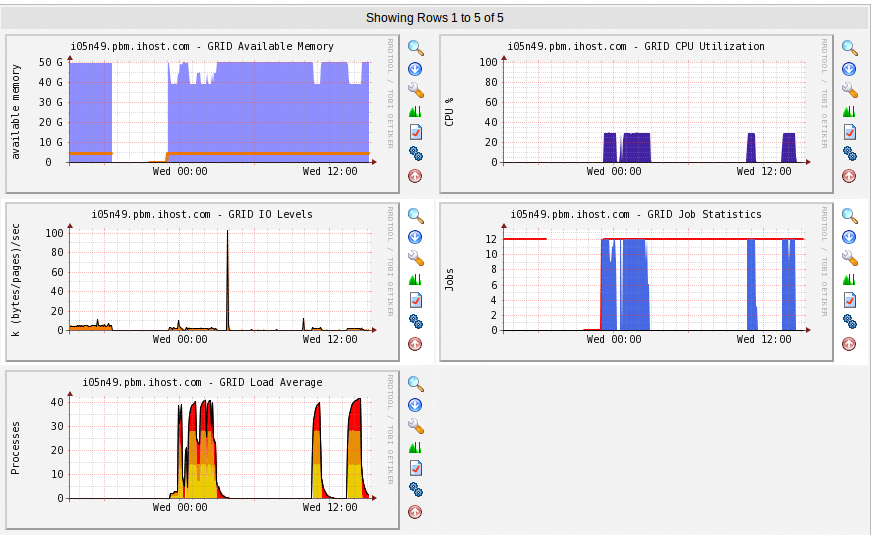
Figure 4-34 IBM Platform RTM execution host graphs
If you are interested in a quick view of all hosts in the cluster, you can access the host dashboard from the Grid tab (see Figure 4-35). It displays each host in a different column, which helps you immediately identify the host status. This dashboard is configurable.

Figure 4-35 IBM Platform RTM Host view
If you move the mouse over each host that is shown on Figure 4-35, you see more details, as shown in Figure 4-36 on page 89.
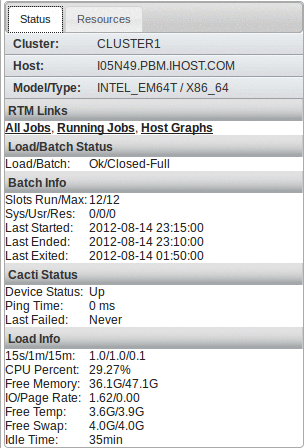
Figure 4-36 IBM Platform RTM host status
Monitoring jobs
From the Grid tab, Job Info section on the left menu of the IBM Platform RTM GUI, you can see all sorts of information about jobs on your clusters. By accessing the Details menu under Job Info, you can see the following information:
•Name and status of a job
•State changes
•Submission user
•CPU usage and efficiency
•Execution host
•Start and end time
You can also configure the items that you see on this page or see all available information about the job by clicking a job ID that is shown in this view. If you click a job ID, you also can access more job details, job graphs, host graphs, and pending reasons for the job. Each element is on a different tab.
Figure 4-37 on page 90 and Figure 4-38 on page 91 show examples of graphs to which you have access from the Job Graphs tab. These graphs can help you understand the details about the resources that are used by the job during execution.
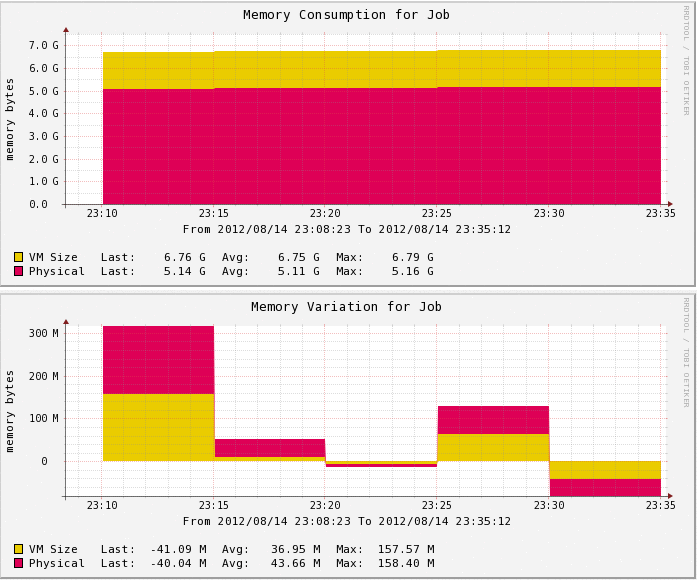
Figure 4-37 IBM Platform RTM Job Graphs Memory
The graphs on Figure 4-38 on page 91 show CPU time utilization by the job and how it varies with time.
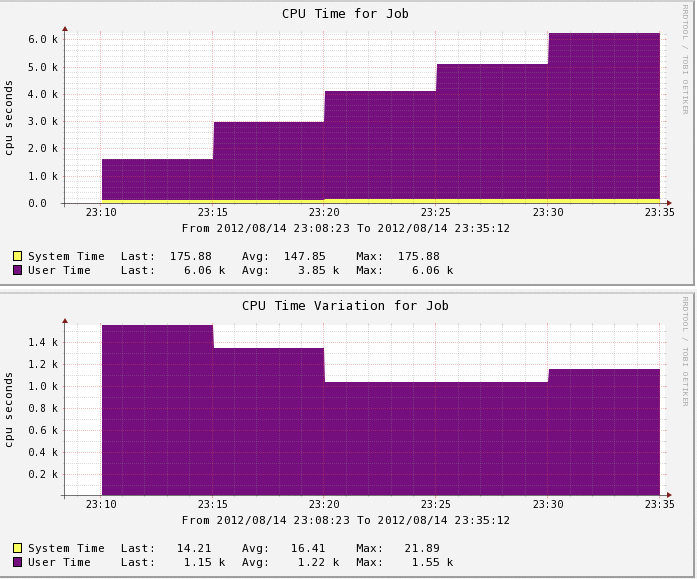
Figure 4-38 IBM Platform RTM Job Graphs CPU
From the Host Graphs tab, you can see graphs of the host where the job ran (as the graphs show in Figure 4-34 on page 88). These graphs show the resource availability relative to job resource requirements and helps fine-tune scheduling policies. New in IBM Platform RTM 8, you can also see job pending reasons from the Pending Reasons tab, if the job is pending in the queue before it is executed. This feature is disabled by default and you must configure IBM Platform RTM to enable it (see “Enable Pending Reason History Reporting” in Administering IBM Platform RTM, GC22-5388-00).
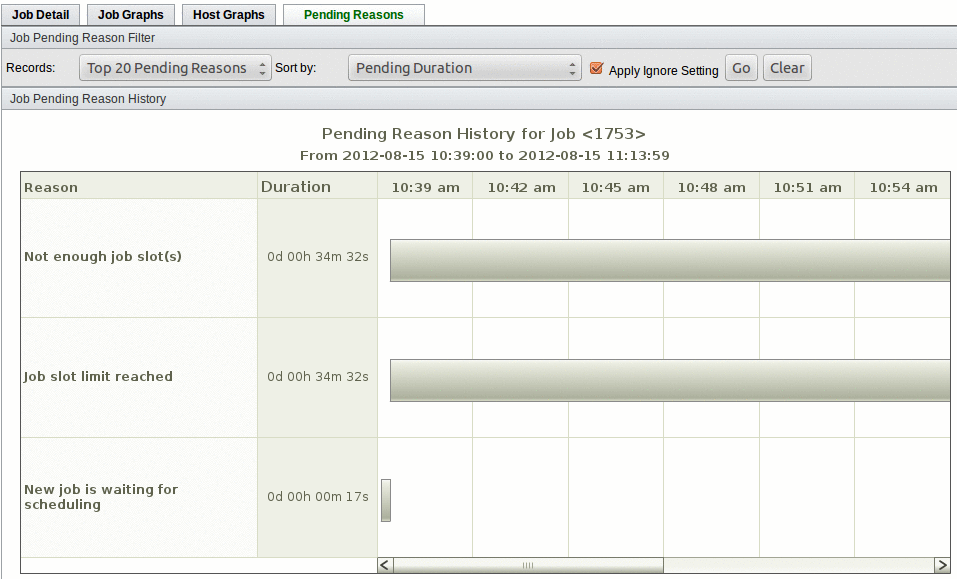
Figure 4-39 IBM Platform RTM Job Pending Reasons tab
Visualizing graphs
IBM Platform RTM provides users access to several types of graphs that allow them to easily control every aspect of the cluster. Figure 4-40 shows some types of the graph templates that are available on IBM Platform RTM.

Figure 4-40 IBM Platform RTM graph templates
The graph in Figure 4-41 shows an example of a graph that represents cluster efficiency in a period of 2 hours. You can see that the cluster is idle for almost one hour, and only after 11 PM, jobs start to run on the cluster. This graph can indicate that the cluster is not efficiently utilized or that there is a problem that affected the cluster so that it became unavailable.
In Figure 4-42, we show another type of graph that can help you understand whether an issue occurred. When you analyze cluster efficiency graphs for longer durations, you can understand trends, identify how to improve SLAs, and plan capacity.
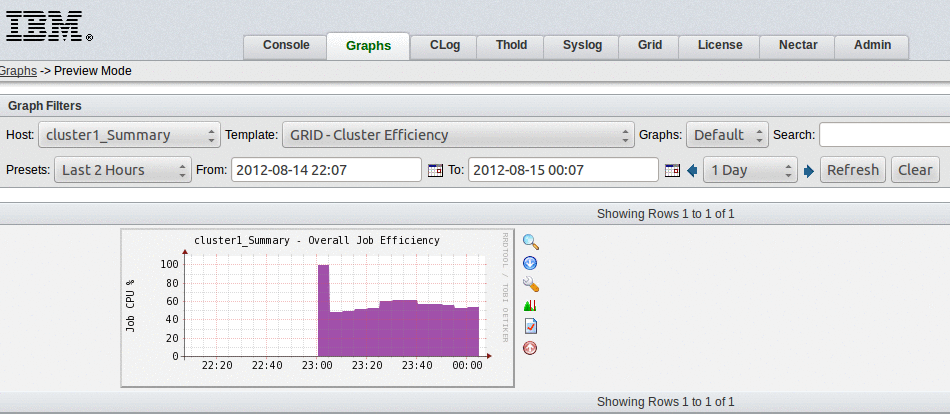
Figure 4-41 IBM Platform RTM Cluster Efficiency
In Figure 4-42, we selected the Grid IO Levels template for cluster1and zoomed the output to the time frame where we observed low cluster efficiency. In that graph, there is a time frame where the I/O level is 0. Figure 4-42 indicates a problem in the cluster where the file system is unavailable, which makes the entire cluster unavailable.

Figure 4-42 IBM Platform RTM Grid IO Levels
IBM Platform RTM also offers graphs that allow users to understand job and queue details. In Figure 4-43, we show graphs that represent job and queue details for the queue normal.
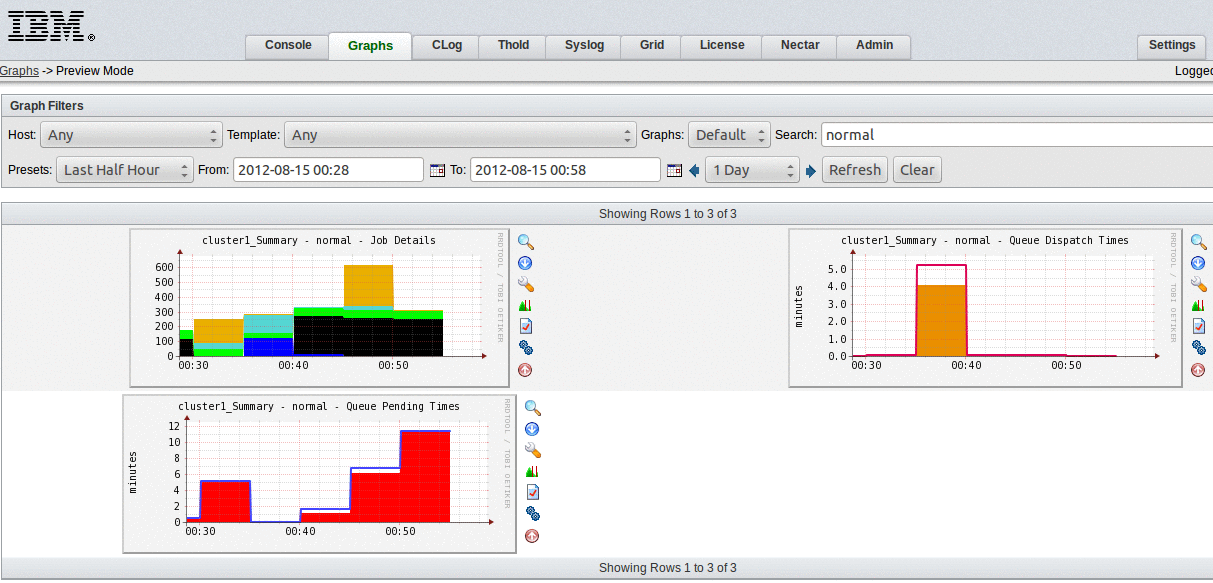
Figure 4-43 IBM Platform RTM cluster graphs
The administrator can customize graphs and create new types of graphs as needed.
Creating thresholds and alerts
IBM Platform RTM allows users to create thresholds and alarms to help control the cluster. This feature is useful if the cluster administrator wants to be alarmed on certain conditions, for example, when hosts are down, when disk utilization is over a certain limit, and several other conditions. Users can see existing thresholds and their statuses from the Thold tab on IBM Platform RTM. They can create thresholds from the Console tab, under Management, Thresholds. Users are allowed to create thresholds per host or for the entire cluster. Thresholds are based on several types of graphs that are available in the application.
In Figure 4-44, we show a threshold that is created for the entire cluster that is based on the graph template “Alert - Jobs Pending for X Seconds”. (For details about how this threshold is created, see Appendix C, “IBM Platform Load Sharing Facility add-ons and examples” on page 321.) We configured the following threshold to enable and alarm when more than 20 jobs are pending in the cluster for more than 300 seconds. In Figure 4-44, there are 36 jobs pending for more than 300 seconds, so the threshold alarm is enabled and shown in red.
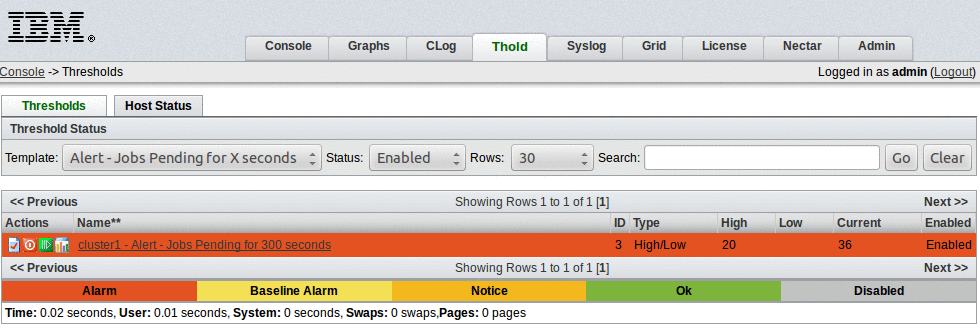
Figure 4-44 IBM Platform RTM threshold enabled
When you create thresholds, you can configure several options such as sending email to administrators when the threshold alarm is enabled. You can show an event in syslog when the alarm is triggered or configure actions to run when alarm is enabled among others. Also, from the Thold tab in IBM Platform RTM, you can click the threshold about which you want to see more details, and get access to graphs with historic information.
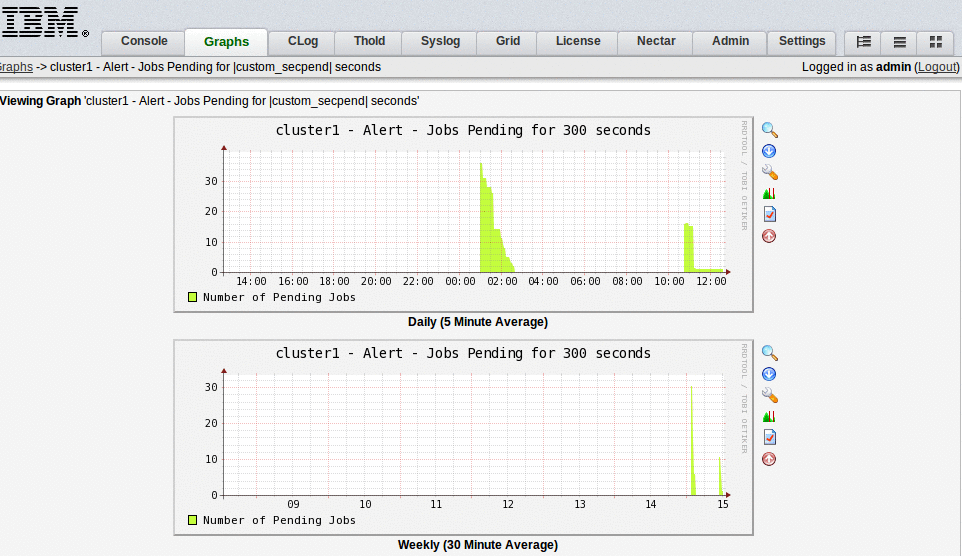
Figure 4-45 IBM Platform RTM threshold details
Other than threshold alarms, administrators can also create grid alarms that combine several metrics that use logical expressions. To create these sorts of alarms, the user needs to be familiar with the IBM Platform RTM database schema. We show in the following figures how to create the same alarm that we created previously by using metrics and expressions. (This alarm indicates when there are jobs in the PEND status for more than 300 seconds in the cluster.) The use of metrics and expressions gives users more flexibility when they create their own alarms.
To start the creation of alarms, go to the Grid tab, and select Metric under Grid Alarms. In Figure 4-46 and Figure 4-47, we create two metrics to use to create this alarm: the Job Pending Time and the Job Status.
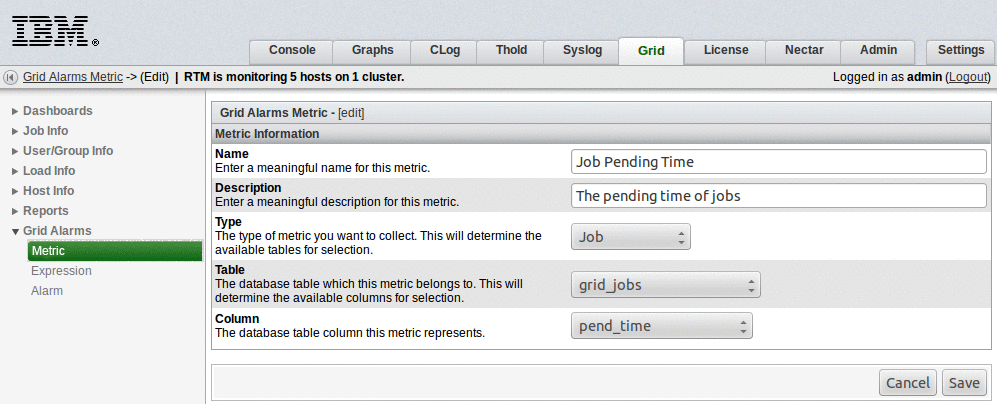
Figure 4-46 IBM Platform RTM Job Pending Time metric
Figure 4-47 shows how to create the Job Status metric.
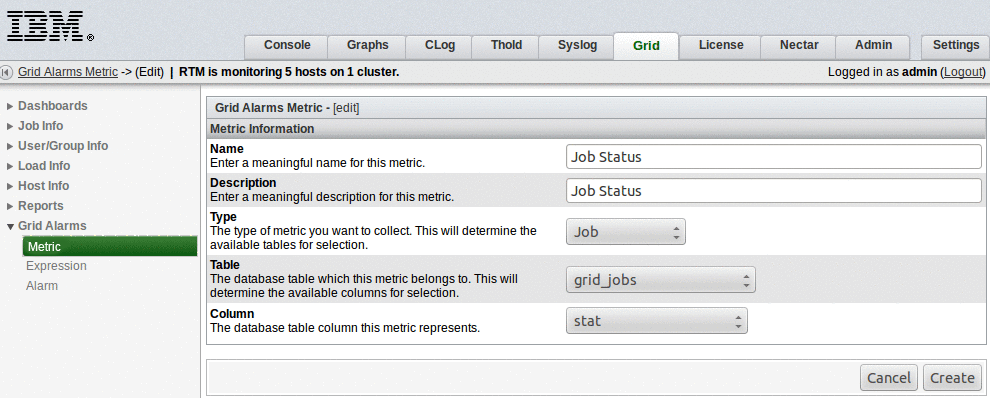
Figure 4-47 IBM Platform RTM Job Status metric
After you create metrics, you need to create an expression. We use the two metrics in Figure 4-46 on page 96 and Figure 4-47 on page 96 to create the expression in Figure 4-48. This expression indicates the query to run in the IBM Platform RTM database to collect the data that is used by this alarm. You need to create each one of the expression items that compose the expression. Click Add in the upper-right corner of the Expression Items section (Figure 4-48). To verify that your expression is correct, click Check Syntax to see a message that indicates whether the expression is OK. Then, click Save and proceed to create the alarm.
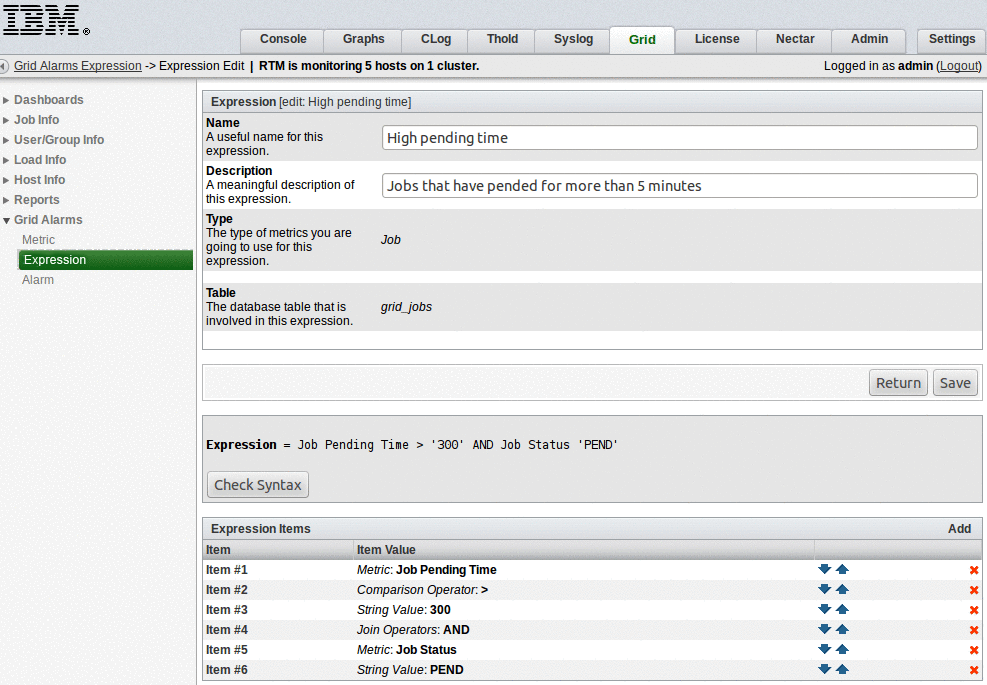
Figure 4-48 IBM Platform RTM High pending time expression
After you create the metrics and expressions, click Alarm (under the menu Expression) on the left side of the IBM Platform RTM GUI (see Figure 4-48). Then, when you click Add, you see a page that is similar to the page that is shown in Appendix C, “IBM Platform Load Sharing Facility add-ons and examples” on page 321 for threshold creation. But, you have to select the Grid Alarm Expression that you created in Figure 4-48 to create the alarm. You then configure the alarm as you want and save it. The alarm is available from the Alarms menu at the Grid tab as shown in Figure 4-49 on page 98.
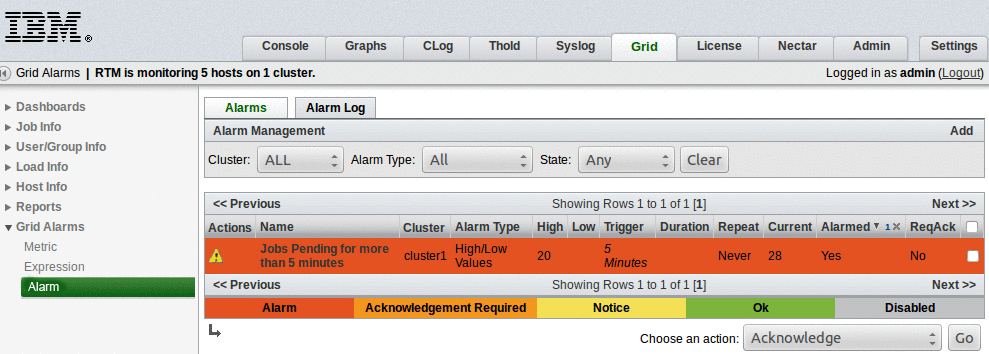
Figure 4-49 IBM Platform RTM raised alarm
4.3.4 IBM Platform Process Manager implementation
To complete the IBM Platform Process Manager installation, we followed the steps in the document Installing IBM Platform Process Manager on UNIX, SC22-5400-00. This document ships with the product (it is not available at the IBM publications site).
We installed IBM Platform Process Manager in the shared file system (/gpfs/fs1) with no failover. When you install the software, ensure that you download all of the distribution tar files that are described in “Prepare distribution files” on page 10 of the installation manual. If you install only the server part (ppm8.3.0.0_svr_lnx26-lib23-x64) and try to start IBM Platform Process Manager, you get the error that is shown in Example 4-9.
Example 4-9 IBM Platform Process Manager error when we started IBM Platform Process Manager
[root@i05n47 ppm8.3.0.0_pinstall]# jadmin start
Starting up jfd ...
No text found for this message, parameters are: `lsid',
jfd failed to start.
Submitting sample flow /gpfs/fs1/ppm/8.3/examples/Sample.xml ...
Error Communicating with Daemon: Invalid response - Unable to connect to Process Manager
<i05n47:1966>.
Renaming /gpfs/fs1/ppm/8.3/examples/Sample.xml to Sample_submitted.xml ...
In Example 4-10, you see the installation output when you install the server package.
Example 4-10 IBM Platform Process Manager server installation logs
[root@i05n47 ppm8.3.0.0_pinstall] ./jsinstall -f install.config
Logging installation sequence in /gpfs/fs1/install/LSF/PPM/ppm8.3.0.0_pinstall/Install.log
Searching for Process Manager tar files in /gpfs/fs1/install/LSF/PPM, Please wait ...
1) Linux 2.6-glibc2.3-x86_64 Server
Press 1 or Enter to install: 1
You have chosen the following tar file(s):
ppm8.3.0.0_svr_lnx26-lib23-x64
Creating /gpfs/fs1/ppm ...
Space required to install: 200000 kb.
Space available under /gpfs/fs1/ppm: 301526784 kb.
Do you want to continue installation? (y/n) [y] y
International Program License Agreement
Part 1 - General Terms
BY DOWNLOADING, INSTALLING, COPYING, ACCESSING, CLICKING ON
AN "ACCEPT" BUTTON, OR OTHERWISE USING THE PROGRAM,
LICENSEE AGREES TO THE TERMS OF THIS AGREEMENT. IF YOU ARE
ACCEPTING THESE TERMS ON BEHALF OF LICENSEE, YOU REPRESENT
AND WARRANT THAT YOU HAVE FULL AUTHORITY TO BIND LICENSEE
TO THESE TERMS. IF YOU DO NOT AGREE TO THESE TERMS,
* DO NOT DOWNLOAD, INSTALL, COPY, ACCESS, CLICK ON AN
"ACCEPT" BUTTON, OR USE THE PROGRAM; AND
* PROMPTLY RETURN THE UNUSED MEDIA, DOCUMENTATION, AND
Press Enter to continue viewing the license agreement, or
enter "1" to accept the agreement, "2" to decline it, "3"
to print it, "4" to read non-IBM terms, or "99" to go back
to the previous screen.
Process Manager pre-installation check ...
Checking the JS_TOP directory /gpfs/fs1/ppm ...
... Done checking the JS_TOP directory /gpfs/fs1/ppm ...
Checking selected tar file(s) ...
... Done checking selected tar file(s).
Checking Process Manager Administrators ...
Process Manager administrator(s): "lsfadmin"
Primary Process Manager administrator: "lsfadmin"
Checking Process Manager Control Administrators ...
... Done checking the license ...
Pre-installation check report saved as text file:
/gpfs/fs1/install/LSF/PPM/ppm8.3.0.0_pinstall/prechk.rpt.
... Done Process Manager pre-installation check.
Installing binary files " ppm8.3.0.0_svr_lnx26-lib23-x64"...
Creating /gpfs/fs1/ppm/8.3 ...
Copying jsinstall files to /gpfs/fs1/ppm/8.3/install
Creating /gpfs/fs1/ppm/8.3/install ...
Creating /gpfs/fs1/ppm/8.3/install/instlib ...
... Done copying jsinstall files to /gpfs/fs1/ppm/8.3/install
Installing linux2.6-glibc2.3-x86_64 Server...
Please wait, extracting ppm8.3.0.0_svr_lnx26-lib23-x64 may take up to 5 minutes ...
... Done extracting /gpfs/fs1/install/LSF/PPM/ppm8.3.0.0_svr_lnx26-lib23-x64.tar.Z.
... linux2.6-glibc2.3-x86_64 Server installed successfully under /gpfs/fs1/ppm/8.3.
Modifying owner, access mode of binary files ...
... Done modifying owner, access mode of binary files ...
Done installing binary files ...
Creating configuration directories and files ...
Creating /gpfs/fs1/ppm/work/alarms ...
Creating /gpfs/fs1/ppm/log ...
Creating /gpfs/fs1/ppm/conf ...
... Done creating configuration directories and files ...
Done creating configuration directories and files ...
Creating /gpfs/fs1/ppm/work/calendar/ ...
Creating /gpfs/fs1/ppm/properties/version ...
Please read /gpfs/fs1/ppm/README for instructions on how
to start the Process Manager
in Example 4-10 on page 98, the only package that is shown for installation (under “Searching for Process Manager tar files in /gpfs/fs1/install/LSF/PPM, Please wait ...”) is “Linux 2.6-glibc2.3-x86_64 Server”. You see this package if you did not download all of the software that is required for the installation. Example 4-11 shows what you see when all of the packages are available for installation. In Example 4-11, we install the client packages and start the server successfully at the end of the process.
Example 4-11 IBM Platform Process Manager -client installation
[root@i05n47 ppm8.3.0.0_pinstall] ./jsinstall -f install.config
Logging installation sequence in /gpfs/fs1/install/LSF/PPM/ppm8.3.0.0_pinstall/Install.log
Searching for Process Manager tar files in /gpfs/fs1/install/LSF/PPM, Please wait ...
1) Linux 2.6-glibc2.3-x86_64 Server
2) Linux 2.6-glibc2.3-x86_64 Flow Editor and Calendar Editor Client
3) Linux 2.6-glibc2.3-x86_64 Flow Manager Client
List the numbers separated by spaces that you want to install.
(E.g. 1 3 7, or press Enter for all): 2 3
You have chosen the following tar file(s):
ppm8.3.0.0_ed_lnx26-lib23-x64
ppm8.3.0.0_fm_lnx26-lib23-x64
Space required to install: 200000 kb.
Space available under /gpfs/fs1/ppm: 301112576 kb.
Do you want to continue installation? (y/n) [y] y
"/gpfs/fs1/ppm" already exists.
Warning: existing files may be overwritten.
Do you wish to continue? (y/n) [n] y
International Program License Agreement
Part 1 - General Terms
BY DOWNLOADING, INSTALLING, COPYING, ACCESSING, CLICKING ON
AN "ACCEPT" BUTTON, OR OTHERWISE USING THE PROGRAM,
LICENSEE AGREES TO THE TERMS OF THIS AGREEMENT. IF YOU ARE
ACCEPTING THESE TERMS ON BEHALF OF LICENSEE, YOU REPRESENT
AND WARRANT THAT YOU HAVE FULL AUTHORITY TO BIND LICENSEE
TO THESE TERMS. IF YOU DO NOT AGREE TO THESE TERMS,
* DO NOT DOWNLOAD, INSTALL, COPY, ACCESS, CLICK ON AN
"ACCEPT" BUTTON, OR USE THE PROGRAM; AND
* PROMPTLY RETURN THE UNUSED MEDIA, DOCUMENTATION, AND
Press Enter to continue viewing the license agreement, or
enter "1" to accept the agreement, "2" to decline it, "3"
to print it, "4" to read non-IBM terms, or "99" to go back
to the previous screen.
1
Process Manager pre-installation check ...
Checking the JS_TOP directory /gpfs/fs1/ppm ...
... Done checking the JS_TOP directory /gpfs/fs1/ppm ...
Checking selected tar file(s) ...
... Done checking selected tar file(s).
Pre-installation check report saved as text file:
/gpfs/fs1/install/LSF/PPM/ppm8.3.0.0_pinstall/prechk.rpt.
... Done Process Manager pre-installation check.
Installing binary files " ppm8.3.0.0_ed_lnx26-lib23-x64 ppm8.3.0.0_fm_lnx26-lib23-x64"...
Copying jsinstall files to /gpfs/fs1/ppm/8.3/install
... Done copying jsinstall files to /gpfs/fs1/ppm/8.3/install
Installing linux2.6-glibc2.3-x86_64 Client...
Please wait, extracting ppm8.3.0.0_ed_lnx26-lib23-x64 may take up to 5 minutes ...
... Done extracting /gpfs/fs1/install/LSF/PPM/ppm8.3.0.0_ed_lnx26-lib23-x64.tar.Z.
... linux2.6-glibc2.3-x86_64 Client installed successfully under /gpfs/fs1/ppm/8.3.
Installing linux2.6-glibc2.3-x86_64 Client...
Please wait, extracting ppm8.3.0.0_fm_lnx26-lib23-x64 may take up to 5 minutes ...
... Done extracting /gpfs/fs1/install/LSF/PPM/ppm8.3.0.0_fm_lnx26-lib23-x64.tar.Z.
... linux2.6-glibc2.3-x86_64 Client installed successfully under /gpfs/fs1/ppm/8.3.
Done installing binary files ...
Creating /gpfs/fs1/ppm/work/templates ...
/gpfs/fs1/ppm/conf/js.conf exists.
Saving the file to /gpfs/fs1/ppm/conf/js.conf.old.
Updating configuration files ...
/gpfs/fs1/ppm/conf/profile.js exists.
Saving the file to /gpfs/fs1/ppm/conf/profile.js.old.
/gpfs/fs1/ppm/conf/cshrc.js exists.
Saving the file to /gpfs/fs1/ppm/conf/cshrc.js.old.
Done creating configuration directories and files ...
Please read /gpfs/fs1/ppm/README for instructions on how
to start the Process Manager
[root@i05n47 ppm8.3.0.0_pinstall]# jadmin start
Starting up jfd ...
Submitting sample flow /gpfs/fs1/ppm/8.3/examples/Sample.xml ...
Flow <lsfadmin:Sample> is submitted. Version <1.0>.
Renaming /gpfs/fs1/ppm/8.3/examples/Sample.xml to Sample_submitted.xml ...
After a successful installation, you can start to use the Flow Editor, Calendar Editor, and the Flow Manager. These applications offer a GUI for users to work with job flows. If you try to start one of these clients, you do not have X11 enabled on your server, and you did not run ssh into the server with X11 forwarding, you get the error in Example 4-12.
Example 4-12 IBM Platform Process Manager error when we started Flow Manager
[root@i05n47 ppm8.3.0.0_pinstall]# flowmanager
Exception in thread "main" java.awt.HeadlessException:
No X11 DISPLAY variable was set, but this program performed an operation which requires it.
at java.awt.GraphicsEnvironment.checkHeadless(GraphicsEnvironment.java:173)
at java.awt.Window.<init>(Window.java:443)
at java.awt.Frame.<init>(Frame.java:414)
at java.awt.Frame.<init>(Frame.java:379)
at javax.swing.SwingUtilities.getSharedOwnerFrame(SwingUtilities.java:1830)
at javax.swing.JDialog.<init>(JDialog.java:264)
at javax.swing.JDialog.<init>(JDialog.java:198)
at com.platform.LSFJobFlow.ui.JFErrorMsgDialog.<init>(JFErrorMsgDialog.java:34)
at com.platform.LSFJobFlow.ui.JFUtility.showAppException(JFUtility.java:243)
at com.platform.LSFJobFlow.app.flowmanagement.JFFlowManagementContainer.main(JFFlowManagementContainer.java:2854)
To run ssh into your server to enable X11 forwarding, run ssh -X <host name>. Then, you can start any of the client applications, Flow Editor, Calendar Editor, and the Flow Manager.
Submitting and managing job flows
After the installation, you can run the Flow Editor by running the command floweditor. From the Flow Editor, you can open job flows that are already available or create new job flows. In Figure 4-50, we use the job flow Example_2.xml that ships with the product. Figure 4-50 shows how to submit it for execution from the Flow Editor interface.
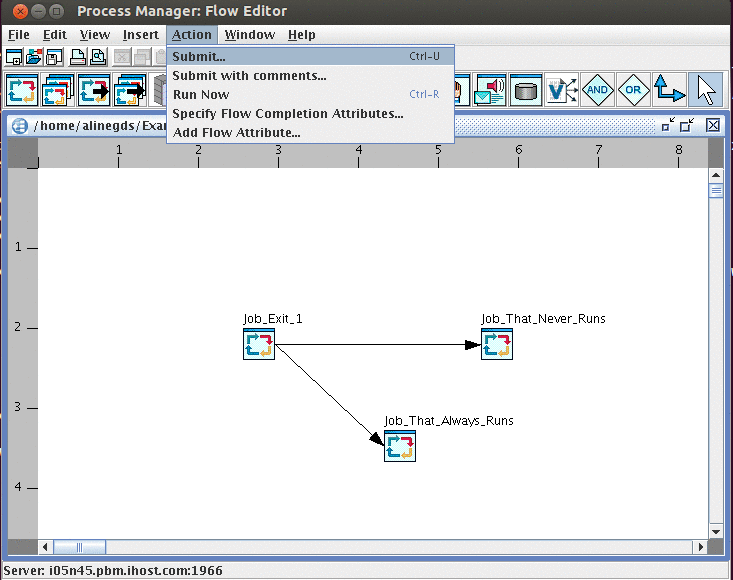
Figure 4-50 IBM Platform Process Manager Submit job flow
After you submit a job flow, you can visualize it in the Flow Manager. To run the Flow Manager, run the command flowmanager. Figure 4-51 shows how to visualize the job flow in the Flow Manager after submission.
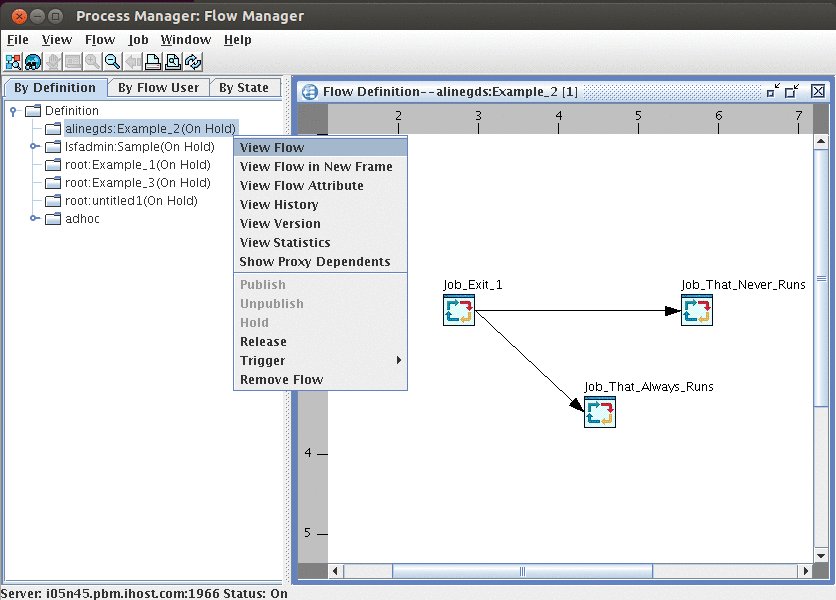
Figure 4-51 IBM Platform Process Manager: View the flow in Flow Manager
After you submit a job flow from the Flow Editor, it is on hold in the Flow Manager, and you can trigger it from the Flow Manager interface. After you trigger it, you can follow the flow status through the GUI. In Figure 4-52 on page 105, after the job flow is triggered, you can see that the job Job_Exit_1 is in status “Pending in LSF”. Job statuses are represented by colors in Flow Manager, and the status “Pending in LSF” is represented by the color brown. The other two jobs in Figure 4-52 on page 105 are in the status “Waiting”, which is represented by the color yellow/orange.
|
Scheduling: When a job flow is submitted, each one of the jobs in the flow is scheduled separately by IBM Platform LSF.
|

Figure 4-52 IBM Platform Process Manager job flow running
The job flow Example_2.xml consists of these steps:
•Job_Exit_1 runs and exits with status 1.
•Job_That_Always_Runs runs when Job_Exit_1 exits with status greater than 0 (always).
•Job_That_Never_Runs runs when Job_Exit_1 completes successfully (never).
In Figure 4-53 on page 106, you can verify that the job flow runs as expected:
•Job_Exit_1 exited with an error (status 1) and is represented by the color red.
•Job_That_Never_Runs stays in waiting status, which is represented by the color yellow/orange because the condition for it to run, which is represented by the arrow between Job_Exit_1 and Job_That_Never_Runs, is not satisfied.
•Job_That_Always_Runs runs as expected and is shown in blue in Figure 4-53 on page 106, which represents that it is running.
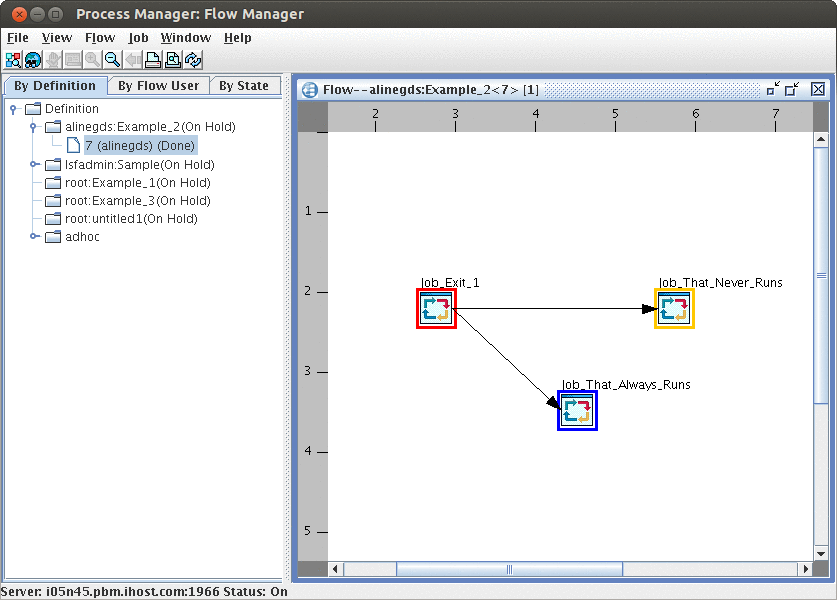
Figure 4-53 IBM Platform Process Manager: Job flow completed
Enabling integration with IBM Platform Application Center
If you installed IBM Platform Process Manager after IBM Platform Application Center (as we did during this residency) and you want to enable job flow visualization and submission in IBM Platform Application Center, edit the file profile.ppm.pmc at PAC_TOP/gui/conf. Then, add the location of the PPM conf dir to the variable JS_ENVDIR as shown in Example 4-13.
Example 4-13 IBM Platform Profile Manager: Enabling job flows in IBM Platform Application Center
#!/bin/sh
JS_ENVDIR=/gpfs/fs1/ppm/conf
if [ "$JS_ENVDIR" != "" ] ; then
. $JS_ENVDIR/profile.js
fi
After you make the change in Example 4-13 and restart IBM Platform Application Center, you are able to visualize flows in the IBM Platform Application Center web interface.
After you integrate IBM Platform Process Manager and IBM Platform Application Center, IBM Platform Application Center tries to authenticate the user that is logged in to the web interface. IBM Platform Application Center tries to authenticate the user against IBM Platform Process Manager to check the authorization to view, change, or configure job flows. If you use LDAP, you need to enable LDAP authentication on IBM Platform Process Manager before you use IBM Platform Application Center. Otherwise, you get the error in Figure 4-54 when you try to visualize jobs and flows.
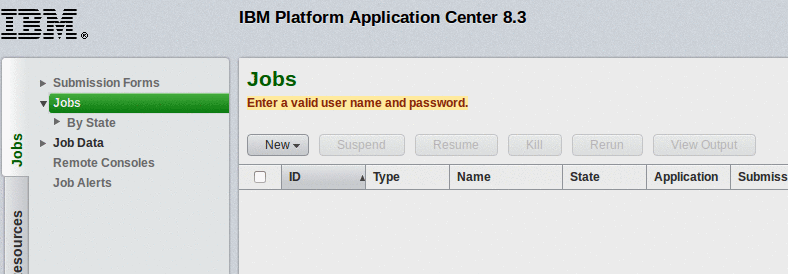
Figure 4-54 IBM Platform Process Manager error visualizing jobs and job flows
To enable LDAP authentication for IBM Platform Process Manager, you need to configure a Pluggable Authentication Module (PAM) policy on the node where IBM Platform Process Manager is installed to add a service name eauth_userpass for the module type auth. After you add the PAM configuration, you need to restart IBM Platform Process Manager and IBM Platform Application Center. Example 4-14 shows how to configure PAM on Red Hat Enterprise Linux 6.2.
Example 4-14 IBM Platform Process Manager LDAP integration
[root@i05n45 ppm]echo “auth required pam_ldap.so” > /etc/pam.d/eauth_userpass
Figure 4-55 on page 108, Figure 4-56 on page 108, and Figure 4-57 on page 108 illustrate how flow definitions and job flow information can be visualized on the IBM Platform Application Center after integration is configured.
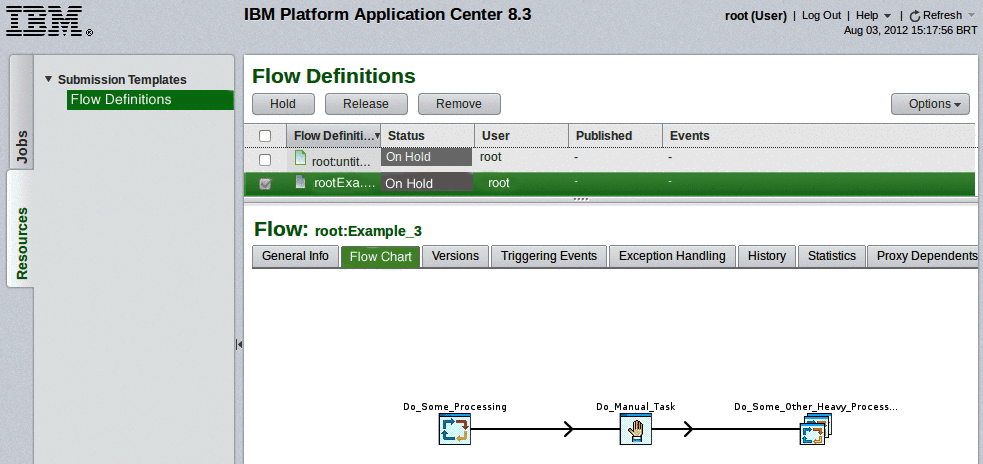
Figure 4-55 IBM Platform Process Manager job flow in IBM Platform Application Center 1
Figure 4-56 shows how flow data is displayed in IBM Platform Application Center.

Figure 4-56 IBM Platform Process Manager job flow in IBM Platform Application Center 2
Figure 4-57 shows the view that displays information about flows by State.
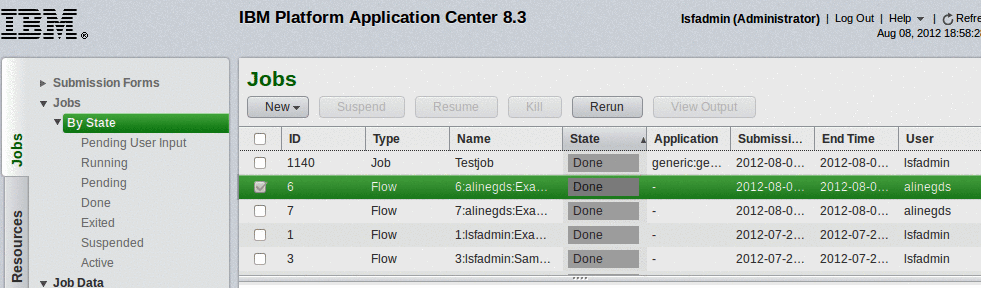
Figure 4-57 IBM Platform Process Manager job flow in IBM Platform Application Center 3
When you select a flow in the Jobs view as shown in Figure 4-57 on page 108, you have access to the flow Summary, Data, and information about subflows and jobs. You can see the flow chart and the flow history. You are also able to see the flow run step-by-step in the flow chart tab.
4.4 References
The IBM Platform LSF documentation that is listed in Table 4-1 is available within each product and can be downloaded from the IBM Publications Center:
Table 4-1 lists the publications and publication numbers that we referenced in this chapter.
Table 4-1 IBM Platform LSF documentation
|
Publication title
|
Publication number
|
|
IBM Platform LSF Quick Reference
|
GC22-5353-00
|
|
Release Notes for IBM Platform LSF Version 8.3
|
GI13-1885-00
|
|
Readme for Installing Remote LSF Poller
|
GI13-1895-00
|
|
Administering IBM Platform LSF
|
SC22-5346-00
|
|
IBM Platform LSF Security
|
SC22-5347-00
|
|
IBM Platform LSF Foundations Guide
|
SC22-5348-00
|
|
IBM Platform LSF Command Reference
|
SC22-5349-00
|
|
IBM Platform LSF Configuration Reference
|
SC22-5350-00
|
|
Running Jobs with IBM Platform LSF
|
SC22-5351-00
|
|
Using IBM Platform LSF on Windows
|
SC22-5355-00
|
|
IBM Platform LSF Programmer’s Guide
|
SC22-5356-00
|
|
Using the IBM Platform LSF Launch Framework
|
SC22-5357-00
|
|
Installing IBM Platform LSF on UNIX and Linux
|
SC22-5358-00
|
|
Upgrading IBM Platform LSF on UNIX and Linux
|
SC22-5359-00
|
|
Installing IBM Platform LSF on Windows
|
SC22-5360-00
|
|
Migrating Platform LSF Version 7 to IBM Platform LSF Version 8 on Windows
|
SC27-4774-00
|
|
Installing and Upgrading Your IBM Platform Symphony/LSF Cluster (http://publibfp.dhe.ibm.com/epubs/pdf/c2747610.pdf)
|
SC27-4761-00
|
|
Administering IBM Platform Application Center
|
SC22-5396-00
|
|
Installing and Upgrading IBM Platform Application Center
|
SC22-5397-00
|
|
Release Notes for IBM Platform Application Center
|
GI13-1890-00
|
|
Release Notes for IBM Platform RTM
|
GI13-1893-00
|
|
IBM Platform RTM Administrator Guide
|
SC27-4756-00
|
|
Installing IBM Platform RTM
|
SC27-4757-00
|
|
Release Notes for IBM Platform Process Manager
|
GI13-1891-00
|
|
Administering IBM Platform Process Manager
|
SC22-5398-00
|
|
Using IBM Platform Process Manager
|
SC27-4751-00
|
|
Guide to Using Templates
|
SC27-4752-00
|
|
Release Notes for IBM Platform License Scheduler Version 8.3
|
GI13-1886-00
|
|
Using IBM Platform License Scheduler
|
SC22-5352-00
|
|
Release Notes for IBM Platform Analytics
|
GI13-1892-00
|
|
Installing IBM Platform Analytics
|
SC27-4753-00
|
|
Administering IBM Platform Analytics
|
SC27-4754-00
|
|
Integrating Platform Analytics into IBM Platform Application Center
|
SC27-4755-00
|
The documentation that is listed in Table 4-2 is available within each product, but it is not yet available from the IBM Publications Center.
Table 4-2 IBM Platform documentation
|
Publication title
|
Publication number
|
|
Installing IBM Platform Process Manager on UNIX
|
SC22-5400-00
|
..................Content has been hidden....................
You can't read the all page of ebook, please click here login for view all page.