


Data Migration with IBM Spectrum Accelerate
This chapter describes the migration process, which is a built-in feature of IBM Spectrum Accelerate. The Data Migration Utility can migrate data from almost any iSCSI attached storage system to Spectrum Accelerate. The chapter also includes the actual pre-migration and post-migration steps.
This chapter includes the following topics:
|
Note: IBM Spectrum Accelerate V11.5.4 also supports IBM Hyper-Scale Mobility over iSCSI. For more information about the IBM Hyper-Scale Mobility, see IBM Hyper-Scale in XIV Storage, REDP-5053 or IBM FlashSystem A9000 and A9000R Replication Solutions, REDP-5401.
|
8.1 Migration overview
IBM Spectrum Accelerate includes a powerful data migration capability at no extra charge. The Data Migration Utility can migrate data from almost any iSCSI attached storage system to IBM Spectrum Accelerate.
At the start of the migration, application hosts are offline for only a short time while connected to IBM Spectrum Accelerate. The logical unit numbers (LUNs) that are migrated are reallocated from the former storage server to the IBM Spectrum Accelerate system and are then natively presented again to the host. Meanwhile, the data is migrated in the background in a controlled fashion.
A migration from an XIV Storage System to IBM Spectrum Accelerate is shown in Figure 8-1.

Figure 8-1 Migration overview
Figure 8-1 shows the following steps of the processes:
1. Volumes and pools that are defined in the XIV Storage System are initially used by host systems.
2. Hosts are connected over iSCSI targets and the LUNs that are defined in the XIV systems are mapped to those hosts. The host is typically running production applications.
3. An iSCSI target is defined in IBM Spectrum Accelerate for the XIV Storage System, as though it were a host. Target migration volumes in IBM Spectrum Accelerate are defined and mapped to the remote LUNs in the XIV Storage System.
4. A new iSCSI connection to the host is defined in the IBM Spectrum Accelerate. At this stage, the IBM Spectrum Accelerate has two hosts that are defined in the system (the actual host and the XIV Storage System).
5. The migration feature is now enabled in the IBM Spectrum Accelerate. While this process happens, the host connectivity to the XIV Storage System is ended (apparent downtime for the host) and the migrating volumes are automatically presented by IBM Spectrum Accelerate to the host.
8.2 Migrating a volume
At a high level, the following steps are used to migrate volumes from an XIV Storage System (or any iSCSI attached Storage System) to IBM Spectrum Accelerate:
1. Initial connection and preparation:
a. Establish physical connection (cabling) between IBM Spectrum Accelerate and XIV Storage System.
b. Prepare an iSCSI qualified name (IQN) table for all the involved systems.
c. Assume that volumes and host are defined in the XIV Storage System.
d. Define IBM Spectrum Accelerate to the XIV Storage System (as a Linux or Windows host).
e. Define XIV Storage System in IBM Spectrum Accelerate (as a migration target).
2. Perform pre-migration tasks for each host that is being migrated:
a. Back up host data.
b. Stop all I/O from the host to the LUNs on the XIV storage.
c. Shut down the host.
3. Define and test the data migration volume:
a. On XIV storage, remap volumes from the old host to IBM Spectrum Accelerate host.
b. On IBM Spectrum Accelerate, create data migration tasks and test them.
4. Activate data migration tasks on IBM Spectrum Accelerate.
5. Define the host in IBM Spectrum Accelerate and bring the host and applications online:
a. Define host and iSCSI Name on IBM Spectrum Accelerate.
b. Map volumes to the host on IBM Spectrum Accelerate.
c. Bring the host online.
d. Verify that the IBM Spectrum Accelerate storage is visible.
e. Enable/start host and applications.
6. Complete the data migration on IBM Spectrum Accelerate:
a. Monitor the IBM Spectrum Accelerate migration tasks.
b. On completion, delete the migration tasks.
|
Tip: Refer to these steps while you perform a migration.
|
The following sections are specific to our example and focus only on the iSCSI-attached volumes in an XIV Storage System with a Windows Host. For more information about migration concepts with XIV Storage System, see IBM XIV Storage System Business Continuity Functions, SG24-7759. For similar information about administration of migration with Hyper-Scale Manager, see IBM FlashSystem A9000 and A9000R Replication Solutions, REDP-5401.
8.2.1 Initial connection and preparation
For the initial connection setup, start by connecting IBM Spectrum Accelerate to the XIV system that is being migrated.
Because the migration and the host attachment are through iSCSI, you must ensure that any firewalls are opened to allow iSCSI communications.
|
Important: If the IP network includes firewalls, TCP port 3260 must be open for iSCSI host attachment and migration to work.
|
It is also a good opportunity for the host OS patches and drivers to be updated to the latest supported levels for the XIV Storage System.
Preparing an IQN table
A good practice is to have all the IQNs of all the systems involved, as listed in Table 8-1.
Table 8-1 Example of an iSCSI Qualified Name (IQN) table
|
Machine Type
|
iSCSI Name
|
|
Windows Host
|
iqn.1991-05.com.microsoft:win-o35n78a30e8
|
|
XIV Storage System
|
iqn.2005-10.com.xivstorage:010091
|
|
IBM Spectrum Accelerate
|
iqn.2005-10.com.xivstorage:021379
|
The IQNs can be determined from the iSCSI initiator properties display by clicking Control Panel → iSCSI initiator in a Windows host.
The IQNs in an XIV GUI can be determined by clicking Systems → System Settings → System and under the Parameters tab, as shown in Figure 8-2.

Figure 8-2 iSCSI Name in XIV GUI
Volumes and host defined in XIV
The example assumes that the pools and the volumes to migrate are in XIV and the host uses those volumes.
Defining IBM Spectrum Accelerate on the XIV Storage System as host
IBM Spectrum Accelerate must be defined as a Linux host to the XIV Storage System:

Figure 8-3 Host and Clusters in XIV GUI
2. Choose Add Host from top menu bar. Add a new Linux host (Data_Migration_Host) with the iSCSI target initiator of the IBM Spectrum Accelerate, as shown in Figure 8-4. The iSCSI Name can be determined from Table 8-1 on page 220.

Figure 8-4 Adding iSCSI port connection for Data Migration Host
Defining XIV Storage System on IBM Spectrum Accelerate as target
After the physical connectivity is established and IBM Spectrum Accelerate is defined to the XIV Storage System (or any iSCSI attached storage), the XIV system also must be defined on IBM Spectrum Accelerate. This process includes defining the storage system object and the connectivity between IBM Spectrum Accelerate and the XIV Storage System, through the iSCSI target initiator.
Complete the following steps:
1. In the XIV GUI, log in to the IBM Spectrum Accelerate System by using the storage admin credentials. For more information, see 5.3, “Managing users” on page 87.

Figure 8-5 Creating Target in IBM Spectrum Accelerate
3. Make the following appropriate entries and selection, as shown in Figure 8-6 on page 223:
– System: This system is the current system; for example, XIV itso_sds1.
– Domain: The default is no-domain, unless specified.
– Target Typ3: There are two options: Migration and Replication. Select Migration.
– Target Name: Enter name for the target, such as ITSO_Data_Migration_Target.
– Target Domain : Depending on the Domain selection, other options might be available.
– Target Protocol: Currently, IBM Spectrum Accelerate supports iSCSI only.
– iSCSI Initiator Name: The iSCSI target that IBM Spectrum Accelerate attaches its volumes from. In this example, the XIV Storage System is the iSCSI Target here; therefore, select the corresponding iSCSI name from Table 8-1 on page 220.
– Max. Sync job Rate: Depending on the network bandwidth, the default value is set to 300 MBps.
– Max. Resync Rate: Depending on the network bandwidth, the default value is set to 300 MBps.
|
Note: The Max. Resync job rate cannot be larger than the Sync job rate.
|
– Max Initialization Rate: Depending on the network bandwidth, the default value is set to 100 MBps.

Figure 8-6 Creating Target in IBM Spectrum Accelerate
After the target is defined, the target appears in the GUI, as shown in Figure 8-7.

Figure 8-7 After defining a target in IBM Spectrum Accelerate
4. Right-click the dark box (target machine) and select Add Ports.
5. In the Add Port window that opens, complete the following steps:
a. Enter the IP addresses for the iSCSI Connectivity of the XIV to establish the connection between the two systems.
b. Click Add.
6. Select the IP ports of the IBM Spectrum Accelerate system and drag it to the ports in the target, as shown in Figure 8-8.

Figure 8-8 Dragging the IP Ports to the target ports
7. If the connection between the IBM Spectrum Accelerate and the target system (XIV Storage System) is successful, it is displayed as green, as shown in Figure 8-9.

Figure 8-9 Successful connection established
8.2.2 Performing pre-migration tasks for each migrated host
The following pre-migration tasks must be performed for each host that you are migrating:
•Back up the volumes that are being migrated
•Stop all I/O from the host to the LUNs on the XIV storage
Backing up the migrated volumes
A full restorable backup must be created before any data migration activity. A good practice is to verify that all the data is restorable from the backup and that there are no backup media errors. In addition to a regular backup, a point-in-time copy of the LUNs that are being migrated (if available) is an extra level of protection with which you can perform a rapid rollback, if necessary.
Stopping all I/O from the host to the LUNs on the XIV storage
Before the actual migration can begin, the application must be quiesced and the file system synchronized. These prerequisites ensure that the application data is in a consistent state. Because the host might need to be rebooted several times before the application data becomes available again, the following steps might be required:
•Set applications to not automatically start when the host operating system restarts.
•Stop file systems from being automatically remounted on start.
|
Note: In clustered environments, such as Windows or Linux, you might choose to work with only one node until the migration is complete. If so, consider shutting down all other nodes in the cluster.
|
8.2.3 Defining and testing data migration volumes
To define and test the data migration volumes, complete the following steps:
1. Remap old volumes to the new host in the XIV system.
2. Define migration volumes in IBM Spectrum Accelerate.
3. Test data migration volumes in IBM Spectrum Accelerate.
Remapping old volumes to the new host in the XIV system
Complete the following steps to remap the old volumes to the new host:
1. In the XIV GUI, log in by using the storage admin credentials.
2. Click Hosts and Clusters → Hosts and Clusters.
3. Select the Data Migration Host in the XIV Storage System that was defined in “Defining IBM Spectrum Accelerate on the XIV Storage System as host” on page 221.
4. Right-click the selected host and click Modify LUN Mapping.
5. Select the volumes to be mapped (the volumes that were earlier mapped to the actual host), as shown in Figure 8-10. Click Map.

Figure 8-10 LUN mapping to the Data Migration Host
You might receive a warning about mapping the same volumes to two different hosts. You can ignore such warnings when you are in a migration scenario.
Defining migration volumes in IBM Spectrum Accelerate
IBM Spectrum Accelerate can determine the size of the XIV Storage volumes (or any iSCSI-attached storage) and create corresponding IBM Spectrum Accelerate volumes quickly when the data migration object is defined. Use this method to help avoid potential problems when manually calculating the real block size of a volume. Complete the following steps:

Figure 8-11 Selecting Migration in the IBM Spectrum Accelerate
2. Select Migrate Volume from the toolbar.
3. Select the appropriate settings for the following entries and click Create, as shown in Figure 8-12 on page 227:
– Destination System: This system is the current system; for example, XIV itso_sds1.
– Create Destination Volume : Select this option if you want to create destination volumes.
– Destination Volume: Enter a name for the destination volume; for example, ITSO_Mig_Vol1.
– Destination Pool: From the Destination Pool List, select the appropriate pool, such as itso_pool1.
– Source System: Select the Target system that was defined in the XIV Storage System.
– Source LUN: This LUN must match the remote LUN; for example, LUN1, LUN2, and LUN3.
– Keep Source Updated: Select this option if you want to update the source volumes when the hosts make changes.
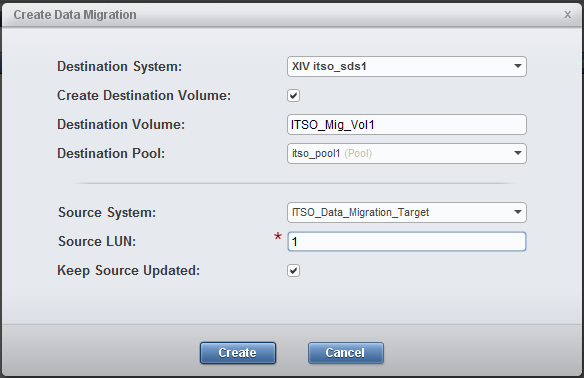
Figure 8-12 Creating migrate volumes in IBM Spectrum Accelerate
4. Accept all the warnings by clicking OK.
5. Repeat steps 3 and 4 for all the migrated volumes with their respective remote LUNs.
After all the migrated volumes are created, a listing is displayed, as shown in Figure 8-13.

Figure 8-13 Migrate volumes view
Testing data migration volumes in IBM Spectrum Accelerate
Right-click the created data migration object and select Test, as shown in Figure 8-14. If there are any issues with the data migration object, the test fails and the issues encountered are reported.

Figure 8-14 Test the data migration volumes
8.2.4 Activating data migration on the migrated volumes
After the data migration volume is tested, the actual data migration process can begin. When data migration is started, the data is copied sequentially in the background from the XIV Storage System volume to IBM Spectrum Accelerate. The host reads and writes data to the new storage system without being aware of the background I/O being performed.
|
Note: After it is activated, the data migration can be deactivated. However, deactivating the migration is not recommended. When the data migration is deactivated, the host cannot read or write to the source migration volume and all host I/O stops. Do not deactivate the migration with host I/O running.
|
To activate data migration. complete the following steps:
1. In the XIV GUI, log in to the IBM Spectrum Accelerate System with Storage Admin credentials (see 5.3, “Managing users” on page 87).
2. Click Remote → Migration.

Figure 8-15 Activating Migration for the migrate volumes
8.2.5 Defining the host in IBM Spectrum Accelerate and bringing the host online
Before running data migration and allocating the volumes to the host, the host must be defined in IBM Spectrum Accelerate. Volumes are then mapped to the hosts or clusters. If the host is to be a member of a cluster, the cluster must be defined first. However, a host can be moved easily from or added to a cluster at any time. To define hosts and bring them online, complete the following steps:
1. In the XIV GUI, click Hosts and Clusters.
2. Click Add Host from top menu bar. Enter the appropriate settings in the Add Host window, including the host name (for example ITSO_SA_Host) as shown Figure 8-16. Click Add.

Figure 8-16 Defining Host in the IBM Spectrum Accelerate
3. Right-click the host and select Add Port. For the Port Type, specify iSCSI as shown in Figure 8-17. Enter the appropriate iSCSI Name from the Table 8-1 on page 220. Click Add.

Figure 8-17 Adding ports to host in IBM Spectrum Accelerate
4. Map all the migrate volumes to the host, as shown in Figure 8-18.

Figure 8-18 Mapping migrated volumes to host in the IBM Spectrum Accelerate
After these steps are complete, the volumes are available to the host for read and write operations. If the host cannot view the volumes, ensure that the Host Attachment Kit (HAK) is installed and configured.
Enabling or starting host and applications
After the volumes and data access are confirmed, the host application can be started and operations verified. The migration tasks run in the background and allow normal host access to the newly mapped volumes.
Restart the server a final time and confirm that all the drive letters are correct and that the applications can start.
Occasionally, a host might not need to be online during the migration (such as after hours, not in production, or migration is completed within the customer change window). It can remain offline and be bought back online after the migration is complete.
|
Note: In clustered environments, the usual recommendation is for only one node of the cluster to be initially brought online after the migration is started, and that all other nodes be offline until the migration is complete. After completion, update all other nodes (driver, host attachment package, and so on), in the same way as the primary node was during the initial outage.
|
8.2.6 Completing the data migration on IBM Spectrum Accelerate
To complete the data migration, complete the tasks that are described in this section.
Data migration progress
Figure 8-19 on page 231 shows the progress of the data migration. The status bar can be toggled between GB remaining, percent complete, and time remaining. Figure 8-19 on page 231 also shows three volumes being migrated; The process is sequential; therefore, when one volume completes its migration, the next volume starts.
Figure 8-19 Data migration process
After all of a volume’s data is copied, the data migration achieves synchronization status. After synchronization is achieved, all read requests are served by the new IBM Spectrum Accelerate system. If source updating was selected, IBM Spectrum Accelerate continues to write data to itself and the storage system that is being migrated until the data migration is ended. Figure 8-20 shows a completed migration.

Figure 8-20 Data Migration complete
Deleting data migration
After the synchronization is achieved, the data migration object can be safely deleted without host interruption.
|
Important: If this migration is an online migration, do not deactivate the data migration before deletion because doing so causes host I/O to stop and can cause data corruption.
|
Right-click the data migration volume and select Delete Data Migration, as shown in Figure 8-21. This deletion can be done without interruption to the host or server.

Figure 8-21 Delete data migration
|
Note: You cannot delete an inactive or unsynchronized data migration from the Data Migration window. An unfinished data migration can be deleted by deleting only the relevant volume from the Volumes → Volumes & Snapshots section in the XIV GUI.
|
..................Content has been hidden....................
You can't read the all page of ebook, please click here login for view all page.