


Developing enterprise applications with Liberty profile
The Liberty profile server supports the full stack of Java EE technologies. In this chapter, you become familiar with advanced application features, such as accessing databases, using Enterprise JavaBeans, asynchronous programming with JMS, concurrent features, and more. By using these features, the Liberty profile developer tools provide code wizards and a server configuration editor to simplify development.
The chapter contains the following sections:
5.1 Data access in the Liberty profile
For data access, WebSphere Liberty profile supports the Java Persistence API (JPA) and JDBC. The Liberty profile developer tools simplify the development of data access applications for these technologies by assisting with the setup of required resources. In this section, we give an overview of data access in the Liberty profile and give examples of how to develop data access applications with the Liberty profile. We also briefly describe accessing noSQL databases from applications deployed in WebSphere Liberty.
5.1.1 Accessing data using a data source and JDBC
JDBC provides a database-independent API for querying and updating data. Liberty profile provides support for data access using 4.1 and earlier versions of the JDBC API.
Basic concepts for configuring data access in Liberty profile server
To use JDBC in an application, first configure access to the database. In Liberty profile, define a data source that has knowledge of the database. Several key configuration concepts important to this process are described in this section.
Files and file sets
A file set is simply a collection of files. They have several purposes in Liberty profile. In the context of data access, they are used to point to the JDBC driver library files provided by a database vendor.
Shared libraries
As described in 3.3, “Controlling class visibility in applications” on page 93, shared libraries provide a collection of classes that can be used by one or more applications or data sources. Libraries are composed of file set elements that define the location of the class files.
JDBC drivers
A JDBC driver definition references a shared library. You can optionally specify individual classes from the vendor-provided JDBC driver library to be used as the data source implementation. If you do not specify the implementation classes, the Liberty profile server infers the appropriate class name for most common databases.
Data sources
A data source is the key piece of configuration for data access in the Liberty profile server. In the simplest case, a data source is composed only of a JDBC driver and the JNDI name where the data source is made available. In more complex scenarios, you can specify other properties, such as the type of data source, transactional behavior, or vendor-specific database properties. For more information about the various configuration options that are available for data sources, see the following IBM Knowledge Center website:
Adding a data source using Liberty profile developer tools
The Liberty profile developer tools facilitate the definition of adding a data source and related entities. The following scenario shows one way to define all of the artifacts that are necessary to add a data source to your application. Complete the following steps to add a data source:
1. Open the server.xml file for your WebSphere Liberty profile server. In the design view, select Server Configuration and click Add. Select Data Source and click OK (Figure 5-1).

Figure 5-1 Adding a data source to an application
The Enable Element pop-up window is displayed and allows you to select the JDBC feature version. For Java EE 7 applications, select jdbc-4.1, as shown in Figure 5-2.

Figure 5-2 Selecting JDBC feature version
2. In the input field for JNDI Name, enter jdbc/ITSO.
3. The data source requires a JDBC Driver. On the Data Source Details window, beside the JDBC driver reference, click Add. You can add either child element or global. You should use global if you plan to use the same driver for many data sources. In this case, you will add child, which is a default, when you click Add. This opens the configuration window where you configure the new JDBC driver. See Figure 5-3.

Figure 5-3 JDBC Driver details
4. A JDBC driver requires driver implementation classes; this is specified using the shared library. Beside the Shared libraries reference field, click Add to create a shared library. This opens a window to configure the library. Enter derbyLibrary in the Name field, as shown in Figure 5-4.
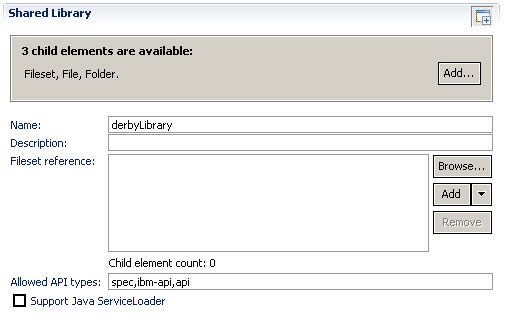
Figure 5-4 Shared Library details
5. Now, create a new file set for the shared library by clicking Add (located next to the input field for Fileset reference). This opens the Fileset Details window.
|
Finding the JAR files: The JAR files that are used for accessing your database are not provided as part of the Liberty run time. You need to select the Base directory in the Fileset details for the JAR files that are provided as part of your database run time. This example uses a Derby database, which can be downloaded from the following website:
|
|
Library placement: For easier Liberty server packaging, it is recommended to put driver JAR files in the Liberty shared resources folder (WLP_HOMEusrshared
esources). This folder is referred to by default by the server variable ${shared.resource.dir}. Variable usage is shown in the Base directory input field in Figure 5-5. We created the derby subdirectory in that folder and put the JAR file in that directory.
|
6. Enter the directory where the JAR files for your JDBC driver are located (in the Base directory field for that JDBC driver). You can also click Browse to select a directory, as shown in Figure 5-5.

Figure 5-5 Fileset details
7. To finish the data source configuration, you need to provide database-related properties. Right-click the Data Source element under the Configuration Structure and select Add → Derby Embedded Properties. Then, use the following steps to finish the data source configuration:
a. In the Properties window, select Create in the Create database drop-down menu.
b. In the Database name field, enter the full path to database (for example, c:DerbyDatabasesITSO). If you provide just the database name, it will be created in the WLP_HOMEusrserversserverName directory.
8. Save the server.xml file. The data source is now available for applications.
Instead of using tools, configuring the data source can be achieved by editing the server.xml file directly. Example 5-1 shows part of the server.xml file that is related to the previous database configuration.
Example 5-1 Datasource definition in the server.xml
<dataSource jndiName="jdbc/ITSO">
<jdbcDriver>
<library name="derbyLibrary">
<fileset dir="${shared.resource.dir}/derby"/>
</library>
</jdbcDriver>
<properties.derby.embedded createDatabase="create" databaseName="ITSO"/>
</dataSource>
This scenario describes a simple data source configuration. More information about configuring database connectivity in the Liberty profile can be found at the following IBM Knowledge Center website:
Using the data source in an application
A data source that is defined in the server configuration can be accessed using JNDI. The jndiName property specifies the location of the data source in the namespace. To retrieve the DataSource object, simply look it up in JNDI. The code in Figure 5-6 displays how to accomplish this using the javax.annotation.Resource annotation on a field. You can also obtain the DataSource object by creating a new InitialContext object and starting the lookup method with the JNDI name of the data source as an argument.

Figure 5-6 Retrieving a DataSource in a servlet
Defining a data source in an application
Applications can also define data sources through annotations or a deployment descriptor. To configure a data source this way, the application must have access to the JDBC driver classes. To do this, create a classloader for the application as described in 3.3, “Controlling class visibility in applications” on page 93. The classloader should reference a shared library that contains the JDBC driver classes.
Defining a data source using annotations
Example 5-2 defines a data source in a Java class of an application using annotations. The DataSourceDefinition annotation on the class defines various properties for the data source. Only the name and className are required properties.
Example 5-2 Annotations defining a data source
@DataSourceDefinition(name="java:comp/env/jdbc/ITSODataSource",
className ="org.apache.derby.jdbc.EmbeddedXADataSource40",
databaseName = "ITSO",
isolationLevel = Connection.TRANSACTION_READ_COMMITTED,
loginTimeout = 88,
maxPoolSize = 10,
properties = {"connectionTimeout=0",
"createDatabase=create",
"queryTimeout=1m20s"})
|
JNDI Naming: The name for the embedded data source must be in one of the java:global, java:app, java:module, or java:comp name spaces.
|
Defining a data source using a deployment descriptor
You can define a data source in a WAR file deployment descriptor by adding a data source element to the web.xml file. You can simply edit the file, or use the deployment descriptor editor in the Liberty profile developer tools.
To create the data source in the tools, complete the following steps:
1. Begin by loading the web.xml file. In the design view, select the Web Application and click Add.
2. On the resulting window, select Data Source. Complete the properties for the data source. For example, enter java:comp/env/jdbc/jdbc/ITSODataSourceDD for the name, org.apache.derby.jdbc.EmbeddedDataSource for the class name, and ITSODD for the database name.
3. Now, click the new data source in the window on the left, and click Add. Select Property to add a property. In the property editor, enter createDatabase in the name field and create in the value field.
4. Save the deployment descriptor. If the server is running, the data source is now available to your applications.
Example 5-3 shows how the completed data source appears in the web.xml file.
Example 5-3 Data source definition in a deployment descriptor
<data-source>
<name>java:comp/env/jdbc/ITSODataSourceDD</name>
<class-name>
org.apache.derby.jdbc.EmbeddedDataSource
</class-name>
<database-name>ITSODD</database-name>
<property>
<name>createDatabase</name>
<value>create</value>
</property>
</data-source>
The definitions here represent a small portion of the configuration options that are available for data sources. For more information about application-defined data sources, see the following IBM Knowledge Center website:
Using application-defined data sources
Obtaining an application-defined data source in an application uses the same procedure regardless of whether the data source was defined in a DataSourceDefinition annotation or in a deployment descriptor. In both cases, the data source is available in the namespace at the location you specified in the name property. Figure 5-7 shows sample code for retrieving a DataSource that was defined in the web application’s deployment descriptor.

Figure 5-7 Obtaining a DataSource defined in web.xml
Figure 5-8 shows sample code for accessing a DataSource that was defined in an annotation.

Figure 5-8 Obtaining a DataSource defined in annotations
Testing the data sources
Appendix A, “Additional material” on page 251 contains an application and three prebuilt Derby databases that can be used to test each data source.
|
Caution: When importing entire projects from the additional materials, some of the examples for later sections might have compile errors. For example, the class MongoServlet has compile errors until you add the MongoDB JDBC driver to the project’s class path, as described in “Configuring MongoDB in the server configuration” on page 132.
|
You can use one of the following database options during testing:
•To use the Derby databases, expand ITSO_Derby.zip, ITSO2_Derby.zip, and ITSODD_Derby.zip in the server’s root directory. The data source definitions in the applications are designed to access these databases.
•To use another database, you must update the data sources to reference your database. Also, you must create a table named USERTBL in the database with the following configurations:
– A column named NAME with a type that maps to java.lang.String (such as VARCHAR).
– A column named LOCATION with a type that maps to java.lang.String.
– A column named ID with a type that maps to java.lang.Integer (such as INTEGER). This column should be generated by the database.
The application contains three servlets: DataSourceServlet, AnnotationDataSourceServlet, and WebXmlDataSourceServlet. Each extends the abstract class BaseDataSourceServlet. Each servlet can perform four simple operations on the database table. The operations include selecting all rows, inserting a new row, dropping the table, or creating the table.
|
Note: Because of database differences, the create table statement might not work for all databases.
|
Each servlet can be tested using the JSP page dataSource.jsp that is included in the additional materials. To access the page, visit:
http://localhost:9080/ITSOWeb/dataSource.jsp
Dynamic configuration updates for data sources
Changing the attributes of a data source element at run time results in dynamic updates to the server. Although the run time is updated immediately, some dynamic updates might affect a running server differently than others. For example, changing the isolationLevel attribute changes the isolation level for any future connection request, but current connections retain their existing isolation level. An update to the value of the commitOrRollbackOnCleanup attribute takes place immediately.
You can find a list of data source properties and their associated configuration update behaviors at the following website:
The rules that are noted apply only to data sources that are defined in the server configuration. When you update the properties of an application-defined data source, the entire data source is destroyed and the updated application uses a new data source. Effectively, from a developer perspective, all of the changes take place immediately.
5.1.2 Developing JPA applications
The Java Persistence API (JPA) provides a framework for working with relational databases in an object-oriented way. WebSphere Liberty profile server provides support for applications that use application-managed and container-managed JPA written to the JPA 2.1 or JPA 2.0 specification. In this chapter, we focus on the JPA 2.1 version. The support is built on top of EclipseLink with extensions to support the container-managed programming model.
Creating a JPA entity
The following procedure allows you to create a simple JPA application in the Liberty profile developer tools:
1. Before beginning, make sure that you defined a data source as described in 5.1, “Data access in the Liberty profile” on page 112.
2. Create a new Dynamic Web Project that uses the WebSphere Liberty runtime and the 3.1 web module version.
3. Begin by enabling the JPA facet on the created project; select the 2.1 version. This causes a persistence.xml file to be added to the project. If the project is deployed to the Liberty profile server, it also causes the tools to prompt you to add the JPA-2.1 feature to the server configuration.
4. Create a JPA entity class by right-clicking the project and selecting New → JPA Entity. Enter com.ibm.itso.jpa21 in the Java package field and Person in the Class name field.
Figure 5-9 shows the first page of the JPA entity wizard.
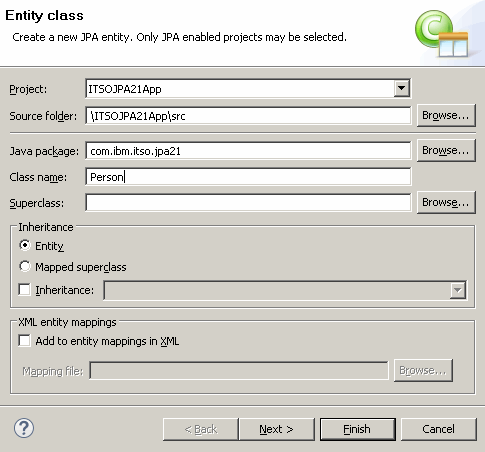
Figure 5-9 New JPA Entity wizard
5. Click Next to advance to the next window. Under Table name, clear the Use default check box. Enter PERSONTBL in the Table name field.
6. Add an entity field by clicking Add. Click Browse next to the Type field to select java.lang.Integer, enter id in the Name field, and then click OK. Select the check box in the Key column for the row containing the id field to indicate that the field is the primary key for the table.
7. Add an entity field by clicking Add. Click Browse next to the Type field to select java.lang.String, enter name in the name field, and then click OK.
Figure 5-10 shows the completed second window of the JPA wizard. Click Finish to exit the wizard.

Figure 5-10 JPA Entity Properties window
9. Now, look at the source of the Person class. Notice that the id field is annotated with the javax.persistence.Id annotation to indicate that it is the primary key.
10. The Derby database that we use is automatically generating the id field. For JPA to handle the generated ID field correctly, it must be annotated with javax.persistence.GeneratedValue. The strategy attribute for the annotation should be set to GenerationValue.IDENTITY. Figure 5-11 shows how the annotation should look.
Figure 5-11 The id field for the UserEntity class
Creating data access object
Once the JPA entities are created, they are managed using the EntityManager. It is a preferable practice to not embed data access code directly in your component (such as, servlet). Instead, create a data access object, which handles all the required tasks.
In this chapter, two possible solutions for data access are presented and noted in the following list:
•POJO-based data access object (DAO), which uses local transactions and CDI.
•EJB-based data access object, which uses JTA container-managed transactions.
Because Java EE 6 and later allows embedding EJBs in the web module, it is now easier to use EJBs for data access and to let the container manage transactions.
Creating a POJO-based DAO
The following process shows you how to create and configure POJO-based JPA entity management.
Create a class to handle the actual persistence by right-clicking the project and selecting New → Class. Enter com.ibm.itso.jpa21 for the package name and PersonPojoDao for the class name. In the source editor, create two methods: persistPerson and listPersons.
The class is using @ApplicationScoped annotation to make the instance of the PersonPojoDao available in the application with injection and @Named annotation to make it accessible in JSP pages by using Expression Language (EL). PersonPojoDao is also using @PersistentUnit to inject the EntityManagerFactory object. In the following simple example, there is no error handling logic needed.
The listPersons method runs a query that selects all Person objects and returns the results.
In the persistPerson method, you start the transaction and persist a new Person object. Finally, you have to commit the transaction or engage rollback in case of an error.
The complete class is presented in Example 5-4.
Example 5-4 PersonPojoDao class
@ApplicationScoped
@Named("personDao")
public class PersonPojoDao {
@PersistenceUnit
private EntityManagerFactory emf;
public Integer persistPerson(Person person) {
EntityManager em = emf.createEntityManager();
try {
em.getTransaction().begin();
em.persist(person);
em.getTransaction().commit();
System.out.println("Created Person: id=" + person.getId() + " name=" + person.getName());
return person.getId();
}
finally {
// clean up in case of exception
if (em.getTransaction().isActive()){
em.getTransaction().rollback();
}
em.close();
}
}
public List<Person> listPersons() {
EntityManager em = emf.createEntityManager();
try {
em.getTransaction().begin();
List<Person> resultList = em.createQuery("Select p from Person p", Person.class).getResultList();
em.getTransaction().commit();
System.out.println("List returned: " + resultList.size());
return resultList;
}
finally {
// clean up in case of exception
if (em.getTransaction().isActive()){
em.getTransaction().rollback();
}
em.close();
}
}
}
Configuring a persistent unit for local transactions
To allow the application to connect to a database, you need to configure a persistent unit by using the following steps:
1. Open the persistence.xml file in the design editor. Then, select the Connection tab.
2. Select Resource Local from the Transaction type combo and enter jdbc/ITSO in the Non-JTA data source field, as shown in Figure 5-12.

Figure 5-12 Persistence unit connection configuration
Creating an EJB-based DAO
The following steps show you how to create and configure EJB-based JPA entity management:
1. Create an EJB class to handle the actual persistence by right-clicking the project and selecting New → Other. In the Select a wizard pop-up window, start typing Session and select Session Bean, as shown in Figure 5-13.

Figure 5-13 Selecting Session Bean in wizard
2. Enter com.ibm.itso.jpa21 for the package name and PersonEJBDao for the class name. In the source editor, create two methods: persistPerson and listPersons.
The class is using @Stateless annotation to mark the class as EJB and @Named annotation to make it accessible in JSP pages by using EL. PersonEJBDao is using @PersistenceContext annotation to inject EntityManager. There is no error handling logic in the following simple example.
The listPersons method runs a query that selects all Person objects and returns the results. The persistPerson persists a new Person object. The complete class is presented in Example 5-5.
Example 5-5 PersonEJBDao class
@Stateless
@LocalBean
@Named("personEJBDao")
public class PersonEJBDao {
@PersistenceContext
private EntityManager em;
public Integer persistPerson(Person person) {
em.persist(person);
em.flush();
System.out.println("Created Person: id=" + person.getId()
+ " name=" + person.getName());
return person.getId();
}
public List<Person> listPersons() {
List<Person> resultList =
em.createQuery("Select p from Person p", Person.class).getResultList();
return resultList;
}
}
Configuring persistent unit for JTA transactions
1. Open the persistence.xml file in the design editor. Then, select the Connection tab.
Select Default(JTA) from the Transaction type combo and enter jdbc/ITSO in the JTA data source field, as shown in Figure 5-14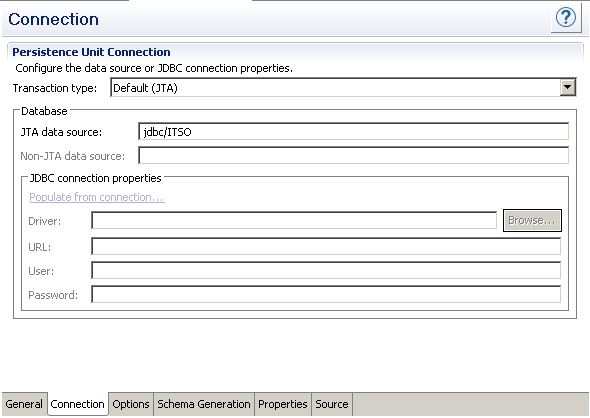 .
.
.Figure 5-14 Configuring persistent unit connection details
Creating the front end for testing JPA
In this section, to test JPA-enabled classes, you create both a simple front-end application and a JSP page and a servlet. Use the following steps to complete the process:
1. Begin by creating a JSP file named index.jsp. The JSP contains a table with a list of persons, a form with two input fields, and a Submit button. The page is accessing a dao object using the name defined in @Named annotation. Example 5-6 shows the completed JSP file.
Example 5-6 Complete index.jsp file
<%@ page language="java" contentType="text/html; charset=ISO-8859-1"
pageEncoding="ISO-8859-1"%>
<%@ taglib prefix="c" uri="http://java.sun.com/jsp/jstl/core" %>
<!DOCTYPE html PUBLIC "-//W3C//DTD HTML 4.01 Transitional//EN" "http://www.w3.org/TR/html4/loose.dtd">
<html><head>
<meta http-equiv="Content-Type" content="text/html; charset=ISO-8859-1">
<title>Hello Liberty JPA</title>
</head>
<body>
<H2>Hello, Liberty Developer from JPA.</H2>
These are our previous visitors:
<TABLE border=5>
<tr>
<TH>ID</TH><TH>Name</TH><TH>Location</TH>
</tr>
<%-- change to items="${personDao.listPersons() to use Pojo dao --%>
<c:forEach var="person" items="${personEJBDao.listPersons()}">
<tr>
<td><c:out value="${person.id}"/></td>
<td><c:out value="${person.name}"/></td>
<td><c:out value="${person.location}"/></td>
</tr>
</c:forEach>
</TABLE>
<form action="JPA21Servlet" method="POST">
Name:<input type="text" name="name"/><BR>
Location: <input type="text" name="location"/><BR>
<input type="submit" value="Submit New Visitor"/>
</form>
</body>
</html>
2. Create a servlet named JPA21Servlet. The servlet uses annotations to either inject a POJO or EJB data access object. Comment out the object not needed, see Example 5-7.
Example 5-7 Injecting dao into servlet
@WebServlet("/JPA21Servlet")
public class JPA21Servlet extends HttpServlet {
// Uncomment for POJO dao
//@Inject
//PersonPojoDao personDao;
// Comment for POJO dao
@EJB
PersonEJBDao personDao;
3. The doPost method reads the name and location parameters on the request to persist a new Person object and redirects to the index.jsp page. Example 5-8 shows a sample doPost method.
Example 5-8 JPA21Servlet doPost method
protected void doPost(HttpServletRequest request, HttpServletResponse response) throws ServletException, IOException {
String name = request.getParameter("name");
String location = request.getParameter("location");
Person p = new Person();
p.setName(name);
p.setLocation(location);
personDao.persistPerson(p);
response.sendRedirect("index.jsp");
}
Configuring server and testing JPA application
Before you can run the application, you need to configure Liberty server for JPA applications and create the database schema that holds persisted objects.
Preparing the server
To run the application, you have to enable the following features in the server configuration:
•jpa-2.1
•jsp-2.3
•cdi-1.2 - for Pojo example
•ejbLite-3.2 - for EJB example
You need to add features to the server configuration by using the following steps:
1. In the Servers view, expand the WebSphere Liberty server and double-click Server Configuration.
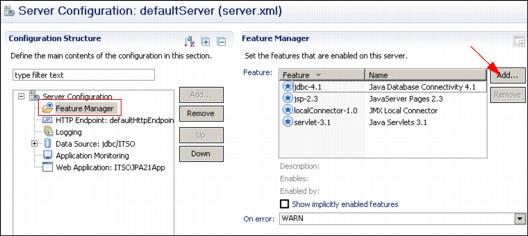
Figure 5-15 Adding features
3. In the Select the features to enable dialog, select jpa-2.1, cdi-1.2, and ejbLite-3.2 features, and click OK. You also need to add the jsp-2.3 feature, if it is not already present.
4. Save the server configuration.
Auto generating the schema for JPA entities
For development purposes, it is useful to quickly generate database schema. The schema can be based on your entities without a need to access database-specific tools or writing and running special schema generating scripts. This is possible in JPA 2.0, but you must use provider proprietary properties. JPA 2.1 introduces standard properties that allow you to generate schema, create scripts, and load data at start.
To configure automatic schema generation, use the following steps:
1. Open the persistence.xml file and select the Schema Generation tab.
2. In the Database action field, select Create. If you often change schema, you can select Drop and Create, but remember that all data is lost during redeployment.
If, in addition, you want to create scripts for later usage, select the required option in the Scripts generation field and provide file names in the Scripts target field, as shown in Figure 5-16. Scripts are generated in the server directory (WLP_HOME/usr/servers/serverName).
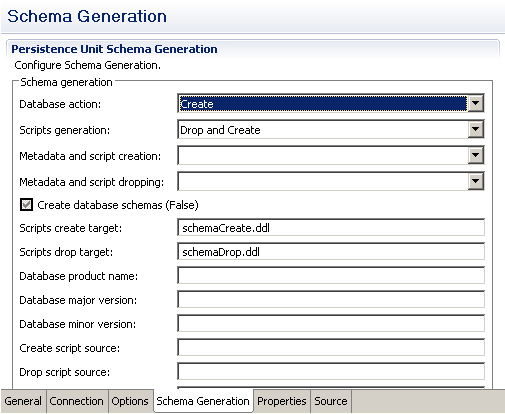
Figure 5-16 Schema generation options
Testing application
Finally, test the application by visiting the following website:
http://localhost:9080/ITSOJPA21App/index.jsp
You should see output similar to Figure 5-17 on page 129. The table is empty on the first run because the database contains no records.

Figure 5-17 Output from the JPA application
5.1.3 Data access with noSQL database
NoSQL databases are becoming more popular. They are especially preferred for storing large amounts of unstructured data. Although they lack traditional database features (such as transaction management and defined schemas), their simple development and ability to scale horizontally make it a preferred choice for some applications.
WebSphere Liberty profile currently provides support for easy development with MongoDB and CouchDB.
Data access with MongoDB
The Liberty profile developer tools can facilitate the development of data access applications using MongoDB by simplifying the setup of required resources. Use the following sections and procedures to create an example application that stores, retrieves, and deletes data from a MongoDB database.
Installing MongoDB
For this example, you need a running instance of MongoDB. For more information about downloading, installing, and running MongoDB, go to the following website:
Setting up the MongoDB Java driver
To set up the MongoDB Java driver, complete the following steps:
1. Download the MongoDB Java driver from the MongoDB website. Ensure that you download Version 2.10.1 or later. Save the Java driver JAR file in the location on disk where you want the Liberty profile server to access the driver.
2. Create a shared library. Select the Server configuration, click Add, and select Shared Library. In the details window for the shared library, enter the value mongoLibrary in the ID field. Click Add next to the Fileset reference field to add a file set to the shared library. In the Base directory field, enter the directory where you saved the MongoDB Java driver JAR file. In the Includes pattern field, enter the Java driver JAR file name. For Version 2.13.1, the file name is mongo-java-driver-2.13.1.jar.
|
Caution: At the time of writing this book, the Mongo 3.x driver was not working in Liberty.
|
Creating an application
To test the MongoDB access, you create a web application with two parts. A JSP file is used to display an input form, and a servlet is used to interact with the MongoDB instance and return results. Complete the following steps to write an application that users MongoDB:
1. Begin by creating a new dynamic web project ITSOMongoApp.
2. Create a JSP file named mongoInput.jsp in the ITSOMongoApp project by using the New JSP File wizard. On the template selection page, choose New JSP File.
3. In the JSP file, add a form that has an input field named item and an input field named price. The action attribute for the form should be MongoServlet and the method attribute should be POST. Add three submit buttons to the form, labeled Add to Catalog, Find in Catalog, and Delete from Catalog. Figure 5-18 shows the completed mongoInput.jsp file.

Figure 5-18 Example mongoInput.jsp file
4. Create a servlet named MongoServlet in the ITSOMongoApp project by using the Create Servlet wizard. In the servlet, access is needed to the APIs that are contained in the MongoDB Java driver JAR file. Add this JAR file to the build path for the ITSOMongoApp project by right-clicking the project and selecting Properties. Select Java Build Path, and then click the Libraries tab. Then, proceed with one of the following two options:
– If your MongoDB Java driver JAR file is in your Eclipse workspace, click Add to add it to the build path.
– Otherwise, click Add External Jars and navigate to the location of the JAR file. When you add the JAR file to the build path, click OK to update the project.
5. In the servlet, add a field of type com.mongodb.DB named mongoDB. Add the annotation @Resource(name = “jndi/mongoDB”) to the field so that the Liberty profile server injects the DB instance automatically.
6. All of the database access takes place in the doPost method. In the doGet method, add the code in Example 5-9 to forward the request to the mongoInput.jsp file.
Example 5-9 Code to forward the request
RequestDispatcher rd = request.getRequestDispatcher(“mongoInput.jsp”);
rd.forward(request, response);
7. In the doPost method, obtain a DBCollection object by calling the getCollection method on the mongoDB field. The method parameter identifies the collection name. For this example, use the name catalog.
8. Also, in the doPost method, create a com.mongodb.BasicDBObject instance named dbObject. Store the request parameters for item and price in the dbObject by using the append method. Continue with the following configuration options:
– If the request parameter add is not null, call insert on the DBCollection object, passing in dbObject.
– If the request parameter find is not null, call find on the DBCollection object, passing in dbObject. The find method returns a com.mongodb.DBCursor object. Use the size method on DBCursor to determine the number of results.
– If the request parameter delete is not null, run the remove method on the collection object, again passing in the dbObject. The remove method returns an object of type com.mongodb.WriteResult. You can use the getN method on the WriteResult object to determine how many results were deleted from the database.
9. Now call the find method on the DBCollection object without passing in any parameters. This returns a DBCursor object that contains all entries in the catalog collection. Iterate through the results using the hasNext and next methods on DBCursor. The next method returns a DBObject instance that you can use to obtain the data.
10. Finally, obtain a RequestDispatcher instance and call the include method to include the contents of the mongoInput.jsp file. The completed doPost method is shown in Figure 5-19.

Figure 5-19 Example doPost method
Configuring MongoDB in the server configuration
To configure MongoDB in the server configuration, complete the following steps:
1. Create a Mongo instance in the server configuration:
a. Select the Server configuration, click Add, and then select Mongo. Accept the prompt to add the Mongo-2.0 Integration feature.
b. The details window contains several different options for configuring the Mongo instance, but you can keep all of the defaults except for the ID and MongoDB Java driver library reference. In the ID field, enter mongo. In the Java driver library reference field, use the drop-down menu to select mongoLibrary.
2. Create a MongoDB DB in the configuration:
a. Select the server configuration, click Add, and then select MongoDB DB.
b. In the JNDI name field, enter the value jndi/mongoDB.
c. In the database name field, enter exampleDB.
d. Use the Mongo instance reference drop-down menu to select mongo.
The configuration is visible in server.xml in Example 5-10.
Example 5-10 Mongo db configuration in server.xml
<library id="mongoLibrary">
<fileset dir="${shared.resource.dir}/mongo" includes="mongo-java-driver-2.13.1.jar"></fileset>
</library>
<mongo id="mongo" libraryRef="mongoLibrary"></mongo>
<mongoDB jndiName="jndi/mongoDB" mongoRef="mongo" databaseName="exampleDB"></mongoDB>
For more complex configurations visit the following page:
Enabling the MongoDB feature
Mongo features should be already enabled in the server.xml as shown in Example 5-11.
Example 5-11 Mongo feature in server.xml
</featureManager>
<feature>mongodb-2.0</feature>
</featureManager>
If the feature is not added, select the Feature Manager in the server configuration. Click Add, and select the mongodb-2.0 feature.
Deploying the Application
Use the following steps to deploy applications:
1. Applications need access to the library you defined for the Mongo Java driver. You cannot just drop it to the dropins folder, you have to configure it in the server.xml file (either using tools in Eclipse or manually). Here you will use Eclipse.
2. Select Liberty server, right-click and select Add and Remove, select ITSOMongoApp, click Add, and then click Finish.
3. Open Server configuration, select Web Application: ITSOMongoApp and click Add.
4. Select Classloader and click OK.
5. In the Classloader Details window, click the Browse button next to the Shared library references field. Select mongoLibrary from the list of available IDs and click OK.
The following fragment of server.xml shows some application configuration, see Example 5-12.
Example 5-12 Application configuration in server.xml
<webApplication id="ITSOMongoApp" location="ITSOMongoApp.war" name="ITSOMongoApp">
<classloader commonLibraryRef="mongoLibrary"></classloader>
</webApplication>
Testing the application
Test the application by visiting the following website:
http://localhost:9080/ITSOMongoApp/MongoServlet
|
Result: You should be able to use the web page to add, find, and remove items from the database. For the find operation to succeed, both input fields must match the corresponding fields in a database entry.
|
Data access with CouchDB
The Liberty profile developer tools can facilitate the development of data access applications using CouchDB by simplifying the setup of required resources. Use the following sections and procedures to create an example application that stores, retrieves, and deletes data from a CouchDB database.
Installing CouchDB
For this example, you need a running instance of CouchDB. For more information about downloading, installing, and running CouchDB, go to the following website:
Setting up the CouchDB Java connector
To set up the CouchDB Java connector, complete the following steps:
1. Download the CouchDB Java connector libraries. You must use Version 1.4.1 or later of the ektorp Java connector. The CouchDB Java connector is a set of files defined by maven dependency. Use the Maven plug-in to obtain it using the dependency shown in Example 5-13.
Example 5-13 Connector dependencies
<dependency>
<groupId>org.ektorp</groupId>
<artifactId>org.ektorp</artifactId>
<version>1.4.1</version>
</dependency>
You can also download JAR files separately by using the list in Example 5-14 on page 134.
Example 5-14 JAR files needed by the connector
org.ektorp-1.4.1.jar
commons-codec-1.6.jar
commons-io-2.0.1.jar
commons-logging-1.1.1.jar
httpclient-4.2.5.jar
httpclient-cache-4.2.5.jar
httpcore-4.2.4.jar
jackson-annotations-2.2.2.jar
jackson-core-2.2.2.jar
jackson-databind-2.2.2.jar
slf4j-api-1.6.4.jar
slf4j-simple-1.6.4.jar
Save the Java connector JAR files in the location on disk where you want the Liberty profile server to access the driver.
2. Create a shared library. Select the Server configuration, click Add, and select Shared Library. In the details window for the shared library, enter the value couchLibrary in the ID field. Click Add next to the Fileset reference field to add a file set to the shared library. In the Base directory field, enter the directory where you saved the CouchDB Java connector JAR file. In the Includes pattern field, enter *.jar to include all the JAR files from the folder.
Creating an application
To test the CouchDB access, you create a web application with two parts. A JSP file is used to display an input form, and a servlet is used to interact with the CouchDB instance and return results. Complete the following steps to create an application that uses CouchDB:
1. Begin by creating a new dynamic web project ITSOCouchApp.
2. Create a JSP file named couchInput.jsp in the ITSOCouchApp project by using the New JSP File wizard. On the template selection page, choose New JSP File.
3. In the JSP file, add a form that has an input field named item and an input field named price. The action attribute for the form should be CouchServlet and the method attribute should be POST. Add three submit buttons to the form, labeled Add to Catalog, Find in Catalog, and Delete from Catalog. Example 5-15 shows the completed couchInput.jsp file.
Example 5-15 couchInput.jsp fragment
<body>
<form action="CouchServlet" method="post">
ID: <input type="text" name="id"><BR>
Item: <input type="text" name="item"><BR>
Price: <input type="text" name="price"><BR>
<input type="submit" name="add" value="Add to Catalog">
<input type="submit" name="find" value="Find in Catalog">
<input type="submit" name="delete" value="Delete fromCatalog">
</form>
</body>
4. Create a servlet named CouchServlet in the ITSOCouchApp project by using the Create Servlet wizard. In the servlet, access is needed to the APIs that are contained in the CouchDB Java connector JAR files. Add these JAR files to the build path for the ITSOCouchApp project by right-clicking the project and selecting Properties. Select Java Build Path, and then click the Libraries tab. Then, proceed with one of the following two options:
– If your CouchDB Java connector JAR files are in your Eclipse workspace, click Add to add it to the build path.
– Otherwise, click Add External Jars and navigate to the location of the JAR files. When you add the JAR files to the build path, click OK to update the project.
5. In the servlet, add a field of type org.ektorp.CouchDbInstance named couchDB. Add the annotation @Resource(name = “couchdb/connector”) to the field so that the Liberty profile server injects the DB instance automatically.
6. All of the database access takes place in the doPost method. In the doGet method, add the code in Example 5-16 to forward the request to the couchInput.jsp file.
Example 5-16 Code to forward the request
RequestDispatcher rd = request.getRequestDispatcher(“couchInput.jsp”);
rd.forward(request, response);
7. In the doPost method, obtain a CouchDbConnector object by calling the createConnector method on the couchDB field. The method parameters identify the database name and database creation, if not existing. For this example, use the name exampledb.
8. Also, in the doPost method, create a HashMap instance named doc. Store the request parameters for id, item, and price in the doc. Put the key value as _id. Continue with the following configuration options:
– If the request parameter add is not null, call create on the CouchDbConnector object, passing in doc object.
– If the request parameter find is not null, call find on the CouchDbConnector object, passing in result class type and object key value. The find method returns a Map object that you put into the database.
– If the request parameter delete is not null, first look for the object to delete by using the find method. If found, run the delete method passing in the found object.
9. Now call the queryView method on the CouchDbConnector object passing ViewQuery object. This returns a List that contains all entries in the exampledb database. Iterate through the results list to display the data.
10. Finally, obtain a RequestDispatcher instance and call the include method to include the contents of the couchInput.jsp file. The completed doPost method is shown in Example 5-17.
Example 5-17 doPost method implementation
protected void doPost(HttpServletRequest request, HttpServletResponse response) throws ServletException, IOException {
PrintWriter writer = response.getWriter();
writer.println("<BODY>");
String dbname = "exampledb";
try {
//creates a database with the specified name
CouchDbConnector dbc = couchDB.createConnector(dbname, true);
//create a simple doc to place into your new database
Map<String, Object> doc = new HashMap<String, Object>();
doc.put("_id", request.getParameter("id"));
doc.put("item", request.getParameter("item"));
doc.put("price", request.getParameter("price"));
if (request.getParameter("add") != null) {
dbc.create(doc);
writer.println("Added a simple doc!");
} else if (request.getParameter("find") != null) {
Map result = dbc.find(Map.class, request.getParameter("id"));
if (result != null) {
writer.println("<P>The item is in the catalog: " + result);
} else {
writer.println("The item was not found in the database");
}
} else if (request.getParameter("delete") != null) {
Map result = dbc.find(Map.class, request.getParameter("id"));
if (result != null) {
writer.println("<P>The item is in the catalog - deleting.... " + result);
dbc.delete(result);
} else {
writer.println("The item was not found in the database");
}
}
writer.println("<P>All Database Entries");
writer.println("<TABLE border="5"><TH>ID</TH><TH>Item</TH><TH>Price</TH>");
ViewQuery q = new ViewQuery().allDocs().includeDocs(true);
List<Map> bulkLoaded = dbc.queryView(q, Map.class);
for (Map map : bulkLoaded) {
writer.println("<TR>");
writer.println("<TD>" + map.get("_id") + "</TD>");
writer.println("<TD>" + map.get("item") + "</TD>");
writer.println("<TD>" + map.get("price") + "</TD>");
writer.println("</TR>");
}
writer.println("</TABLE>");
}
catch(Exception e){
e.printStackTrace();
}
RequestDispatcher rd = request.getRequestDispatcher("couchInput.jsp");
rd.include(request, response);
writer.println("</BODY>");
}
Configuring CouchDB in the server configuration
To configure CouchDB in the server configuration, complete the following process.
Create a Couch instance in the server configuration:
•Select the Server configuration, click Add, and then select Couch. Accept when prompted to add the couchdb-1.0 Integration feature.
•The details window contains several different options for configuring the Couch instance. Provide the following options, as shown in Figure 5-20 on page 137:
– ID: couchdb
– Library reference: couchLibrary
– CouchDB user id: admin
– Password: mysecretpassword
– JNDI name: couchdb/connector
– URL: http://localhost:5984
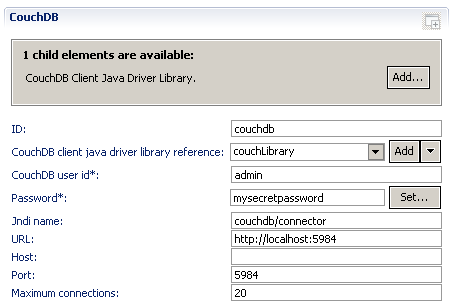
Figure 5-20 CouchDB options
The configuration is visible in server.xml in Example 5-18.
Example 5-18 Couch db configuration in server.xml
<library id="couchLibrary">
<fileset dir="${shared.resource.dir}/crouch" includes="*.jar"/>
</library>
<couchdb id="couchdb" jndiName="couchdb/connector"
libraryRef="couchLibrary" url="http://localhost:5984"
username="admin" password="mysecretpassword"/> 
Enabling the CouchDB feature
Couch features should be already enabled in the server.xml as shown in Example 5-19.
Example 5-19 Couch feature in server.xml
</featureManager>
<feature>couchdb-1.0</feature>
</featureManager>
If the CouchDB feature is not added, select the Feature Manager in the server configuration. Click Add, and select the couchdb-1.0 feature.
Deploying Application
Use the following steps to deploy the application:
1. Applications need access to the library you defined for the CouchDB Java connector. You cannot just drop it into the dropins folder. You have to configure it in the server.xml, either by using tools in Eclipse or manually. In this example, use Eclipse.
2. Select Liberty server, right-click and select Add and Remove. Select ITSOCouchApp, click Add >, and click Finish.
3. Open Server configuration, select Web Application: ITSOCouchApp and click Add.
4. Select Classloader and click OK.
5. In the Classloader Details window, click the Browse button next to the Shared library references field. Select couchLibrary from the list of available IDs and click OK.
The following fragment of server.xml shows some of the application configuration in Example 5-20.
Example 5-20 Application configuration in server.xml
<webApplication id="ITSOCrouchApp" location="ITSOCrouchApp.war" name="ITSOCrouchApp">
<classloader commonLibraryRef="couchLibrary"></classloader>
</webApplication>
Testing the application
Test the application by visiting the following website:
http://localhost:9080/ITSOCouchApp/CouchServlet
|
Result: You should be able to use the web page to add, find, and remove items from the database. For the find and delete operations to succeed, you must provide an ID field.
Not authorized: If you receive the 401:Unauthorized error from the call, configure the admin user in CouchDB. In the C:CouchDBetccouchdblocal.ini file at the end (in the [admins] section entry), uncomment the entry admin = mysecretpassword.
|
5.2 Developing Enterprise JavaBeans applications
The Enterprise JavaBeans (EJB) specification describes a component model for business logic in server applications. WebSphere Liberty Profile Server supports the EJB 3.2, EJB 3.2 Lite specification, and message-driven beans (MDBs).
5.2.1 What’s new in developing EJB applications for Liberty profile
WebSphere Liberty profile now supports full EJB 3.2 specification in addition to EJB Lite. The latest available features include those noted in the following list:
•Local and remote EJB
•Support for persistent and non-persistent timers
•Support for asynchronous session bean invocations
5.2.2 Developing applications using local EJB
The Liberty profile developer tools facilitate the development of EJB applications by providing wizards that help generate portions of the EJB code. Use the following sections and procedures to create and test a simple stateless local session bean that uses ejblite-3.2. Since Java EE now allows embedding EJBs in the web modules, this approach is shown in this section. WebSphere Liberty also fully supports creating an EAR project with separate web and EJB modules.
Creating a Dynamic Web Project
To create a project, complete the following steps:
1. Begin by creating a new project to hold the EJB application. Click File → New → Dynamic Web Project. On the first page of the New Project wizard, enter ITSOEJBLocal in the Project name field.
2. Make sure that WebSphere Application Server V8.5 Liberty Profile is selected for the Target run time. Also, ensure that the Add project to an EAR check box is cleared.
3. Click Finish to complete the wizard. A new project named ITSOEJBLocal is created after you exit the wizard.
Creating the EJB
After creating the project, complete the following steps to create the EJB:
1. From the menu, select File → New → Session Bean (EJB 3.x), which starts the Create EJB 3.x Session Bean wizard.
2. In the first window of the wizard, ensure that ITSOEJBLocal is selected in the Project field, enter com.ibm.itso.ejblocal in the Java package field, and Hello in the Class name field. Ensure that Stateless is specified for the State type field, and default No-interface View is selected. When you select the No-interface View, all public, non-static methods of the bean are available to clients. If you do not want that availability, select Local and define the interface with only required methods. The EJB creation wizard is shown in Figure 5-21.
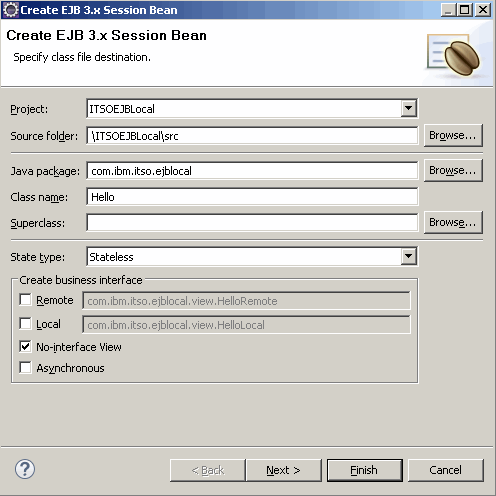
Figure 5-21 Creating EJB
3. Click Next to advance to the next window, and then click Finish. The wizard now creates a class named Hello. Notice that the class is annotated with @Stateless and @LocalBean.
4. Now, complete the EJB implementation by adding a method that is named hello that returns the string Hello from local bean. The completed class is shown in Example 5-21.
Example 5-21 Hello bean class
@Stateless
@LocalBean
public class Hello {
public String hello() {
return "Hello from local bean";
}
}
Creating a test client
A servlet is used to test the created bean. To create a servlet, complete the following steps:
1. Using the Create New Servlet wizard, create a servlet in the ITSOEJBLocal project, in the package com.ibm.itso.ejbLocal named HelloServlet. In the generated class, add a field named helloBean of type Hello. Annotate the field with @EJB.
2. In the servlet’s doGet method, print the results of calling the hello method on helloBean. The completed servlet is shown in Example 5-22.
Example 5-22 HelloServlet class
@WebServlet("/HelloServlet")
public class HelloServlet extends HttpServlet {
private static final long serialVersionUID = 1L;
@EJB
private Hello helloBean;
protected void doGet(HttpServletRequest request, HttpServletResponse response)
throws ServletException, IOException {
PrintWriter out = response.getWriter();
out.println(helloBean.hello());
}
}
Enabling the EJB feature and testing
You can test HelloServlet directly from the workspace:
•Select the HelloServlet file, right-click, and select Run as → Run on Server
•Browser in Eclipse is automatically opened pointing to the following website: http://localhost:9080/ITSOEJBLocal/HelloServlet
|
Result: You should see the output, Hello from the local bean, in your web browser. This shows that the EJB was automatically injected into the helloBean field and that the servlet was able to successfully start the method hello.
|
By default, WebSphere Liberty server automatically loads the required features if they are available in the runtime. You should see, in the console, output messages similar to those in Example 5-23 on page 141 where the server is automatically adding jndi-1.0 and ejbLite-3.2; you can also notice default binding for the Hello bean.
Example 5-23 Automatically enabling features
[AUDIT ] CWWKG0016I: Starting server configuration update.
[INFO ] CWWKF0007I: Feature update started.
[AUDIT ] CWWKG0017I: The server configuration was successfully updated in 0.856 seconds.
[AUDIT ] CWWKF0012I: The server installed the following features: [jndi-1.0, ejbLite-3.2].
[AUDIT ] CWWKF0008I: Feature update completed in 0.846 seconds.
[INFO ] CWWKZ0018I: Starting application ITSOEJBLocal.
[INFO ] CNTR4000I: The ITSOEJBLocal.war EJB module in the ITSOEJBLocal application is starting.
[INFO ] CNTR0167I: The server is binding the com.ibm.itso.ejblocal.Hello interface of the Hello enterprise bean in the ITSOEJBLocal.war module of the ITSOEJBLocal application. The binding location is: java:global/ITSOEJBLocal/Hello!com.ibm.itso.ejblocal.Hello
[INFO ] CNTR4001I: The ITSOEJBLocal.war EJB module in the ITSOEJBLocal application has started successfully.
[INFO ] SRVE0169I: Loading Web Module: ITSOEJBLocal.
[INFO ] SRVE0250I: Web Module ITSOEJBLocal has been bound to default_host.
[AUDIT ] CWWKT0016I: Web application available (default_host): http://localhost:9080/ITSOEJBLocal/
[AUDIT ] CWWKZ0001I: Application ITSOEJBLocal started in 0.313 seconds.
[AUDIT ] CWWKG0016I: Starting server configuration update.
The required features can also be added by opening the server configuration and selecting Feature Manager in the server configuration. Then, click Add, and select ejbLite-3.2 and jndi-1.0.
5.2.3 Developing applications using remote EJB
Liberty also supports remote EJB as required by the Java EE 7 full platform specification. In this chapter, you create a project that has remote EJB and two types of clients (separate web application and Java client application).
Creating an EJB project
To create a project, complete the following steps:
1. Begin by creating a new project to hold the EJB application. Click File → New → EJB Project. On the first page of the New EJB Project wizard, enter ITSORemoteEJB in the Project name field, ensure that Add project to an EAR is checked and provides ITSORemote as the name for the EAR. Click Next. Then, again click Next.
2. In the Configure EJB module settings window, ensure that Create an EJB Client JAR is selected, then click Finish.
The EJB client JAR file is used by remote clients to find required class files.
Creating the EJB
After creating the project, complete the following steps to create the EJB:
1. From the menu select File → New → Session Bean (EJB 3.x), which starts the Create EJB 3.x Session Bean wizard.
2. In the first window of the wizard, ensure that ITSORemoteEJB is selected in the Project field. Enter com.ibm.itso.ejbRemote in the Java package field and HelloRemoteEJB in the Class name field. Ensure that Stateless is specified for the State type field, and change the business interface option from No-interface View to Remote (shown in Figure 5-22).
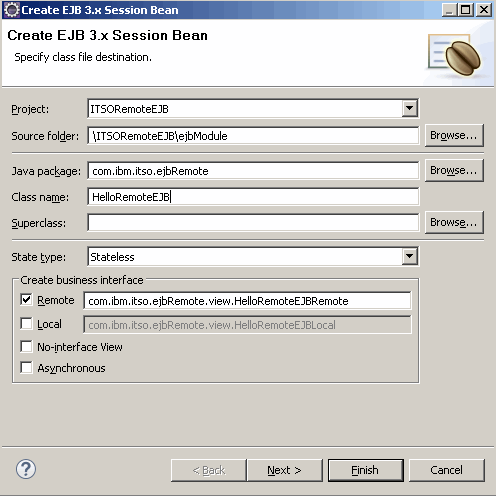
Figure 5-22 Creating remote EJB
3. Click Next to advance to the next window, and then click Finish. The wizard now creates a class named HelloREmoteEJB and also an interface called HelloREmoteEJBRemote in the ITSORemoteEJBClient project. Notice that the class is annotated with @Stateless and @Remote.
4. Now, complete the EJB implementation by adding a method that is named hello that returns the string Hello from remote bean. The completed class is shown in Example 5-24.
Example 5-24 HelloRemoteEJB class
@Stateless
@Remote(HelloRemoteEJBRemote.class)
public class HelloRemoteEJB implements HelloRemoteEJBRemote {
public String hello() {
return "Hello from remote bean!";
}
}
5. Promote the hello() method to the remote interface. In the Outline view, click hello() method, right-click, and select Java EE Tools → Promote Methods. Accept the defaults and click OK.
Enabling the feature and deploying to the server
To enable ejbRemote-3.2 in the server configuration, use the following steps:
1. In the Servers view, expand Liberty Server and double-click Server Configuration [server.xml].
2. Select Feature Manager and in the Feature Manager section of the window, click the Add button and add the ejbRemote-3.2 feature.
3. Save the changes.
Now, deploy ITSORemote application to the server. To do so, in the Servers view right-click Liberty Server, then click Add and Remove, and add ITSORemote application.
Your remote EJB application is ready for testing.
Creating a web test client
A separate web project is created to show the remote access to the EJB. Complete the following steps to create a web test client:
1. Begin by creating a new web project to hold the client application. Click File → New → Dynamic Web Project. On the first page of the New Project wizard, enter ITSORemoteWebClient in the Project name field.
2. Make sure that WebSphere Application Server V8.5 Liberty Profile is selected for the Target run time. Also, ensure that the Add project to an EAR check box is cleared.
3. Click Finish to complete the wizard. A new project named ITSORemoteWebClient is created after you exit the wizard.
4. Using the Create New Servlet wizard, create a servlet in the ITSORemoteWebClient project, in the package com.ibm.itso.ejbRemote named HelloRemoteServlet. In the generated class, add a field named helloRemoteBean of type HelloRemoteEJBRemote. Annotate the field with @EJB.
5. In the servlet’s doGet method, print the results of calling the hello method on helloBean. The completed servlet is shown in Example 5-25.
Example 5-25 HelloServlet class
@WebServlet("/HelloRemoteServlet")
public class HelloRemoteServlet extends HttpServlet {
private static final long serialVersionUID = 1L;
@EJB(lookup="java:global/ITSORemote/ITSORemoteEJB/HelloRemoteEJB!com.ibm.itso.ejbRemote.view.HelloRemoteEJBRemote")
private HelloRemoteEJBRemote helloRemoteBean;
protected void doGet(HttpServletRequest request, HttpServletResponse response) throws ServletException, IOException {
PrintWriter out = response.getWriter();
out.println(helloRemoteBean.hello());
}
}
|
JNDI name for remote EJB:
For beans in the same Liberty server, use: java:global/ApplicationName/ModuleName/EJBName!full.package.remote.interface.Name
For beans in a different Liberty server, use: corbaname::differentHostName:2809#ejb/global/ApplicationName/ModuleName/EJBName!full.package.remote.interface.Name
|
You can now test directly from the workspace:
1. Select the HelloRemoteServlet file, right-click, and select Run as → Run on Server
2. Browser is automatically opened pointing to http://localhost:9080/ITSORemoteWebClient/HelloRemoteServlet
|
Result: You should see the output Hello from the remote bean in your web browser. This shows that the EJB was automatically injected into the helloRemoteBean field and that the servlet was able to successfully call the method hello in the remote bean.
|
Creating a Java application test client
WebSphere Liberty now supports running Java applications, in the application client container, that can access your components running on the Liberty server (for example remote EJB).
Using the client container is a two part process. First, you need to create an application. Then, configure and run that application using a client container.
Creating a Java application client
Use the following steps to create a Java application client:
1. Start by creating the new application client project. From the menu, select File → New → Application Client Project. On the first page of the New Project wizard, enter ITSOHelloJavaClient in the Project name field, type ITSOHelloJavaClientEAR in the EAR project name, and select 7.0 as the Application client module version. See Figure 5-23 on page 145. Then, click Next twice.

Figure 5-23 Creating an application client project
|
Attention: At the time of writing this book, it was not possible to select the Liberty Target run time while creating the Application client project. As a result, you need to later on add the Server Library to the project.
|
2. In the Configure Client module settings window, clear Create default Main class, and check to Generate application-client.xml. Click Finish.
3. Add the server run time to the project:
a. Right-click the ITSOHelloJavaClient project and select Build Path → Configure Build Path.
b. Click Add Library. Select Server Runtime. Select your WebSphere Liberty runtime and click Finish. Click OK.
4. Add ITSORemoteEJBClient library to the application libraries:
a. Right-click ITSOHelloJavaClientEAR and select Properties.
b. Select Deployment Assembly in the left section of the Properties window, as shown in Figure 5-24 on page 146, and click Add.

Figure 5-24 Configuring Deployment Assembly
c. Select Project and click Next.
d. Select ITSORemoteEJBClient and click Finish.
e. Click OK to close Properties window.
5. Create the main application class by using the New Java Class wizard. Enter com.ibm.itso.appclient as the Package name, HelloClient as Class name, and check to Create the main method. Click Finish.
6. Add the injected EJB as the static class field, and code the main method to call EJB. See the complete code in Example 5-26.
Example 5-26 Complete Hello client class
public class HelloClient {
@EJB(lookup="corbaname::localhost:2809#ejb/global/ITSORemote/ITSORemoteEJB/HelloRemoteEJB!com.ibm.itso.ejbRemote.view.HelloRemoteEJBRemote")
static HelloRemoteEJBRemote remoteBean;
public static void main(String[] args) {
System.out.println("Starting Liberty java client");
System.out.println(remoteBean.hello());
}
}
7. For the application to automatically run, it needs to have the Main-class attribute configured in the MANIFEST.MF file. Use the following steps for that process:
a. Expand ITSORemoteEJBClient → appClientModule → META-INF and double-click MANIFEST.MF.
b. Scroll down and beside Main-Class, click Browse and select HelloClient class, as shown in Figure 5-25 on page 147.

Figure 5-25 Defining Main-Class in the manifest file
8. Create the application deployment descriptor by right-clicking the ITSOHelloJavaClientEAR and select the Java EE Tools → Generate Deployment Descriptor Stub.
9. To export the application, right-click ITSOHelloJavaClientEAR and select Export → EAR file. Now, the ITSOHelloJavaClientEARapplication is ready to be deployed in the application client container.
|
Running the application client: At the time of writing the book, it was not possible to run WebSphere Liberty application client directly from Eclipse. You need to export the application and configure application client container as described in the next section.
|
Configuring the Java application client container
To run the Java application client for WebSphere Liberty, you need to create and configure the container. To create the container, use the following steps:
1. Start by running the client create clientName command from the WLP_HOMEin directory, providing ITSOHelloClient as the client name, as shown in Example 5-27.
Example 5-27 Creating client container
C:IBMWebSpherewlpin>client create ITSOHelloClient
Client ITSOHelloClient created.
2. Observe that the ITSOHelloClient folder was created in the C:IBMWebSpherewlpusrclients directory.
3. Copy the previously exported ITSOHelloJavaClientEAR.ear file to the C:IBMWebSpherewlpusrclientsITSOHelloClientapps folder.
4. Edit the client configuration file, client.xml, in C:IBMWebSpherewlpusrclientsITSOHelloClient (See Example 5-28).
Example 5-28 Client configuration file, client.xml
<?xml version="1.0" encoding="UTF-8"?>
<client description="new client">
<featureManager>
<feature>javaeeClient-7.0</feature>
</featureManager>
<application id="ITSOHelloJavaClientEAR_ID" name="ITSOHelloJavaClientEAR" type="ear" location="ITSOHelloJavaClientEAR.ear"/>
</client>
5. Run your application by using the client container. This container executes the client run clientName command, as shown in Example 5-29.
Example 5-29 Running application
C:IBMWebSpherewlpin>client run ITSOHelloClient
6. Observe the output from the successful application execution, as shown in Example 5-30.
Example 5-30 Output from the running application
...
[AUDIT ] CWWKZ0001I: Application ITSOHelloJavaClientEAR started in 1.578 seconds.
...
[AUDIT ] CWWKF0035I: The client ITSOHelloClient is running.
Starting Liberty java client
Hello from remote bean!
[AUDIT ] CWWKZ0009I: The application ITSOHelloJavaClientEAR has stopped successfully.
[AUDIT ] CWWKE0908I: The client ITSOHelloClient stopped after 8.216 seconds.
5.2.4 Developing applications using timers
Applications often need to perform some tasks at a specific time or repeatedly (such as generating daily reports). The timer service allows you to schedule notifications according to a calendar schedule, at a specific time, after a duration of time, or at timed intervals. It is available to all enterprise beans except stateful.
Timers can be either automatic (created by the @Schedule annotation), or programmatic (created explicitly by TimerService methods). Automatic timers are created by the container during the application start.
Timers can also be non-persistent or persistent. Non-persistent timers configuration is held only in JVM memory. In case of application or server restart, it needs to be re-created. Non-persistent timers run in every JVM of the cluster, where the application is deployed. Persistent timers configuration is stored in the database and any missed notifications, for example, due to a stopped application, will be reissued after the restart.
Using non-persistent timers
Use the following steps to create non-persistent timers:
1. Start by creating a new project that holds your timer class.
2. Create a new class with the code shown in Example 5-31 on page 149. Make sure to have persistent=false (as by default, timers are persistent). This timer runs on the tenth second every minute.
Example 5-31 Non-persistent timer bean
@Singleton
@Startup
public class TimerBean {
@PostConstruct
public void init() {
System.out.println("TimerBean initialized");
}
@Schedule(second="10", minute="*", hour="*", persistent=false )
public void generateReport() {
System.out.println("Generating report...");
// your logic here....
}
}
3. Configure the server to run the application with a non-persistent timer:
a. In the Servers view, expand your Liberty server and double-click Server configuration.

Figure 5-26 Adding the ejbLite-3.2 feature
You can also enable the ejbLite-3.2 feature manually, adding the snippet shown in Example 5-32 to the server.xml.
Example 5-32 ejbLite feature in server.xml
<featureManager>
<feature>ejbLite-3.2</feature>
</featureManager>
4. Now, deploy your application to the server. After a short time, you should see the output in the console (as shown in Example 5-33).
Example 5-33 Non-persistent timer running
[INFO ] CNTR4000I: The ITSOTimerApp.war EJB module in the ITSOTimerApp application is starting.
[INFO ] CNTR0167I: The server is binding the com.ibm.itso.timers.TimerBean interface of the TimerBean enterprise bean in the ITSOTimerApp.war module of the ITSOTimerApp application. The binding location is: java:global/ITSOTimerApp/TimerBean!com.ibm.itso.timers.TimerBean
[INFO ] CNTR0219I: The server created 0 persistent automatic timer or timers and 1 non-persistent automatic timer or timers for the ITSOTimerApp.war module.
...
[INFO ] CNTR4001I: The ITSOTimerApp.war EJB module in the ITSOTimerApp application has started successfully.
[INFO ] SRVE0169I: Loading Web Module: ITSOTimerApp.
[INFO ] SRVE0250I: Web Module ITSOTimerApp has been bound to default_host.
[AUDIT ] CWWKT0016I: Web application available (default_host): http://localhost:9080/ITSOTimerApp/
[AUDIT ] CWWKZ0001I: Application ITSOTimerApp started in 0.625 seconds.
[AUDIT ] CWWKF0012I: The server installed the following features: [localConnector-1.0, jdbc-4.1, cdi-1.2, servlet-3.1, jndi-1.0, ejbLite-3.2].
[INFO ] CWWKF0008I: Feature update completed in 1.803 seconds.
[AUDIT ] CWWKF0011I: The server timerTest is ready to run a smarter planet.
Generating report...
Using persistent timers
Creating a persistent timer is similar to non-persistent, except for the server configuration, which is a bit more complex:
1. Start by creating a new project that holds your timer class.
2. Create a class with the code shown in Example 5-34. Make sure that you have a persistent=true or that you do not have a persistent element at all, as the default value for persistent element is true, if omitted. This timer runs on the tenth second of every minute.
Example 5-34 Persistent timer bean
@Singleton
@Startup
public class TimerBean {
@PostConstruct
public void init() {
System.out.println("TimerBean initialized");
}
@Schedule(second="10", minute="*", hour="*")
public void generateReport() {
System.out.println("Generating report via persistent timer...");
}
}
3. Configure the server to run the application with a non-persistent timer by using the following steps:
a. In the Servers view, expand your Liberty server and double-click Server configuration.

Figure 5-27 Adding the ejbPersistentTimer feature
You can also enable the ejbPersistentTimer-3.2 feature manually, adding the snippet shown in Example 5-35 to server.xml.
Example 5-35 ejbPersistentTimer feature in server.xml
<featureManager>
<feature>ejbPersistentTimer-3.2</feature>
</featureManager>
c. Persistent timers require a database to store the timer details. In Liberty, persistent timers use the data source identified by the DefaultDataSource ID. Add default data source configuration to the server.xml, as shown in Example 5-36 on page 152. You can also add default data by using the graphical editor in a similar fashion (as shown in “Adding a data source using Liberty profile developer tools” on page 113).
Example 5-36 Default data source configuration using a Derby database
<dataSource id="DefaultDataSource">
<jdbcDriver>
<library name="derbyLibrary">
<fileset dir="${shared.resource.dir}/derby"/>
</library>
</jdbcDriver>
<properties.derby.embedded createDatabase="create" databaseName="EJBTimers"/>
</dataSource>
4. Deploy your application to the server. After a short time, you should see the output in the console, as shown in Example 5-37.
Example 5-37 Persistent timer running
[INFO ] CNTR4000I: The ITSOTimerApp.war EJB module in the ITSOTimerApp application is starting.
[INFO ] CNTR0167I: The server is binding the com.ibm.itso.timers.TimerBean interface of the TimerBean enterprise bean in the ITSOTimerApp.war module of the ITSOTimerApp application. The binding location is: java:global/ITSOTimerApp/TimerBean!com.ibm.itso.timers.TimerBean
[INFO ] DSRA8203I: Database product name : Apache Derby
[INFO ] DSRA8204I: Database product version : 10.8.2.3 - (1212722)
[INFO ] DSRA8205I: JDBC driver name : Apache Derby Embedded JDBC Driver
[INFO ] DSRA8206I: JDBC driver version : 10.8.2.3 - (1212722)
[INFO ] CNTR0219I: The server created 1 persistent automatic timer or timers and 0 non-persistent automatic timer or timers for the ITSOTimerApp.war module.
TimerBean initialized
[INFO ] CNTR4001I: The ITSOTimerApp.war EJB module in the ITSOTimerApp application has started successfully.
[INFO ] SRVE0169I: Loading Web Module: ITSOTimerApp.
[INFO ] SRVE0250I: Web Module ITSOTimerApp has been bound to default_host.
[AUDIT ] CWWKT0016I: Web application available (default_host): http://localhost:9080/ITSOTimerApp/
[AUDIT ] CWWKZ0001I: Application ITSOTimerApp started in 2.859 seconds.
[AUDIT ] CWWKF0012I: The server installed the following features: [ejbPersistentTimer-3.2, localConnector-1.0, jdbc-4.1, cdi-1.2, servlet-3.1, jndi-1.0, ejbLite-3.2].
[INFO ] CWWKF0008I: Feature update completed in 4.141 seconds.
[AUDIT ] CWWKF0011I: The server timerTest is ready to run a Smarter Planet.
Generating report via persistent timer...
Using programmatic timers
Sometimes, timers need to be created on demand. This can be achieved by the TimerService. You create the timer using a TimerService API and a mark method to be invoked using the @Timeout annotation. Example 5-38 on page 153 shows sample code that creates a timer repeating every 10 seconds. The Returned Timer object can be used to query timer information (for example, when is the next execution of this timer) or cancel it (if you no longer want it to execute).
Refer to the TimerService Javadoc for more information; see the following website:
Example 5-38 Programmatic timer example
@Stateless
public class ProgrammaticTimer {
@Resource
TimerService timerService;
public Timer setupTimer() {
System.out.println("Setting up timer");
TimerConfig tConfig = new TimerConfig();
tConfig.setPersistent(false);
Timer timer = timerService.createIntervalTimer(new Date(), 10000, tConfig);
return timer;
}
@Timeout
public void timeout() {
System.out.println("Programmatic timer");
}
}
While creating the timer, you can, via TimerConfig object, attach any Serializable object to it that may provide some additional data to the timeout method. See Example 5-39 about how to pass and retrieve that additional information.
Example 5-39 Using additional data with timer
public Timer setupTimerWithInfo() {
System.out.println("Setting up timer with Info");
String timerInfo = "ImportantMonthlyReport"
TimerConfig tConfig = new TimerConfig(timerInfo);
tConfig.setPersistent(false);
Timer timer = timerService.createIntervalTimer(new Date(), 10000, tConfig);
return timer;
}
@Timeout
public void timeout(Timer timer) {
// retrieve additional info
System.out.println("Programmatic timer for: " + timer.getInfo());
}
5.3 Developing Java Message Service applications
By using the Java Message Service (JMS) API, you can send messages between Java EE applications and components. It allows you to develop applications with loosely coupled communication. JMS is supported by WebSphere Liberty Profile, but it is not supported by the WebSphere Liberty core edition.
The WebSphere Liberty profile provides an embedded messaging server that allows applications to act as a JMS server. Your applications can also act as JMS clients for another WebSphere Liberty profile instance, for an external WebSphere MQ server or for a third-party JMS provider when bundled with an application. For details about how to configure your application with Apache MQ, refer to chapter 7 of the IBM Redbooks publication Configuring and Deploying Open Source with WebSphere Application Server Liberty Profile, SG24-8194. WebSphere Liberty profile server supports both the point-to-point model and the publish and subscribe model.
Use the procedure that is outlined in the rest of this section to create a web application that uses the JMS to send and receive messages. If you are using Liberty core edition, you cannot compile this application in the Liberty profile developer tools because the API JAR files for JMS are not available.
In addition to the EJB lite 3.2 specification, Liberty profile server provides support for the MDB 3.2 specification. Message driven beans allow you to construct enterprise beans that operate asynchronously on messages that are received from other Java EE components.
5.3.1 What’s new in JMS 2.0 API?
Java EE 7 specification updates JMS API from 1.1 to 2.0. The most important changes are noted in the following list:
•New simplified API. API includes JMSContext object, which can be used instead of Connection and Session objects.
•All objects that have to be closed implement Autoclosable interface.
•Resources can be configured and injected via annotations.
5.3.2 Developing applications using JMS 2.0 API
In this section, you create a simple web application that uses new JMS 2.0 API to send and receive messages. You also configure Liberty server to support messaging.
Creating an application
1. Start by creating a new dynamic web project that holds your application.
2. Create a servlet that will be used to send messages. The SenderServlet code is presented in Example 5-40. Observe injection of resources, the Queue and JMSContext, and how simple it is to send messages by using its interface.
Example 5-40 SenderServlet code
@WebServlet("/SenderServlet")
@Resource(name="jms/itsoQCF", lookup="jms/itsoQCF", type=ConnectionFactory.class)
public class SenderServlet extends HttpServlet {
@Inject
@JMSConnectionFactory("java:comp/env/jms/itsoQCF")
private JMSContext jmsContext;
@Resource(lookup="jms/itsoQ")
private Queue queue;
protected void doGet(HttpServletRequest request, HttpServletResponse response) throws ServletException, IOException {
String message = "Test message " + new Date();
if(request.getParameter("msg") != null) {
message = request.getParameter("msg");
}
System.out.println("Sending message: " + message);
jmsContext.createProducer().send(queue, message);
System.out.println("Message Sent!");
PrintWriter out = response.getWriter();
out.println("Message Sent!");
}
}
3. Create a second servlet to test the receiving of messages. This example uses synchronous receiving (see section 5.3.3, “Developing a message-driven bean (MDB) application” on page 160, where you learn how to write a message-driven bean to read messages). Example 5-41 shows the ReceiverServlet. Again observe injection and usage of the new API to read messages.
Example 5-41 ReceiverServlet code
@WebServlet("/ReceiverServlet")
public class ReceiverServlet extends HttpServlet {
@Inject
@JMSConnectionFactory("jms/itsoQCF")
private JMSContext jmsContext;
@Resource(lookup="jms/itsoQ")
private Queue queue;
protected void doGet(HttpServletRequest request, HttpServletResponse response) throws ServletException, IOException {
System.out.println("Receiving message...");
PrintWriter out = response.getWriter();
Message message = jmsContext.createConsumer(queue).receive(5000);
if(message != null && message instanceof TextMessage) {
TextMessage textMessage = (TextMessage) message;
try {
System.out.println("Received: " + textMessage.getText());
out.println("Received: " + textMessage.getText());
} catch (JMSException e) {
out.println("Error: " + e.getMessage());
}
}
else {
System.out.println("No or unknown message");
out.println("No or unknown message");
}
}
}
4. For injection of JMSContext to work, your application needs to be CDI enabled. You can do it by creating an empty beans.xml file in the WEB-INF folder in case of web modules or META-INF folder, in case of EJB or utility modules. Figure 5-28 on page 156 shows the project structure with servlets and beans.xml file.

Figure 5-28 Project structure
Now the application code is ready. Next, prepare the server for it.
Configuring server for JMS application
This configuration uses an embedded JMS engine provided with Liberty. JMS support is not available in the Liberty Core edition; however, the developers version contains full support for JMS so that you can develop and test your JMS applications.
To configure Liberty server to support JMS, use the following steps:
1. In the Servers view, expand Liberty Server and double-click Server Configuration.
2. Start with adding features to the Feature Manager. You can do it either using a graphical editor or editing the server.xml directly. You need to add features that are shown in Example 5-42.
Example 5-42 Features required by JMS application
<featureManager>
<feature>servlet-3.1</feature>
<feature>wasJmsServer-1.0</feature>
<feature>wasJmsClient-2.0</feature>
<feature>cdi-1.2</feature>
<feature>jndi-1.0</feature>
</featureManager>
3. Next, configure the Messaging engine. Select Server configuration and click Add. Select Messaging Engine, as shown in Figure 5-29 on page 157, and click OK.

Figure 5-29 Adding the messaging engine
4. Next, configure the queue. Select the recently added Messaging Engine element and click Add. Select Queue, as shown in Figure 5-30 on page 158, and click OK.

Figure 5-30 Adding queue

Figure 5-31 Queue details
The same configuration could be achieved by adding text from Example 5-43 to the server.xml file.
Example 5-43 Messaging engine configuration in server.xml
<messagingEngine>
<queue id="itsoQ"></queue>
</messagingEngine>
6. Configure required JMS resources (the connection factory and queue). Start with the connection factory.
7. Select Server configuration; click Add. Start typing JMS and select JMS Connection Factory, as shown in Figure 5-32, and click OK.
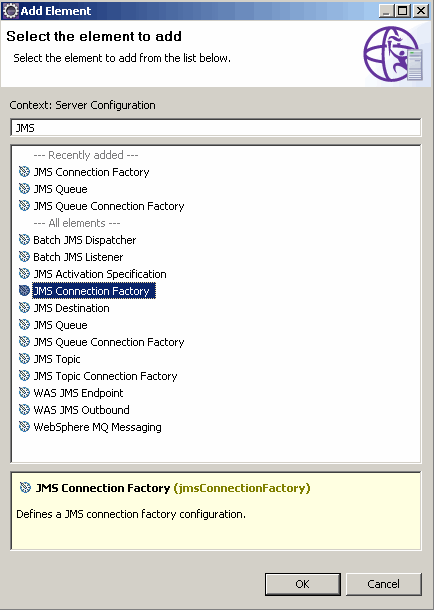
Figure 5-32 Adding connection factory
8. Select the recently added JMS Connection Factory, enter jms/itsoQCF as the JNDI name, and click Add. Select Embedded Messaging and click OK.
9. In a similar way, add JMS Queue. Enter jms/itsoQ as JNDI name, and itsoQ as Queue name in the Embedded Messaging configuration, as shown in Figure 5-33 on page 160.

Figure 5-33 Queue configuration details
10. Similar configuration of JMS resources could be done by adding Example 5-44 fragment to the server.xml file.
Example 5-44 JMS resources configuration in server.xml
<jmsConnectionFactory jndiName="jms/itsoQCF">
<properties.wasJms/>
</jmsConnectionFactory>
<jmsQueue jndiName="jms/itsoQ">
<properties.wasJms queueName="itsoQ"/>
</jmsQueue>
11. Your configuration is done. Save Server Configuration and close the editor.
Testing JMS application
To test the JMS application, follow these steps:
1. Start the server and deploy the sample application to it.
2. First invoke SenderServlet, either from Workspace or by using the following URL:
http://localhost:9080/ITSOJMSApp/SenderServlet.
You should see Message sent! text in the browser.
3. Now invoke ReceiverServlet, either from Workspace or by using the following URL: http://localhost:9080/ITSOJMSApp/ReceiverServlet. You should see Received: Test message Wed May 13 01:59:43 CEST 2015 text in the browser.
5.3.3 Developing a message-driven bean (MDB) application
The Liberty profile developer tools simplify the development of message-driven beans by providing wizards for creating message-driven beans and for creating related JMS resources. You extend the application from the previous section with MDB that will be invoked by the container when a new message arrives in the queue.
Creating the message-driven bean
To create a message driven bean, complete the following steps:
1. Select the ITSOJMSApp project. By using the menu, click File → New → Message Driven Bean.
2. In the message-driven bean wizard, enter the package name com.ibm.itso.jms20 and the class name as SimpleMDB. Click Finish.
3. To finish implementing the ExamplePubSubMDB class, modify the onMessage method so that it prints the message that is received by the console. The completed message-driven bean class is shown in Example 5-45.
Example 5-45 Complete SimpleMDB code
@MessageDriven(name="SimpleMDB")
public class SimpleMDB implements MessageListener {
public void onMessage(Message message) {
try {
System.out.println("MDB: " + ((TextMessage)message).getText());
} catch (JMSException e) {
e.printStackTrace();
}
}
}
Creating message-driven bean resources
This example uses the resources that are created in the JMS example in “Configuring server for JMS application” on page 156, including the messaging engine, queue, and JMS Queue. For this message-driven bean example, you must also create a JMS activation specification and properties.
To create a JMS activation specification, complete the following steps:
1. In the Servers view, expand the Liberty Server and double-click the Server Configuration.
2. Select Server Configuration and click Add. Start typing JMS and select JMS Activation Specification.
3. In the details window, specify a value for the ID field. The value must be in the format applicationName/moduleName/beanName, where applicationName is the name of the EAR application. Only applicationName is needed, if the application is packed as EAR. ApplicationName should be omitted if the application is a WAR or stand-alone EJB JAR file. The moduleName is the name of the module in which the message-driven bean is packaged (without extension). The beanName is the ejb-name of the enterprise bean. For this example, you use the application packed as WAR, so enter the value ITSOJMSApp/SimpleMDB.
You also must add properties to the JMS activation specification to indicate that you are using the embedded messaging engine and to specify the JMS Queue to be used. To do this, complete the following steps:
1. Click JMS Activation Specification in the server configuration and click Add.
2. Select WebSphere Embedded JMS Activation Specification in the dialog box.
3. On the details window for the properties, enter jmsItsoQ in the Destination reference field. Set ID in the JMS Queue (changing from itsoQ to jmsItsoQ), if the ID was not defined earlier. ID in the queue configuration is required.
Enabling features
To use the message-driven beans, you need to enable the mdb-3.2 feature. To add the mdb-3.2 feature, complete the following steps:
1. Select Feature Manager in the server configuration.
2. Click Add, and select the mdb-3.2 feature.
3. It is assumed that other features required by ITSOJMSApp are already defined. If they are not, you need the features that are shown in Example 5-46.
Example 5-46 Features required to run MDB application
<featureManager>
<feature>wasJmsServer-1.0</feature>
<feature>wasJmsClient-2.0</feature>
<feature>cdi-1.2</feature>
<feature>mdb-3.2</feature>
</featureManager>
Testing the message-driven bean
To test the message-driven bean, use the SenderServlet servlet from 5.3.2, “Developing applications using JMS 2.0 API” on page 154. Point your browser to the following link to invoke servlet that will send a message, which will be received by the message-driven bean:
http://localhost:9080/ITSOJMSApp/SenderServlet
In the Console view, you should see the output shown in Example 5-47.
Example 5-47 Output from running MDB test
[INFO ] SRVE0242I: [ITSOJMSApp] [/ITSOJMSApp] [com.ibm.itso.jms20.SenderServlet]: Initialization successful.
Sending message: Test message Mon May 18 00:51:46 CEST 2015
Message Sent!
MDB: Test message Mon May 18 00:51:46 CEST 2015
5.4 Developing applications using asynchronous and concurrent features
Java EE 7 specification allows the application to invoke some of its logic asynchronously, as background tasks, and continue its main processing. Later, when the result is ready, it can be retrieved and returned to the client application.
Asynchronous call is usually used for long-running tasks, or tasks that require waiting for a resource that is needed to generate the response. Such operations limit the scalability of the application. Asynchronous call is running in a separate thread, which allows a return of the thread associated with the original request immediately to the container and then be available for processing requests from the next client.
Asynchronous processing can be achieved using the following methods:
•Asynchronous Servlets and Filters
•Asynchronous methods in Session beans
•Usage of Concurrent API
Each of these methods is briefly discussed in the next sections.
5.4.1 Developing using @Asynchronous in servlets and filters
Java EE provides asynchronous processing support for servlets and filters. You create a simple servlet that prepares a response in asynchronous call.
1. Start by creating a new dynamic web project.
2. In the project, start the New Servlet wizard, and enter AsyncServlet as the class name and click Next.
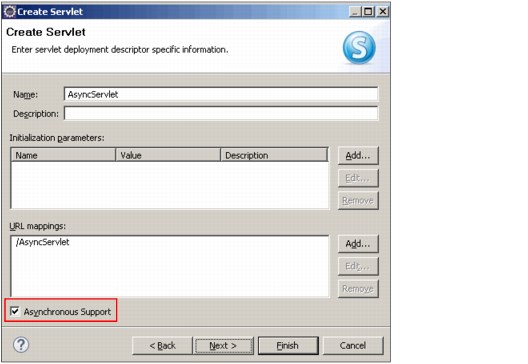
Figure 5-34 Enabling Asynchronous support in the servlet
Example 5-48 AsyncServlet definition
@WebServlet(asyncSupported = true, urlPatterns = { "/AsyncServlet" })
public class AsyncServlet extends HttpServlet {
|
Notice: If the request to the asynchronous servlet goes through servlet filters, they also need to have asynchronous support enabled.
|
5. Start to implement the doGet method. To put the request in the asynchronous mode and initialize AsyncContext, you call the request.startAsync() method.
6. Asynchronous tasks are represented as objects implementing the Runnable interface. You can either create a separate class for the task or instantiate the task as anonymous class. You need to pass the runnable task as parameter to the asyncContext.start() method. In this simple example, you use anonymous class as shown in Example 5-49 on page 164. If you want to use a separate class, remember to pass the asyncContext object to it. The run() method of the class just prints text to the servlet response and to the system out log. To simulate a long call, there are some calls to the Thread.sleep(3000) in the method.
Example 5-49 Implementing asynchronous method
asyncContext.start(new Runnable() {
public void run() {
try {
String jobName = asyncContext.getRequest().getParameter("name");
if(jobName == null) jobName = "TestJob";
ServletResponse response = asyncContext.getResponse();
response.setContentType("text/html");
PrintWriter out = response.getWriter();
out.println("<H2>Async servlet doing job: " + jobName + "</H2>");
out.println("Doing async job....<BR>");
out.flush();
System.out.println("Doing async job....");
Thread.sleep(3000);
out.println("Doing async job....<BR>");
out.flush();
System.out.println("Doing async job....");
Thread.sleep(3000);
out.println("Sending response....<BR>");
out.flush();
System.out.println("Sending response");
asyncContext.complete();
}
catch(Exception e) {
e.printStackTrace();
}
}
});
7. Call the asyncContext.complete() method to notify the container that the response should be returned. The full servlet code is shown in Example 5-50.
Example 5-50 AsyncServlet code
@WebServlet(asyncSupported = true, urlPatterns = { "/AsyncServlet" })
public class AsyncServlet extends HttpServlet {
protected void doGet(HttpServletRequest request, HttpServletResponse response) throws ServletException, IOException {
System.out.println("Before async");
final AsyncContext asyncContext = request.startAsync();
asyncContext.start(new Runnable() {
public void run() {
try {
String jobName = asyncContext.getRequest().getParameter("name");
if(jobName == null) jobName = "TestJob";
ServletResponse response = asyncContext.getResponse();
response.setContentType("text/html");
PrintWriter out = response.getWriter();
out.println("<H2>Async servlet doing job: " + jobName + "</H2>");
out.println("Doing async job....<BR>");
out.flush();
System.out.println("Doing async job....");
Thread.sleep(3000);
out.println("Doing async job....<BR>");
out.flush();
System.out.println("Doing async job....");
Thread.sleep(3000);
out.println("Sending response....<BR>");
out.flush();
System.out.println("Sending response");
asyncContext.complete();
}
catch(Exception e) {
e.printStackTrace();
}
}
});
try {
// sleep added to show 2 different threads executing
Thread.sleep(3000);
} catch (InterruptedException e) {
e.printStackTrace();
}
System.out.println("Ending main thread");
}
}
8. When you run this example in the message.log file, you can observe that it is executed by using two different threads (as shown in Example 5-51).
Example 5-51 Output in the message.log
[5/15/15 14:26:27:989 CEST] 0000005d SystemOut O Before async
[5/15/15 14:26:27:989 CEST] 0000005b SystemOut O Doing async job....
[5/15/15 14:26:30:989 CEST] 0000005b SystemOut O Doing async job....
[5/15/15 14:26:30:989 CEST] 0000005d SystemOut O Ending main thread
[5/15/15 14:26:33:989 CEST] 0000005b SystemOut O Sending response
5.4.2 Developing using @Asynchronous in session beans
Until Java EE 7, all calls to session beans were synchronous, and control was not returned to the client until the method has ended. With the introduction of asynchronous methods in session beans, control is returned immediately and the client can execute other logic while the bean is running. Asynchronous method returns an implementation of the java.util.concurrent.Future<V> interface, which allows the client to check: If the method has completed, retrieved the result, or requested computation to be canceled.
While defining asynchronous beans, specification allows to either mark a single method or class with @Asynchronous annotation. If the class is marked, all business methods are asynchronous. For simplicity, use annotation defined on the class level.
To create a session bean with asynchronous support, use the following steps:
1. Create a new Session bean by selecting File → New → Session bean. Enter AsyncBean as a class name and check Asynchronous, as shown in Figure 5-35 on page 166.

Figure 5-35 Creating asynchronous session bean
2. Observe @Asynchronous annotation in the generated class in Example 5-52.
Example 5-52 Asynchronous session bean
@Stateless
@LocalBean
@Asynchronous
public class AsyncBean {
3. You implement a simple method that does some computation and returns AsyncResult<String> object, which implements Future interface, as shown in Example 5-53.
Example 5-53 Sample asynchronous method
public Future<String> longRunningCall() {
try {
System.out.println("In logng running method...");
Thread.sleep(10000);
System.out.println("In logng running method...Ending");
} catch (InterruptedException e) {
e.printStackTrace();
}
return new AsyncResult<String>("Done " + new Date());
}
4. As a test client, a servlet is created. Servlet invokes a session bean method and stores the returned Future object in session. Later, servlet can check, by using the Future.isDone() method, if the result is ready, and retrieve the result using the Future.get() method. The complete doGet() method of the servlet is shown in Example 5-54.
Example 5-54 Servlet doGet method
@EJB
AsyncBean bean;
protected void doGet(HttpServletRequest request, HttpServletResponse response) throws ServletException, IOException {
PrintWriter out = response.getWriter();
HttpSession httpSession = request.getSession();
if(request.getParameter("create") != null) {
out.println("Calling bean");
Future<String> result = bean.longRunningCall();
out.println("isDone? " + result.isDone());
httpSession.setAttribute("result", result);
}
else {
Future<String> result =
(Future<String>) httpSession.getAttribute("result");
if(result != null) {
out.println("isDone? " + result.isDone());
if(result.isDone()) {
try {
out.println("Reslut: " + result.get());
httpSession.removeAttribute("result");
} catch (InterruptedException | ExecutionException e) {
e.printStackTrace();
}
}
else {
out.println("Not ready yet");
}
}
else {
out.println("Not started yet");
}
}
}
}
5.4.3 Developing using Concurrent API
Sometimes applications need to do some long running computation or schedule a task to be at a specific time on demand. This usually is done by creating new threads or using third-party libraries. It is a Java EE best practice to not create unmanaged threads. Java EE 7 provides a standardized way to obtain managed threads that can run with context provided by the container using concurrent API.
Concurrent API provided by the server offers the following classes to support asynchronous processing:
•Managed executors: Provides a way to start asynchronous tasks as Runnable or Callable objects within an application server environment with propagated context.
You see an example of managed executor usage later in this chapter.
For more information about configuring and using managed executors, see the following website:
•Managed scheduled executors: Can schedule a task to run at a specific time or interval. For more information about configuring and using scheduled executors, see the following website:
•Managed thread factory: Allows to obtain container-managed thread for execution of custom code. Code runs within the context propagated from the thread that looked up or injected the managed thread factory.
For more information about configuring and using managed thread factory, see the following website:
•Thread context service: Allows to capture a managed thread context and apply it to invocations of specified interface methods on any thread. For more information about configuring and using context service, see the following website:
Using Managed Executor
In this section, you learn how to use managed executor and how to configure a server to support that. You access executor via ExecutorService. To create a class that uses executor service, use the following steps:
1. In the project, start the New Servlet wizard, and enter ConcurrentServlet as the class name and click Finish.
2. Inject into the servlet, the ExecutorService, as shown in Example 5-55. In the @Resource annotation, specify the JNDI name of the factory. It is configured later in the server.
Example 5-55 Injecting ExecutorService
@WebServlet("/ConcurrentServlet")
public class ConcurrentServlet extends HttpServlet {
@Resource(lookup="concurrent/executorService")
ExecutorService executorService;
3. In the doGet method, use the executorService to submit a Runnable object to it. This is shown in Example 5-56.
Example 5-56 Submitting a task for executor
protected void doGet(HttpServletRequest request, HttpServletResponse response)
throws ServletException, IOException {
System.out.println("In doGet - creating task");
executorService.submit(new Runnable() {
@Override
public void run() {
System.out.println("in task");
// your Runnable code
try {
Thread.sleep(5000);
} catch (InterruptedException e) {
e.printStackTrace();
}
System.out.println("Finishing task");
}
});
try {
Thread.sleep(2000);
} catch (InterruptedException e) {
e.printStackTrace();
}
System.out.println("Returning servlet method");
PrintWriter out = response.getWriter();
out.println("Servlet finished, task still working");
}
4. This simple servlet shows that you can finish your web request, while the newly created managed task is still executing. The sample output (the contents of the message.log file) is shown in Example 5-57.
Example 5-57 Output of running servlet
[5/17/15 2:09:15:529 CEST] 00000160 com.ibm.ws.webcontainer.servlet I SRVE0242I: [ITSOAsyncApp] [/ITSOAsyncApp] [com.ibm.itso.async.ConcurrentServlet]: Initialization successful.
[5/17/15 2:09:15:529 CEST] 00000160 SystemOut O In get - creating task
[5/17/15 2:09:15:529 CEST] 0000016a SystemOut O in task
[5/17/15 2:09:17:529 CEST] 00000160 SystemOut O Returning servlet method
[5/17/15 2:09:20:545 CEST] 0000016a SystemOut O Finishing task
Configuring the server for using concurrent API
To be able to use resources like thread factories or executors, you have to configure them in server.xml and enable the concurrent-1.0 feature. Use the following steps to configure the server:
1. In the Servers view, expand Liberty server and double-click Server Configuration.
2. Select Server Configuration, click Add, and start typing Managed. Select Managed Executor, as shown in Figure 5-36, and click OK. As you can see, other objects that were mentioned in this chapter are available for configuration.

Figure 5-36 Adding Managed Executor to the configuration
3. Accept the prompt to enable the concurrent-1.0 feature, as shown in Figure 5-37 on page 171.

Figure 5-37 Enabling concurrent-1.0 feature
4. Finish configuring the executor by entering concurrent/executorService in the JNDI name.
5. Save the changes. The server is ready to run the example. After deployment, you can invoke it by using http://localhost:9080/ITSOAsyncApp/ConcurrentServlet.
5.5 Developing applications using JavaMail
Liberty profile server now supports JavaMail features as required by Java EE 7 specification. You can send and receive emails in applications running on a Liberty server. MailSession object can be injected in application by using annotation or by JNDI lookup.
5.5.1 Writing, testing, and deploying the JavaMail sample application
Use the following steps to write a simple JavaMail application that can send a mail to a valid recipient through the server:
1. Create a new web application.
2. Create a new servlet with the content shown in Example 5-58. Make sure to use the correct “toAddress” value.
Example 5-58 Mail sending servlet
@WebServlet("/MailSender")
public class MailSender extends HttpServlet {
@Resource(lookup="mail/itsoMailSession")
Session mailSession;
protected void doGet(HttpServletRequest request, HttpServletResponse response) throws ServletException, IOException {
System.out.println("Sending test email");
String message = "Test message";
if(request.getParameter("msg") != null) {
message = request.getParameter("msg");
}
Message mail = new MimeMessage(mailSession);
try {
mail.setRecipient(Message.RecipientType.TO, new InternetAddress(toAddress));
mail.setSubject("Test subject");
mail.setSentDate(new Date());
mail.setText(message);
Transport.send(mail);
System.out.println("Message sent successfully");
} catch (MessagingException e) {
e.printStackTrace();
}
}
}
3. Configure a mail session in the Liberty server:
a. In the Servers view, expand Liberty server and double-click Server Configuration.
b. In the Configuration Structure section, highlight Server Configuration and click Add.
c. In the Select the element to add section, start typing mail and select Mail Session Object, as shown in Figure 5-38 on page 173.

Figure 5-38 Adding a Mail Session element
d. Provide Mail Session parameters: Mail session ID, JNDI name, description, mail server host, valid user name, and password for your mail server. You can also provide a default “From” address. The parameters are shown in Figure 5-39.
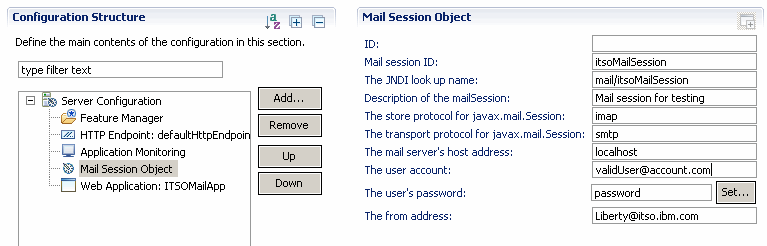
Figure 5-39 Mail Session details
Instead of using tools, the same outcome can be achieved by editing the server.xml file directly. Example 5-59 shows part of the server.xml file that is related to the configuration previously done.
Example 5-59 Mail Session in server.xml
<mailSession
description="Mail session for testing"
from="[email protected]"
host="localhost"
jndiName="mail/itsoMailSession"
mailSessionID="itsoMailSession"
user="[email protected]"
password="password"/>
4. Add servlet-3.1, cdi-1.2, and javaMail-1.5 features to the Liberty server.xml file as shown in Figure 5-40.
|
<featureManager>
<feature>servlet-3.1</feature>
<feature>javaMail-1.5</feature>
<feature>cdi-1.2</feature>
</featureManager>
|
Figure 5-40 Enabling features in Liberty server.xml
5. Deploy the application on the Liberty profile server by copying it to the dropins folder or running directly from Workspace.
6. Use the following URL to invoke the MailServlet on the Liberty profile server:
http://<hostname>:<httpport>/ITSOMailApp/MailSender
A message should now be sent to the recipient mentioned in the servlet using the James mail server that is running outside of Liberty profile server.
..................Content has been hidden....................
You can't read the all page of ebook, please click here login for view all page.