


Configuring application security
Security is an essential component of any enterprise-level application. In this chapter, we provide you with a basic introduction to security using the Liberty profile.
The chapter contains the following sections:
It is beyond the scope of this book to describe all aspects of security and how to configure them. For more information about security and how to implement specific security models not covered by this chapter (such as LTPA or SSO), see the IBM Knowledge Center at the following website:
6.1 Enabling SSL
You can configure the Liberty profile server to provide secure communication between a client and the server by enabling SSL. To establish secure communication, a certificate and an SSL configuration must be specified.
The keystore and certificate can be created either by using the WebSphere developer tools or from the command line. For development, you usually use a self-signed certificate, as shown in our examples later in this chapter.
|
Important: On publicly facing production servers, import a certificate from a trusted provider to the server keystore rather than using a self-signed certificate.
|
6.1.1 Configuration using the WebSphere developer tools
Use the WebSphere developer tools to add the keystore and self-signed certificate to your server using the following steps:
1. Open the Servers view in the workbench.

Figure 6-1 Selecting to create the SSL Certificate using WebSphere developer tools
3. You are prompted to create a password for your keystore and optionally set the validity period or subject for the certificate, as shown in Figure 6-2 on page 177.
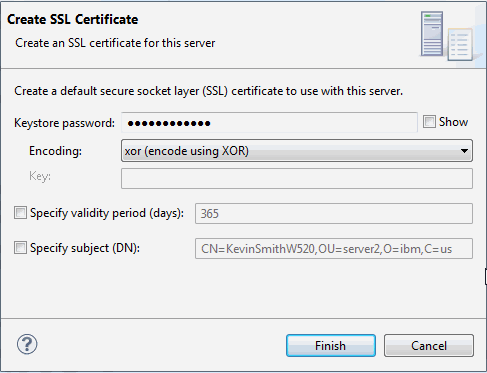
Figure 6-2 Entering values for the keystore and certificate
4. Enter the required values and click Finish. The Console window shows the output of the command, as shown in Figure 6-3.

Figure 6-3 Output of the Create SSL Certificate command
5. The output shows the line that should be added into the server configuration (server.xml). The line specifies to include GeneratedSSLInclude.xml file with SSL configuration (as shown in Example 6-1). The GeneratedSSLInclude.xml file contains configuration of the default keystore and enablement of the ssl-1.0 feature.
Example 6-1 GeneratedSSLInclude.xml file contents.
<?xml version="1.0" encoding="UTF-8" ?>
<server description="This file was generated by the 'securityUtility createSSLCertificate' command on 2015-05-18 11:29:48 CEST.">
<featureManager>
<feature>ssl-1.0</feature>
</featureManager>
<keyStore id="defaultKeyStore" password="{xor}Lz4sLCgwLTs=" />
</server>
6. If the line with the include command was not added to the server.xml automatically, you can paste the required line directly into the server.xml configuration file (in which case your configuration is complete and you can proceed to “HTTPS redirect”). Alternatively, use the Design view to be guided through the configuration, as shown in the following steps:
a. In the Servers view, expand the server and double-click Server configuration.
b. In the opened editor, select Server Configuration and click Add. Start typing Include and select the Include element, as shown in Figure 6-4. Then, click OK.

Figure 6-4 Adding Include element
c. Select added Include element, and beside the Location field, click Browse. Next, select the GeneratedSSLInclude.xml file and click OK.
d. Your configuration is now complete. Save the changes to the server configuration. The server, if started, detects the new settings and the SSL port is opened.
7. If you have applications that are installed on your server, you can now access them by specifying https:// and pointing your browser to the https port defined in your server configuration, httpEndpoint.
6.1.2 Configuration using the command line
To create the keystore and generate the self-signed certificate using the command line, you must use the securityUtility command that is in ${wlp.install.dir}/bin. Example 6-2 shows the command and the expected output.
Example 6-2 Using the securityUtility command
C:Libertyv85Runtimein>securityUtility createSSLCertificate --server=myThirdServer --password=passw0rd --validity=365 --subject="CN=liberty,O=IBM,C=US"
Creating keystore C:Libertyv85RuntimeusrserversmyThirdServer
esourcessecuritykey.jks
Created SSL certificate for server myThirdServer
Add the following lines to the server.xml to enable SSL:
<featureManager>
<feature>ssl-1.0</feature>
</featureManager>
<keyStore id="defaultKeyStore" password="{xor}Lz4sLChvLTs=" />
The output from the command contains the information to be added into your server configuration to enable SSL. Copy and paste this output into your server.xml file. The server automatically detects the changes and activates the SSL port.
6.2 HTTPS redirect
With SSL enabled, the client can, in most cases, still access the application on both the secure and nonsecure ports. HTTPS redirect allows you to always direct the client to the secure HTTPS port even if the client requested the standard nonsecure port.
This section assumes that you are starting with the web application created in Chapter 3, “Developing and deploying web applications” on page 59. If you do not have this application in your project workspace, you can find a completed version included in the download material for this book. For more information see Appendix A, “Additional material” on page 251. As well, you can use any other web application that you currently have in your workspace.
To access and edit the available web applications to work with HTTPS redirect, complete the following steps:
1. Security settings for web applications are defined in the web.xml file. However, this file is not required, so it is possible that you do not have one in your project. Select your project, right-click, and choose Java EE Tools Generate → Deployment Descriptor Stub.
2. In the Project Explorer, expand your web application and double-click the deployment descriptor.
3. To enable HTTPS redirect, add a security constraint to your application. To do this, select Web Application in the Overview section and then click Add.
4. In the Add Item window, start typing Security and select Security Constraint, then click OK.
5. The Security Constraint now appears in the Overview section. Next, define the Web Resource Collection for the Security Constraint. This identifies which addresses are covered by the Security Constraint. Expand the Security Constraint in the Overview section and select Web Resource Collection.
6. The details window, which is located to the right of the Editor, allows you to enter the details of the Web Resources. Give the Web Resource Collection a name and add in the URL Patterns to be used, as shown in Figure 6-5. Use pattern /* to protect all resources in the application.

Figure 6-5 Entering details for the Web Resource collection
7. Next, specify the details of the Security Constraint. In the Overview section, select Security Constraint. The details window now allows you to define the Security Constraint. Give the Security Constraint a name. Under the User Data Constraint section, select CONFIDENTIAL for the transport guarantee, as shown in Figure 6-6. This allows only secure communication with the web resource collection.
Figure 6-6 Entering details for Security constraint
8. This example currently applies the HTTPS redirect to all communications with the addresses defined in the Web Resource Collection. To apply this redirect to only specific HTTP methods, right-click the Web Resource Collection in the Overview section and select Add → HTTP Method. You restrict HTTPS to only GET requests by entering just GET for the HTTP Method. However, it is recommended that you use the same settings for all HTTP methods.
9. The next step is to enable application security. In the server view, expand the server until you see the Feature Manager entry. Double-click the Feature Manager or right-click and select Open.
10. The Feature Manager window opens. Click Add, select appSecurity-2.0 from the list, and click OK.
11. HTTPS redirect is now fully configured. Save your changes and the WebSphere Developer Tool automatically updates the server with the new version of your application. If you now attempt to access the application at http://localhost:9080/yourContext, you notice that you are always redirected to https://localhost:9443/yourContext.
6.3 Form login
One of the most common ways to provide an authentication method to users of a web application is to use form-based login. This presents the users with a form where they can provide their login credentials. This section describes how to update your application and server to provide the form-based login.
This section expands on the HTTPS redirect example in 6.2, “HTTPS redirect” on page 179.
6.3.1 Defining the basic user registry
The first step in configuring form login is to create and define the actual registry that is used for authentication. In our example, we use a Basic User Registry. However, the Liberty profile does support other registries, including LDAP and custom registry. The following website provides more information about configuring the Liberty profile to work with these other registries:
Use the following steps to create and define the registry for authentication using a Basic User Registry:
1. Open the server view in your workbench and double-click the Server Configuration for your server. This opens your server.xml file. Switch to the design tab, if it is not already selected.
2. In the Configuration Structure section located to the left, select the Feature Manager. The Feature Manager details are displayed to the right.
3. If the appSecurity-2.0 feature is not already in the list of features, click Add and select the appSecurity-2.0 feature.
4. Add the basic registry that is used for authentication. Under the Configuration Structure, select Server Configuration and click Add.
5. Start typing Basic, as shown in Figure 6-7 on page 182, select Basic User Registry, and click OK.

Figure 6-7 Adding Basic User Registry
6. Select Basic User Registry in the Configuration Structure. Under the Basic User Registry Details section to the right, enter an ID and Realm name for your registry, as shown in Figure 6-8.
Figure 6-8 Entering the Basic Registry details
7. Now that you have a basic user registry, you must add users or groups to it. Therefore, click Add.
8. In the resulting window, select User and click OK.
9. A user object now appears under your basic user registry. Click the User object. Located to the right, under User Details, enter a user name of User1 and then click Set to enter a password, as shown in Figure 6-9. For the password encoding, you can use XOR encoding, AES encryption, or one-way hash. See the following link for more information about using encryption:

Figure 6-9 Adding a user
10. Enter the password and click OK. You have now created a user for the basic registry. Repeat the process and add another user that is called User2.
11. Then, add a security group to the basic user registry. Select the Basic User Registry and click Add.
12. Select Group from the Add Item window and click OK.
13. A group element appears under your basic user registry. Ensure that it is selected and under Group Details. Enter Group1 as the group name.
14. We must now add users to the group. Select the group under the Configuration Structure and click Add. In the Add Item window, select member and click OK.
15. Select the member element that appears under the group. In the Group Member Details window, enter User1 for the User name.
16. Save the changes. Your configuration Structure should now contain the basic user registry structure, as shown in Figure 6-10.

Figure 6-10 The completed basic user registry
6.3.2 Updating an application to support Form Login
To use Form Login for your application, you must make a number of changes to the application and its configuration. These changes are needed to allow the user to authenticate. The following sections describe the changes in detail.
Adding the login page
The user of the application must provide their login credentials to be authenticated. To allow the login process, provide a login page. This login page must contain a form that requests the user name and password and must always have the j_security_check action.
Example 6-3 shows an example form from the login.html page.
Example 6-3 The login form
<form method="POST" action="j_security_check">
<strong> Enter user ID and password: </strong>
<BR>
<strong> User ID</strong> <input type="text" size="20" name="j_username">
<strong> Password </strong> <input type="password" size="20" name="j_password">
<BR>
<strong> Click submit to authenticate: </strong>
<input type="submit" name="login" value="Login">
</form>
Use the j_username input field to obtain the user name and use the j_password input field to obtain the user password. When a user requests a web page that requires authentication, the web server stores the original request and displays the login form. When the login form is completed and the user is successfully authenticated, the server redirects the call to the original request.
Adding a login error page
If the authentication of a user fails, you must be able to advise the user of the failure. This is done by adding a login error page to your application. Example 6-4 shows an example of a loginError.html file.
Example 6-4 An example login error page
<!DOCTYPE html PUBLIC "-//W3C//DTD HTML 4.01 Transitional//EN" "http://www.w3.org/TR/html4/loose.dtd">
<html>
<head>
<meta http-equiv="Content-Type" content="text/html; charset=ISO-8859-1">
<title>Login Error</title>
</head>
<body>
<H1><B>A Form login authentication failure occurred</B></H1>
<P>Authentication might fail for one of many reasons. Some possibilities include:
<OL>
<LI>The user ID or password might have been entered incorrectly; either misspelled or the wrong case was used.
<LI>The user ID or password does not exist, has expired, or has been disabled.
</OL>
</body>
</html>
Adding a form logout page
Form logout is a mechanism to log out without having to close all web browser sessions. After logging out, access to a protected web resource requires reauthentication.
|
Caution: Logout does not work for basic authentication (such as a browser pop-up window), as the browser stores user credentials in the HTTP headers and resends them on every request. You have to close all browser windows to successfully log out of the site protected by basic authentication.
|
The form logout page is an HTML or JSP file that you include with your web application. This logout page contains a form with a special post action. Example 6-5 provides an example of a logout.jsp file.
Example 6-5 A Sample logout page
<%@ page language="java" contentType="text/html; charset=ISO-8859-1"
pageEncoding="ISO-8859-1"%>
<!DOCTYPE html PUBLIC "-//W3C//DTD HTML 4.01 Transitional//EN" "http://www.w3.org/TR/html4/loose.dtd">
<html>
<head>
<meta http-equiv="Content-Type" content="text/html; charset=ISO-8859-1">
<title>Insert title here</title>
</head>
<body>
<h2>Sample Form Logout</h2>
<form method="POST" action="ibm_security_logout" name="logout">
<BR>
<strong> Click this button to log out: </strong>
<input type="submit" name="logout" value="Logout">
<input type="HIDDEN" name="logoutExitPage" value="/login.html">
</form>
</body>
</html>
The logoutExitPage specifies where the user is to be redirected after logging out.
Configuring the application
The final changes that are needed to the web application are in the configuration. The web application must define the login mechanism and also restrict access to the relevant endpoints.
Although you do not need to do the HTTPS redirect as part of the form login, it is advised. Connection over HTTPS ensures confidentiality of the login credentials. The following steps expand upon the configuration you set up in 6.2, “HTTPS redirect” on page 179 to define the login mechanism and limit the access to the relevant endpoints:
1. In the Project Explorer, expand your web application and double-click deployment descriptor.
2. The first configuration that must be added is a login configuration (which defines the login mechanism). In the Overview section of the Deployment Descriptor Editor, select Web Application and click Add.
3. Select Login Configuration from the list and click OK.
4. Click the login configuration. You can now define how the user logs in by updating the properties for the login configuration, as shown in Figure 6-11.

Figure 6-11 Defining the login configuration settings
|
Realm name: The realm name is an optional attribute that is used for differentiating between different repositories. If you have multiple repositories in your server, each one can have a realm name. You can then use the realm name to identify the repository to use for authentication. If you have only one repository, you can leave this value blank.
|
5. You now must restrict your endpoint to allow only certain users to access the resource. This is done by adding a security constraint and adding an authorization constraint to that security constraint. You already have a security constraint that you added in 6.2, “HTTPS redirect” on page 179. Use this constraint and add the authorization constraint to it. Select the Security Constraint from within the Overview section, as shown in Figure 6-12.
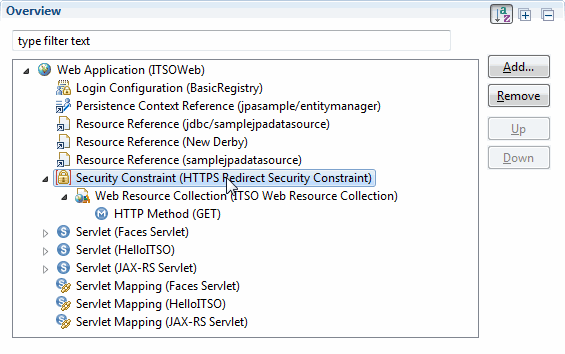
Figure 6-12 Selecting the Security Constraint
6. In the details section, under Authorization Constraint, click Add (located to the right of the Role Name). This adds a role that is required for access to the resource. Give the role a name, as shown in Figure 6-13.
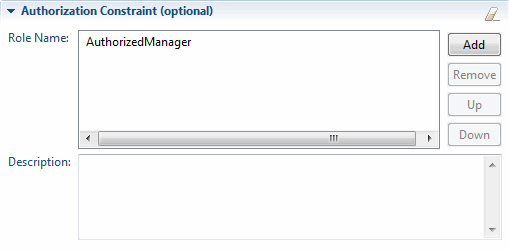
Figure 6-13 Adding an authorization role
|
Note: The Role Name within your application is a logical name and can be any value that you like. In 6.3.3, “Defining bindings between the application and the server” on page 187, you add mappings between your application roles and the users and groups that are defined in your user registry.
|
7. The application changes are now complete. Save all the changes.
6.3.3 Defining bindings between the application and the server
The final step in enabling Form Login is to map the roles that are defined within the application to the groups and users in your user registry. To do this, you must add an application binding in your server configuration using the following steps:
1. Open the Server view in Eclipse and double-click Server Configuration for your server. This opens your server.xml file. Switch to the design tab if it is not already selected.
2. In the Configuration Structure, select your application and click Add, as shown in Figure 6-14 on page 188.

Figure 6-14 Adding an application binding
3. Select Application Binding from the list and click OK.
4. We now must specify the role to map. This should be the role that you defined in your application. Select Application Binding under the Configuration Structure and click Add.
5. Select security-role from the list and click OK.
6. Make sure that the security role is selected in the Configuration Structure and complete the security role name, as shown in Figure 6-15.

Figure 6-15 Defining the security role name
7. Map the security role with the users and groups that are to be considered part of this role. In our example, we are going to map Group1 to the AuthorizedManager role. Select the security-role under the Configuration Structure and click Add.
8. Select group from the list and click OK.
|
Note: As well as user and group, you can also select the special-subject option to assign access to either everyone or all.
|
9. Select the Group element in the Configuration Structure. Under Group Details, enter the name of the group that is to be allowed access to the resource, as shown in Figure 6-16.

Figure 6-16 Entering the group details
10. Your Forms Login configuration is now complete. Save all changes.
If you now access your application, you are taken to the login window. When you enter the user credentials, only User1, which is in Group1, has access to the application.
6.4 Securing EJB applications
WebSphere Liberty also supports security in EJB components. You can define the method permissions using ejb-jar.xml or with annotations. Example 6-6 shows how to define security roles and method permissions using annotations. The @DeclareRoles annotation defines security role references. The @RolesAllowed annotation defines which roles are allowed to call a given method. You can also use SessionContext interface to obtain the user principal or check if the user has a certain role.
Example 6-6 Defining roles and method permissions via annotations
@Stateless
@LocalBean
@DeclareRoles("user")
public class SecuredEJB {
@Resource
private SessionContext ctx;
@RolesAllowed("user")
public String protectedMethod() {
return " Method called by " + ctx.getCallerPrincipal();
}
}
For more details about EJB security, see the following web site:
You can also find a lot of useful information about protecting EJB applications in Chapter 9, Securing an Enterprise JavaBeans application, in IBM Redbooks publication, WebSphere Application Server V7.0 Security Guide, SG24-7660. Although that publication is about the 7.0 version, most of the information presented there is also relevant to WebSphere Liberty.
6.5 Securing JMS applications
By default, JMS resources that are configured in the WebSphere Liberty profile server can be accessed by any user. You can enable JMS security to ensure that only authenticated and authorized users can access JMS resources, such as queues and topics.
You can enable JMS security by manually editing the list of features in the server configuration file to add wasJmsSecurity-1.0. You can also enable the feature in the WebSphere developer tools by loading the server configuration editor and adding the wasJmsSecurity-1.0 feature to the feature manager.
After you enable the JMS security feature, you must authenticate with an authorized user to access any JMS resources.
6.5.1 Setting up user authentication
The first step to authenticating users is to create a user registry. Instructions for creating a basic user registry can be found in 6.3.1, “Defining the basic user registry” on page 181. You can also use a quickStartSecurity registry or an LDAP registry.
Users can be authenticated within application code or by configuration. The recommended approach is to authenticate using configured authentication data and avoid hardcoding authentication data in application.
To authenticate within the server configuration, you edit the properties for the JMS Connection Factory to specify authentication data. Use the following steps to complete that process:
1. Open the Server Configuration. Click Add, start typing auth, select Authentication Data, as shown in Figure 6-17 on page 191. Then, click OK.
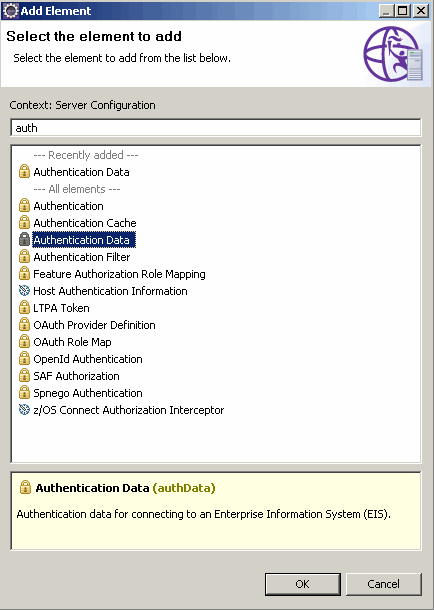
Figure 6-17 Adding authentication data
2. In the authentication data, provide the ID (for example jmsUser), username, and password.
3. Select JMS Connection Factory. In the Container managed authentication data reference, select the just added authentication data (jmsUser), as shown in Figure 6-18.

Figure 6-18 Configuring authentication reference
Example 6-7 Using authentication alias
<server description="new server">
....
<authData user="user1" password="password" id="jmsUser"></authData>
<jmsConnectionFactory jndiName="jms/itsoQCF" containerAuthDataRef="jmsUser">
<properties.wasJms/>
</jmsConnectionFactory>
</server>
You can also store the user name and password directly in the Embedded Messaging entry (represented as attributes of the properties.wasJms element) in the server.xml file, as shown in Example 6-8.
Example 6-8 Authenticating using properties.wasJms
<jmsConnectionFactory jndiName="jms/itsoQCF">
<properties.wasJms password="password" userName="user1"/>
</jmsConnectionFactory>
To authenticate in the application code, provide the user name and password as parameters when you create a JMSContext in your application. Example 6-9 shows how you use the JMS API to authenticate.
Example 6-9 Authenticating within application code
@Resource(lookup="jms/itsoQCF")
private ConnectionFactory qcf;
....
jmsContext = qcf.createContext("user1", "password");
jmsContext.createProducer().send(queue, message);
When you have a message-driven bean in your application, you need to specify an authentication data reference in the activation specification (as shown in Example 6-10). You use the same authentication data that was configured earlier for the connection factory.
Example 6-10 Configuring authentication data in activation specification
<jmsActivationSpec authDataRef="jmsUser" id="ITSOJMSApp/SimpleMDB">
<properties.wasJms destinationRef="jmsItsoQ" destinationType="javax.jms.Queue"/>
</jmsActivationSpec>
For more information about authentication, see the following website:
6.5.2 Setting up user authorization
To access JMS resources, an authenticated user must be granted authorization to access the resources. Authorization can be configured by editing the server configuration to add roles, users, and groups.
To complete this process, use the following steps:
1. Set up authorization in the Liberty profile developer tools. Open the server configuration editor and select Messaging Engine. Click Add and select Messaging Security, as shown in Figure 6-19.

Figure 6-19 Adding Messaging Security
2. Now, select Role underneath Messaging Security. In the details window, enter a name (such as developer) in the Role name field. With Role still selected, click Add, to add a user. In the User details window, enter a user name, such as User1, from your user registry.
3. Add permissions for the role by selecting Role, then clicking Add, and selecting Queue Permission. In the Action field of the details window, you can configure whether the user is authorized to send, receive, browse, or all. Select an action from the drop-down next to the Action field (such as ALL). You can add additional actions by using the Add button.
In the Queue reference field, enter a value that corresponds to the queue ID.
You can also manually edit configurations. Example 6-11 on page 194 shows the configuration that must be added to the server.xml file for manual editing.
Example 6-11 Configuration for manual editing
<messagingEngine>
<queue id="itsoQ"/>
<messagingSecurity>
<role id="developer" name="developer">
<user name="user1"/>
<queuePermission queueRef="itsoQ">
<action>ALL</action>
</queuePermission>
</role>
</messagingSecurity>
</messagingEngine>
6.6 JAX-WS security
Web services in Liberty profile server can be secured either at the transport layer or at the messaging layer. Configuring transport security allows you to authenticate and ensure confidentiality of HTTP communications between a web service client and a web service provider. Transport security can be enabled using SSL, basic authentication, or client certificate authentication.
Message-level security allows you to secure SOAP messages that are exchanged between web service clients and web service providers using WS-Security standards. WebSphere Liberty profile supports the following web service standards:
•Web Services Security SOAP Message Security 1.1
•Web Services Security Username Token Profile 1.1
•Web Services Security X.509 Certificate Token Profile 1.1
•WS-SecurityPolicy 1.3
This section provides an example of how to secure a web service using SSL at the transport layer and Username Token authentication at the message layer. For more information about other ways to secure web services, see the following IBM Knowledge Center website:
This example builds on the JAX-WS example in 3.1.6, “Developing JAX-WS web services applications with the Liberty profile developer tools” on page 77. Before you begin, make sure that you enabled SSL by creating a keystore, as described in 6.1, “Enabling SSL” on page 176. Also, make sure that the appSecurity-2.0 feature is enabled.
In addition to creating a keystore, you must create an SSL Default Repertoire. To complete that process, use the following steps:
1. In the Liberty profile developer tools server configuration editor, create the default repertoire by selecting the server configuration element.
2. Click Add and then select SSL Default Repertoire. In the details window, enter defaultSSLConfig in the Default SSL repertoire field. Outside of the tool environment, create the sslDefault element, as shown in Example 6-12.
Example 6-12 Default SSL Repertoire
<sslDefault sslRef=”defaultSSLConfig”/>
3. You must also enable HTTPS redirect for the pattern /ITSOGreeterService so that requests to the web service over HTTP are redirected to the SSL port using HTTPS. To accomplish this task, use the procedure in 6.2, “HTTPS redirect” on page 179. After enabling redirect, test that it is working by visiting the following link:
http://localhost:9080/ITSOWeb/ITSOGreeterService?wsdl
You should be redirected to the following ULR:
https://localhost:9443/ITSOWeb/ITSOGreeterService?wsdl
You should see the contents of the WSDL document.
4. To enable the web services security run time, you must enable the wsSecurity-1.1 feature in the server configuration.
5. To configure the JAX-WS run time to send a Username Token with web service client requests, you can add a wsSecurityClient element to the server configuration. When it is specified, the WS-Security client configuration becomes the default configuration for all web services clients on the server. The configuration might be overridden programmatically by passing in property values in the RequestContext in the client code. Example 6-13 shows an example WS-Security client configuration.
Example 6-13 WS-Security Client configuration
<wsSecurityClient ws-security.password=”password1” ws-security.username=”user1”/>
6. The WS-Security provider can also have a default configuration that is specified in the server configuration. To specify that web service providers should place the identity of the Username Token from the SOAP message on the thread, configure a wsSecurityProvider element in the server.xml file, as shown in Example 6-14.
Example 6-14 WS-Security Provider configuration
<wsSecurityProvider ws-security.username=”user1”>
<callerToken name=”UsernameToken”/>
</wsSecurityProvider>
7. You must also configure the WSDL for the web service provider and client to enforce SSL and to require a user name token. The Liberty profile developer tools make it easy to add web service security policy templates to the WSDL.
8. If you did not generate a WSDL file for the web service, you can do so now by following the procedure in “Creating a web service” on page 78 and making sure that the Generate WSDL file into the project option is selected in the second window. The wizard does not overwrite any existing artifacts without confirmation, so you do not lose any modifications that you made.
a. Begin by expanding ITSOWeb → Services and selecting (http://example.itso.com/ITSOGreeterService). Right-click the service and select Add Security Policy to Service WSDL. In the wizard, give the policy a name, such as UsernameTokenSSL. In the drop-down field for Policy template, select UsernameToken with password text, nonce, and created timestamp over SSL, as shown in Figure 6-20 on page 196.

Figure 6-20 Web Service Security Policy wizard
b. Click Next and then select the check box to attach the security policy to the ITSOGreeterPortBinding. Click Finish and open the WSDL document in ITSOWeb/WebContent/WEB-INF/wsdl. A Policy element is added with the name UsernameTokenSSL. Also, there is now a PolicyReference element located underneath the binding element. With these changes to the WSDL file, the web service now generates an error if a client attempts to access the service without SSL or without a user name token.
In the same WSDL file, we can ensure that SSL is used by changing the address for the ITSOGreeterPort. The new service definition is shown in Example 6-15.
Example 6-15 ITSOGreeterService definition
<service name=”ITSOGreeterService”>
<port name=”ITSOGreeterPort” binding=”tns:ITSOGreeterPortBinding”>
<soap:address location=”https://localhost:9443/ITSOWeb/ITSOGreeterService”/>
</port>
</service>
9. You can attempt to test these changes now by visiting the link http://localhost:9080/ITSOWebClient/JAXWSGreeterClient. However, the test should fail because the client does not yet send a user name token.
10. Now, make the same changes that were made to the provider WSDL to add the WS-Security policy and update the address to the client WSDL in the ITSOWebClient project. After making these changes, you can try again visiting the test client. This time, you should see the output Hello, JAX-WS Client from the ITSO Greeter that indicates that the service was successfully started.
6.7 Securing NoSQL applications
NoSQL databases are becoming more popular. However, most of them are not protected by default and allow anybody to perform all operations. For production deployments of applications using such databases, you should enable protection on the databases and access them in a secure way.
6.7.1 Securing MongoDB applications
Applications that use MongoDB can be secured by using either application-managed security or container-managed security. You must also enable access control on the MondoDB instance. For more information about enabling database authorization in MongoDB, see the following website:
In application-managed security, you make changes inside the application code to authenticate with the MongoDB instance. The code in Example 6-16 shows how to use the MongoDB APIs to authenticate.
Example 6-16 Authenticating with a MongoDB instance
// mongoDB is an instance of com.mongodb.DB
if (!mongoDB.isAuthenticated())
mongoDB.authenticate(“user1”, “password1”.toCharArray());
In container-managed security, you edit the server configuration to specify a user name and password for the MongoDB instance. Example 6-17 shows how you specify the user name and password in the server.xml file.
Example 6-17 Configuring authentication in a server.xml file
<mongo id=”mongoInstance1” libraryRef=”mongoLibrary” user=”user1” password=”password1”/>
6.7.2 Securing CouchDB applications
CouchDB databases are unprotected by default and everyone has privileges to do anything. For more information about enabling database security in CouchDB, see the following website:
You can specify user name and password for a user accessing CouchDB in the Server configuration. To Configure the CouchDB element as shown in Figure 6-21 on page 198, double-click Server configuration in the Servers view, and select CouchDB element in the Server Configuration. Enter the username in the CouchDB user ID field and password in the password field.

Figure 6-21 Configuring CouchDB
You can also edit the server.xml file manually. Add the username and password elements, which are shown in Example 6-18.
Example 6-18 CouchDB element in server.xml
<couchdb username="admin" password="admin" libraryRef="couchLibrary" jndiName="couchdb/connector" url="http://localhost:5984" id="couchdb"></couchdb>
6.8 Authenticating users in Liberty profile
WebSphere Liberty profile server uses a user registry to get information about users and groups. The user registry is also used during authentication and authorization process.
For more information about how authentication is handled in Liberty, see the following page:
6.8.1 User registries for WebSphere Liberty profile
The user registries store user and group information that is used for authentication purposes. Liberty profile supports the following types of user registries:
•Basic user registry: A simple registry, with all information contained in the server.xml file, mostly for development and prototyping purposes.
•LDAP registry: An extensive LDAP registry, supporting federation of multiple LDAPs and failover. Recommended for production deployments.
•Custom registry: You can develop a custom user registry class by implementing the com.ibm.websphere.security.UserRegistry and deploy as Open Service Gateway initiative (OSGi) service.
•SAF registry: On the z/OS platform, you can configure Liberty to use the SAF registry.
For more information about configuration of these registries, see the following website:
6.8.2 Custom authentication methods
In this section, various authentication options are briefly described.
Using a servlet API
Java EE servlet API provides methods that can be used while customizing the authentication process. The most useful methods from the HttpServletRequest interface are noted in the following list:
•login(String username, String password): Authenticates user to the server with given user ID and password. If authentication is successful, it creates subject and LTPA cookie.
•logout(): Logs out the current user. This method invalidates user’s HTTP session, clears LTPA cookie, and removes user from the authentication cache.
•authenticate(HttpServletResponse response): Invokes authentication mechanism currently configured in given application. Method returns true, if authentication was successful.
For more information about these methods, see the following website:
Using a Trust Association Interceptor (TAI)
Sometimes, you need to provide a custom authentication process with additional parameters required or integrate authentication with a third-party security service. In such scenarios, you can develop TAI. To create TAI, you need to implement the com.ibm.wsspi.security.tai.TrustAssociationInterceptor interface.
Once TAI is implemented, you need to add it to the Liberty profile server. You can use one of the following methods:
•Put the custom TAI class in a JAR file, for example simpleTAI.jar; then, make the JAR file available as a shared library. See the following website for Configuring TAI for the Liberty profile page:
•Package the custom TAI class as a feature. See the following website for Developing a custom TAI as a Liberty profile feature page:
For more information about TAI in general, see the following website:
Using a login module
WebSphere Liberty profile provides Java Authentication and Authorization Service (JAAS) plug-in points to modify system login configuration. Login modules are best used when the authentication process suits your needs in general but you would like to add custom information to the created Subject.
To create a login module, you need to implement javax.security.auth.spi.LoginModule interface and then add it to the system.WEB_INBOUND login configuration.
For more information about developing login modules, see the following website:
Using OpenID
OpenID is an open standard that allows users to authenticate themselves to multiple sites without the need to manage multiple accounts. WebSphere Liberty profile supports OpenID 2.0 and plays a role as a Relying Party in web single-sign-on.
The user accessing a protected application is redirected to the OpenID provider site for credential verification and then redirected back to the original site with authentication result.
For more information about using OpenID, see the following website:
Using OpenID Connect
OpenID Connect is another standard that is used by web single-sign-on. It is built on top of the OAuth 2.0 protocol. This protocol enables client applications to rely on authentication that is performed by an OpenID Connect Provider to verify the identity of a user. WebSphere Liberty profile supports OpenID Connect 1.0 and can act as Client, Relying Party, and Provider.
For example, this mechanism can be used to authenticate users to your application using their Google credentials. See the following website for more information about this topic:
For more information about using OpenID Connect, see the following website:
For more information about OAuth support, see the following website:
Using JASPIC
The Java Authentication SPI for Containers specification (JASPIC) defines a standard way to plug in your custom authentication provider. You can develop your JASPIC provider as a Liberty user feature or embed the provider in your application.
For more information about developing using JASPIC, see the following website:
Using SPNEGO
You can use single sign-on for HTTP requests by using the Simple and Protected GSS API Negotiation Mechanism (SPNEGO) web authentication for WebSphere Liberty profile. SPNEGO single sign-on enables HTTP users to log in to a Microsoft domain controller only once at their desktop and to achieve single sign-on (SSO) with the Liberty profile server.
|
Note: SPNEGO is only supported in WebSphere Liberty profile with the IBM JDK.
|
For more information about configuring SPNEGO in Liberty, see the following website:
Authentication filters
Authentication filters let you configure which requests should be processed by certain authentication providers (such as OpenID, OpenID Connect, or SPNEGO).
In the provider configuration, you define reference to the authentication filter. If all conditions defined in the filter are met, the request is processed by that provider.
Authentication filter can use any of the following elements: userAgent, host, webApp, remoteAddress, and requestUrl.
For more information about how to configure authentication filter, see the following website:
..................Content has been hidden....................
You can't read the all page of ebook, please click here login for view all page.