


Iterative development of OSGi applications
In addition to Java EE applications, WebSphere Application Server Liberty Profile allows you to develop Open Services Gateway initiative (OSGi) applications. OSGi provides a framework for developing flexible, modular applications. With OSGi applications, you can deploy and manage applications as a set of versioned OSGi bundles.
The chapter contains the following sections:
4.1 Introduction to OSGi applications in Liberty profile
The Liberty profile server and Liberty profile developer tools help you to develop and deploy modular OSGi applications quickly. The advantages of OSGi are included in the following list:
•Reduces complexity through modular design.
•Integrates with standard Java EE technologies such as servlets.
•Promotes service-oriented design.
•Composes isolated enterprise applications using multiple versioned bundles with dynamic lifecycles.
•Provides careful dependency and version management.
•Offers declarative assembly of components.
•Allows sharing modules through a bundle repository that can host common and versioned bundles.
•Allows access to external bundle repositories.
•Allows administrative updates to deployed applications at a bundle level.
For more information, see the OSGi home page at the following website:
The OSGi support in the WebSphere Application Server Liberty profile is based on the Apache Aries open community project.
4.2 Developing OSGi applications in the Liberty profile developer tools
The Liberty profile developer tools make developing OSGi applications easier by providing graphical editors for OSGi artifacts such as OSGi Blueprint and manifest files. The tool environment allows you to safely create dependencies on other bundles without having to worry about problems being introduced by mistakes in manual editing of manifest files. The Liberty profile developer tools can also help with converting existing Java EE applications into OSGi applications.
4.2.1 Using the tools to build an OSGi application
In this section, we describe how to build a simple hello world style OSGi application using different bundles for the client, the service, and the API. The application shows a limited subset of what is possible with OSGi applications, and shows how to get started building OSGi applications in the Liberty profile developer tools.
Creating OSGi bundle projects
In this application, we use three bundles: a client bundle, a service bundle, and an API bundle. Begin by creating a project for each bundle by using the following process:
1. Click File → New → OSGi Bundle Project.
2. Enter a project name. This example uses the project names ITSO.OSGiExample.API, ITSO.OSGiExample.Client, and ITSO.OSGiExample.Service.
3. For the Target Runtime, select WebSphere Application Server V8.5 Liberty Profile.
4. Clear the Add bundle to application check box. If you leave this check box selected, a new OSGi application project is created.
5. Leave all other values as the default settings and exit the wizard by clicking Next → Next → Finish.
Starting with version 8.5.5.5, you can use the developer tools to create OSGi bundles using the Web 3.1 facet configuration as shown in Figure 4-1 on page 100.

Figure 4-1 Creating an OSGi Bundle with Web 3.1
Creating the client API
In the ITSO.OSGiExample.API project, create an interface named HelloAPI in the com.itso.example.osgi.api package. The interface should contain a single public method with a void return type named sayHello.
Expose this interface class to other bundles by editing the manifest file for the project. You can open the manifest editor by double-clicking the Manifest element underneath the bundle project, as shown in Figure 4-2.

Figure 4-2 API bundle project
In the manifest editor, click the Runtime tab. In the exported packages pane, click Add. Select the com.itso.example.osgi.api package from the list and then click OK.
Creating the service bundle
The OSGi service bundle provides an implementation of the API. For the API interface to be visible in the service project, import the API package in the service bundle. To import the API package, complete the following steps:
1. Open the manifest editor for the ITSO.OSGiExample.Service project. In the Imported Packages pane of the Dependencies tab, click Add. In the package selection dialog, select com.itso.example.osgi.api. Save and close the manifest.
2. Create an implementation for the API by creating a new Java class in the ITSO.OSGiExample.Service project named HelloImpl in the com.itso.example.osgi.service package. The class should implement the HelloAPI interface. In the implementation of the sayHello() method, enter an output statement such as System.out.println(“Hello, Liberty developers from OSGi”). Save and close the file.
|
Warning: When selecting an interface, you might need to start typing before the list of available interfaces is shown.
|
3. Export the service implementation using an OSGi Blueprint file. Begin by creating the file. Right-click the ITSO.OSGiExample.Service project and select New → Blueprint File. Leave all values as the defaults, and click Finish.
4. In the Overview pane of the Blueprint editor’s design tab, click Add. Click Bean and click OK. Click Browse and select HelloImpl (you must start typing in the “choose type name” field to display the list of options). Leave the Bean ID field as the default value, HelloImplBean.
5. Click Blueprint in the Overview pane and click Add.
a. Click Service, and click OK.
b. Click Browse next to the Service Interface field and select HelloAPI.
c. Click Browse next to the Bean Reference field and select HelloImplBean.
d. Click OK and save the file.
e. Examine the source for the Blueprint file and verify that it resembles the XML that is shown in Figure 4-3.

Figure 4-3 Service Blueprint file
Creating an OSGi client bundle
The OSGi client bundle calls the sayHello method on the service implementation. Similar to the service bundle, the client bundle must have access to the API by importing the API package in its manifest. Use the procedure from step 1 on page 101 to edit the manifest and import the API.
Create a HelloITSOClient class in the ITSO.OSGiExample.Client project in the com.itso.example.osgi.client package. The class should contain the following pieces:
•A private field of type HelloAPI named helloService.
•Get and Set methods for the helloService field.
•A method named init that is called when the client is initialized. This method should print a message and then run helloService.sayHello().
The completed class should resemble the code that is shown in Figure 4-4.

Figure 4-4 Source code for HelloITSOClient
The client must be configured so that it can recognize the service implementation and have the service dependency that is injected into the helloService field. This is done by creating a Blueprint file for the client by using the following steps:
1. Create a Blueprint file by right-clicking the ITSO.OSGiExample.Client project and selecting New → Blueprint File. You can accept all default values for the file and click Finish.
2. Add a reference element to the Blueprint:
a. Click Add in the Overview pane in the Blueprint editor.
b. Click Reference and click OK.
c. Click Browse beside the Reference Interface field, and select HelloAPI from the list of classes.
d. In the Reference ID field, enter helloRef.
e. Click OK to finish adding the reference element.
3. Add a bean element to the Blueprint file:
a. Click Add in the Overview pane.
b. Select Bean and click OK.
c. Click Browse, select HelloITSOClient, and click OK.
d. Click OK again to finish adding the bean element.
e. In the bean properties window on the right side of the editor, locate the Initialization Method field and click Browse.
f. Select the init() method and click OK. This alerts the Blueprint container to run the init method when the HelloITSOClient class is instantiated.
4. Add a property to the HelloITSOClientBean by selecting the bean in the Overview pane and clicking Add. Select Property and click OK. In the Details window, enter helloService in the Name field. Then, click Browse beside the Reference field and select the helloRef reference. Click OK to finish adding the property.
5. Save the Blueprint file and switch to the Source tab.
The completed file should resemble Figure 4-5.

Figure 4-5 Blueprint file for ITSO.OSGiExample.Client
Creating an OSGi application
Create an OSGi application to contain the three OSGi bundles by completing the following steps:
1. Click File → New → OSGi Application Project.
2. Enter a project name, such as ITSO.OSGiExample.App. Leave the other values as the defaults and click Next.
3. In the contained bundles list, select all three OSGi bundle projects and click Finish.
4.2.2 Using the tools to deploy and test an OSGi application
To deploy the OSGi application to a WebSphere Liberty profile server instance, right-click the server in the Servers view and select Add and Remove. In the Add and Remove window, select the ITSO.OSGiExample.App application and click Add. Then, click Finish to complete adding the application to the server.
The application is now deployed and started. You should see output in the console similar to Figure 4-6.
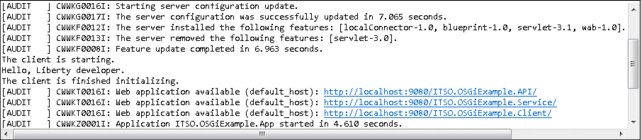
Figure 4-6 Output after adding the OSGi application to the server
The localConnector-1.0, blueprint-1.0, servlet-3.1, wab-1.0 features are added automatically and the default servlet-3.0 is removed automatically because it is superseded by the servlet-3.1 feature. The init method of the client is called during the application start, so you see the messages that are printed in the init method in the console. Note also that the message from the service implementation is printed because the client started the sayHello method.
4.2.3 Adding an OSGi web application bundle
Now add an OSGi web application bundle to the OSGi application. The web application uses the existing service inside a servlet. Rather than using Blueprint to manage the service reference, use the service registry to locate the service. Complete the following steps:
1. Begin by creating an OSGi bundle project called ITSO.OSGiExample.WebApp. This process is similar to the process that is described in “Creating OSGi bundle projects” on page 99. The following list shows the differences:
a. On the first window of the create project wizard, select the Add Web Support check box.
b. Leave the check box checked for adding the bundle to the OSGi application so that it is added to the ITSO.OSGiExample.App application.
c. Optionally, on the web module window, enter a different value for the context root. In this example, we use a context root of osgi.
2. As was the case with the service and client bundles, you must edit the manifest for the web application bundle to import its dependencies. Open the manifest editor and navigate to the Dependencies tab. Notice that several servlet dependencies were automatically added to the manifest when the project was created. Add the com.itso.example.osgi.api package to the list of dependencies. Additionally, you must add org.osgi.framework version 1.5.0 to the list.
3. Create a servlet in the new bundle project by using the Create Servlet wizard. Name the servlet HelloWABServlet, use the com.itso.example.osgi.wab package name, and edit the servlet URL mapping value to be /hello. For more information about creating servlets in the Liberty profile developer tools, see 3.1.1, “Using the tools to create a simple servlet application” on page 60.
4. In the servlet, add a private field of type HelloAPI named helloService. In the doGet method, add a call to helloService.sayHello().
5. Also, in the servlet, override the init(ServletContext) method. In this method, you use the ServletContext to get the ServletConfig. From the ServletConfig, get the osgi-bundlecontext attribute. This is the OSGi BundleContext object. You can use this BundleContext to look up the HelloAPI service in the service registry. The complete init method is shown in Figure 4-7.

Figure 4-7 Example init method for the HelloWABServlet
6. Save the servlet.
You can test this by visiting a link such as the one below, providing your server is listening on localhost and port 9080 as defined in its server.xml configuration file:
http://localhost:9080/osgi/hello
You do not see any output in the browser (unless you added output in the servlet’s doGet method) but you see the message Hello, Liberty developer displayed in the console output. This message shows that the servlet successfully retrieved the service from the service register in its init method and started the service’s sayHello method in its doGet method.
A new feature osgiAppIntegration-1.0 available with Liberty profile version 8.5.5.5, enables the integration of OSGi application services. This means that the OSGi applications running in the same Liberty profile server can share their services with each other. To accomplish this, you must do the following tasks:
1. Add the future osgiAppIntegration-1.0 to the server.xml configuration file of your Liberty profile server.
2. Add the Application-ExportService header to the META-INF/APPLICATION.MF file of the application that needs to export the service as in Example 4-1.
Example 4-1 Application-ExportService header in META-INF/APPLICATION.MF
Application-ExportService: com.itso.example.osgi.service;binding:=local
3. Add the Application-ImportService header to the META-INF/APPLICATION.MF file of the application that needs to import the service as in Example 4-2.
Example 4-2 Application-ImportService header in META-INF/APPLICATION.MF
Application-ImportService: com.itso.example.osgi.service;binding:=local
An OSGi application can both export and import services from other OSGi applications from the same Liberty profile server by using both headers. The binding:=local directive has to be added at the end of the import and export headers so that the OSGi applications within the same Liberty profile server can communicate with each other.
4.2.4 Deploying an OSGi application to Liberty in the cloud
You can deploy an OSGi application in IBM Bluemix™ in order to share it and use the benefits of the cloud environment.
You can use IBM WebSphere Application Server Developer Tools to package a Liberty profile server to IBM Bluemix. The IBM Eclipse Tools for Bluemix needs to be installed in the Developer Tools so that you can define a Bluemix server that is required as a target to package your Liberty profile server. You also need a valid IBM Bluemix account.
To create an IBM Bluemix server profile by using your Developer Tools, select the IBM Bluemix option under the IBM group in the New Server window shown in Figure 4-8 on page 107.

Figure 4-8 Defining a new IBM Bluemix server
To package a Liberty profile server that you already configured, right-click the server in the Servers view and select the Package Server to IBM Bluemix option that is located under Utilities, shown in Figure 4-9.

Figure 4-9 Package a Liberty profile server to IBM Bluemix
For more information about deploying applications with IBM Eclipse Tools for Bluemix, refer to the following website:
4.3 Developing OSGi applications outside Liberty profile developer tools
Developers who prefer working outside of the Liberty profile developer tools environment can still develop OSGi applications quickly by using the Liberty profile server. In this section, we describe some considerations for developing in this environment and some tools to automate build and deployment processes.
4.3.1 Building and deploying OSGi applications outside of the tools
When building OSGi applications outside the Liberty profile developer tools, there are several API and SPI JAR files that are in the dev directory that contain important core classes, such as BundleContext and ServiceReference:
|
Note: For the following files, use the appropriate versions that are related to your Liberty profile environment.
|
•dev/api/spec/com.ibm.ws.org.osgi.cmpn.4.2.0_1.0.8.jar
•dev/api/spec/com.ibm.ws.org.osgi.core.4.2.0_1.0.8.jar
•dev/spi/third-party/com.ibm.wsspi.thirdparty.blueprint_1.1.8.jar
•dev/spi/spec/com.ibm.wsspi.org.osgi.cmpn.5.0.0_1.0.8.jar
•dev/spi/spec/com.ibm.wsspi.org.osgi.core.5.0.0_1.0.8.jar
Enterprise bundle archive (EBA) files can be placed in the dropins directory, such as EAR or WAR files. You can also define them explicitly using an application element in the server.xml file.
|
Important: To deploy OSGi applications to a Liberty profile server, you need to manually enable the features blueprint-1.0, osgi.jpa-1.0, and wab-1.0 in the server.xml configuration file.
|
OSGi console
You can use the OSGi console to debug your applications. The Liberty profile uses the Eclipse Equinox implementation of the OSGi core specification that provides this console. The OSGi console is not available by default; you have to enable it:
1. Add the osgiConsole-1.0 feature to your Liberty profile server.xml file.
2. Set the OSGi console port in the bootstrap.properties file of your Liberty profile server by adding the line osgi.console=5471.
The bootstrap.properties file has to be created manually in the same location as your server.xml file; it does not exist by default.
3. Restart your Liberty profile server.
4. Test the OSGi console by issuing a telnet command to the console port you have set.
OSGi bundle repositories
You can share common OSGi bundles both locally or remotely so that your OSGi applications can access them. This can be accomplished by editing the server.xml configuration file and adding a bundleRepository tag. Example 4-3 on page 109 shows a local repository configuration and Example 4-4 on page 109 shows a remote repository configuration type.
Example 4-3 Server.xml configuration for a local OSGi bundle repository
<bundleRepository>
<fileset dir="directory_path" include="*.jar"/>
</bundleRepository>
The directory_path used to define a local OSGi bundle repository is the path to the directory containing the common OSGi bundles.
Example 4-4 Server.xml configuration for a remote OSGi bundle repository
<bundleRepository location="URL" />
The URL used to define a remote OSGi bundle repository defines the location of an OSGi Bundle Repository XML file and it supports HTTP, HTTPS, and file protocol types.
4.3.2 Using Maven to automate OSGi development tasks
You can automate the building and deployment of OSGi applications by using the Liberty Maven plug-in, with open source tools. An example of an open source tool is the EBA Maven plug-in that is developed by Apache Aries.
As described in 3.2.7, “Using Maven to automate tasks for the Liberty profile” on page 89, you can use the Liberty Maven plug-in to automate tasks. Some examples of these tasks are deploying applications and starting a Liberty profile server.
The EBA Maven plug-in allows you to build EBA archives from component bundles. It can automatically generate an Application Manifest file from information that is contained in the Maven pom file. For more information about the EBA Maven plug-in, refer to the following website:
4.3.3 Using Ant to automate OSGi development tasks
With Apache Ant and the Liberty Ant plug-in, you can automate the packaging and deployment of OSGi applications. Refer to 3.2.8, “Using Ant to automate tasks for the Liberty profile” on page 92 for more information about using the Liberty plug-in. This section gives further details about how to automate tasks, such as deploying and undeploying applications or starting and stopping servers.
You can use standard Ant tasks, such as zip, to package OSGi applications that can then be deployed using the Liberty plug-in. Example 4-5 shows sample syntax for creating an OSGi application named ITSOExampleApp by packaging the META-INF/APPLICATION.MF file into the EBA file, and including all bundle files.
Example 4-5 Syntax for creating an OSGi application
<zip destfile="${output.dir}/ITSOExampleApp.eba" basedir="${basedir}">
<filename name="META-INF/APPLICATION.MF"/>
<fileset dir="${basedir}">
<include name="*.jar"/>
</fileset>
</zip>
The Ant property ${output.dir} is user-defined and specifies the output directory for your build. The Ant property ${basedir} is predefined and specifies the directory that contains the Ant build.xml file.
Refer to the following website for more information about how to use Ant to automate tasks for the Liberty profile:
..................Content has been hidden....................
You can't read the all page of ebook, please click here login for view all page.