
In Chapter 1, we took a high-level look at the compilation process. You saw that the compiler takes the source code file and produces an output file called an assembly. This chapter will take a closer look at assemblies and how they are produced and deployed. You will also look at how namespaces help organize types.
All the programs you've seen so far have, for the most part, declared and used their own classes. In many projects, however, you will want to use classes or types from other assemblies. These other assemblies might come from the BCL or a third-party vendor, or you might have created them yourself. These are called class libraries, and the names of their assembly files generally end with the .dll extension rather than the .exe extension.
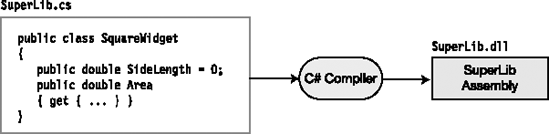
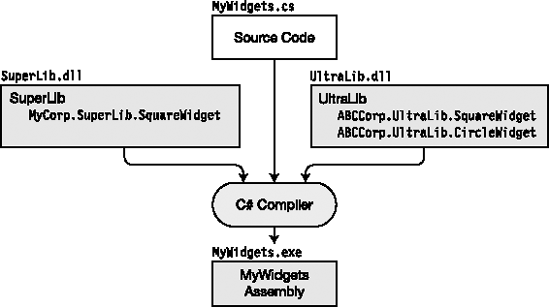
For example, suppose that you want to create a class library that contains classes and types that can be used by other assemblies. The source code for a simple library is shown in the following example and is contained in a file called SuperLib.cs. The library contains a single public class called SquareWidget. Figure 10-1 illustrates the production of the DLL.
public class SquareWidget
   {
      public double SideLength = 0;
      public double Area
      {
         get { return SideLength * SideLength; }
      }
   }
Suppose also that you are writing a program called MyWidgets, and you want to use the SquareWidget class. The code for the program is in a file called MyWidgets.cs and is shown in the following example. The code simply creates an object of type SquareWidget and uses the object's members.
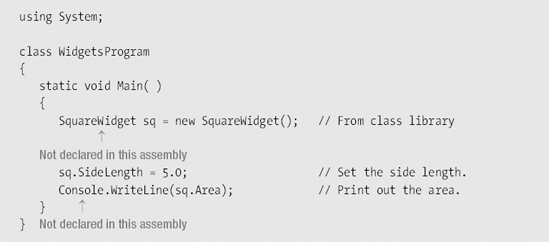
Notice that the code doesn't declare class SquareWidget. Instead, you use the class defined in SuperLib. When you compile the MyWidgets program, however, the compiler must be aware that your code uses assembly SuperLib so it can get the information about class SquareWidget. To do this, you need to give the compiler a reference to the assembly, by giving its name and location.
In Visual Studio, you can add references to a project in the following way:
Select the Solution Explorer and find the
Referencesfolder underneath the project name. TheReferencesfolder contains a list of the assemblies used by the project.Right-click the
Referencesfolder and select Add Reference. There are five tab pages from which to choose, allowing you to find the class library in different ways.For our program, select the Browse tab, browse to the DLL file containing the
SquareWidgetclass definition, and select it.Click the OK button, and the reference will be added to the project.
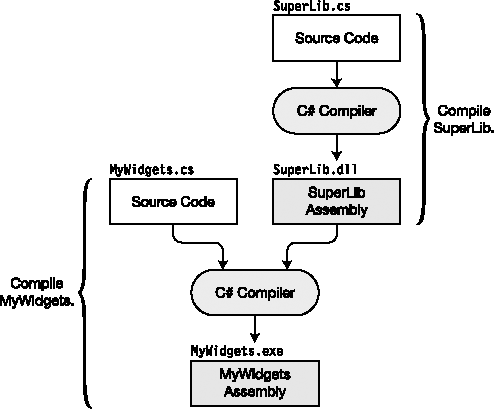
After you've added the reference, you can compile MyWidgets. The full compilation process is illustrated in Figure 10-2.
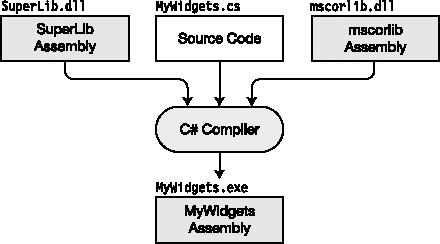
There's a class library that I've been using in almost every example in the book so far. I t is the one that contains the Console class. The Console class is defined in an assembly called mscorlib in a file called mscorlib.dll. You won't find this assembly listed in the References folder, however. Assembly mscorlib contains the definitions of the C# types, and the basic types for most .NET languages. It must always be referenced when compiling a C# program, so Visual Studio doesn't show it in the References folder.
When you take into account mscorlib, the compilation process for MyWidgets looks more like the representation shown in Figure 10-3. After this, I'll assume the use of the mscorlib assembly without representing it again.
Now suppose that your program has been working fine with the SquareWidget class, but you want to expand its capabilities to use a class called CircleWidget, which is defined in a different assembly called UltraLib. The MyWidgets source code now looks like the following. It creates a SquareWidget object as defined in SuperLib, and a CircleWidget object as defined in UltraLib.
class WidgetsProgram
   {
      static void Main( )
      {
         SquareWidget sq = new SquareWidget();      // From SuperLib
         ...


         CircleWidget circle = new CirclWidget();   // From UltraLib
         ...
      }
   }
The source code for class library UltraLib is shown in the following example. Notice that besides class CircleWidget, like library SuperLib, it also declares a class called SquareWidget. You can compile UltraLib to a DLL and add it to the list of references in project MyWidgets.
public class SquareWidget
   {
      ...
   }


   public class CircleWidget
   {
      public double Radius = 0;
      public double Area
      {
         get { ... }
      }
   }
Since both libraries contain a class called SquareWidget, when you attempt to compile program MyWidgets, the compiler produces an error message because it doesn't know which version of class SquareWidget to use. This name clash is illustrated in Figure 10-4.
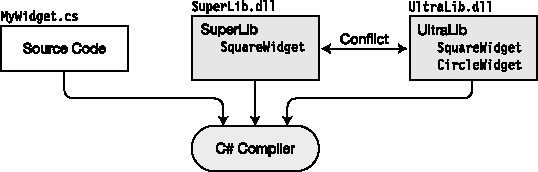
In the MyWidgets example, since you have the source code, you can solve the name clash by just changing the name of the SquareWidget class in either the SuperLib source code or the UltraLib source code. But what if these libraries had been developed by separate companies, and you didn't have the source code? Suppose that SuperLib was produced by a company called MyCorp, and UltraLib was produced by the ABCCorp company. In that case, you wouldn't be able to use them together if you used any classes or types where there was a clash.
As you can imagine, with your development machine containing assemblies produced by dozens of different companies, there is likely to be a certain amount of duplication in the names of classes. It would be a shame if you couldn't use two assemblies in the same program just because they happened to have type names in common. The namespace feature helps you avoid this problem.
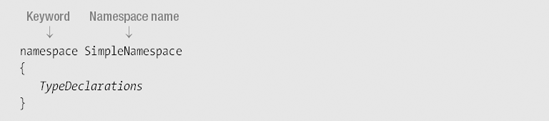
Namespaces group a set of types together and give them a name, called the namespace name. The namespace name should be descriptive of the contents of the namespace and be distinct from other namespace names.
The following shows the syntax for declaring a namespace. The names of all the classes and other types declared between the curly braces are members of the namespace.
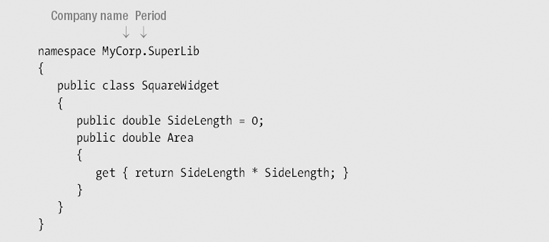
Now suppose that the programmers at MyCorp have modified the source code as shown in the following example. It now has a namespace that surrounds the class declarations. Notice two interesting things about the namespace name:
Namespaces can contain periods.
The company name is at the beginning of the namespace name.
When the MyCorp company ships you the new updated assembly, you can use it by modifying your MyWidgets program as shown here. Notice that instead of just using the class name (since it's ambiguous between the two class libraries), you preface the namespace name to the class name and separate the two with a period. The entire string, with the namespace name and the class name, is called the fully qualified name.
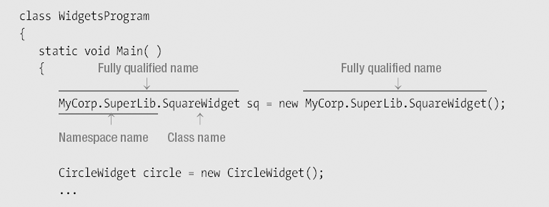
Now that you have explicitly specified the SuperLib version of SquareWidget in your code, the compiler will no longer have a problem distinguishing the classes. The fully qualified name is a bit long to type, but at least you can now use both libraries. A little later in the chapter, we'll cover the using alias directive to solve the inconvenience of having to repeatedly type in the fully qualified name.
If the UltraLib assembly is also updated with a namespace by the company that produces it (ABCCorp), then the compile process would be as shown in Figure 10-5.
As you saw, the name of a namespace can contain the name of the company that created the assembly. Besides identifying the company, the name is also used to help programmers get a quick idea of the kinds of types defined in the namespace.
Some important points about the names of namespaces are the following:
A namespace name can be any valid identifier.
A namespace name can include the period character, which is used to organize types into hierarchies.
For example, Table 10-1 gives the names of some of the namespaces in the .NET BCL.
Table 10-1. Sample Namespaces from the BCL
|
|
|
|
|
|
Namespace naming guidelines suggest the following:
Start namespace names with the company name.
Follow the company name with the technology name.
Do not name a namespace with the same name as a class or type.
For example, the software development department of the Acme Widget Company develops software in the following three namespaces, as shown in the following code:
AcmeWidgets.SuperWidgetAcmeWidgets.MediaAcmeWidgets.Games
namespace AcmeWidgets.SuperWidget.SPDComponent
{
   class SPDBase ...
   ...
}There are several other important points you should know about namespaces:
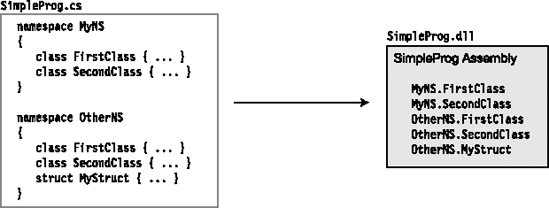
Figure 10-6 shows a source file on the left that declares two namespaces sequentially, with several types in each one. Notice that even though the namespaces contain several class names in common, they are differentiated by their namespace names, as shown in the assembly at the right of the figure.
The .NET Framework BCL offers thousands of defined classes and types to choose from in building your programs. To help organize this array of available functionality, types with related functionality are declared in the same namespace. The BCL uses more than 100 namespaces to organize its types.
A namespace is not closed. This means that you can add more type declarations to it by declaring it again either later in the source file or in another source file.
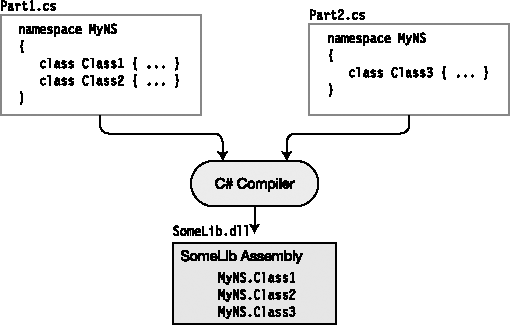
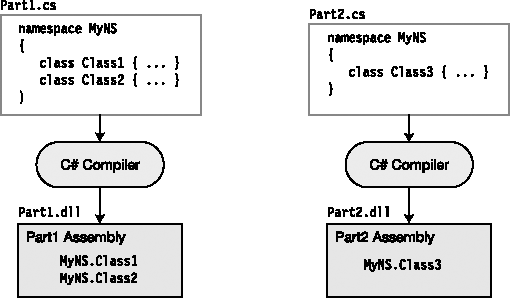
For example, Figure 10-7 shows the declaration of three classes, all in the same name- space, but declared in separate source files. The source files can be compiled into a single assembly, as shown in Figure 10-7, or into separate assemblies, as shown in Figure 10-8.
A namespace can be a member of another namespace. The member is called a nested name-space. Nesting namespaces allows you to create a conceptual hierarchy of types.
Although the nested namespace is a member of the enclosing namespace, its members are not members of the enclosing namespace. A common misconception people initially have about nested namespaces is that since the nested namespace is inside the enclosing namespace, the members of the nested namespace must be a subset of the enclosing namespace. This is not true; the namespaces are separate.
There are two ways you can declare a nested namespace:
Textual nesting: You can create a nested namespace by placing its declaration inside the declaration body of the enclosing namespace. This is illustrated on the left in Figure 10-9. In this example, namespace
OtherNsis nested in namespaceMyNamespace.Separate declaration: You can also create a separate declaration for the nested name-space, but you must use its fully qualified name in the declaration. This is illustrated on the right in Figure 10-9. Notice that in the declaration of nested namespace
OtherNs, the fully qualified nameMyNamespace.OtherNSis used.
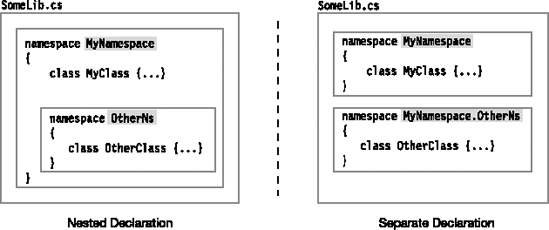
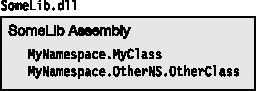
Both forms of the nested namespace declarations shown in Figure 10-9 produce the same assembly, as illustrated in Figure 10-10. The figure shows the two classes declared in file SomeLib.cs, with their fully qualified names.
Fully qualified names can be quite long, and using them throughout your code can become quite tedious. There are two compiler directives, however, that allow you to avoid having to use fully qualified names--the using namespace directive and the using alias directive.
Two important points about the using directives are the following:
They must be placed at the top of the source file, before any type declarations.
They apply for all the namespaces in the current source file.
You saw in the MyWidgets example several sections back that you can specify a class by using the fully qualified name. You can avoid having to use the long name by placing using namespace directives at the top of the source file.
The using namespace directive instructs the compiler that you will be using types from certain specific namespaces. You can then go ahead and use the simple class names without having to fully qualify them.
When the compiler encounters a name that is not in the current namespace, it checks the list of namespaces given in the using namespace directives and appends the unknown name to the first namespace in the list. If the resulting fully qualified name matches a class in this assembly or a referenced assembly, the compiler uses that class. If it does not match, it tries the next namespace in the list.
The using namespace directive consists of the keyword using, followed by a namespace identifier.

One method I have been using throughout the text is the WriteLine method, which is a member of class Console, in the System namespace. Rather than use its fully qualified name throughout the code, I simplified our work just a bit, by the use of the using namespace directive at the top of the code.
For example, the following code uses the using namespace directive in the first line to state that the code uses classes or other types from the System namespace.
using System;                                // using namespace directive
       ...
   System.Console.WriteLine("This is text 1");  // Use fully qualified name
   Console.WriteLine("This is text 2");         // Use directive
The using alias directive allows you to assign an alias for either of the following:
A namespace
A type in a namespace
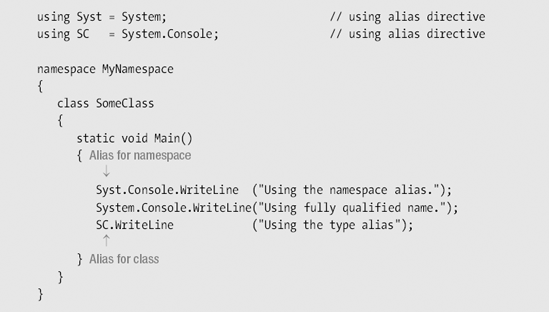
For example, the following code shows the use of two using alias directives. The first directive instructs the compiler that identifier Syst is an alias for namespace System. The second directive says that identifier SC is an alias for class System.Console.
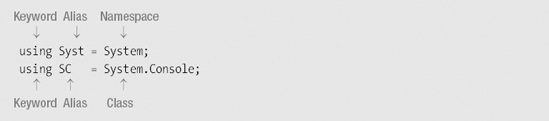
The following code uses these aliases. All three lines of code in Main call the System.Console.WriteLine method.
The first statement in
Mainuses the alias for a namespace—System.The second statement uses the fully qualified name of the method.
The third statement uses the alias for a class—
Console.
As you saw in Chapter 1, an assembly does not contain native machine code, but Common Intermediate Language (CIL) code. It also contains everything needed by the Just-in-Time (JIT) compiler to convert the CIL into native code at run time, including references to other assemblies it references. The file extension for an assembly is generally .exe or .dll.
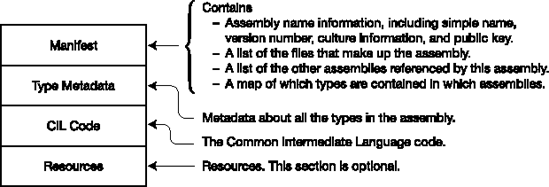
Most assemblies are composed of a single file. Figure 10-11 illustrates the four main sections of an assembly.
The assembly manifest contains the following:
The identity of the assembly name
A list of the files that make up the assembly
A map of where things are in the assembly
Information about other assemblies that are referenced
The type metadata section contains the information about all the types defined in the assembly. This information contains everything there is to know about each type.
The CIL section contains all the intermediate code for the assembly.
The resources section is optional, but can contain graphics or language resources.
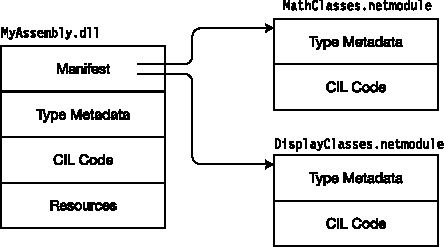
Although most assemblies comprise a single file, some have more. For an assembly with multiple modules, one file is the primary module and the others are secondary modules.
The primary module contains the manifest of the assembly and references to the secondary modules.
The filenames of secondary modules end with the extension
.netmodule.Multiple-file assemblies are considered a single unit. They are deployed together and versioned together.
Figure 10-12 illustrates a multi-file assembly with secondary modules.
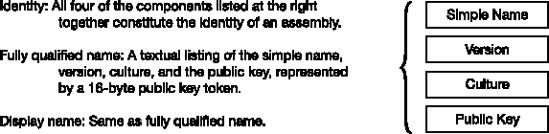
In the .NET Framework, the filenames of assemblies are not as important as in other operating systems and environments. What is much more important is the identity of an assembly.
The identity of an assembly has four components that together should uniquely identify it. These four components are the following:
Simple name: This is just the filename without the file extension. Every assembly has a simple name. It is also called the assembly name or the friendly name.
Version number: This consists of a string of four period-separated integers, in the form
MajorVersion.MinorVersion.Build.Revision—for example,2.0.35.9.Culture information: This is a string that consists of two to five characters representing a language, or a language and a country or region. For example, the culture name for English as used in the United States is
en-US. For German as used in Germany, it isde-DE.Public key: This 128-byte string should be unique to the company producing the assembly.
The public key is part of a public/private key pair, which is a set of two very large, specially chosen numbers that can be used to create secure digital signatures. The public key, as its name implies, can be made public. The private key must be guarded by the owner. The public key is part of the assembly's identity. We will look at the use of the private key later in the chapter.
The components of an assembly's name are embedded in the assembly's manifest. Figure 10-13 illustrates this section of the manifest.
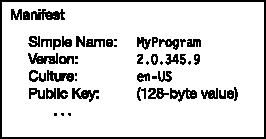
Figure 10-14 shows some of the terms used in the .NET documentation and literature regarding the identity of an assembly.
A strongly named assembly is one that has a unique digital signature attached to it. Strongly named assemblies are much more secure than assemblies that do not have strong names, for the following reasons:
A strong name uniquely identifies an assembly. No one else can create an assembly with the same strong name, so the user can be sure that the assembly came from the claimed source.
The contents of an assembly with a strong name cannot be altered without the security components of the CLR catching the modification.
A weakly named assembly is one that is not strongly named. Since a weakly named assembly does not have a digital signature, it is inherently insecure. Because a chain is only as strong as its weakest link, by default, strongly named assemblies can only access other strongly named assemblies. (There's also a way to allow "partially trusted callers," but I won't be covering that topic.)
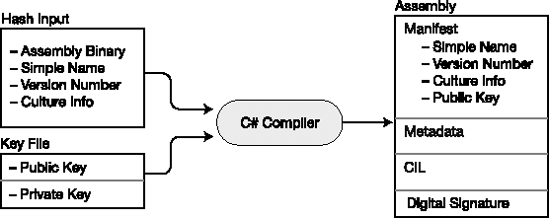
The programmer does not produce the strong name. The compiler produces it by taking information about the assembly and hashing it to create a unique digital signature that it attaches to the assembly. The pieces of information it uses in the hash process are the following:
The sequence of bytes composing the assembly
The simple name
The version number
The culture information
The public/private key pair
Note
Note There is some diversity in the nomenclature surrounding strong names. What I'm calling "strongly named" is often referred to as "strong-named." What I'm calling "weakly named" is sometimes referred to as "not strong-named" or "assembly with a simple name."
To strongly name an assembly using Visual Studio 2008, you must have a copy of the public/private key pair file. If you don't have a key file, you can have Visual Studio generate one for you. You can then do the following:
Open the properties of the project.
Select the Signing tab.
Select the Sign the Assembly check box and enter the location of the key file.
When you compile the code, the compiler will produce a strongly named assembly. The inputs and output of the compiler are illustrated in Figure 10-15.
Deploying a program on a target machine can be as simple as creating a directory on the machine and copying the application to it. If the application doesn't need other assemblies (such as DLLs), or if the required DLLs are in the same directory, the program should work just fine where it is. Programs deployed this way are called private assemblies, and this method of deployment is called xcopy deployment.
Private assemblies can be placed in almost any directory, and are self-sufficient as long as all the files on which they depend are in the same directory or a subdirectory. In fact, you could have several directories in various parts of the file system, each with the identical set of assemblies, and they would all work fine in their various locations.
Some important things to know about private assembly deployment are the following:
Private assemblies are very useful, but sometimes you will want to put a DLL in a central place so that a single copy can be shared by other assemblies on the system. .NET has such a repository, called the global assembly cache (GAC). An assembly placed into the GAC is called a shared assembly.
Some important facts about the GAC are the following:
When you attempt to install an assembly into the GAC, the security components of the CLR must first verify that the digital signature on the assembly is valid. If there is no digital signature, or if it is invalid, the system will not install it into the GAC.
This is a one-time check, however. After an assembly is in the GAC, no further checks are required when it is referenced by a running program.
The gacutil.exe command-line utility allows you to add and delete assemblies from the GAC, and list the assemblies it contains. The three most useful flags are the following:
/i: Inserts an assembly into the GAC/u: Uninstalls an assembly from the GAC/l: Lists the assemblies in the GAC
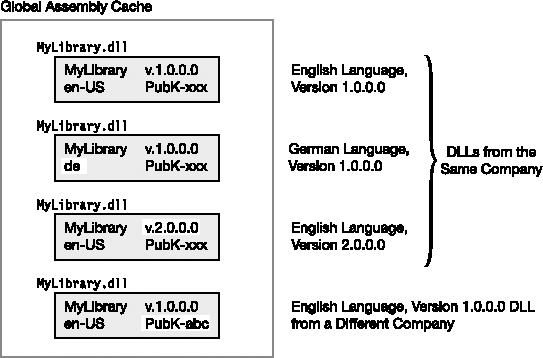
After an assembly is deployed to the GAC, it can be used by other assemblies in the system. Remember, however, that an assembly's identity consists of all four parts of the fully qualified name. So, if the version number of a library changes, or if it has a different public key, these differences specify different assemblies.
The result is that there can be many different assemblies in the GAC that have the same filename. Although they have the same filename, they are different assemblies and coexist perfectly fine together in the GAC. This makes it easy for different applications to use different versions of the same DLL at the same time, since they are different assemblies with different identities. This is called side-by-side execution.
Figure 10-16 illustrates four different DLLs in the GAC that all have the same filename—MyLibrary.dll. Looking at the figure, you can see that the first three come from the same company, because they have the same public key, and the fourth comes from a different source, since it has a different public key. These versions differ as follows:
An English version 1.0.0.0, from company A
An English version 2.0.0.0, from company A
A German version 1.0.0.0, from company A
An English version 1.0.0.0, from company B
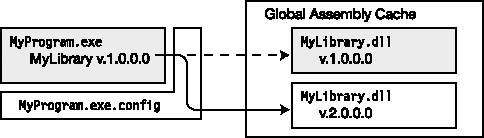
Configuration files contain information about the application, for use by the CLR at run time. They can instruct the CLR to do such things as use a different version of a DLL, or to look in additional directories when searching for a DLL referenced by the program.
Configuration files consist of XML code and don't contain C# code. The details of writing the XML code are beyond the scope of this text, but you should understand the purpose of configuration files and how they are used. One way they are used is to update an application assembly to use the new version of a DLL.
Suppose, for example, that you have an application that references a DLL in the GAC. The identity of the reference in the application's manifest must exactly match the identity of the assembly in the GAC. If a new version of the DLL is released, it can be added to the GAC, where it can happily coexist with the old version.
The application, however, still has embedded in its manifest the identity of the old version of the DLL. Unless you recompile the application and make it reference the new version of the DLL, it will continue to use the old version. That's fine, if that's what you want.
If, however, you do not want to recompile the application but want it to use the new DLL, then you can create a configuration file telling the CLR to use the new version rather than the old version. The configuration file is placed in the application directory.
Figure 10-17 illustrates objects in the runtime process. The MyProgram.exe application on the left calls for version 1.0.0.0 of the MyLibrary.dll, as indicated by the dashed arrow. But the application has a configuration file, which instructs the CLR to load version 2.0.0.0 instead. Notice that the name of the configuration file consists of the full name of the executable file including the extension, plus the additional extension .config.
It is important that companies carefully guard the private key of their official public/private key pair. Otherwise, if untrustworthy people were to obtain it, they could publish code masquerading as the company's code. To avoid this, companies clearly cannot allow free access to the file containing their public/private key pair. In large companies, the final strong naming of an assembly is often performed at the very end of the development process, by a special group with access to the key pair.
This can cause problems, though, in the development and testing processes, for several reasons. First, since the public key is one of the four components of an assembly's identity, it can't be set until the public key is supplied. Also, a weakly named assembly cannot be deployed to the GAC. Both the developers and testers need to be able to compile and test the code in the way it will be deployed on release, including its identity and location in the GAC.
To allow for this, there is a modified form of assigning a strong name, called delayed signing, or partial signing, that overcomes these problems, but without releasing access to the private key.
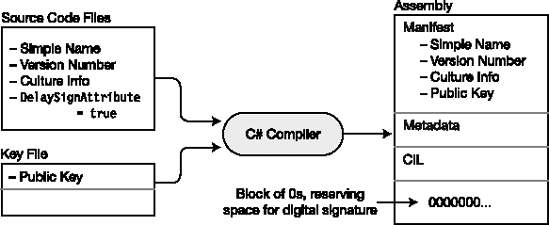
In delayed signing, the compiler uses only the public key of the public/private key pair. The public key can then be placed in the manifest to complete the assembly's identity. Delayed signing also uses a block of 0s to reserve space for the digital signature.
To create a delay-signed assembly, you must do two things. First, create a copy of the key file that has only the public key, rather than the public/private key pair. Next, add an additional attribute called DelaySignAttribute to the assembly scope of the source code and set its value to true.
Figure 10-18 shows the input and output for producing a delay-signed assembly. Notice the following in the figure:
In the input, the
DelaySignAttributeis located in the source files, and the key file contains only the public key.In the output, there is space reserved for the digital signature at the bottom of the assembly.
If you try to deploy the delay-signed assembly to the GAC, the CLR will not allow it, because it's not strongly named. To deploy it on this machine, you must first issue a command-line command that disables the GAC's signature verification on this machine, for this assembly only, and allows it to be installed in the GAC. To do this, issue the following command from the Visual Studio command prompt.
sn -vr MyAssembly.dll
You've now looked at weakly named assemblies, delay-signed assemblies, and strongly named assemblies. Figure 10-19 summarizes the differences in their structures.
