
In this chapter, I'll cover a number of other topics that are important in using C#, but that don't fit neatly into one of the other chapters. These include string handling, nullable types, the Main method, documentation comments, and nested types.
0s and 1s are fine for internal computation, but for human-readable input and output, we need strings of characters. The BCL provides a number of classes that make string handling easy.
The C# predefined type string represents the .NET class System.String. The most important things to know about strings are the following:
Strings are arrays of Unicode characters.
Strings are immutable—they cannot be changed.
The string type has many useful string-manipulation members, including those that allow you to determine their length, change their case, concatenate strings, and perform many other useful tasks. Some of the most useful members are listed in Table 25-1.
Table 25-1. Useful Members of the string Type
Member | Type | Meaning |
|---|---|---|
| Property | Returns the length of the string |
| Static method | Returns a string that is the concatenation of its argument strings |
| Method | Returns a |
| Static method | Returns a formatted string |
| Method | Inserts a string at a specific point in the object string |
| Method | Removes a set of characters from the object string |
| Method | Replaces a character or string in the object string |
| Method | Retrieves a substring from the object string |
| Method | Returns a copy of the object string in which the alphabetic characters are all uppercase |
| Method | Returns a copy of the object string in which the alphabetic characters are all lowercase |
The names of many of the methods in Table 25-1 sound as if they are changing the string object. Actually, they are not changing the strings but returning new copies. For a string, any "change" allocates a new immutable string.
For example, the following code declares and initializes a string called s. The first WriteLine statement calls the ToUpper method on s, which returns a copy of the string in all uppercase. The last line prints out the value of s, showing that it is unchanged.
string s = "Hi there.";

   Console.WriteLine("{0}", s.ToUpper());         // Print uppercase copy
   Console.WriteLine("{0}", s);                   // String is unchanged
This code produces the following output:
HI THERE.
Hi there.
The StringBuilder class produces strings that can be changed.
The
StringBuilderclass is a member of the BCL, in namespaceSystem.Text.A
StringBuilderobject is a mutable array of Unicode characters.
For example, the following code declares and initializes a string of type StringBuilder and prints its value. The fourth line changes the actual object by replacing part of the string. Now when you print its value, you can see that, unlike an object of type string, the StringBuilder object has actually been changed.
using System.Text;

   StringBuilder sb = new StringBuilder("Hi there.");
   Console.WriteLine("{0}", sb);                 // Print string
   sb.Replace("Hi", "Hello");                    // Replace a substring
   Console.WriteLine("{0}", sb);                 // Print changed string
This code produces the following output:
Hi there.
Hello there.
When a StringBuilder object is created, the class allocates a buffer longer than the actual current string length. As long as the changes made to the string can fit in the buffer, no new memory is allocated. If changes to the string require more space than is available in the buffer, a new, larger buffer is allocated, and the string is copied to it. Like the original buffer, this new buffer also has extra space.
To get the string corresponding to the StringBuilder content, you simply call its ToString method.
Throughout the text, the sample code has used the WriteLine method to display values. Each time, it used the simple substitution marker consisting of curly braces surrounding an integer. Many times, however, you will want to present the output of a text string in a format more appropriate than just a plain number. For example, you might want to display a value as currency or as a fixed-point value with a certain number of decimal places. You can do these things by using format strings.
For example, the following code consists of two statements that print out the value 500. The first line prints out the number without any additional formatting. In the second line, the format string specifies that the number should be formatted as currency.

This code produces the following output:
The value: 500.
The value: $500.00.
The difference between the two statements is that the format item includes additional information in the form of a format specifier. The syntax for a format specifier consists of three fields inside the set of curly braces: the index, the alignment specifier, and the format specifier. The syntax is shown in Figure 25-1.
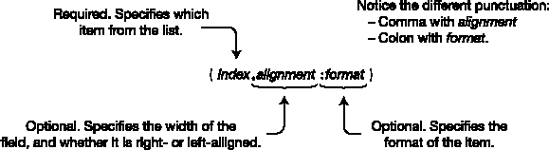
The first thing in the format item is the index. As you well know by now, the index specifies which item from the list following the format string should be formatted. The index is required, and numbering of the list items starts at 0.
The alignment specifier represents the minimum width of the field in terms of characters. The alignment specifier has the following characteristics:
It is optional and separated from the index with a comma.
It consists of a positive or negative integer.
The integer represents the minimum number of characters to use for the field.
The sign represents either right or left alignment. Positive specifies right alignment; negative specifies left alignment.

For example, the following code shows two format items, formatting the value of int variable myInt. In the first case, the value of myInt is displayed as a right-aligned string of ten characters. In the second case, it is left-aligned. The format items are between two vertical bars, just to show in the output their limits on each side.
int myInt = 500;
   Console.WriteLine("|{0, 10}|", myInt);                 // Aligned right
   Console.WriteLine("|{0,-10}|", myInt);                 // Aligned left
This code produces the following output; there are ten characters between the vertical bars:
|       500|
|500       |
The actual representation of the value might take more or fewer characters than specified in the alignment specifier:
If the representation takes fewer characters than specified in the alignment specifier, the remaining characters are padded with spaces.
If the representation takes more characters than specified, the alignment specifier is ignored, and the representation uses as many characters as is needed.
The format component specifies the form that the numeric representation should take. For example, should it be represented as currency, in decimal format, in hexadecimal format, or in fixed-point notation?
The format component has two parts, as shown in Figure 25-2:
The format specifier is a single alphabetic character, from a set of nine built-in character formats. The character can be uppercase or lowercase. The case is significant for some specifiers, but not for others.
The precision specifier is optional, and consists of one or two digits. Its actual meaning depends on the format specifier.

The following code shows an example of the syntax of the format string component:

Some examples of different format strings are shown in the following code:
double myDouble = 12.345678;
   Console.WriteLine("{0,-10:G} -- General",                      myDouble);
   Console.WriteLine("{0,-10} -- Default, same as General",       myDouble);
   Console.WriteLine("{0,-10:F4} -- Fixed Point, 4 dec places",   myDouble);
   Console.WriteLine("{0,-10:C} -- Currency",                     myDouble);
   Console.WriteLine("{0,-10:E3} -- Sci. Notation, 3 dec places", myDouble);
   Console.WriteLine("{0,-10:x} -- Hexadecimal integer",          1194719 );
This code produces the following output:
12.345678  -- General
12.345678  -- Default, same as General
12.3457    -- Fixed Point, 4 dec places
$12.35     -- Currency
1.235E+001 -- Sci. Notation, 3 dec places
123adf     -- Hexadecimal integer
The Regional and Language Options applet of the Windows Control Panel can affect the resulting formats of some of the specifiers. For example, the currency symbol of the country or region specified will be used by the currency format specifier.
Table 25-2 summarizes the nine standard numeric format specifiers. The first column lists the name of the specifier followed by the specifier characters. If the specifier characters have different output depending on their case, they are marked case sensitive.
Table 25-2. Standard Numeric Format Specifiers
Name and Characters | Meaning |
|---|---|
Currency | Formatsthe value as a currency, using a currency symbol. Precision specifier: The number of decimal places. Sample: |
Decimal | A string of decimal digits, with a negative sign, if appropriate. Can be used only with integral types. Precision specifier: The minimum number of digits to use in the output string. If the number has fewer digits, it will be padded with 0s on the left. Sample: |
Fixed-point | A string of decimal digits with a decimal point. Can also include a negative sign, if appropriate. Precision specifier: The number of decimal places. Sample: |
General | A compact fixed-point representation or a scientific notation representation, depending on the value. This is the default, if no specifier is listed. Precision specifier: Depends on the value. Sample: |
Hexadecimal | A string of hexadecimal digits. The hex digits A through F will match the case of the specifier. Precision specifier: The minimum number of digits to use in the output string. If the number has fewer digits, it will be padded with 0s on the left. Sample: |
Number | Similar to fixed-point representation, but includes separators between each group of three digits, starting at the decimal point and going left. Precision specifier: The number of decimal places. Sample: |
Percent | A string that represents percent. The number is multiplied by 100. Precision specifier: The number of decimal places. Sample: |
Round-trip | The output string is chosen so that if the string is converted back to a numeric value using a Precision specifier: Ignored. Sample: |
Scientific | Scientific notation with a mantissa and an exponent. The exponent is preceded by the letter E. The E will be the same case as the specifier. Precision specifier: The number of decimal places. Sample: |
Strings are arrays of Unicode characters. For example, string "25.873" is six characters long and is not a number. Although it looks like a number, you cannot perform arithmetic functions on it. "Adding" two strings produces their concatenation.
Parsing allows you to take a string that represents a value and convert it into an actual value.
All the predefined, simple types have a static method called
Parse, which takes a string value representing the type and converts it into an actual value of the type.
The following statement shows an example of the syntax of using a Parse method. Notice that Parse is static, so you need to invoke it by using the name of the target type.

The following code shows an example of parsing two strings to values of type double and then adding them:
static void Main()
   {
      string s1 = "25.873";
      string s2 = "36.240";

      double d1 = double.Parse(s1);
      double d2 = double.Parse(s2);

      double total = d1 + d2;
      Console.WriteLine("Total:  {0}", total);
   }
This code produces the following output:
Total: 62.113
If the string cannot be parsed, the system raises an exception. There is another static method, TryParse, that returns true if the string was successfully parsed and false otherwise. It does not raise an exception if the parse fails.
Note
A common misconception about Parse is that since it operates on a string, it is thought of as a member of the string class. It is not. Parse is not a single method at all, but a number of methods implemented by the target types.
There are situations, particularly when working with databases, where you want to indicate that a variable does not currently hold a valid value. For reference types, you can do this easily, by setting the variable to null. When you define a variable of a value type, however, its memory is allocated whether or not its contents have any valid meaning.
What you would like in this situation is to have a Boolean indicator associated with the variable, so that when the value is valid, the indicator is true, and when the value is not valid, the indicator is false.
Nullable types, which were introduced in C# 2.0, allow you to create a value type variable that can be marked as valid or invalid so that you can make sure a variable is valid before using it. Regular value types are called non-nullable types.
A nullable type is always based on another type, called the underlying type, that has already been declared.
You can create a nullable type from any value type, including the predefined, simple types.
You cannot create a nullable type from a reference type or another nullable type.
You do not explicitly declare a nullable type in your code. Instead, you declare a variable of a nullable type. The compiler implicitly creates the nullable type for you, using generics, as you'll see later.
To create a variable of a nullable type, simply add a question mark to the end of the name of the underlying type, in the variable declaration. Unfortunately, this syntax makes it appear that you have a lot of questions about your code.
For example, the following code declares a variable of the nullable int type. Notice that the suffix is attached to the type name—not the variable name.

With this declaration statement, the compiler takes care of both producing the nullable type and the variable of that type. Figure 25-3 shows the structure of this nullable type. It contains the following:
An instance of the underlying type
Several important read-only properties:
Property
Has Valueis of typebooland indicates whether the value is valid.Property
Valueis the same type as the underlying type and returns the value of the variable—if the variable is valid.

Figure 25-3. A nullable type contains an object of the underlying type in a struct, with two read-only properties.
You can use the two read-only properties explicitly as follows:
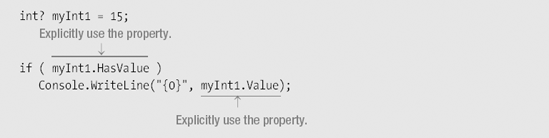
A better method, however, is to use the shortcut forms, as shown in the following code.
To check whether a nullable type has a value, you can compare it to
null.Like any variable, to retrieve its value, you can just use its name.
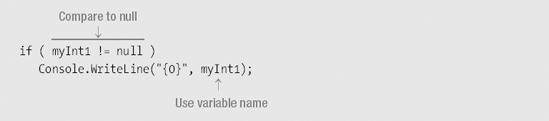
Both sets of code produce the following output:
15
Reading a variable of a nullable type returns its value. You must, however, make sure that the variable is not null. Attempting to read the value of a null variable produces an exception.
You can easily convert between a nullable type and its corresponding non-nullable type.
There is an implicit conversion between a non-nullable type and its nullable version. That is, no cast is needed.
There is an explicit conversion between a nullable type and its non-nullable version.
For example, the following lines show conversion in both directions. In the first line, a literal of type int is implicitly converted to a value of type int? and is used to initialize the variable of the nullable type. In the second line, the variable is explicitly converted to its non-nullable version.
int? myInt1 = 15;                       // Implicitly convert int to int?
   int  regInt = (int) myInt1;             // Explicitly convert int? to int
There are three kinds of values you can assign to a variable of a nullable type:
A value of the underlying type
A value of the same nullable type
The value
null
The following code shows an example of each of the three types of assignment:
int? myI1, myI2, myI3;

   myI1 = 28;                                   // Value of underlying type
   myI2 = myI1;                                 // Value of nullable type
   myI3 = null;                                 // Null

   Console.WriteLine("myI1: {0}, myI2: {1}", myI1, myI2);
   Console.WriteLine("myI3 {0} null", myI3 == null ? "is" : "is not");
This code produces the following output:
myI1: 28, myI2: 28
myI3 is null
The standard arithmetic and comparison operators also handle nullable types. There is also a new operator called the null coalescing operator, which allows you to return a value to an expression, in case a nullable type variable is null.
The null coalescing operator consists of two contiguous question marks and has two operands:
The first operand is a variable of a nullable type.
The second is a non-nullable value of the same underlying type.
If, at run time, the first operand evaluates to
null, the second operand is returned as the result of the operation.

This code produces the following output:
myI4: −1
myI4: 10
The equality comparison operators, == and !=, have an interesting characteristic you need to be aware of. If you compare two values of the same nullable type, and both are null, the equality comparison operators consider them equal. For example, in the following code, the two nullable ints are set to null. The equality comparison operator will declare them equal.
int? i1 = null, i2 = null;                       // Both are null.

   if (i1 == i2)                                    // Operator returns true.
Console.WriteLine("Equal");So far, you have seen nullable forms of the predefined, simple types. You can also create nullable forms of user-defined value types. These bring up additional issues that don't come up when using the simple types.
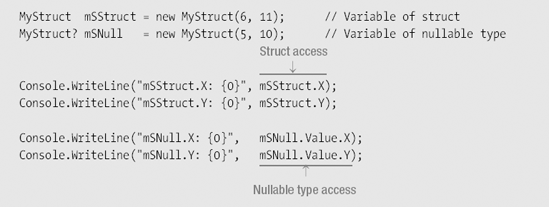
The main issue is access to the members of the encapsulated underlying type. A nullable type doesn't directly expose any of the members of the underlying type. For example, take a look at the following code and its representation in Figure 25-4. The code declares a struct (which is a value type) called MyStruct, with two public fields.
Since the fields of the struct are public, they can easily be accessed in any instance of the struct, as shown on the left of the figure.
The nullable version of the struct, however, exposes the underlying type only through the
Valueproperty, and does not directly expose any of its members. Although the members are public to the struct, they are not public to the nullable type, as shown on the right of the figure.
struct MyStruct                                        // Declare a struct.
{
   public int X;                                       // Field
   public int Y;                                       // Field
   public MyStruct(int xVal, int yVal)                 // Constructor
   { X = xVal;  Y = yVal; }
}

class Program {
   static void Main()
   {
      MyStruct? mSNull = new MyStruct(5, 10);
      ...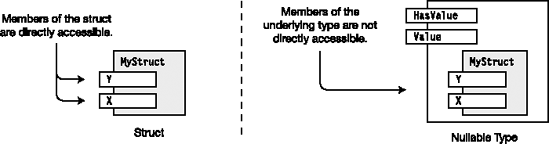
Figure 25-4. The accessibility of the members of a struct is different from that of the nullable type.
For example, the following code uses the previously declared struct and creates variables of both the struct and the corresponding nullable type. In the third and fourth lines of code, the values of the struct's variables are read directly. In the fifth and sixth lines, they must be read from the value returned by the nullable's Value property.
Nullable types are implemented by using a .NET type called System.Nullable<T>, which uses the C# generics feature.
The question mark syntax of C# nullable types is just shortcut syntax for creating a variable of type Nullable<T>, where T is the underlying type. Nullable<T> takes the underlying type and embeds it in a structure, and provides the structure with the properties, methods, and constructors of the nullable type.
You can use either the generics syntax of Nullable<T> or the C# shortcut syntax. The shortcut syntax is easier to write and to understand, and is less prone to errors.
The following code uses the Nullable<T> syntax with struct MyStruct, declared in the preceding example, to create a variable called mSNull of type Nullable<MyStruct>:
Nullable<MyStruct> mSNull = new Nullable<MyStruct>();
The following code uses the question mark syntax but is semantically equivalent to the Nullable<T> syntax:
MyStruct? mSNull = new MyStruct();
Every C# program must have one entry point—a method that must be called Main.
In the sample code throughout this text, I have used a version of Main that takes no parameters and returns no value. There are, however, four forms of Main that are acceptable as the entry point to a program. These forms are the following:
static void Main() {...}static void Main( string[] args) {...}static int Main() {...}static int Main( string[] args) {...}
The first two forms don't return a value to the execution environment when the program terminates. The second two forms return an int value. A return value, if one is used, is generally used to report success or failure of the program, where 0 is generally used to indicate success.
The second and fourth forms allow you to pass actual parameters, also called arguments, from the command line into the program, when it starts. Some important characteristics of command-line arguments are the following:
There can be zero or more command-line arguments. Even if there are no arguments, the
argsparameter is notnull. Instead, it is an array with no elements.The arguments are separated by spaces or tabs.
Each argument is interpreted by the program as a string, but you do not need to enclose them in quotation marks on the command line.
For example, the following program, called CommandLineArgs, accepts command-line arguments and prints out each argument supplied:
class Program
   {
      static void Main(string[] args)
      {
         foreach (string s in args)
            Console.WriteLine(s);
      }
   }
The following command line executes program CommandLineArgs with five arguments:

The preceding program and command line produce the following output:
Jon
Peter
Beth
Julia
Tammi
Other important things to know about Main are the following:
Mainmust always be declaredstatic.Maincan be declared in either a class or a struct.
A program can contain only one declaration of the four acceptable entry point forms of Main. You can, however, legally declare other methods named Main, as long as they don't have any of the four entry point forms—but doing this is inviting confusion.
Main can be declared public or private:
If
Mainis declaredprivate, other assemblies cannot access it, and only the execution environment can start the program.If
Mainis declaredpublic, other assemblies can call it.
The execution environment, however, always has access to Main, regardless of its declared access level, or the declared access level of the class or struct in which it is declared.
By default, when Visual Studio creates a project, it creates a program outline where Main is implicitly private. You can always add the public modifier if you need to.
The documentation comments feature allows you to include documentation of your program in the form of XML elements. Visual Studio even assists you in inserting the elements, and will read them from your source file and copy them to a separate XML file for you. This section does not cover the topic of XML, but presents the overall process of using documentation comments.
Figure 25-5 gives an overview of using XML comments. This includes the following steps:
You can use Visual Studio to produce the source file with the embedded XML. Visual Studio can automatically insert most of the important XML elements.
Visual Studio reads the XML from the source code file and copies the XML code to a new file.
Another program, called a documentation compiler, can take the XML file and produce various types of documentation files from it.
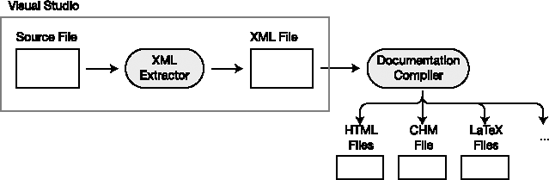
Earlier versions of Visual Studio contained an elementary documentation compiler, but it was removed before the release of Visual Studio 2005. Microsoft is developing a new documentation compiler called Sandcastle, which they already use to generate the .NET Framework documentation. You can download it from the Microsoft Developer Network website (http://msdn.microsoft.com).
Documentation comments start with three consecutive forward slashes.
The first two slashes indicate to the compiler that this is an end-of-line comment and should be ignored in the parsing of the program.
The third slash indicates that it is a documentation comment.
For example, in the following code, the first four lines show documentation comments about the class declaration. They use the <summary> XML tag. Above the declaration of the field are three lines documenting the field—again using the <summary> tag.
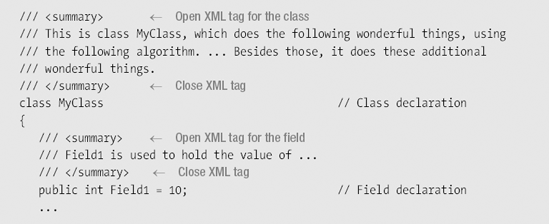
Each XML element is inserted by Visual Studio automatically when you type three slashes above the declaration of a language feature, such as a class or a class member.
For example, the following code shows two slashes above the declaration of class MyClass:
//
   class MyClass
   { ...
As soon as you add the third slash, Visual Studio immediately expands the comment to the following code, without your having to do anything. You can then type anything you want on the documentation comment lines between the tags.
/// <summary>        Automatically inserted
   ///                  Automatically inserted
   /// </summary>       Automatically inserted
   class MyClass
{ ...In the preceding examples, you saw the use of the summary XML tag. There are also a number of other tags that C# recognizes. Some of the most important are listed in Table 25-3.
Table 25-3. Documentation Code XML Tags
Tag | Meaning |
|---|---|
| Format the enclosing lines in a font that looks like code. |
| Mark the enclosing lines as an example. |
| Mark a parameter for a method or constructor, and allow a description. |
| Describe a type declaration. |
| Describe a return value. |
| Create a See Also entry in the output document. |
| Describe a type or a type member. |
| Describe a property. |
Types are usually declared directly inside a namespace. You can, however, also declare types inside a class or struct declaration.
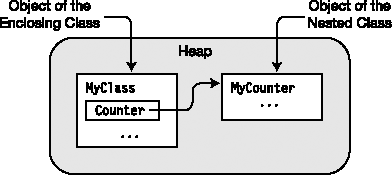
For example, the following code shows class MyClass, with a nested class called MyCounter.
class MyClass                       // Enclosing class
   {
      class MyCounter                  // Nested class
      {
         ...
      }
      ...
   }
Declaring a type as a nested type often makes sense if it is only meant to be used as a helper for the enclosing type.
Don't be confused by the term nested. Nested refers to the location of the declaration—not the location of any instances. Although a nested type's declaration is inside the enclosing type's declaration, objects of the nested type are not necessarily enclosed in objects of the enclosing type. Objects of the nested type—if any are created at all—are located wherever they would have been located had they not been declared inside another type.
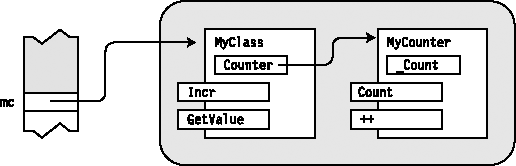
For example, Figure 25-6 shows objects of types MyClass and MyCounter, as outlined in the preceding code. The figure additionally shows a field called Counter, in class MyClass, that is a reference to an object of the nested class, which is located elsewhere in the heap.
The following code fleshes out classes MyClass and MyCounter into a full program. MyCounter implements an integer counter that starts at 0 and can be incremented using the ++ operator. When the constructor for MyClass is called, it creates an instance of the nested class and assigns the reference to the field. Figure 25-7 illustrates the structure of the objects in the code.
class MyClass
   {
      class MyCounter                                      // Nested class
      {
         private int _Count = 0;
         public int Count                                  // Read-only property
         {
            get { return _Count; }
         }

         public static MyCounter operator++( MyCounter current )
         {
            current._Count++;
            return current;
         }
      }

      private MyCounter counter;                         // Field of nested class

      public MyClass() { counter = new MyCounter(); }    // Constructor

      public int Incr()     { return (counter++).Count; }  // Increment method
      public int GetValue() { return counter.Count; }      // Get counter value
   }

   class Program
   {
      static void Main( )
      {
         MyClass mc = new MyClass();                       // Create object

         mc.Incr(); mc.Incr(); mc.Incr();                  // Increment it.
         mc.Incr(); mc.Incr(); mc.Incr();                  // Increment it.

         Console.WriteLine("Total:  {0}", mc.GetValue());  // Print its value.
      }
   }
This code produces the following output:
Total: 6
In Chapter 7, you learned that classes, and types in general, can have an access level of either public or internal. Nested types, however, are different in that they have member accessibility rather than type accessibility. Therefore, the following are true:
A nested type declared inside a class can have any of the five class member accessibility levels
public, protected, private, internal, orprotected internal.A nested type declared inside a struct can have one of the three struct member accessibility levels
public, internal, orprivate.
In both cases, the default access level of a nested type is private, which means it cannot be seen outside the enclosing type.
The relationship between the members of the enclosing class and the nested class is a little less straightforward, and is illustrated in Figure 25-8. The nested type has complete access to the members of the enclosing type, regardless of their declared accessibility, including members that are private and protected.
The relationship, however, is not symmetrical. Although the members of the enclosing type can always see the nested type declaration and create variables and instances of it, they do not have complete access to its members. Instead, their access is limited to the declared access of the nested class members—just as if the nested type were a separate type. That is, they can access the public and internal members, but cannot access the private or protected members of the nested type.
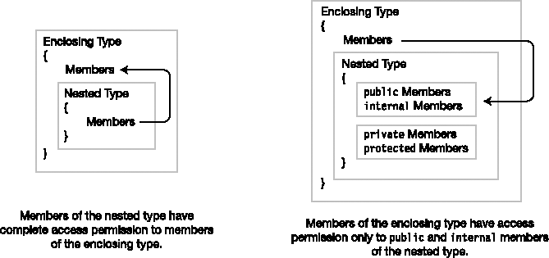
You can summarize this relationship as follows:
The members of a nested type always have full access rights to members of the enclosing type.
The members of an enclosing type
Always have access to the nested type itself
Only have the declared access rights to members of the nested type
The visibility of nested types can also affect the inheritance of base members. If the enclosing class is a derived class, a nested type can hide a base class member with the same name. Use the new modifier with the declaration of the nested class to make the hiding explicit.
A this reference within a nested type refers to the object of the nested type—not the object of the enclosing type. If an object of the nested type needs access to the enclosing type, it must have a reference to it. You can have the enclosing object supply its this reference as a parameter to the nested type's constructor, as shown in the following code:
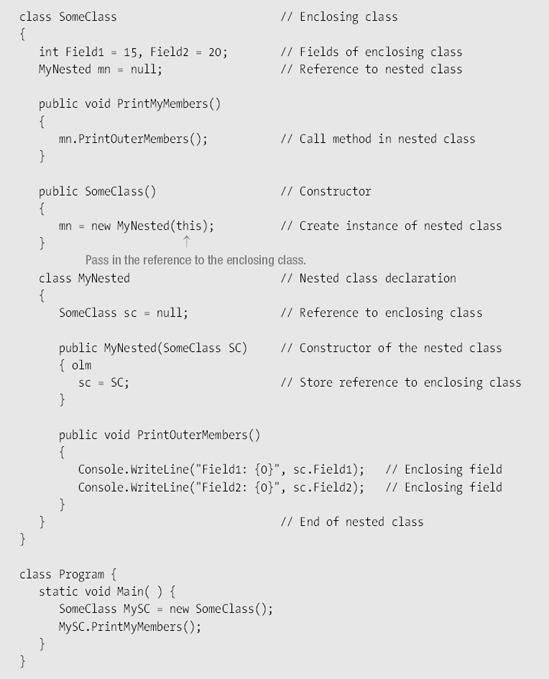
This codeproducesthe following output:
Field1: 15
Field2: 20