
C H A P T E R 6
![]()
More About Classes
![]() Class Members
Class Members
![]() Instance Class Members
Instance Class Members
![]() Static Fields
Static Fields
![]() Static Function Members
Static Function Members
![]() Other Static Class Member Types
Other Static Class Member Types
![]() Constants
Constants
![]() Properties
Properties
![]() Instance Constructors
Instance Constructors
![]() Static Constructors
Static Constructors
![]() Accessibility of Constructors
Accessibility of Constructors
![]() Destructors
Destructors
![]() Comparison of Constructors and Destructors
Comparison of Constructors and Destructors
![]() The readonly Modifier
The readonly Modifier
![]() The this Keyword
The this Keyword
![]() Indexers
Indexers
![]() Access Modifiers on Accessors
Access Modifiers on Accessors
![]() Partial Classes
Partial Classes
Class Members
The previous two chapters covered two of the nine types of class members: fields and methods. In this chapter, I’ll introduce more types of class members, and explain their features.
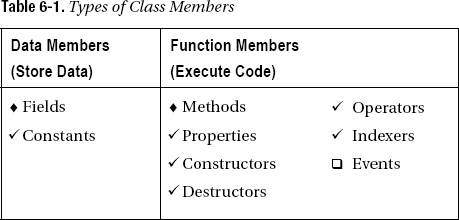
Table 6-1 shows a list of the class member types. Those that have already been introduced are marked with diamonds. Those that are covered in this chapter are marked with a check. Those that will be covered later in the text are marked with empty check boxes.
Table 6-1. Types of Class Members
Order of Member Modifiers
Previously, you saw that the declarations of fields and methods can include modifiers such as public and private. In this chapter, I'll discuss a number of additional modifiers. Since many of these modifiers can be used together, the question that arises is, what order do they need to be in?
Class member declaration statements consist of the following: the core declaration, an optional set of modifiers, and an optional set of attributes. The syntax used to describe this structure is the following. The square brackets indicate that the enclosed set of components is optional.
[ attributes ] [ modifiers ] CoreDeclaration
The optional components are the following:
- Modifiers
- If there are any modifiers, they must be placed before the core declaration.
- If there are multiple modifiers, they can be in an order.
- Attributes
- If there are any attributes, they must be placed before the modifiers and core declaration.
- If there are multiple attributes, they can be in any order.
So far, I've explained only two modifiers: public and private, and I'll cover attributes in Chapter 24. For example, public and static are both modifiers that can be used together to modify certain declarations. Since they're both modifiers, they can be placed in either order. The following two lines are semantically equivalent:
   public static int MaxVal;


   static public int MaxVal;
Figure 6-1 shows the order of the components as applied to the member types shown so far: fields and methods. Notice that the type of the field and the return type of the method are not modifiers—they're part of the core declaration.

Figure 6-1. The order of attributes, modifiers, and core declarations
Instance Class Members
Class members can be associated with an instance of the class or with the class as a whole. By default, members are associated with an instance. You can think of each instance of a class as having its own copy of each class member. These members are called instance members.
Changes to the value of one instance field do not affect the values of the members in any other instance. So far, the fields and methods you've seen have all been instance fields and instance methods.
For example, the following code declares a class D with a single integer field Mem1. Main creates two instances of the class. Each instance has its own copy of field Mem1. Changing the value of one instance's copy of the field doesn't affect the value of the other instance's copy. Figure 6-2 shows the two instances of class D.
   class D

   {

      public int Mem1;

   }


   class Program

   {

      static void Main()

      {

         D d1 = new D();

         D d2 = new D();

         d1.Mem1 = 10; d2.Mem1 = 28;


         Console.WriteLine("d1 = {0}, d2 = {1}", d1.Mem1, d2.Mem1);

      }

   }
This code produces the following output:
d1 = 10, d2 = 28
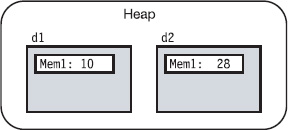
Figure 6-2. Each instance of class D has its own copy of field Mem1.
Static Fields
Besides instance fields, classes can have what are called static fields.
- A static field is shared by all the instances of the class, and all the instances access the same memory location. Hence, if the value of the memory location is changed by one instance, the change is visible to all the instances.
- Use the
staticmodifier to declare a field static, as follows:

For example, the code on the left in Figure 6-3 declares class D with static field Mem2 and instance field Mem1. Main defines two instances of class D. The figure shows that static field Mem2 is stored separately from the storage of any of the instances. The gray fields inside the instances represent the fact that, from inside an instance method, the syntax to access or update the static field is the same as for any other member field.
- Because
Mem2is static, both instances of classDshare a singleMem2field. IfMem2is changed, that change is seen from both. - Member
Mem1is not declaredstatic, so each instance has its own distinct copy.
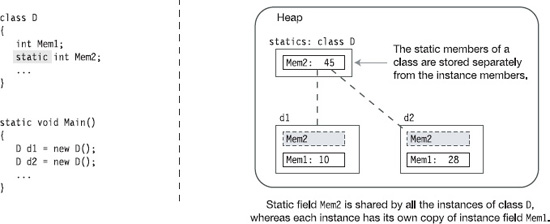
Figure 6-3. Static and instance data members
Accessing Static Members from Outside the Class
In the previous chapter, you saw that dot-syntax notation is used to access instance members from outside the class. Dot-syntax notation consists of listing the instance name, followed by a dot, followed by the member name.
Static members, like instance members, are also accessed from outside the class using dot-syntax notation. But since there is no instance, you must use the class name, as shown here:

Example of a Static Field
The following code expands the preceding class D by adding two methods:
- One method sets the values of the two data members.
- The other method displays the values of the two data members.

This code produces the following output:
d1: Mem1= 2, Mem2= 4

d2: Mem1= 15, Mem2= 17

d1: Mem1= 2, Mem2= 17
Lifetimes of Static Members
The lifetimes for static members are different from those of instance members.
- As you saw previously, instance members come into existence when the instance is created and go out of existence when the instance is destroyed.
- Static members, however, exist and are accessible even if there are no instances of the class.
Figure 6-4 illustrates a class D, with a static field, Mem2. Even though Main doesn't define any instances of the class, it assigns the value 5 to the static field and prints it out with no problem.
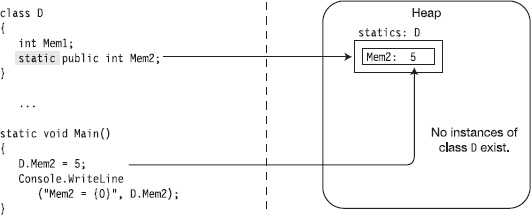
Figure 6-4. Static fields with no class instances can still be assigned to and read from, because the field is associated with the class, and not an instance.
The code in Figure 6-4 produces the following output:
Mem2 = 5
![]() Note Static members exist even if there are no instances of the class. If a static field has an initializer, the field is initialized before the use of any of the class's static fields but not necessarily at the beginning of program execution.
Note Static members exist even if there are no instances of the class. If a static field has an initializer, the field is initialized before the use of any of the class's static fields but not necessarily at the beginning of program execution.
Static Function Members
Besides static fields, there are also static function members.
- Static function members, like static fields, are independent of any class instance. Even if there are no instances of a class, you can still call a static method.
- Static function members cannot access instance members. They can, however, access other static members.
For example, the following class contains a static field and a static method. Notice that the body of the static method accesses the static field.

The following code uses class X, defined in the preceding code:

This code produces the following output:
Value of A: 10
Figure 6-5 illustrates the preceding code.
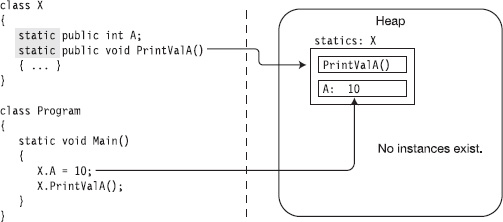
Figure 6-5. Static methods of a class can be called even if there are no instances of the class.
Other Static Class Member Types
The types of class members that can be declared static are shown checked in Table 6-2. The other member types cannot be declared static.
Table 6-2. Class Member Types That Can Be Declared Static
| Data Members (Store Data) | Function Members (Execute Code) |
Constants |
Indexers |
Member Constants
Member constants are like the local constants covered in the previous chapter, except that they're declared in the class declaration, as shown in the following example:

Like local constants, the value used to initialize a member constant must be computable at compile time and is usually one of the predefined simple types or an expression composed of them.
   class MyClass

   {

      const int IntVal1 = 100;

      const int IntVal2 = 2 * IntVal1;  // Fine, since the value of IntVal1

   }                                    // was set in the previous line.
Like local constants, you cannot assign to a member constant after its declaration.
   class MyClass

   {

      const int IntVal;                // Error: initialization is required.

      IntVal = 100;                    // Error: assignment is not allowed.

   }
![]() Note Unlike C and C++, in C# there are no global constants. Every constant must be declared within a type.
Note Unlike C and C++, in C# there are no global constants. Every constant must be declared within a type.
Constants Are Like Statics
Member constants, however, are more interesting than local constants, in that they act like static values. They're “visible” to every instance of the class, and they're available even if there are no instances of the class.
For example, the following code declares class X with constant field PI. Main doesn't create any instances of X, and yet it can use field PI and print its value.
   class X

   {

      public const double PI = 3.1416;

   }


   class Program

   {

      static void Main()

      {

         Console.WriteLine("pi = {0}", X.PI);    // Use static field PI

      }

   }
This code produces the following output:
pi = 3.1416
Unlike actual statics, however, constants do not have their own storage locations and are substituted in by the compiler at compile time in a manner similar to #define values in C and C++. This is shown in Figure 6-6, which illustrates the preceding code. Hence, although a constant member acts like a static, you cannot declare a constant as static.
   static const double PI = 3.14;


   Error: can't declare a constant as static
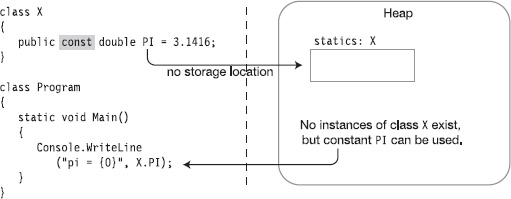
Figure 6-6. Constant fields act like static fields but do not have a storage location in memory.
Properties
A property is a member that represents an item of data in a class or class instance. Using a property appears very much like writing to, or reading from, a field. The syntax is the same.
For example, the following code shows the use of a class called MyClass that has both a public field and a public property. From their usage, you cannot tell them apart.
   MyClass mc = new MyClass();


   mc.MyField    = 5;                               // Assigning to a field

   mc.MyProperty = 10;                              // Assigning to a property


   WriteLine("{0} {1}", mc.MyField, mc.MyProperty); // Read field and property
A property, like a field, has the following characteristics:
- It is a named class member.
- It has a type.
- It can be assigned to and read from.
Unlike a field, however, a property is a function member.
- It does not necessarily allocate memory for data storage.
- It executes code.
A property is a named set of two matching methods called accessors.
- The
setaccessor is used for assigning a value to the property. - The
getaccessor is used for retrieving a value from the property.
Figure 6-7 shows the representation of a property. The code on the left shows the syntax of declaring a property named MyValue, of type int. The image on the right shows how properties will be represented visually in this text. Notice that the accessors are shown sticking out the back, because, as you will soon see, they're not directly callable.
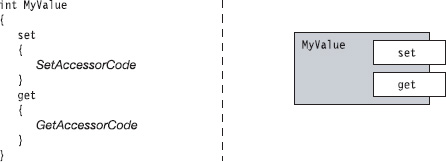
Figure 6-7. An example property of type int, named MyValue
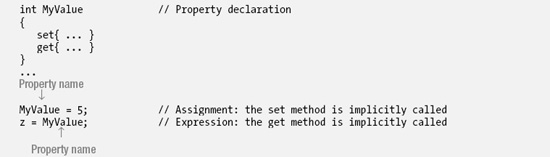
Property Declarations and Accessors
The set and get accessors have predefined syntax and semantics. You can think of the set accessor as a method with a single parameter that “sets” the value of the property. The get accessor has no parameters and returns the value the property.
- The
setaccessor always has the following:- A single, implicit value parameter named
value, of the same type as the property - A return type of
void
- A single, implicit value parameter named
- The
getaccessor always has the following:- No parameters
- A return type of the same type as the property
Figure 6-8 shows the structure of a property declaration. Notice in the figure that neither accessor declaration has explicit parameter or return type declarations. They don't need them, because they're implicit in the type of the property.
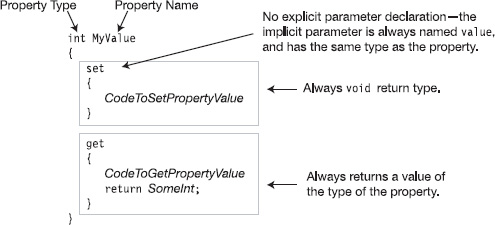
Figure 6-8. The syntax and structure of a property declaration
The implicit parameter value in the set accessor is a normal value parameter. Like other value parameters, you can use it to send data into a method body—or in this case, the accessor block. Once inside the block, you can use value like a normal variable, including assigning values to it.
Other important points about accessors are the following:
- All paths through the implementation of a
getaccessor must include areturnstatement that returns a value of the property type. - The
setandgetaccessors can be declared in either order, and no methods other than the two accessors are allowed on a property.
A Property Example
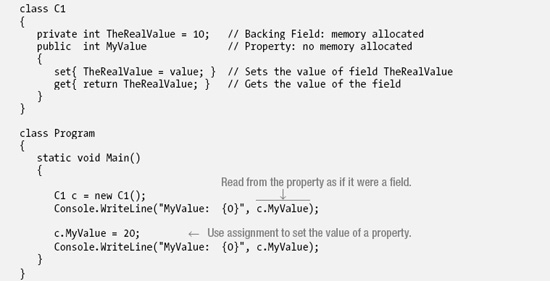
The following code shows an example of the declaration of a class called C1 that contains a property named MyValue.
- Notice that the property itself doesn't have any storage. Instead, the accessors determine what should be done with data sent in and what data should be sent out. In this case, the property uses a field called
TheRealValuefor storage. - The
setaccessor takes its input parameter,value, and assigns that value to fieldTheRealValue. - The
getaccessor just returns the value of fieldTheRealValue.
Figure 6-9 illustrates the code.
   class C1

   {

      private int TheRealValue;               // Field: memory allocated


      public int MyValue      // Property: no memory allocated

      {

         set

         {

            TheRealValue = value;

         }


         get

         {

            return TheRealValue;

         }

      }

   }
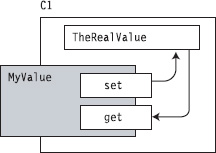
Figure 6-9. Property accessors often use fields for storage
Using a Property
As you saw previously, you write to and read from a property in the same way you access a field. The accessors are called implicitly.
- To write to a property, use the property's name on the left side of an assignment statement.
- To read from a property, use the property's name in an expression.
For example, the following code contains an outline of the declaration of a property named MyValue. You write to and read from the property using just the property name, as if it were a field name.
The appropriate accessor is called implicitly depending on whether you are writing to or reading from the property. You cannot explicitly call the accessors. Attempting to do so produces a compile error.
   y = MyValue.get();      // Error! Can't explicitly call get accessor.

   MyValue.set(5);         // Error! Can't explicitly call set accessor.
Properties and Associated Fields
A property is often associated with a field, as shown in the previous two sections. A common practice is to encapsulate a field in a class by declaring it private and declaring a public property to give controlled access to the field from outside the class. The field associated with a property is called the backing field or backing store.
For example, the following code uses the public property MyValue to give controlled access to private field TheRealValue:
There are several conventions for naming properties and their backing fields. One convention is to use the same string for both names but use camel casing (in which the first letter is lowercase) for the field and Pascal casing for the property. Although this violates the general rule that it is bad practice to have different identifiers that differ only in casing, it has the advantage of tying the two identifiers together in a meaningful way.
Another convention is to use Pascal casing for the property, and then for the field, use the camel case version of the same identifier, with an underscore in front.
The following code shows both conventions:
   private int firstField;                  // Camel casing

   public  int FirstField                   // Pascal casing

   {

      get { return firstField; }

      set { firstField = value; }

   }


   private int _secondField;                // Underscore and camel casing

   public  int SecondField

   {

      get { return _secondField; }

      set { _secondField = value; }

   }
Performing Other Calculations
Property accessors are not limited to just passing values back and forth from an associated backing field; the get and set accessors can perform any, or no, computations. The only action required is that the get accessor return a value of the property type.
For instance, the following example shows a valid (but probably useless) property that just returns the value 5 when its get accessor is called. When the set accessor is called, it doesn't do anything. The value of implicit parameter value is ignored.
   public int Useless

   {

      set{  /* I'm not setting anything.         */ }

      get{  /* I'm just returning the value 5.   */

         return 5;

      }

   }
The following code shows a more realistic and useful property, where the set accessor performs filtering before setting the associated field. The set accessor sets field TheRealValue to the input value—unless the input value is greater than 100. In that case, it sets TheRealValue to 100.
   int TheRealValue = 10;                     // The field

   int MyValue                                // The property

   {

      set                                     // Sets the value of the field

      {

         TheRealValue = value > 100           // but makes sure it's not > 100

                           ? 100

                           : value;

      }

      get                                     // Gets the value of the field

      {

         return TheRealValue;

      }

   }
![]() Note In the preceding code sample, the syntax between the equals sign and the end of the statement might look somewhat strange. That expression uses the conditional operator, which will be covered in greater detail in Chapter 8. The conditional operator is a ternary operator that evaluates the expression in front of the question mark, and if the expression evaluates to
Note In the preceding code sample, the syntax between the equals sign and the end of the statement might look somewhat strange. That expression uses the conditional operator, which will be covered in greater detail in Chapter 8. The conditional operator is a ternary operator that evaluates the expression in front of the question mark, and if the expression evaluates to true, it returns the expression after the question mark. Otherwise, it returns the expression after the colon.
Read-Only and Write-Only Properties
You can leave one or the other (but not both) of a property's accessors undefined by omitting its declaration.
- A property with only a
getaccessor is called a read-only property. A read-only property is a safe way of passing an item of data out from a class or class instance without allowing too much access. - A property with only a
setaccessor is called a write-only property. A write-only property is a safe way of passing an item of data from outside the class to the class without allowing too much access. - At least one of the two accessors must be defined, or the compiler will produce an error message.
Figure 6-10 illustrates read-only and write-only properties.

Figure 6-10. A property can have one or the other of its accessors undefined.
An Example of a Computed, Read-Only Property
In most of the examples so far, the property has been associated with a field, and the get and set accessors have referenced that field. However, a property does not have to be associated with a field. In the following example, the get accessor computes the return value.
In the following example code, class RightTriangle represents, not surprisingly, a right triangle.
- It has two public fields that represent the lengths of the two right-angle sides of the triangle. These fields can be written to and read from.
- The third side is represented by property
Hypotenuse, which is a read-only property whose return value is based on the lengths of the other two sides. It isn't stored in a field. Instead, it computes the correct value, on demand, for the current values ofAandB.
Figure 6-11 illustrates read-only property Hypotenuse.
   class RightTriangle

   {

      public double A = 3;

      public double B = 4;

      public double Hypotenuse                    // Read-only property

      {

         get{ return Math.Sqrt((A*A)+(B*B)); }    // Calculate return value

      }

   }


   class Program

   {

      static void Main()

      {

         RightTriangle c = new RightTriangle();

         Console.WriteLine("Hypotenuse:  {0}", c.Hypotenuse);

      }

   }
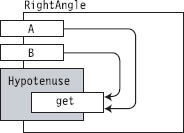
Figure 6-11. Read-only property Hypotenuse
Example of Properties and Databases
Another example in which a property is not associated with a field is when the property is associated with a value in a database. In that case, the get accessor makes the appropriate database calls to get the value from the database. The set accessor makes the corresponding calls to the database to set the new value in the database.
For example, the following property is associated with a particular value in some database. The code assumes that there are two other methods in the class to handle the details of the database transactions:
SetValueInDatabasetakes an integer parameter and uses it to set a particular field in a record in some database.GetValueFromDatabaseretrieves and returns a particular integer field value from a particular record in some database.
   int MyDatabaseValue

   {

      set                          // Sets integer value in the database

      {

         SetValueInDatabase(value);

      }

      get                          // Gets integer value from the database

      {

         return GetValueFromDatabase();

      }

   }
Properties vs. Public Fields
As a matter of preferred coding practice, properties are preferred over public fields for several reasons:
- Since properties are functional members as opposed to data members, they allow you to process the input and output, which you can't do with public fields.
- The semantics of a compiled variable and a compiled property are different.
The second point has implications when you release an assembly that is accessed by other code. For example, sometimes there's the temptation is to use a public field rather than a property, with the reasoning that if you ever need to add processing to the data held in the field, you can always change it to a property at a later time. This is true, but if you make that change, you will also have to recompile any other assemblies accessing that field, because the compiled semantics of fields and properties are different. On the other hand, if you had implemented it as a property and just changed its implementation, you wouldn't need to recompile the other assemblies accessing it.
Automatically Implemented Properties
Because properties are so often associated with backing fields, C# 3.0 added automatically implemented properties, or auto-implemented properties, which allow you to just declare the property, without declaring a backing field. The compiler creates a hidden backing field for you and automatically hooks up the get and set accessors to it.
The important points about auto-implemented properties are the following:
- You do not declare the backing field—the compiler allocates the storage for you, based on the type of the property.
- You cannot supply the bodies of the accessors—they must be declared simply as semicolons. The
getacts as a simple read of the memory, and thesetas a simple write. - You cannot access the backing field other than through the accessors. Since you can't access it any other way, it wouldn't make sense to have read-only or write-only auto-implemented properties—so they're not allowed.
The following code shows an example of an automatically implemented property:
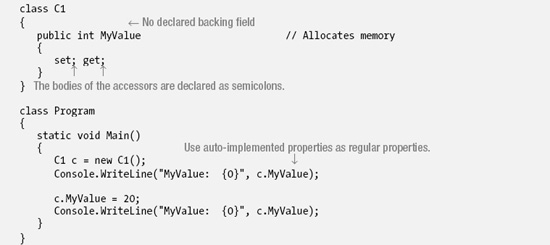
This code produces the following output:
MyValue:  0

MyValue:  20
Besides being convenient, auto-implemented properties allow you to easily insert a property where you might be tempted to declare a public field.
Static Properties
Properties can also be declared static. Accessors of static properties, like all static members
- Cannot access instance members of a class—although they can be accessed by them
- Exist regardless of whether there are instances of the class
- Must be referenced by the class name, rather than an instance name, when being accessed from outside the class
For example, the following code shows a class with an auto-implemented static property called MyValue. In the first three lines of Main, the property is accessed, even though there are no instances of the class. The last line of Main calls an instance method that accesses the property from inside the class.
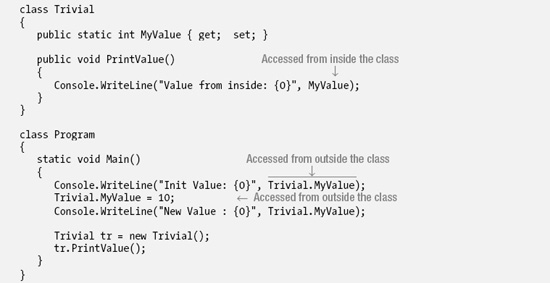
Init Value: 0

New Value : 10

Value from inside: 10
Instance Constructors
An instance constructor is a special method that is executed whenever a new instance of a class is created.
- A constructor is used to initialize the state of the class instance.
- If you want to be able to create instances of your class from outside the class, you need to declare the constructor
public.
Figure 6-12 shows the syntax of a constructor. A constructor looks like the other methods in a class declaration, with the following exceptions:
- The name of the constructor is the same as the name of the class.
- A constructor cannot have a return value.
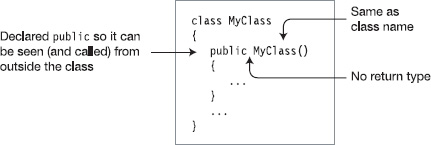
Figure 6-12. Constructor declaration
For example, the following class uses its constructor to initialize its fields. In this case, it has a field called TimeOfInstantiation that is initialized with the current date and time.
   class MyClass

   {

      DateTime TimeOfInstantiation;                        // Field

      ...

      public MyClass()                                     // Constructor

      {

         TimeOfInstantiation = DateTime.Now;               // Initialize field

      }

      ...

   }
![]() Note Having finished the section on static properties, take a closer look at the line that initializes
Note Having finished the section on static properties, take a closer look at the line that initializes TimeOfInstantiation. The DateTime class is from the BCL, and Now is a static property of the DateTime class. The Now property creates a new instance of the DateTime class, initializes it with the current date and time from the system clock, and returns a reference to the new DateTime instance.
Constructors with Parameters
Constructors are like other methods in the following ways:
- A constructor can have parameters. The syntax for the parameters is exactly the same as for other methods.
- A constructor can be overloaded.
When you use an object-creation expression to create a new instance of a class, you use the new operator followed by one of the class's constructors. The new operator uses that constructor to create the instance of the class.
For example, in the following code, Class1 has three constructors: one that takes no parameters, one that takes an int, and another that takes a string. Main creates an instance using each one.
   class Class1

   {

      int Id;

      string Name;


      public Class1() { Id=28; Name="Nemo"; }                 // Constructor 0

      public Class1(int val)     { Id=val;   Name="Nemo"; }   // Constructor 1

      public Class1(String name) { Name=name;             }   // Constructor 2


      public void SoundOff()

      { Console.WriteLine("Name {0},   Id {1}", Name, Id); }

   }


   class Program

   {

      static void Main()

      {

         Class1 a = new Class1(),                     // Call constructor 0.

                b = new Class1(7),                    // Call constructor 1.

                c = new Class1("Bill");               // Call constructor 2.


         a.SoundOff();

         b.SoundOff();

         c.SoundOff();

      }

   }
This code produces the following output:
Name Nemo,   Id 28

Name Nemo,   Id 7

Name Bill,   Id 0
Default Constructors
If no instance constructor is explicitly supplied in the class declaration, then the compiler supplies an implicit, default constructor, which has the following characteristics:
- It takes no parameters.
- It has an empty body.
If you declare any constructors at all for a class, then the compiler does not define a default constructor for the class.
For example, Class2 declares two constructors.
- Because there is at least one explicitly defined constructor, the compiler does not create any additional constructors.
- In
Main, there is an attempt to create a new instance using a constructor with no parameters. Since there is no constructor with zero parameters, the compiler produces an error message.
   class Class2

   {

      public Class2(int Value)    { ... }   // Constructor 0

      public Class2(String Value) { ... }   // Constructor 1

   }


   class Program

   {

      static void Main()

      {

         Class2 a = new Class2();   // Error! No constructor with 0 parameters

         ...

      }

   }
Static Constructors
Constructors can also be declared static. While an instance constructor initializes each new instance of a class, a static constructor initializes items at the class level. Generally, static constructors initialize the static fields of the class.
- Class-level items need to be initialized:
- Before any static member is referenced
- Before any instance of the class is created
- Static constructors are like instance constructors in the following ways:
- The name of the static constructor must be the same as the name of the class.
- The constructor cannot return a value.
- Static constructors are unlike instance constructors in the following ways:
- Static constructors use the
statickeyword in the declaration. - There can only be a single static constructor for a class, and it cannot have parameters.
- Static constructors cannot have accessibility modifiers.
- Static constructors use the
The following is an example of a static constructor. Notice that its form is the same as that of an instance constructor, but with the addition of the static keyword.
   class Class1

   {

      static Class1 ()

      {

         ...                // Do all the static initializations.

      }

      ...
Other important things you should know about static constructors are the following:
- A class can have both a static constructor and instance constructors.
- Like static methods, a static constructor cannot access instance members of its class and cannot use the
thisaccessor, which we'll cover shortly. - You cannot explicitly call static constructors from your program. They're called automatically by the system, at some time:
- Before any instance of the class is created
- Before any static member of the class is referenced
Example of a Static Constructor
The following code uses a static constructor to initialize a private static field named RandomKey, of type Random. Random is a class provided by the BCL to produce random numbers. It is in the System namespace.
   class RandomNumberClass

   {

      private static Random RandomKey;         // Private static field


      static RandomNumberClass()               // Static constructor

      {

         RandomKey = new Random();             // Initialize RandomKey

      }


      public int GetRandomNumber()

      {

         return RandomKey.Next();

      }

   }


   class Program

   {

      static void Main()

      {

         RandomNumberClass a = new RandomNumberClass();

         RandomNumberClass b = new RandomNumberClass();


         Console.WriteLine("Next Random #: {0}", a.GetRandomNumber());

         Console.WriteLine("Next Random #: {0}", b.GetRandomNumber());

      }

   }
One execution of this code produced the following output:
Next Random #: 47857058

Next Random #: 1124842041
Accessibility of Constructors
You can assign access modifiers to instance constructors just as you can to other members. Notice that in the examples, the constructors have been declared public so that you can create instances from outside the class.
You can also create private constructors, which cannot be called from outside the class, but can be used from within the class, as you'll see in the next chapter.
Object Initializers
So far in the text, you've seen that an object-creation expression consists of the keyword new followed by a class constructor and its parameter list. An object initializer extends that syntax by placing a list of member initializations at the end of the expression. This allows you to set the values of fields and properties when creating a new instance of an object.
The syntax has two forms, as shown here. One form includes the constructor's argument list, and the other doesn't. Notice that the first form doesn't even use the parentheses that would enclose the argument list.

For example, for a class named Point with two public integer fields X and Y, you could use the following expression to create a new object:
![]()
Important things to know about object initializers are the following:
- The fields and properties being initialized must be accessible to the code creating the object. For example, in the previous code,
XandYmust bepublic. - The initialization occurs after the constructor has finished execution, so the values might have been set in the constructor and then reset to the same or different value in the object initialize.
The following code shows an example of using an object initializer. In Main, pt1 calls just the constructor, which sets the values of its two fields. For pt2, however, the constructor sets the fields' values to 1 and 2, and the initializer changes them to 5 and 6.
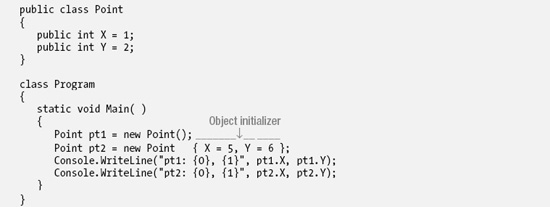
This code produces the following output:
pt1: 1, 2

pt2: 5, 6
Destructors
Destructors perform actions required to clean up or release unmanaged resources after an instance of a class is no longer referenced. The important things to know about destructors are the following:
- You can have only a single destructor per class.
- A destructor cannot have parameters.
- A destructor cannot have accessibility modifiers.
- A destructor has the same name as the class but is preceded by a tilde character (pronounced TIL-duh).
- A destructor only acts on instances of classes; hence, there are no static destructors.
- You cannot call a destructor explicitly in your code. Instead, it is called during the garbage collection process, when the garbage collector analyzes your code and determines that there is no longer any path through your code that references the object.
For example, the following code illustrates the syntax for a destructor of a class called Class1:
   Class1

   {

      ~Class1()                   // The destructor

      {

         CleanupCode

      }

      ...

   }
Some important guidelines for using destructors are the following:
- Don't implement a destructor if you don't need one. They can incur performance costs.
- A destructor should only release external resources that the object owns.
- A destructor should not access other objects because you can't assume that those objects haven't already been destroyed.
![]() Note Before the release of version 3.0 of C#, destructors were sometimes called finalizers. You might sometimes still run across this term in the literature and in the .NET API method names.
Note Before the release of version 3.0 of C#, destructors were sometimes called finalizers. You might sometimes still run across this term in the literature and in the .NET API method names.
Calling the Destructor
Unlike a C++ destructor, a C# destructor is not called immediately when an instance goes out of scope. In fact, there is no way of knowing when the destructor will be called. Furthermore, as previously mentioned, you cannot explicitly call a destructor. If your code needs a destructor, you must provide it for the system, which will call it at some point before the object is removed from the managed heap.
If your code contains unmanaged resources that need to be released in a timely manner, you shouldn't leave that task for the destructor, since there is no guarantee that the destructor will run any time soon. Instead, you should adopt the standard pattern where your classes implement what is called the IDisposable interface. (I'll cover interfaces in Chapter 17.) This consists of encapsulating the cleanup code for these resources in a void, parameterless method, which you should call Dispose.
When you're done with the resources and want them released, you need to call Dispose. Notice that it is you who needs to call Dispose—not the destructor. The system won't call it for you automatically.
Some guidelines for your Dispose method are the following:
- Implement the code in
Disposein such a way that it is safe for the method to be called more than once. If it has already been called, then on any subsequent invocations it should not raise an exception or do any additional work. (Exceptions are covered in Chapter 11.) - Write your
Disposemethod and destructor such that, if for some reason your code doesn't get to callDispose, your destructor will call it and release the resources. - Since
Disposeis doing the cleanup rather than the destructor, it should call theGC.SuppressFinalizemethod, which tells the CLR not to call this object's destructor, because it has already been taken care of.
The following code describes the safe disposal process. First, the class needs to declare a Boolean disposed field to keep track of whether the cleanup has occurred. This is initialized to false when the object is created.
Inside the Dispose method, do the following:
- Check the flag to see whether the resources have already been released. If not, then do the following:
- Call the
Disposemethods on any managed resources that require it. - Release any unmanaged resources held by the object.
- Call the
- Now that the disposal has occurred, set the
disposedflag totrue. - Finally, call the garbage collector's
SuppressFinalizemethod to tell the garbage collector not to call the class's destructor.
The process in the destructor is similar to but shorter than that in the Dispose method. Just check to see whether the object has already been cleaned up, and if not, then release the unmanaged resources. Notice that in this case you do not call the Dispose methods of any managed resources, because the garbage collector might have already deleted those objects.
   class MyClass

   {

      bool disposed = false;             // Flag indicating disposal status


      ////////////////////////////////////////////////////////

      public void Dispose()              // Public Dispose

      {

         if (disposed == false)          // Check the flag.

         {

            // Call Dispose on managed resources.

            ...


            // Release any unmanaged resources.

            ...

         }

         disposed = true;                // Set the flag to show disposal.

         GC.SuppressFinalize(this);      // Tell GC not to call Finalize.

      }


      ////////////////////////////////////////////////////////

      ~MyClass()                         // Destructor

      {

         if (disposed == false)          // Check the flag.

         {

            // Release any unmanaged resources.

            ...

         }

      }


      ...

   }
The Standard Dispose Pattern
In the previous section, you saw that the destructor code is essentially a subset of the Dispose code. The standard pattern factors out most of the common code of these two methods into another method called Dispose, which I'll call the factored Dispose. It takes a single Boolean parameter that is used to indicate whether the method is being called from the public Dispose method (true) or from the destructor (false).
This standard dispose pattern is shown following and illustrated in Figure 6-13. I'll cover the protected and virtual modifiers in the next chapter.
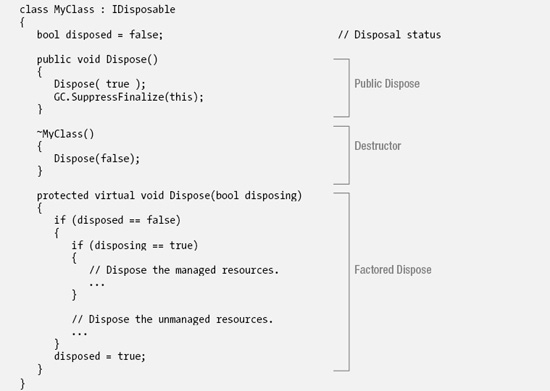
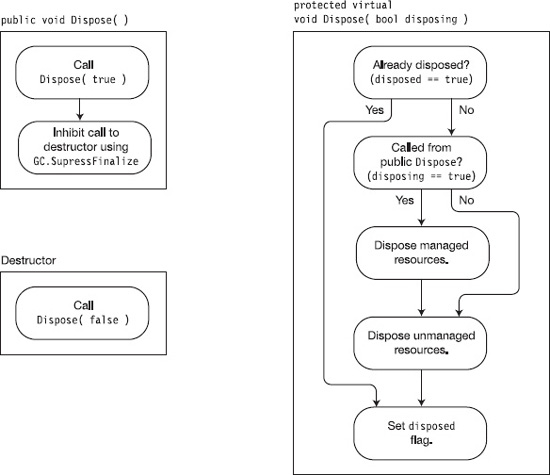
Figure 6-13. The standard dispose pattern
Comparing Constructors and Destructors
Table 6-3 provides a summary of when constructors and destructors are called.
Table 6-3. Constructors and Destructors
| When and How Often Called | ||
| Instance | Constructor | Called once on the creation of each new instance of the class. |
| Destructor | Called for each instance of the class, at some point after the program flow can no longer access the instance. | |
| Static | Constructor | Called only once—either before the first access of any static member of the class or before any instances of the class are created, whichever is first. |
| Destructor | Does not exist—destructors work only on instances. | |
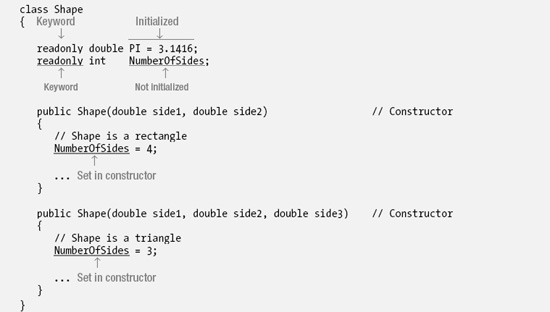
The readonly Modifier
A field can be declared with the readonly modifier. The effect is similar to declaring a field as const, in that once the value is set, it cannot be changed.
- While a
constfield can only be initialized in the field's declaration statement, areadonlyfield can have its value set in any of the following places:- The field declaration statement—like a
const. - Any of the class constructors. If it's a
staticfield, then it must be done in thestaticconstructor.
- The field declaration statement—like a
- While the value of a
constfield must be determinable at compile time, the value of areadonlyfield can be determined at run time. This additional freedom allows you to set different values under different circumstances or in different constructors! - Unlike a
const, which always acts like a static, the following is true of areadonlyfield:- It can be either an instance field or a static field.
- It has a storage location in memory.
For example, the following code declares a class called Shape, with two readonly fields.
- Field
PIis initialized in its declaration. - Field
NumberOfSidesis set to either 3 or 4, depending on which constructor is called.
The this Keyword
The this keyword, used in a class, is a reference to the current instance. It can be used only in the blocks of the following class members:
- Instance constructors.
- Instance methods.
- Instance accessors of properties and indexers. (Indexers are covered in the next section.)
Clearly, since static members are not part of an instance, you cannot use the this keyword inside the code of any static function member. Rather, it is used for the following:
- To distinguish between class members and local variables or parameters
- As an actual parameter when calling a method
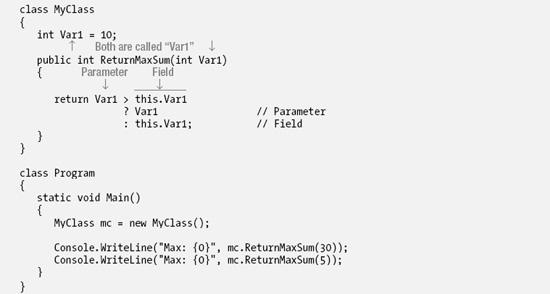
For example, the following code declares class MyClass, with an int field and a method that takes a single int parameter. The method compares the values of the parameter and the field and returns the greater value. The only complicating factor is that the names of the field and the formal parameter are the same: Var1. The two names are distinguished inside the method by using the this access keyword to reference the field.
Indexers
Suppose you were to define class Employee, with three fields of type string (as shown in Figure 6-14). You could then access the fields using their names, as shown in the code in Main.
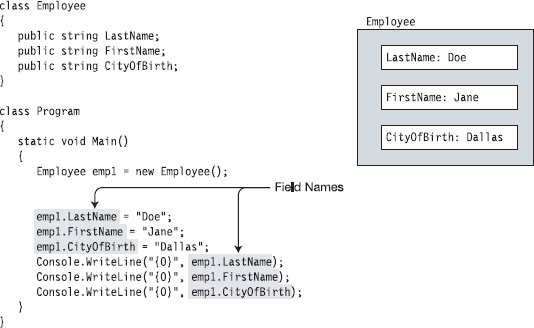
Figure 6-14. Simple class without indexers
There are times, however, when it would be convenient to be able to access them with an index, as if the instance were an array of fields. This is exactly what indexers allow you to do. If you were to write an indexer for class Employee, method Main might look like the code in Figure 6-15. Notice that instead of using dot-syntax notation, indexers use index notation, which consists of an index between square brackets.
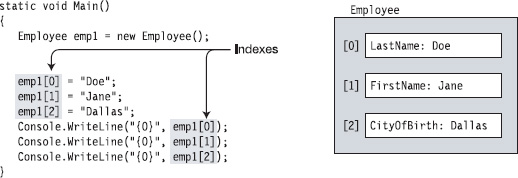
Figure 6-15. Using indexed fields
What Is an Indexer?
An indexer is a pair of get and set accessors, similar to those of properties. Figure 6-16 shows the representation of an indexer for a class that can get and set values of type string.
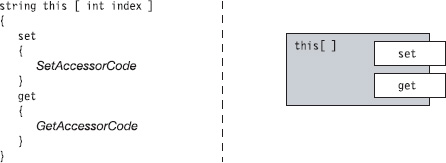
Figure 6-16. Representations of an indexer
Indexers and Properties
Indexers and properties are similar in many ways.
- Like a property, an indexer does not allocate memory for storage.
- Both indexers and properties are used primarily for giving access to other data members with which they're associated and for which they provide get and set access.
- A property usually represents a single data member.
- An indexer usually represents multiple data members.
![]() Note You can think of an indexer as a property that gives get and set access to multiple data members of the class. You select which of the many possible data members by supplying an index, which itself can be of any type—not just numeric.
Note You can think of an indexer as a property that gives get and set access to multiple data members of the class. You select which of the many possible data members by supplying an index, which itself can be of any type—not just numeric.
Some additional points you should know when working with indexers are the following:
- Like a property, an indexer can have either one or both of the accessors.
- Indexers are always instance members; hence, an indexer cannot be declared
static. - Like properties, the code implementing the
getandsetaccessors does not have to be associated with any fields or properties. The code can do anything, or nothing, as long as thegetaccessor returns some value of the specified type.
Declaring an Indexer
The syntax for declaring an indexer is shown next. Notice the following about indexers:
- An indexer does not have a name. In place of the name is the keyword
this. - The parameter list is between square brackets.
- There must be at least one parameter declaration in the parameter list.
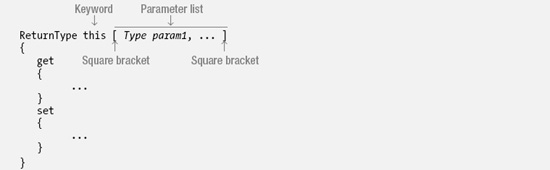
Declaring an indexer is similar to declaring a property. Figure 6-17 shows the syntactic similarities and differences.

Figure 6-17. Comparing an indexer declaration to a property declaration
The Indexer set Accessor
When the indexer is the target of an assignment, the set accessor is called and receives two items of data, as follows:
- An implicit parameter, named
value, which holds the data to be stored - One or more index parameters that represent where it should be stored

Your code in the set accessor must examine the index parameters, determine where the data should be stored, and then store it.
Figure 6-18 shows the syntax and meaning of the set accessor. The left side of the figure shows the actual syntax of the accessor declaration. The right side shows the semantics of the accessor if it were written using the syntax of a normal method. The figure on the right shows that the set accessor has the following semantics:
- It has a
voidreturn type. - It uses the same parameter list as that in the indexer declaration.
- It has an implicit value parameter named
value, of the same type as the indexer.
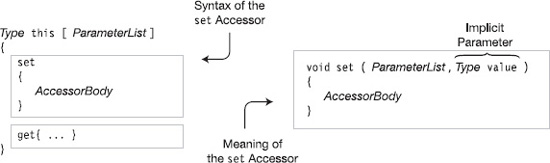
Figure 6-18. The syntax and meaning of the set accessor declaration
The Indexer get Accessor
When the indexer is used to retrieve a value, the get accessor is called with one or more index parameters. The index parameters represent which value to retrieve.
![]()
The code in the get accessor body must examine the index parameters, determine which field they represent, and return the value of that field.
Figure 6-19 shows the syntax and meaning of the get accessor. The left side of the figure shows the actual syntax of the accessor declaration. The right side shows the semantics of the accessor if it were written using the syntax of a normal method. The semantics of the get accessor are as follows:
- It has the same parameter list as in the indexer declaration.
- It returns a value of the same type as the indexer.
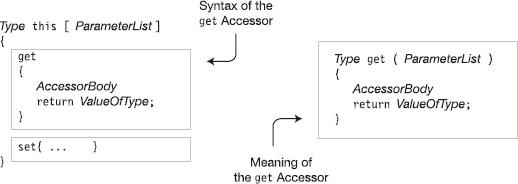
Figure 6-19. The syntax and meaning of the get accessor declaration
More About Indexers
As with properties, the get and set accessors cannot be called explicitly. Instead, the get accessor is called automatically when the indexer is used in an expression for a value. The set accessor is called automatically when the indexer is assigned a value with the assignment statement.
When an indexer is “called,” the parameters are supplied between the square brackets.

Declaring the Indexer for the Employee Example
The following code declares an indexer for the earlier example: class Employee.
- The indexer must read and write values of type
string—sostringmust be declared as the indexer's type. It must be declaredpublicso that it can be accessed from outside the class. - The three fields in the example have been arbitrarily indexed as integers 0 through 2, so the formal parameter between the square brackets, named
indexin this case, must be of typeint. - In the body of the
setaccessor, the code determines which field the index refers to and assigns the value of implicit variablevalueto it. In the body of thegetaccessor, the code determines which field the index refers to and returns that field's value.
   class Employee

   {

      public string LastName;                     // Call this field 0.

      public string FirstName;                    // Call this field 1.

      public string CityOfBirth;                  // Call this field 2.


      public string this[int index]               // Indexer declaration

      {

         set                                      // Set accessor declaration

         {

            switch (index)

            {

               case 0: LastName = value;

                  break;

               case 1: FirstName = value;

                  break;

               case 2: CityOfBirth = value;

                  break;


               default:                           // (Exceptions in Ch. 11)

                  throw new ArgumentOutOfRangeException("index");

            }

         }


         get                                     // Get accessor declaration

         {

            switch (index)

            {

               case 0: return LastName;

               case 1: return FirstName;

               case 2: return CityOfBirth;


               default:                           // (Exceptions in Ch. 11)

                  throw new ArgumentOutOfRangeException("index");

            }

         }

      }

   }
Another Indexer Example
The following is an additional example that indexes the two int fields of class Class1:
   class Class1

   {

      int Temp0;                         // Private field

      int Temp1;                         // Private field

      public int this [ int index ]      // The indexer

      {

         get

         {

            return ( 0 == index )        // Return value of either Temp0 or Temp1

                        ? Temp0

                        : Temp1;

         }


         set

         {

            if( 0 == index )

               Temp0 = value;            // Note the implicit variable "value".

            else

               Temp1 = value;            // Note the implicit variable "value".

         }

      }

   }


   class Program

   {

      static void Main()

      {

         Class1 a = new Class1();


         Console.WriteLine("Values -- T0: {0}, T1: {1}", a[0], a[1]);

         a[0] = 15;

         a[1] = 20;

         Console.WriteLine("Values -- T0: {0}, T1: {1}", a[0], a[1]);

      }

   }
This code produces the following output:
Values -- T0: 0,  T1: 0

Values -- T0: 15, T1: 20
Indexer Overloading
A class can have any number of indexers, as long as the parameter lists are different; it isn't sufficient for the indexer type to be different. This is called indexer overloading, because all the indexers have the same “name”—the this access reference.
For example, the following class has three indexers: two of type string and one of type int. Of the two indexers of type string, one has a single int parameter, and the other has two int parameters.
   class MyClass

   {

      public string this [ int index ]

      {

         get { ... }

         set { ... }

      }


      public string this [ int index1, int index2 ]

      {

         get { ... }

         set { ... }

      }


      public int this [ float index1 ]

      {

         get { ... }

         set { ... }

      }


      ...

   }
![]() Note Remember that the overloaded indexers of a class must have different parameter lists.
Note Remember that the overloaded indexers of a class must have different parameter lists.
Access Modifiers on Accessors
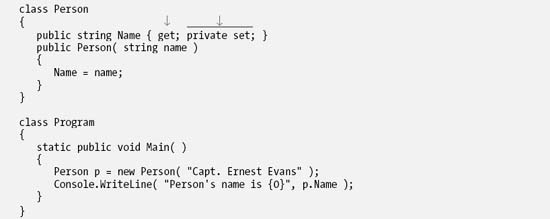
In this chapter, you've seen two types of function members that have get and set accessors: properties and indexers. By default, both a member's accessors have the same access level as the member itself. That is, if a property has an access level of public, then both its accessors have that same access level. The same is true of indexers.
You can, however, assign different access levels to the two accessors. For example, the following code shows a common and important paradigm of declaring a private set accessor and a public get accessor. The get is public because the access level of the property is public.
Notice in this code that although the property can be read from outside the class, it can only be set from inside the class itself, in this case by the constructor. This is an important tool for encapsulation.
There are several restrictions on the access modifiers of accessors. The most important ones are the following:
- An accessor can have an access modifier only if the member (property or indexer) has both a
getaccessor and asetaccessor. - Although both accessors must be present, only one of them can have an access modifier.
- The access modifier of the accessor must be strictly more restrictive than the access level of the member.
Figure 6-20 shows the hierarchy of access levels. The access level of an accessor must be strictly lower in the chart than the access level of the member.
For example, if a property has an access level of public, you can give any of the four lower access levels on the chart to one of the accessors. But if the property has an access level of protected, the only access modifier you can use on one of the accessors is private.
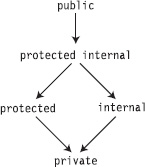
Figure 6-20. Hierarchy of strictly restrictive accessor levels
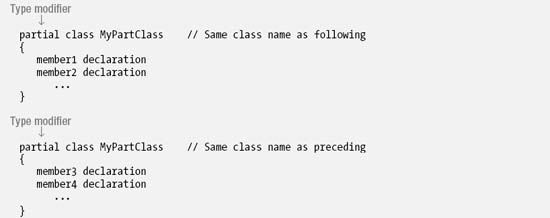
Partial Classes and Partial Types
The declaration of a class can be partitioned among several partial class declarations.
- Each of the partial class declarations contains the declarations of some of the class members.
- The partial class declarations of a class can be in the same file or in different files.
Each partial declaration must be labeled as partial class, in contrast to the single keyword class. The declaration of a partial class looks the same as the declaration of a normal class, other than the addition of the type modifier partial.
![]() Note The type modifier
Note The type modifier partial is not a keyword, so in other contexts you can use it as an identifier in your program. But when used immediately before the keywords class, struct, or interface, it signals the use of a partial type.
For example, the box on the left of Figure 6-21 represents a file with a class declaration. The boxes on the right of the figure represent that same class declaration split into two files.

Figure 6-21. Class split using partial types
All the partial class declarations comprising a class must be compiled together. A class using partial class declarations has the same meaning as if all the class members were declared within a single class declaration body.
Visual Studio uses this feature in its standard Windows program templates. When you create an ASP.NET project or a Windows Forms project from the standard templates, the templates create two class files for each web page or form:
- One file contains the partial class containing the code generated by Visual Studio, declaring the components on the page. You shouldn't modify the partial class in this file, since it's regenerated by the Visual Studio when you modify the components on the page.
- The other file contains the partial class you use to implement the look and behavior of the components of the page or form.
Besides partial classes, you can also create two other partial types, which are the following:
- Partial structs. (Structs are covered in Chapter 12.)
- Partial interfaces. (Interfaces are covered in Chapter 17.)
Partial Methods
Partial methods are methods that are declared in two parts of a partial class. The two parts of the partial method can be declared in different parts of the partial class or in the same part. The two parts of the partial method are the following:
- The defining partial method declaration:
- Gives the signature and return type.
- The implementation part of the declaration consists of only a semicolon.
- The implementing partial method declaration:
- Gives the signature and return type.
- The implementation is in the normal format, which, as you know, is a statement block.
The important things to know about partial methods are the following:
- Both the defining and implementing declaration must match in signature and return type. The signature and return type have the following characteristics:
- The contextual keyword
partialmust be included in both the defining and implementing declarations immediately before the keywordvoid. - The signature cannot include access modifiers, making partial methods implicitly private.
- The return type must be
void. - The parameter list cannot contain
outparameters.
- The contextual keyword
- You can have a defining partial method without an implementing partial method. In this case, the compiler removes the declaration and any calls to the method made inside the class. If, however, the class has an implementing partial method, it must also have a defining partial method.
The following code shows an example of a partial method called PrintSum.
PrintSumis declared in different parts of partial classMyclass: the defining declaration in the first part and the implementing declaration in the second part. The implementation prints out the sum of its two integer parameters.- Since partial methods are implicitly private,
PrintSumcannot be called from outside the class. MethodAddis a public method that callsPrintSum. Maincreates an object of classMyClassand calls public methodAdd, which calls methodPrintSum, which prints out the sum of the input parameters.
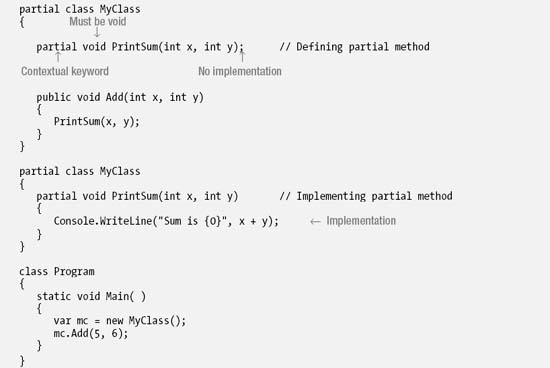
This code produces the following output:
Sum is 11