C H A P T E R 9
Statements
- What Are Statements?
- Expression Statements
- Flow-of-Control Statements
- The if Statement
- The if...else Statement
- The while Loop
- The do Loop
- The for Loop
- The switch Statement
- Jump Statements
- The break Statement
- The continue Statement
- Labeled Statements
- The goto Statement
- The using Statement
- Other Statements
What Are Statements?
The statements in C# are very similar to those of C and C++. This chapter covers the characteristics of the C# statements, as well as the flow-of-control statements provided by the language.
- A statement is a source code instruction describing a type or telling the program to perform an action.
- There are three major categories of statements:
- Declaration statements: Statements that declare types or variables
- Embedded statements: Statements that perform actions or manage flow of control
- Labeled statements: Statements to which control can jump
Previous chapters have covered a number of different declaration statements, including declarations of local variables, classes, and class members. This chapter covers the embedded statements, which do not declare types, variables, or instances. Instead, they use expressions and flow-of-control constructs to work with the objects and variables that have been declared by the declaration statements.
- A simple statement consists of an expression followed by a semicolon.
- A block is a sequence of statements enclosed by matching curly braces. The enclosed statements can include the following:
- Declaration statements
- Embedded statements
- Labeled statements
- Nested blocks
The following code gives examples of each:
   int x = 10;              // Simple declaration

   int z;                   // Simple declaration


   {                        // Start of a block

      int y = 20;           // Simple declaration

      z = x + y;            // Embedded statement

   top: y = 30;             // Labeled statement

         ...

      {                     // Start of a nested block

         ...

      }                     // End of nested block

   }                        // End of outer block
![]() Note A block counts syntactically as a single embedded statement. Anywhere that an embedded statement is required syntactically, you can use a block.
Note A block counts syntactically as a single embedded statement. Anywhere that an embedded statement is required syntactically, you can use a block.
An empty statement consists of just a semicolon. You can use an empty statement at any position where the syntax of the language requires an embedded statement but your program logic does not require any action.
For example, the following code shows an example of using the empty statement.
- The second line in the code is an empty statement. It’s required because there must be an embedded statement between the
ifpart and theelsepart of the construct.- The fourth line is a simple statement, as shown by the terminating semicolon.
   if( x < y )

      ;                     // Empty statement

   else

      z = a + b;            // Simple statement
Expression Statements
The previous chapter looked at expressions. Expressions return values, but they can also have side effects.
- A side effect is an action that affects the state of the program.
- Many expressions are evaluated only for their side effects.
You can create a statement from an expression by placing a statement terminator (a semicolon) after the expression. Any value returned by the expression is discarded. For example, the following code shows an expression statement. It consists of the assignment expression (an assignment operator and two operands) followed by a semicolon. This does the following two things:
- The expression assigns the value on the right of the operator to the memory location referenced by variable
x. Although this is probably the main reason for the statement, this is considered the side effect.- After setting the value of
x, the expression returns with the new value ofx. But there is nothing to receive this return value, so it is ignored.x = 10;
The whole reason for evaluating the expression is to achieve the side effect.
Flow-of-Control Statements
C# provides the flow-of-control constructs common to modern programming languages.
- Conditional execution executes or skips a section of code depending on a condition. The conditional execution statements are the following:
ifif...elseswitch- Looping statements repeatedly execute a section of code. The looping statements are the following:
whiledoforforeach- Jump statements change the flow of control from one section of code to a specific statement in another section of code. The jump statements are the following:
breakcontinuereturngotothrow
Conditional execution and looping constructs (other than foreach) require a test expression, or condition, to determine where the program should continue execution.
![]() Note Unlike C and C++, in C# test expressions must return a value of type
Note Unlike C and C++, in C# test expressions must return a value of type bool. Numbers do not have a Boolean interpretation in C#.
The if Statement
The if statement implements conditional execution. The syntax for the if statement is shown here and is illustrated in Figure 9-1.
TestExprmust evaluate to a value of typebool.- If
TestExprevaluates totrue,Statementis executed.- If it evaluates to
false,Statementis skipped.
   if( TestExpr )

      Statement
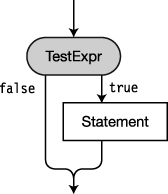
Figure 9-1. The if statement
The following code shows examples of if statements:
   // With a simple statement

   if( x <= 10 )

       z = x – 1;        // Single statement--no curly braces needed


   // With a block

   if( x >= 20 )

   {

       x = x – 5;        // Block--curly braces needed

       y = x + z;

   }


   int x = 5;

   if( x )               // Error: test expression must be a bool, not int

   {

       ...

   }
The if...else Statement
The if...else statement implements a two-way branch. The syntax for the if...else statement is shown here and is illustrated in Figure 9-2.
- If
TestExprevaluates totrue,Statement1is executed.- Otherwise,
Statement2is executed instead.
   if( TestExpr )

      Statement1

   else

      Statement2
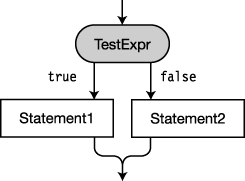
Figure 9-2. The if...else statement
The following is an example of the if...else statement:
   if( x <= 10 )

      z = x – 1;               // Single statement

   else

   {                           // Multiple statements--block

      x = x – 5;

      y = x + z;

   }
Of course, Statement1, Statement2, or both could themselves be if or if...else statements, which could be nested further. If you’re looking at code containing nested if...else statements and need to determine which else goes with which if, there’s a simple rule. Every else belongs to the closest previous if that doesn’t have an associated else clause.
When Statement2 is an if or if...else statement, it’s common to format the construct as in the code below, putting the second if clause on the same line as the else clause. This examples shows two if...else statements, but you can make an arbitrarily long chain.
   if( TestExpr1 )

      Statement1

   else if ( TestExpr2 )

      Statement2

   else

      Statement3
The while Loop
The while loop is a simple loop construct in which the test expression is performed at the top of the loop. The syntax of the while loop is shown here and is illustrated in Figure 9-3.
- First,
TestExpris evaluated- If
TestExprevaluates tofalse, then execution continues after the end of thewhileloop.- Otherwise, when
TestExprevaluates totrue, thenStatementis executed, andTestExpris evaluated again. Each timeTestExprevaluates totrue,Statementis executed another time. The loop ends whenTestExprevaluates tofalse.
   while( TestExpr )

      Statement
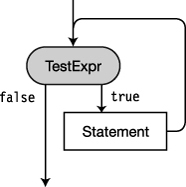
Figure 9-3. The while loop
The following code shows an example of the while loop, where the test expression variable starts with a value of 3 and is decremented at each iteration. The loop exits when the value of the variable becomes 0.
   int x = 3;

   while( x > 0 )

   {

      Console.WriteLine("x:  {0}", x);

      x--;

   }

   Console.WriteLine("Out of loop");
This code produces the following output:
x:  3

x:  2

x:  1

Out of loop
The do Loop
The do loop is a simple loop construct in which the test expression is performed at the bottom of the loop. The syntax for the do loop is shown here and illustrated in Figure 9-4.
- First,
Statementis executed.- Then,
TestExpris evaluated.- If
TestExprreturnstrue, thenStatementis executed again.- Each time
TestExprreturnstrue,Statementis executed again.- When
TestExprreturnsfalse, control passes to the statement following the end of the loop construct.
   do

      Statement

   while( TestExpr );             // End of do loop
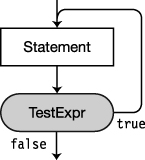
Figure 9-4. The do loop
The do loop has several characteristics that set it apart from other flow-of-control constructs. They are the following:
- The body of the loop,
Statement, is always executed at least once, even ifTestExpris initiallyfalse. The reason for this is thatTestExprisn’t evaluated until the bottom of the loop.- A semicolon is required after the closing parenthesis of the test expression.
The following code shows an example of a do loop:
   int x = 0;

   do

      Console.WriteLine("x is {0}", x++);

   while (x<3);

              ↑

           Required
This code produces the following output:
x is 0

x is 1

x is 2
The for Loop
The for loop construct executes the body of the loop as long as the test expression returns true when it is evaluated at the top of the loop. The syntax of the for loop is shown here and illustrated in Figure 9-5.
- At the beginning of the
forloop,Initializeris executed once.TestExpris then evaluated.- If
TestExprreturnstrue,Statementis executed, followed byIterationExpr.- Control then returns to the top of the loop, and
TestExpris evaluated again.- As long as
TestExprreturnstrue,Statement, followed byIterationExpr, is executed.- As soon as
TestExprreturnsfalse, execution continues at the statement followingStatement.
                 Separated by semicolons

                   ↓         ↓

   for( Initializer; TestExpr; IterationExpr )

      Statement
Some parts of the statement are optional, and others are required.
Initializer,TestExpr, andIterationExprare all optional. Their positions can be left blank. If theTestExprposition is left blank, the test is assumed to returntrue. Therefore, there must be some other method of exiting the statement if the program is to avoid going into an infinite loop.- The two semicolons are always required as field separators, even if any of the optional items are omitted.
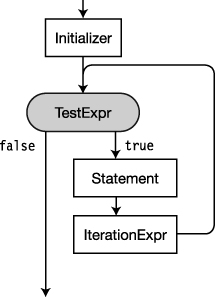
Figure 9-5. The for loop
Figure 9-5 illustrates the flow of control through the for statement. You should also know the following about its components:
Initializeris executed only once, before any other part of theforconstruct. It is usually used to declare and initialize local values to be used in the loop.TestExpris evaluated to determine whetherStatementshould be executed or skipped. It must evaluate to a value of typebool. As stated previously, ifTestExpris left blank, it’s assumed to always be true.IterationExpr is executed immediately afterStatementand before returning to the top of the loop toTestExpr.
For example, in the following code
- Before anything else, the initializer (
int i=0) defines a variable callediand initializes its value to0.- The condition (
i<3) is then evaluated. If it’strue, then the body of the loop is executed.- At the bottom of the loop, after all the loop statements have been executed, the
IterationExprstatement is executed—in this case, incrementing the value ofi.
   // The body of this for loop is executed three times.

   for( int i=0 ; i<3 ; i++ )

      Console.WriteLine("Inside loop.  i:  {0}", i);


   Console.WriteLine("Out of Loop");
This code produces the following output:
Inside loop.  i:  0

Inside loop.  i:  1

Inside loop.  i:  2

Out of Loop
The Scope of Variables in a for Statement
Variables declared in the initializer, called loop variables, are visible only within the for statement.
- This is different from C and C++, where the declaration introduces the variable into the enclosing block.
- The following code illustrates this point:
   Type is needed here for declaration.

        ↓

   for(int i=0; i<10; i++ ) // Variable i is in scope here, and also

     Statement;             // here within the statement.

                            // Here, after the statement, i no longer exists.


   Type is needed here again because the previous variable i has gone out of existence.

       ↓

   for(int i=0; i<10; i++ ) // We need to define a new variable i here,

      Statement;            // the previous one has gone out of existence.
The local variables declared within the body of the loop are known only within the loop.
![]() Note Loop variables are often given the identifiers
Note Loop variables are often given the identifiers i, j, or k. This is a tradition from the old days of FORTRAN programming. In FORTRAN, identifiers that started with the letters I, J, K, L, M, and N were, by default, of type INTEGER, and you didn’t have to declare them. Since loop variables are usually integers, programmers simply used the easy convention of using I as the name of the loop variable. It was short and easy to use, and you didn’t have to declare it. If they had a nested loop, the inner loop variable was usually named J. If there was yet another inner nested loop, that variable was named K.
Although some people object to using nondescriptive names as identifiers, I like the historical connection, and the clarity and brevity, when using these identifiers as loop variables.
Multiple Expressions in the Initializer and Iteration Expression
Both the initializer expression and the iteration expression can contain multiple expressions as long as they are separated by commas.
For example, the following code has two variable declarations in the initializer and two expressions in the iteration expression:
   static void Main( )

   {

      const int MaxI = 5;


              Two declarations           Two expressions

                   ↓                       ↓

      for (int i = 0, j = 10; i < MaxI; i++, j += 10)

      {

         Console.WriteLine("{0}, {1}", i, j);

      }

   }
This code produces the following output:
0, 10

1, 20

2, 30

3, 40

4, 50
The switch Statement
The switch statement implements multiway branching. Figure 9-6 shows the syntax and structure of the switch statement.
- The
switchstatement contains zero or more switch sections.- Each switch section starts with one or more switch labels.
- Each switch section must end with the
breakstatement or one of the other four jump statements.
- The jump statements are
break,return,continue,goto, andthrow. These are described later in this chapter.- Of the five jump statements, the
breakstatement is the most commonly used for ending aswitchsection. Thebreakstatement branches execution to the end of theswitchstatement. I’ll cover all the jump statements later in this chapter.
The switch labels are evaluated in order. If one matches the value of the test expression, its switch section is executed, and then control jumps to the bottom of the switch statement.
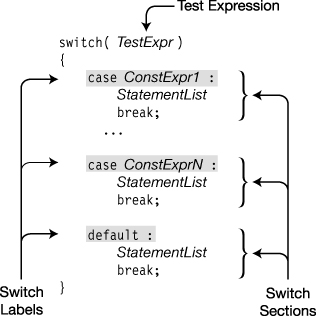
Figure 9-6. Structure of a switch statement
Switch labels have the following form:
case ConstantExpression:

  ↑                    ↑

Keyword           Switch label terminator
The flow of control through the structure in Figure 9-6 is the following:
- The test expression,
TestExpr, is evaluated at the top of the construct.- If the value of
TestExpris equal to the value ofConstExpr1, the constant expression in the first switch label and then the statements in the statement list following the switch label are executed, until the one of the jump statements is encountered.- The
defaultsection is optional, but if it is included, it must end with one of the jump statements.
Figure 9-7 illustrates the general flow of control through a switch statement. You can modify the flow through a switch statement with a goto statement or a return statement.
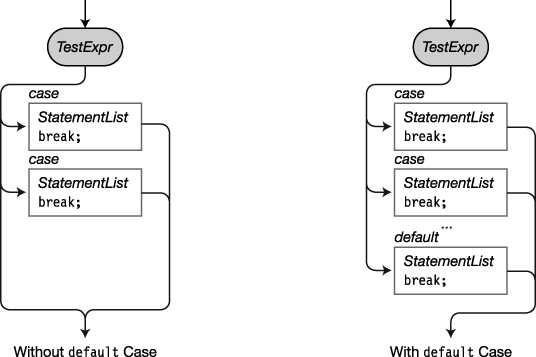
Figure 9-7. The flow of control through a switch statement
A Switch Example
The following code executes the switch statement five times, with the value of x ranging from 1 to 5. From the output, you can tell which case section was executed on each cycle through the loop.
   for( int x=1; x<6; x++ )

   {

      switch( x )                          // Evaluate the value of variable x.

      {

         case 2:                                        // If x equals 2

            Console.WriteLine("x is {0} -- In Case 2", x);

            break;                                      // Go to end of switch.


         case 5:                                        // If x equals 5

            Console.WriteLine("x is {0} -- In Case 5", x);

            break;                                      // Go to end of switch.


         default:                                       // If x is neither 2 nor 5

            Console.WriteLine("x is {0} -- In Default case", x);

            break;                                      // Go to end of switch.

      }

   }
This code produces the following output:
x is 1 -- In Default case

x is 2 -- In Case 2

x is 3 -- In Default case

x is 4 -- In Default case

x is 5 -- In Case 5
More on the switch Statement
A switch statement can have any number of switch sections, including none. The default section is not required, as shown in the following example. It is, however, generally considered good practice to include it, since it can catch potential errors.
For example, the switch statement in the following code has no default section. The switch statement is inside a for loop, which executes the statement five times, with the value of x starting at 1 and ending at 5.
   for( int x=1; x<6; x++ )

   {

       switch( x )

       {

          case 5:

             Console.WriteLine("x is {0} -- In Case 5", x);

             break;

       }

   }
This code produces the following output:
x is 5 -- In Case 5
The following code has only the default section:
   for( int x=1; x<4; x++ )

   {

      switch( x )

      {

         default:

            Console.WriteLine("x is {0} -- In Default case", x);

            break;

      }

   }
This code produces the following output:
x is 1 -- In Default case

x is 2 -- In Default case

x is 3 -- In Default case
Switch Labels
The expression following the keyword case in a switch label must be a constant expression and must therefore be completely evaluable by the compiler at compile time. It must also be of the same type as the test expression.
For example, Figure 9-8 shows three sample switch statements.
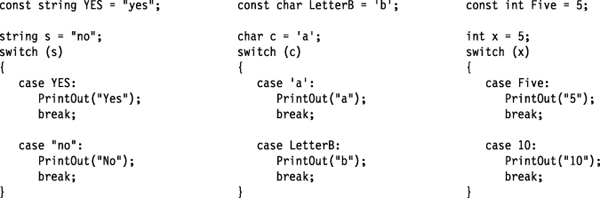
Figure 9-8. Switch statements with different types of switch labels
![]() Note Unlike C and C++, in C# each
Note Unlike C and C++, in C# each switch section, including the optional default section, must end with one of the jump statements. In C#, you cannot execute the code in one switch section and then fall through to the next.
Although C# does not allow falling through from one switch section to another, you can do the following:
- You can attach multiple switch labels to any switch section.
- Following the statement list associated with a case, there must be one of the jump statements before the next switch label, unless there are no intervening executable statements between the switch labels.
For example, in the following code, since there are no executable statements between the first three switch labels, it’s fine to have one follow the other. Cases 5 and 6, however, have an executable statement between them, so there must be a jump statement before case 6.
   switch( x )

   {

      case 1:                    // Acceptable

      case 2:

      case 3:

         ...                     // Execute this code if x equals 1, 2, or 3.

         break;

      case 5:

         y = x + 1;

      case 6:                    // Not acceptable because there is no break

         ...
Jump Statements
When the flow of control reaches jump statements, program execution is unconditionally transferred to another part of the program. The jump statements are the following:
breakcontinuereturngotothrow
This chapter covers the first four of these statements. The throw statement is explained in Chapter 11.
The break Statement
Earlier in this chapter you saw the break statement used in the switch statement. It can also be used in the following statement types:
forforeachwhiledo
In the body of one of these statements, break causes execution to exit the innermost enclosing loop.
For example, the following while loop would be an infinite loop if it relied only on its test expression, which is always true. But instead, after three iterations of the loop, the break statement is encountered, and the loop is exited.
   int x = 0;

   while( true )

   {

       x++;

       if( x >= 3 )

           break;

   }
The continue Statement
The continue statement causes program execution to go to the top of the innermost enclosing loop of the following types:
whiledoforforeach
For example, the following for loop is executed five times. In the first three iterations, it encounters the continue statement and goes directly back to the top of the loop, missing the WriteLine statement at the bottom of the loop. Execution only reaches the WriteLine statement during the last two iterations.
   for( int x=0; x<5; x++ )            // Execute loop five times

   {

      if( x < 3 )                      // The first three times

         continue;                     // Go directly back to top of loop


      // This line is only reached when x is 3 or greater.

      Console.WriteLine("Value of x is {0}", x);

   }
This code produces the following output:
Value of x is 3

Value of x is 4
The following code shows an example of a continue statement in a while loop. This code produces the same output as the preceding for loop example.
   int x = 0;

   while( x < 5 )

   {

      if( x < 3 )

      {

          x++;

          continue;                         // Go back to top of loop

      }


      // This line is reached only when x is 3 or greater.

      Console.WriteLine("Value of x is {0}", x);

      x++;

   }
Labeled Statements
A labeled statement consists of an identifier, followed by a colon, followed by a statement. It has the following form:
Identifier: Statement
A labeled statement is executed exactly as if the label were not there and consisted of just the Statement part.
- Adding a label to a statement allows control to be transferred to the statement from another part of the code.
- Labeled statements are allowed only inside blocks.
Labels
Labels have their own declaration space, so the identifier in a labeled statement can be any valid identifier—including those that might be declared in an overlapping scope, such as local variables or parameter names.
For example, the following code shows the valid use of a label with the same identifier as a local variable:
   {

      int xyz = 0;                                     // Variable xyz

         ...

      xyz: Console.WriteLine("No problem.");           // Label xyz

   }
There are restrictions, however. The identifier cannot be either
- A keyword
- The same as another label identifier with an overlapping scope
The Scope of Labeled Statements
Labeled statements cannot be seen (or accessed) from outside the block in which they are declared. The scope of a labeled statement is the following:
- The block in which it is declared
- Any blocks nested inside that block
For example, the code on the left of Figure 9-9 contains several nested blocks, with their scopes marked. There are two labeled statements declared in scope B of the program: increment and end.
- The shaded portions on the right of the figure show the areas of the code in which the labeled statements are in scope.
- Code in scope B, and all the nested blocks, can see and access the labeled statements.
- Code from any of the inner scopes can jump out to the labeled statements.
- Code from outside (scope A, in this case) cannot jump into a block with a labeled statement.
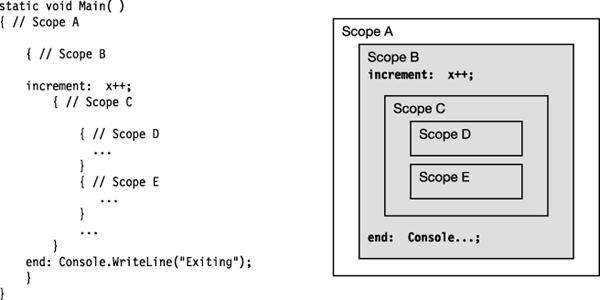
Figure 9-9. The scope of labels includes nested blocks.
The goto Statement
The goto statement unconditionally transfers control to a labeled statement. Its general form is the following, where Identifier is the identifier of a labeled statement:
goto Identifier ;
For example, the following code shows the simple use of a goto statement:
   bool thingsAreFine;

   while (true)

   {

      thingsAreFine = GetNuclearReactorCondition();


      if ( thingsAreFine )

         Console.WriteLine("Things are fine.");

      else

         goto NotSoGood;

   }


   NotSoGood: Console.WriteLine("We have a problem.");
The goto statement must be within the scope of the labeled statement.
- A
gotostatement can jump to any labeled statement within its own block or can jump out to any block in which it is nested.- A
gotostatement cannot jump into any blocks nested within its own block.
![]() Caution Using the
Caution Using the goto statement is strongly discouraged because it can lead to code that is poorly structured and difficult to debug and maintain. Edsger Dijkstra’s 1968 letter to the Communications of the ACM, entitled “Go To Statement Considered Harmful,” was an important contribution to computer science; it was one of the first published descriptions of the pitfalls of using the goto statement.
The goto Statement Inside a switch Statement
There are also two other forms of the goto statement, for use inside switch statements. These goto statements transfer control to the correspondingly named switch label in the switch statement.
   goto case ConstantExpression;

   goto default;
The using Statement
Certain types of unmanaged objects are limited in number or are expensive with system resources. It’s important that when your code is done with them, they be released as soon as possible. The using statement helps simplify the process and ensures that these resources are properly disposed of.
A resource is a class or struct that implements the System.IDisposable interface. Interfaces are covered in detail in Chapter 15—but in short, an interface is a collection of unimplemented function members that classes and structs can choose to implement. The IDisposable interface contains a single method, named Dispose.
The phases of using a resource are shown in Figure 9-10 and consist of the following:
- Allocating the resource
- Using the resource
- Disposing of the resource
If an unexpected runtime error occurs during the portion of the code using the resource, the code disposing of the resource might not get executed.
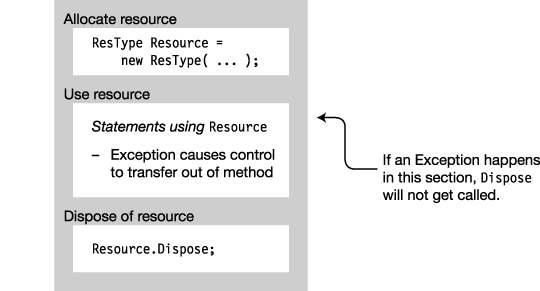
Figure 9-10. Components of using a resource
![]() Note The
Note The using statement is different from the using directives. The using directives are covered in detail in Chapter 21.
Packaging the Use of a Resource
The using statement helps reduce the potential problem of an unexpected runtime error by neatly packaging the use of a resource.
There are two forms of the using statement. The first form is the following and is illustrated in Figure 9-11.
- The code between the parentheses allocates the resource.
Statementis the code that uses the resource.- The
usingstatement implicitly generates the code to dispose of the resource.
   using ( ResourceType Identifier = Expression ) Statement

                             ↑                        ↑

                         Allocates resource              Uses resource
Unexpected runtime errors are called exceptions and are covered in detail in Chapter 22. The standard way of handling the possibility of exceptions is to place the code that might cause an exception in a try block and place any code that must be executed, whether or not there is an exception, into a finally block.
This form of the using statement does exactly that. It performs the following:
- Allocating the resource
- Placing
Statementin atryblock- Creating a call to the resource’s
Disposemethod and placing it in afinallyblock
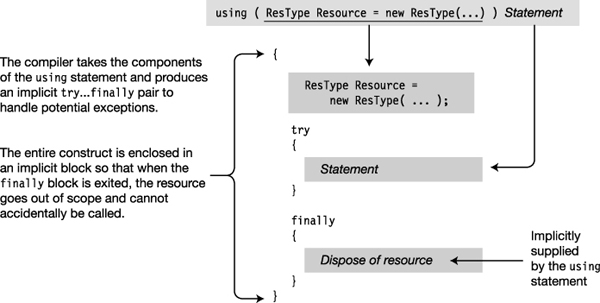
Figure 9-11. The effect of the using statement
Example of the using Statement
The following code uses the using statement twice—once with a class called TextWriter and once with a class called TextReader, both from the System.IO namespace. Both classes implement the IDisposable interface, as required by the using statement.
- The
TextWriterresource opens a text file for writing and writes a line to the file.- The
TextReaderresource then opens the same text file and reads and displays the contents, line by line.- In both cases, the
usingstatement makes sure that the objects’Disposemethods are called.- Notice also the difference between the
usingstatements inMainand theusingdirectives on the first two lines.
   using System;                    // using DIRECTIVE; not using statement

   using System.IO;                 // using DIRECTIVE; not using statement


   namespace UsingStatement

   {

      class Program

      {

         static void Main( )

         {

            // using statement

            using (TextWriter tw = File.CreateText("Lincoln.txt") )

            {

               tw.WriteLine("Four score and seven years ago, ...");

            }


            // using statement

            using (TextReader tr = File.OpenText("Lincoln.txt"))

            {

               string InputString;

               while (null != (InputString = tr.ReadLine()))

                  Console.WriteLine(InputString);

            }

         }

      }

   }
This code produces the following output:
Four score and seven years ago, ...
Multiple Resources and Nesting
The using statement can also be used with multiple resources of the same type, with the resource declarations separated by commas. The syntax is the following:
        Only one type         Resource        Resource

             ↓               ↓             ↓

   using ( ResourceType Id1 = Expr1,  Id2 = Expr2, ... ) EmbeddedStatement
For example, in the following code, each using statement allocates and uses two resources:
   static void Main()

   {

      using (TextWriter tw1 = File.CreateText("Lincoln.txt"),

                        tw2 = File.CreateText("Franklin.txt"))

      {

         tw1.WriteLine("Four score and seven years ago, ...");

         tw2.WriteLine("Early to bed; Early to rise ...");

      }


      using (TextReader tr1 = File.OpenText("Lincoln.txt"),

                        tr2 = File.OpenText("Franklin.txt"))

      {

         string InputString;


         while (null != (InputString = tr1.ReadLine()))

            Console.WriteLine(InputString);


         while (null != (InputString = tr2.ReadLine()))

            Console.WriteLine(InputString);

      }

   }
The using statement can also be nested. In the following code, besides the nesting of the using statements, also note that it is not necessary to use a block with the second using statement because it consists of only a single, simple statement.
   using ( TextWriter tw1 = File.CreateText("Lincoln.txt") )

   {

      tw1.WriteLine("Four score and seven years ago, ...");


      using ( TextWriter tw2 = File.CreateText("Franklin.txt") ) // Nested

         tw2.WriteLine("Early to bed; Early to rise ...");       // Single

   }
Another Form of the using Statement
Another form of the using statement is the following:
  Keyword  Resource        Uses resource

     ↓      ↓                ↓

   using ( Expression ) EmbeddedStatement
In this form, the resource is declared before the using statement.
   TextWriter tw = File.CreateText("Lincoln.txt");           // Resource declared


   using ( tw )                                              // using statement

      tw.WriteLine("Four score and seven years ago, ...");
Although this form still ensures that the Dispose method will always be called after you finish using the resource, it does not protect you from attempting to use the resource after the using statement has released its unmanaged resources, leaving it in an inconsistent state. It therefore gives less protection and is discouraged. This form is illustrated in Figure 9-12.
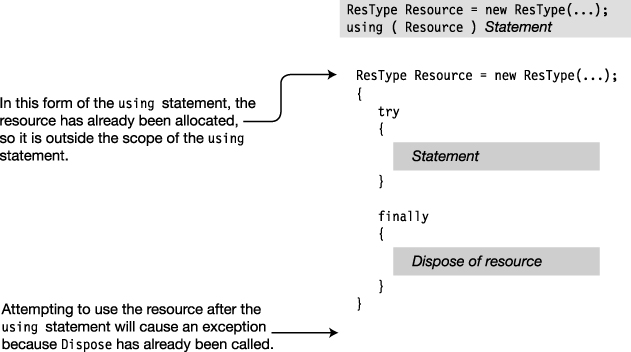
Figure 9-12. Resource declaration before the using statement
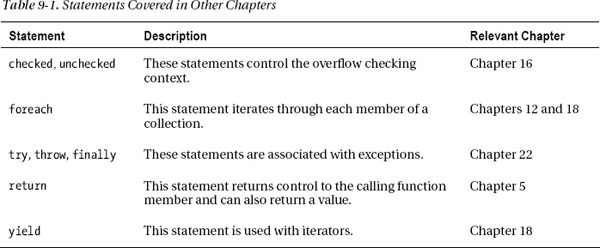
Other Statements
There are other statements that are associated with particular features of the language. These statements are covered in the sections dealing with those features. The statements covered in other chapters are shown in Table 9-1.