
C H A P T E R 19
Introduction to LINQ
What Is LINQ?
In a relational database system, data is organized into nicely normalized tables and accessed with a very simple but powerful query language—SQL. SQL can work with any set of data in a database because the data is organized into tables, following strict rules.
In a program, as opposed to a database, however, data is stored in class objects or structs that are all vastly different. As a result, there’s been no general query language for retrieving data from data structures. The method of retrieving data from objects has always been custom-designed as part of the program. LINQ, however, makes it easy to query collections of objects.
The following are the important high-level characteristics of LINQ:
- LINQ stands for Language Integrated Query and is pronounced link.
- LINQ is an extension of the .NET Framework and allows you to query collections of data in a manner similar to using SQL to query databases.
- With LINQ you can query data from databases, collections of program objects, XML documents, and more.
The following code shows a simple example of using LINQ. In this code, the data source being queried is simply an array of ints. The definition of the query is the statement with the from and select keywords. Although the query is defined in this statement, it’s not actually performed until the result is required in the foreach statement at the bottom.
   static void Main()

   {

      int[] numbers = { 2, 12, 5, 15 };         // Data source


      IEnumerable<int> lowNums =                // Define and store the query.

                         from n in numbers

                         where n < 10

                         select n;


      foreach (var x in lowNums)                // Execute the query.

          Console.Write("{0}, ", x);

   }
This code produces the following output:
2, 5,
LINQ Providers
In the previous example, the data source was simply an array of ints, which is an in-memory object of the program. LINQ, however, can work with many different types of data sources, such as SQL databases, XML documents, and a host of others. For every data source type, however, under the covers there must be a module of code that implements the LINQ queries in terms of that data source type. These code modules are called LINQ providers. The important points about LINQ providers are the following:
- Microsoft provides LINQ providers for a number of common data source types, as shown in Figure 19-1.
- You can use any LINQ-enabled language (C# in our case) to query any data source type for which there is a LINQ provider.
- New LINQ providers are constantly being produced by third parties for all sorts of data source types.

Figure 19-1. The of LINQ, the LINQ-enabled languages, and LINQ providers
There are entire books dedicated to LINQ in all its forms and subtleties, but that’s clearly beyond the scope of this chapter. Instead, this chapter will introduce you to LINQ and explain how to use it with program objects (LINQ to Objects) and XML (LINQ to XML).
Anonymous Types
Before getting into the details of LINQ’s querying features, I’ll start by covering a language feature that allows you to create unnamed class types. These are called, not surprisingly, anonymous types. Anonymous types are often used for the results of LINQ queries.
Chapter 6 covered object initializers, which allow you to initialize the fields and properties of a new class instance when using an object-creation expression. Just to remind you, this kind of object-creation expression consists of three components: the keyword new, the class name or constructor, and the object initializer. The object initializer consists of a comma-separated list of member initializers between a set of curly braces.
Creating a variable of an anonymous type uses the same form—but without the class name or constructor. The following line of code shows the object-creation expression form of an anonymous type:
   No class name        Anonymous object initializer

       ↓                       ↓

   new  { FieldProp = InitExpr, FieldProp = InitExpr, ...}

                   ↑                     ↑

              Member initializer          Member initializer
The following code shows an example of creating and using an anonymous type. It creates a variable called student, with an anonymous type that has two string properties and one int property. Notice in the WriteLine statement that the instance’s members are accessed just as if they were members of a named type.
   static void Main( )

   {

      var student = new {Name="Mary Jones", Age=19, Major="History"};

       ↑                                         ↑

   Must use var                            Anonymous object initializer


      Console.WriteLine("{0}, Age {1}, Major: {2}",

                         student.Name, student.Age, student.Major);

   }
This code produces the following output:
Mary Jones, Age 19, Major: History
Important things to know about anonymous types are the following:
- Anonymous types can be used only with local variables, not with class members.
- Since an anonymous type doesn’t have a name, you must use the
varkeyword as the variable type.- You cannot assign to the properties of an object of an anonymous type. The properties created by the compiler for an anonymous type are read-only properties.
When the compiler encounters the object initializer of an anonymous type, it creates a new class type with a private name that it constructs. For each member initializer, it infers its type and creates a read-only property to access its value. The property has the same name as the member initializer. Once the anonymous type is constructed, the compiler creates an object of that type.
Besides the assignment form of member initializers, anonymous type object initializers also allow two other forms: simple identifiers and member access expressions. These forms, called projection initializers, don’t use assignment expressions. Instead, they use either an identifier or the name of a member of an object being accessed as the name for the anonymous type member. The following variable declaration shows all three forms. The first member initializer is in the assignment form. The second is a member access expression, and the third is an identifier.
var student = new { Age = 19, Other.Name, Major };
For example, the following code shows how this is used. Notice that the projection initializers must be defined before the declaration of the anonymous type. Major is a local variable, and Name is a static field of class Other.
   class Other

   {

      static public string Name = "Mary Jones";

   }


   class Program

   {

      static void Main()

      {

          string Major = "History";

                           Assignment form             Identifier

                                 ↓                    ↓

          var student = new { Age = 19, Other.Name, Major};

                                             ↑

                                       Member access

          Console.WriteLine("{0}, Age {1}, Major: {2}",

                       student.Name, student.Age, student.Major);

      }

   }
This code produces the following output:
Mary Jones, Age 19, Major: History
The projection initializer form of the object initializer just shown has exactly the same result as the assignment form shown here:
var student = new { Age = Age, Name = Other.Name, Major = Major};
If the compiler encounters another anonymous object initializer with the same parameter names, with the same inferred types, and in the same order, it reuses the anonymous type already created and just creates a new instance—not a new anonymous type.
Method Syntax and Query Syntax
LINQ provides two syntactic forms for specifying queries: query syntax and method syntax.
- Method syntax uses standard method invocations. The methods are from a set called the standard query operators, which I’ll describe later in the chapter.
- Query syntax looks very much like an SQL statement. Query syntax is written in the form of query expressions.
- You can combine both forms in a single query.
Query syntax is a declarative form, which means that your query describes what you want returned, but doesn’t specify how to perform the query. Method syntax is an imperative form, which specifies an exact order in which query methods are to be called. Queries expressed using query syntax are translated by the C# compiler into method invocation form. There is no difference in runtime performance between the two forms.
Microsoft recommends using query syntax because it’s more readable and more clearly states your query intentions, and is therefore less error-prone. There are some operators, however, that can only be written using method syntax.
The following code shows the two forms and an example of the combined form. In the method syntax part, notice that the parameter of the Where method uses a lambda expression, as was described in Chapter 13. I’ll cover its use in LINQ a bit later in the chapter.
static void Main( )

   {

      int[] numbers = { 2, 5, 28, 31, 17, 16, 42 };


      var numsQuery = from n in numbers                    // Query syntax

                      where n < 20

                      select n;


      var numsMethod = numbers.Where(x => x < 20);         // Method syntax


      int numsCount = (from n in numbers                   // Combined

                      where n < 20

                      select n).Count();


      foreach (var x in numsQuery)

         Console.Write("{0}, ", x);

      Console.WriteLine();


      foreach (var x in numsMethod)

         Console.Write("{0}, ", x);

      Console.WriteLine();


      Console.WriteLine(numsCount);

   }
This code produces the following output:
2, 5, 17, 16,

2, 5, 17, 16,

4
Query Variables
A LINQ query can return one of two types of results: an enumeration, which lists the items that satisfy the query parameters; or a single value, called a scalar, which is some form of summary of the results that satisfied the query.
In the following example code, the following happens:
- The first statement creates an array of
ints and initializes it with three values.- The second statement specifies a LINQ query that enumerates the results of the query.
- The third statement executes the query and then calls a LINQ method (
Count) that returns the count of the items returned from the query. I’ll cover operators that return scalars, such asCount, later in the chapter.
   int[] numbers = { 2, 5, 28 };


   IEnumerable<int> lowNums = from n in numbers       // Returns an enumerator

                              where n < 20

                              select n;


   int numsCount            = (from n in numbers       // Returns an int

                              where n < 20

                              select n).Count();
The variable on the left of the equal sign of the second and third statements is called the query variable. Although the types of the query variables (IEnumerable<T> and int) are given explicitly in the example statements, you could also have used the var keyword in place of the type names, and had the compiler infer the types of the query variables.
It’s important to understand how query variables are used. After executing the preceding code, query variable lowNums does not contain the results of the query. Instead, the compiler has created code that will be run to execute the query if it’s called upon to do so later in the code.
Query variable numsCount, however, contains an actual integer value, which can only be obtained by actually running the query.
The differences in the timing of the execution of the queries can be summarized as follows:
- If a query expression returns an enumeration, the query is not executed until the enumeration is processed.
- If the enumeration is processed multiple times, the query is executed multiple times.
- If the data changes between the time the enumeration is produced and the time the query is executed, the query is run on the new data.
- If the query expression returns a scalar, the query is executed immediately, and the result is stored in the query variable.
The Structure of Query Expressions
A query expression consists of a from clause followed by a query body, as illustrated in Figure 19-2. Some of the important things to know about query expressions are the following:
- The clauses must appear in the order shown.
- The two parts that are required are the
fromclause and theselect...groupclause.- The other clauses are optional.
- In a LINQ query expression, the
selectclause is at the end of the expression. This is different from SQL, where theSELECTstatement is at the beginning of a query. One of the reasons for using this position in C# is that it allows Visual Studio’s IntelliSense to give you more options while you’re entering code.- There can be any number of
from...let...whereclauses, as illustrated in the figure.
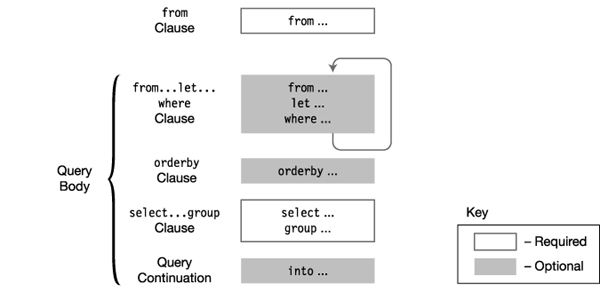
Figure 19-2. The structure of a query statement consists of a from clause followed by a query body.
The from Clause
The from clause specifies the data collection that is to be used as the data source. It also introduces the iteration variable. The important points about the from clause are the following:
- The iteration variable sequentially represents each element in the data source.
- The syntax of the
fromclause is shown below, where
Typeis the type of the elements in the collection. This is optional, because the compiler can infer the type from the collection.Itemis the name of the iteration variable.Itemsis the name of the collection to be queried. The collection must be enumerable, as described in Chapter 18.
      Iteration variable declaration

             ↓

     from Type Item in Items
The following code shows a query expression used to query an array of four ints. Iteration variable item will represent each of the four elements in the array and will be either selected or rejected by the where and select clauses following it. This code leaves out the optional type (int) of the iteration variable.
   int[] arr1 = {10, 11, 12, 13};

               Iteration variable

                     ↓

   var query = from item in arr1

               where item < 13      ←  Uses the iteration variable

               select item;         ←  Uses the iteration variable


   foreach( var item in query )

      Console.Write("{0}, ", item );
This code produces the following output:
10, 11, 12,
Figure 19-3 shows the syntax of the from clause. Again, the type specifier is optional, since it can be inferred by the compiler. There can be any number of optional join clauses.
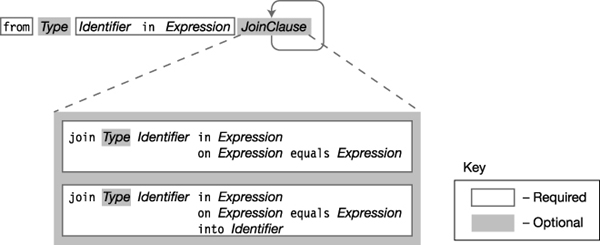
Figure 19-3. The syntax of the from clause
Although there is a strong similarity between the LINQ from clause and the foreach statement, there are several major differences:
- The foreach statement imperatively specifies that the items in the collection are to be considered in order, from the first to the last. The from clause declaratively states that each item in the collection must be considered, but does not assume an order.
- The foreach statement executes its body at the point in the code where it is encountered. The from clause, on the other hand, does not execute anything. It creates a behind-the-scenes code object that can execute the query later on. The query is only executed if the program’s flow of control encounters a statement that accesses the query variable.
The join Clause
The join clause in LINQ is much like the JOIN clause in SQL. If you’re familiar with joins from SQL, then joins in LINQ will be nothing new for you, except for the fact that you can now perform them on collections of objects as well as database tables. If you’re new to joins or need a refresher, then the next section should help clear things up for you.
The first important things to know about a join are the following:
- You use a join to combine data from two or more collections.
- A join operation takes two collections and creates a new temporary collection of objects, where each object in the new collection contains all the fields from an object from both initial collections.
The following shows the syntax for a join. It specifies that the second collection is to be joined with the collection in the previous clause. Notice the contextual keyword equals, which must be used to compare the fields, rather than the == operator.
  Keyword         Keyword        Keyword     Keyword

    ↓                ↓             ↓          ↓

   join Identifier in Collection2 on Field1 equals Field2

                     ↑                       ↑

           Specify additional collection        The fields to compare

             and ID to reference it.              for equality
Figure 19-4 illustrates the syntax for the join clause.
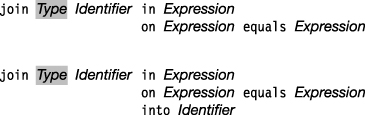
Figure 19-4. Syntax for the join clause
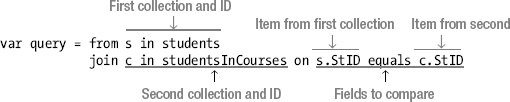
The following annotated statement shows an example of the join clause:
What Is a Join?
A join in LINQ takes two collections and creates a new collection where each element has members from the elements of the two original collections.
For example, the following code declares two classes: Student and CourseStudent.
- Objects of type
Studentcontain a student’s last name and student ID number.- Objects of type
CourseStudentrepresent a student that is enrolled in a course and contain the course name and a student ID number.
   public class Student

   {

      public int    StID;

      public string LastName;

   }


   public class CourseStudent

   {

      public string CourseName;

      public int    StID;

   }
Figure 19-5 shows the situation in a program where there are three students and three courses, and the students are enrolled in various courses. The program has an array called students, of Student objects, and an array called studentsInCourses, of CourseStudent objects, which contains one object for every student enrolled in each course.
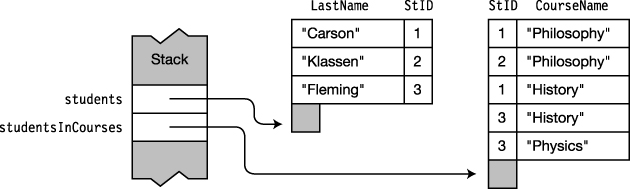
Figure 19-5. Students enrolled in various courses
Suppose now that you want to get the last name of every student in a particular course. The students array has the last names, but not the class enrollment information. The studentsInCourses array has the course enrollment information, but not the student names. But we can tie this information together using the student ID number (StID), which is common to the objects of both arrays. You can do this with a join on the StID field.
Figure 19-6 shows how the join works. The left column shows the students array, and the right column shows the studentsInCourses array. If we take the first student record and compare its ID with the student ID in each studentsInCourses object, we find that two of them match, as shown at the top of the center column. If we then do the same with the other two students, we find that the second student is taking one course, and the third student is taking two courses.
The five grayed objects in the middle column represent the join of the two arrays on field StID. Each object contains three fields: the LastName field from the Students class, the CourseName field from the CourseStudent class, and the StID field common to both classes.
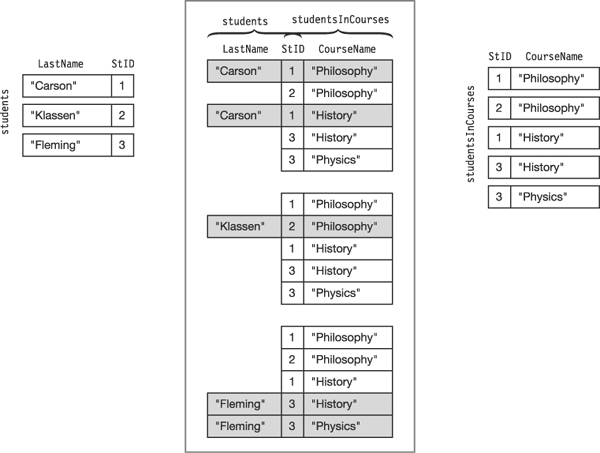
Figure 19-6. Two arrays of objects and their join on field StId
The following code puts the whole example together. The query finds the last names of all the students taking the history course.
   class Program

   {

      public class Student {                         // Declare classes.

         public int    StID;

         public string LastName;

      }


      public class CourseStudent {

         public string CourseName;

         public int    StID;

      }


      static Student[] students = new Student[] {

           new Student { StID = 1, LastName = "Carson"   },

           new Student { StID = 2, LastName = "Klassen"  },

           new Student { StID = 3, LastName = "Fleming"  },

       };

                                                     // Initialize arrays.

      static CourseStudent[] studentsInCourses = new CourseStudent[] {

           new CourseStudent { CourseName = "Art",         StID = 1 },

           new CourseStudent { CourseName = "Art",         StID = 2 },

           new CourseStudent { CourseName = "History",     StID = 1 },

           new CourseStudent { CourseName = "History",     StID = 3 },

           new CourseStudent { CourseName = "Physics",     StID = 3 },

       };


      static void Main( )

      {

         // Find the last names of the students taking history.

         var query = from s in students

                     join c in studentsInCourses on s.StID equals c.StID

                     where c.CourseName == "History"

                     select s.LastName;


         // Display the names of the students taking history.

         foreach (var q in query)

            Console.WriteLine("Student taking History:  {0}", q);

      }

   }
This code produces the following output:
Student taking History:  Carson

Student taking History:  Fleming
The from . . . let . . . where Section in the Query Body
The optional from...let...where section is the first section of the query body. It can have any number of any of the three clauses that comprise it—the from clause, the let clause, and the where clause. Figure 19-7 summarizes the syntax of the three clauses.
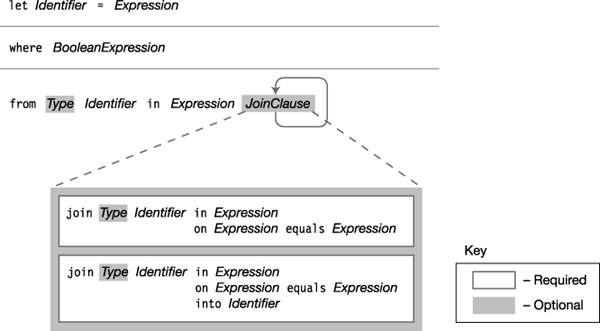
Figure 19-7. The syntax of the from . . . let . . . where clause
The from Clause
You saw that a query expression starts with a required from clause, which is followed by the query body. The body itself can start with any number of additional from clauses, where each subsequent from clause specifies an additional source data collection and introduces a new iteration variable for use in further evaluations. The syntax and meanings of all the from clauses are the same.
The following code shows an example of this use.
- The first
fromclause is the required clause of the query expression.- The second
fromclause is the first clause of the query body.- The
selectclause creates objects of an anonymous type.
   static void Main()

   {

      var groupA = new[] { 3, 4, 5, 6 };

      var groupB = new[] { 6, 7, 8, 9 };


      var someInts = from a in groupA                ← Required first from clause

                     from b in groupB                ← First clause of query body

                     where a > 4 && b <= 8

                     select new {a, b, sum = a + b}; ← Object of anonymous type


      foreach (var a in someInts)

         Console.WriteLine(a);

   }
This code produces the following output:
{ a = 5, b = 6, sum = 11 }

{ a = 5, b = 7, sum = 12 }

{ a = 5, b = 8, sum = 13 }

{ a = 6, b = 6, sum = 12 }

{ a = 6, b = 7, sum = 13 }

{ a = 6, b = 8, sum = 14 }
The let Clause
The let clause takes the evaluation of an expression and assigns it to an identifier to be used in other evaluations. The syntax of the let clause is the following:
let Identifier = Expression
For example, the query expression in the following code pairs each member of array groupA with each element of array groupB. The where clause eliminates each set of integers from the two arrays where the sum of the two is not equal to 12.
   static void Main()

   {

      var groupA = new[] { 3, 4, 5, 6 };

      var groupB = new[] { 6, 7, 8, 9 };


      var someInts = from a in groupA

                     from b in groupB

                     let sum = a + b        ← Store result in new variable.

                     where sum == 12

                     select new {a, b, sum};


      foreach (var a in someInts)

         Console.WriteLine(a);

   }
This code produces the following output:
{ a = 3, b = 9, sum = 12 }

{ a = 4, b = 8, sum = 12 }

{ a = 5, b = 7, sum = 12 }

{ a = 6, b = 6, sum = 12 }
The where Clause
The where clause eliminates items from further consideration if they don’t meet the specified condition. The syntax of the where clause is the following:
where BooleanExpression
Important things to know about the where clause are the following:
- A query expression can have any number of
whereclauses, as long as they are in thefrom...let...wheresection.- An item must satisfy all the
whereclauses to avoid elimination from further consideration.
The following code shows an example of a query expression that contains two where clauses. The where clauses eliminate each set of integers from the two arrays where the sum of the two is not greater than or equal to 11 and the element from groupA is not the value 4. Each set of elements selected must satisfy the conditions of both where clauses.
   static void Main()

   {

      var groupA = new[] { 3, 4, 5, 6 };

      var groupB = new[] { 6, 7, 8, 9 };


      var someInts = from int a in groupA

                     from int b in groupB

                     let sum = a + b

                     where sum >= 11          ← Condition 1

                     where a == 4             ← Condition 2

                     select new {a, b, sum};


      foreach (var a in someInts)

         Console.WriteLine(a);

   }
This code produces the following output:
{ a = 4, b = 7, sum = 11 }

{ a = 4, b = 8, sum = 12 }

{ a = 4, b = 9, sum = 13 }
The orderby Clause
The orderby clause takes an expression and returns the result items in order according to the expression.
Figure 19-8 shows the syntax of the orderby clause. The optional keywords ascending and descending set the direction of the order. Expression is usually a field of the items. The field doesn’t have to be a numeric field. It can another orderable type such as a string, as well.
- The default ordering of an
orderbyclause is ascending. You can, however, explicitly set the ordering of the elements to either ascending or descending using theascendinganddescendingkeywords.- There can be any number of
orderbyclauses, and they must be separated by commas.

Figure 19-8. The syntax of the orderby clause
The following code shows an example of student records ordered by the ages of the students. Notice that the array of student information is stored in an array of anonymous types.
   static void Main( ) {

      var students = new []       // Array of objects of an anonymous type

      {

         new { LName="Jones",   FName="Mary",   Age=19, Major="History" },

         new { LName="Smith",   FName="Bob",    Age=20, Major="CompSci" },

         new { LName="Fleming", FName="Carol",  Age=21, Major="History" }

      };


      var query = from student in students

                  orderby student.Age      ← Order by Age.

                  select student;


      foreach (var s in query) {

         Console.WriteLine("{0}, {1}:  {2} - {3}",

                  s.LName, s.FName, s.Age, s.Major);

      }

   }
This code produces the following output:
Jones, Mary:  19 - History

Smith, Bob:  20 - CompSci

Fleming, Carol:  21 - History
The select . . . group Clause
There are two types of clauses that make up the select...group section: the select clause and the group...by clause. While the clauses that precede the select...group section specify the data sources and which objects to choose, the select...group section does the following:
- The
selectclause specifies which parts of the chosen objects should be selected. It can specify any of the following:
- The entire data item
- A field from the data item
- A new object comprising several fields from the data item (or any other value, for that matter)
- The
group...byclause is optional and specifies how the chosen items should be grouped. I’ll cover thegroup...byclause later in the chapter.
Figure 19-9 shows the syntax for the select...group clause.
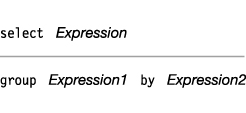
Figure 19-9. The syntax of the select . . . group clause
The following code shows an example of using the select clause to select the entire data item. First, the program creates an array of objects of an anonymous type. The query expression then uses the select statement to select each item in the array.
   using System;

   using System.Linq;

   class Program {

      static void Main() {

         var students = new[]       // Array of objects of an anonymous type

         {

            new { LName="Jones",   FName="Mary",  Age=19, Major="History" },

            new { LName="Smith",   FName="Bob",   Age=20, Major="CompSci" },

            new { LName="Fleming", FName="Carol", Age=21, Major="History" }

         };


         var query = from s in students

                     select s;


         foreach (var q in query)

             Console.WriteLine("{0}, {1}: Age {2}, {3}",

                               q.LName, q.FName, q.Age, q.Major);

      }

   }
This code produces the following output:
Jones, Mary: Age 19, History

Smith, Bob: Age 20, CompSci

Fleming, Carol: Age 21, History
You can also use the select clause to choose particular fields of the object. For example, if you substitute the following two statements for the corresponding two statements in the example above, the code selects only the last name of the student.
   var query = from s in students

               select s.LName;


   foreach (var q in query)

       Console.WriteLine(q);
With this substitution, the program produces the following output, printing only the last names:
Jones

Smith

Fleming
Anonymous Types in Queries
The result of a query can consist of items from the source collections, fields from the items in the source collections, or anonymous types.
You can create an anonymous type in a select clause by placing curly braces around a comma-separated list of fields you want to include in the type. For example, to make the code in the previous section select just the names and majors of the students, you could use the following syntax:
   select new { s.LastName, s.FirstName, s.Major };

                                ↑

                          Anonymous type
The following code creates an anonymous type in the select clause and uses it later in the WriteLine statement.
   using System;

   using System.Linq;


   class Program

   {

      static void Main()

      {

         var students = new[]       // Array of objects of an anonymous type

         {

            new { LName="Jones",   FName="Mary",  Age=19, Major="History" },

            new { LName="Smith",   FName="Bob",   Age=20, Major="CompSci" },

            new { LName="Fleming", FName="Carol", Age=21, Major="History" }

         };


         var query = from s in students

                     select new { s.LName, s.FName, s.Major };

                                            ↑

                                    Create anonymous type.

         foreach (var q in query)

            Console.WriteLine("{0} {1} -- {2}",

                                q.FName, q.LName, q.Major );

      }                                      •↑

   }                             Access fields of anonymous type
This code produces the following output:
Mary Jones -- History

Bob Smith -- CompSci

Carol Fleming -- History
The group Clause
The group clause groups the selected objects according to a specified criterion. For example, with the array of students in the previous examples, the program could group the students according to their majors.
The important things to know about the group clause are the following:
- When items are included in the result of the query, they’re placed in groups according to the value of a particular field. The property on which items are grouped is called the key.
- A query with the group clause does not return an enumeration of the items from the original source. Instead, it returns an enumerable that enumerates the groups of items that have been formed.
- The groups themselves are enumerable and can enumerate the actual items.
An example of the syntax of the group clause is the following:
   group student by student.Major;

     ↑            ↑

  Keyword       Keyword
For example, the following code groups the students according to their majors:
   static void Main( )

   {

      var students = new[]       // Array of objects of an anonymous type

      {

         new { LName="Jones",   FName="Mary",  Age=19, Major="History" },

         new { LName="Smith",   FName="Bob",   Age=20, Major="CompSci" },

         new { LName="Fleming", FName="Carol", Age=21, Major="History" }

      };


      var query = from student in students

                  group student by student.Major;


      foreach (var s in query)            // Enumerate the groups.

      {

         Console.WriteLine("{0}", s.Key);

                                    ↑

                                Grouping key

         foreach (var t in s)             // Enumerate the items in the group.

            Console.WriteLine("      {0}, {1}", t.LName, t.FName);

      }

   }
This code produces the following output:
History

      Jones, Mary

      Fleming, Carol

CompSci

      Smith, Bob
Figure 19-10 illustrates the object that is returned from the query expression and stored in the query variable.
- The object returned from the query is an enumerable that enumerates the groups resulting from the query.
- Each group is distinguished by a field called Key.
- Each group is itself enumerable and can enumerate its items.
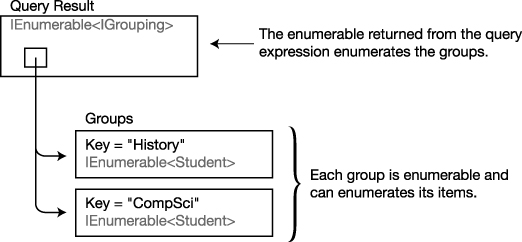
Figure 19-10. The group clause returns a collection of collections of objects rather than a collection of objects.
Query Continuation: The into Clause
A query continuation clause takes the result of one part of a query and assigns it a name so that it can be used in another part of the query. Figure 19-11 shows the syntax for query continuation.
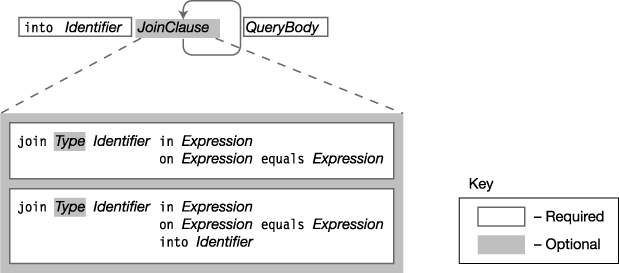
Figure 19-11. The syntax of the query continuation clause
For example, the following query joins groupA and groupB and names the result groupAandB. It then performs a simple select from groupAandB.
   static void Main()

   {

      var groupA = new[] { 3, 4, 5, 6 };

      var groupB = new[] { 4, 5, 6, 7 };


      var someInts = from a in groupA

                     join b in groupB on a equals b

                     into groupAandB                ← Query continuation

                     from c in groupAandB

                     select c;


      foreach (var a in someInts)

         Console.Write("{0}  ", a);

   }
This code produces the following output:
4 5 6
The Standard Query Operators
The standard query operators comprise a set of methods called an application programming interface (API) that lets you query any .NET array or collection. Important characteristics of the standard query operators are the following:
- The collection objects queried are called sequences and must implement the IEnumerable<T> interface, where T is a type.
- The standard query operators use method syntax.
- Some operators return IEnumerable objects (or other sequences), while others return scalars. Operators that return scalars execute their queries immediately and return a value instead of an enumerable object.
- Many of these operators take a predicate as a parameter. A predicate is a method that takes an object as a parameter and returns true or false depending on whether or not the object meets some criterion.
For example, the following code shows the use of operators Sum and Count, which return ints. Notice the following about the code:
- The operators are used as methods directly on the sequence of objects, which in this case is the array
numbers.- The return type is not an
IEnumerableobject but anint.
   class Program

   {

      static int[] numbers = new int[] {2, 4, 6};


      static void Main( )

      {

         int total   = numbers.Sum();

         int howMany = numbers.Count();

          ↑               ↑       ↑

         Scalar         Sequence   Operator

         object

         Console.WriteLine("Total: {0}, Count: {1}", total, howMany);

      }

   }
This code produces the following output:
Total: 12, Count: 3
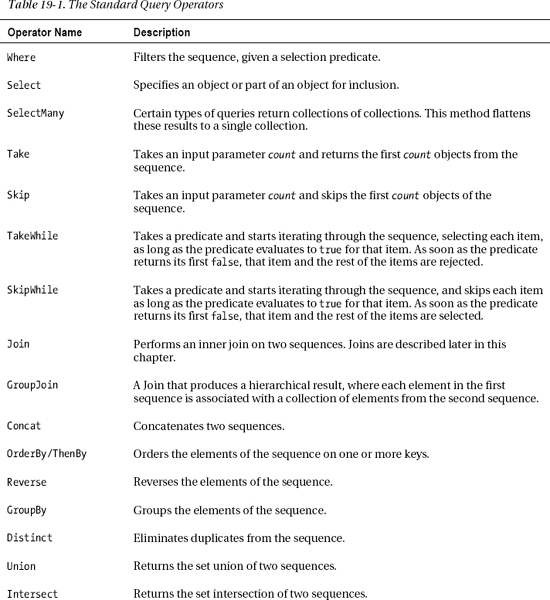
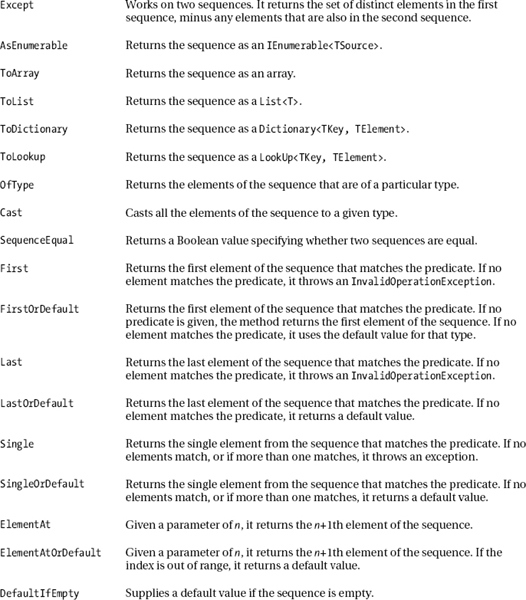
There are 47 standard query operators. They operate on one or more sequences. A sequence is any class that implements the IEnumerable<> interface. This includes such classes as List<>, Dictionary<>, Stack<>, and Array. The standard query operators can help you query and manipulate objects of these types in very powerful ways.
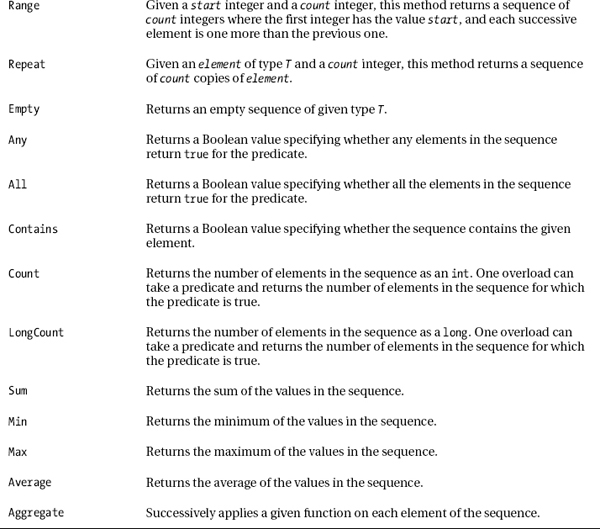
Table 19-1 lists these operators and gives just enough information to let you know the purpose and general idea of each one. Most of them, however, have several overloads, allowing different options and behaviors. You should peruse the list and become familiar with these powerful tools that can save you lots of time and effort. Then when you need to use them, you can look up the full documentation online.
Signatures of the Standard Query Operators
The standard query operators are methods declared in class System.Linq.Enumerable. These methods, however, aren’t just any methods—they’re extension methods that extend generic class IEnumerable<T>.
I covered extension methods in Chapters 7 and 17, but this is a good opportunity for you to see how .NET uses them. This will give you a good model for your own code, and also give you a better understanding of the standard query operators.
As a review, recall that extension methods are public, static methods that, although defined in one class, are designed to add functionality to a different class—the one listed as the first formal parameter. This formal parameter must be preceded by the keyword this.
For example, the following are the signatures of three of the standard query operators: Count, First, and Where. At first glance, these can be somewhat intimidating. Notice the following about the signatures:
- Since the operators are generic methods, they have a generic parameter (
T) associated with their names.- Since the operators are extension methods that extend class IEnumerable<T>, they satisfy the following syntactic requirements:
- They’re declared
publicandstatic.- They have the
thisextension indicator before the first parameter.- They have
IEnumerable<T>as the first parameter type.
         Always                      Name and               First

        public, static                   generic param           parameter

           ↓                           ↓                    ↓

      public static      int         Count<T>( this IEnumerable<T> source );

      public static       T          First<T>( this IEnumerable<T> source );

      public static IEnumerable<T>   Where<T>( this IEnumerable<T> source, ... );

                           ↑                    ↑

                         Return             Extension method

                          type                 indicator
To show the syntactic difference between calling an extension method directly and calling it as an extension, the following code calls the standard query operators Count and First using both forms. Both operators take only a single parameter—the reference to the IEnumerable<T> object.
- The Count operator returns a single value, which is the count of all the elements in the sequence.
- The First operator returns the first element of the sequence.
The first two times the operators are used in this code, they’re called directly, just like normal methods, passing the name of the array as the first parameter. In the following two lines, however, they are called using the extension syntax, as if they were method members of the array. This is valid because .NET class Array implements the IEnumerable<T> interface.
Notice that in this case no parameter is supplied. Instead, the array name has been moved from the parameter list to before the method name. There it is used as if it contained a declaration of the method.
The method syntax calls and the extension syntax calls are semantically equivalent—only their syntax is different.
   using System.Linq;

      ...

   static void Main( )

   {

      int[] intArray = new int[] { 3, 4, 5, 6, 7, 9 };

                                    Array as parameter

                                          ↓

      var count1    = Enumerable.Count(intArray);   // Method syntax

      var firstNum1 = Enumerable.First(intArray);   // Method syntax


      var count2    = intArray.Count();             // Extension syntax

      var firstNum2 = intArray.First();             // Extension syntax

                         ↑

                  Array as extended object

      Console.WriteLine("Count: {0}, FirstNumber: {1}", count1, firstNum1);

      Console.WriteLine("Count: {0}, FirstNumber: {1}", count2, firstNum2);

   }
This code produces the following output:
Count: 6, FirstNumber: 3

Count: 6, FirstNumber: 3
Query Expressions and the Standard Query Operators
The set of standard query operators is a set of methods for performing queries. As mentioned at the beginning of the chapter, every query expression can also be written using method syntax with the standard query operators. The compiler translates every query expression into standard query operator form.
Clearly, since all query expressions are translated into the standard query operators, the operators can perform everything done by query expressions. But the operators also give additional capabilities that aren’t available in query expression form. For example, operators Sum and Count, which were used in the previous example, can be expressed only using the method syntax.
The two forms, query expressions and method syntax, can, however, be combined. For example, the following code shows a query expression that also uses operator Count. Notice that the query expression part of the statement is inside parentheses, which is followed by a dot and the name of the method.
   static void Main()

   {

      var numbers = new int[] { 2, 6, 4, 8, 10 };


      int howMany = (from n in numbers

                     where n < 7

                     select n).Count();

                        ↑        ↑

                Query expression   Operator


      Console.WriteLine("Count: {0}", howMany);

   }
This code produces the following output:
Count: 3
Delegates As Parameters
As you just saw in the previous section, the first parameter of every operator is a reference to an IEnumerable<T> object. The parameters following it can be of any type. Many operators take generic delegates as parameters. (Generic delegates were explained in Chapter 17.) The most important thing to recall about generic delegates as parameters is the following:
- Generic delegates are used to supply user-defined code to the operator.
To explain this, I’ll start with an example showing several ways you might use the Count operator. The Count operator is overloaded and has two forms. The first form, as you saw in the previous example, has a single parameter that returns the number of elements in the collection. Its signature is repeated here:
public static int Count<T>(this IEnumerable<T> source);
Suppose, however, that you only want to count the odd elements of the array. To do that, you must supply the Count method with code that determines whether an integer is odd.
To do this, you need to use the second form of the Count method, which is shown below. As its second parameter, it takes a generic delegate. At the point it is invoked, you must supply a delegate object that takes a single input parameter of type T and returns a Boolean value. The return value of the delegate code must specify whether the element should be included in the count.
   public static int Count<T>(this IEnumerable<T> source,

                                             Func<T, bool> predicate );

                                                         ↑

                                                    Generic delegate
For example, the following code uses this second form of the Count operator to instruct it to include only those values that are odd. It does this by supplying a lambda expression that returns true if the input value is odd, and returns false otherwise. (Again, lambda expressions were covered in Chapter 13.) At each iteration through the collection, Count calls this method (represented by the lambda expression) with the current value as input. If the input is odd, the method returns true, and Count includes the element in the total.
   static void Main()

   {

      int[] intArray = new int[] { 3, 4, 5, 6, 7, 9 };


      var countOdd = intArray.Count(n => n % 2 == 1);

                                           ↑

                             Lambda expression identifying the odd values

      Console.WriteLine("Count of odd numbers: {0}", countOdd);

   }
This code produces the following output:
Count of odd numbers: 4
The LINQ Predefined Delegate Types
Like the Count operator from the previous example, many of the LINQ operators require you to supply code that directs how the operator performs its operation. You can do this by using delegate objects as parameters.
Remember from Chapter 13 that you can think of a delegate object as an object that contains a method or list of methods with a particular signature and return type. When the delegate is invoked, the methods it contains are invoked in sequence.
LINQ defines two families of generic delegate types for use with the standard query operators. These are the Func delegates and the Action delegates. Each set has 17 members.
- The delegate objects you create for use as actual parameters must be of these delegate types or of these forms.
TRrepresents the return type and is always last in the list of type parameters.
The first four generic Func delegates are listed here. The first form takes no method parameters and returns an object of the return type. The second takes a single method parameter and returns a value, and so forth.
   public delegate TR Func<out TR>                     ( );

   public delegate TR Func<in T1, out TR >             ( T1 a1 );

   public delegate TR Func<in T1, in T2, out TR >      ( T1 a1, T2 a2 );

   public delegate TR Func<in T1, in T2, in T3, out TR>( T1 a1, T2 a2, T3 a3 );

                    ↑                  ↑                         ↑

                Return type         Type parameters              Method parameters
Notice that the return type parameter has the out keyword, making it covariant. It can therefore accept the type declared or any type derived from that type. The input parameters have the in keyword, making them contravariant. They, therefore, can accept the declared type, or any type derived from that type.
With this in mind, if you look again at the declaration of Count, shown below, you see that the second parameter must be a delegate object that takes a single value of some type T as the method parameter and returns a value of type bool. As mentioned earlier in the chapter, a delegate of this form is called a predicate.
   public static int Count<T>(this IEnumerable<T> source,

                                             Func<T, bool> predicate );

                                                   ↑   ↑

                                          Parameter type  Return type
The first four Action delegates are the following. They’re the same as the Func delegates except that they have no return value and hence no return value type parameter. All their type parameters are contravariant.
   public delegate void Action                     ( );

   public delegate void Action<in T1>              ( T1 a1 );

   public delegate void Action<in T1, in T2>       ( T1 a1, T2 a2 );

   public delegate void Action<in T1, in T2, in T3>( T1 a1, T2 a2, T3 a3 );
Example Using a Delegate Parameter
Now that you better understand Count’s signature and LINQ’s use of generic delegate parameters, you’ll be better able to understand a full example.
The following code declares method IsOdd, which takes a single parameter of type int and returns a bool value specifying whether the input parameter was odd. Method Main does the following:
- Declares an array of
ints as the data source.- Creates a delegate object called
MyDel, of typeFunc<int, bool>, and it uses methodIsOddto initialize the delegate object. Notice that you don’t need to declare theFuncdelegate type because, as you saw, it’s already predefined by LINQ.- Calls
Countusing the delegate object.
   class Program

   {

      static bool IsOdd(int x)    // Method to be used by the delegate object

      {

         return x % 2 == 1;       // Return true if x is odd.

      }


      static void Main()

      {

         int[] intArray = new int[] { 3, 4, 5, 6, 7, 9 };


         Func<int, bool> myDel = new Func<int, bool>(IsOdd); // Delegate object

         var countOdd = intArray.Count(myDel);               // Use delegate.


         Console.WriteLine("Count of odd numbers: {0}", countOdd);

      }

   }
This code produces the following output:
Count of odd numbers: 4
Example Using a Lambda Expression Parameter
The previous example used a separate method and a delegate to attach the code to the operator. This required declaring the method, declaring the delegate object, and then passing the delegate object to the operator. This works fine and is exactly the right approach to take if either of the following conditions is true:
- If the method must be called from somewhere in the program other than the place it’s used to initialize the delegate object
- If the code in the method body is more than just a statement or two long
If neither of these conditions is true, however, you probably want to use a more compact and localized method of supplying the code to the operator, using a lambda expression.
We can modify the previous example to use a lambda expression by first deleting the IsOdd method entirely and placing the equivalent lambda expression directly at the declaration of the delegate object. The new code is shorter and cleaner and looks like this:
   class Program

   {

      static void Main()

      {

         int[] intArray = new int[] { 3, 4, 5, 6, 7, 9 };

                                        Lambda expression

                                               ↓

         var countOdd = intArray.Count( x => x % 2 == 1 );


         Console.WriteLine("Count of odd numbers: {0}", countOdd);

      }

   }
Like the previous example, this code produces the following output:
Count of odd numbers: 4
We could also have used an anonymous method in place of the lambda expression, as shown below. This is more verbose, though, and since lambda expressions are equivalent semantically and are less verbose, there’s little reason to use anonymous methods anymore.
   class Program

   {

      static void Main( )

      {

         int[] intArray = new int[] { 3, 4, 5, 6, 7, 9 };

                                 Anonymous method

                                        ↓

         Func<int, bool> myDel = delegate(int x)

                                 {

                                    return x % 2 == 1;

                                 };

         var countOdd = intArray.Count(myDel);


         Console.WriteLine("Count of odd numbers: {0}", countOdd);

      }

   }
LINQ to XML
Extensible Markup Language (XML) is an important means of storing and exchanging data. LINQ adds features to the language that make working with XML much easier than previous methods, such as XPath and XSLT. If you’re familiar with these methods, you might be pleased to hear that LINQ to XML simplifies the creation, querying, and manipulation of XML in a number of ways, including the following:
- You can create an XML tree in a top-down fashion, with a single statement.
- You can create and manipulate XML in-memory without having an XML document to contain the tree.
- You can create and manipulate string nodes without having a
Textsubnode.- One of the huge differences (improvements!) is that you no longer have to traverse an XML tree to search it. Instead, you just query the tree and have it return your result.
Although I won’t give a complete treatment of XML, I will start by giving a very brief introduction to it before describing some of the XML manipulation features supplied by LINQ.
Markup Languages
A markup language is a set of tags placed in a document to give information about the informationin the document and to organize its content. That is, the markup tags are not the data of the document—they contain data about the data. Data about data is called metadata.
A markup language is a defined set of tags designed to convey particular types of metadata about the contents of a document. HTML, for example, is the most widely known markup language. The metadata in its tags contains information about how a web page should be rendered in a browser and how to navigate among the pages using the hypertext links.
While most markup languages contain a predefined set of tags, XML contains only a few defined tags, and the rest are defined by the programmer to represent whatever kinds of metadata are required by a particular document type. As long as the writer and reader of the data agree on what the tags mean, the tags can contain whatever useful information the designers want.
XML Basics
Data in an XML document is contained in an XML tree, which consists mainly of a set of nested elements.
The element is the fundamental constituent of an XML tree. Every element has a name and can contain data. Some can also contain other nested elements. Elements are demarcated by opening and closing tags. Any data contained by an element must be between its opening and closing tags.
- An opening tag starts with an open angle bracket, followed by the element name, followed optionally by any attributes, followed by a closing angle bracket:
<PhoneNumber>- A closing tag starts with an open angle bracket, followed by a slash character, followed by the element name, followed by a closing angle bracket:
</PhoneNumber>- An element with no content can be represented by a single tag that starts with an open angle bracket, followed by the name of the element, followed by a slash, and is terminated with a closing angle bracket:
<PhoneNumber />
The following XML fragment shows an element named EmployeeName followed by an empty element named PhoneNumber.
           Opening tag                  Closing tag

               ↓                         ↓

         <EmployeeName>Sally Jones</EmployeeName>

                ↑            ↑

                          Content

         <PhoneNumber />     ← Element with no content
Other important things to know about XML are the following:
- XML documents must have a single root element that contains all the other elements.
- XML tags must be properly nested.
- Unlike HTML tags, XML tags are case-sensitive.
- XML attributes are name/value pairs that contain additional metadata about an element. The value part of an attribute must always be enclosed in quotation marks, which can be either double quotation marks or single quotation marks.
- Whitespace within an XML document is maintained. This is unlike HTML, where whitespace is consolidated to a single space in the output.
The following XML document is an example of XML that contains information about two employees. This XML tree is extremely simple in order to show the elements clearly. The important things to notice about the XML tree are the following:
- The tree contains a root node of type
Employeesthat contains two child nodes of typeEmployee.- Each
Employeenode contains nodes containing the name and phone numbers of an employee.
   <Employees>

      <Employee>

         <Name>Bob Smith</Name>

         <PhoneNumber>408-555-1000</PhoneNumber>

         <CellPhone />

      </Employee>

      <Employee>

         <Name>Sally Jones</Name>

         <PhoneNumber>415-555-2000</PhoneNumber>

         <PhoneNumber>415-555-2001</PhoneNumber>

      </Employee>

   </Employees>
Figure 19-12 illustrates the hierarchical structure of the sample XML tree.
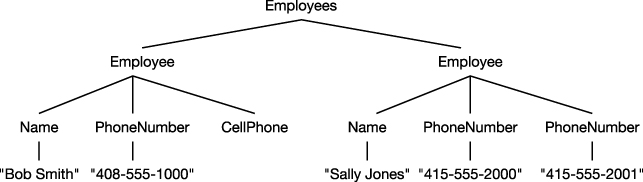
Figure 19-12. Hierarchical structure of the sample XML tree
The XML Classes
LINQ to XML can be used to work with XML in two ways. The first way is as a simplified XML manipulation API. The second way is to use the LINQ query facilities you’ve seen throughout the earlier part of this chapter. I’ll start by introducing the LINQ to XML API.
The LINQ to XML API consists of a number of classes that represent the components of an XML tree. The three most important classes you’ll use are XElement, XAttribute, and XDocument. There are other classes as well, but these are the main ones.
In Figure 19-12, you saw that an XML tree is a set of nested elements. Figure 19-13 shows the classes used to build an XML tree and how they can be nested.
For example, the figure shows the following:
- An
XDocumentnode can have the following as its direct child nodes:
- At most, one of each of the following node types: an
XDeclarationnode, anXDocumentTypenode, and anXElementnode- Any number of
XProcessingInstructionnodes- If there is a top-level
XElementnode under theXDocument, it is the root of the rest of the elements in the XML tree.- The root element can in turn contain any number of nested
XElement,XComment, orXProcessingInstructionnodes, nested to any level.
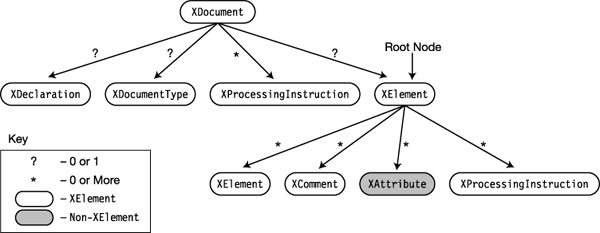
Figure 19-13. The containment structure of XML nodes
Except for the XAttribute class, most of the classes used to create an XML tree are derived from a class called XNode and are referred to generically in the literature as XNodes. Figure 19-13 shows the XNode classes in white clouds, while the XAttribute class is shown in a gray cloud.
Creating, Saving, Loading, and Displaying an XML Document
The best way to demonstrate the simplicity and usage of the XML API is to show simple code samples. For example, the following code shows how simple it is to perform several of the important tasks required when working with XML.
It starts by creating a simple XML tree consisting of a node called Employees, with two subnodes containing the names of two employees. Notice the following about the code:
- The tree is created with a single statement that creates all the nested elements in place in the tree. This is called functional construction.
- Each element is created in place using an object-creation expression, using the constructor of the type of the node.
After creating the tree, the code saves it to a file called EmployeesFile.xml, using XDocument’s Save method. It then reads the XML tree back from the file using XDocument’s static Load method and assigns the tree to a new XDocument object. Finally, it uses WriteLine to display the structure of the tree held by the new XDocument object.
   using System;

   using System.Xml.Linq;                           // Required namespace


   class Program {

      static void Main( ) {

         XDocument employees1 =

            new XDocument(                       // Create the XML document.

               new XElement("Employees",         // Create the root element.

                  new XElement("Name", "Bob Smith"),      // Create element.

                  new XElement("Name", "Sally Jones")     // Create element.

               )

            );


         employees1.Save("EmployeesFile.xml");            // Save to a file.


         // Load the saved document into a new variable.

         XDocument employees2 = XDocument.Load("EmployeesFile.xml");

                                       ↑

                                  Static method

         Console.WriteLine(employees2);                   // Display document.

      }

   }
This code produces the following output:
<Employees>

  <Name>Bob Smith</Name>

  <Name>Sally Jones</Name>

</Employees>
Creating an XML Tree
In the previous example, you saw that you can create an XML document in-memory by using constructors for XDocument and XElement. In the case of both constructors
- The first parameter is the name of the object.
- The second and following parameters contain the nodes of the XML tree. The second parameter of the constructor is a
paramsparameter, and so can have any number of parameters.
For example, the following code produces an XML tree and displays it using the Console.WriteLine method:
   using System;

   using System.Xml.Linq;                         // This namespace is required.


   class Program

   {

      static void Main( ) {

         XDocument employeeDoc =

            new XDocument(                     // Create the document.

               new XElement("Employees",       // Create the root element.

                  new XElement("Employee",     // First employee element

                     new XElement("Name", "Bob Smith"),

                     new XElement("PhoneNumber", "408-555-1000") ),


                  new XElement("Employee",     // Second employee element

                     new XElement("Name", "Sally Jones"),

                     new XElement("PhoneNumber", "415-555-2000"),

                     new XElement("PhoneNumber", "415-555-2001") )

               )

            );

         Console.WriteLine(employeeDoc);       // Displays the document

      }

   }
This code produces the following output:
<Employees>

  <Employee>

    <Name>Bob Smith</Name>

    <PhoneNumber>408-555-1000</PhoneNumber>

  </Employee>

  <Employee>

    <Name>Sally Jones</Name>

    <PhoneNumber>415-555-2000</PhoneNumber>

    <PhoneNumber>415-555-2001</PhoneNumber>

  </Employee>

</Employees>
Using Values from the XML Tree
The power of XML becomes evident when you traverse an XML tree and retrieve or modify values. Table 19-2 shows the main methods used for retrieving data.
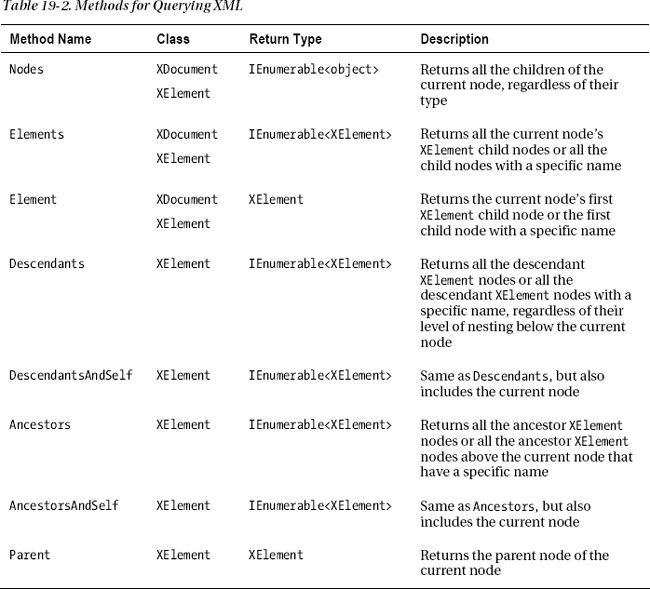
Some of the important things to know about the methods in Table 19-2 are the following:
Nodes: TheNodesmethod returns an object of typeIEnumerable<object>, because the nodes returned might be of different types, such asXElement,XComment, and so on. You can use the type parameterized methodOfType<type>to specify what type of nodes to return. For example, the following line of code retrieves only theXCommentnodes:IEnumerable<XComment> comments = xd.Nodes().OfType<XComment>();Elements: Since retrievingXElementsis such a common requirement, there is a shortcut for expressionNodes().OfType<XElement>()—theElementsmethod.
- Using the
Elementsmethod with no parameters returns all the childXElements.- Using the
Elementsmethod with a single name parameter returns only the childXElements with that name. For example, the following line of code returns all the childXElementnodes with the name PhoneNumber.IEnumerable<XElement> empPhones = emp.Elements("PhoneNumber");Element: This method retrieves just the first childXElementof the current node. Like theElementsmethod, it can be called with either one or no parameters. With no parameters, it gets the first childXElementnode. With a single name parameter, it gets the first childXElementnode of that name.DescendantsandAncestors: These methods work like theElementsandParentmethods, but instead of returning the immediate child elements or parent element, they include the elements below or above the current node, regardless of the difference in nesting level.
The following code illustrates the Element and Elements methods:
   using System;

   using System.Collections.Generic;

   using System.Xml.Linq;


   class Program {

      static void Main( ) {

         XDocument employeeDoc =

            new XDocument(

               new XElement("Employees",

                  new XElement("Employee",

                     new XElement("Name", "Bob Smith"),

                     new XElement("PhoneNumber", "408-555-1000")),

                  new XElement("Employee",

                     new XElement("Name", "Sally Jones"),

                     new XElement("PhoneNumber", "415-555-2000"),

                     new XElement("PhoneNumber", "415-555-2001"))

                  )

               );             Get first child XElement named "Employees"

                                             ↓

         XElement root = employeeDoc.Element("Employees");

         IEnumerable<XElement> employees = root.Elements();


         foreach (XElement emp in employees)

         {                        Get first child XElement named "Name"

                                             ↓

            XElement empNameNode = emp.Element("Name");

            Console.WriteLine(empNameNode.Value);

                                            Get all child elements named "PhoneNumber"

                                                           ↓

            IEnumerable<XElement> empPhones = emp.Elements("PhoneNumber");

            foreach (XElement phone in empPhones)

               Console.WriteLine("   {0}", phone.Value);

         }

      }

   }
This code produces the following output:
Bob Smith

   408-555-1000

Sally Jones

   415-555-2000

   415-555-2001
Adding Nodes and Manipulating XML
You can add a child element to an existing element using the Add method. The Add method allows you to add as many elements as you like in a single method call, regardless of the node types you’re adding.
For example, the following code creates a simple XML tree and displays it. It then uses the Add method to add a single node to the root element. Following that, it uses the Add method a second time to add three elements—two XElements and an XComment. Notice the results in the output:
   using System;

   using System.Xml.Linq;


   class Program

   {

      static void Main()

      {

         XDocument xd = new XDocument(               // Create XML tree.

            new XElement("root",

               new XElement("first")

            )

         );


         Console.WriteLine("Original tree");

         Console.WriteLine(xd); Console.WriteLine(); // Display the tree.


         XElement rt = xd.Element("root");           // Get the first element.


         rt.Add( new XElement("second"));            // Add a child element.


         rt.Add( new XElement("third"),              // Add three more children.

                 new XComment("Important Comment"),

                 new XElement("fourth"));


         Console.WriteLine("Modified tree");

         Console.WriteLine(xd);                      // Display modified tree.

      }

   }
This code produces the following output:
<root>

  <first />

</root>


<root>

  <first />

  <second />

  <third />

  <!--Important Comment-->

  <fourth />

</root>
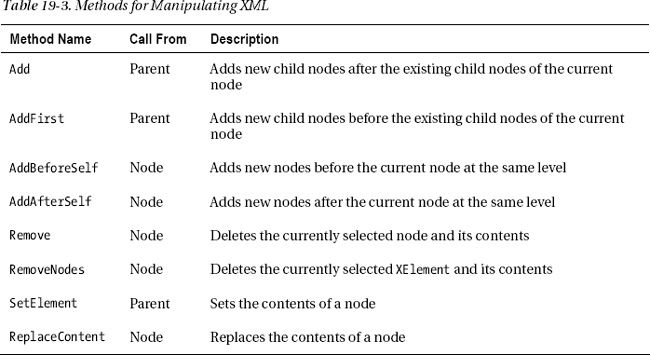
The Add method places the new child nodes after the existing child nodes, but you can place the nodes before and between the child nodes as well, using the AddFirst, AddBeforeSelf, and AddAfterSelf methods.
Table 19-3 lists some of the most important methods for manipulating XML. Notice that some of the methods are applied to the parent node and others to the node itself.
Working with XML Attributes
Attributes give additional information about an XElement node. They’re placed in the opening tag of the XML element.
When you functionally construct an XML tree, you can add attributes by just including XAttribute constructors within the scope of the XElement constructor. There are two forms of the XAttribute constructor; one takes a name and a value, and the other takes a reference to an already existing XAttribute.
The following code adds two attributes to root. Notice that both parameters to the XAttribute constructor are strings; the first specifies the name of the attribute, and the second gives the value.
   XDocument xd = new XDocument(

                            Name    Value

      new XElement("root",    ↓       ↓

            new XAttribute("color", "red"),       // Attribute constructor

            new XAttribute("size", "large"),      // Attribute constructor

         new XElement("first"),

         new XElement("second")

      )

   );


   Console.WriteLine(xd);
This code produces the following output. Notice that the attributes are placed inside the opening tag of the element.
<root color="red" size="large">

  <first />

  <second />

</root>
To retrieve an attribute from an XElement node, use the Attribute method, supplying the name of the attribute as the parameter. The following code creates an XML tree with a node with two attributes—color and size. It then retrieves the values of the attributes and displays them.
   static void Main( )

   {

      XDocument xd = new XDocument(                      // Create XML tree.

         new XElement("root",

            new XAttribute("color", "red"),

            new XAttribute("size", "large"),

            new XElement("first")

         )

      );


      Console.WriteLine(xd); Console.WriteLine();        // Display XML tree.


      XElement rt = xd.Element("root");                  // Get the element.


      XAttribute color = rt.Attribute("color");          // Get the attribute.

      XAttribute size =  rt.Attribute("size");           // Get the attribute.


      Console.WriteLine("color is {0}", color.Value);    // Display attr. value.

      Console.WriteLine("size  is {0}", size.Value);     // Display attr. value.

   }
This code produces the following output:
<root color="red" size="large">

  <first />

</root>


color is red

size  is large
To remove an attribute, you can select the attribute and use the Remove method, or use the SetAttributeValue method on its parent and set the attribute value to null. The following code demonstrates both methods:
   static void Main( ) {

      XDocument xd = new XDocument(

         new XElement("root",

            new XAttribute("color", "red"),

            new XAttribute("size", "large"),

            new XElement("first")

         )

      );


      XElement rt = xd.Element("root");          // Get the element.


      rt.Attribute("color").Remove();            // Remove the color attribute.

      rt.SetAttributeValue("size", null);        // Remove the size attribute.


      Console.WriteLine(xd);

   }
This code produces the following output:
<root>

  <first />

</root>
To add an attribute to an XML tree or change the value of an attribute, you can use the SetAttributeValue method, as shown in the following code:
   static void Main( ) {

      XDocument xd = new XDocument(

         new XElement("root",

            new XAttribute("color", "red"),

            new XAttribute("size", "large"),

            new XElement("first")));


      XElement rt = xd.Element("root");            // Get the element.


      rt.SetAttributeValue("size",  "medium");     // Change attribute value.

      rt.SetAttributeValue("width", "narrow");     // Add an attribute.


      Console.WriteLine(xd); Console.WriteLine();

   }
This code produces the following output:
<root color="red" size="medium" width="narrow">

  <first />

</root>
Other Types of Nodes
Three other types of nodes used in the previous examples are XComment, XDeclaration, and XProcessingInstruction. They’re described in the following sections.
XComment
Comments in XML consist of text between the <!-- and --> tokens. The text between the tokens is ignored by XML parsers. You can insert text in an XML document using the XComment class, as shown in the following line of code:
new XComment("This is a comment")
This code produces the following line in the XML document:
<!--This is a comment-->
XDeclaration
XML documents start with a line that includes the version of XML used, the type of character encoding used, and whether the document depends on external references. This is information about the XML, so it’s actually metadata about the metadata! This is called the XML declaration and is inserted using the XDeclaration class. The following shows an example of an XDeclaration statement:
new XDeclaration("1.0", "utf-8", "yes")
This code produces the following line in the XML document:
<?xml version="1.0" encoding="utf-8" standalone="yes"?>
XProcessingInstruction
An XML processing instruction is used to supply additional data about how an XML document should be used or interpreted. Most commonly, processing instructions are used to associate a style sheet with the XML document.
You can include a processing instruction using the XProcessingInstruction constructor, which takes two string parameters—a target and a data string. If the processing instruction takes multiple data parameters, those parameters must be included in the second parameter string of the XProcessingInstruction constructor, as shown in the following constructor code. Notice that in this example, the second parameter is a verbatim string, and literal double quotes inside the string are represented by sets of two contiguous double quote marks.
   new XProcessingInstruction( "xml-stylesheet",

                               @"href=""stories"", type=""text/css""")
This code produces the following line in the XML document:
<?xml-stylesheet href="stories.css" type="text/css"?>
The following code uses all three constructs:
   static void Main( )

   {

      XDocument xd = new XDocument(

         new XDeclaration("1.0", "utf-8", "yes"),

         new XComment("This is a comment"),

         new XProcessingInstruction("xml-stylesheet",

                                    @"href=""stories.css"" type=""text/css"""),

         new XElement("root",

            new XElement("first"),

            new XElement("second")

         )

      );

   }
This code produces the following output in the output file. Using a WriteLine of xd, however, would not show the declaration statement, even though it’s included in the document file.
<?xml version="1.0" encoding="utf-8" standalone="yes"?>

<!--This is a comment-->

<?xml-stylesheet href="stories.css" type="text/css"?>

<root>

  <first />

  <second />

</root>
Using LINQ Queries with LINQ to XML
You can combine the LINQ XML API with LINQ query expressions to produce simple yet powerful XML tree searches.
The following code creates a simple XML tree, displays it to the screen, and then saves it to a file called SimpleSample.xml. Although there’s nothing new in this code, we’ll use this XML tree in the following examples.
   static void Main( )

   {

      XDocument xd = new XDocument(

         new XElement("MyElements",

            new XElement("first",

               new XAttribute("color", "red"),

               new XAttribute("size",  "small")),

            new XElement("second",

               new XAttribute("color", "red"),

               new XAttribute("size",  "medium")),

            new XElement("third",

               new XAttribute("color", "blue"),

               new XAttribute("size",  "large"))));


      Console.WriteLine(xd);                      // Display XML tree.

      xd.Save("SimpleSample.xml");                // Save XML tree.

   }
This code produces the following output:
<MyElements>

  <first color="red" size="small" />

  <second color="red" size="medium" />

  <third color="blue" size="large" />

</MyElements>
The following example code uses a simple LINQ query to select a subset of the nodes from the XML tree and then display them in several ways. This code does the following:
- It selects from the XML tree only those elements whose names have five characters. Since the names of the elements are first, second, and third, only node names first and third match the search criterion, and therefore those nodes are selected.
- It displays the names of the selected elements.
- It formats and displays the selected nodes, including the node name and the values of the attributes. Notice that the attributes are retrieved using the
Attributemethod, and the values of the attributes are retrieved with theValueproperty.
   static void Main( )

   {

      XDocument xd = XDocument.Load("SimpleSample.xml"); // Load the document.

      XElement rt = xd.Element("MyElements");            // Get the root element.


      var xyz = from e in rt.Elements()                  // Select elements whose

                where e.Name.ToString().Length == 5      // names have 5 chars.

                select e;


      foreach (XElement x in xyz)                        // Display the

         Console.WriteLine(x.Name.ToString());           // selected elements.


      Console.WriteLine();

      foreach (XElement x in xyz)

         Console.WriteLine("Name: {0}, color: {1}, size: {2}",

                           x.Name,

                           x.Attribute("color").Value,

                           x.Attribute("size") .Value);

                                      ↑           ↑

   }                          Get the attribute.       Get the attribute’s value.
This code produces the following output:
first

third


Name: first, color: red, size: small

Name: third, color: blue, size: large
The following code uses a simple query to retrieve all the top-level elements of the XML tree and creates an object of an anonymous type for each one. The first use of the WriteLine method shows the default formatting of the anonymous type. The second WriteLine statement explicitly formats the members of the anonymous type objects.
   using System;

   using System.Linq;

   using System.Xml.Linq;


   static void Main( )

   {

      XDocument xd = XDocument.Load("SimpleSample.xml"); // Load the document.

      XElement rt = xd.Element("MyElements");            // Get the root element.


      var xyz = from e in rt.Elements()

                select new { e.Name, color = e.Attribute("color") };

                                             ↑

      foreach (var x in xyz)       Create an anonymous type.

         Console.WriteLine(x);                     // Default formatting


      Console.WriteLine();

      foreach (var x in xyz)

         Console.WriteLine("{0,-6},   color: {1, -7}", x.Name, x.color.Value);

   }
This code produces the following output. The first three lines show the default formatting of the anonymous type. The last three lines show the explicit formatting specified in the format string of the second WriteLine method.
{ Name = first, color = color="red" }

{ Name = second, color = color="red" }

{ Name = third, color = color="blue" }


first ,   color: red

second,   color: red

third ,   color: blue
From these examples, you can see that you can easily combine the XML API with the LINQ query facilities to produce powerful XML querying capabilities.