
C H A P T E R 20
Introduction to Asynchronous Programming
What Is Asynchrony?
When you start a program, the system creates a new process in memory. A process is the set of resources that comprise a running program. These include the virtual address space, file handles, and a host of other things required for the program to run.
Inside the process, the system creates a kernel object, called a thread, which represents the actual executing program. (Thread is short for “thread of execution.”) Once the process is set up, the system starts the thread executing at the first statement in method Main.
Some important things to know about threads are the following:
- By default, a process contains only a single thread, which executes from the beginning of the program to the end.
- A thread can spawn other threads so that at any time, a process might have multiple threads in various states, executing different parts of the program.
- If there are multiple threads in a process, they all share the process’s resources.
- It is threads, not processes, that are the units scheduled by the system for execution on the processor.
All the sample programs shown so far in this book have used only a single thread and have executed sequentially from the first statement in the program to the last. There are many situations, however, where this simple model produces unacceptable behavior, in either performance or end-user experience.
For example, a server program might be constantly initiating connections with other servers and requesting data from them, while at the same time processing the requests from many client programs. These communications tasks usually require a fair amount of time where the program is just waiting for a response from another computer on the network or on the Internet. This significantly decreases performance. Instead of just wasting this time waiting for a response, it would be more efficient to work on other tasks in the meantime, and then resume working on the first task when the reply arrives.
Another example would be an interactive GUI program. If the user initiates an operation that takes a significant amount of time, it’s unacceptable for the program to freeze on the screen until the action completes. The user should still be able to move the window around on the screen, and maybe even cancel the operation.
In this chapter we’re going to look at asynchronous programming, which is a type of programming where portions of a program’s code aren’t necessarily executed in the strict order in which the code is written. Sometimes this involves running a section of code on another thread. Other times, however, no new thread is created, but instead, the execution of the code is reordered to make better use of the single thread’s capacity.
We’ll start by looking at a new feature introduced in C# 5.0 that allows you to build asynchronous methods. It’s called the async/await feature. After that we’ll look at several features that are part of the .NET Framework, but not built into the C# language, that allow additional forms of asynchrony. These topics include the BackgroundWorker class and an introduction to the .NET Task Parallel Library. Both these topics implement asynchrony by creating new threads. We’ll finish the chapter by looking at other ways of producing asynchrony.
A Starting Example
For illustration and comparison, we’ll start by looking at an example that does not use asynchrony, and then compare it to a similar program that uses asynchrony.
In the code sample shown below, method DoRun is a method of class MyDownloadString that does the following:
- It creates and starts an object of class
Stopwatch, which is in theSystem.Diagnosticsnamespace. It uses thisStopwatchtimer to time the various tasks performed in the code.- It then makes two calls to method
CountCharacters, which downloads the content of the web site and returns the number of characters the web site contains. The web site is specified as a URL string given as the second parameter.- It then makes four calls to method
CountToALargeNumber. This method is just make-work that represents a task that takes a certain amount of time. It just loops the given number of times.- Finally, it prints out the number of characters that were found for the two web sites.
   using System;

   using System.Net;

   using System.Diagnostics;


   class MyDownloadString

   {

      Stopwatch sw = new Stopwatch();


      public void DoRun() {

         const int LargeNumber = 6000000;

         sw.Start();


         int t1 = CountCharacters( 1, "http://www.microsoft.com" );

         int t2 = CountCharacters( 2, "http://www.illustratedcsharp.com" );


         CountToALargeNumber( 1, LargeNumber );  CountToALargeNumber( 2, LargeNumber );

         CountToALargeNumber( 3, LargeNumber );  CountToALargeNumber( 4, LargeNumber );


         Console.WriteLine( "Chars in http://www.microsoft.com        : {0}", t1 );

         Console.WriteLine( "Chars in http://www.illustratedcsharp.com: {0}", t2 );

      }


      private int CountCharacters(int id, string uriString ) {

         WebClient wc1 = new WebClient();

         Console.WriteLine( "Starting call {0}    :     {1, 4:N0} ms",

                            id, sw.Elapsed.TotalMilliseconds );

         string result = wc1.DownloadString( new Uri( uriString ) );

         Console.WriteLine( "   Call {0} completed:     {1, 4:N0} ms",

                            id, sw.Elapsed.TotalMilliseconds );

         return result.Length;

      }
      private void CountToALargeNumber( int id, int value ) {

         for ( long i=0; i < value; i++ )

            ;

         Console.WriteLine( "   End counting {0}  :     {1, 4:N0} ms",

                            id, sw.Elapsed.TotalMilliseconds );

      }

   }


   class Program

   {

      static void Main() {

         MyDownloadString ds = new MyDownloadString();

         ds.DoRun();

      }

   }
This code produced the following output on one of its runs. The timing numbers, listed in milliseconds (ms), will be different when you run it.
Starting call 1    :        1 ms

   Call 1 completed:      178 ms

Starting call 2    :      178 ms

   Call 2 completed:      504 ms

   End counting 1  :      523 ms

   End counting 2  :      542 ms

   End counting 3  :      561 ms

   End counting 4  :      579 ms

Chars in http://www.microsoft.com        : 1020

Chars in http://www.illustratedcsharp.com: 4699
Figure 20-1 summarizes the output, showing a timeline of when the various tasks start and end. Looking at the figure, you’ll notice that calls 1 and 2 took the bulk of the time of the method call. But for each of these calls, the vast majority of the time required was just wasted waiting for the responses from the web sites.
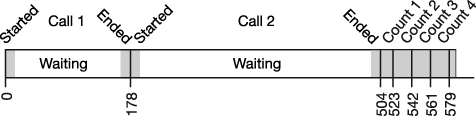
Figure 20-1. Timeline of the time required for the various tasks in the program
We could significantly improve the performance of the program if we could initiate both of the CountCharacter calls, and not wait for the results, but go ahead and perform the four calls to CountToALargeNumber, and then pick up the results of the two CountCharacter method calls when they’re done.
C#’s new async/await feature allows us to do exactly that. The code, rewritten to use this feature, is shown below. I’ll go into the details of the new feature shortly, but the things to notice in this example are the following:
- When method
DoRuncallsCountCharactersAsync,CountCharactersAsyncreturns almost immediately, and before it actually does the work of downloading the characters. It returns to the calling method a placeholder object of typeTask<int>that represents the work it plans to do, which will eventually “return” anint.- This allows method
DoRunto continue on its way without having to wait for the actual work to be done. Its next statement is another call toCountCharactersAsync, which does the same thing, returning anotherTask<int>object.DoRuncan then continue on and make the four calls toCountToALargeNumber, while the two calls toCountCharactersAsynccontinue to do their work—which consists mostly of waiting.- The last two lines of method
DoRunretrieve the results from theTasks returned by theCountCharactersAsynccalls. If a result isn’t ready yet, execution blocks and waits until it is.
   ...

   using System.Threading.Tasks;


   class MyDownloadString

   {

      Stopwatch sw = new Stopwatch();


      public void DoRun()  {

         const int LargeNumber = 6000000;

         sw.Start();

           Objects that will hold the results

               ↓

         Task<int> t1 = CountCharactersAsync( 1, "http://www.microsoft.com" );

         Task<int> t2 = CountCharactersAsync( 2, "http://www.illustratedcsharp.com" );

         CountToALargeNumber( 1, LargeNumber );  CountToALargeNumber( 2, LargeNumber );

         CountToALargeNumber( 3, LargeNumber );  CountToALargeNumber( 4, LargeNumber );

                                                                               Get results.

                                                                                  ↓

         Console.WriteLine( "Chars in http://www.microsoft.com        : {0}", t1.Result );

         Console.WriteLine( "Chars in http://www.illustratedcsharp.com: {0}", t2.Result );

      }

          Contextual       Type that represents work being done,

           keyword       which will eventually return an int

              ↓         ↓

      private async Task<int> CountCharactersAsync( int id, string site ) {

         WebClient wc = new WebClient();

         Console.WriteLine( "Starting call {0}    :     {1, 4:N0} ms",

                            id, sw.Elapsed.TotalMilliseconds );

                      Contextual keyword

                           ↓

         string result = await wc.DownloadStringTaskAsync( new Uri( site ) );
         Console.WriteLine( "   Call {0} completed:     {1, 4:N0} ms",

                            id, sw.Elapsed.TotalMilliseconds );

         return result.Length;

      }


      private void CountToALargeNumber( int id, int value )

      {

         for ( long i=0; i < value; i++ ) ;

         Console.WriteLine( "   End counting {0}  :     {1, 4:N0} ms",

                            id, sw.Elapsed.TotalMilliseconds );

      }

   }

   class Program

   {

      static void Main()

      {

         MyDownloadString ds = new MyDownloadString();

         ds.DoRun();

      }

   }
One run of this code on my machine produced the following results. Again, your timing results, and possibly the ordering of the lines, will most likely be different than mine.
Starting call 1    :       12 ms

Starting call 2    :       60 ms

   End counting 1  :       80 ms

   End counting 2  :       99 ms

   End counting 3  :      118 ms

   Call 1 completed:      124 ms

   End counting 4  :      138 ms

Chars in http://www.microsoft.com        : 1020

   Call 2 completed:      387 ms

Chars in http://www.illustratedcsharp.com: 4699
Figure 20-2 summarizes the output, showing a timeline of the modified program. The new version is 32 percent faster than the previous version. It gains this time by performing the four calls to CountToALargeNumber during the time it’s waiting for the responses from the web sites in the two CountCharactersAsync method calls. All this was done on the main thread; we did not create any additional threads!
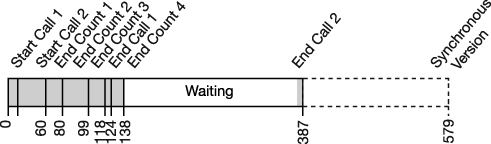
Figure 20-2. Timeline of the async/await version of the program
The Structure of the async/await Feature
Now that you’ve seen an example of an asynchronous method, let’s go into the definitions and details.
When a program makes a method call and waits for the method to perform all its processing before continuing, we say that the method call is synchronous. This is the default form, and what you’ve seen in all the chapters previous to this one.
In contrast to that, an asynchronous method returns to the calling method before it finishes all its work. C#’s async/await feature allows you to create and use asynchronous methods. The feature comprises three components, as illustrated in Figure 20-3:
- The calling method is the method that calls an
asyncmethod and then continues on its way while theasyncmethod performs its tasks, either on the same thread or a different thread.- The
asyncmethod is the method that sets up its work to be done asynchronously, and then returns early to the calling method.- The
awaitexpression is used inside theasyncmethod and specifies the task that needs to be performed asynchronously. Anasyncmethod can contain any number ofawaitexpressions, although the compiler produces a warning message if there isn’t at least one.
I’ll cover each of these three components in detail in the coming sections, starting with the syntax and semantics of the async method.

Figure 20-3. The overall structure of the async/await feature
What Is An async Method?
As stated in the previous section, an async method is a method that returns to the calling method before completing all its work, and then completes its work while the calling method continues its execution.
Syntactically, an async method has the following characteristics, illustrated in Figure 20-4.
- It has the
asyncmethod modifier in the method header.- It contains one or more
awaitexpressions. These expressions represent tasks that can be done asynchronously.- It must have one of the following three return types. In the second and third cases—that is,
TaskandTask<T>—the returned object represents a chunk of work that will be completed in the future, while both the calling method and theasyncmethod can continue processing.
voidTaskTask<T>- An
asyncmethod can have any number of formal parameters of any types. None of the parameters, however, can beoutorrefparameters.- By convention, the name of an
asyncmethod should end with the suffixAsync.- Besides methods, lambda expressions and anonymous methods can also act as
asyncobjects.
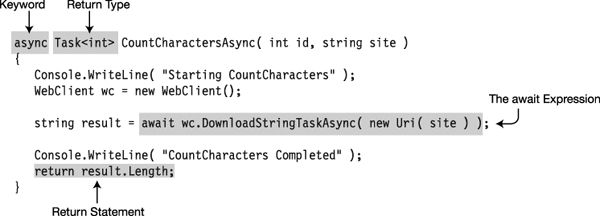
Figure 20-4. The structure of an async method
Figure 20-4 highlights the components of an async method, which we can now look at in more detail. The first item is the async keyword.
- An
asyncmethod must have theasynckeyword in its method header, and it must be before the return type.- This modifier doesn’t do anything more than signal that the method contains one or more
awaitexpressions. That is, it doesn’t, in itself, create any asynchrony.- The
asynckeyword is a contextual keyword, meaning that in positions other than as a method modifier (or lambda or anonymous method modifier),asynccan be used as an identifier.
The return type must be one of the three following types. Notice that two of the return types include the Task class. When referring to the class I’ll use the capitalized form (since that’s the name of the class) and the syntax typeface. I’ll use the lowercase form in the general sense to indicate a set of work that needs to be done.
Task<T>: If the calling method is to receive a value of typeTback from the call, the return type of theasyncmethod must beTask<T>. The calling method will then get the value of type T by reading theTask’sResultproperty, as shown in the following code from a calling method:Task<int> value = DoStuff.CalculateSumAsync( 5, 6 );
...
Console.WriteLine( "Value: {0}", value.Result );Task: If the calling method doesn’t need a return value from theasyncmethod, but needs to be able to check on theasyncmethod’s state, then theasyncmethod can return an object of typeTask. In this case, if there are anyreturnstatements in theasyncmethod, they must not return anything. The following code sample is from a calling method:Task someTask = DoStuff.CalculateSumAsync(5, 6);
...
someTask.Wait();void: If the calling method just wants theasyncmethod to execute, but doesn’t need any further interaction with it (this is sometimes called fire and forget), theasyncmethod can have a return type ofvoid. In this case, as with the previous case, if there are anyreturnstatements in theasyncmethod, they must not return anything.
Notice that in Figure 20-4, above, that the return type of the async method is Task<int>. Yet when you inspect the body of the method, you won’t find any return statements that return an object of type Task<int>. There is, however, a single return statement at the end of the method that returns a value of type int. We can generalize this observation to the following, which we’ll look at in more detail shortly:
- Any
asyncmethod with a return type ofTask<T>must return a value of typeTor a type implicitly convertible toT.
Figures 20-5, 20-6, and 20-7 show the architectures required for the interactions between the calling method and the async method for the three kinds of return types.
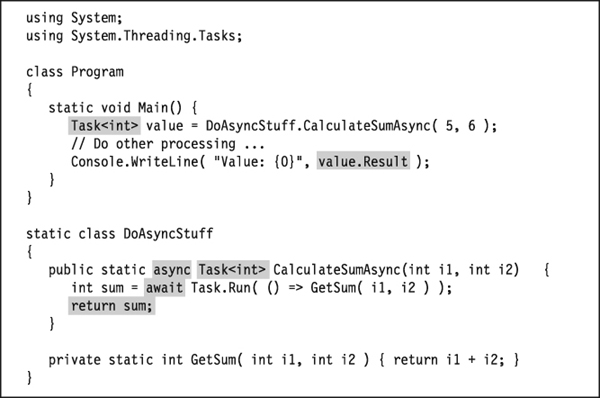
Figure 20-5. Using an async method that returns a Task<int> object
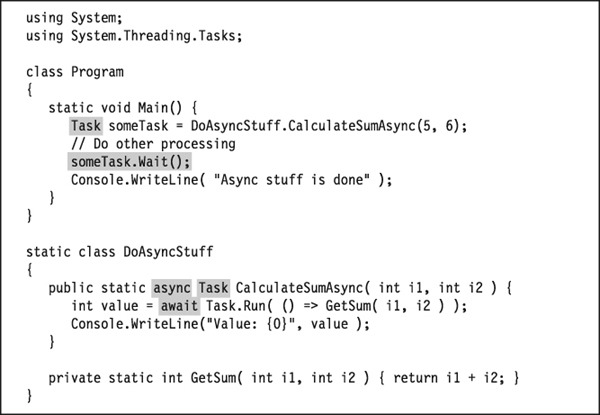
Figure 20-6. Using an async method that returns a Task object
The code in Figure 20-7 uses the Thread.Sleep method to pause the main thread so that it doesn’t exit before the async method has finished.
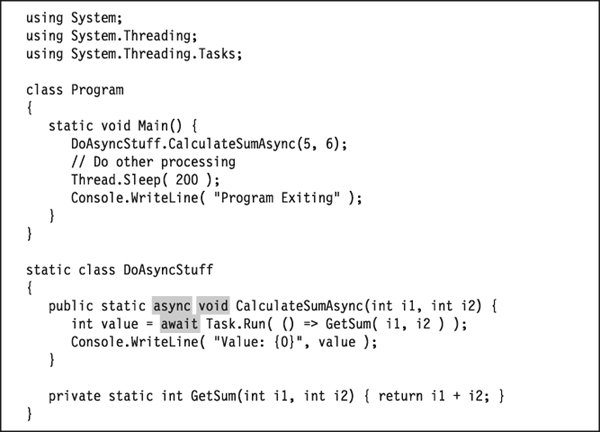
Figure 20-7. Using a fire-and-forget async method
The Flow of Control in an Async Method
The structure of the body of an async method has three distinct regions, which are illustrated in Figure 20-8. I’ll cover the await expression in detail in the next section, but in this section you can get an overview of its position and role. The three regions are the following:
- Before the first
awaitexpression: This includes all the code at the beginning of the method up until the firstawaitexpression. This region should only contain a small amount of code that doesn’t require too much processing.- The
awaitexpression: This expression represents the task to be performed asynchronously.- The continuation: This is the rest of the code in the method, following the
awaitexpression. This is packaged up along with its execution environment, which includes the information about which thread it’s on, the values of the variables currently in scope, and other things it’ll need in order to resume execution later, after theawaitexpression completes.
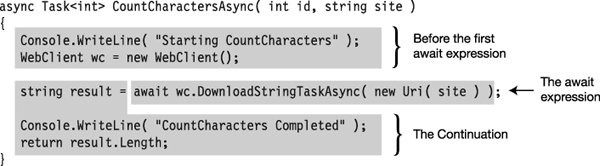
Figure 20-8. The code regions of an async method
Figure 20-9 summarizes the flow of control through an async method. It starts with the code before the first await expression, and executes normally (synchronously) until it encounters the first await. This region actually ends at the first await expression, where the await’s task has not already completed (which should be the vast majority of the time). If the await’s task has already completed, the method continues executing synchronously. The process is repeated if another await is encountered.
When the await expression is reached, the async method returns control to the calling method. If the method’s return type is of type Task or Task<T>, the method creates a Task object that represents both the task to be done asynchronously and the continuation, and returns that Task to the calling method.
There are now two flows of control: the one in the async method and the one in the calling method. The code in the async method does the following:
- It executes, asynchronously, its
awaitexpression’s awaitable task.- When the
awaitexpression is done, it executes the continuation. The continuation itself might have otherawaitexpressions, which are handled the same way. That is, theawaitexpression is executed asynchronously, followed by the execution of its continuation.- When the continuation encounters a
returnstatement or the end of the method, the following happens:- If the method’s return type is
void, the flow of control exits.- If the method’s return type is
Task, the continuation sets the status properties on theTaskand exits. If the return type is aTask<T>, the continuation additionally sets theResultproperty of theTaskobject.
In the meantime, the code in the calling method continues on it course, having received the Task object back from the async method. When it needs the actual result value, it references the Result property of the Task object. If, by that point, the async method has set that property, the calling method retrieves the value and continues on. Otherwise, it halts and waits for the property to be set before continuing on.
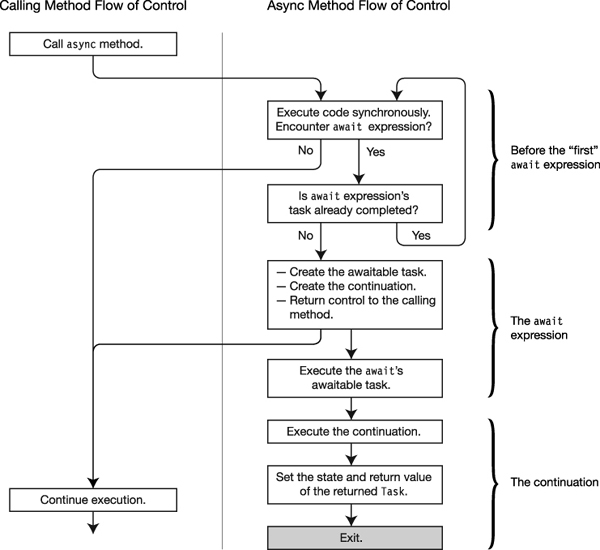
Figure 20-9. The flow of control through an async method
One thing that people are sometimes confused about is the type of the object returned when the first await in the async method is encountered. The type returned is the type listed as the return type in the header of the async method; it has nothing to do with the type of the value returned by the await expression.
In the code below, for example, the await expression returns a string. But during execution of the method, when that await expression is reached, the async method returns to the calling method an object of Task<int> because that’s the return type of the method.
   private async Task<int> CountCharactersAsync( string site )

   {

      WebClient wc = new WebClient();


      string result = await wc.DownloadStringTaskAsync( new Uri( site ) );


      return result.Length;

   }
Another potentially confusing thing is that when the async method “returns” as the result of a return statement in the method, or by reaching the end of the method, it doesn't actually return to anything—it just exits.
The await Expression
The await expression specifies a task to be done asynchronously. The syntax of the await expression is shown below and consists of the await keyword followed by an awaitable object, which is called the task. The task might or might not be an object of type Task. By default, this task is run asynchronously on the current thread.
await task
An awaitable object is an instance of an awaitable type. An awaitable type is one that has a method named GetAwaiter, which takes no parameters and returns an object of a type called an awaiter, which has the following members:
bool IsCompleted { get; }void OnCompleted(Action);
It also has one of the following:
void GetResult();T GetResult();(whereTis any type)
In reality, however, you rarely need to build your own awaitable. Instead, you should use the Task class, which is awaitable, and is probably all that most programmers will ever need with regard to awaitables.
With .NET 4.5, Microsoft released a large number of new and reworked asynchronous methods, throughout the BCL, that return objects of type Task<T>. You can plug these right into your await expression, and they’ll work asynchronously on your current thread.
In many of our previous examples, we’ve been using the WebClient.DownloadStringTaskAsync method. This is one of these asynchronous methods. The following code is an example of its usage:
   Uri site      = new Uri("http://www.illustratedcsharp.com" );

   WebClient wc  = new WebClient();

   string result = await wc.DownloadStringTaskAsync( site );

                                        ↑

                                Returns a Task<string>
Although there are now a number of BCL methods that return objects of type Task<T>, you’ll most likely have your own methods that you want to use as the task for an await expression. The easiest way to do that is to create a Task from your method using the Task.Run method. One very important fact about the Task.Run method is that it runs your method on a different thread.
One signature of the Task.Run method is the following, which takes a Func<TReturn> delegate as a parameter. You’ll remember from Chapter 19 that Func<TReturn> is a predefined delegate that takes no parameters and returns a value of type TReturn:
Task Run( Func<TReturn> func )
So, to pass your method to the Task.Run method, you need to create a delegate from it. The following code shows three ways to do this. In the code, method Get10 has a form compatible with a Func<int> delegate since it takes no parameters and returns an int.
- In the first instance, which is in the first two lines of method
DoWorkAsync, aFunc<int>delegate namedtenis created usingGet10. That delegate is then used in theTask.Runmethod in the next line.- In the second instance, a
Func<int>delegate is created right in theTask.Runmethod’s parameter list.- The last instance doesn’t use the
Get10method at all. It uses thereturnstatement that comprises the body of theGet10method, and uses it as the body of a lambda expression compatible with aFunc<int>delegate. The lambda expression is implicitly converted to the delegate.
   class MyClass

   {

      public int Get10()                             // Func<int> compatible

      {

         return 10;

      }


      public async Task DoWorkAsync()

      {

         Func<int> ten = new Func<int>(Get10);

         int a = await Task.Run(ten);


         int b = await Task.Run(new Func<int>(Get10));


         int c = await Task.Run(() => { return 10; });


         Console.WriteLine("{0}  {1}  {2}", a, b, c);

      }


   class Program

   {

      static void Main()

      {

         Task t = (new MyClass()).DoWorkAsync();

         t.Wait();

      }

   }
This code produces the following output:
10 10 10
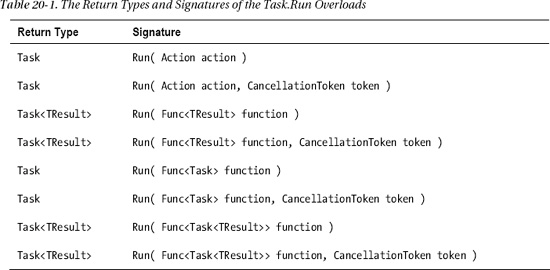
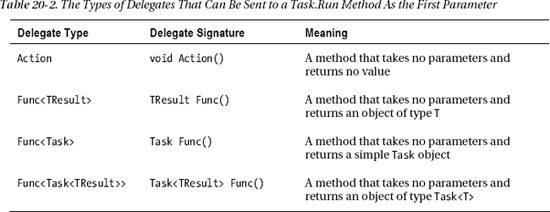
In the example code above, we used the signature for Task.Run that takes a Func<TResult> as the parameter. There are a total of eight overloads for the method, which are shown in Table 20-1. Table 20-2 shows the signatures of the four delegate types that can be used.
The following code shows four await statements that use the Task.Run method to run methods with the four different delegate types:
   static class MyClass

   {

      public static async Task DoWorkAsync()

      {                                  Action

                                           ↓

         await Task.Run(() => Console.WriteLine(5.ToString()));

                                          TResult Func()

                                              ↓

         Console.WriteLine((await Task.Run(() => 6)).ToString());

                                              Task Func()

                                                 ↓

         await Task.Run(() => Task.Run(() => Console.WriteLine(7.ToString())));

                                        Task<TResult> Func()

                                               ↓

         int value = await Task.Run(() => Task.Run(() => 8));

         Console.WriteLine(value.ToString());

      }

   }


   class Program

   {

      static void Main()

      {

         Task t = MyClass.DoWorkAsync();

         t.Wait();

         Console.WriteLine("Press Enter key to exit");

         Console.Read();

      }

   }
This code produces the following output:
5

6

7

8
The await expression can be used anywhere any other expression can be used (as long as it’s inside an async method). In the code above, the four await expressions are used in three different positions.
- The first and third instances use the
awaitexpression as a statement.- In the second instance, the
awaitexpression is used as the parameter to theWriteLinemethod call.- The fourth instance uses the
awaitexpression as the right-hand side of an assignment statement.
Suppose, however, that you have a method that doesn’t match any of the four delegate forms. For example, suppose that you have a method named GetSum that takes two int values as input and returns the sum of the two values. This isn’t compatible with any of the four acceptable delegates. To get around this, you can create a lambda function in the form of an acceptable Func delegate, whose sole action is to run the GetSum method, as shown in the following line of code:
int value = await Task.Run(() => GetSum(5, 6));
The lambda function () => GetSum(5, 6) satisfies the Func<TResult> delegate because it is a method that takes no parameters, but returns a single value. The following code shows a full example:
static class MyClass

{

   private static int GetSum(int i1, int i2)

   {

      return i1 + i2;

   }


   public static async Task DoWorkAsync()

   {                                   TResult Func()

                                           ↓

      int value = await Task.Run( () => GetSum(5, 6) );

      Console.WriteLine(value.ToString());

   }

}


class Program

{

   static void Main()

   {

      Task t = MyClass.DoWorkAsync();

      t.Wait();

      Console.WriteLine("Press Enter key to exit");

      Console.Read();

   }

}
This code produces the following output:
11

Press Enter key to exit
Cancelling an async Operation
Some of the .NET asynchronous methods allow you to request that they abort their execution. You can also build this feature into your own async methods. There are two classes in the System.Threading.Tasks namespace that are designed for this purpose: CancellationToken and CancellationTokenSource.
- A
CancellationTokenobject contains the information about whether a task should be cancelled or not.- A task that has a
CancellationTokenobject needs to periodically inspect it to see what the token’s state is. If theCancellationTokenobject’sIsCancellationRequestedproperty is set totrue, the task should halt its operations and return.- A
CancellationTokenis nonreversible and can only be used once. That is, once it’sIsCancellationRequestedproperty is set totrue, it can’t be changed.- A
CancellationTokenSourceobject creates aCancellationTokenobject, which can then be given to various tasks. Any objects holding aCancellationTokenSourcecan call itsCancelmethod, which sets theCancellationToken’sIsCancellationRequestedproperty totrue.
The following code shows how the CancellationTokenSource and CancellationToken classes are used to implement cancellation. Notice that the process is cooperative. That is, the fact that you call Cancel on the CancellationTokenSource doesn’t, in itself, cancel the operation. Instead, it sets the state of the CancellationToken’s IsCancellationRequested property to true. It’s up to the code containing the CancellationToken to inspect it and see whether it should stop its execution and return.
The following code shows the use of the cancellation classes. The code as it’s written does not cancel the async method, but contains two commented lines in the middle of method Main that invoke the cancellation action.
   class Program

   {

      static void Main()

      {

         CancellationTokenSource cts   = new CancellationTokenSource();

         CancellationToken       token = cts.Token;


         MyClass mc  = new MyClass();

         Task t      = mc.RunAsync( token );


         //Thread.Sleep( 3000 );   // Wait 3 seconds.

         //cts.Cancel();           //cancel the operation.


         t.Wait();

         Console.WriteLine( "Was Cancelled: {0}", token.IsCancellationRequested );

      }

   }
   class MyClass

   {

      public async Task RunAsync( CancellationToken ct )

      {

         if ( ct.IsCancellationRequested )

            return;

         await Task.Run( () => CycleMethod( ct ), ct );

      }


      void CycleMethod( CancellationToken ct )

      {

         Console.WriteLine( "Starting CycleMethod" );

         const int max = 5;

         for ( int i=0; i < max; i++ )

         {

            if ( ct.IsCancellationRequested )     // Monitor the CancellationToken.

               return;

            Thread.Sleep( 1000 );

            Console.WriteLine( "   {0} of {1} iterations completed", i+1, max );

         }

      }

   }
The first run, leaving the lines commented, does not cancel the task, and produces the following output:
Starting CycleMethod

   1 of 5 iterations completed

   2 of 5 iterations completed

   3 of 5 iterations completed

   4 of 5 iterations completed

   5 of 5 iterations completed

Was Cancelled: False
If you uncomment the Thread.Sleep and Cancel statements in method Main, the task is cancelled after three seconds, and the execution produces the following output:
Starting CycleMethod

   1 of 5 iterations completed

   2 of 5 iterations completed

   3 of 5 iterations completed

Was Cancelled: True
Exception Handling and the await Expression
You can use await expressions inside a try statement just as you would with any other expression, and the try…catch…finally constructs work as you would expect.
The following code shows an example of an await expression with a task that throws an exception. The await expression is inside a try block, which handles the exception in the normal way.
   class Program

   {

      static void Main(string[] args)

      {

         Task t = BadAsync();

         t.Wait();

         Console.WriteLine("Task Status   :  {0}", t.Status);

         Console.WriteLine("Task IsFaulted:  {0}", t.IsFaulted);

      }


      static async Task BadAsync()

      {

         try

         {

            await Task.Run(() => { throw new Exception(); });

         }

         catch

         {

            Console.WriteLine("Exception in BadAsync");

         }

      }

   }
This code produces the following output:
Exception in BadAsync

Task Status   :  RanToCompletion

Task IsFaulted:  False
Notice in the output that even though the Task threw an Exception, at the end of Main, the Task’s status is RanToCompletion. This might be a bit surprising, since the async method threw an exception. The reason for this, though, is that the following two conditions are true: (1) the Task wasn’t cancelled, and (2) there were no unhandled exceptions. Similarly, the IsFaulted property is set to False because there were no unhandled exceptions.
Waiting Synchronously for Tasks in the Calling Method
The calling method can make any number of calls to various async methods and receive back Task objects from them. Your code might then continue, doing various tasks, but then get to a point where it wants to wait for a particular Task object to complete before continuing further. To do this, the Task class provides instance method Wait, which you call on a Task object.
The following code shows an example of its use. In the code, the calling method DoRun calls async method CountCharactersAsync and receives back a Task<int>. It then calls the Wait method on the Task instance to wait until the Task finishes. When it finishes, it displays the result message.
   static class MyDownloadString

   {

      public static void DoRun()

      {

         Task<int> t = CountCharactersAsync( "http://www.illustratedcsharp.com" );

      Wait until the Task t completes.

           ↓

         t.Wait();

         Console.WriteLine( "The task has finished, returning value {0}.", t.Result );

      }


      private static async Task<int> CountCharactersAsync( string site )

      {

         string result = await new WebClient().DownloadStringTaskAsync( new Uri( site ) );

         return result.Length;

      }

   }


   class Program

   {

      static void Main()

      {

         MyDownloadString.DoRun();

      }

   }
This code produces the following output:
The task has finished, returning value 4699.
The Wait method is for use with a single Task object. But you can also wait on a set of Task objects. Given a set of Tasks, you can wait until all of them are completed, or you can wait until one of them completes. The methods you use to do this are the following two static methods on the Task class:
WaitAllWaitAny
These are synchronous methods that return no value. That is, they stop and wait until their constraint is satisfied, before continuing.
We’ll start by looking at a simple program that has a method called DoRun, which calls an async method twice, getting back two Task<int> objects in return. The method then continues on its way, checking and printing out whether or not the tasks are completed. It then goes to the end of the method and waits on the Console.Read call before completing. The Console.Read method waits for a character received from the keyboard.
The program, as written, doesn’t use the wait methods, but it contains a commented section in the middle of DoRun that contains the wait code, which we’ll use shortly, to compare against the results of this version.
   class MyDownloadString

   {

      Stopwatch sw = new Stopwatch();


      public void DoRun()

      {

         sw.Start();


         Task<int> t1 = CountCharactersAsync( 1, "http://www.microsoft.com" );

         Task<int> t2 = CountCharactersAsync( 2, "http://www.illustratedcsharp.com" );


         //Task<int>[] tasks = new Task<int>[] { t1, t2 };

         //Task.WaitAll( tasks );

         //Task.WaitAny( tasks );


         Console.WriteLine( "Task 1:  {0}Finished", t1.IsCompleted ? "" : "Not " );

         Console.WriteLine( "Task 2:  {0}Finished", t2.IsCompleted ? "" : "Not " );

         Console.Read();

      }


      private async Task<int> CountCharactersAsync( int id, string site )

      {

         WebClient wc = new WebClient();

         string result = await wc.DownloadStringTaskAsync( new Uri( site ) );

         Console.WriteLine( "   Call {0} completed:     {1, 4:N0} ms",

                                          id, sw.Elapsed.TotalMilliseconds );

         return result.Length;

      }

   }


   class Program

   {

      static void Main()

      {

         MyDownloadString ds = new MyDownloadString();

         ds.DoRun();

      }

   }
This code produces the following output. Notice that neither Task had completed when they were checked with the IsCompleted method.
If we uncomment the first two lines of commented code in the middle of DoRun, as shown in the following three lines of code, the method creates an array containing the two tasks and passes the array to the WaitAll method. The code will then stop and wait until both tasks have completed before continuing execution.
   Task<int>[] tasks = new Task<int>[] { t1, t2 };

   Task.WaitAll( tasks );

   //Task.WaitAny( tasks );
When we run the code with this configuration, the result is the following:
   Call 1 completed:      137 ms

   Call 2 completed:      601 ms

Task 1:  Finished

Task 2:  Finished
If we modify the section again to comment out the WaitAll method call and uncomment the WaitAny method call, the code looks like the following:
   Task<int>[] tasks = new Task<int>[] { t1, t2 };

   //Task.WaitAll( tasks );

   Task.WaitAny( tasks );
In this case, the WaitAny call halts until at least one of the Tasks completes. When we run the code again, the results are the following:
   Call 1 completed:      137 ms

Task 1:  Finished

Task 2:  Not Finished

   Call 2 completed:      413 ms
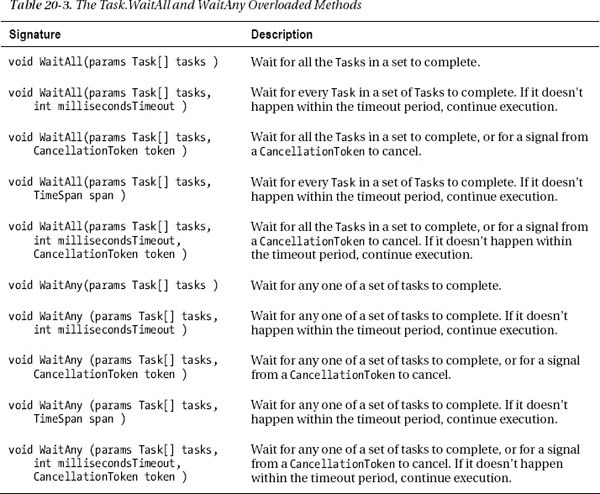
There are four overloads each for the WaitAll and WaitAny methods, allowing different ways of continuing execution other than completion of the tasks. The different overloads allow you to set a timeout or to use a CancellationToken to force continuation of the process. Table 20-3 shows the overloads for the methods.
Waiting Asynchronously for Tasks in the async Method
In the previous section, you learned how to wait synchronously for Task completion. Sometimes, however, in your async method, you will want to wait on Tasks as your await expression. This allows your async method to return to the calling method, but allows the async method to wait for completion of one or all of a set of tasks. The calls that allow this are the Task.WhenAll and Task.WhenAny methods. These methods are called combinators.
The following code shows an example of using the Task.WhenAll method. This method waits asynchronously, without requiring time on the main thread, until all the Tasks associated with it are completed. Notice that the await expression’s task is the Task.WhenAll call.
   using System;

   using System.Collections.Generic;

   using System.Net;

   using System.Threading.Tasks;


   class MyDownloadString

   {

      public void DoRun()

      {

         Task<int> t = CountCharactersAsync( "http://www.microsoft.com",

                                          "http://www.illustratedcsharp.com");


         Console.WriteLine( "DoRun:  Task {0}Finished", t.IsCompleted ? "" : "Not " );

         Console.WriteLine( "DoRun:  Result = {0}", t.Result );

      }


      private async Task<int> CountCharactersAsync(string site1, string site2 )

      {

         WebClient wc1 = new WebClient();

         WebClient wc2 = new WebClient();

         Task<string> t1 = wc1.DownloadStringTaskAsync( new Uri( site1 ) );

         Task<string> t2 = wc2.DownloadStringTaskAsync( new Uri( site2 ) );


         List<Task<string>> tasks = new List<Task<string>>();

         tasks.Add( t1 );

         tasks.Add( t2 );


         await Task.WhenAll( tasks );


         Console.WriteLine( "     CCA:  T1 {0}Finished", t1.IsCompleted ? "" : "Not " );

         Console.WriteLine( "     CCA:  T2 {0}Finished", t2.IsCompleted ? "" : "Not " );


         return t1.IsCompleted ? t1.Result.Length : t2.Result.Length;

      }

   }
   class Program

   {

      static void Main()

      {

         MyDownloadString ds = new MyDownloadString();

         ds.DoRun();

      }

   }
This code produces the following output:
DoRun:  Task Not Finished

     CCA:  T1 Finished

     CCA:  T2 Finished

DoRun:  Result = 1020
The Task.WhenAny combinator waits asynchronously until one of the Tasks associated with it completes. If you change the await expression to use the Task.WhenAny method instead of the Task.WhenAll method, and rerun the program, it produces the following output:
DoRun:  Task Not Finished

     CCA:  T1 Finished

     CCA:  T2 Not Finished

DoRun:  Result = 1020
The Task.Delay Method
The Task.Delay method creates a Task object that stops its own processing on the thread and completes after a set amount of time passes. Unlike Thread.Sleep, however, which blocks work on the thread, Task.Delay does not block the thread, so it can continue processing other work.
The following code shows an example of using the Task.Delay method:
   class Simple

   {

      Stopwatch sw = new Stopwatch();


      public void DoRun()

      {

         Console.WriteLine( "Caller: Before call" );

         ShowDelayAsync();

         Console.WriteLine( "Caller: After call" );

      }


      private async void ShowDelayAsync (  )

      {

         sw.Start();

         Console.WriteLine( "   Before Delay: {0}", sw.ElapsedMilliseconds );

         await Task.Delay( 1000 );

         Console.WriteLine( "   After Delay : {0}", sw.ElapsedMilliseconds );

      }

   }


   class Program

   {

      static void Main()

      {

         Simple ds = new Simple ();

         ds.DoRun();

         Console.Read();

      }

   }
This code produces the following output:
Caller: Before call

   Before Delay: 0

Caller: After call

   After Delay : 1007
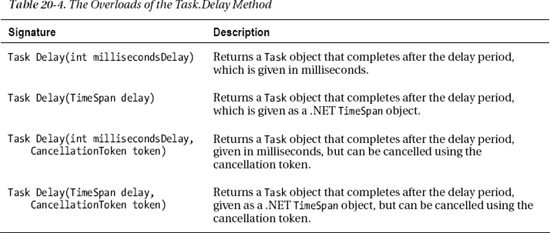
There are four overloads for the Delay method, allowing for different ways of specifying the time period, and also allowing for a CancellationToken object. Table 20-4 shows the four overloads for the method.
Async Operations in GUI Programs
Although all the code in this chapter so far has been for console applications, asynchronous methods are particularly useful for GUI programs.
The reason for this is that GUI programs are designed such that almost every change in the display, including servicing button clicks, displaying labels, and moving the window itself, must be done on the main GUI thread. The way this is implemented in Windows programs is through the use of messages, which are placed into a message queue, which is managed by the message pump.
The message pump takes a message out of the queue and calls that message’s handler code. When the handler code finishes, the message pump gets the next message and repeats the cycle.
Because of this architecture, it’s important that handler code be short, so that it doesn’t hold up the process and block other GUI actions from being processed. If the handler code for a particular message takes a long time, a message backlog builds up in the message queue, and the program becomes unresponsive because none of those messages can be handled until the long-running handler is finished.
Figure 20-10 shows two versions of a window from a WPF program. The window consists of a status label and a button underneath it. The intention of the programmer was that the program user would click the button and the button’s handler code would do the following:
- Disable the button, so that the user can’t click it again while the handler is working
- Change the message to “Doing Stuff,” so that the user knows the program is working
- Have the program sleep for 4 seconds—simulating some work
- Change the message back to the original message and reenable the button
The screenshot on the right of the figure illustrates what the programmer expected the window to look like for the 4 seconds after the button is pressed. It turns out, however, that that wasn’t the result. When the programmer clicked the button, nothing appeared to happen at all, and when he tried to move the window around on the screen several seconds after clicking the button, the window was frozen on the screen and wouldn’t move—until after the 4 seconds were done, when the window all of a sudden lurched to the new position.
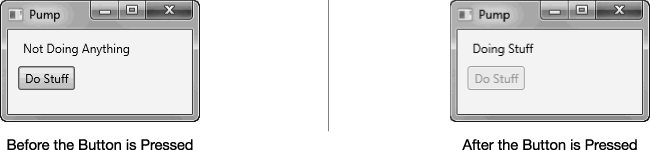
Figure 20-10. A simple WPF program with a button and a status string
![]() Note WPF is Microsoft’s replacement for the Windows Forms GUI programming framework. For further information about WPF programming, please see my book Illustrated WPF (Apress, 2009).
Note WPF is Microsoft’s replacement for the Windows Forms GUI programming framework. For further information about WPF programming, please see my book Illustrated WPF (Apress, 2009).
To re-create this WPF program, called MessagePump, in Visual Studio 2012, do the following:
- Select the File
New
- On the pane on the left of the window, open the Installed Templates section, if it’s not already open.
- Under the C# category, click the Windows entry. This populates the center pane with the installed Windows program templates.
- Click WPF Application, and then at the bottom of the window, enter
MessagePumpin the Name text box. Below that, select a location and click the OK button.- Modify the XAML markup in file
MainWindow.xamlto be the same as the following markup. This creates the window with the status label and the button.<Window x:Class="MessagePump.MainWindow"
xmlns="http://schemas.microsoft.com/winfx/2006/xaml/presentation"
xmlns:x="http://schemas.microsoft.com/winfx/2006/xaml"
Title="Pump" Height="120" Width="200 ">
<StackPanel>
<Label Name="lblStatus" Margin="10,5,10,0" >Not Doing Anything</Label>
<Button Name="btnDoStuff" Content="Do Stuff" HorizontalAlignment="Left"
Margin="10,5" Padding="5,2" Click="btnDoStuff_Click"/>
</StackPanel>
</Window>- Modify the code-behind file,
MainWindow.xaml.cs, so that it matches the following C# code.using System.Threading;
using System.Threading.Tasks;
using System.Windows;
namespace MessagePump
{
public partial class MainWindow : Window
{
public MainWindow()
{
InitializeComponent();
}
private void btnDoStuff_Click( object sender, RoutedEventArgs e )
{
btnDoStuff.IsEnabled = false;
lblStatus.Content = "Doing Stuff";
Thread.Sleep( 4000 );
lblStatus.Content = "Not Doing Anything";
btnDoStuff.IsEnabled = true;
}
}
}
When you run the program, you’ll find that its behavior matches the preceding description, which is that the button isn’t disabled and the status label doesn’t change, and if you try to move the window, it won’t move until the 4 seconds have passed.
The reason for this possibly surprising behavior is very simple. Figure 20-11 illustrates the situation. When the button is clicked, a button Click message is placed on the message queue. The message pump removes the message from the queue and starts the button click’s handler code—which is method btnDoStuff_Click. The btnDoStuff_Click handler places on the queue the messages that will trigger the behaviors we want, as shown on the right side of the figure. But none of those messages can be executed until the handler itself exits, which isn’t until after it sleeps for 4 seconds and exits. Then all those things happen, but they’re too quick to see.
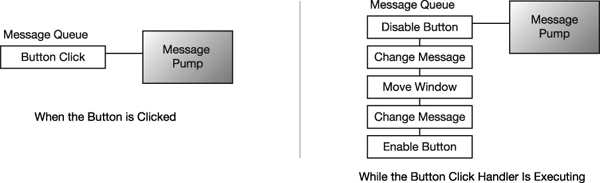
Figure 20-11. The message pump dispatches messages from the front of the message queue. While the button message handler is executing, messages for the other actions build up on the queue, and can’t be executed until it’s done.
If, however, we could have the handler put the first two messages onto the queue and then take itself off the processor and only have itself put back into the queue when the 4 seconds are finished, then those and any other messages could be processed during the waiting time, and the process would perform as we wanted and would remain responsive.
We can accomplish this easily using the async/await feature, as shown below in the modified version of the handler code. When the await statement is reached, the handler returns to the calling method and is taken off the processor, allowing other messages to be processed—including the two it just put on. After the awaitable task finishes (the Task.Delay, in this case), the continuation (the rest of the method) is scheduled back onto the thread.
   private async void btnDoStuff_Click( object sender, RoutedEventArgs e )

   {

      btnDoStuff.IsEnabled = false;

      lblStatus.Content    = "Doing Stuff";


      await Task.Delay( 4000 );


      lblStatus.Content    = "Not Doing Anything";

      btnDoStuff.IsEnabled = true;

   }
Task.Yield
The Task.Yield method creates an awaitable that immediately returns. Awaiting a Yield allows the async method to return to the calling method while continuing on in the async method’s code. You can think of this as leaving the front of the message queue and going to the back of the line, in order to allow other tasks to get time on the processor.
The following sample code shows an async method that yields control every 1,000 times through a loop it executes. Each time it executes the Yield method, it allows other tasks in the thread to execute.
   static class DoStuff

   {

      public static async Task<int> FindSeriesSum( int i1 )

      {

         int sum = 0;

         for ( int i=0; i < i1; i++ )

         {

            sum += i;

            if ( i % 1000 == 0 )

               await Task.Yield();

         }


         return sum;

      }

   }


   class Program

   {

      static void Main()

      {

         Task<int> value = DoStuff.FindSeriesSum( 1000000 );

         CountBig( 100000 );  CountBig( 100000 );

         CountBig( 100000 );  CountBig( 100000 );

         Console.WriteLine( "Sum: {0}", value.Result );

      }


      private static void CountBig( int p )

      {

         for ( int i=0; i < p; i++ )

            ;

      }

   }
This code produces the following output:
Sum: 1783293664
The Yield method can be extremely useful in GUI programs to break up large chunks of work and let other tasks use the processor.
Using an async Lambda Expression
So far in this chapter you’ve only seen async methods. But if you recall, I stated that you can also use async anonymous methods and async lambda expressions. These constructs are particularly useful for event handlers with only a small amount of work. The following code snippet shows a lambda expression being registered as the event handler for a button click event.
   startWorkButton.Click += async ( sender, e ) =>

      {

         // Do the Click handler work.

      };
The following is a short WPF program showing its use. The following is the code-behind:
   using System.Threading.Tasks;

   using System.Windows;


   namespace AsyncLambda

   {

      public partial class MainWindow : Window

      {

         public MainWindow()

         {

            InitializeComponent();


                                       Async lambda expression

                                               ↓

            startWorkButton.Click += async ( sender, e ) =>

               {

                  SetGuiValues( false, "Work Started" );

                  await DoSomeWork();

                  SetGuiValues( true, "Work Finished" );

               };

         }


         private void SetGuiValues(bool buttonEnabled, string status)

         {

            startWorkButton.IsEnabled = buttonEnabled;

            workStartedTextBlock.Text = status;

         }


         private Task DoSomeWork()

         {

            return Task.Delay( 2500 );

         }

      }

   }
The following markup is the XAML file for the program:
   <Window x:Class="AsyncLambda.MainWindow"

           xmlns="http://schemas.microsoft.com/winfx/2006/xaml/presentation"

           xmlns:x="http://schemas.microsoft.com/winfx/2006/xaml"

           Title="Async Lambda" Height="115" Width="150">

       <StackPanel>

           <TextBlock Name="workStartedTextBlock" Margin="10,10"/>

           <Button Name="startWorkButton" Width="100" Margin="4" Content="Start Work" />

       </StackPanel>

   </Window>
This program produces a window with the three states shown in Figure 20-12.
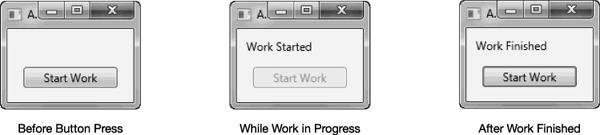
Figure 20-12. The output of the example program AsyncLambda
A Full GUI Example
I’ve covered the async/await components one piece at a time. In this section I want you to see a complete WPF GUI program that includes a status bar and cancellation.
The sample program presents the screenshot shown on the left in Figure 20-13. When you click the button, the program begins to process and updates the progress bar. If you let the processing go to completion, it displays the message box shown at the top on the right of the figure. If you click the Cancel button before processing is complete, the program displays the message box shown at the bottom on the right of the figure.
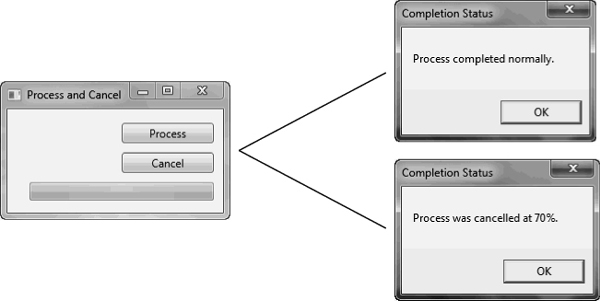
Figure 20-13. Screenshots from a simple WPF program that implements a status bar and cancellation
To re-create the program, create a new WPF application called WpfAwait. Modify the XAML markup in file MainWindow.xaml so that it matches the following:
   <Window x:Class="WpfAwait.MainWindow"

           xmlns="http://schemas.microsoft.com/winfx/2006/xaml/presentation"

           xmlns:x="http://schemas.microsoft.com/winfx/2006/xaml"

           Title="Process and Cancel" Height="150  " Width="250">

       <StackPanel>

           <Button Name="btnProcess" Width="100" Click="btnProcess_Click"

                   HorizontalAlignment="Right" Margin="10,15,10,10">Process</Button>

           <Button Name="btnCancel" Width="100" Click="btnCancel_Click"

                   HorizontalAlignment="Right" Margin="10,0">Cancel</Button>

           <ProgressBar Name="progressBar" Height="20" Width="200" Margin="10"

                        HorizontalAlignment="Right"/>

       </StackPanel>

   </Window>
Modify the code-behind file, MainWindow.xaml.cs, so that it matches the following:
   using System.Threading;

   using System.Threading.Tasks;

   using System.Windows;

   namespace WpfAwait

   {
      public partial class MainWindow : Window

      {

         CancellationTokenSource _cancellationTokenSource;

         CancellationToken       _cancellationToken;


         public MainWindow()

         {

            InitializeComponent();

         }


         private async void btnProcess_Click( object sender, RoutedEventArgs e )

         {

            btnProcess.IsEnabled = false;


            _cancellationTokenSource = new CancellationTokenSource();

            _cancellationToken       = _cancellationTokenSource.Token;


            int completedPercent = 0;

            for ( int i = 0; i < 10; i++ )

            {

               if ( _cancellationToken.IsCancellationRequested )

                  break;

               try {

                  await Task.Delay( 500, _cancellationToken );

                  completedPercent = ( i + 1 ) * 10;

               }

               catch ( TaskCanceledException ex ) {

                  completedPercent = i * 10;

               }

               progressBar.Value = completedPercent;

            }


            string message = _cancellationToken.IsCancellationRequested

                     ? string.Format("Process was cancelled at {0}%.", completedPercent)

                     : "Process completed normally.";

            MessageBox.Show( message, "Completion Status" );


            progressBar.Value = 0;

            btnProcess.IsEnabled = true;

            btnCancel.IsEnabled  = true;

         }


         private void btnCancel_Click( object sender, RoutedEventArgs e ) {

            if ( !btnProcess.IsEnabled )

            {

               btnCancel.IsEnabled = false;

               _cancellationTokenSource.Cancel();

            }

         }

      }

   }
The BackgroundWorker Class
In the previous sections you learned how to use the async/await feature to process tasks asynchronously. In this section you’ll learn another means of doing asynchronous work—in this case, on a background thread. The async/await feature works best for a small, discrete task that needs to be done in the background.
Sometimes, however, you might want to set up another thread that is continuously running in the background performing work, and occasionally communicating with the main thread. The BackgroundWorker class is perfect for this. Figure 20-14 shows the key members of the class.
- The first two properties shown in the figure are used to set whether the background task can report its progress to the main thread and whether it supports cancellation from the main thread. You use the third property to find out whether the background task is running.
- The class has three events, which are used to signal different program events and states. You need to write event handlers for these events to take whatever actions are appropriate for your program.
- The
DoWorkevent is raised when the background thread starts.- The
ProgressChangedevent is raised when the background task reports progress.- The
RunWorkerCompletedevent is raised when the background worker exits.- The three methods are used to initiate actions or change state.
- Calling the
RunWorkerAsyncmethod retrieves a background thread that executes theDoWorkevent handler.- Calling the
CancelAsyncmethod sets theCancellationPendingproperty totrue. It is the responsibility of theDoWorkevent handler to inspect this property to determine whether it should stop its processing.- The
ReportProgressmethod can be called by theDoWorkevent handler (from the background thread) when it wants to report its progress to the main thread.
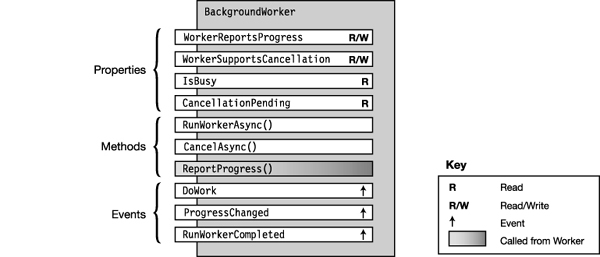
Figure 20-14. The key members of the BackgroundWorker class
To use a BackgroundWorker class object, you need to write the following event handlers. The first is required since it contains the code you want to be executed in the background thread. The other two are optional, and you can include them or not, depending on what your program needs.
- The handler attached to the
DoWorkevent contains the code you want executed in the background on a separate thread.
- In Figure 20-15, this handler is named
DoTheWorkand is in a gradient-shaded box to illustrate that it’s executed in the background thread.- The
DoWorkevent is raised when the main thread calls theBackgroundWorkerobject’sRunWorkerAsyncmethod.- The background thread communicates with the main thread by calling the
ReportProgressmethod. When this happens, theProgressChangedevent is raised, and the main thread can handle the event with the handler attached to theProgressChangedevent.- The handler attached to the
RunWorkerCompletedevent contains the code to be executed on the main thread after the background thread completes the execution of theDoWorkevent handler.
Figure 20-15 shows the structure of a program, with the event handlers attached to the events of the BackgroundWorker object.
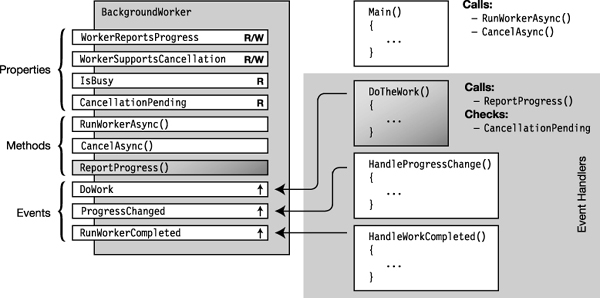
Figure 20-15. Your code must supply event handlers for the events that control the flow through execution of the tasks.
The delegates for these event handlers are the following. Each takes an object reference as the first parameter and a specialized subclass of the EventArgs class as the second parameter.
   void DoWorkEventHandler             ( object sender, DoWorkEventArgs e )


   void ProgressChangedEventHandler    ( object sender, ProgressChangedEventArgs e )


   void RunWorkerCompletedEventHandler ( object sender, RunWorkerCompletedEventArgs e)
Figure 20-16 illustrates the structure of the EventArg classes used by these event handlers.

Figure 20-16. The EventArg classes used by the BackgroundWorker event handlers
When you have the event handlers written and attached to their events, you can use the class by doing the following:
- Start by creating an object of the
BackgroundWorkerclass and configuring it.
- If you want the worker thread to communicate progress to the main thread, then set the
WorkerReportsProgressproperty totrue.- If you want to be able to cancel the worker thread from the main thread, then set the
WorkerSupportsCancellationproperty totrue.- Now that the object is configured, you can start it by calling the object’s
RunWorkerAsyncmethod. This retrieves a background thread that raises theDoWorkevent and executes the event’s handler in the background.
Now you have both the main thread and the background thread running. While the background thread is running, you can continue processing on the main thread.
In the main thread, if you’ve enabled the WorkerSupportsCancellation property, then you can call the object’s CancelAsync method. As with the CancellationToken that you saw at the beginning of the chapter, this does not cancel the background thread. Instead, it sets the object’s CancellationPending property to true. The DoWork event handler code running on the background thread needs to periodically check the CancellationPending property to see whether it should exit.
The background thread, in the meantime, continues to perform its computational tasks, as well as doing the following:
- If the
WorkerReportsProgressproperty istrueand the background thread has progress to report to the main thread, then it must call theBackgroundWorkerobject’sReportProgressmethod. This raises theProgressChangedevent in the main thread, which runs the corresponding event handler.- If the
WorkerSupportsCancellationproperty is enabled, then theDoWorkevent handler code should regularly check theCancellationPendingproperty to determine whether it has been cancelled. If so, it should exit.- If the background thread finishes its processing without being cancelled, it can return a result to the main thread by setting the
Resultfield in theDoWorkEventArgsparameter shown previously in Figure 20-16.
When the background thread exits, the RunWorkerCompleted event is raised and its handler is executed on the main thread. The RunWorkerCompletedEventArgs parameter can contain information from the now completed background thread, such as the return value and whether the thread was cancelled.
Example of the BackgroundWorker Class in a WPF Program
Since the BackgroundWorker class is primarily used with GUI programming, the following program shows its use in a simple WPF program.
This program produces the window shown on the left in Figure 20-17. When you click the Process button, it starts the background thread, which reports to the main thread every half second and increments the progress bar at the top by 10 percent. At completion, it shows the dialog box on the right of the figure.
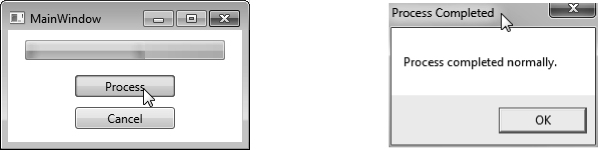
Figure 20-17. The example WPF program using the BackgroundWorker class
To re-create this WPF program, use Visual Studio to create a new WPF application named SimpleWorker. Modify your MainWindow.xaml file to match the following listing:
   <Window x:Class="SimpleWorker.MainWindow"

           xmlns="http://schemas.microsoft.com/winfx/2006/xaml/presentation"

           xmlns:x="http://schemas.microsoft.com/winfx/2006/xaml"

           Title="MainWindow" Height="150  " Width="250">

      <StackPanel>

         <ProgressBar Name="progressBar" Height="20" Width="200" Margin="10"/>

         <Button Name="btnProcess" Width="100" Click="btnProcess_Click"

                 Margin="5">Process</Button>

         <Button Name="btnCancel" Width="100" Click="btnCancel_Click"

                 Margin="5">Cancel</Button>

      </StackPanel>

   </Window>
Modify the MainWindow.xaml.cs file to match the following listing:
   using System.Windows;

   using System.ComponentModel;

   using System.Threading;


   namespace SimpleWorker

   {

      public partial class MainWindow : Window

      {

         BackgroundWorker bgWorker = new BackgroundWorker();


         public MainWindow()

         {

            InitializeComponent();


            // Set BackgroundWorker properties

            bgWorker.WorkerReportsProgress      = true;

            bgWorker.WorkerSupportsCancellation = true;


            // Connect handlers to BackgroundWorker object.

            bgWorker.DoWork             += DoWork_Handler;

            bgWorker.ProgressChanged    += ProgressChanged_Handler;

            bgWorker.RunWorkerCompleted += RunWorkerCompleted_Handler;

         }


         private void btnProcess_Click( object sender, RoutedEventArgs e )

         {

            if ( !bgWorker.IsBusy )

               bgWorker.RunWorkerAsync();

         }


         private void ProgressChanged_Handler( object sender,

                                               ProgressChangedEventArgs args )

         {

            progressBar.Value = args.ProgressPercentage;

         }
         private void DoWork_Handler( object sender, DoWorkEventArgs args )

         {

            BackgroundWorker worker = sender as BackgroundWorker;


            for ( int i = 1; i <= 10; i++ )

            {

               if ( worker.CancellationPending )

               {

                  args.Cancel = true;

                  break;

               }

               else

               {

                  worker.ReportProgress( i * 10 );

                  Thread.Sleep( 500 );

               }

            }

         }


         private void RunWorkerCompleted_Handler( object sender,

                                                  RunWorkerCompletedEventArgs args )

         {

            progressBar.Value = 0;


            if ( args.Cancelled )

               MessageBox.Show( "Process was cancelled.", "Process Cancelled" );

            else

               MessageBox.Show( "Process completed normally.", "Process Completed" );

         }


         private void btnCancel_Click( object sender, RoutedEventArgs e )

         {

            bgWorker.CancelAsync();

         }

      }

   }
Parallel Loops
In this section we’ll take a much-abbreviated look at the Task Parallel Library. The Task Parallel Library is a library of classes in the BCL that greatly simplifies parallel programming. Covering the library in detail is far more than I can do in this chapter. So, unfortunately, I’ve had to settle for whetting your appetite by introducing just two of its very simple constructs that you can learn and use quickly and easily. These are the Parallel.For loop and the Parallel.ForEach loop. These constructs are in the System.Threading.Tasks namespace.
By this point in the book I’m sure you’re quite familiar with C#’s standard for and foreach loops. These are common and tremendously powerful constructs. Many times when using these constructs, each iteration depends on a calculation or action in the previous iteration. But this isn’t always the case. If the iterations are independent of each other, and you’re running on a multiprocessor machine, it might be a huge advantage if you could put different iterations on different processors and process them in parallel. This is exactly what the Parallel.For and Parallel.ForEach constructs do.
These constructs are in the form of methods with input parameters. There are 12 overloads of the Parallel.For method, but the simplest has the signature shown in the following line of code:
void Parallel.For( int fromInclusive, int toExclusive, Action body);
The parameters are the following:
- The
fromInclusiveparameter is the first integer in the iteration series.- The
toExclusiveparameter is an integer that is one greater than the last index in the iteration series. That is, it’s the same as comparing using the expressionindex <ToExclusive.- The
bodyis a delegate that takes a single input parameter. The code ofbodyis executed once per iteration.
The following code is an example using the Parallel.For construct. It iterates from 0 to 14 (remember that the 15 listed as the actual parameter is one more than the top iteration index) and prints out the iteration index and the square of the index. This application fits the requirement that each iteration is independent of any other iteration. Notice also that you must use the System.Threading.Tasks namespace.
   using System;

   using System.Threading.Tasks;         // Must use this namespace


   namespace ExampleParallelFor

   {

      class Program

      {

         static void Main( )

         {

            Parallel.For( 0, 15, i =>

               Console.WriteLine( "The square of {0} is {1}", i, i * i ));

         }

      }

   }
One run of this code on my PC with a two-core processor produced the following output. Notice that you’re not guaranteed any particular order of the iterations.
The square of 0 is 0

The square of 7 is 49

The square of 8 is 64

The square of 9 is 81

The square of 10 is 100

The square of 11 is 121

The square of 12 is 144

The square of 13 is 169

The square of 3 is 9

The square of 4 is 16

The square of 5 is 25

The square of 6 is 36

The square of 14 is 196

The square of 1 is 1

The square of 2 is 4
Another example is the following code. This program fills an integer array, in parallel, with the square of the iteration index.
   class Program

   {

      static void Main()

      {

         const int maxValues = 50;

         int[] squares = new int[maxValues];


         Parallel.For( 0, maxValues, i => squares[i] = i * i );

      }

   }
In this example, even though the iterations might be executed in parallel and in any order, the end result is an array containing the first 50 squares—in order!
The other parallel loop construct is the Parallel.ForEach method. There are more than a dozen overloads for this method, but the simplest is the following:
- The
TSourceis the type of object in the collection.- The
sourceis the collection ofTSourceobjects.- The
bodyis the lambda expression to be applied to each element of the collection.
   static ParallelLoopResult ForEach<TSource>( IEnumerable<TSource> source,

                                               Action<TSource> body)
An example of using the Parallel.ForEach method is the following code. In this case, TSource is string, and the source is a string[].
   using System;

   using System.Threading.Tasks;


   namespace ParallelForeach1

   {

      class Program

      {

         static void Main()

         {

            string[] squares = new string[]

                     { "We", "hold", "these", "truths", "to", "be", "self-evident",

                       "that", "all", "men", "are", "created", "equal"};


            Parallel.ForEach( squares,

               i => Console.WriteLine( string.Format("{0} has {1} letters", i, i.Length) ));

         }

      }

   }
One run of this code on my PC with a two-core processor produced the following output, but the order might change each time:
"We" has 2 letters

"equal" has 5 letters

"truths" has 6 letters

"to" has 2 letters

"be" has 2 letters

"that" has 4 letters

"hold" has 4 letters

"these" has 5 letters

"all" has 3 letters

"men" has 3 letters

"are" has 3 letters

"created" has 7 letters

"self-evident" has 12 letters
Other Asynchronous Programming Patterns
For most of the asynchronous code you’ll be producing, you’ll probably be using the async/await feature, the BackgroundWorker class covered in the first part of this chapter, or the Task Parallel Library. There might still be occasions, however, where you’ll need to use the older patterns for producing asynchronous code. For completeness, I’ll cover these patterns, starting with this section to the end of the chapter. After learning these older patterns, you’ll have a greater appreciation for how much simpler life is with the async/await feature.
Chapter 13 covered the topic of delegates, and you saw that when a delegate object is invoked, it invokes the methods contained in its invocation list. This is done synchronously, just as if the methods had been called by the program.
If a delegate object has only a single method (which I’ll call the referenced method) in its invocation list, it can execute that method asynchronously. The delegate class has two methods, called BeginInvoke and EndInvoke, that are used to do this. You use these methods in the following way:
- When you call the delegate’s
BeginInvokemethod, it starts its referenced method executing on a separate thread and then returns immediately to the initial thread. The initial thread then continues on while the referenced method executes in parallel.- When your program wants to retrieve the results of the completed asynchronous method, it either checks the
IsCompletedproperty of theIAsyncResultreturned byBeginInvokeor calls the delegate’sEndInvokemethod to wait for the delegate to finish.
Figure 20-18 shows the three standard patterns for using this process. In all three patterns, the initial thread initiates an asynchronous method call and then does some additional processing. The patterns differ, however, in the ways in which the initial thread receives the information that the spawned thread has completed.
- In the wait-until-done pattern, after spawning the asynchronous method and doing some additional processing, the initial thread halts and waits for the spawned thread to finish before continuing.
- In the polling pattern, the initial thread checks periodically whether the spawned thread has completed, and if not, it continues additional processing.
- In the callback pattern, the initial thread continues execution without waiting or checking whether the spawned thread has completed. Instead, when the referenced method in the spawned thread finishes, it calls a callback method, which handles the results of the asynchronous method before calling
EndInvoke.
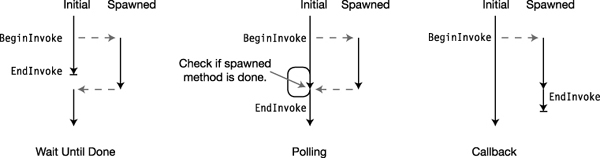
Figure 20-18. The standard patterns for asynchronous method calls
BeginInvoke and EndInvoke
Before we look at examples of these asynchronous programming patterns, let’s take a closer look at the BeginInvoke and EndInvoke methods. Some of the important things to know about BeginInvoke are the following:
- When calling
BeginInvoke, the actual parameters in the parameter list consist of the following:
- The parameters required by the referenced method
- Two additional parameters, called the
callbackparameter and thestateparameterBeginInvokeretrieves a thread from the thread pool and starts the referenced method running on the new thread.BeginInvokereturns to the calling thread a reference to an object implementing theIAsyncResultinterface. This interface reference contains information about the current state of the asynchronous method on the thread pool thread. The initial thread then continues execution.
The following code shows an example of calling a delegate’s BeginInvoke method. The first line declares a delegate type called MyDel. The next line declares a method called Sum, which matches the delegate.
- The following line declares a delegate object called
del, of the delegate typeMyDel, and initializes its invocation list with theSummethod.- Finally, the last line of code calls the
BeginInvokemethod of the delegate object and supplies it with the two delegate parameters3and5and the twoBeginInvokeparameterscallbackandstate, which are set tonullin this example. When executed, theBeginInvokemethod performs two actions:
- It gets a thread from the thread pool and starts method
Sumrunning on the new thread, supplying it with3and5as its actual parameters.- It collects information about the state of the new thread and makes it available through a reference to an interface of type
IAsyncResult, which it returns to the calling thread. The calling thread, in this example, stores it in a variable callediar.
   delegate long MyDel( int first, int second );          // Delegate declaration

      ...

   static long Sum(int x, int y){ ... }                   // Method matching delegate

      ...

   MyDel del        = new MyDel(Sum);                     // Create delegate object

   IAsyncResult iar = del.BeginInvoke( 3, 5, null, null );

           ↑                 ↑           ↑        ↑

   Information about       Invoke delegate      Delegate    Extra

     new thread          asynchronously      params    params
You use the EndInvoke method to retrieve the values returned by the asynchronous method call and to release resources used by the thread. EndInvoke has the following characteristics:
- It takes as a parameter the reference to the
IAsyncResultreturned by theBeginInvokemethod and finds the thread it refers to.- If the thread pool thread has exited,
EndInvokedoes the following:
- It cleans up the exited thread’s loose ends and disposes of its resources.
- It finds the value returned by the referenced method and returns that value as its return value.
- If the thread pool thread is still running when
EndInvokeis called, the calling thread stops and waits for it to finish before cleaning up and returning the value. BecauseEndInvokecleans up after the spawned thread, you must make sure that anEndInvokeis called for eachBeginInvoke.- If the asynchronous method triggers an exception, the exception is raised when
EndInvokeis called.
The following line of code shows an example of calling EndInvoke to retrieve the value from an asynchronous method. You must always include the reference to the IAsyncResult object as a parameter.
             Delegate object

                  ↓

   long result = del.EndInvoke( iar );

        ↑                        ↑

    Return value from             IAsyncResult

  asynchronous method             object
EndInvoke supplies all the output from the asynchronous method call, including ref and out parameters. If a delegate’s referenced method has ref or out parameters, they must be included in EndInvoke’s parameter list before the reference to the IAsyncResult object, as shown here:
  long result = del.EndInvoke(out someInt, iar);

       ↑                           ↑        ↑

  Return value from                    Out     IAsyncResult

   asynchronous method                parameter     object
The Wait-Until-Done Pattern
Now that you understand the BeginInvoke and EndInvoke delegate methods, we can look at the asynchronous programming patterns. The first one we’ll look at is the wait-until-done pattern. In this pattern, the initial thread initiates an asynchronous method call, does some additional processing, and then stops and waits until the spawned thread finishes. It’s summarized as follows:
   IAsyncResult iar = del.BeginInvoke( 3, 5, null, null );

        // Do additional work in the calling thread, while the method

        // is being executed asynchronously in the spawned thread.

        ...

   long result = del.EndInvoke( iar );
The following code shows a full example of this pattern. This code uses the Sleep method of the Thread class to suspend itself for 100 milliseconds (1/10 of a second). The Thread class is in the System.Threading namespace.
   using System;

   using System.Threading;                         // For Thread.Sleep()


   delegate long MyDel( int first, int second );   // Declare delegate type.


   class Program {

      static long Sum(int x, int y)                // Declare method for async.

      {

         Console.WriteLine("                       Inside Sum");

         Thread.Sleep(100);


         return x + y;

      }

      static void Main( ) {

         MyDel del = new MyDel(Sum);


         Console.WriteLine( "Before BeginInvoke" );

         IAsyncResult iar = del.BeginInvoke(3, 5, null, null); // Start async

         Console.WriteLine( "After  BeginInvoke" );


         Console.WriteLine( "Doing stuff" );


         long result = del.EndInvoke( iar );    // Wait for end and get result

         Console.WriteLine( "After  EndInvoke: {0}", result );

      }

   }
This code produces the following output:
Before BeginInvoke

After  BeginInvoke

Doing stuff

                       Inside Sum

After  EndInvoke: 8
The AsyncResult Class
Now that you’ve seen BeginInvoke and EndInvoke in action in their simplest forms, it’s time to take a closer look at IAsyncResult, which is an integral part of using these methods.
BeginInvoke returns a reference to an IAsyncResult interface that is inside a class object of type AsyncResult. The AsyncResult class represents the state of the asynchronous method. Figure 20-19 shows a representation of some of the important parts of the class. The important things to know about the class are the following:
- When you call a delegate object’s
BeginInvokemethod, the system creates an object of the classAsyncResult. It doesn’t, however, return a reference to the class object. Instead, it returns a reference to the interface contained in the object—IAsyncResult.- An
AsyncResultobject contains a property calledAsyncDelegate, which returns a reference to the delegate that was invoked to start the asynchronous method. This property, however, is part of the class object but not part of the interface.- The
IsCompletedproperty returns a Boolean value indicating whether the asynchronous method has completed.- The
AsyncStateproperty returns a reference to the object that was listed as thestateparameter in theBeginInvokemethod invocation. It returns a reference of typeobject. I'll explain this in the section on the callback pattern.
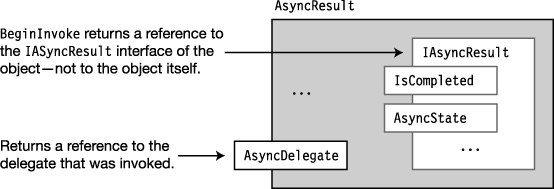
Figure 20-19. An AsyncResult class object
The Polling Pattern
In the polling pattern, the initial thread initiates an asynchronous method call, does some additional processing, and then uses the IsCompleted method of the IAsyncResult object to check periodically whether the spawned thread has completed. If the asynchronous method has completed, the initial thread calls EndInvoke and continues. Otherwise, it does some additional processing and checks again later. The “processing” in this example just consists of counting from 0 to 10,000,000.
   delegate long MyDel(int first, int second);


   class Program

   {

      static long Sum(int x, int y)

      {

         Console.WriteLine("                  Inside Sum");

         Thread.Sleep(100);


         return x + y;

      }


      static void Main()

      {

         MyDel del = new MyDel(Sum); Spawn asynchronous method.

                                           ↓

         IAsyncResult iar = del.BeginInvoke(3, 5, null, null); // Start async.

         Console.WriteLine("After BeginInvoke");

        Check whether the asynchronous method is done.

                     ↓

        while ( !iar.IsCompleted )

         {

            Console.WriteLine("Not Done");


            // Continue processing, even though in this case it's just busywork.

            for (long i = 0; i < 10000000; i++)

               ;                                       // Empty statement

         }

         Console.WriteLine("Done");

                        Call EndInvoke to get result and clean up.

                               ↓

         long result = del.EndInvoke(iar);

         Console.WriteLine("Result: {0}", result);

      }

   }
This code produces the following output:
After BeginInvoke

Not Done

                  Inside Sum

Not Done

Not Done

Done

Result: 8
The Callback Pattern
In the previous two patterns, wait-until-done and polling, the initial thread continues with its flow of control only after it knows that the spawned thread has completed. It then retrieves the results and continues.
The callback pattern is different in that once the initial thread spawns the asynchronous method, it goes on its way without synchronizing with it again. When the asynchronous method call completes, the system invokes a user-supplied method to handle its results and to call the delegate’s EndInvoke method. This user-defined method is called a callback method, or just a callback.
The two extra parameters at the end of the BeginInvoke parameter list are used with the callback method as follows:
- The first of the two parameters, the
callbackparameter, is the name of the callback method.- The second parameter, the
stateparameter, can be eithernullor a reference to an object you want passed into the callback method. You’ll be able to access this object through the method’sIAsyncResultparameter using itsAsyncStateproperty. The type of this parameter isobject.
The Callback Method
The signature and return type of the callback method must be of the form described by the AsyncCallback delegate type. This form requires that the method take a single parameter of type IAsyncResult and have a void return type, as shown here:
void AsyncCallback( IAsyncResult iar )
There are several ways you can supply the callback method to the BeginInvoke method. Since the callback parameter in BeginInvoke is a delegate of type AsyncCallback, you can supply it as a delegate, as shown in the first code statement that follows. Or you can just supply the name of the callback method and let the compiler create the delegate for you. Both forms are semantically equivalent.
                            Create a delegate with the callback method.

   IAsyncResult iar1 =                  ↓

      del.BeginInvoke(3, 5, new AsyncCallback(CallWhenDone), null);

                                      Just use the callback method’s name.

                                                ↓

   IAsyncResult iar2 = del.BeginInvoke(3, 5, CallWhenDone, null);
The second additional BeginInvoke parameter (which is the last one in the parameter list) is used to send an object to the callback method. It can be an object of any type, since the parameter is of type object. Inside the callback method you’ll have to cast it to the correct type.
Calling EndInvoke Inside the Callback Method
Inside the callback method, your code should call the delegate’s EndInvoke method and take care of handling the output results of the asynchronous method execution. To call the delegate’s EndInvoke method, though, you need a reference to the delegate object, which is in the initial thread—not here in the spawned thread.
If you’re not using BeginInvoke’s state parameter for anything else, you can use it to send the delegate reference to the callback method, as shown here:
                  Delegate object                Send delegate object as state param.

                      ↓                                  ↓

   IAsyncResult iar = del.BeginInvoke(3, 5, CallWhenDone, del);
Otherwise, you can extract the delegate’s reference from the IAsyncResult object sent into the method as the parameter. This is shown in the following code and illustrated in Figure 20-20.
- The single parameter to the callback method is a reference to the
IAsyncResultinterface of the asynchronous method that has just completed. Remember that theIAsyncResultinterface object is inside theAsyncResultclass object.- Although the
IAsyncResultinterface doesn’t have a reference to the delegate object, theAsyncResultclass object enclosing it does have a reference to the delegate object. So, the first line inside the example method body gets a reference to the class object by casting the interface reference to the class type. Variablearnow has a reference to the class object.- With the reference to the class object, you can now use the
AsyncDelegateproperty of the class object and cast it to the appropriate delegate type. This gives you the delegate reference, which you can then use to callEndInvoke.
   using System.Runtime.Remoting.Messaging;     // Contains AsyncResult class


   void CallWhenDone( IAsyncResult iar )

   {

      AsyncResult ar = (AsyncResult) iar;       // Get class object reference.

      MyDel del = (MyDel) ar.AsyncDelegate;     // Get reference to delegate.


      long Sum = del.EndInvoke( iar );          // Call EndInvoke.

         ...

   }
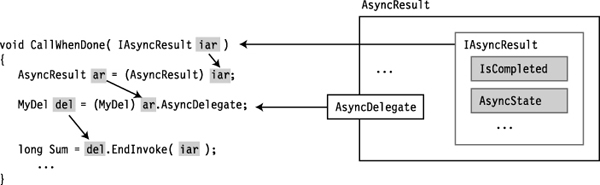
Figure 20-20. Extracting the delegate’s reference inside the callback method
The following code puts it all together and is an example of using the callback pattern:
   using System;

   using System.Runtime.Remoting.Messaging;      // To access the AsyncResult type

   using System.Threading;


   delegate long MyDel(int first, int second);


   class Program

   {

      static long Sum(int x, int y)

      {

         Console.WriteLine("                         Inside Sum");

         Thread.Sleep(100);

         return x + y;

      }

      static void CallWhenDone(IAsyncResult iar)

      {

         Console.WriteLine("                         Inside CallWhenDone.");

         AsyncResult ar = (AsyncResult) iar;

         MyDel del = (MyDel)ar.AsyncDelegate;


         long result = del.EndInvoke(iar);

         Console.WriteLine

            ("                         The result is: {0}.", result);

      }

      static void Main()

      {

         MyDel del = new MyDel(Sum);


         Console.WriteLine("Before BeginInvoke");

         IAsyncResult iar =

            del.BeginInvoke(3, 5, new AsyncCallback(CallWhenDone), null);


         Console.WriteLine("Doing more work in Main.");

         Thread.Sleep(500);

         Console.WriteLine("Done with Main. Exiting.");

      }

   }
This code produces the following output:
Before BeginInvoke

Doing more work in Main.

                         Inside Sum

                         Inside CallWhenDone.

                         The result is: 8.

Done with Main. Exiting.
Timers
Timers provide another way to run an asynchronous method on a regular, recurring basis. Although there are several Timer classes available in the .NET BCL, I’ll describe the one in the System.Threading namespace.
The important things to know about this timer class are the following:
- The timer uses a callback method that is called each time the timer expires. The callback method must be in the form of the
TimerCallbackdelegate, which has the following form. It takes a single parameter of typeobjectand has avoidreturn type.void TimerCallback( object state )- When the timer expires, the system sets up the callback method on a thread from the thread pool, supplies the
stateobject as its parameter, and starts it running.- You can set a number of the timer’s characteristics, including the following:
- The
dueTimeis the amount of time before the first call of the callback method. IfdueTimeis set to the special valueTimeout.Infinite, the timer will not start. If it’s set to0, the callback is called immediately.- The
periodis the amount of time between each successive call of the callback method. If it’s value is set toTimeout.Infinite, the callback won’t be called after the first time.- The
stateis eithernullor a reference to an object to be passed to the callback method each time it’s executed.
The constructor for the Timer class takes as parameters the name of the callback method, the dueTime, the period, and the state. There are several constructors for Timer; the one that’s probably the most commonly used has the following form:
Timer( TimerCallback callback, object state, uint dueTime, uint period )
The following code statement shows an example of the creation of a Timer object:
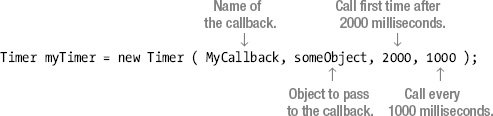
Once a Timer object is created, you can change its dueTime or period using the Change method.
The following code shows an example of using a timer. The Main method creates the timer so that it will call the callback for the first time after 2 seconds and once every second after that. The callback method simply prints out a message, including the number of times it’s been called.
   using System;

   using System.Threading;


   namespace Timers

   {

      class Program

      {

         int TimesCalled = 0;


         void Display (object state)

         {

            Console.WriteLine("{0} {1}",(string)state, ++TimesCalled);

         }


         static void Main( )

         {

            Program p = new Program();               First callback at

                                                      2 seconds

            Timer myTimer = new Timer                                                     ↓

                  (p.Display, "Processing timer event", 2000, 1000);

            Console.WriteLine("Timer started.");                                                      ↑

                                                             Repeat every

            Console.ReadLine();                               second.

         }

      }

   }
This code produces the following output before being terminated after about 5 seconds:
Timer started.

Processing timer event 1

Processing timer event 2

Processing timer event 3

Processing timer event 4
There are several other timer classes supplied by the .NET BCL, each having its own uses. The other timer classes are the following:
System.Windows.Forms.Timer: This class is used in Windows Forms applications to periodically placeWM_TIMERmessages into the program’s message queue. When the program gets the message from the queue, it processes the handler synchronously on the main user interface thread. This is extremely important in Windows Forms applications.System.Timers.Timer: This class is more extensive and contains a number of members for manipulating the timer through properties and methods. It also has a member event calledElapsed, which is raised when each period expires. This timer can run on either a user interface thread or a worker thread.