
C H A P T E R 23
Preprocessor Directives
- What Are Preprocessor Directives?
- General Rules
- The #define and #undef Directives
- Conditional Compilation
- The Conditional Compilation Constructs
- Diagnostic Directives
- Line Number Directives
- Region Directives
- The #pragma warning Directive
What Are Preprocessor Directives?
The source code specifies the definition of a program. The preprocessor directives instruct the compiler how to treat the source code. For example, under certain conditions, you might want the compiler to ignore portions of the code, and under other conditions, you might want that code compiled. The preprocessor directives give you those options and several others.
In C and C++ there is an actual preprocessor phase, in which the preprocessor goes through the source code and prepares an output stream of text to be processed by the subsequent compilation phase. In C# there is no actual preprocessor. The “preprocessor” directives are handled by the compiler. The term, however, remains.
General Rules
Some of the most important syntactic rules for preprocessor directives are the following:
- Preprocessor directives must be on lines separate from C# code.
- Unlike C# statements, preprocessor directives are not terminated with a semicolon.
- Every line containing a preprocessor directive must start with the
#character.
- There can be space before the
#character.- There can be space between the
#character and the directive.- End-of-line comments are allowed.
- Delimited comments are not allowed in a preprocessor directive line.
The following code illustrating these rules:
                   No semicolon

                         ↓

   #define PremiumVersion             // OK


   Space before

      ↓

       #define BudgetVersion          // OK

     #  define MediumVersion          // OK

      ↑

    Space between                                  Delimited comments are not allowed.

                                                              ↓

     #define PremiumVersion                      /* all bells & whistles */

                                                 End-of-line comments are fine.

                                                            ↓

     #define BudgetVersion                       // Stripped-down version
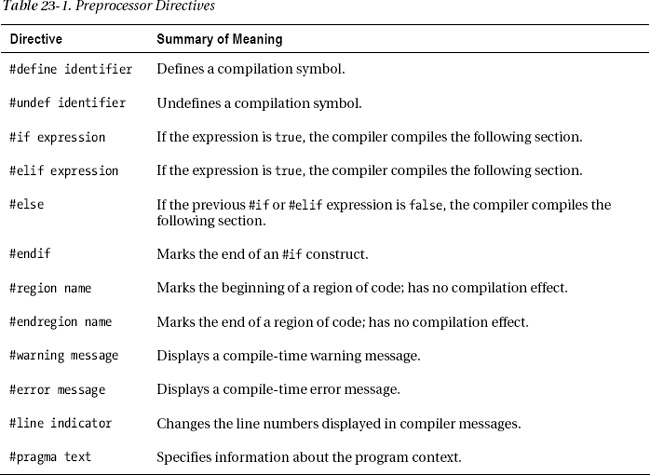
Table 23-1 lists the preprocessor directives.
The #define and #undef Directives
A compilation symbol is an identifier that has only two possible states. It is either defined or undefined. A compilation symbol has the following characteristics:
- It can be any identifier except
trueorfalse. This includes C# keywords and identifiers declared in your C# code—both of which are fine.- It has no value. Unlike in C and C++, it does not represent a string.
As shown in Table 23-1:
- The
#definedirective declares a compilation symbol.- The
#undefdirective undefines a compilation symbol.
   #define PremiumVersion

   #define EconomyVersion

      ...

   #undef PremiumVersion
The #define and #undef directives can be used only at the top of a source file, before any C# code is listed. After the C# code has started, the #define and #undef directives can no longer be used.
   using System;                        // First line of C# code

   #define PremiumVersion               // Error


   namespace Eagle

   {

      #define PremiumVersion            // Error

      ...
The scope of a compilation symbol is limited to a single source file. Redefining a symbol that is already defined is perfectly fine—as long as it’s before any C# code, of course.
   #define AValue

   #define BValue


   #define AValue                       // Redefinition is fine.
Conditional Compilation
Conditional compilation allows you to mark a section of source code to be either compiled or skipped, depending on whether a particular compilation symbol is defined.
There are four directives for specifying conditional compilation:
#if#else#elif#endif
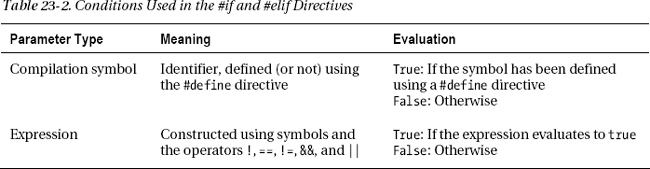
A condition is a simple expression that returns either true or false.
- A condition can consist of a single compilation symbol or an expression of symbols and operators, as summarized in Table 23-2. Subexpressions can be grouped with parentheses.
- The literals
trueandfalsecan also be used in conditional expressions.
The following are examples of conditional compilation conditions:
        Expression

            ↓

   #if !DemoVersion

      ...

   #endif             Expression

                           ↓

   #if (LeftHanded && OemVersion) || FullVersion

      ...

   #endif


   #if true   // The following code segment will always be compiled.

      ...

   #endif
The Conditional Compilation Constructs
The #if and #endif directives are the matching demarcations of a conditional compilation construct. Whenever there is an #if directive, there must also be a matching #endif.
Figure 23-1 illustrates the #if and #if...#else constructs.
- If the condition in the
#ifconstruct evaluates totrue, the code section following it is compiled. Otherwise, it is skipped.- In the
#if...#elseconstruct, if the condition evaluates totrue, CodeSection1 is compiled. Otherwise, CodeSection2 is compiled.
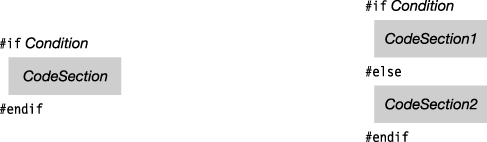
Figure 23-1. The #if and #else constructs
For example, the following code illustrates a simple #if...#else construct. If the symbol RightHanded is defined, the code between the #if and the #else is compiled. Otherwise, the code between the #else and the #endif is compiled.
   ...

   #if RightHanded

      // Code implementing right-handed functionality

      ...

   #else

      // Code implementing left-handed functionality

      ...

   #endif
Figure 23-2 illustrates the #if...#elif and #if...#elif...#else constructs.
- In the
#if...#elifconstruct:
- If Cond1 evaluates to
true, CodeSection1 is compiled, and compilation continues after the#endif.- Otherwise, if Cond2 evaluates to
true, CodeSection2 is compiled, and compilation continues after the#endif.- This continues until either a condition evaluates to
trueor all the conditions have returnedfalse. If that’s the case, none of the code sections in the construct are compiled, and compilation continues after the#endif.- The
#if...#elif...#elseconstruct works the same way, except that if no condition istrue, then the code section after the#elseis then compiled, and compilation continues after the#endif.
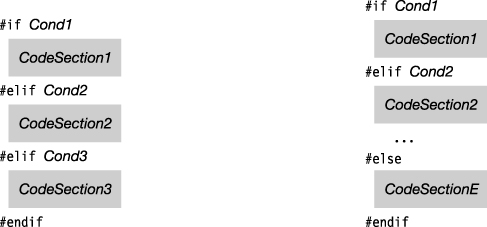
Figure 23-2. The #if...#elif construct (left) and the #if...#elif...#else construct (right)
The following code demonstrates the #if...#elif...#else construct. The string containing the description of the version of the program is set to various values, depending on which compilation symbol is defined.
   #define DemoVersionWithoutTimeLimit

         ...

      const int intExpireLength = 30;

      string strVersionDesc     = null;

      int    intExpireCount     = 0;


   #if   DemoVersionWithTimeLimit

      intExpireCount = intExpireLength;

      strVersionDesc = "This version of Supergame Plus will expire in 30 days";


   #elif DemoVersionWithoutTimeLimit

      strVersionDesc = "Demo Version of Supergame Plus";


   #elif OEMVersion

      strVersionDesc = "Supergame Plus, distributed under license";


   #else

      strVersionDesc = "The original Supergame Plus!!";


   #endif


      Console.WriteLine( strVersionDesc );

         ...
Diagnostic Directives
Diagnostic directives produce user-defined compile-time warning and error messages.
The following is the syntax of the diagnostic directives. The messages are strings, but notice that unlike normal C# strings, they do not have to be enclosed in quotation marks.
   #warning Message


   #error Message
When the compiler reaches a diagnostic directive, it writes out the associated message. The diagnostic directive messages are listed by the compiler along with any compiler-generated warning and error messages.
For example, the following code shows an #error directive and a #warning directive.
- The
#errordirective is inside an#ifconstruct so that it will be generated only if the conditions on the#ifdirective are met.- The
#warningdirective is a reminder to the programmer to come back and clean up a section of code.
#define RightHanded

#define LeftHanded


#if RightHanded && LeftHanded

#error Can't build for both RightHanded and LeftHanded

#endif


#warning Remember to come back and clean up this code!
Line Number Directives
Line number directives can do several things, including the following:
- Change the apparent line numbers reported by the compiler’s warning and error messages
- Change the apparent file name of the source file being compiled
- Hide a sequence of lines from the interactive debugger
The syntax for the #line directives is the following:
   #line integer           // Sets line number of next line to value of integer

   #line "filename"        // Sets the apparent file name

   #line default           // Restores real line number and file name


   #line hidden            // Hides the following code from stepping debugger

   #line                   // Stops hiding from debugger
The #line directive with an integer parameter causes the compiler to consider that value to be the line number of the following line of code. Numbering of the subsequent lines continues, based on that line number.
- To change the apparent file name, use the file name, inside double quotes, as the parameter. The double quotes are required.
- To return to true line numbering and the true file name, use
defaultas the parameter.- To hide a segment of code from the step-through-code feature of the interactive debugger, use
hiddenas the parameter. To stop hiding, use the directive with no parameter. This feature has so far mostly been used in ASP.NET and WPF for hiding compiler-generated code.
The following code shows examples of the line number directives:
   #line 226

         x = y + z; // Now considered by the compiler to be line 226

         ...


   #line 330 "SourceFile.cs" // Changes the reported line number and file name

         var1 = var2 + var3;

         ...


   #line default              // Restores true line numbers and file name
Region Directives
The region directive allows you to mark, and optionally name, a section of code. A region consists of a #region directive and an #endregion directive somewhere below it. The characteristics of a region are the following:
- A
#regiondirective is placed on the line above the section of code you want to mark, and an #endregiondirective is placed after the last line of code in the region.- A
#regiondirective can take an optional string of text following it on the line. The string serves as the name of the region.- Regions can have other regions nested inside them.
- Regions can be nested to any level.
- An
#endregiondirective always matches the first unmatched#regiondirective above it.
Although region directives are ignored by the compiler, they can be used by source code tools. Visual Studio, for example, allows you to easily hide or display regions.
As an example, the following code has a region called Constructors, which encloses the two constructors of class MyClass. In Visual Studio, you can collapse this region to a single line when you don’t want to see it in the code, and then expand it again when you need to work on it or add another constructor.
   #region Constructors

      MyClass()

      {  ...

      }


      MyClass(string s)

      {  ...

      }

   #endregion
Regions can be nested, as shown in Figure 23-3.
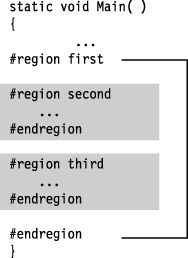
Figure 23-3. Nested regions
The #pragma warning Directive
The #pragma warning directive allows you to turn off warning messages and to turn them back on.
- To turn off warning messages, use the
disableform with a comma-separated list of warning numbers you want to turn off.- To turn warning messages back on, use the
restoreform with a list of the warning numbers you want to turn back on.
For example, the following code turns off two warning messages: 618 and 414. Further down in the code, it turns on messages for 618 but leaves the messages for 414 turned off.
                    Warning messages to turn off

                            ↓

   #pragma warning disable 618, 414

      ...      Messages for the listed warnings are off in this section of code.

   #pragma warning restore 618
If you use either form without a warning number list, the command then applies to all warnings. For example, the following code turns off, and then restores, all warning messages.
   #pragma warning disable

         ...      All warning messages are turned off in this section of code.


   #pragma warning restore

         ...      All warning messages are turned back on in this section of code.