
C H A P T E R 24
Reflection and Attributes
- Metadata and Reflection
- The Type Class
- Getting a Type Object
- What Is an Attribute?
- Applying an Attribute
- Predefined, Reserved Attributes
- More About Applying Attributes
- Custom Attributes
- Accessing an Attribute
Metadata and Reflection
Most programs are written to work on data. They read, write, manipulate, and display data. (Graphics are a form of data.) For some types of programs, however, the data they manipulate is not numbers, text, or graphics, but information about programs and program types.
- Data about programs and their classes is called metadata and is stored in the programs’ assemblies.
- A program can look at the metadata of other assemblies or of itself, while it’s running. When a running program looks at its own metadata, or that of other programs, it’s called reflection.
An object browser is an example of a program that displays metadata. It can read assemblies and display the types they contain, along with all the characteristics and members.
This chapter will look at how your programs can reflect on data using the Type class and how you can add metadata to your types using attributes.
![]() Note To use reflection, you must use the
Note To use reflection, you must use the System.Reflection namespace.
The Type Class
Throughout this text I’ve described how to declare and use the types available in C#. These include the predefined types (int, long, string, and so on), types from the BCL (Console, IEnumerable, and so on), and user-defined types (MyClass, MyDel, and so on). Every type has its own members and characteristics.
The BCL declares an abstract class called Type, which is designed to contain the characteristics of a type. Using objects of this class allows you to get information about the types your program is using.
Since Type is an abstract class, it cannot have actual instances. Instead, at run time, the CLR creates instances of a class derived from Type (RuntimeType) that contains the type information. When you access one of these instances, the CLR returns a reference, not of the derived type but of the base class Type. For simplicity’s sake, though, throughout the rest of the chapter, I’ll call the object pointed at by the reference an object of type Type, although technically it’s an object of a derived type that is internal to the BCL.
Important things to know about Type are the following:
- For every type used in a program, the CLR creates a
Typeobject that contains the information about the type.- Every type used in a program is associated with a separate
Typeobject.- Regardless of the number of instances of a type that are created, there is only a single
Typeobject associated with all the instances.
Figure 24-1 shows a running program with two MyClass objects and an OtherClass object. Notice that although there are two instances of MyClass, there is only a single Type object representing it.

Figure 24-1. The CLR instantiates objects of type Type for every type used in a program.
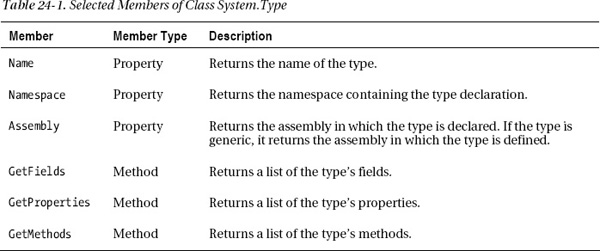
You can get almost anything you need to know about a type from its Type object. Table 24-1 lists some of the more useful members of the class.
Getting a Type Object
You can get a Type object by using the GetType method or by using the typeof operator. Type object contains a method called GetType, which returns a reference to an instance’s Type object. Since every type is ultimately derived from object, you can call the GetType method on an object of any type to get its Type object, as shown here:
Type t = myInstance.GetType();
The following code shows the declarations of a base class and a class derived from it. Method Main creates an instance of each class and places the references in an array called bca for easy processing. Inside the outer foreach loop, the code gets the Type object and prints out the name of the class. It then gets the fields of the class and prints them out. Figure 24-2 illustrates the objects in memory.
   using System;

   using System.Reflection;                           // Must use this namespace

   class BaseClass

   {

      public int BaseField = 0;

   }


   class DerivedClass : BaseClass

   {

      public int DerivedField = 0;

   }


   class Program

   {

      static void Main( )

      {

         var bc = new BaseClass();

         var dc = new DerivedClass();


         BaseClass[] bca = new BaseClass[] { bc, dc };


         foreach (var v in bca)

         {

            Type t = v.GetType();                     // Get the type.


            Console.WriteLine("Object type : {0}", t.Name);


            FieldInfo[] fi = t.GetFields();           // Get the field information.

            foreach (var f in fi)

               Console.WriteLine("      Field : {0}", f.Name);

            Console.WriteLine();

         }

      }

   }
This code produces the following output:
Object type : BaseClass

      Field : BaseField


Object type : DerivedClass

      Field : DerivedField

      Field : BaseField
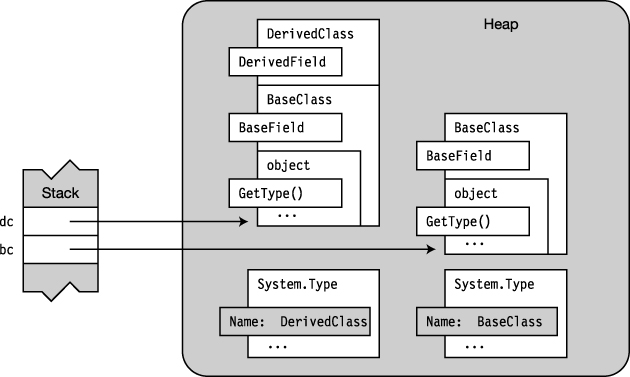
Figure 24-2. The base class and derived class objects along with their Type objects
You can also use the typeof operator to get a Type object. Just supply the name of the type as the operand, and it returns a reference to the Type object, as shown here:
   Type t = typeof( DerivedClass );

              ↑          ↑

            Operator   Type you want the Type object for
The following code shows a simple example of using the typeof operator:
   using System;

   using System.Reflection;                           // Must use this namespace


   namespace SimpleReflection

   {

      class BaseClass

      {

         public int MyFieldBase;

      }


      class DerivedClass : BaseClass

      {

         public int MyFieldDerived;

      }


      class Program

      {

         static void Main( )

         {

            Type tbc = typeof(DerivedClass);                    // Get the type.

            Console.WriteLine("Result is {0}.", tbc.Name);


            Console.WriteLine("It has the following fields:");  // Use the type.

            FieldInfo[] fi = tbc.GetFields();

            foreach (var f in fi)

               Console.WriteLine("   {0}", f.Name);

         }

      }

   }
This code produces the following output:
Result is DerivedClass.

It has the following fields:

   MyFieldDerived

   MyFieldBase
What Is an Attribute?
An attribute is a language construct that allows you to add metadata to a program’s assembly. It’s a special type of class for storing information about program constructs.
- The program construct to which you apply an attribute is called its target.
- Programs designed to retrieve and use metadata, such as object browsers, are said to be consumers of the attributes.
- There are attributes that are predefined in .NET, and you can also declare custom attributes.
Figure 24-3 gives an overview of the components involved in using attributes, and illustrates the following points about them:
- You apply attributes to program constructs in the source code.
- The compiler takes the source code and produces metadata from the attributes, and places that metadata in the assembly.
- Consumer programs can access the metadata of the attributes along with the metadata for the rest of the components of the program. Notice that the compiler both produces and consumes attributes.

Figure 24-3. The components involved with creating and using attributes
By convention, attribute names use Pascal casing and end with the suffix Attribute. When applying an attribute to a target, however, you can leave off the suffix. For example, for attributes SerializableAttribute and MyAttributeAttribute, you can use the short names Serializable and MyAttribute when applying them to a construct.
Applying an Attribute
Rather than starting with a description of how to create attributes, I’m going to start by showing how to use attributes that are already defined. That way, you can get an idea of how they might be useful.
The purpose of an attribute is to tell the compiler to emit a certain set of metadata about a program construct and place it in the assembly. You do this by applying the attribute to the construct.
- You apply an attribute by placing an attribute section immediately before the construct.
- An attribute section consists of square brackets enclosing an attribute name and sometimes a parameter list.
For example, the following code shows the headings of two classes. The first few lines of code show an attribute named Serializable applied to class MyClass. Notice that Serializable has no parameter list. The second class declaration has an attribute called MyAttribute, which has a parameter list with two string parameters.
   [ Serializable ]                                  // Attribute

   public class MyClass

   { ...


   [ MyAttribute("Simple class", "Version 3.57") ]   // Attribute with parameters

   public class MyOtherClass

   { ...
Some important things to know about attributes are the following:
- Most attributes apply only to the construct immediately following the attribute section or sections.
- A construct with an attribute applied to it is said to be decorated, or adorned, with the attribute. Both terms are common.
Predefined, Reserved Attributes
In this section we’ll look at several attributes predefined and reserved by .NET.
The Obsolete Attribute
Over a program’s lifetime, it may go through many different releases, possibly over a period of years. Later in its life cycle you will often write a new method that supersedes an older method that performed a similar function. For many reasons, you might want to leave alone all the old code that calls the older, now obsolete method, but have the newer code call the new method.
When this happens, you will want your team members, or programmers who work on the code at a later time, to use the new method rather than the old method. To help warn them against using the old method, you can use the Obsolete attribute to mark the old method as obsolete, and to display a helpful warning message when the code is compiled. The following code shows an example of its use:
   class Program     Apply attribute.

   {                    ↓


      [Obsolete("Use method SuperPrintOut")]   // Apply attribute to method.

      static void PrintOut(string str)

      {

          Console.WriteLine(str);

      }

      static void Main(string[] args)

      {

          PrintOut("Start of Main");           // Invoke obsolete method.

      }

   }
Notice that method Main calls PrintOut even though it’s marked as obsolete. In spite of this, the code compiles and runs fine and produces the following output:
Start of Main
During compilation, though, the compiler produces the following CS0618 warning message to inform you that you’re using an obsolete construct:
'AttrObs.Program.PrintOut(string)' is obsolete: 'Use method SuperPrintOut'
Another overload of the Obsolete attribute takes a second parameter, of type bool. This parameter specifies whether to flag the usage as an error instead of just a warning. The following code specifies that it should be flagged as an error:
                                      Flag as an error.

                                           ↓

   [ Obsolete("Use method SuperPrintOut", true) ]  // Apply attribute to method.

   static void PrintOut(string str)

   { ...
The Conditional Attribute
The Conditional attribute allows you to instruct the compiler to either include or exclude all the invocations of a particular method. To use the Conditional attribute, apply it to the method declaration, along with a compilation symbol as a parameter.
- If the compilation symbol is defined, the compiler includes the code for all the invocations of the method, the way it would for any normal method.
- If the compilation symbol is not defined, the compiler omits all the method invocations throughout the code.
The CIL code defining the method itself is always included in the assembly. It’s just the invocations that are either inserted or omitted.
For example, in the following code, the Conditional attribute is applied to the declaration of a method called TraceMessage. The attribute has a single parameter, which in this case is the string DoTrace.
- When the compiler is compiling the code, it checks whether there is a compilation symbol named
DoTracedefined.- If
DoTraceis defined, the compiler places in the code all the calls to methodTraceMessage, as usual.- If there is no
DoTracecompilation symbol defined, it doesn’t output code for any of the calls toTraceMessage.
              Compilation symbol

                    ↓

   [Conditional( "DoTrace" )]

   static void TraceMessage(string str)

   {

      Console.WriteLine(str);

   }
Example of the Conditional Attribute
The following code shows a full example of using the Conditional attribute.
- Method
Maincontains two calls to methodTraceMessage.- The declaration for method
TraceMessageis decorated with theConditionalattribute, which has the compilation symbolDoTraceas its parameter. So ifDoTraceis defined, the compiler will include the code for all the calls toTraceMessage.- Since the first line of code defines a compilation symbol named
DoTrace, the compiler will include the code for both calls toTraceMessage.
   #define DoTrace

   using System;

   using System.Diagnostics;


   namespace AttributesConditional

   {

      class Program

      {

         [Conditional( "DoTrace" )]

         static void TraceMessage(string str)

         { Console.WriteLine(str); }


         static void Main( )

         {

            TraceMessage("Start of Main");

            Console.WriteLine("Doing work in Main.");

            TraceMessage("End of Main");

         }

      }

   }
This code produces the following output:
Start of Main

Doing work in Main.

End of Main
If you comment out the first line so that DoTrace is not defined, the compiler will not insert the code for the two calls to TraceMessage. This time, when you run the program, it produces the following output:
Doing work in Main.
The Caller Information Attributes
The caller information attributes allow you to access source code information about the file path, the line number, and the name of the calling member.
- The three attribute names are
CallerFilePath,CallerLineNumber, andCallerMemberName.- These attributes can only be used with optional parameters on methods.
The following code declares a method named MyTrace, which uses the three caller information attributes on its three optional parameters. If the method is called with explicit values for those parameters, the values of the actual parameters will be used. In the call from Main, shown below, however, no explicit values are supplied, so the system supplies the source code’s file path, the line number of the line where the method was called, and the name of the member calling the method.
   using System;

   using System.Runtime.CompilerServices;


   public static class Program

   {

      public static void MyTrace( string message,

                                  [CallerFilePath]   string fileName = "",

                                  [CallerLineNumber] int lineNumber = 0,

                                  [CallerMemberName] string callingMember = "" )

      {

         Console.WriteLine( "File:        {0}", fileName );

         Console.WriteLine( "Line:        {0}", lineNumber );

         Console.WriteLine( "Called From: {0}", callingMember );

         Console.WriteLine( "Message:     {0}", message );

      }


      public static void Main()

      {

         MyTrace( "Simple message" );

      }

   }
This code produces the following output:
File:        c:TestCallerInfoTestCallerInfoProgram.cs

Line:        19

Called From: Main

Message:     Simple message
The DebuggerStepThrough Attribute
Many times when you’re debugging code and stepping through it line by line, there are certain methods that you don’t want the debugger to step into; you just want it to execute the method and step to the line following the method call. The DebuggerStepThrough attribute instructs the debugger to execute the target code without stepping into it.
In my own code, this is the attribute I find most useful on a regular basis. Some methods are so small and obviously correct, that it’s just annoying to have to step through them repeatedly when debugging. Use this attribute with care, though, because you don’t want to exclude code that might contain a bug.
Important things to know about DebuggerStepThrough are the following:
- This attribute is in the
System.Diagnosticsnamespace.- You can use this attribute on classes, structs, constructors, methods, or accessors.
The following extremely contrived code shows the attribute used on an accessor and a method. If you step through this code in your debugger, you’ll find that the debugger doesn’t enter the IncrementFields method or the set accessor of the X property.
   using System;

   using System.Diagnostics;         // Required for this DebuggerStepThrough


   class Program

   {

      int _x = 1;

      int X

      {

         get { return _x; }

         [DebuggerStepThrough]       // Don’t step through the set accessor.

         set

         {

            _x = _x * 2;

            _x += value;

         }

      }


      public int Y { get; set; }


      public static void Main()  {

         Program p = new Program();


         p.IncrementFields();

         p.X = 5;

         Console.WriteLine( "X = {0}, Y = {1}", p.X, p.Y );

      }

      [DebuggerStepThrough]          // Don’t step through this method.

      void IncrementFields()

      {

         X++;

         Y++;

      }

   }
Other Predefined Attributes
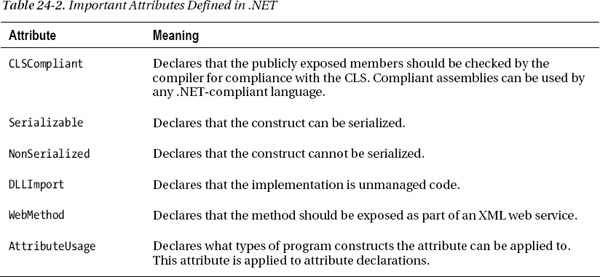
The .NET Framework predefines a number of attributes that are understood and interpreted by the compiler and the CLR. Table 24-2 lists some of these. The table uses the short names, without the “Attribute” suffix. For example, the full name of CLSCompliant is CLSCompliantAttribute.
More About Applying Attributes
The simple attributes shown so far have used a single attribute applied to a method. This section describes other types of attribute usage.
Multiple Attributes
You can apply multiple attributes to a single construct.
- Multiple attributes can be listed in either of the following formats:
- Separate attribute sections, one after another. Usually these are stacked on top of each other, on separate lines.
- A single attribute section, with the attributes separated by commas.
- You can list the attributes in any order.
For example, the following code shows the two ways of applying multiple attributes. The sections of code are equivalent.
   [ Serializable ]                                                 // Stacked

   [ MyAttribute("Simple class", "Version 3.57") ]


   [ MyAttribute("Simple class", "Version 3.57"), Serializable ]    // Comma separated

                         ↑                             ↑

                     Attribute                          Attribute
Other Types of Targets
Besides classes, you can also apply attributes to other program constructs, such as fields and properties. The following declaration shows an attribute on a field and multiple attributes on a method:
   [MyAttribute("Holds a value", "Version 3.2")]                // On a field

   public int MyField;


   [Obsolete]                                                   // On a method

   [MyAttribute("Prints out a message.", "Version 3.6")]

   public void PrintOut()

   {

      ...
You can also explicitly label attributes to apply to a particular target construct. To use an explicit target specifier, place the target type, followed by a colon, at the beginning of the attribute section. For example, the following code decorates the method with an attribute and also applies an attribute to the return value.
  Explicit target specifier

     ↓

   [method: MyAttribute("Prints out a message.", "Version 3.6")]

   [return: MyAttribute("This value represents ...", "Version 2.3")]

   public long ReturnSetting()

   {

      ...
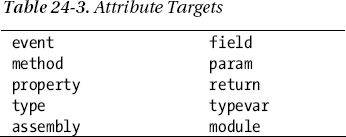
The C# language defines ten standard attribute targets, which are listed in Table 24-3. Most of the target names are self-explanatory, but type covers classes, structs, delegates, enums, and interfaces. The typevar target name specifies type parameters to constructs that use generics.
Global Attributes
You can also use an explicit target specifier to set attributes at the assembly and module level by using the assembly and module target names. (Assemblies and modules were explained in Chapter 21.) Some important points about assembly-level attributes are the following:
- Assembly-level attributes must be placed outside any namespace scope and are usually placed in the
AssemblyInfo.csfile.- The
AssembyInfo.csfile usually contains metadata about the company, product, and copyright information.
The following are lines from an AssemblyInfo.cs file:
   [assembly: AssemblyTitle("SuperWidget")]

   [assembly: AssemblyDescription("Implements the SuperWidget product.")]

   [assembly: AssemblyConfiguration("")]

   [assembly: AssemblyCompany("McArthur Widgets, Inc.")]

   [assembly: AssemblyProduct("Super Widget Deluxe")]

   [assembly: AssemblyCopyright("Copyright © McArthur Widgets 2012")]

   [assembly: AssemblyTrademark("")]

   [assembly: AssemblyCulture("")]
Custom Attributes
You’ve probably noticed that the syntax for applying an attribute is very different from anything you’ve seen so far. From that, you might get the impression that attributes are an entirely different type of construct. They’re not—they’re just a special kind of class.
Some important points about attribute classes are the following:
- User-defined attribute classes are called custom attributes.
- All attribute classes are derived from class
System.Attribute.
Declaring a Custom Attribute
Declaring an attribute class is, for the most part, the same as declaring any other class. There are, however, several things to be aware of:
- To declare a custom attribute, do the following:
- Declare a class derived from
System.Attribute.- Give it a name ending with the suffix
Attribute.- For security, it’s generally suggested that you declare your attribute classes as
sealed.
For example, the following code shows the beginning of the declaration of attribute MyAttributeAttribute:
                           Attribute name

                               ↓

   public sealed class MyAttributeAttribute : System.Attribute

   {                                 ↑              ↑

      ...                           Suffix          Base class
Since an attribute holds information about the target, the public members of an attribute class generally consist only of the following:
- Fields
- Properties
- Constructors
Using Attribute Constructors
Attributes, like other classes, have constructors. Every attribute must have at least one public constructor.
- As with other classes, if you don’t declare a constructor, the compiler will produce an implicit, public, parameterless constructor for you.
- Attribute constructors, like other constructors, can be overloaded.
- When declaring the constructor, you must use the full class name, including the suffix. You can only use the shortened name when applying an attribute.
For example, with the following constructor, if the method name did not included the suffix, the compiler would produce an error message:
                        Suffix

                         ↓

   public MyAttributeAttribute(string desc, string ver)

   {

      Description   = desc;

      VersionNumber = ver;

   }
Specifying the Constructor
When you apply an attribute to a target, you are specifying which constructor should be used to create the instance of the attribute. The parameters listed in the attribute application are the actual parameters for the constructor.
For example, in the following code, MyAttribute is applied to a field and to a method. For the field, the declaration specifies a constructor with a single string parameter. For the method, it specifies a constructor with two string parameters.
   [MyAttribute("Holds a value")]                 // Constructor with one string

   public int MyField;


   [MyAttribute("Version 1.3", "Sal Martin")]     // Constructor with two strings

   public void MyMethod()

   { ...
Other important points about attribute constructors are the following:
- When applying an attribute, the actual parameters for the constructor must be constant expressions whose values can be determined at compile time.
- If you apply an attribute constructor with no parameters, you can leave off the parentheses. For example, both classes in the following code use the parameterless constructor for the attribute
MyAttr. The meanings of the two forms are the same.
   [MyAttr]

   class SomeClass ...


   [MyAttr()]

   class OtherClass ...
Using the Constructor
Notice that you never explicitly call the constructor. Instead, an instance of an attribute is created, and its constructor called only when an attribute consumer accesses the attribute. This is very different from other class instances, which are created at the position where you use an object-creation expression. Applying an attribute is a declarative statement that does not determine when an object of the attribute class should be constructed.
Figure 24-4 compares the use of a constructor for a regular class and the use of a constructor with attributes.
- The imperative statement says, in effect, “Create a new class object here.”
- The declarative statement says, “This attribute is associated with this target, and in case the attribute needs to be constructed, use this constructor.”

Figure 24-4. Comparing the use of constructors
Positional and Named Parameters in Constructors
Like the methods and constructors of regular classes, the attribute constructors can also use positional and named parameters.
The following code shows the application of an attribute using a positional parameter and two named parameters:

The following code shows the declaration of the attribute class, as well as its application on class MyClass. Notice that the constructor declaration lists only a single formal parameter. And yet, by using named parameters, you can give the constructor three actual parameters. The two named parameters set the values of fields Ver and Reviewer.
   public sealed class MyAttributeAttribute : System.Attribute

   {

      public string Description;

      public string Ver;

      public string Reviewer;


      public MyAttributeAttribute(string desc)  // Single formal parameter

      {

         Description = desc;

      }

   }                               Three actual parameters

                                             ↓

   [MyAttribute("An excellent class", Reviewer="Amy McArthur", Ver="7.15.33")]

   class MyClass

   {

      ...

   }
![]() Note As with methods, if the constructor requires any positional parameters, they must be placed before any named parameters.
Note As with methods, if the constructor requires any positional parameters, they must be placed before any named parameters.
Restricting the Usage of an Attribute
You’ve seen that you can apply attributes to classes. But attributes themselves are classes, and there is one important predefined attribute that you can apply to your custom attributes: the AttributeUsage attribute. You can use it to restrict the usage of an attribute to a specific set of target types.
For example, if you want your custom attribute MyAttribute to be applied only to methods, you could use the following form of AttributeUsage:
                        Only to methods

                              ↓

   [ AttributeUsage( AttributeTarget.Method ) ]

   public sealed class MyAttributeAttribute : System.Attribute

   { ...
AttributeUsage has three important public properties, which are listed in Table 24-4. The table shows the names of the properties and their meanings. For the second two properties, it also shows their default values.
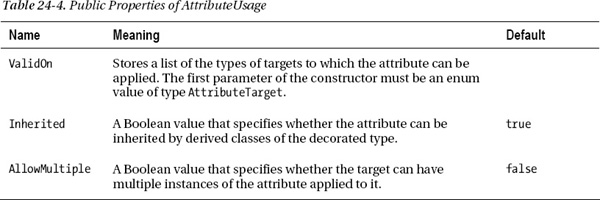
The Constructor for AttributeUsage
The constructor for AttributeUsage takes a single, positional parameter that specifies which target types are allowed for the attribute. It uses this parameter to set its ValidOn property. The acceptable target types are members of the AttributeTarget enumeration. Table 24-5 shows the complete set of the members of the AttributeTarget enumeration.
You can combine the usage types by using the bitwise OR operator. For example, the attribute declared in the following code can be applied only to methods and constructors.
                                              Targets

                                               ↓

   [ AttributeUsage( AttributeTarget.Method | AttributeTarget.Constructor ) ]

   public sealed class MyAttributeAttribute : System.Attribute

   { ...

When you apply AttributeUsage to an attribute declaration, the constructor will have at least the one required parameter, which contains the target types to be stored in ValidOn. You can also optionally set the Inherited and AllowMultiple properties by using named parameters. If you don’t set them, they’ll have their default values, as shown in Table 24-4.
As an example, the next code block specifies the following about MyAttribute:
MyAttributemust be applied only to classes.MyAttributeis not inherited by classes derived from classes to which it is applied.- There cannot be multiple instances of
MyAttributeapplied to the same target.
   [ AttributeUsage( AttributeTarget.Class,          // Required, positional

                     Inherited = false,              // Optional, named

                     AllowMultiple = false ) ]       // Optional, named

   public sealed class MyAttributeAttribute : System.Attribute

   { ...
Suggested Practices for Custom Attributes
The following practices are strongly suggested when writing custom attributes:
- The attribute class should represent some state of the target construct.
- If the attribute requires certain fields, include a constructor with positional parameters to collect that data, and let optional fields be initialized with named parameters, as needed.
- Don’t implement public methods or other function members other than properties.
- For additional security, declare the attribute class as
sealed.- Use the
AttributeUsageattribute on your attribute declaration to explicitly specify the set of attribute targets.
The following code illustrates these guidelines:
   [AttributeUsage( AttributeTargets.Class )]

   public sealed class  ReviewCommentAttribute : System.Attribute

   {

      public string Description   { get; set; }

      public string VersionNumber { get; set; }

      public string ReviewerID    { get; set; }


      public ReviewCommentAttribute(string desc, string ver)

      {

         Description   = desc;

         VersionNumber = ver;

      }

   }
Accessing an Attribute
At the beginning of the chapter, you saw that you can access information about a type using its Type object. You can access custom attributes in the same way. There are two methods of Type that are particularly useful in this: IsDefined and GetCustomAttributes.
Using the IsDefined Method
You can use the IsDefined method of the Type object to determine whether a particular attribute is applied to a particular class.
For example, the following code declares an attributed class called MyClass and also acts as its own attribute consumer by accessing an attribute declared and applied in the program itself. At the top of the code are declarations of the attribute ReviewComment and the class MyClass, to which it is applied. The code does the following:
- First,
Maincreates an object of the class. It then retrieves a reference to theTypeobject by using theGetTypemethod, which it inherited from its base class,object.- With the reference to the
Typeobject, it can call theIsDefinedmethod to find out whether attributeReviewCommentis applied to this class.
- The first parameter takes a
Typeobject of the attribute you are checking for.- The second parameter is of type
booland specifies whether to search the inheritance tree ofMyClassto find the attribute.
   [AttributeUsage(AttributeTargets.Class)]

   public sealed class ReviewCommentAttribute : System.Attribute

   { ... }


   [ReviewComment("Check it out", "2.4")]

   class MyClass {  }


   class Program

   {

      static void Main()

      {

         MyClass mc = new MyClass(); // Create an instance of the class.

         Type t = mc.GetType();      // Get the Type object from the instance.

         bool isDefined =            // Check the Type for the attribute.

            t.IsDefined(typeof(ReviewCommentAttribute), false);


         if( isDefined )

            Console.WriteLine("ReviewComment is applied to type {0}", t.Name);

      }

   }
This code produces the following output:
ReviewComment is applied to type MyClass
Using the GetCustomAttributes Method
The GetCustomAttributes method returns an array of the attributes applied to a construct.
- The actual object returned is an array of
objects, which you must then cast to the correct attribute type.- The Boolean parameter specifies whether to search the inheritance tree to find the attribute.
object[] AttArr = t.GetCustomAttributes(false);- When the
GetCustomAttributesmethod is called, an instance of each attribute associated with the target is created.
The following code uses the same attribute and class declarations as the previous example. But in this case, it doesn’t just determine whether an attribute is applied to the class. Instead, it retrieves an array of the attributes applied to the class and cycles through them, printing out their member values.
   using System;


   [AttributeUsage( AttributeTargets.Class )]

   public sealed class MyAttributeAttribute : System.Attribute

   {

      public string Description   { get; set; }

      public string VersionNumber { get; set; }

      public string ReviewerID    { get; set; }


      public MyAttributeAttribute( string desc, string ver )

      {

         Description   = desc;

         VersionNumber = ver;

      }

   }


   [MyAttribute( "Check it out", "2.4" )]

   class MyClass

   {

   }


   class Program

   {

      static void Main()

      {

         Type t = typeof( MyClass );

         object[] AttArr = t.GetCustomAttributes( false );


         foreach ( Attribute a in AttArr )

         {

            MyAttributeAttribute attr = a as MyAttributeAttribute;

            if ( null != attr )

            {

               Console.WriteLine( "Description    : {0}", attr.Description );

               Console.WriteLine( "Version Number : {0}", attr.VersionNumber );

               Console.WriteLine( "Reviewer ID    : {0}", attr.ReviewerID );

            }

         }

      }

   }
This code produces the following output:
Description    : Check it out

Version Number : 2.4

Reviewer ID    :