
Chapter 11. SharePoint site provisioning
This chapter focuses on creating templates for sites. We will compare the different types of templates that can be created and discuss their strengths and weaknesses. You will learn about the underlying Microsoft SharePoint site provisioning architecture, in which every new site is created by using a specific site definition. We will examine the role of the GLOBAL site definition and discuss site definitions, web templates and site templates. We will also look at using server-side code to create sites by using site provisioning providers and web provisioning events. Finally, we’ll look at templates for sites hosting SharePoint apps.
You can create a site in SharePoint through the user interface, by using Windows PowerShell, by using a farm or sandboxed solution, or by using the client-side object model from, for instance, a SharePoint app or an externally hosted application. Site collections can only be created through the user interface, by using Windows PowerShell, or by using a farm solution. From a sandboxed solution or the client-side object model it is not possible to create site collections.
Regardless of the approach you choose to create a site, and regardless of whether you create a site or a site collection, SharePoint will always use a template to fully provision your site. In the first section, we will discuss the different types of templates that you can use to provision sites. We will look into site definitions, site templates, and web templates, and the advantages and disadvantages of each of them when they are used to create your own templates.
Whenever a new site is created, the exact steps are that executed to provision the site differ depending on how the site is being created. The provisioning process always starts with the same steps, though. The first step of the site provisioning process is to reserve the URL. Before SharePoint 2010, you could tell that this was the case, because if site creation failed at some point after the URL had been reserved, you couldn’t create a new site by using that same URL and you also couldn’t browse to the site on that URL, because it wasn’t completely provisioned. The URL was stored in the database, though, meaning that it couldn’t be used again. Starting with SharePoint 2010, the site provisioning process was redesigned to be processed as a single transaction. If provisioning fails at some point during site creation, the whole site is removed again, and the URL can be reused to create another site.
The GLOBAL site definition
After the URL has been reserved, SharePoint begins the actual site provisioning process by executing the provisioning instructions defined in a special site definition called the GLOBAL site definition. The GLOBAL site definition contains a set of common provisioning instructions. It has an ONET.xml file that contains site provisioning instructions that are executed each time a new site is created. If you examine the ONET.xml file of the GLOBAL site definition, you will find a Project element that contains child elements named NavBars, ListTemplates, BaseTypes, Configurations, and Modules:
<Project>  <!-- can define navigation elements -->
  <NavBars/>  <!-- defines list definitions for system lists and galleries -->
  <ListTemplates/>   <!-- defines base types used by list and document libraries -->
  <BaseTypes/>  <!-- defines configuration with shared provisioning instructions -->
  <Configurations/>  <!-- provisions files for standard master pages and themes -->
  <Modules/>
</Project>
The NavBars element of the GLOBAL site definition is empty; no top-level or Quick Launch navigation elements are defined in it. The ListTemplates element contains ListTemplate elements that define list definitions for creating special system lists and galleries such as the Master Page Gallery, the Solution Gallery, and the Web Part Gallery. The BaseTypes section provides a definition for each of the supported base types. The base types are Generic List, Document Library, Discussion Form, Vote or Survey, and Issues List. All base type elements contain configurations that define which fields are added to every list and document library.
The Configurations element of the GLOBAL site definition is important because it is used to activate the built-in fields and ctypes features automatically whenever a new site collection is created. No other features are listed in the GLOBAL site definition; the only ones that are activated on all sites automatically are the fields and ctypes features. The Configuration element also contains a Lists element to create special system lists and galleries. There are six other List elements, which contain a RootWebOnly attribute with a value of TRUE. This attribute setting configures these List elements so that they create system lists and galleries in top-level sites only when a new site collection is being created. Examples of system lists that only exist in the root web of a site collection are the Master Page Gallery, the Solutions Gallery, the User Information List, and the Web Part Gallery.
The ONET.xml file in the GLOBAL site definition includes two Module elements, which are named DefaultMasterPage and OOBThemesV15. The Module element named DefaultMasterPage is used to add the standard SharePoint master pages to every new site. The Module element named OOBThemesV15 has been written to add the .thmx files for the standard SharePoint themes into the Themes Gallery of each top-level site.
The next steps of the provisioning process depend on the way the site is being provisioned. There are three types of templates that can be used to provision a site in SharePoint:
Site definitions
Web templates
Site templates
Site definitions
A site definition is a template that is used by SharePoint to create and provision new sites. Site definitions can provide information about the navigation, the lists and libraries that are available, features that are activated, and pages that are created when the site is provisioned. After a site has been created, the site definition that the site is based on will stay with the site forever. The SPWeb.WebTemplate property stores the name of the site definition that was used to create the site, and SPWeb.WebTemplateId stores the ID of the site definition that the site is based on. The SPWeb.Configuration property stores the ID of the configuration that was used. Even if other mechanisms, such as web templates or site templates, are used to create the site, the WebTemplate, WebTemplateId, and Configuration properties will still refer to a site definition and its configuration and not to the web template or site template. All the out-of-the-box templates that you can choose from when you create a site are site definitions. A site definition consists of a minimum of two different files, the webtemp*.xml file and the ONET.xml file. The metadata of the site definition, such as the name and ID and information about the configuration, is stored in the webtemp*.xml file.
Webtemp*.xml
The webtemp files are stored the SharePoint root directory at TEMPLATE/1033/XML. Note that the 1033 in this path refers to the English version of SharePoint, or the English language packs. If you are running a different version of SharePoint, such as a Spanish or a Chinese version, 1033 will be replaced by a different locale identifier. If you have multiple language packs installed on your SharePoint server and you want a site definition to be available for all of those languages, you will have to deploy your webtemp file to the XML folders for all those languages.
On a SharePoint server there are several webtemp files, all of which start with webtemp and end with .xml. The file name of the webtemp file can be made unique by adding something in between webtemp and .xml. The webtemp file that contains information about the eDiscovery site definitions, for instance, is called webtempedisc.xml. The webtemp of the basic SharePoint Foundation sites is simply called webtemp.xml. Figure 11-1 shows the contents of the TEMPLATE/1033/XML folder on a server that is running SharePoint Server 2013 Enterprise Edition.
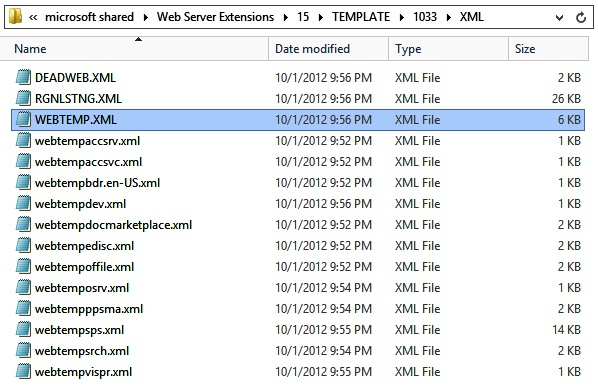
A single webtemp file can contain information about more than one site definition. The webtemp.xml file, for instance, contains information about 16 different site definitions. Some of them are hidden and should not be used by end users or by developers to create sites; others are visible and can be selected as templates when sites are created through the user interface. Site definitions can be made hidden for several reasons. In some cases, they are only for SharePoint internal usage, such as the GLOBAL site definition and the Central Administration site definitions. Other times, Microsoft might want to deprecate a site definition because it is no longer in line with how SharePoint can best be used, or because a better alternative exists. Because existing sites might break if a site definition is removed completely, Microsoft won’t remove the site definition from SharePoint, but they will make it hidden so that existing sites in your environment will continue to work. The fact that the definitions can still be found in the file system of a SharePoint server does not mean that it is a good idea to use them to create sites. Changing the Hidden property of an out-of-the-box site definition so that end users can use the site definition to create sites is not supported and should not be attempted.
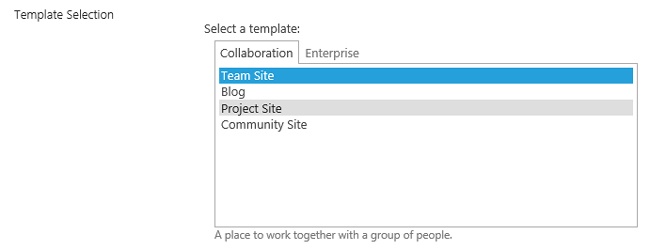
The webtemp file contains Template and Configuration elements. The template element is linked to an ONET.xml file. Multiple configurations can be defined in a single ONET.xml file, with a Configuration element for each one. In the Configuration element, the title as users will view it, whether a site definition is hidden, a description, and a display category are defined. The display category is the tab on which the site definition will appear in the site creation user interface in SharePoint. The image used to be visible when subsites were created from an existing site collection, but in SharePoint 2013 the image won’t show up anywhere in the user interface:
<Template Name="STS" ID="1">
    <Configuration ID="0"
                   Title="Team Site"
                   Hidden="FALSE"
                   ImageUrl="/_layouts/15/images/stts.png?rev=23"
                   Description="A place to work together with a group of people."
                   DisplayCategory="Collaboration" >
    </Configuration>
    <Configuration ID="1"
                   Title="Blank Site"
                   Hidden="TRUE"
                   ImageUrl="/_layouts/15/images/stbs.png?rev=23"
                   Description="A blank site for you to customize
                             based on your requirements."
                   DisplayCategory="Collaboration"
                   AllowGlobalFeatureAssociations="False" >
    </Configuration>
    <Configuration ID="2"
                   Title="Document Workspace"
                   Hidden="TRUE"
                   ImageUrl="/_layouts/15/images/stdw.png?rev=23"
                   Description="A site for colleagues to work together on a document.
                   It provides a document library for storing the primary document
                   and supporting files, a tasks list for assigning to-do items,
                   and a links list for resources related to the document."
                   DisplayCategory="Collaboration" >
    </Configuration>
 </Template>
Figure 11-2 shows the template selection box that is displayed when a new subsite is created.
ONET.xml for site definitions
Now that we have discussed the webtemp file, we can move on to the ONET.xml file. The ONET.xml file serves as the top-level manifest for a site definition. This manifest file is used to define provisioning instructions that activate features and create site elements. ONET.xml files are deployed to a subfolder of the TEMPLATESiteTemplates folder. Each site definition has its own dedicated subfolder. The name of this subfolder matches the name of the site definition in the webtemp*.xml file. The ONET.xml file for the Team site and Blank site, for instance, is deployed to the TEMPLATESiteTemplatesSTS folder.
Let’s examine the contents of the ONET.xml file that serves as the manifest for the STS or Team Site site definition. The basic structure of the ONET.xml file includes a top-level Project element, which contains several child elements such as NavBars, ListTemplates, DocumentTemplates, Configurations, Modules, and ServerEmailFooter:
<Project
  Title="$Resources:onet_TeamWebSite;"
  Revision="2"
  ListDir="$Resources:core,lists_Folder;"
  xmlns:ows="Microsoft SharePoint"
  UIVersion="4">

  <NavBars />
  <ListTemplates />
  <DocumentTemplates />
  <Configurations/>
  <Modules />
  <ServerEmailFooter/>

</Project>
The NavBars node defines the set of navigation bars that are created when a new site is provisioned. The NavBars element inside the STS site definition has been written to create several navigation bars that are used by the top link bar and the Quick Launch bar:
<NavBars>
  <NavBar Name="$Resources:core,category_Top;" ID="1002" />
  <NavBar Name="$Resources:core,category_Documents;" ID="1004" />
  <NavBar Name="$Resources:core,category_Lists;" ID="1003" />
  <NavBar Name="$Resources:core,category_Discussions;" ID="1006" />
</NavBars>
Note that these NavBar elements are based on well-known ID values. The NavBar element with an ID of 1002 is used to create the navigation bar used by the top link bar. The NavBar elements with IDs of 1004, 1003, and 1006 are used to create dynamic collections of navigation nodes that are displayed in the Quick Launch bar. For example, the NavBar element with an ID of 1004 creates a dynamic collection of navigation nodes that link to document libraries that have been created, with the option to display them on the Quick Launch bar. If the NavBar elements are omitted, some navigation will still be displayed in the site, but it won’t be possible to adjust the navigation by using the user interface.
The Configurations section of the ONET.xml file contains a child Configuration element for each supported configuration. This is what makes it possible for a single ONET.xml file to be used to provision several types of sites. The ONET.xml file in the STS site definition defines three separate Configuration elements for creating team sites, blank sites, and document workspace sites:
<Project>
  <Configurations>    <!-used to create team sites -->
    <Configuration ID="0" Name="Default" />      <!-used to create blank sites -->
    <Configuration ID="1" Name="Blank" />        <!-used to create document workspace sites -->
    <Configuration ID="2" Name="DWS" />
  </Configurations>
</Project>
A Configuration element contains attributes such as ID, Name, and MasterUrl. A Configuration element also contains child elements such as Lists, Modules, SiteFeatures, and WebFeatures, which are used to create site elements and activate features:
<Configuration ID="0" Name="Default"
               MasterUrl="_catalogs/masterpage/seattle.master">
  <Lists />
  <Modules />
  <SiteFeatures />
  <WebFeatures />
</Configuration>
The Configuration element for a team site contains a Lists element that creates the Documents document library:
<Lists>
  <List FeatureId="00BFEA71-E717-4E80-AA17-D0C71B360101"
        Type="101"
        Title="$Resources:core,shareddocuments_Title_15;"
        Url="$Resources:core,shareddocuments_Folder;"
        OnQuickLaunch="TRUE"
        QuickLaunchHeading="TRUE" />
</Lists>
The Configurations section contains a Modules element that is used to reference Module elements. For example, the Configuration element for a team site includes a Modules element that references a Module named Default:
<Modules>
  <Module Name="Default" />
</Modules>
Although Module elements are referenced inside the Configurations element, they are actually defined in a Modules element that is nested directly inside the top-level Project element. A Module element can contain a File element that creates a Web Part page and can optionally populate it with Web Part instances. The STS site definition contains a Module element named Default, which is referenced by the Configuration element for a team site. This Module element provisions a home page for a new team site named default.aspx and adds a link to the top link bar:
<Module Name="Default" Url="" Path="">
  <File Url="default.aspx" NavBarHome="True">
    <NavBarPage Name="~siteTitle" Url="~site" ID="1002" Position="Start" />
    <NavBarPage Name="~siteTitle" Url="" ID="0" Position="Start" />
  </File>
</Module>
The last two items in an ONET.xml file that are important to discuss are the two elements inside the Configuration element named SiteFeatures and WebFeatures. These two elements contain Feature elements whose purpose is to activate specific features during the site provisioning process. For example, the SiteFeatures element for the team site configuration activates two site collection–scoped features that add support for the standard SharePoint Foundation Web Parts and the Three-State Workflow template:
<SiteFeatures>
  <!-- BasicWebParts Feature -->
  <Feature ID="00BFEA71-1C5E-4A24-B310-BA51C3EB7A57" />
  <!-- Three-State Workflow Feature -->
  <Feature ID="FDE5D850-671E-4143-950A-87B473922DC7" />
</SiteFeatures>
The WebFeatures element for the team site configuration activates five site-scoped features that add support for the basic functionality of a team site, such as collaboration list types and a standard wiki library named SitePages:
<WebFeatures>
  <!-- TeamCollab Feature -->
  <Feature ID="00BFEA71-4EA5-48D4-A4AD-7EA5C011ABE5" />
  <!-- MobilityRedirect -->
  <Feature ID="F41CC668-37E5-4743-B4A8-74D1DB3FD8A4" />
  <!-- WikiPageHomePage Feature -->
  <Feature ID="00BFEA71-D8FE-4FEC-8DAD-01C19A6E4053" />
  <!-- SiteNotebook Feature -->
  <Feature ID="F151BB39-7C3B-414F-BB36-6BF18872052F" />
  <!-- Getting Started List instance -->
  <Feature ID="4AEC7207-0D02-4f4f-AA07-B370199CD0C7" />
  <!-- MDS -->
  <Feature ID="87294C72-F260-42f3-A41B-981A2FFCE37A" />
</WebFeatures>
Because of the link that will always exist between the site and the site definition, changing a site definition after it has been used to create sites is not supported. It is never supported to adjust out-of-the-box SharePoint files, so adjusting the out-of-the-box site definitions is not supported even if they haven’t been used to create sites. If you need a new version of an existing site definition, you can either create a new site definition and hide the old one, or you can use feature stapling to add features and thus functionality to a site that is created based on the site definitions.
Feature stapling
A feature can be used to attach one or more features to a configuration of a site definition through a technique known as feature stapling. For example, instead of creating a custom site definition, you can elect to create a custom feature to extend configurations from a standard site definition. For example, you can create a feature to staple the MainSite feature to the Team Site configuration.
To staple a feature to a configuration such as Team Site, you must create a second feature to associate the feature to be stapled with one or more configurations. Feature stapling is achieved by adding a FeatureSiteTemplateAssociation element that contains an Id attribute specifying the feature that is being stapled and a TemplateName attribute specifying the target configuration. The following example demonstrates stapling the MainSite feature to the Team Site configuration by using the feature’s ID and the name and configuration ID for Team Site:
<Elements xmlns="http://schemas.microsoft.com/sharepoint/">
  <FeatureSiteTemplateAssociation
    Id="edcdcd75-dff2-479d-ac32-b37f8fa9d459"
    TemplateName="STS#0" />
  </Elements>
The purpose of feature stapling is to activate features automatically when a new site is created. After a feature that staples other features has been activated, SharePoint automatically activates the stapled features when new sites are created. However, it is important that you know how the scope of a feature that staples other features affects the provisioning behavior of SharePoint.
The activation scope of the feature performing the stapling must be higher than the features being stapled. For example, a feature that is activated at the site collection scope can only staple features that activate at site-level scope. A feature that activates at the web application scope can staple features that activate at site-level scope or at the site collection scope. A feature that activates at the farm scope can staple features that activate at any of the other three scopes. If you define a feature that activates at the web application scope, it provides a quick and easy way to automate the activation of its stapled features within every new team site that is created in the target web application. Going one step further, you can associate stapling a feature to the main configuration of the GLOBAL site definition. This technique makes it possible to staple a feature to all new sites, as opposed to only sites created from a specific configuration:
<Elements xmlns="http://schemas.microsoft.com/sharepoint/">
  <FeatureSiteTemplateAssociation
    Id="edcdcd75-dff2-479d-ac32-b37f8fa9d459"
    TemplateName=" GLOBAL" />
</Elements>
This technique is powerful because it allows you to activate specific features on any type of site created within a farm. The one caveat here is that the configuration for blank sites is configured to ignore any features stapled to the GLOBAL site definition. This is done by setting the AllowGlobalFeatureAssociations attribute, that is added to the Configuration for the blank site in the webtemp.xml file, to False. Also, a feature stapled to a certain site definition will be stapled to that site definition in the entire farm. This might not always be appropriate.
Another downside of using stapled features is that it is not possible to define the order in which they are activated. When a site is provisioned, the features that are stapled to the site will be activated in a random order. This means that if one stapled feature requires another stapled feature to be activated first, you will have to use feature dependencies, or design your features in a different way.
Order of provisioning when using site definitions
When a site is provisioned by using a site definition, several steps are executed. We already discussed the first two. The full list is:
The URL of the site is reserved.
The configuration as stored in the GLOBAL site definition is provisioned.
If a site collection is being created, all site collection–scoped features that are listed in the SiteFeatures section of the relevant configuration in the ONET.xml file are activated in the order in which they are listed.
If a subsite is being created, SharePoint will check to make sure that all site collection–scoped features that are listed in the SiteFeatures section of the relevant configuration in the ONET.xml file are already activated on the site-collection level. If they are not, site provisioning will be aborted and steps that have already been executed will be rolled back.
If a site collection is being created, all site collection–scoped features that are stapled to the site definition are activated in a random order.
If a subsite is being created, SharePoint will check to make sure that all site collection–scoped features that are stapled to the site definition are already activated on the site-collection level. If they are not, site provisioning will be aborted and steps that have already been executed will be rolled back.
All site-scoped features that are listed in the WebFeatures section of the relevant configuration in the ONET.xml file are activated in the order in which they are listed.
All site-scoped features that are stapled to the site definition are activated in a random order.
All list instances that are defined in the ONET.xml file will be created.
The contents of the modules that are defined in the ONET.xml file are created. These are usually pages.
From this list, you can note a couple of things that might cause problems. The fact that site collection–scoped features are always activated before site-scoped features and that features that are listed in the ONET.xml file are always activated before stapled features means that you have to take this into account when designing your features. The good news is that this behavior is predictable. So all it takes it some proper planning up front to avoid problems. Another common challenge is that all features are activated before the pages that are defined in the Modules element of the ONET.xml are created. This means that if you create a feature to modify one of these pages (for instance, if you add a Web Part to the home page), the feature will be activated before the page exists and you will be trying to add Web Parts to a nonexistent page. To avoid this, it is a best practice to create your pages by using a separate feature. That way you can make sure that the page gets created before it is modified.
Custom site definitions
Technically it is possible for you to create your own custom site definitions. However, you are advised not to create custom site definitions, because site definitions cannot be removed after they have been used—they will need to exist as long as those sites exist, even when the environment is updated to a new version of SharePoint, which adds significant extra complexity to upgrades. Custom site definitions will always have to be deployed by using farm solutions, because that is the only way to deploy files to the file system and thus the only way to deploy the webtemp*.xml and the ONET.xml file to the right file locations. This means that if you ever want to move to a cloud-hosted service such as Microsoft Office 365, you will not be able to deploy your own custom site definitions, and you won’t be able to move your sites to that service. You will have to migrate the data from that site to new sites in the cloud-hosted environment.
So although the SharePoint Developer Tools have a predefined element called Site Definition, which you can use to create a custom site definition, you shouldn’t use it. There is really only one scenario that might require you to create custom site definitions. In all other scenarios, it is better to create a custom web template or use custom code to adjust your sites after provisioning them based on an out-of-the-box site definition. Neither of these approaches will work if you are creating a Variations Hierarchy. A Variations Hierarchy is mainly used for creating multilingual web content management sites. If the same pages with the same content have to be published in multiple languages, you might want to use Variations for this. If you want to create custom templates for the sites used in the Variations Hierarchy, you will have to create custom site definitions. In all other cases, you should not create custom site definitions.
Web templates
Web templates were introduced in SharePoint 2010. They provide a more flexible way to create custom templates that can be used to create sites. Web templates use an ONET.xml just like site definitions, but they do not use a webtemp*.xml file. Instead, they use the WebTemplate element in an elements.xml file to define the metadata of the template. The ONET.xml file of a web template is not deployed to a subfolder of the SiteTemplates directory; instead, web templates are deployed by using features, and both the elements.xml file and the ONET.xml file are stored with the features.
Web templates are not deployed with a standard SharePoint installation. They are specifically designed so that developers can create custom templates for their sites without the templates themselves being persisted within the system like site definitions. From a customizations perspective, the ability to create web templates is one of most important changes of the SharePoint 2010 release. To start creating a new web template, first create a new Microsoft Visual Studio solution called WingtipToysWebTemplates by using the SharePoint 2013 - Empty Project template. This solution is included in the downloadable .zip archive of companion code for this book. Next add a new Empty Element item to it. Call the element ProjectSite. Rename the feature that was generated by the SharePoint Developer Tools when you added the empty element to WingtipToysWebTemplates.
elements.xml
Next open up the elements.xml file and add a WebTemplate element to it and fill in some of the attributes. When you add a WebTemplate element to an elements.xml file, you will notice that you can choose from a long list of properties. For this example, you will only use some of the basic and mandatory ones. The first one to fill in is the Name attribute. The name of the WebTemplate element has to be an exact match to the name of the EmptyElement. In this case, that is ProjectSite. The next properties are Title and Description. These are what users will see in the user interface when they are creating a site, so they should be something that a user can understand. The DisplayCategory is the tab of the template selection box that the template will show up in. You will choose WingtipToys and create your own tab, but you could have also used Collaboration to add it to the existing Collaboration tab.
The next three attributes are linked together: BaseTemplateID, BaseTemplateName, and BaseConfigurationID. These properties are used to link the web template to a site definition. You saw earlier that the SPWeb has three properties—the WebTemplateName and the WebTemplateId that store the site definition that was used to create the site, and Configuration, which stores the ID of the configuration that was used. Even when a web template is used to create a site, SharePoint still requires a value for each of these properties. You will specify these values through the values that you assign to the BaseTemplateID, BaseTemplateName, and BaseConfigurationID attributes. The values are just for reference; the site definition and configuration that you select aren’t actually used when a site is created. Only the information from your web template is used. You should still select a site definition and a configuration that are relatively similar to the template you are creating. After the site has been created for SharePoint, it will seem like the site was created by using the specified site definition, and the changes between the site definition and what the site actually looks like are made afterward. Though there is no requirement for the site definition and the configuration to be similar to what you’re creating, it is less likely to cause problems in the future if the selected site definition doesn’t deviate too much from what’s specified in the web template. In this example, you will use the Team Site template as the base. The elements.xml contents are show in Example 11-1. After the site has been created, it has no reference to the web template that was used to create it. The only reference the site has is to the site definition and configuration that you specified. This means that you can safely change or even remove a web template after it has been used to create sites, making it a lot easier to maintain and a lot more flexible than site definitions.
<Elements xmlns="http://schemas.microsoft.com/sharepoint/">
  <WebTemplate BaseTemplateID="1"
               BaseTemplateName="STS"
               BaseConfigurationID="0"
               Name="ProjectSite"
               Title="WingtipToys Project Site"
               Description="Use this template to create
                            a Wingtip Toys project site"
               DisplayCategory="WingtipToys">
  </WebTemplate>
</Elements>
ONET.xml for web templates
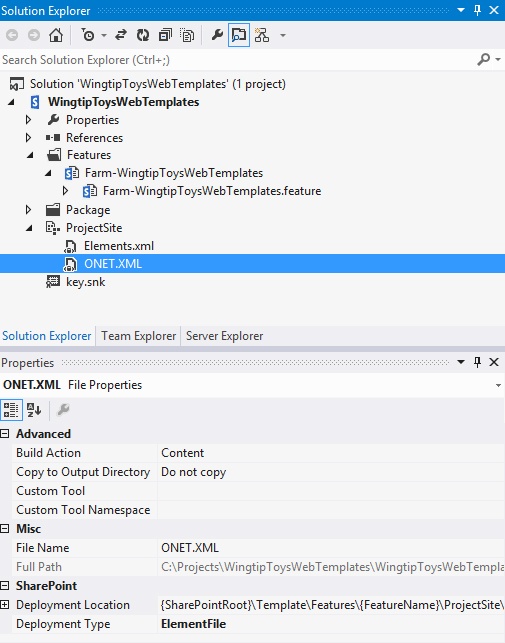
The next file to create is an ONET.xml file. The ONET.xml file of a web template is very similar to that of a site definition, and because of that, the easiest way to start is by copying the ONET.xml file of a site definition into your empty element. Copy the ONET.xml of the standard Team Site definition from the TEMPLATESiteTemplatesstsxml folder in the SharePoint root directory. If you copy files into your project this way, you always have to check the deployment type of the file by selecting the file in Solution Explorer and scrolling to the bottom of the properties pane. If the deployment type is set to No Deployment, you have to adjust it so that it is set to ElementFile, as shown in Figure 11-3.
Though the ONET.xml file of a web template is similar to that of a site definition, they are not the same. Some elements that are used in a site definition’s ONET.xml file are not supported in the ONET.xml of a web template. Elements that are not supported are:
Modules. A collection of Module elements that specify files and “all user” Web Parts with which to provision a website.
FileDialogPostProcessor. A class used to modify the File Open and Save dialog boxes’ interfaces in a document library.
ExternalSecurityProvider. An interface that returns custom information about the security used in SharePoint Foundation for indexing by a search crawler on a portal.
ServerEmailFooter. The footer section for server email, which includes both HTML and the text that is displayed.
Modules are used to add pages to your site. We already discussed earlier that it is a best practice not to use the Modules element, but to use a feature instead, so this limitation won’t have much of an impact.
The FileDialogPostProcessor and ExternalSecurityProvider elements are hardly ever used, so there will be very few people affected by the fact that they can’t use these elements in a web template. Although the ServerEmailFooter is used in, for instance, the out-of-the-box team site, its use isn’t critical to the workings of the site definition, so this element won’t be missed too much either.
The ONET.xml file can also only contain one configuration when you are using web templates. You saw that for site definitions it is possible to specify several configurations in a single ONET.xml file, but you can’t use this technique when using web templates. Each type of site will need to have its own web template. This is not a problem, but something to keep in mind. The ID of the configuration in the ONET.xml file must match that specified in the BaseConfigurationID attribute in the elements.xml file.
Another “limitation” of web templates is that you can’t use feature stapling with them. However, the reason that feature stapling is so attractive when you are using site definitions is because you can use it to adjust the behavior of the site definition without modifying the definition itself, which is not supported after the site definition has been used to create sites. Web templates can be modified after they have been used to create sites, so instead of using feature stapling you can simply add all features you want activated on the site to the SiteFeatures and WebFeatures elements of the ONET.xml file. This way you can not only modify the features you want activated on the sites you are creating, you can also specify the order in which they are activated.
The order in which sites are provisioned by using a web template is:
The URL of the site is reserved.
The configuration as stored in the GLOBAL site definition is provisioned.
If a site collection is being created, all site collection–scoped features that are listed in the SiteFeatures section of the relevant configuration in the ONET.xml file are activated in the order in which they are listed.
If a subsite is being created, SharePoint will check to make sure that all site collection–scoped features that are listed in the SiteFeatures section of the relevant configuration in the ONET.xml file are already activated on the site-collection level. If they are not, site provisioning will be aborted and steps that have already been executed will be rolled back.
All site-scoped features that are listed in the WebFeatures section of the relevant configuration in the ONET.xml file are activated in the order in which they are listed.
All list instances that are defined in the ONET.xml are created.
If you add a lot of features to the SiteFeatures element of the ONET.xml file, it is worth paying attention to step 3 of the site provisioning process. If users are trying to create a subsite and the features specified in the SiteFeatures element aren’t activated on the site collection site, creation will fail with an error. In some cases, this can be expected behavior and no problem at all. But if you are creating a new version of an existing web template, and after you have deployed the new template users can’t create subsites anymore by using the same template they used to create the site collection, they might get annoyed. And they’d have a point. You can avoid this, especially when updating existing web templates, by not adding features to the SiteFeatures element. If you still have to add new site collection–scoped features to the web template, you can use a trick. You can create a web-scoped feature, and in the FeatureActivated event receiver of that feature run a little bit of code to activate the site collection–scoped feature. Before you write code like this, make sure that activating the site collection–scoped feature won’t cause a problem on any existing sites, because you will no longer have control over exactly where the feature is activated.
After you have added the WebTemplate element and its attributes to the elements.xml file and have stripped the ONET.xml file of the elements that you cannot use in web templates, you have the absolute necessities for your web template. The only thing left to do before you can deploy is to determine the scope of the feature. You can choose whether to set the scope of the feature to farm or site. You cannot use web application–scoped or web–scoped features to deploy web templates.
Deploying web templates
If you use a farm-scoped feature to deploy a web template, the web template can be used to create sites throughout the SharePoint farm. If you deploy a web template this way, it will behave exactly like a site definition would. From the user interface it will be impossible to tell the difference between the web template and a site definition. You can use the template to create a site collection from Central Administration, and you can use the template to create subsites from every site in the environment.
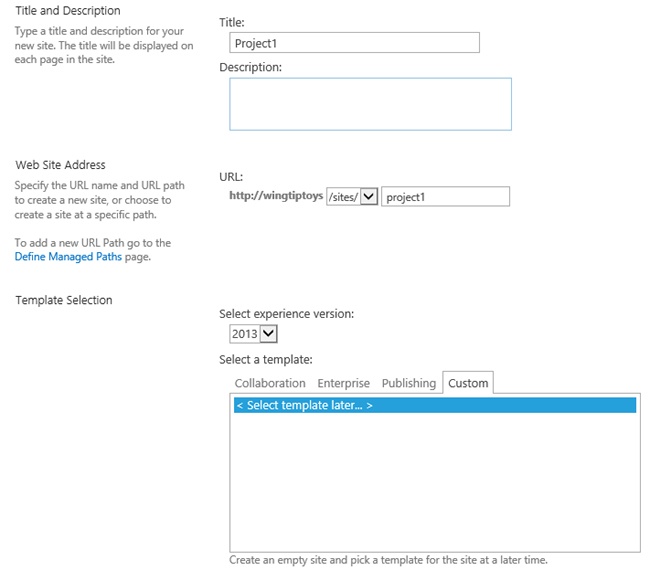
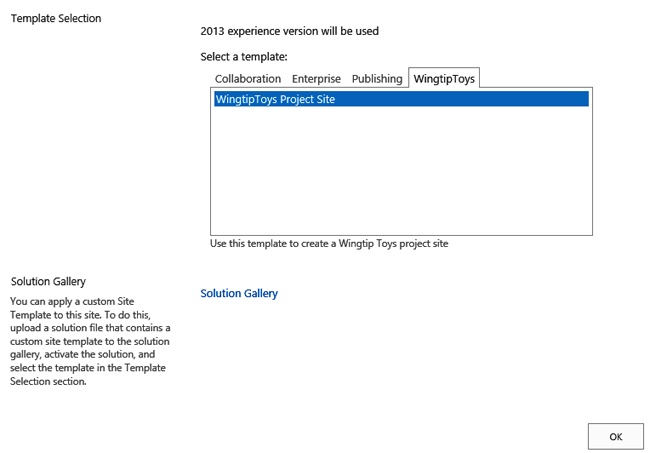
If you use a site collection–scoped feature, the template will only be available on sites where you activate the feature. If you want to create subsites based on the web template, you have to browse to the site settings page and click the Site Collection Features link in the Site Collection Administration area of the page. You should find your feature on this page. If you activate it, you will make the template available for users to create subsites based on it. If you want to use the web template to create a site collection, but you deploy the template by using a site collection–scoped feature, you can still do this—it will just take a couple more steps. To do this, first go to Central Administration and browse to the Application Management page. From there, click Create Site Collections. As shown in Figure 11-4, you can fill in a title and URL and optionally a description. In the template selection box, select the Custom tab and < Select Template Later >. Next, select a site collection administrator, and click OK to create the site.
Creating a site collection without selecting a template is relatively quick because the site won’t be fully provisioned yet. When the site is ready, you can click the link to browse to it. This will take you directly to the template selection page of the site. However, because the feature isn’t enabled yet, you can’t select your template. From the template selection page, you can browse to the site settings and site collection features pages and activate your feature. If you now try to browse to the home page of the site, SharePoint will take you back to the template selection page on which you can now select your web template. You can click OK to complete the provisioning of the site. SharePoint will come back to ask you whether to use existing SharePoint groups for the Visitors, Members, and Owners groups, or whether to create new ones. Because the existing ones were just created when you provisioned the first part of the site, it makes sense to stick to these and create a new site of groups.
If you use a farm-scoped feature to make the web template available in your SharePoint farm, you will have to use a farm solution to deploy the web template and the feature. However if you use a site collection–scoped feature, you can use a sandboxed solution to deploy the web template. Using a sandboxed solution to deploy a web template is particularly appealing if you are using a cloud-hosted environment such as Office 365, or if you only want to make the template available to certain people or even just to yourself. You could simply upload the sandboxed solution to the site collection Solution Gallery and activate the feature to make the template available on a particular site. If you want to create a site collection by using the template, you can follow the steps described previously and click the Solution Gallery link, as shown in Figure 11-5, to upload your solution before activating the site collection–scoped feature.
Because there is no link between a site after it has been created and the web template that was used to create the site, it is a best practice to store this information about the web template when the site is created. This can easily be done by creating a web-scoped feature that will be activated as the last feature in the WebFeatures element in the ONET.xml file. The feature can contain an empty element that adds a couple of properties to the property bag of the site. You can add the properties by adding the PropertyBag and Property elements in the elements.xml file of the empty element. Storing information about the web template that was used to create the site makes it possible to identify sites and versions of sites later on, perhaps for grouping sites together, upgrading specific sites to new a new version of SharePoint, or maybe writing custom code to make the same changes to all sites of the same type or version:
<Elements xmlns="http://schemas.microsoft.com/sharepoint/">
  <PropertyBag ParentType="Web">
    <Property Name="WingtipToys.WebTemplate" Type="string" Value="ProjectSite" />
    <Property Name="WingtipToys.WebTemplateVersion" Type="string" Value="1.0.0.0"/>
    <Property Name="WingtipToys.WebTemplateFeature" Type="string" Value="c1dd0ae6-e166-4dec-91eb-3eeacfc38257"/>
  </PropertyBag>
</Elements>
Using custom code to create sites
In some scenarios, you might not want to let your users create sites from the SharePoint user interface, but from a piece of custom code. In order to completely provision a site by using code, you will still have to specify either a site definition or a web template. You create a site by using SPWebCollection.Add; to create a site collection, you would use SPSiteCollection.Add. Both methods have several overloads. If you choose to use an overload that doesn’t specify the template that should be used to provision the site, you can specify this later by using SPWeb.ApplyWebTemplate.
If you want to specify a site definition, you can do so by using the name of the site definition followed by a # and the configuration ID. For instance, to specify a team site, you would use STS#0, and to specify a blog site, you would use BLOG#0.
If you want to specify a web template, you will use the same format, but instead of the site definition name you will specify the feature ID of the feature that is used to deploy the template, and instead of the configuration ID you specify the web template name. So the format for specifying a web template is [Feature Id]#[Web Template Name]. To specify the Project Site web template from the example solution, you would use c1dd0ae6-e166-4dec-91eb-3eeacfc38257#ProjectSite.
Site templates
If you don’t want to use Visual Studio to create a web template, but you still want to create custom templates for creating sites, you can create site templates. A site template can be created by browsing to the site settings page of a site and clicking Save Site As Template in the Site Actions area. Saving a site as a template will generate a .wsp file, just as deploying a Visual Studio project will, and will store it in the site collection’s Solution Gallery. As soon as the template is saved to the Solutions Gallery, it can be used to create subsites within that same site collection. If you want to use the site template to create sites in a different site collection, you can browse to the Solution Gallery and download the solution. You can then upload the solution in a different site to make the site template available there.
The Save Site As Template functionality uses the web template technique behind the scenes. It generates an ONET.xml file and an elements.xml file containing a WebTemplate element. When a site is saved as a template, SharePoint has to make sure that everything that was available in the original site is also available in a new site that is created by using the site template. To ensure this, SharePoint packages all the features, site columns, content types, property bag values, and much more from the original site into the site template. This means that the site template doesn’t just contain the few lists and some navigation settings that you might have created; it also contains a lot of things that someone might one day want to use, but that you never used in the original site. All these things in the site template won’t cause a problem, and in fact, you won’t even notice them except when you use the option to import the site template into Visual Studio.
When you create a new project in Visual Studio, one of the options that the SharePoint Developer Tools adds is SharePoint 2013 - Import Solution Package. This option allows you to select a site template and import it into Visual Studio. In theory this sounds really powerful, because you can have business users create the site they want or need, save the site as a template, and then import it into Visual Studio. In Visual Studio you can then make some slight adjustments and repackage it. However, because of all the properties, features, site columns, and content types that are added to the package, it quickly becomes very messy and unstable. Even if you don’t import the solution into Visual Studio, all the information that is saved in the template can cause problems, because it’s just too much to oversee and keep track of.
Site templates can be fairly powerful, but they aren’t quite ready to be used as an enterprise solution to create templates for sites. It is better to just use a site template as is, to create sites on a small scale based on templates that were configured through the user interface, and to use web templates if sites have to be created on a large scale, or if modifications have to be made to the template that can’t be created through the user interface.
There is one tangible limitation to using site templates. They can only be used on sites that don’t have the publishing features enabled. Activating the publishing features on a site will make the Save Site As Template link disappear from the site settings page. Some clever users might figure out that if they know the URL they can still browse to the page and save a site as a template even if the publishing features are enabled on it. This is, however, not supported and will cause major issues. The advice is easy: don’t save sites as templates that have the publishing features enabled on them, not even if you think you know how to trick SharePoint. The same is true for deactivating the feature just so you can save the site and then activating it again after the new site has been created. If you want to work with publishing features, you will have to use web templates to create custom templates for your sites.
Site provisioning providers
Yet another way to create sites is by using site provisioning providers. Using site provisioning providers is particularly useful if you want to create several sites at the same time according to a predefined structure. It is not recommended to create custom site provisioning providers, because you need a farm solution to deploy them. We will still demonstrate how they work, though, in case you run across one or feel that they are still the best way for you to create the behavior you need.
The purpose of a site provisioning provider is to create and initialize new sites. A site provisioning provider can be used with standard SharePoint site definitions or web templates. You create a site provisioning provider with a class that inherits from the SPWebProvisioningProvider base class and that overrides a single method named Provision:
using System;
using Microsoft.SharePoint;

namespace WingtipToysProvisioning {
  public class WingtipToysProvisioningProvider : SPWebProvisioningProvider {
    public override void Provision(SPWebProvisioningProperties properties) {
      // add code to provision new site
    }
  }
}
When you implement the Provision method, you get to specify the configuration that is used to provision the new site by calling the ApplyWebTemplate method. This makes it possible to create customized provisioning instructions while using standard configurations such as Team Site:
public override void Provision(SPWebProvisioningProperties properties) {

   // provision new site using Blank site configuration
   properties.Web.ApplyWebTemplate("STS#0");

  // TODO: add extra code here to initialize new site.
}
When the ApplyWebTemplate method completes, SharePoint has finished provisioning the new site by using the Team Site configuration. Now you can add whatever logic you would like to activate features, initialize site properties, and create any required site elements, such as lists and child sites. Note that due to security issues, you must call a method named RunWithElevatedPrivileges on the SPSecurity class to run your code with the privileges required to initialize a new site:
public override void Provision(SPWebProvisioningProperties properties) {
  // apply template using a configuration
  properties.Web.ApplyWebTemplate("STS#0");

  // elevate privileges before programming against site
  SPSecurity.RunWithElevatedPrivileges(delegate() {
    using (SPSite siteCollection = new SPSite(properties.Web.Site.ID)) {
      using (SPWeb site = siteCollection.OpenWeb(properties.Web.ID)) {
        // activate features and initialize site properties
        site.Features.Add(new Guid("00BFEA71-D8FE-4FEC-8DAD-01C19A6E4053"));
        site.Title = "My Custom Site Title";
        site.Update();
      }
    }
  });
}
The final step to deploying a site provisioning provider involves creating a webtemp file that references the site provisioning provider class. In this case, we have created a webtemp file named webtemp_WingtipSiteTemplates.xml, which is deployed to the TEMPLATE/1033/XML directory:
<Template Name=" WingtipToysProvisioning" ID="11001">

    <Configuration ID="0"
        Title="Wingtip Toys Standard Team Site"
        Hidden="FALSE"
        Description="Use this site template to create a Wingtip Toys team site."
        DisplayCategory="WingtipToys"
        ProvisionAssembly="$SharePoint.Project.AssemblyFullName$"
        ProvisionClass="WingtipToysProvisioning.WingtipProvisioningProvider"
        ProvisionData="StandardTeamSite" />

    <Configuration ID="1"
        Title="Wingtip Toys Sales Site"
        Hidden="FALSE"
        Description="Use this site template to create a Wingtip Toys team site."
        DisplayCategory="WingtipToys"
        ProvisionAssembly="$SharePoint.Project.AssemblyFullName$"
        ProvisionClass="WingtipToysProvisioning.WingtipProvisioningProvider"
        ProvisionData="SalesSite" />

  </Template>

</Templates>
As you can tell, this web template file defines two configurations called Wingtip Toys Standard Team Site and Wingtip Toys Sales Site. Both of these configurations are set to be displayed in the standard SharePoint template selection box on the WingtipToys custom tab. Both Configuration elements are configured to use the same provisioning provider class, but they have different values for the ProvisionData attribute. This makes it possible for the WingtipProvisioningProvider class to provide the Provision method that inspects the ProvisionData attribute to determine what type of new site to create and initialize:
public override void Provision(SPWebProvisioningProperties properties) {
  if (properties.Data.Equals("StandardTeamSite")) {
    // add code to provision standard team site
  }
  if (properties.Data.Equals("SalesSite")) {
    // add code to provision sales site
  }
}
Web provisioning events
Regardless of whether your site is provisioned by using a site definition, a web template, or custom code, you can hook into the events related to managing your site. These events are called web provisioning events and are part of the SPWebEventReceiver class. There are eight events that you can catch:
SiteDeleted. An asynchronous event that occurs after a site collection has been deleted
SiteDeleting. A synchronous event that occurs while a site collection is being deleted
WebAdding. A synchronous event that occurs while a new subsite is being created, but that doesn’t fire when the rootweb of a site collection is being created
WebDeleted. An asynchronous event that occurs after a site has been deleted
WebDeleting. A synchronous event that occurs when a site is being deleted
WebMoved. An asynchronous event that occurs after an existing site has been moved
WebMoving. A synchronous event that occurs while an existing site is being moved
WebProvisioned. An asynchronous event that occurs after a subsite has been fully provisioned, but that doesn’t fire when the rootweb of a site collection has been created
As you can tell, there are two event receivers that you can use to execute code after a subsite has been created: WebAdding to execute code during the provisioning process, and WebProvisioned to execute code after the subsite has been completely provisioned. It is important to note that neither of these will fire when the rootweb of a new site collection is created. These event receivers can only be used when subsites are created.
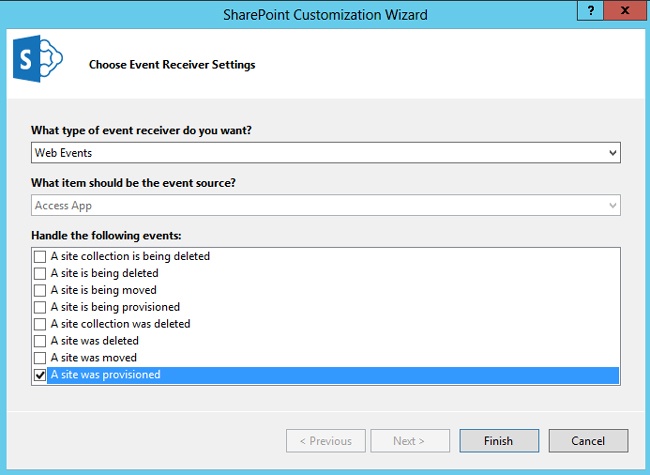
To view what this looks like in Visual Studio, you will add an EventReceiver to the WingtipToysWebTemplates solution. Start by right-clicking the project and selecting Add New Item. Next choose the EventReceiver project item and name it SetSubSiteNavigation. The SharePoint Developer Tools will start the wizard in Figure 11-6, in which you can select the type of event receiver to create. Select Web Events as the type of event receiver and A Site Was Provisioned as the event to handle.
The SharePoint Developer Tools will create an event receiver that consists of an elements.xml file and a class file. The elements.xml file is used to link the class file to the WebProvisioned event:
<Elements xmlns="http://schemas.microsoft.com/sharepoint/">
  <Receivers >
      <Receiver>
        <Name>SetSubSiteNavigationWebProvisioned</Name>
        <Type>WebProvisioned</Type>
        <Assembly>$SharePoint.Project.AssemblyFullName$</Assembly>
        <Class>WingtipToysWebTemplates.SetSubSiteNavigation.SetSubSiteNavigation</Class>
        <SequenceNumber>10000</SequenceNumber>
      </Receiver>
  </Receivers>
</Elements>
The class inherits from SPWebEventReceiver and contains a method to which you can add the code that you want to execute when a subsite is created. In this example you will adjust the navigation of the subsite to let it inherit the navigation from the parent site. You will create a new web-scoped feature that will be used to deploy the event receiver, and you will add the feature to the WebFeatures section of the Project Site web template, as shown in Example 11-2.
using System;
using Microsoft.SharePoint;

namespace WingtipToysWebTemplates.SetSubSiteNavigation
{
    /// <summary>
    /// Web Events
    /// </summary>
    public class SetSubSiteNavigation : SPWebEventReceiver
    {
        /// <summary>
        /// A site was provisioned.
        /// </summary>
        public override void WebProvisioned(SPWebEventProperties properties)
        {
            base.WebProvisioned(properties);

            SPWeb web = properties.Web;

            // Let sub-site navigation inherit from the parent site
            web.Navigation.UseShared = true;

            web.Update();
        }
    }
}
Web templates and SharePoint apps
In Chapter 4, SharePoint apps and the app web were discussed in depth. We talked about how adding a SharePoint-hosted app to a host site will create an app web as a subsite of the host site. When an app web is created, normally the standard App Template site definition is used to provision it. This template is defined in the webtemp.xml file. The name of the template is APP, and it has one configuration, which is titled App Template and has an ID of 0. The ONET.xml for the app template can be found in the TEMPLATESiteTemplatesApp folder in the SharePoint Root folder:
<Template Name="APP" SetupPath="SiteTemplatesapp" ID="17">
  <Configuration ID="0"
                 Title="App Template"
                 Hidden="TRUE"
                 ImageUrl=""
                 Description="A base template for app development.
                   It provides the minimal set of features
                   needed for an app." >
  </Configuration>
</Template>
If you want to use your own template to create an app web, you can do this by using web templates. You can create a custom web template and use the appmanifest.xml file to make sure that your template is used when the app web is created. A web template that will be used to create an app web is deployed in the app itself by using a web-scoped feature. This is different from when you are creating a normal web template, because for those the scope of the feature can only be farm or site.
Unfortunately, it is not possible to deploy normal web templates by using a SharePoint app. Normal web templates can only be deployed by using farm or sandboxed solutions. This is one of the limitations of SharePoint apps; at least for now, it is not possible to use apps to create a template that can be used to provision sites. Apps can be added manually to any site after it has been created, but they cannot provision the site itself, and they can’t automatically be added during site provisioning, either.
The app manifest file of an app has a WebTemplate element that can be used to define your own web template. In the Id attribute, you use the same format you would when using code to call you web template, [Feature Id]#[Web Template Name]. Microsoft IntelliSense in Visual Studio will tell you that the WebTemplate element also has a FeatureId attribute, but you don’t need this; it is obsolete:
<App xmlns="http://schemas.microsoft.com/sharepoint/2012/app/manifest"
     Name="WingTipApp"
     ProductID="{5399d258-e7af-4b70-8b53-74ff3c9979f8}"
     Version="1.0.0.0"
     SharePointMinVersion="15.0.0.0">

  <Properties>
    <Title>WingTipApp</Title>
    <StartPage>~appWebUrl/Pages/Default.aspx?{StandardTokens}</StartPage>
    <WebTemplate Id="{1A74A5BD-BD62-4470-A0DB-C9421BC53F73}#WingtipToysAppWeb"/>
  </Properties>

  <AppPrincipal>
    <Internal />
  </AppPrincipal>
</App>
Be aware that if you do use your own web template to create the app web, you have to make sure that all the necessary app-related plumbing that is part of the standard app template is in your web template as well. Also be aware that most users will be browsing to the host site and not to the app web. If you are creating your own template, it will mostly be because of some extra plumbing that you need in the app web in order for your app to work properly, not because you want the user to view your spiffy template. In most cases, the standard app template will do just fine, and you won’t need a custom web template to create your app web.
Summary
This chapter explained that site definitions play a key role in the provisioning process of SharePoint site collections and sites. You shouldn’t create custom site definitions anymore though, because they cannot be updated or removed from your farm after they have been used. This makes them hard to maintain and means that you will have to upgrade them whenever you want to update your farm to a new version of SharePoint.
If you want to create a custom template to provision sites, you should use web templates. Web templates are just as powerful as site definitions but are a lot more flexible. They can be updated or even removed after they have been used, because there is no link between the web template and the site that has been created with it. To make sure that you can still identify what template and what version of the template has been used to create a site, you should create a custom hidden web-scoped feature that stores this information in the site—for instance, in the property bag.
If you need more flexibility, or if you want to create sites by using an automated process, you can use custom code to create sites. When using custom code, you will still have to select a template for the site. This can be either a site definition or a web template. You can also use the web provisioning events to run custom code during or after the site provisioning process. This approach only works for subsites, though; it doesn’t work for the rootweb of a site collection.